autoDL部署comfy-ui,使用comfy-flashvsr实现超分辨率
前置条件
1.已在 AutoDL 租用 GPU 服务器(建议显存≥12G,如 A10、3090 等),系统选择 Ubuntu 20.04/22.04。 2.服务器已预装 Python 3.10+、Git、CUDA 11.8+(AutoDL 镜像通常自带,可跳过)。
也可手动安装环境
安装 PyTorch 2.4.0+cu118
Python 3.12 环境下安装Block-Sparse-Attention 自定义节点进行本地编译安装会报错
conda create -n bsa python=3.11  # 创建 Python 3.11 环境
conda activate bsa
pip install torch==2.4.0+cu118 torchvision==0.19.0+cu118 torchaudio==2.4.0+cu118 --index-url https://download.pytorch.org/whl/cu118
步骤 1:部署基础 ComfyUI 环境
1.登录 AutoDL 控制台,进入租用的实例,打开「JupyterLab」或「SSH 终端」(推荐 SSH,操作更高效)。 2.克隆 ComfyUI 仓库并进入目录:
git clone https://github.com/comfyanonymous/ComfyUI.git
cd ComfyUI
3.安装 ComfyUI 依赖:
pip install -r requirements.txt验证环境与启动 ComfyUI
python -c "import torch; print(torch.__version__); print(torch.cuda.is_available())"
# 输出应为 2.4.0+cu118 和 True,确保 CUDA 可用。
安装 Git LFS
# 安装Git LFS(用于下载大模型文件)
curl -s https://packagecloud.io/install/repositories/github/git-lfs/script.deb.sh | sudo bash
sudo apt-get install git-lfs
git lfs install
3.安装ComfyUI-Manager
GitHub 仓库:https://github.com/Comfy-Org/ComfyUI-Manager.git
国内镜像地址(推荐访问速度较慢时使用):https://gitcode.com/gh_mirrors/co/ComfyUI-Manager
cd /path/to/ComfyUI/custom_nodes
git clone https://github.com/Comfy-Org/ComfyUI-Manager.git
cd ComfyUI-Manager
pip install -r requirements.txt
重启 ComfyUI 后,即可在界面中看到「管理器」按钮,用于搜索和安装缺失的自定义节点
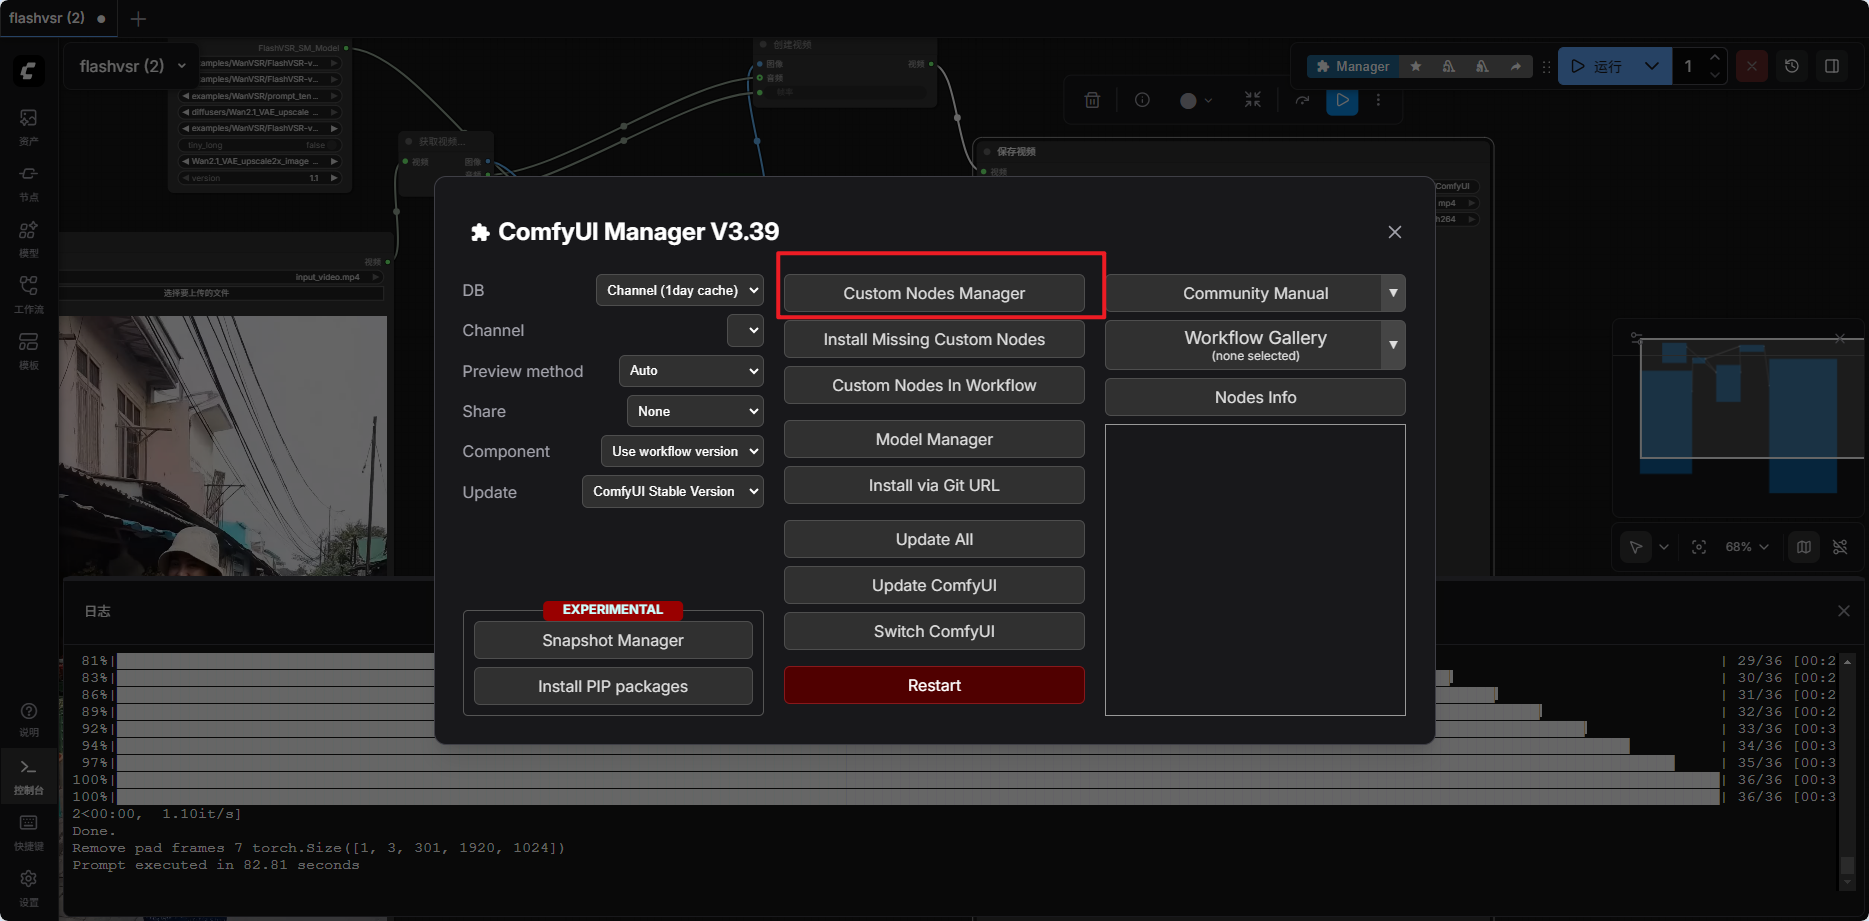
搜索“WanVideoWrapper”安装(或者在安装好模型之后再执行这一步)
步骤 2:安装 ComfyUI_FlashVSR 插件
1.进入 ComfyUI 的插件目录,克隆 ComfyUI_FlashVSR 插件:
# 进入ComfyUI的custom_nodes目录
cd custom_nodes
# 克隆FlashVSR节点仓库
git clone https://github.com/smthemex/ComfyUI_FlashVSR
cd ComfyUI_FlashVSR
# 安装节点依赖
pip install -r requirements.txt
2.安装 Block-Sparse-Attention(关键依赖)
Ubuntu 系统中尝试为 ComfyUI 的 Block-Sparse-Attention 自定义节点进行本地编译安装
# 192.168.9.204
sudo apt-get install python3.10-venv python3.10-dev -y # python3.10环境
python3.10 -m venv comfy_bsa_env_py310_new # 创建虚拟环境
source comfy_bsa_env_py310_new/bin/activate # 切换虚拟环境
pip install --upgrade pip setuptools wheel

# 确保环境配置
export CC=/usr/bin/gcc-11
export CXX=/usr/bin/g++-11
export CUDA_HOME=/usr/local/cuda
export C_INCLUDE_PATH=$CUDA_HOME/include:$C_INCLUDE_PATH
export CXX_INCLUDE_PATH=$CUDA_HOME/include:$CXX_INCLUDE_PATH
rm -rf build/ dist/ block_sparse_attn.egg-info/

# 系统找不到 CUDA 的 nvcc 编译器(路径 /usr/local/cuda/bin/nvcc 不存在
# 解决:
which nvcc # 查看nvcc路径
# 结果:/usr/bin/nvcc
sudo mkdir -p /usr/local/cuda/bin/
sudo ln -s /usr/bin/nvcc /usr/local/cuda/bin/nvcc
ls /usr/local/cuda/bin/nvcc
# 结果:/usr/local/cuda/bin/nvcc
/usr/local/cuda/bin/nvcc --version # 查看nvcc版本
# 结果:
nvcc: NVIDIA (R) Cuda compiler driver
Copyright (c) 2005-2023 NVIDIA Corporation
Built on Fri_Jan__6_16:45:21_PST_2023
Cuda compilation tools, release 12.0, V12.0.140
Build cuda_12.0.r12.0/compiler.32267302_0
ls /usr/local/cuda/include/cusparse.h # 查看头部文件是否存在
# 结果:/usr/local/cuda/include/cusparse.h

# 如果遇到cusparse.h与版本不匹配
# 删除系统原有cusparse.h
sudo rm -f /usr/local/cuda/include/cusparse.h
# 重新编译

# 编译
MAX_JOBS=4 pip install -e . --no-build-isolation --break-system-packages
# 返回上级目录(custom_nodes)
cd ..
# 克隆Block-Sparse-Attention(推荐国内适配版本)
git clone https://github.com/smthemex/Block-Sparse-Attention
cd Block-Sparse-Attention
# 安装编译依赖
pip install packaging ninja
# 编译安装
python setup.py install
# 验证安装是否成功
python -c "import block_sparse_attn; print('Block-Sparse-Attention 安装成功!')"
# 如果编译失败了可以尝试
# 进入 Block-Sparse-Attention 目录
cd /root/autodl-tmp/ComfyUI/custom_nodes/Block-Sparse-Attention
# 先清理之前的编译缓存
rm -rf build/ dist/ *.egg-info
# 用单线程重新编译(核心是添加 MAX_JOBS=1)
MAX_JOBS=1 pip install -e . --no-build-isolation / MAX_JOBS=4 pip install -e . --no-build-isolation
#2080编译失败
1.2.4.0+cu118 CUDA 版本不兼容
需要先卸载当前不兼容的 PyTorch
pip uninstall torch -y
安装匹配 CUDA 12.8 的 PyTorch 版本
pip install torch==2.4.0 torchvision torchaudio --index-url https://download.pytorch.org/whl/cu121 -i http://mirrors.aliyun.com/pypi/simple --trusted-host mirrors.aliyun.com
验证 PyTorch 与 CUDA 匹配性
python -c "import torch; print(f'PyTorch 版本: {torch.__version__}'); print(f'CUDA 是否可用: {torch.cuda.is_available()}'); print(f'CUDA 版本: {torch.version.cuda}')"
正常输出应该类似:
PyTorch 版本: 2.4.0+cu121
CUDA 是否可用: True
CUDA 版本: 12.1
重新尝试
MAX_JOBS=1 pip install -e . --no-build-isolation
备选方案
# 临时设置环境变量,跳过 CUDA 版本检查
export TORCH_CUDA_ARCH_LIST="8.0;8.6;8.9;9.0"
export FORCE_CUDA=1
# 重新安装
MAX_JOBS=1 pip install -e . --no-build-isolation --ignore-installed
2.如果是缺失依赖的头文件(cute/algorithm/copy.hpp 和 cutlass/numeric_types.h),这说明 Block-Sparse-Attention 项目里的 cutlass 子模块没有被正确下载,导致编译时找不到必要的头文件。
# 初始化子模块(如果还没初始化)
git submodule init
# 更新子模块(下载 cutlass 等依赖)
git submodule update --recursive
# 如果上述命令报错(比如不是 git 仓库),直接手动克隆 cutlass 到指定目录
rm -rf csrc/cutlass # 先删除空的 cutlass 目录
git clone https://github.com/NVIDIA/cutlass.git csrc/cutlass
cd csrc/cutlass
git checkout 3.3.0/git checkout v3.3.0
(git fetch origin --tags # 拉取所有远程标签
git tag | grep 3.3.0 # 检查标签是否存在) # 切换到兼容的版本(Block-Sparse-Attention 常用 3.3.0)
cd ../..
# 安装 gcc/g++ 等编译工具(如果没有的话)
apt update && apt install -y build-essential gcc g++
# 确认 nvcc 可用
nvcc --version
# 保留之前的 CUDA 环境变量配置
export TORCH_CUDA_ARCH_LIST="8.0;8.6;8.9"
export FORCE_CUDA=1
# 重新安装
MAX_JOBS=1 pip install -e . --no-build-isolation3.下载FlashVSR模型
# 进入FlashVSR的示例目录
cd ../ComfyUI_FlashVSR/FlashVSR/examples/WanVSR
# 克隆模型仓库(包含V1.0/V1.1版本)
git lfs clone https://huggingface.co/JunhaoZhuang/FlashVSR-v1.1
# 下载位置:./FlashVSR-v1.1/(需包含LQ_proj_in.ckpt、TCDecoder.ckpt等文件)
在~/autodl-tmp/ComfyUI/models/FlashVSR/examples/WanVSR/也需要
步骤 3:启动comfy
python main.py --listen 0.0.0.0 --port 6006
本地cmd映射端口就可以本机访问6006
ssh -CNg -L 6006:127.0.0.1:6006 root@connect.westx.seetacloud.com -p 36768
root@connect.westx.seetacloud.com/36768:对应autoDL实例
验证是否成功:
添加节点,搜索”flashvsr“,出现:
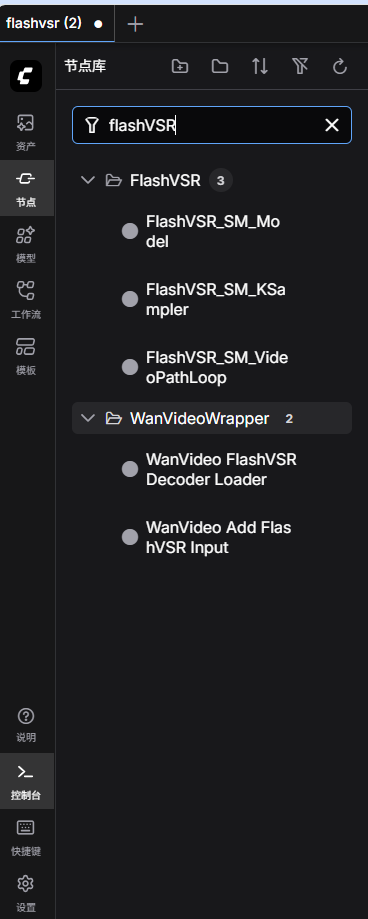
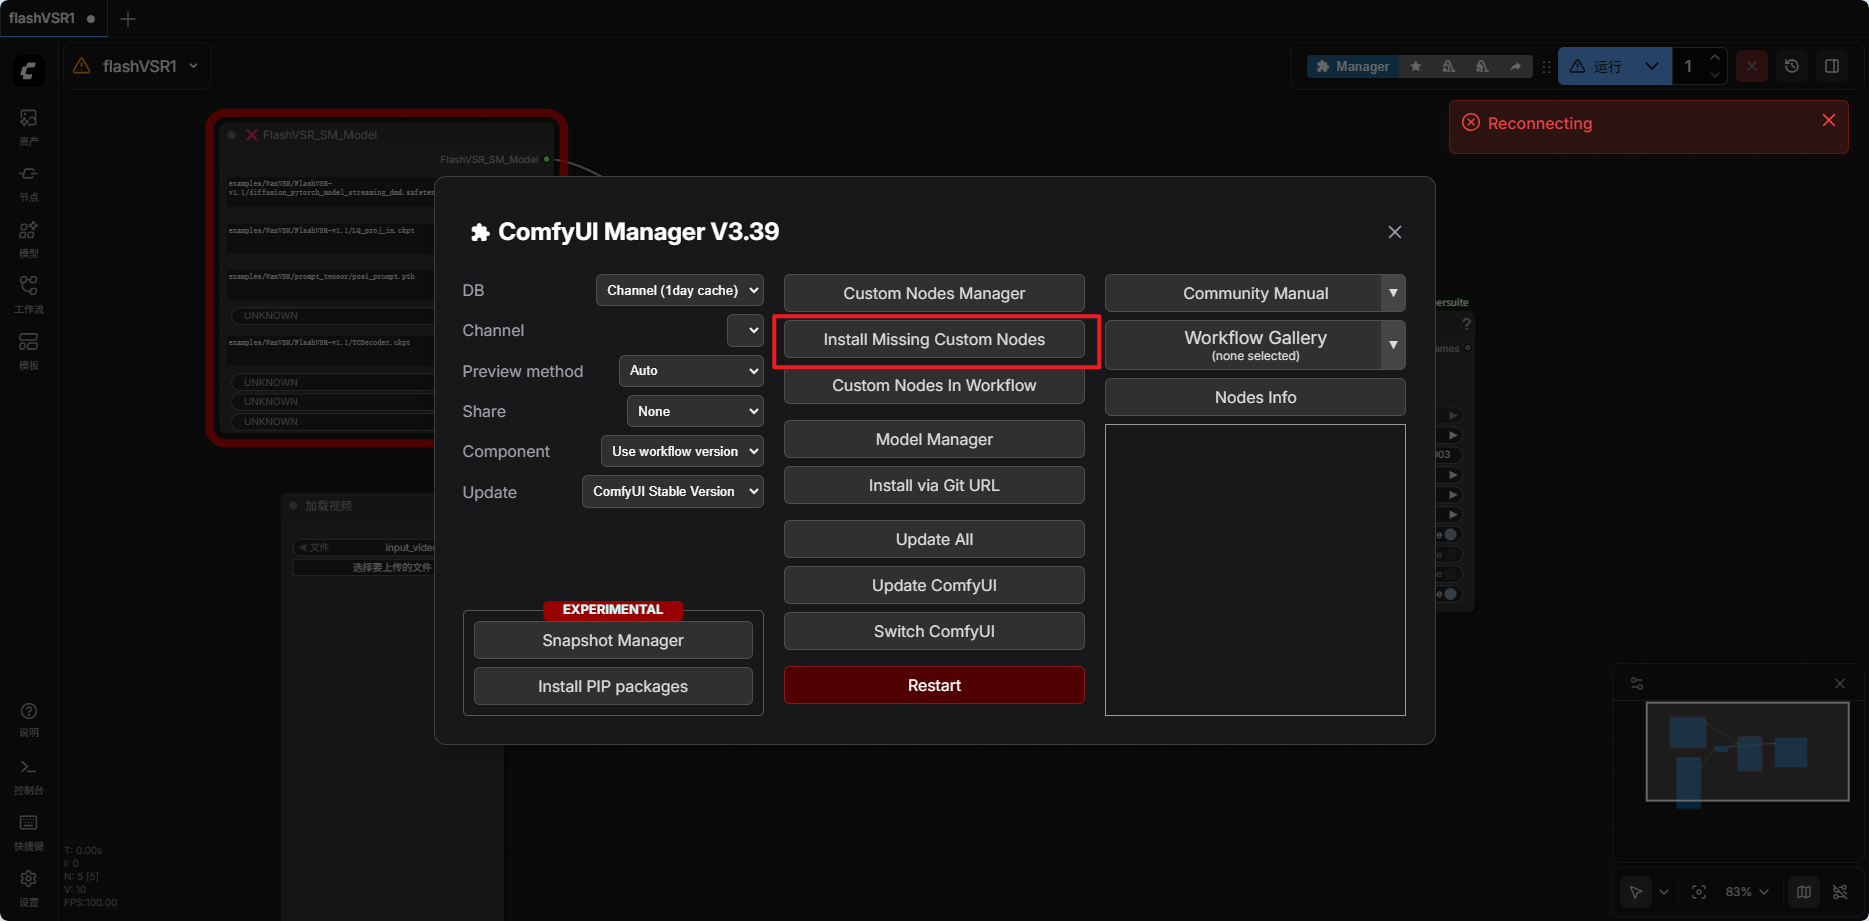
补充: 如果没有flash模型,可以先在Manager下载, 搜索”comfy-flashVSR和ComfyUI-VideoHelperSuite“(缺啥补啥)
如下载报错,节点放在 ~/autodl-tmp/ComfyUI/custom_nodes, 模型放在~/autodl-tmp/ComfyUI/models 比如FlashVSR模型
cd ~/autodl-tmp/ComfyUI/models
git clone https://github.com/OpenImagingLab/FlashVSR.git
比如comfyui-videohelpersuite节点
cd  ~/autodl-tmp/ComfyUI/custom_nodes
git clone xxxx
cd comfyui-videohelpersuite
git clone https://github.com/OpenImagingLab/FlashVSR.git
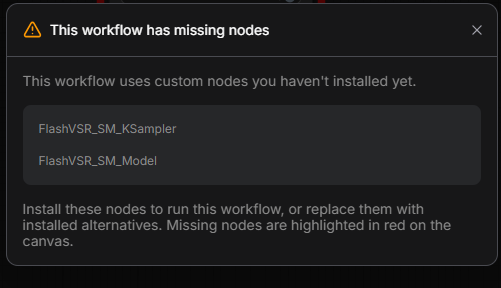
如果已经有ComfyUI_FlashVSR且初始化了,界面还是提示没有以下两个节点的话,可以在Manager-》Install Misssing Custom Nodes-》搜索FlashVSR,会有具体的报错信息

AtomGit 是由开放原子开源基金会联合 CSDN 等生态伙伴共同推出的新一代开源与人工智能协作平台。平台坚持“开放、中立、公益”的理念,把代码托管、模型共享、数据集托管、智能体开发体验和算力服务整合在一起,为开发者提供从开发、训练到部署的一站式体验。
更多推荐

 5
5 0
0- 0


 已为社区贡献2条内容

所有评论(0)