yolov8训练使用柑橘叶片病虫害数据集_权重来识别蓟马橘叶片病虫害检测 构建一个基于YOLOv8的柑橘叶片病虫害检测系统
yolov8训练使用柑橘叶片病虫害数据集_权重来识别蓟马橘叶片病虫害检测 构建一个基于YOLOv8的柑橘叶片病虫害检测系统
柑橘叶片病虫害数据集YOLO VOC带标注水果病害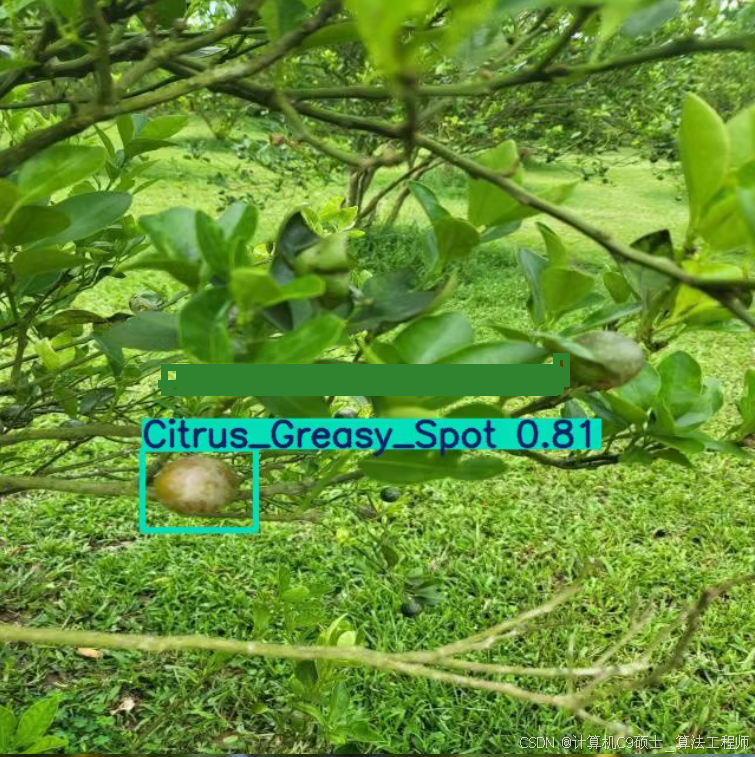
类别名称 图片数量(张) 标注框数量(个)
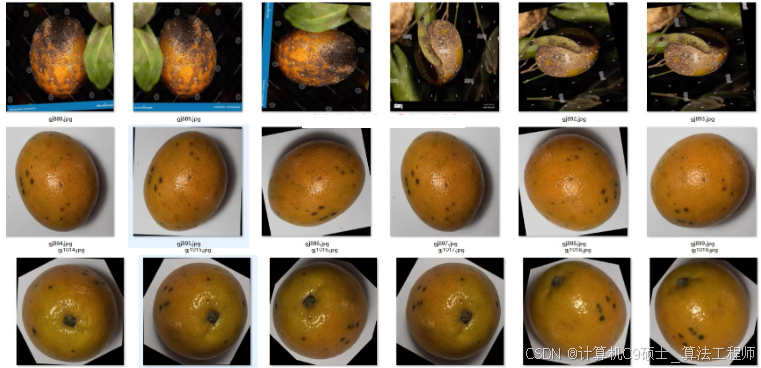
柑橘叶片病虫害数据集(YOLO、VOC带标注水果病害)
| 类别名称 | 图片数量(张) | 标注框数量(个) |
|---|---|---|
| Brown_Spot褐斑病 | 63 | 148 |
| Citrus_Black Spot柑橘黑斑病 | 372 | 379 |
| Citrus_Canker柑橘溃疡病 | 277 | 394 |
| Citrus_Greasy_Spot柑橘油斑病 | 121 | 163 |
|Citrus_Scab柑橘疮痂病366|600|
|Greening.柑橘黄龙病| 222|399 |
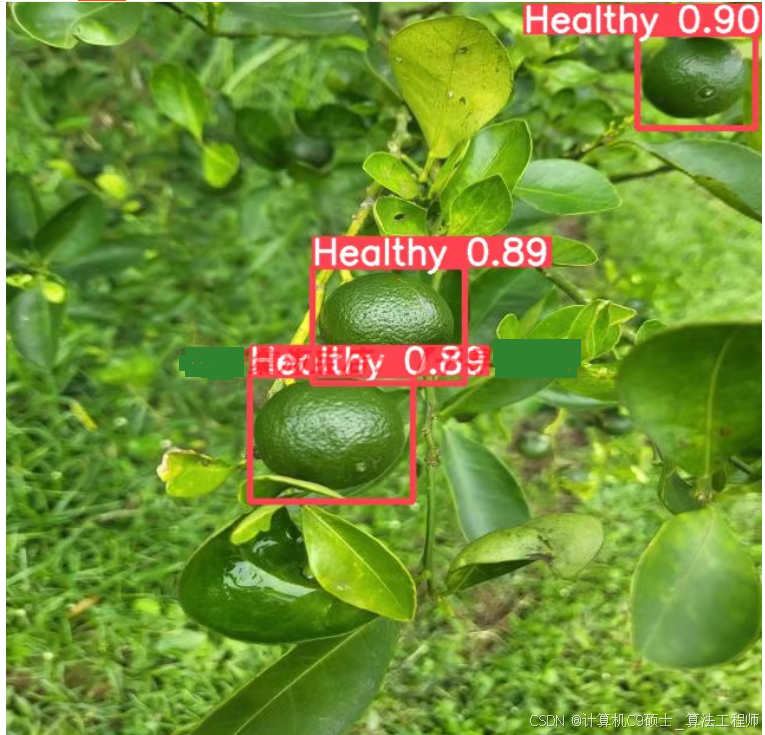
|Healthy_健康|604|1671|
|Leprosis_柑橘麻风病|187|380|
|Orange_Scab橙疮痂病|72|124|
|Sooty_Mold_煤烟病|160|487|
|Thrips_蓟马|350|573|
|Xyloporosis_柑橘木质化病|91|201|
总分类: 12个
图片总数量: 2377张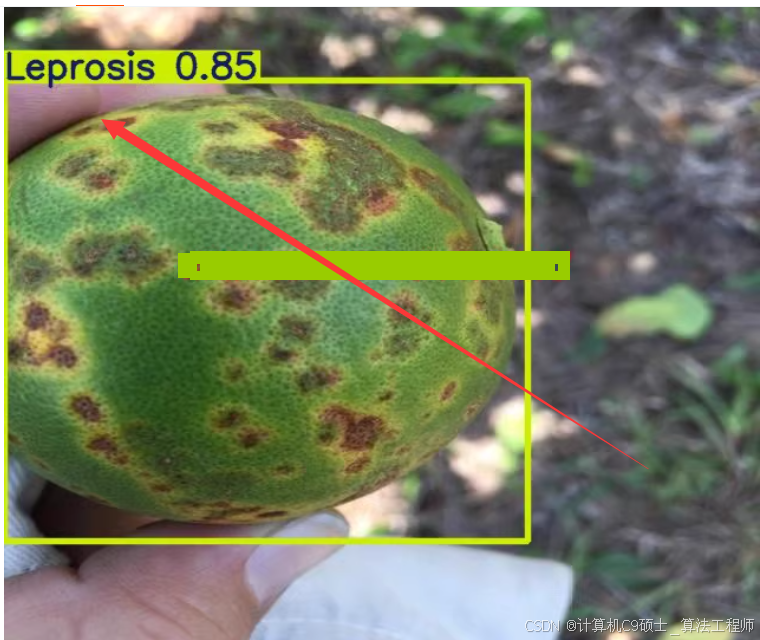
构建一个基于YOLOv8的柑橘叶片病虫害检测系统,,涉及多个步骤,包括环境设置、数据准备、模型训练、评估和推理部署。以下是详细的指南:
1. 环境设置
确保你的开发环境已经安装了必要的库和工具:
pip install torch torchvision ultralytics pyqt5 opencv-python pandas
2. 数据准备
2.1 数据集结构
根据你提供的信息,数据集包含12个类别,共2377张图片和600个设计标注框。确保数据集目录结构如下:
datasets/
└── citrus_leaf_disease/
    ├── images/
    │   ├── train/
    │   └── val/
    ├── labels_yolo/
    │   ├── train/
    │   └── val/
每个图像对应一个同名的.txt文件(YOLO格式),标签文件是CSV或XML格式的注释文件。
2.2 类别映射
你提到有12个分类:
Brown_Spot(褐斑病)Citrus_Black_Spot(柑橘黑斑病)Citrus_Canker(柑橘溃疡病)Citrus_Greasy_Spot(柑橘油斑病)Citrus_Scab(柑橘疮痂病)Greening(柑橘黄龙病)Healthy(健康)Leprosis(柑橘麻风病)Orange_Scab(橙疮痂病)Sooty_Mold(煤烟病)Thrips(蓟马)Xyloporosis(柑橘木质化病)
假设你已经有了正确的YOLO格式的标注文件,其中每个类别有一个对应的ID。例如:
- Brown_Spot: 0
- Citrus_Black_Spot: 1
- Citrus_Canker: 2
- …
- Xyloporosis: 11
2.3 转换VOC到YOLO格式
如果你的数据是以VOC格式提供的,可以使用Python脚本将它们转换为YOLO格式:
import xml.etree.ElementTree as ET
import os

# Define class names and their corresponding IDs
class_names = [
    'Brown_Spot', 'Citrus_Black_Spot', 'Citrus_Canker', 'Citrus_Greasy_Spot',
    'Citrus_Scab', 'Greening', 'Healthy', 'Leprosis', 'Orange_Scab',
    'Sooty_Mold', 'Thrips', 'Xyloporosis'
]
class_ids = {name: idx for idx, name in enumerate(class_names)}

def convert_voc_to_yolo(xml_file, output_dir):
    tree = ET.parse(xml_file)
    root = tree.getroot()

    img_width = int(root.find('size/width').text)
    img_height = int(root.find('size/height').text)

    with open(os.path.join(output_dir, root.find('filename').text.split('.')[0] + '.txt'), 'w') as f:
        for obj in root.findall('object'):
            class_name = obj.find('name').text
            if class_name not in class_ids:
                continue
            bbox = obj.find('bndbox')
            x_min = float(bbox.find('xmin').text)
            y_min = float(bbox.find('ymin').text)
            x_max = float(bbox.find('xmax').text)
            y_max = float(bbox.find('ymax').text)

            x_center = ((x_min + x_max) / 2) / img_width
            y_center = ((y_min + y_max) / 2) / img_height
            bbox_width = (x_max - x_min) / img_width
            bbox_height = (y_max - y_min) / img_height

            f.write(f"{class_ids[class_name]} {x_center} {y_center} {bbox_width} {bbox_height}\n")

# Example usage
for filename in os.listdir('path/to/voc/annotations'):
    if filename.endswith('.xml'):
        convert_voc_to_yolo(os.path.join('path/to/voc/annotations', filename), 'labels_yolo/train')
3. 文件内容
3.1 Config.py
配置文件用于定义数据集路径、模型路径等。
# Config.py
DATASET_PATH = 'datasets/citrus_leaf_disease/'
MODEL_PATH = 'runs/detect/train/weights/best.pt'
IMG_SIZE = 640
BATCH_SIZE = 16
EPOCHS = 50
CONF_THRESHOLD = 0.5
3.2 train.py
训练YOLOv8模型的脚本。注意,这里我们有多个类别,因此 nc 应该设置为类别数量,并且 names 列表应该包含所有类别的名称。
from ultralytics import YOLO
import os

# Load a model
model = YOLO('yolov8n.pt')  # You can also use other versions like yolov8s.pt, yolov8m.pt, etc.

# Define dataset configuration
dataset_config = f"""
train: {os.path.join(os.getenv('DATASET_PATH', 'datasets/citrus_leaf_disease/'), 'images/train')}
val: {os.path.join(os.getenv('DATASET_PATH', 'datasets/citrus_leaf_disease/'), 'images/val')}
nc: 12
names: {['Brown_Spot', 'Citrus_Black_Spot', 'Citrus_Canker', 'Citrus_Greasy_Spot', 'Citrus_Scab', 'Greening', 'Healthy', 'Leprosis', 'Orange_Scab', 'Sooty_Mold', 'Thrips', 'Xyloporosis']}
"""

# Save dataset configuration to a YAML file
with open('citrus.yaml', 'w') as f:
    f.write(dataset_config)

# Train the model
results = model.train(data='citrus.yaml', epochs=int(os.getenv('EPOCHS', 50)), imgsz=int(os.getenv('IMG_SIZE', 640)), batch=int(os.getenv('BATCH_SIZE', 16)))
3.3 detect_tools.py
用于检测的工具函数。
from ultralytics import YOLO
import cv2
import numpy as np

def load_model(model_path):
    return YOLO(model_path)

def detect_objects(frame, model, conf_threshold=0.5):
    results = model(frame, conf=conf_threshold)
    detections = []
    for result in results:
        boxes = result.boxes.cpu().numpy()
        for box in boxes:
            r = box.xyxy[0].astype(int)
            cls = int(box.cls[0])
            conf = round(float(box.conf[0]), 2)
            label = f"{model.names[cls]} {conf}"
            detections.append((r, label))
    return detections

def draw_detections(frame, detections):
    for (r, label) in detections:
        cv2.rectangle(frame, (r[0], r[1]), (r[2], r[3]), (0, 255, 0), 2)
        cv2.putText(frame, label, (r[0], r[1] - 10), cv2.FONT_HERSHEY_SIMPLEX, 0.9, (0, 255, 0), 2)
    return frame
3.4 UIProgram/MainProgram.py
主程序,使用PyQt5构建图形界面。
import sys
import cv2
from PyQt5.QtWidgets import QApplication, QMainWindow, QLabel, QVBoxLayout, QWidget, QPushButton
from PyQt5.QtGui import QImage, QPixmap
from PyQt5.QtCore import Qt, QTimer
from detect_tools import load_model, detect_objects, draw_detections
import os

class VideoWindow(QMainWindow):
    def __init__(self):
        super().__init__()

        self.setWindowTitle("Citrus Leaf Disease Detection")
        self.setGeometry(100, 100, 800, 600)

        self.central_widget = QWidget()
        self.setCentralWidget(self.central_widget)

        self.layout = QVBoxLayout()
        self.central_widget.setLayout(self.layout)

        self.label = QLabel()
        self.layout.addWidget(self.label)

        self.start_button = QPushButton("Start Detection")
        self.start_button.clicked.connect(self.start_detection)
        self.layout.addWidget(self.start_button)

        self.cap = None
        self.timer = QTimer()
        self.timer.timeout.connect(self.update_frame)

        self.model = load_model(os.getenv('MODEL_PATH', 'runs/detect/train/weights/best.pt'))

    def start_detection(self):
        if not self.cap:
            self.cap = cv2.VideoCapture(0)  # Use webcam
        self.timer.start(30)

    def update_frame(self):
        ret, frame = self.cap.read()
        if not ret:
            return

        detections = detect_objects(frame, self.model, conf_threshold=float(os.getenv('CONF_THRESHOLD', 0.5)))
        frame = draw_detections(frame, detections)

        rgb_image = cv2.cvtColor(frame, cv2.COLOR_BGR2RGB)
        h, w, ch = rgb_image.shape
        bytes_per_line = ch * w
        qt_image = QImage(rgb_image.data, w, h, bytes_per_line, QImage.Format_RGB888)
        pixmap = QPixmap.fromImage(qt_image)
        self.label.setPixmap(pixmap.scaled(800, 600, Qt.KeepAspectRatio))

if __name__ == "__main__":
    app = QApplication(sys.argv)
    window = VideoWindow()
    window.show()
    sys.exit(app.exec_())
3.5 requirements.txt
列出所有依赖项。
torch
torchvision
ultralytics
pyqt5
opencv-python
pandas
3.6 setup.py
用于安装项目的脚本。
from setuptools import setup, find_packages

setup(
    name='citrus_leaf_disease_detection',
    version='0.1',
    packages=find_packages(),
    install_requires=[
        'torch',
        'torchvision',
        'ultralytics',
        'pyqt5',
        'opencv-python',
        'pandas'
    ],
    entry_points={
        'console_scripts': [
            'train=train:main',
            'detect=UIProgram.MainProgram:main'
        ]
    }
)
3.7 README.md
项目说明文档。
# Citrus Leaf Disease Detection System

This project uses YOLOv8 and PyQt5 to create a real-time detection system for citrus leaf diseases. The system detects various types of diseases such as Brown Spot, Citrus Black Spot, Citrus Canker, Citrus Greasy Spot, Citrus Scab, Greening, Healthy, Leprosis, Orange Scab, Sooty Mold, Thrips, and Xyloporosis.

## Installation

1. Clone the repository:
   ```bash
   git clone https://github.com/yourusername/citrus-leaf-disease-detection.git
   cd citrus-leaf-disease-detection
-
Install dependencies:
pip install -r requirements.txt -
Set up environment variables (optional):
export DATASET_PATH=./datasets/citrus_leaf_disease/
export MODEL_PATH=./runs/detect/train/weights/best.pt
export IMG_SIZE=640
export BATCH_SIZE=16
export EPOCHS=50
export CONF_THRESHOLD=0.5
Training
To train the YOLOv8 model:
python train.py
Running the GUI
To run the graphical user interface:
python UIProgram/MainProgram.py
Usage Tutorial
See 使用教程.xt for detailed usage instructions.
### 4. 运行步骤

- **确保数据集路径正确**:将你的数据集放在 `datasets/citrus_leaf_disease` 目录下。
- **安装必要的库**:确保已安装所有所需库。
- **运行代码**:
  - 首先运行训练代码来训练YOLOv8模型:
    ```bash
    python train.py
    ```
  - 然后运行GUI代码来启动检测系统:
    ```bash
    python UIProgram/MainProgram.py
    ```

### 5. 模型评估与优化

在训练完成后,你可以通过验证集评估模型性能,查看mAP(平均精度均值)和其他指标。根据评估结果,调整超参数如学习率、批次大小、图像尺寸等,以优化模型性能。

### 6. 结果分析与可视化

利用内置的方法或自定义脚本来分析结果和可视化预测边界框。这有助于理解模型的表现并识别可能的改进点。

### 7. 用户界面开发

为了构建用户界面,你可以使用Flask或FastAPI等框架创建RESTful服务,或者直接用Streamlit这样的快速原型开发工具。上述代码中已经包含了使用PyQt5创建的简单GUI示例。

### 注意事项

- **类别映射**:确保YOLO格式的标签文件中的类别ID与`train.py`中定义的类别名称一致。
- **数据增强**:考虑到植物叶片图像可能会有复杂背景和光照变化,可以考虑使用数据增强技术提高模型的泛化能力。
- **模型选择**:根据你的硬件条件和需求选择合适的YOLO版本(如YOLOv8n、YOLOv8s等)。
- **预处理**:对于特别大的数据集,建议在训练前对数据进行适当的预处理,比如缩放、裁剪等操作。
- **数据集划分**:如果数据集还没有划分好训练集和验证集,请确保按照合适的比例进行划分(例如80%训练集,20%验证集)。

希望这些信息能帮助同学顺利构建基于YOLOv8的柑橘叶片病虫害检测系统。

AtomGit 是由开放原子开源基金会联合 CSDN 等生态伙伴共同推出的新一代开源与人工智能协作平台。平台坚持“开放、中立、公益”的理念,把代码托管、模型共享、数据集托管、智能体开发体验和算力服务整合在一起,为开发者提供从开发、训练到部署的一站式体验。
更多推荐

 9
9 0
0- 0


 已为社区贡献43条内容

所有评论(0)