Swift UI 框架 NavigationStack 导航栏 + 页面跳转 DetailView 弹窗 Alert + 删除列表功能 sheet 半屏弹窗
·
NavigationStack 导航栏 + 页面跳转
这是做多页面 App的核心,比如:列表点一下进入详情页。
一、NavigationStack 是干嘛的?
- 自带导航栏(顶部标题栏)
- 自带返回按钮
- 支持页面 push 跳转(从右滑进来那种)
结构固定写法:
NavigationStack {
    // 你的页面内容
}
二、加标题:navigationTitle
NavigationStack {
    List {
        // ...
    }
    .navigationTitle("通讯录")
}
三、页面跳转:NavigationLink
最常用写法:点一行跳转到新页面
NavigationLink {
    // 目标页面(跳转后显示什么)
    DetailView(name: name)
} label: {
    // 长什么样(就是你原来那一行)
    HStack {
        Image(systemName: "person.circle")
        Text(name)
        Spacer()
        Image(systemName: "chevron.right")
    }
}
四、完整作业升级版:带跳转的通讯录
直接复制,可直接运行:
import SwiftUI

struct ContentView: View {
    let contacts = ["张三", "李四", "王五", "赵六"]

    var body: some View {
        NavigationStack {
            List(contacts, id: \.self) { name in
                // 点这一行就跳转
                NavigationLink {
                    // 跳转到详情页
                    DetailView(name: name)
                } label: {
                    HStack(spacing: 12) {
                        Image(systemName: "person.circle")
                            .foregroundColor(.blue)
                        Text(name)
                        Spacer()
                        Image(systemName: "chevron.right")
                            .foregroundColor(.gray)
                    }
                }
            }
            .navigationTitle("通讯录")
            .listStyle(.grouped)
        }
    }
}

// 详情页
struct DetailView: View {
    let name: String

    var body: some View {
        VStack(spacing: 20) {
            Image(systemName: "person.circle.fill")
                .font(.system(size: 80))
                .foregroundColor(.blue)

            Text(name)
                .font(.title)
                .bold()

            Text("这是 \(name) 的详情页面")
                .foregroundColor(.gray)

            Spacer()
        }
        .navigationTitle("详情")
        .padding(.top, 40)
    }
}

#Preview {
    ContentView()
}
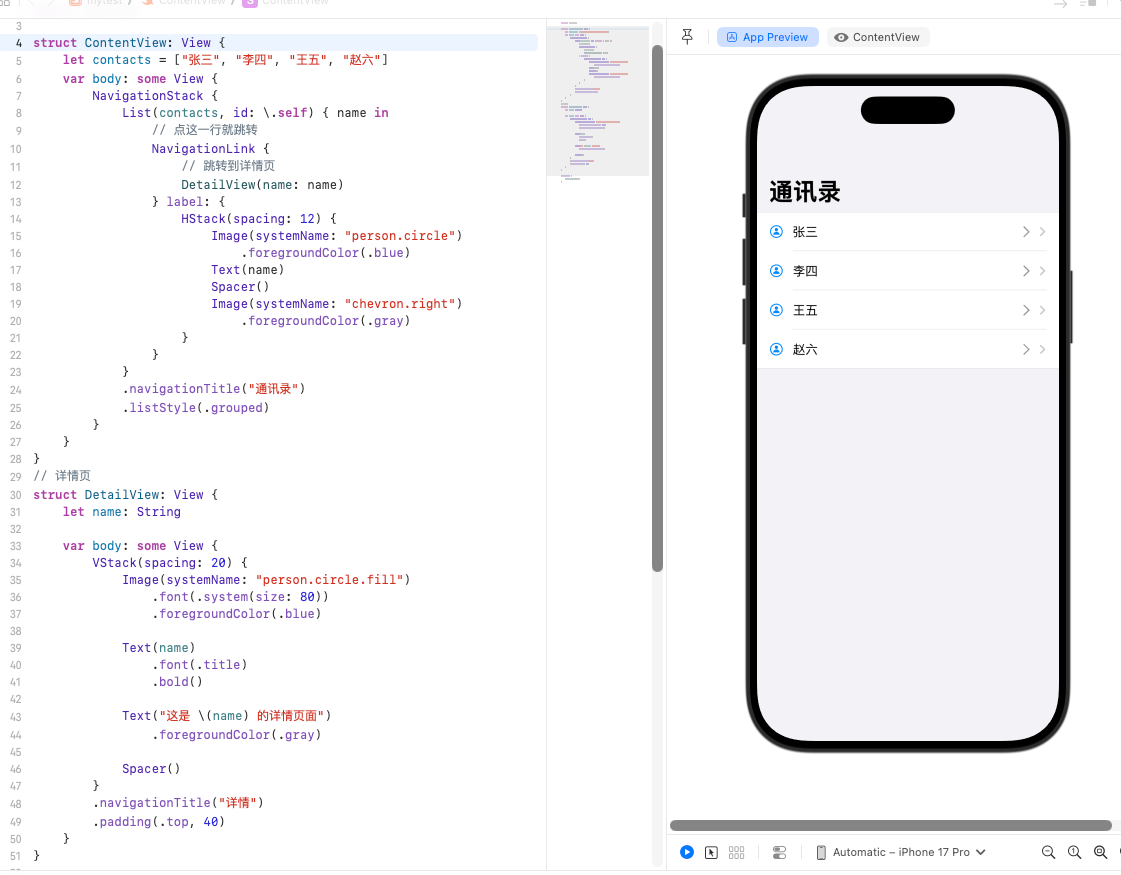
效果你会看到:
- 首页是列表
- 点任意一行 → 从右边滑进详情页
- 左上角自动出现返回按钮
- 每个页面都有导航栏标题
DetailView 是什么?
DetailView = 你点击列表行后,跳进去的那个 “详情页面”
- 首页叫
ContentView - 点进去的第二页叫
DetailView
它就是第二个页面!
🟢 DetailView (name: name) 这句到底啥意思?
DetailView(name: name)
拆开讲:
-
DetailView( )表示:跳转到 DetailView 这个页面
-
name: name表示:把当前这个人的名字,传给详情页
- 前面的
name:→ 详情页需要接收的名字 - 后面的
name→ 列表当前这一行的名字(张三 / 李四 / 王五)
- 前面的
🟢 详情页里为什么要写?
struct DetailView: View {
    let name: String  // 接收传过来的名字
    ...
}
意思就是:我这个详情页,需要接收一个名字才能显示!
🟢 最最简单的总结(背下来)
- ContentView = 首页列表
- DetailView = 详情页
- DetailView(name: name) = 跳转到详情页,并把名字带过去
自定义数据模型(Struct)+ 更真实的列表
之前我们只用了名字,现在做更像真实 App的联系人:
- 头像
- 姓名
- 手机号
- 备注
一、先定义一个数据结构:Contact
struct Contact: Identifiable {
    let id = UUID()
    let name: String
    let phone: String
    let icon: String
}
Identifiable:自动识别 id,不用写id: \.selfUUID():自动生成唯一 id
二、造一组模拟数据
let contacts = [
    Contact(name: "张三", phone: "13800138000", icon: "person.circle"),
    Contact(name: "李四", phone: "13900139000", icon: "person.circle.fill"),
    Contact(name: "王五", phone: "13700137000", icon: "person.circle"),
    Contact(name: "赵六", phone: "13600136000", icon: "person.circle.fill")
]
三、完整可运行代码(直接复制)
import SwiftUI
// 1. 自定义数据模型
struct Contact: Identifiable {
let id = UUID()
let name: String
let phone: String
let icon: String
}
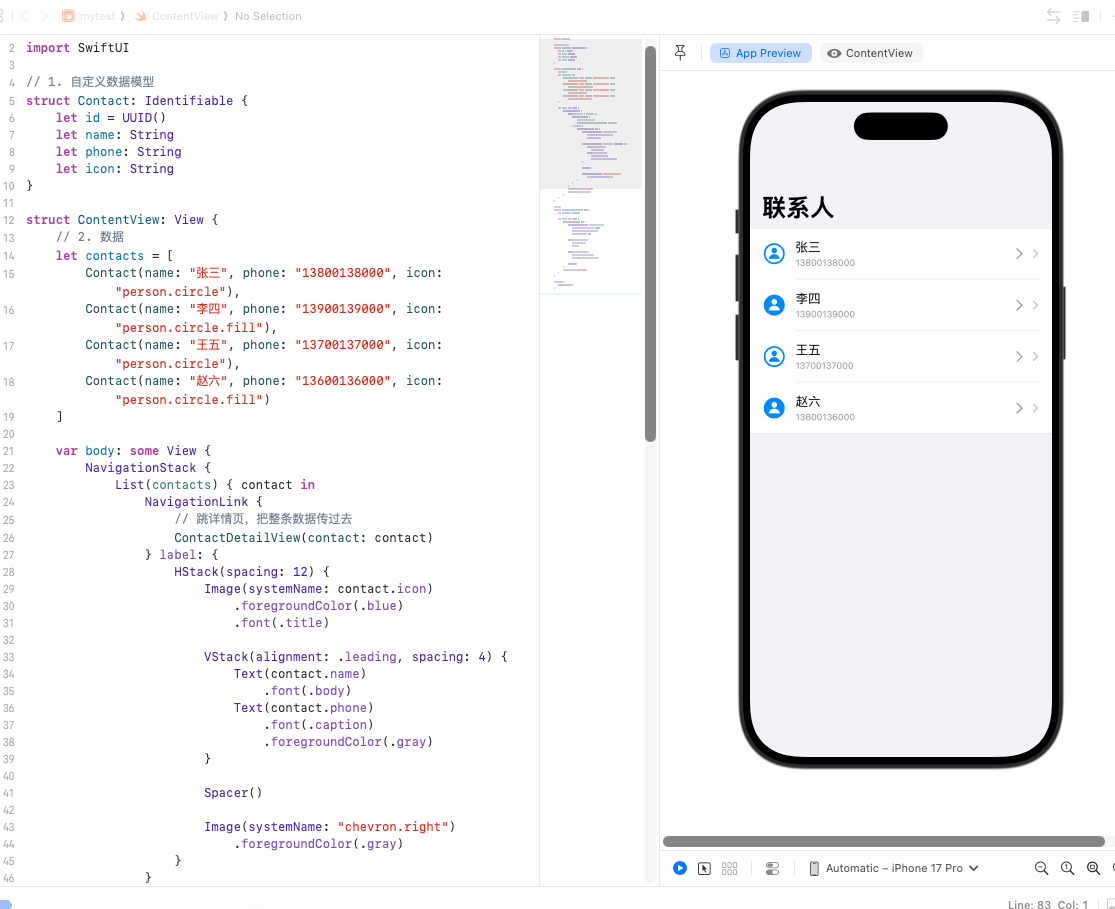
struct ContentView: View {
// 2. 数据
let contacts = [
Contact(name: "张三", phone: "13800138000", icon: "person.circle"),
Contact(name: "李四", phone: "13900139000", icon: "person.circle.fill"),
Contact(name: "王五", phone: "13700137000", icon: "person.circle"),
Contact(name: "赵六", phone: "13600136000", icon: "person.circle.fill")
]
var body: some View {
NavigationStack {
List(contacts) { contact in
NavigationLink {
// 跳详情页,把整条数据传过去
ContactDetailView(contact: contact)
} label: {
HStack(spacing: 12) {
Image(systemName: contact.icon)
.foregroundColor(.blue)
.font(.title)
VStack(alignment: .leading, spacing: 4) {
Text(contact.name)
.font(.body)
Text(contact.phone)
.font(.caption)
.foregroundColor(.gray)
}
Spacer()
Image(systemName: "chevron.right")
.foregroundColor(.gray)
}
}
}
.navigationTitle("联系人")
.listStyle(.grouped)
}
}
}
// 详情页
struct ContactDetailView: View {
let contact: Contact
var body: some View {
VStack(spacing: 20) {
Image(systemName: contact.icon)
.font(.system(size: 100))
.foregroundColor(.blue)
.padding(.top, 40)
Text(contact.name)
.font(.title)
.bold()
Text(contact.phone)
.font(.subheadline)
.foregroundColor(.gray)
Spacer()
}
.navigationTitle("详情")
}
}
#Preview {
ContentView()
}
弹窗 Alert + 删除列表功能
这一讲学会两个超级实用的东西:
- 弹出确认框(Alert)
- 在列表里删除数据
一、先讲弹窗:Alert
弹窗需要一个 @State 控制显示 / 隐藏:
@State private var showAlert = false
然后用 .alert 修饰符:
.alert("提示", isPresented: $showAlert) {
    Button("确定", role: .destructive) {
        // 删除逻辑
    }
    Button("取消", role: .cancel) { }
} message: {
    Text("确定要删除这个联系人吗?")
}
二、完整代码:可删除的联系人列表
直接复制运行,点按行左侧小圆点就能删:
import SwiftUI

// 数据模型
struct Contact: Identifiable {
    let id = UUID()
    let name: String
    let phone: String
    let icon: String
}

struct ContentView: View {
    // 数组要用 @State 才能修改
    @State private var contacts: [Contact] = [
        Contact(name: "张三", phone: "13800138000", icon: "person.circle"),
        Contact(name: "李四", phone: "13900139000", icon: "person.circle.fill"),
        Contact(name: "王五", phone: "13700137000", icon: "person.circle"),
        Contact(name: "赵六", phone: "13600136000", icon: "person.circle.fill")
    ]

    // 控制弹窗
    @State private var showAlert = false
    @State private var contactToDelete: Contact?

    var body: some View {
        NavigationStack {
            List {
                ForEach(contacts) { contact in
                    HStack(spacing: 12) {
                        Image(systemName: contact.icon)
                            .foregroundColor(.blue)
                            .font(.title)

                        VStack(alignment: .leading, spacing: 4) {
                            Text(contact.name)
                            Text(contact.phone)
                                .font(.caption)
                                .foregroundColor(.gray)
                        }

                        Spacer()
                    }
                    // 长按/点击左边圆点出现删除
                    .onTapGesture {
                        contactToDelete = contact
                        showAlert = true
                    }
                }
                .onDelete(perform: deleteContact)
            }
            .navigationTitle("联系人")
            .toolbar {
                EditButton() // 编辑按钮
            }
            .alert("确认删除", isPresented: $showAlert) {
                Button("删除", role: .destructive) {
                    if let contact = contactToDelete {
                        contacts.removeAll { $0.id == contact.id }
                    }
                }
                Button("取消", role: .cancel) { }
            } message: {
                Text("确定要删除该联系人吗?")
            }
        }
    }

    // 删除方法
    private func deleteContact(at offsets: IndexSet) {
        contacts.remove(atOffsets: offsets)
    }
}

#Preview {
    ContentView()
}
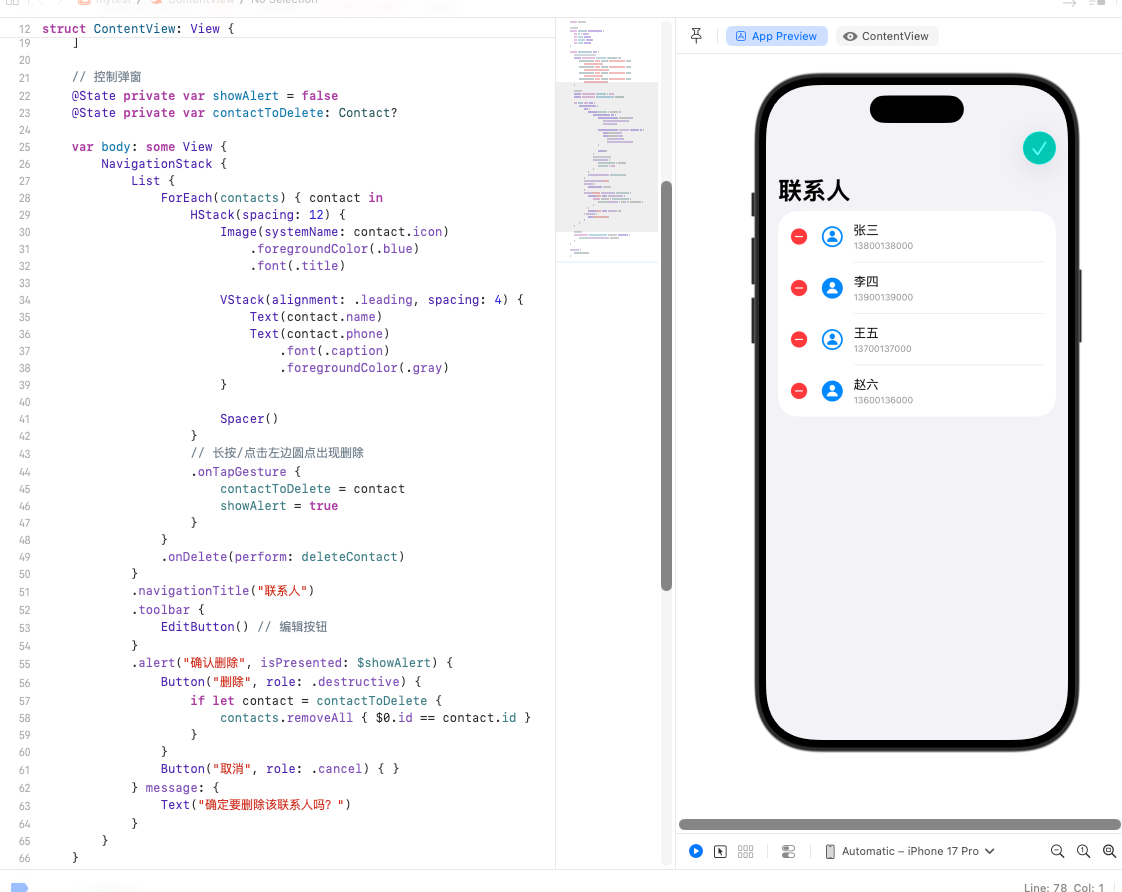
运行效果
- 右上角有 Edit 编辑按钮,可批量删除
- 点击任意一行,会弹出删除确认框
- 点删除 → 该行消失
- 点取消 → 不操作
sheet 半屏弹窗(从底部滑上来)
这是 iOS 里最常用的弹窗样式:从底部弹出、不是全屏、可以下滑关闭
一、sheet 怎么用?
同样用 @State 控制显示:
@State private var showSheet = false
触发弹窗:
.sheet(isPresented: $showSheet) {
    // 这里写弹窗里的内容
    AddContactView()
}
二、完整示例:点按钮弹出 “添加联系人” 弹窗
直接复制运行:
import SwiftUI

struct Contact: Identifiable {
    let id = UUID()
    let name: String
    let phone: String
    let icon: String
}

struct ContentView: View {
    @State private var contacts: [Contact] = [
        Contact(name: "张三", phone: "13800138000", icon: "person.circle"),
        Contact(name: "李四", phone: "13900139000", icon: "person.circle.fill")
    ]

    // 控制半屏弹窗
    @State private var showAddSheet = false

    var body: some View {
        NavigationStack {
            List(contacts) { contact in
                HStack(spacing: 12) {
                    Image(systemName: contact.icon)
                        .foregroundColor(.blue)
                        .font(.title)

                    VStack(alignment: .leading) {
                        Text(contact.name)
                        Text(contact.phone)
                            .font(.caption)
                            .foregroundColor(.gray)
                    }
                }
            }
            .navigationTitle("联系人")
            .toolbar {
                // 右上角 + 号按钮
                Button {
                    showAddSheet = true
                } label: {
                    Image(systemName: "plus")
                }
            }
            // 弹出半屏页面
            .sheet(isPresented: $showAddSheet) {
                AddContactView()
            }
        }
    }
}

// 弹出的添加联系人页面
struct AddContactView: View {
    @Environment(\.dismiss) var dismiss // 关闭弹窗

    var body: some View {
        NavigationStack {
            VStack(spacing: 20) {
                TextField("姓名", text: .constant(""))
                    .padding()
                    .background(.gray.opacity(0.1))
                    .cornerRadius(8)
                    .padding(.horizontal)

                TextField("电话", text: .constant(""))
                    .padding()
                    .background(.gray.opacity(0.1))
                    .cornerRadius(8)
                    .padding(.horizontal)

                Spacer()
            }
            .navigationTitle("添加联系人")
            .toolbar {
                Button("完成") {
                    // 关闭弹窗
                    dismiss()
                }
            }
        }
    }
}

#Preview {
    ContentView()
}
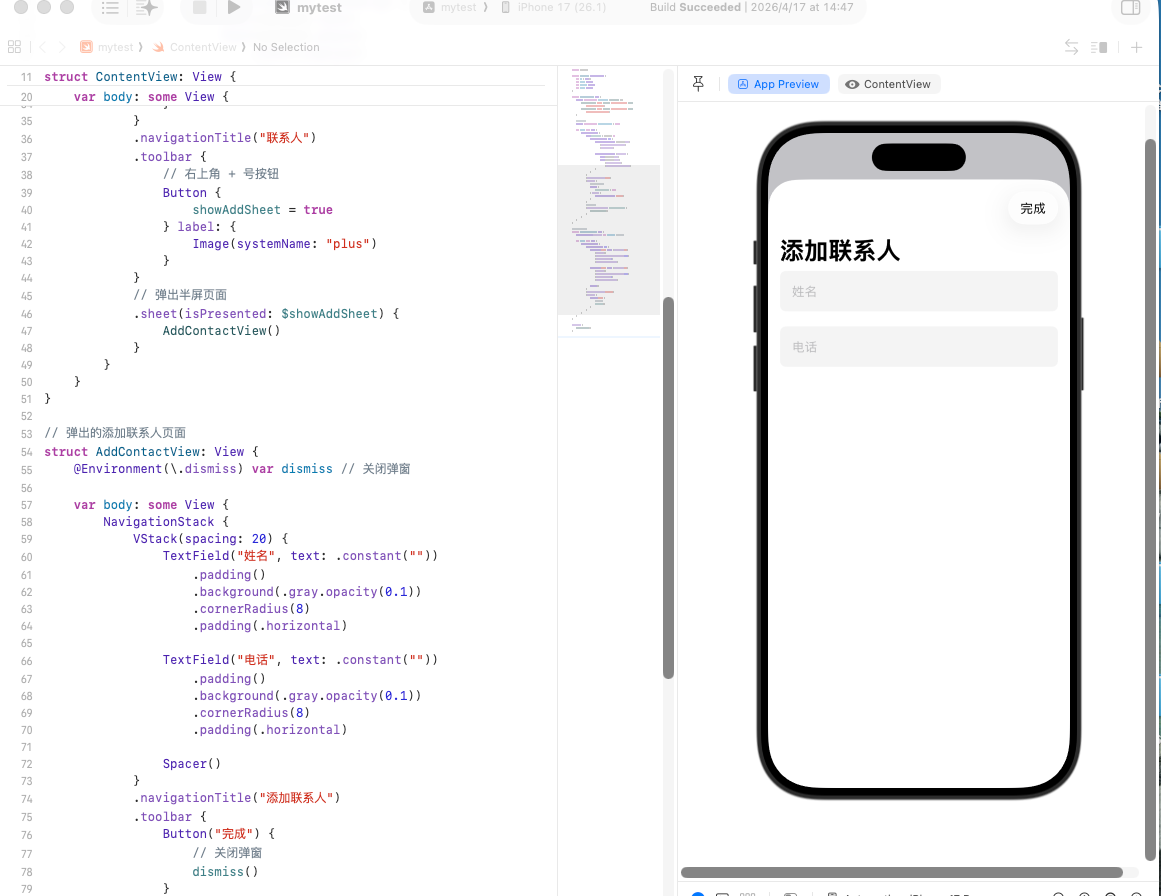
效果
- 右上角点 +
- 从底部滑出 添加联系人页面
- 点 “完成” 或下滑 → 关闭

AtomGit 是由开放原子开源基金会联合 CSDN 等生态伙伴共同推出的新一代开源与人工智能协作平台。平台坚持“开放、中立、公益”的理念,把代码托管、模型共享、数据集托管、智能体开发体验和算力服务整合在一起,为开发者提供从开发、训练到部署的一站式体验。
更多推荐

 17
17 0
0- 0


 已为社区贡献13条内容

所有评论(0)