LangGraph框架研究-基础篇
引言
深受业界信赖的底层框架:包括 Klarna、Uber、摩根大通等在内的众多正在塑造智能体未来的公司都信赖 LangGraph。它是一个用于构建、管理和部署长运行、有状态智能体的底层编排框架和运行时。
LangGraph 的定位非常底层,完全专注于智能体的编排。在使用 LangGraph 之前,我们建议你首先熟悉构建智能体所需的一些组件,从模型和工具开始入手。
我们在文档中通常会使用 LangChain 组件来集成模型和工具,但使用 LangGraph 并不强制要求你必须使用 LangChain。如果你是智能体领域的新手,或者希望使用更高层级的抽象,我们建议你使用 LangChain 的智能体,因为它为常见的 LLM 和工具调用循环提供了预构建的架构。
LangGraph 专注于智能体编排所需的核心底层能力:持久化执行、流式传输、人机回环等等。
一句话概括LangGraph作用就是智能体的行按照流程图逻辑执行,LangGraph就是这门流程图绘制语言。
目录
1 概览
1.1 安装
pip install -U langgraph后,创建一个简单的 Hello World 示例
from langgraph.graph import StateGraph, MessagesState, START, END

def mock_llm(state: MessagesState):
    return {"messages": [{"role": "ai", "content": "hello world"}]}

graph = StateGraph(MessagesState)
graph.add_node(mock_llm)
graph.add_edge(START, "mock_llm")
graph.add_edge("mock_llm", END)
graph = graph.compile()

result = graph.invoke({"messages": [{"role": "user", "content": "hi!"}]})
print(result)
输出
{
  "messages": [
    {
      "role": "HumanMessage",
      "content": "hi!",
      "additional_kwargs": {},
      "response_metadata": {},
      "id": "9ee701a7-327f-412c-82ea-256023934fab"
    },
    {
      "role": "AIMessage",
      "content": "hello world",
      "additional_kwargs": {},
      "response_metadata": {},
      "id": "7976f85b-3cf8-426e-b8b8-bd1624e562d8",
      "tool_calls": [],
      "invalid_tool_calls": []
    }
  ]
}
使用 LangSmith来追踪请求、调试智能体行为以及评估输出结果。设置 LANGSMITH_TRACING=true 并配置你的 API 密钥即可开始使用
1.2 核心价值
LangGraph 为任何长运行、有状态的工作流或智能体提供底层基础设施支持。它不会去抽象(屏蔽)提示词或架构细节,而是提供以下核心优势:
- 持久化执行:构建能够经受故障并长期运行的智能体,它们可以中断后从上次停止的地方继续运行。
- 人机回环:通过在任何时间点检查和修改智能体的状态,将人类的监督纳入流程中。
- 全面的记忆能力:创建有状态的智能体,既具备用于持续推理的短期工作记忆,也具备跨会话的长期记忆。
- 利用 LangSmith 进行调试:通过可视化工具深入了解复杂的智能体行为,这些工具可以追踪执行路径、捕捉状态转换并提供详细的运行时指标。
- 生产级部署:利用专为应对有状态、长运行工作流的独特挑战而设计的可扩展基础设施,自信地部署复杂的智能体系统
1..3 生态系统
虽然 LangGraph 可以独立使用,但它也能与任何 LangChain 产品无缝集成,为开发者提供了一整套构建智能体的工具。为了提升你的 LLM 应用开发体验,可以将 LangGraph 与:
- LangSmith检测:在一个地方追踪请求、评估输出并监控部署情况。使用 LangGraph 在本地进行原型开发,然后通过集成的可观测性和评估功能过渡到生产环境,从而构建更可靠的智能体系统
- LangSmith部署:通过专为长运行、有状态工作流构建的部署平台,轻松部署和扩展智能体。在团队间发现、复用、配置和共享智能体,并在 Studio 中通过可视化原型快速迭代
- LangChain:提供集成和可组合的组件,以简化 LLM 应用程序的开发。其中包含构建在 LangGraph 之上的智能体抽象
1.4 致谢
LangGraph 的灵感来源于 Pregel 和 Apache Beam。其对外公开接口的设计则借鉴了 NetworkX。LangGraph 由 LangChain 的创造者——LangChain Inc 开发,但你可以完全不依赖 LangChain 独立使用它
2 入门
2.1 安装
安装langgraph包,如果已经安装过最新版langchain,默认就会安装langgraph
pip install -U langgraph
#或者
uv add langgraph
使用 LangGraph 时,你通常需要访问大语言模型并定义工具。具体怎么做,完全取决于你。文档中我们会采用的一种方式是使用 LangChain。请使用以下命令安装 LangChain:
pip install -U langchain
# Requires Python 3.10+
#或者
uv add langchain
# Requires Python 3.10+
若要使用特定的大语言模型提供商(LLM Provider)的软件包,你需要单独进行安装。请前往集成页面,查看针对特定提供商的安装说明。
2.2 快速开始
本快速入门指南将演示如何使用 LangGraph 的图 API 或函数式 API 来构建一个计算器智能体
请安装 LangChain Docs MCP 服务器,以便让您的智能体能够访问最新、最准确的 LangChain 文档和代码示例。请安装 LangChain Skills,以提升您的智能体在处理 LangChain 生态相关任务时的表现
关于概念性信息,请参阅图 API 概览和函数式 API 概览
2.2.1 使用图API
2.2.1.1 定义工具和模型
在本示例中,我们将使用 Claude Sonnet 4.5 模型,并定义用于加法、乘法和除法的工具
from langchain.tools import tool
from langchain.chat_models import init_chat_model


model = init_chat_model(
    "claude-sonnet-4-6",
    temperature=0
)


# Define tools
@tool
def multiply(a: int, b: int) -> int:
    """Multiply `a` and `b`.

    Args:
        a: First int
        b: Second int
    """
    return a * b


@tool
def add(a: int, b: int) -> int:
    """Adds `a` and `b`.

    Args:
        a: First int
        b: Second int
    """
    return a + b


@tool
def divide(a: int, b: int) -> float:
    """Divide `a` and `b`.

    Args:
        a: First int
        b: Second int
    """
    return a / b


# Augment the LLM with tools
tools = [add, multiply, divide]
tools_by_name = {tool.name: tool for tool in tools}
#这里要注意的式model_with_tools.invoke不会真正执行工具调用,只是输出计划
model_with_tools = model.bind_tools(tools)
2.2.1.2 定义状态
图的 State(状态)用于存储消息列表和 LLM 的调用次数。LangGraph 中的 State(状态)会在智能体执行的整个过程中持续存在。带有 operator.add 的 Annotated 类型可以确保新消息是追加到现有列表中,而不是将其替换掉
from langchain.messages import AnyMessage
from typing_extensions import TypedDict, Annotated
import operator


class MessagesState(TypedDict):
    messages: Annotated[list[AnyMessage], operator.add]
    llm_calls: int
2.2.1.3 定义模型节点
模型节点用于调用 LLM,并决定是否需要调用工具
from langchain.messages import SystemMessage


def llm_call(state: dict):
    """LLM decides whether to call a tool or not"""

    return {
        "messages": [
            #上面绑定了工具的模型
            model_with_tools.invoke(
                [
                    SystemMessage(
                        content="You are a helpful assistant tasked with performing arithmetic on a set of inputs."
                    )
                ]
                + state["messages"]
            )
        ],
        "llm_calls": state.get('llm_calls', 0) + 1
    }
2.2.1.4 定义工具节点
工具节点用于调用工具并返回结果
from langchain.messages import ToolMessage


def tool_node(state: dict):
    """Performs the tool call"""

    result = []
    for tool_call in state["messages"][-1].tool_calls:
        tool = tools_by_name[tool_call["name"]]
        observation = tool.invoke(tool_call["args"])
        result.append(ToolMessage(content=observation, tool_call_id=tool_call["id"]))
    return {"messages": result}
2.2.1.5 定义结束逻辑
条件边函数用于根据 LLM 是否发起了工具调用,将流程路由到工具节点或结束流程
from typing import Literal
from langgraph.graph import StateGraph, START, END


def should_continue(state: MessagesState) -> Literal["tool_node", END]:
    """Decide if we should continue the loop or stop based upon whether the LLM made a tool call"""

    messages = state["messages"]
    last_message = messages[-1]

    # If the LLM makes a tool call, then perform an action
    if last_message.tool_calls:
        return "tool_node"

    # Otherwise, we stop (reply to the user)
    return END
2.2.1.6 构建编译智能体
该智能体是使用 StateGraph 类构建的,并通过 compile 方法进行编译
# Build workflow
agent_builder = StateGraph(MessagesState)

# Add nodes
agent_builder.add_node("llm_call", llm_call)
agent_builder.add_node("tool_node", tool_node)

# Add edges to connect nodes
agent_builder.add_edge(START, "llm_call")
agent_builder.add_conditional_edges(
    "llm_call",
    should_continue,
    ["tool_node", END]
)
agent_builder.add_edge("tool_node", "llm_call")

# Compile the agent
agent = agent_builder.compile()

# Show the agent
from IPython.display import Image, display
display(Image(agent.get_graph(xray=True).draw_mermaid_png()))

# Invoke
from langchain.messages import HumanMessage
messages = [HumanMessage(content="Add 3 and 4.")]
messages = agent.invoke({"messages": messages})
for m in messages["messages"]:
    m.pretty_print()
输出
<IPython.core.display.Image object>
================================ Human Message =================================

Add 3 and 4.
================================== Ai Message ==================================
Tool Calls:
  add (3a726a88-0819-4d9b-8fe6-207f9407c56e)
 Call ID: 3a726a88-0819-4d9b-8fe6-207f9407c56e
  Args:
    a: 3
    b: 4
================================= Tool Message =================================

7
================================== Ai Message ==================================

The result of adding 3 and 4 is **7**.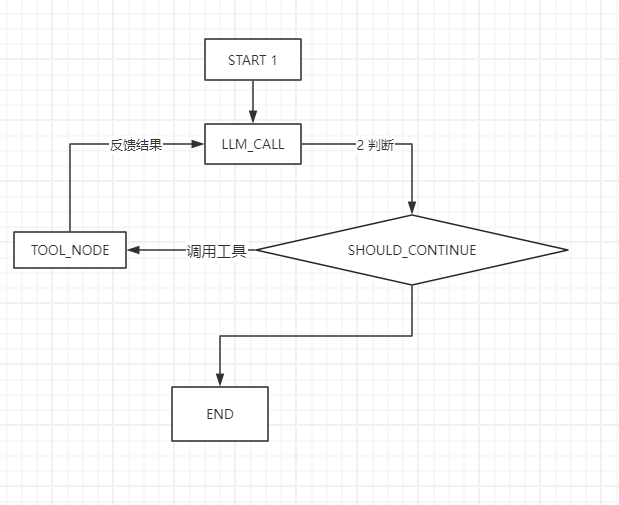
2.2.2 使用函数式API
2.2.2.1 定义工具和模型
在本示例中,我们将使用 Claude Sonnet 4.5 模型,并定义用于加法、乘法和除法的工具
from langchain.tools import tool
from langchain.chat_models import init_chat_model


model = init_chat_model(
    "claude-sonnet-4-6",
    temperature=0
)


# Define tools
@tool
def multiply(a: int, b: int) -> int:
    """Multiply `a` and `b`.

    Args:
        a: First int
        b: Second int
    """
    return a * b


@tool
def add(a: int, b: int) -> int:
    """Adds `a` and `b`.

    Args:
        a: First int
        b: Second int
    """
    return a + b


@tool
def divide(a: int, b: int) -> float:
    """Divide `a` and `b`.

    Args:
        a: First int
        b: Second int
    """
    return a / b


# Augment the LLM with tools
tools = [add, multiply, divide]
tools_by_name = {tool.name: tool for tool in tools}
model_with_tools = model.bind_tools(tools)

from langgraph.graph import add_messages
from langchain.messages import (
    SystemMessage,
    HumanMessage,
    ToolCall,
)
from langchain_core.messages import BaseMessage
from langgraph.func import entrypoint, task
2.2.2.2 定义模型节点
模型节点用于调用 LLM,并决定是否需要调用工具。@task 装饰器用于将函数标记为智能体可执行的任务。这些任务可以在入口点函数中同步或异步调用
@task
def call_llm(messages: list[BaseMessage]):
    """LLM decides whether to call a tool or not"""
    return model_with_tools.invoke(
        [
            SystemMessage(
                content="You are a helpful assistant tasked with performing arithmetic on a set of inputs."
            )
        ]
        + messages
    )
2.2.2.3 定义工具节点
工具节点用于调用工具并返回结果
@task
def call_tool(tool_call: ToolCall):
    """Performs the tool call"""
    tool = tools_by_name[tool_call["name"]]
    return tool.invoke(tool_call)
2.2.2.2 定义智能体
该智能体是使用 @entrypoint 函数构建的
在 Functional API 中,你无需显式地定义节点和边,而是直接在单个函数内编写标准的控制流逻辑(如循环、条件判断)
@entrypoint()
def agent(messages: list[BaseMessage]):
    model_response = call_llm(messages).result()

    while True:
        if not model_response.tool_calls:
            break

        # Execute tools
        tool_result_futures = [
            call_tool(tool_call) for tool_call in model_response.tool_calls
        ]
        tool_results = [fut.result() for fut in tool_result_futures]
        messages = add_messages(messages, [model_response, *tool_results])
        model_response = call_llm(messages).result()

    messages = add_messages(messages, model_response)
    return messages

# Invoke
messages = [HumanMessage(content="Add 3 and 4.")]
for chunk in agent.stream(messages, stream_mode="updates"):
    print(chunk)
    print("\n")
2.3 本地服务
本指南将向您展示如何在本地运行 LangGraph 应用程序
前提条件
开始之前,请确保您具备以下条件:一个 LangSmith API 密钥 —— 注册完全免费
2.3.1 安装langgraph CLI
# Python >= 3.11 is required.
pip install -U "langgraph-cli[inmem]"
#或者
# Python >= 3.11 is required.
uv add "langgraph-cli[inmem]"2.3.2 创建langgraph应用
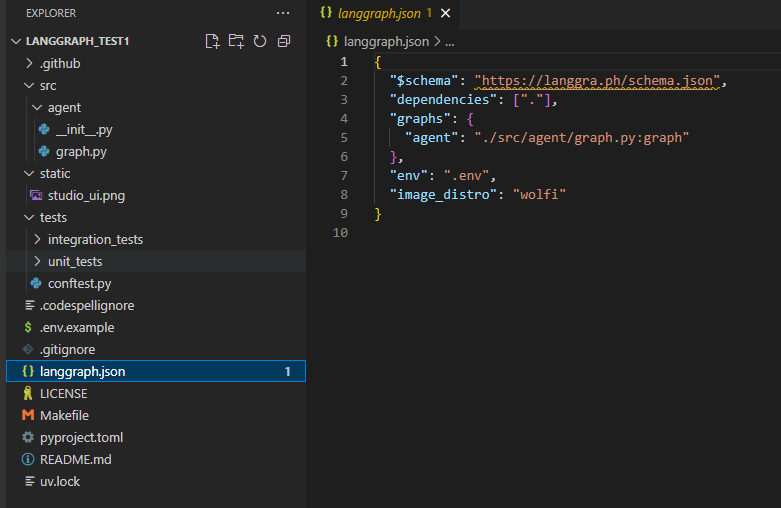
基于 new-langgraph-project-python 模板创建一个新应用。该模板展示了一个单节点应用的结构,你可以在此基础上扩展自己的业务逻辑
langgraph new path/to/your/app --template new-langgraph-project-python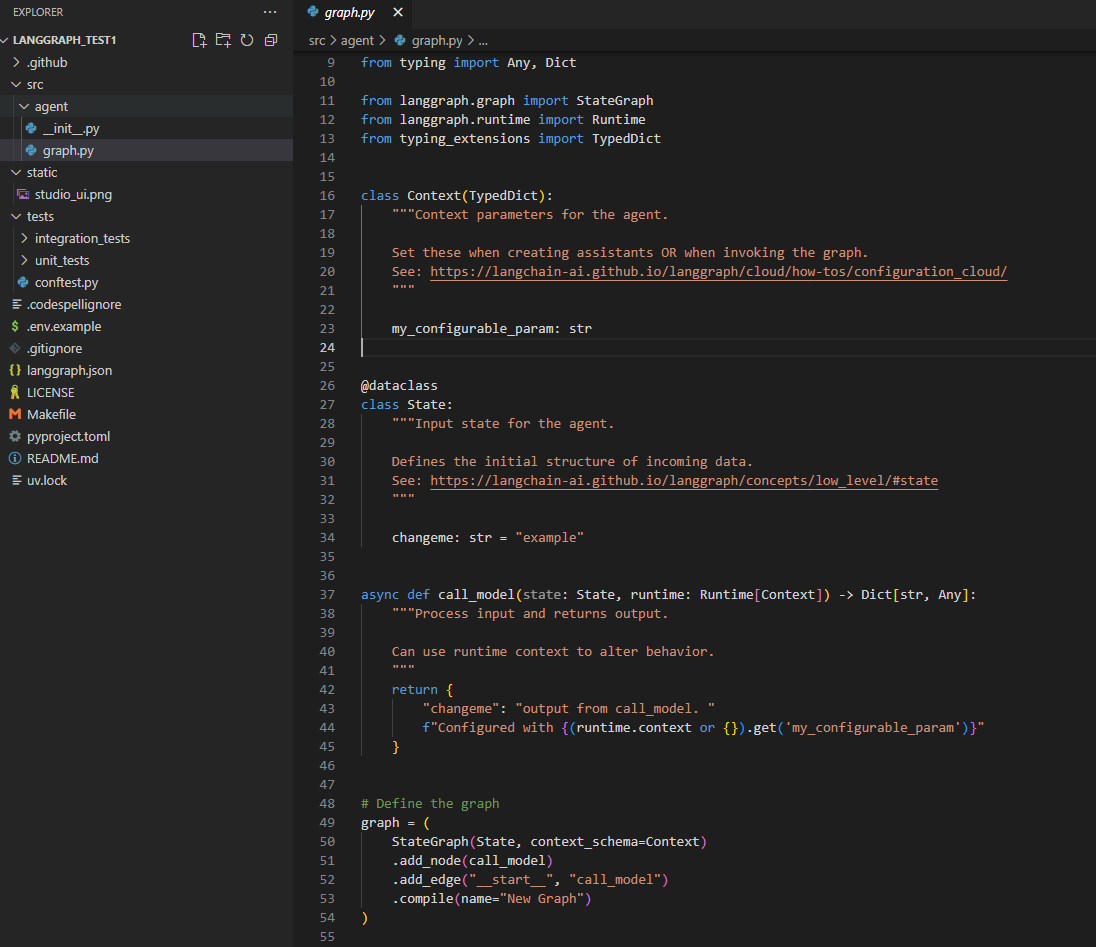
其他模板:如果您在使用 langgraph new 命令时未指定具体模板,系统将会显示一个交互式菜单,允许您从可用模板列表中进行选择。
2.3.3 安装依赖
在您的新 LangGraph 应用的根目录下,以编辑模式安装依赖,以便服务器能够使用您的本地代码更改:
cd path/to/your/app
pip install -e .
或者
cd path/to/your/app
uv sync2.3.4 创建.env
在 LangGraph 应用中配置环境变量时,通常需要在项目根目录下创建 .env 文件。具体操作步骤如下:
- 复制示例文件:找到根目录下的
.env.example文件,将其内容复制到新创建的.env文件中。 - 填写 API 密钥:在
.env文件中填入必要的 API 密钥和其他配置变量。为了简化教程或开发流程,这些变量通常直接存储在.env文件中,而不是直接在应用服务中配置。 - 注意优先级:如果同时配置了系统环境变量和
.env文件,系统环境变量的优先级通常高于.env文件中的配置
LANGSMITH_API_KEY=lsv2...2.3.5 启动agent server
启动LangGraph API本地服务
langgraph dev样例输出
INFO:langgraph_api.cli:

        Welcome to

╦  ┌─┐┌┐┌┌─┐╔═╗┬─┐┌─┐┌─┐┬ ┬
║  ├─┤││││ ┬║ ╦├┬┘├─┤├─┘├─┤
╩═╝┴ ┴┘└┘└─┘╚═╝┴└─┴ ┴┴  ┴ ┴

- 🚀 API: http://127.0.0.1:2024
- 🎨 Studio UI: https://smith.langchain.com/studio/?baseUrl=http://127.0.0.1:2024
- 📚 API Docs: http://127.0.0.1:2024/docs

This in-memory server is designed for development and testing.
For production use, please use LangSmith Deployment.
langgraph dev 命令会以内存模式启动 Agent Server。这种模式仅适用于开发和测试目的。若要在生产环境中使用,请部署配置了持久化存储后端的 Agent Server。有关更多信息,请参阅平台设置概览。在langchain也有说明
2.3.6 在studio测试应用
Studio 是一个专用的用户界面,您可以将其连接到 LangGraph API 服务器,以便在本地可视化、交互和调试您的应用程序。请访问 langgraph dev 命令输出中提供的 URL,在 Studio 中测试您的图
> - LangGraph Studio Web UI: https://smith.langchain.com/studio/?baseUrl=http://127.0.0.1:2024对于运行在自定义主机或端口的 Agent Server,请更新 URL 中的 baseUrl 查询参数。例如,如果您的服务器运行在 http://myhost:3000 上
https://smith.langchain.com/studio/?baseUrl=http://myhost:30002.3.7 测试接口
1 安装python sdk
pip install langgraph-sdk2 向助手发送一条消息(无线程运行)
#异步
from langgraph_sdk import get_client
import asyncio

client = get_client(url="http://localhost:2024")

async def main():
    async for chunk in client.runs.stream(
        None,  # Threadless run
        "agent", # Name of assistant. Defined in langgraph.json.
        input={
        "messages": [{
            "role": "human",
            "content": "What is LangGraph?",
            }],
        },
    ):
        print(f"Receiving new event of type: {chunk.event}...")
        print(chunk.data)
        print("\n\n")

asyncio.run(main())
#同步
from langgraph_sdk import get_sync_client
client = get_sync_client(url="http://localhost:2024")
for chunk in client.runs.stream(
None, # Threadless run
"agent", # Name of assistant. Defined in langgraph.json.
input={
"messages": [{
"role": "human",
"content": "What is LangGraph?",
}],
},
stream_mode="messages-tuple",
):
print(f"Receiving new event of type: {chunk.event}...")
print(chunk.data)
print("\n\n")#Rest API
curl -s --request POST \
--url "http://localhost:2024/runs/stream" \
--header 'Content-Type: application/json' \
--data "{
\"assistant_id\": \"agent\",
\"input\": {
\"messages\": [
{
\"role\": \"human\",
\"content\": \"What is LangGraph?\"
}
]
},
\"stream_mode\": \"messages-tuple\"
}"2.3.2 下一步
既然您已经在本地成功运行了 LangGraph 应用,不妨通过探索部署和高级功能来更进一步:
2.4 LangGraph 的思维方式
在使用 LangGraph 构建智能体时,您首先会将其拆解为称为“节点”的独立步骤。接着,您将描述每个节点的决策逻辑和流转路径。最后,通过一个各节点均可读写的“共享状态”,将这些节点连接起来。在本指南中,我们将引导您通过构建一个客服邮件智能体的全过程,来梳理这一开发思路
2.4.1 从您想要自动化的业务流程入手
想象一下,你需要构建一个处理客户支持邮件的 AI 智能体。你的产品团队已经给了你这些需求:
这个智能体应该具备以下能力:
- 阅读收到的客户邮件
- 根据紧急程度和主题对邮件进行分类
- 检索相关文档以回答问题
- 起草合适的回复
- 将复杂问题升级并转交给人工客服处理
- 在需要时安排后续跟进
需要处理的具体场景示例:
- 简单的产品咨询:“我该怎么重置密码?”
- 错误报告:“我一选 PDF 格式导出,功能就崩溃了。”
- 紧急的账单问题:“我的订阅被扣了两次款!”
- 功能建议:“你们能在手机 App 里加个深色模式吗?”
- 复杂的技术问题:“我们的 API 集成时不时会报 504 错误。”
要在 LangGraph 中实现一个智能体,你通常会遵循相同的五个步骤。
2.4.1.1 第1步 将你的工作流拆解为独立的步骤
首先,要识别出你整个流程中具体包含哪些独立的步骤。每一个步骤最终都会变成一个节点(也就是一个只负责做一件具体事情的函数)。然后,试着画出这些步骤之间是如何相互连接的。

2.4.1.2 第2步 明确每个步骤具体要做什么
| 节点类型 | 适用场景 |
|---|---|
| 大语言模型步骤 | 当你需要理解、分析、生成文本或进行推理决策时使用 |
| 数据步骤 | 当你需要从外部来源检索信息时使用 |
| 执行步骤 | 当你需要执行外部操作时使用 |
| 用户输入步骤 | 当你需要人工干预时使用 |
图中的箭头虽然展示了可能的路径,但具体走哪条路,实际上是由每个节点内部来做决定的。
既然我们已经确定了工作流中的各个组件,接下来就看看每个节点具体需要做什么:
- 读取邮件:提取并解析邮件内容。
- 意图分类:利用大语言模型对紧急程度和主题进行分类,然后将其导向相应的处理动作。
- 文档搜索:在你的知识库中查询相关信息。
- 缺陷追踪:在追踪系统中创建或更新问题工单。
- 起草回复:生成合适的回复内容。
- 人工审核:升级并转交给人工客服进行审批或处理。
- 发送回复:发出回复邮件。
请注意,有些节点会决定下一步该去哪里(比如“意图分类”、“起草回复”、“人工审核”),而另一些节点则总是固定进入同一个后续步骤(比如“读取邮件”之后永远是“意图分类”,“文档搜索”之后永远是“起草回复”)。
LLM 步骤
当一个步骤需要理解、分析、生成文本或做出推理决策时(例如):
1. 意图分类
- 静态上下文(提示词):分类类别、紧急程度定义、响应格式要求。
- 动态上下文(来自状态):邮件内容、发件人信息。
- 预期结果:确定路由路径的结构化分类结果。
2. 起草回复
- 静态上下文(提示词):语气指南、公司政策、回复模板。
- 动态上下文(来自状态):分类结果、搜索结果、客户历史记录。
- 预期结果:准备就绪、可供审核的专业邮件回复。
数据步骤
当一个步骤需要从外部来源检索信息时(例如):
1. 文档搜索
- 参数:根据意图和主题构建查询词。
- 重试策略:是,针对瞬时故障采用指数退避策略。
- 缓存:可以缓存常见查询,以减少 API 调用次数。
2. 客户历史查询
- 参数:来自状态中的客户邮箱或 ID。
- 重试策略:是,但如果不可用,则回退到获取基本信息。
- 缓存:是,设置生存时间以平衡数据新鲜度和性能。
动作步骤
当一个步骤需要执行外部操作时(例如):
1. 发送回复
- 节点执行时机:在获得批准(人工或自动)之后。
- 重试策略:是,针对网络问题采用指数退避策略。
- 不应缓存:每次发送都是一个独特的操作。
2. 缺陷追踪
- 节点执行时机:只要意图是“缺陷”就执行。
- 重试策略:是,绝不能丢失缺陷报告。
- 返回结果:工单 ID,以便包含在回复中。
用户输入步骤
当一个步骤需要人工干预时(例如):
人工审核节点
- 决策所需的上下文:原始邮件、回复草稿、紧急程度、分类结果。
- 预期的输入格式:批准布尔值(是/否)加上可选的编辑后回复。
- 触发时机:高紧急度、复杂问题或存在质量顾虑时。
2.4.1.3 第3步 状态设计
状态(State)是你的智能体中所有节点都能访问的共享内存。你可以把它想象成智能体用来记录工作过程中所有学习和决策内容的“笔记本”
数据状态应该存什么
针对每一条数据,问问自己下面这两个问题:
-
包含在状态中
它需要在各个步骤之间持久保存吗?如果是,那就把它放进状态里。
(比如:原始邮件内容、客户ID。因为这些信息第一步读到了,最后一步发邮件时可能还得用,必须一直存着。) -
不要存储
你能从其他数据里推导出它吗?如果是,那就等到需要用的时候再计算,别把它存在状态里。
(比如:邮件的字符数、或者是某个临时的中间变量。这种用完即弃或者随时能算出来的东西,就别占内存了。)
对于咱们的邮件智能体,我们需要追踪以下内容:
- 原始邮件和发件人信息(因为这些以后没法重新构建)
- 分类结果(因为后续/下游的多个节点都需要用到它)
- 搜索结果和客户数据(因为重新获取这些数据的代价很高)
- 回复草稿(因为它需要在审核过程中一直保存)
- 执行元数据(用于调试和故障恢复)
保持状态原始,按需格式化提示词
有一个关键原则:你的状态(State)应该存储原始数据,而不是格式化后的文本。请等到在节点内部需要使用时,再去格式化提示词。
这种分离意味着:
- 不同的节点可以根据各自的需求,将同一份数据格式化成不同的样子。
- 你可以随时修改提示词模板,而无需修改你的状态结构。
- 调试会更清晰——你能确切地看到每个节点接收到了什么数据。
- 你的智能体可以在不破坏现有状态的情况下不断进化。
from typing import TypedDict, Literal

# Define the structure for email classification
class EmailClassification(TypedDict):
    intent: Literal["question", "bug", "billing", "feature", "complex"]
    urgency: Literal["low", "medium", "high", "critical"]
    topic: str
    summary: str

class EmailAgentState(TypedDict):
    # Raw email data
    email_content: str
    sender_email: str
    email_id: str

    # Classification result
    classification: EmailClassification | None

    # Raw search/API results
    search_results: list[str] | None  # List of raw document chunks
    customer_history: dict | None  # Raw customer data from CRM

    # Generated content
    draft_response: str | None
    messages: list[str] | None
请注意,状态(State)中只包含原始数据——没有提示词模板,没有格式化后的字符串,也没有指令。分类输出是直接由大语言模型生成的单个字典形式存储的。
2.4.1.4 第 4 步 构建你的节点
现在,我们将每个步骤实现为一个函数。在 LangGraph 中,一个节点本质上就是一个 Python 函数,它接收当前的状态(State),并返回对状态的更新。
适当地处理错误
不同的错误需要不同的处理策略:
| 错误类型 | 谁来修复 | 策略 | 何时使用 |
|---|---|---|---|
| 瞬时错误 (网络问题、速率限制) |
系统 (自动) | 重试策略 | 那些通常重试一下就能解决的临时性故障 |
| LLM 可恢复的错误 (工具调用失败、解析问题) |
LLM | 将错误存入状态并循环返回 | LLM 能看到错误信息并调整它的方法 |
| 用户可修复的错误 (信息缺失、指令不清) |
人类 | 使用 interrupt() 暂停 | 需要用户输入才能继续进行时 |
| 意外错误 | 开发者 | 让它们冒泡抛出 | 那些需要调试的未知问题 |
临时错误
添加重试策略,以自动重试网络问题和速率限制:
- Network issues:比如网断了,自动重连。
- Rate limits:比如 API 提示“你太快了”,自动等一会儿再试。
LLM 可恢复的错误
将错误存入状态并循环返回,这样 LLM 就能看到哪里出错了,并再次尝试
from langgraph.types import Command


def execute_tool(state: State) -> Command[Literal["agent", "execute_tool"]]:
    try:
        result = run_tool(state['tool_call'])
        return Command(update={"tool_result": result}, goto="agent")
    except ToolError as e:
        # Let the LLM see what went wrong and try again
        return Command(
            update={"tool_result": f"Tool error: {str(e)}"},
            goto="agent"
        )
用户可修复的错误
在需要时暂停并收集用户信息(比如账户 ID、订单号,或者请求澄清说明):
from langgraph.types import Command


def lookup_customer_history(state: State) -> Command[Literal["draft_response"]]:
    if not state.get('customer_id'):
        user_input = interrupt({
            "message": "Customer ID needed",
            "request": "Please provide the customer's account ID to look up their subscription history"
        })
        return Command(
            update={"customer_id": user_input['customer_id']},
            goto="lookup_customer_history"
        )
    # Now proceed with the lookup
    customer_data = fetch_customer_history(state['customer_id'])
    return Command(update={"customer_history": customer_data}, goto="draft_response")
意外错误
让它们冒泡抛出以便调试。不要捕获你无法处理的错误。
def send_reply(state: EmailAgentState):
    try:
        email_service.send(state["draft_response"])
    except Exception:
        raise  # Surface unexpected errors
实现我们的邮件智能体节点
我们将把每个节点实现为一个简单的函数。请记住:节点接收状态,执行工作,然后返回更新。
读和分类节点
from typing import Literal
from langgraph.graph import StateGraph, START, END
from langgraph.types import interrupt, Command, RetryPolicy
from langchain_openai import ChatOpenAI
from langchain.messages import HumanMessage

llm = ChatOpenAI(model="gpt-5-nano")

def read_email(state: EmailAgentState) -> dict:
    """Extract and parse email content"""
    # In production, this would connect to your email service
    return {
        "messages": [HumanMessage(content=f"Processing email: {state['email_content']}")]
    }

def classify_intent(state: EmailAgentState) -> Command[Literal["search_documentation", "human_review", "draft_response", "bug_tracking"]]:
    """Use LLM to classify email intent and urgency, then route accordingly"""

    # Create structured LLM that returns EmailClassification dict
    structured_llm = llm.with_structured_output(EmailClassification)

    # Format the prompt on-demand, not stored in state
    classification_prompt = f"""
    Analyze this customer email and classify it:

    Email: {state['email_content']}
    From: {state['sender_email']}

    Provide classification including intent, urgency, topic, and summary.
    """

    # Get structured response directly as dict
    classification = structured_llm.invoke(classification_prompt)

    # Determine next node based on classification
    if classification['intent'] == 'billing' or classification['urgency'] == 'critical':
        goto = "human_review"
    elif classification['intent'] in ['question', 'feature']:
        goto = "search_documentation"
    elif classification['intent'] == 'bug':
        goto = "bug_tracking"
    else:
        goto = "draft_response"

    # Store classification as a single dict in state
    return Command(
        update={"classification": classification},
        goto=goto
    )
查询和跟踪节点
def search_documentation(state: EmailAgentState) -> Command[Literal["draft_response"]]:
    """Search knowledge base for relevant information"""

    # Build search query from classification
    classification = state.get('classification', {})
    query = f"{classification.get('intent', '')} {classification.get('topic', '')}"

    try:
        # Implement your search logic here
        # Store raw search results, not formatted text
        search_results = [
            "Reset password via Settings > Security > Change Password",
            "Password must be at least 12 characters",
            "Include uppercase, lowercase, numbers, and symbols"
        ]
    except SearchAPIError as e:
        # For recoverable search errors, store error and continue
        search_results = [f"Search temporarily unavailable: {str(e)}"]

    return Command(
        update={"search_results": search_results},  # Store raw results or error
        goto="draft_response"
    )

def bug_tracking(state: EmailAgentState) -> Command[Literal["draft_response"]]:
    """Create or update bug tracking ticket"""

    # Create ticket in your bug tracking system
    ticket_id = "BUG-12345"  # Would be created via API

    return Command(
        update={
            "search_results": [f"Bug ticket {ticket_id} created"],
            "current_step": "bug_tracked"
        },
        goto="draft_response"
    )
响应节点
def draft_response(state: EmailAgentState) -> Command[Literal["human_review", "send_reply"]]:
    """Generate response using context and route based on quality"""

    classification = state.get('classification', {})

    # Format context from raw state data on-demand
    context_sections = []

    if state.get('search_results'):
        # Format search results for the prompt
        formatted_docs = "\n".join([f"- {doc}" for doc in state['search_results']])
        context_sections.append(f"Relevant documentation:\n{formatted_docs}")

    if state.get('customer_history'):
        # Format customer data for the prompt
        context_sections.append(f"Customer tier: {state['customer_history'].get('tier', 'standard')}")

    # Build the prompt with formatted context
    draft_prompt = f"""
    Draft a response to this customer email:
    {state['email_content']}

    Email intent: {classification.get('intent', 'unknown')}
    Urgency level: {classification.get('urgency', 'medium')}

    {chr(10).join(context_sections)}

    Guidelines:
    - Be professional and helpful
    - Address their specific concern
    - Use the provided documentation when relevant
    """

    response = llm.invoke(draft_prompt)

    # Determine if human review needed based on urgency and intent
    needs_review = (
        classification.get('urgency') in ['high', 'critical'] or
        classification.get('intent') == 'complex'
    )

    # Route to appropriate next node
    goto = "human_review" if needs_review else "send_reply"

    return Command(
        update={"draft_response": response.content},  # Store only the raw response
        goto=goto
    )

def human_review(state: EmailAgentState) -> Command[Literal["send_reply", END]]:
    """Pause for human review using interrupt and route based on decision"""

    classification = state.get('classification', {})

    # interrupt() must come first - any code before it will re-run on resume
    human_decision = interrupt({
        "email_id": state.get('email_id',''),
        "original_email": state.get('email_content',''),
        "draft_response": state.get('draft_response',''),
        "urgency": classification.get('urgency'),
        "intent": classification.get('intent'),
        "action": "Please review and approve/edit this response"
    })

    # Now process the human's decision
    if human_decision.get("approved"):
        return Command(
            update={"draft_response": human_decision.get("edited_response", state.get('draft_response',''))},
            goto="send_reply"
        )
    else:
        # Rejection means human will handle directly
        return Command(update={}, goto=END)

def send_reply(state: EmailAgentState) -> dict:
    """Send the email response"""
    # Integrate with email service
    print(f"Sending reply: {state['draft_response'][:100]}...")
    return {}
2.4.1.5 第 5 步 将它们连接起来
现在,我们将节点连接成一个可运行的图。由于我们的节点已经自己处理了路由决策,所以我们只需要几条关键的边。为了通过 interrupt() 实现“人在回路”功能,我们需要在编译时配置一个检查点器,以便在多次运行之间保存状态:
#图的构建与编译代码
from langgraph.checkpoint.memory import MemorySaver
from langgraph.types import RetryPolicy

# Create the graph
workflow = StateGraph(EmailAgentState)

# Add nodes with appropriate error handling
workflow.add_node("read_email", read_email)
workflow.add_node("classify_intent", classify_intent)

# Add retry policy for nodes that might have transient failures
workflow.add_node(
    "search_documentation",
    search_documentation,
    retry_policy=RetryPolicy(max_attempts=3)
)
workflow.add_node("bug_tracking", bug_tracking)
workflow.add_node("draft_response", draft_response)
workflow.add_node("human_review", human_review)
workflow.add_node("send_reply", send_reply)

# Add only the essential edges
workflow.add_edge(START, "read_email")
workflow.add_edge("read_email", "classify_intent")
workflow.add_edge("send_reply", END)

# Compile with checkpointer for persistence, in case run graph with Local_Server --> Please compile without checkpointer
memory = MemorySaver()
app = workflow.compile(checkpointer=memory)
图的结构非常精简,因为路由逻辑是通过 Command 对象在节点内部处理的。每个节点都使用类型提示(比如 Command[Literal["node1", "node2"]])来声明它可以去往哪里,这使得流程既明确又可追踪
#测试智能体
# Test with an urgent billing issue
initial_state = {
    "email_content": "I was charged twice for my subscription! This is urgent!",
    "sender_email": "customer@example.com",
    "email_id": "email_123",
    "messages": []
}

# Run with a thread_id for persistence
config = {"configurable": {"thread_id": "customer_123"}}
result = app.invoke(initial_state, config)
# The graph will pause at human_review
print(f"human review interrupt:{result['__interrupt__']}")

# When ready, provide human input to resume
from langgraph.types import Command

human_response = Command(
    resume={
        "approved": True,
        "edited_response": "We sincerely apologize for the double charge. I've initiated an immediate refund..."
    }
)

# Resume execution
final_result = app.invoke(human_response, config)
print(f"Email sent successfully!")
当流程运行到 interrupt() 时,图会暂停,把一切都保存到检查点器中,然后进入等待状态。哪怕过了几天它也能恢复运行,并且能精准地从刚才停下的地方接着干。而 thread_id 则确保了这场对话的所有状态数据都被完整地保存在一起
2.4.2 总结与后续步骤
2.4.2.1 核心洞察
构建这个邮件智能体让我们领略了 LangGraph 的思维方式
| 核心概念 | 详细解读 |
|---|---|
| 拆解为离散步骤 (Break into discrete steps) |
每个节点只专注于做好一件事。这种拆解方式不仅能让进度更新像流媒体一样实时可见,还能实现“断点续传”般的持久化执行,更让调试变得清晰——因为你可以随时检查每一步之间的状态。 |
| 状态即共享记忆 (State is shared memory) |
在状态中存储原始数据,而不是格式化后的文本。这样能让不同的节点根据自己的需求,灵活地使用同一份信息。 |
| 节点即函数 (Nodes are functions) |
节点接收状态,执行工作,然后返回更新。当它们需要做路由决策时,会同时指定“状态更新内容”和“下一个目的地”。 |
| 错误也是流程的一部分 (Errors are part of the flow) |
暂时性的故障会自动重试;LLM 能修复的错误会带着上下文循环回去重试;用户能解决的问题会暂停等待输入;只有意料之外的错误才会直接抛出以便调试。 |
| 人类输入是一等公民 (Human input is first-class) |
interrupt() 函数可以无限期地暂停执行,保存所有状态,并在你提供输入后精准地从断点处恢复。当它与其他操作在同一个节点中使用时,必须放在首位。 |
| 图结构自然涌现 (Graph structure emerges naturally) |
你只需要定义关键的连接,具体的路由逻辑交给节点自己处理。这让控制流程既明确又可追踪——只要看当前节点,你就能明白智能体下一步要做什么。 |
2.4.2.2 进阶考量
节点粒度的权衡
本部分将探讨节点粒度设计中的权衡之道。大多数应用其实可以直接跳过这一节,沿用上面展示的模式即可。
你可能会想:为什么不把“读取邮件”和“意图分类”合并成一个节点呢?
又或者,为什么要把“文档搜索”和“起草回复”分开?
答案就在于韧性和可观测性之间的权衡。
关于韧性的考量:
LangGraph 的持久化执行会在节点的边界处创建检查点。当工作流在中断或故障后恢复时,它会从执行停止的那个节点的开头重新开始。
- 节点越小:检查点越频繁,万一出事,需要重做的工作就越少。
- 节点越大:如果你把多个操作合并成一个大节点,一旦在快结束时失败,就意味着要从这个节点的开头重新执行所有操作。
为什么我们为邮件智能体选择这种拆分方式:
- 隔离外部服务:“文档搜索”和“Bug 追踪”是独立的节点,因为它们需要调用外部 API。如果搜索服务变慢或挂了,我们希望能把它和 LLM 的调用隔离开。我们可以针对这些特定节点添加重试策略,而不影响其他节点。
- 中间状态的可见性:把“意图分类”作为一个独立的节点,让我们能在采取行动之前,检查 LLM 到底做了什么决定。这对调试和监控非常有价值——你可以清楚地看到智能体是在何时、为何转接到人工审核的。
- 不同的故障模式:LLM 调用、数据库查询和邮件发送有着不同的重试策略。独立的节点让你能分别配置它们。
- 可复用性与测试:更小的节点更容易被独立测试,也更容易复用到其他工作流中。
另一种可行的方案:
你可以把“读取邮件”和“意图分类”合并成一个节点。但这样做的代价是,你将无法在分类前检查原始邮件内容,而且一旦该节点内任何环节出错,两个操作都得重来。对于大多数应用来说,独立节点带来的可观测性和调试优势是值得这种权衡的。
应用层面的考量:
第 2 步中关于缓存的讨论(是否缓存搜索结果)属于应用层面的决策,而非 LangGraph 框架的特性。你需要根据具体需求在节点函数内部实现缓存——LangGraph 不会对此做强制规定。
性能考量:
节点多并不意味着执行慢。LangGraph 默认在后台异步写入检查点(异步持久化模式),所以你的图会继续运行,无需等待检查点完成。这意味着你可以以极小的性能损耗获得频繁的检查点。如果需要,你也可以调整这种行为——比如使用“退出”模式仅在完成时检查点,或者使用“同步”模式阻塞执行直到每个检查点都写入完毕。
2.4.2.3 下一步学习指南
| 进阶方向 | 具体能做什么 |
|---|---|
| 人在回路模式 (Human-in-the-loop patterns) |
学习如何在执行前添加工具审批、批量审批等模式,让人类更深度地参与决策。 |
| 子图 (Subgraphs) |
为复杂的多步操作创建子图,把大流程拆分成更清晰的小模块。 |
| 流式传输 (Streaming) |
添加流式输出功能,让用户能像看进度条一样,实时看到智能体的思考和执行进度。 |
| 可观测性 (Observability) |
接入 LangSmith,为你的智能体装上“监控摄像头”,方便调试和监控运行状态。 |
| 工具集成 (Tool Integration) |
集成更多外部工具,比如联网搜索、数据库查询和各种 API 调用,让智能体手眼通天。 |
| 重试逻辑 (Retry Logic) |
为失败的操作实现带有“指数退避”策略的重试逻辑,让系统在面对网络波动时更稳健。 |
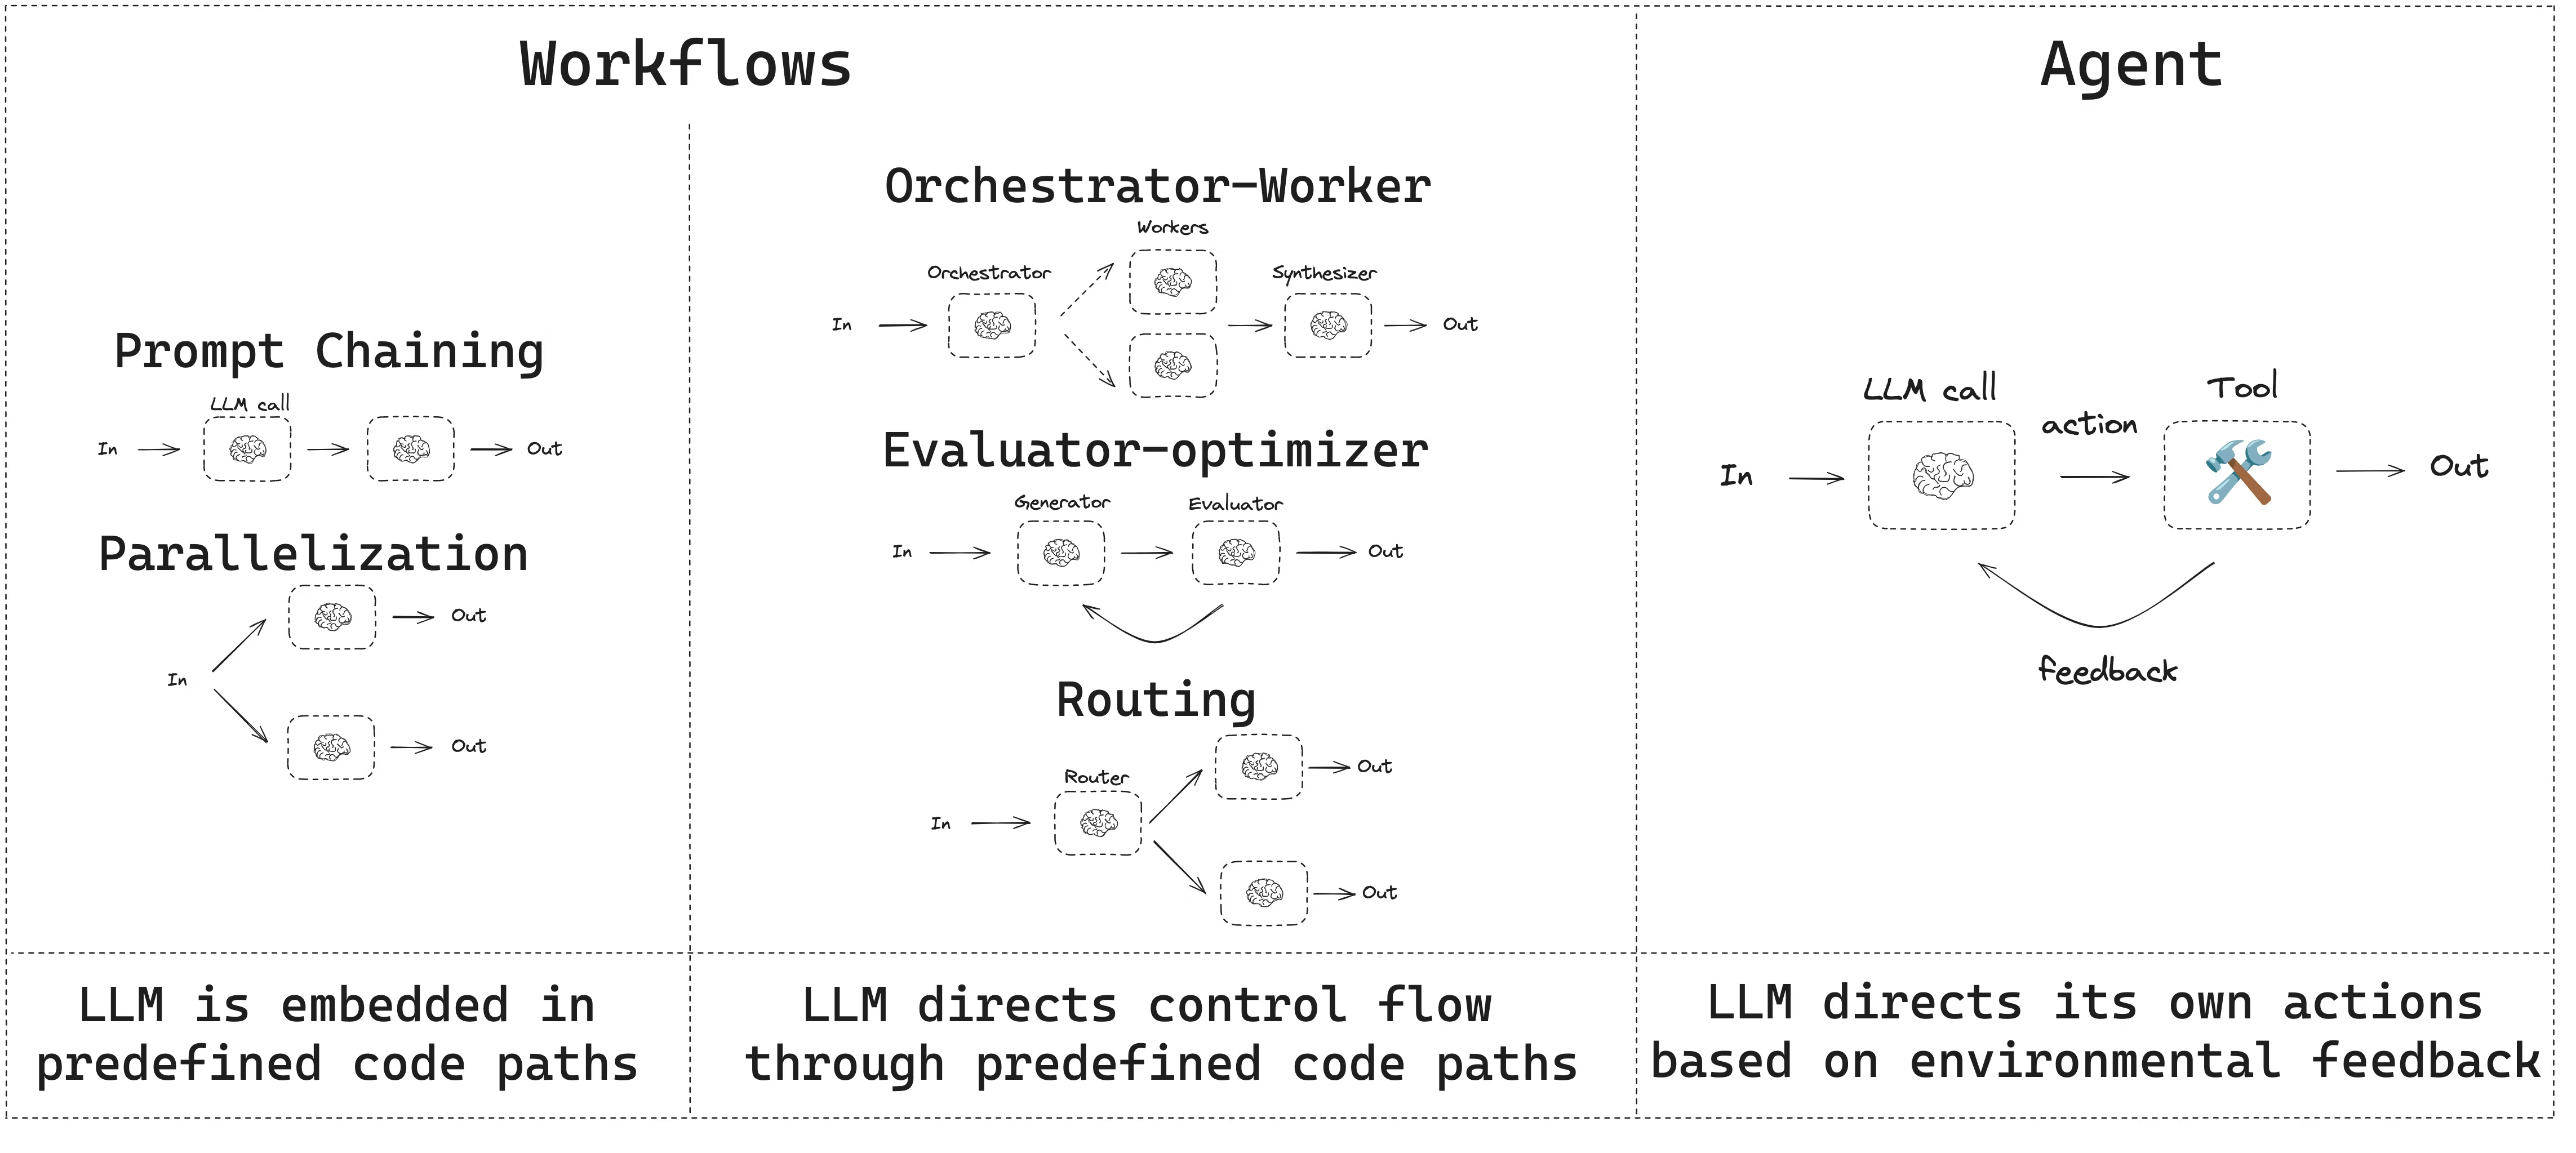
2.5 工作流+智能体
本指南回顾了常见的工作流和智能体模式。工作流具有预定义的代码路径,并且旨在按特定顺序运行。智能体则是动态的,它们会定义自己的流程并决定如何使用工具。
在使用 LangGraph 构建智能体和工作流时,它提供了诸多优势,包括持久化、流式传输,以及对调试和部署的支持
2.5.1 安装
若要构建工作流或智能体,你可以使用任何支持结构化输出和工具调用的聊天模型。以下示例使用的是 Anthropic
1 依赖
pip install langchain_core langchain-anthropic langgraph2 初始化LLM
import os
import getpass

from langchain_anthropic import ChatAnthropic

def _set_env(var: str):
    if not os.environ.get(var):
        #输入步回显内容
        os.environ[var] = getpass.getpass(f"{var}: ")


_set_env("ANTHROPIC_API_KEY")

llm = ChatAnthropic(model="claude-sonnet-4-6")
2.5.2 模型和参数
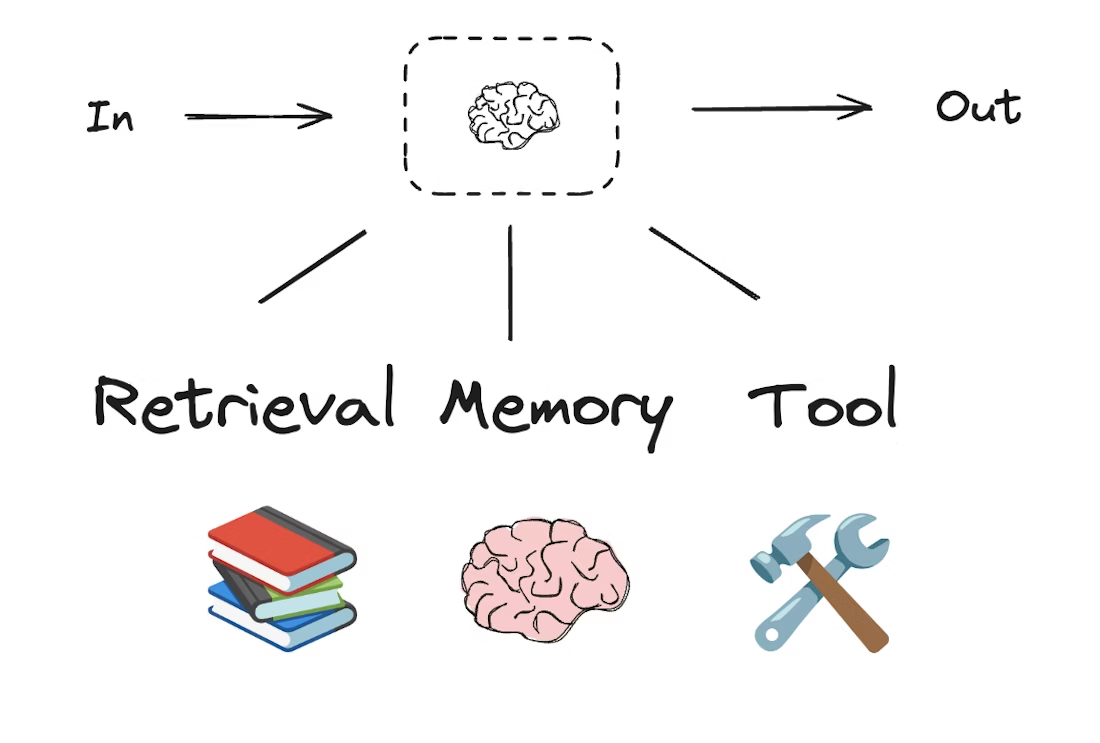
工作流和智能体系统是建立在大语言模型及其各种增强功能之上的。工具调用、结构化输出和短期记忆,就是几种用来根据需求定制大语言模型的手段
# Schema for structured output
from pydantic import BaseModel, Field


class SearchQuery(BaseModel):
    search_query: str = Field(None, description="Query that is optimized web search.")
    justification: str = Field(
        None, description="Why this query is relevant to the user's request."
    )


# Augment the LLM with schema for structured output
structured_llm = llm.with_structured_output(SearchQuery)

# Invoke the augmented LLM
output = structured_llm.invoke("How does Calcium CT score relate to high cholesterol?")

# Define a tool
def multiply(a: int, b: int) -> int:
    return a * b

# Augment the LLM with tools
llm_with_tools = llm.bind_tools([multiply])

# Invoke the LLM with input that triggers the tool call
msg = llm_with_tools.invoke("What is 2 times 3?")

# Get the tool call
msg.tool_calls
2.5.3 提示词链
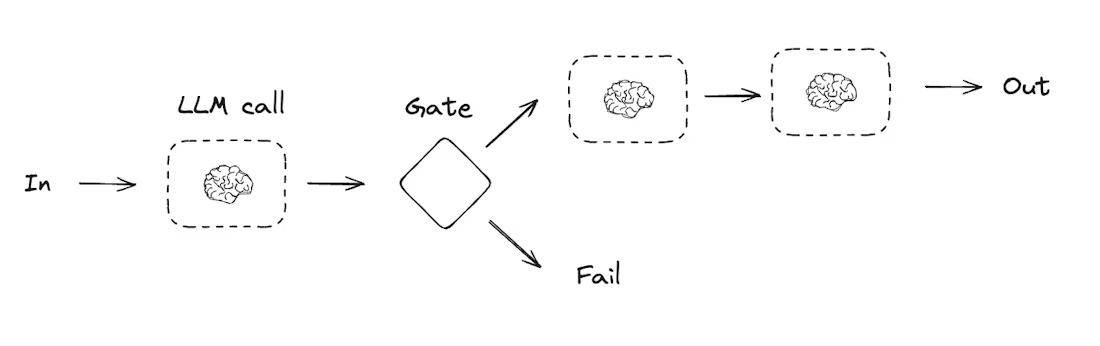
提示链是指每一个大语言模型的调用都会处理前一次调用的输出。它通常用于执行那些定义明确、且可以拆解为更小、可验证步骤的任务。
一些例子包括:
- 将文档翻译成不同的语言
- 验证生成内容的一致性
#图api
from typing_extensions import TypedDict
from langgraph.graph import StateGraph, START, END
from IPython.display import Image, display


# Graph state
class State(TypedDict):
    topic: str
    joke: str
    improved_joke: str
    final_joke: str


# Nodes
def generate_joke(state: State):
    """First LLM call to generate initial joke"""

    msg = llm.invoke(f"Write a short joke about {state['topic']}")
    return {"joke": msg.content}


def check_punchline(state: State):
    """Gate function to check if the joke has a punchline"""

    # Simple check - does the joke contain "?" or "!"
    if "?" in state["joke"] or "!" in state["joke"]:
        return "Pass"
    return "Fail"


def improve_joke(state: State):
    """Second LLM call to improve the joke"""

    msg = llm.invoke(f"Make this joke funnier by adding wordplay: {state['joke']}")
    return {"improved_joke": msg.content}


def polish_joke(state: State):
    """Third LLM call for final polish"""
    msg = llm.invoke(f"Add a surprising twist to this joke: {state['improved_joke']}")
    return {"final_joke": msg.content}


# Build workflow
workflow = StateGraph(State)

# Add nodes
workflow.add_node("generate_joke", generate_joke)
workflow.add_node("improve_joke", improve_joke)
workflow.add_node("polish_joke", polish_joke)

# Add edges to connect nodes
workflow.add_edge(START, "generate_joke")
workflow.add_conditional_edges(
    "generate_joke", check_punchline, {"Fail": "improve_joke", "Pass": END}
)
workflow.add_edge("improve_joke", "polish_joke")
workflow.add_edge("polish_joke", END)

# Compile
chain = workflow.compile()

# Show workflow
display(Image(chain.get_graph().draw_mermaid_png()))

# Invoke
state = chain.invoke({"topic": "cats"})
print("Initial joke:")
print(state["joke"])
print("\n--- --- ---\n")
if "improved_joke" in state:
    print("Improved joke:")
    print(state["improved_joke"])
    print("\n--- --- ---\n")

    print("Final joke:")
    print(state["final_joke"])
else:
    print("Final joke:")
    print(state["joke"])
#函数式API
from langgraph.func import entrypoint, task
# Tasks
@task
def generate_joke(topic: str):
"""First LLM call to generate initial joke"""
msg = llm.invoke(f"Write a short joke about {topic}")
return msg.content
def check_punchline(joke: str):
"""Gate function to check if the joke has a punchline"""
# Simple check - does the joke contain "?" or "!"
if "?" in joke or "!" in joke:
return "Fail"
return "Pass"
@task
def improve_joke(joke: str):
"""Second LLM call to improve the joke"""
msg = llm.invoke(f"Make this joke funnier by adding wordplay: {joke}")
return msg.content
@task
def polish_joke(joke: str):
"""Third LLM call for final polish"""
msg = llm.invoke(f"Add a surprising twist to this joke: {joke}")
return msg.content
@entrypoint()
def prompt_chaining_workflow(topic: str):
original_joke = generate_joke(topic).result()
if check_punchline(original_joke) == "Pass":
return original_joke
improved_joke = improve_joke(original_joke).result()
return polish_joke(improved_joke).result()
# Invoke
for step in prompt_chaining_workflow.stream("cats", stream_mode="updates"):
print(step)
print("\n")个人感觉可能使用图的方式更好理解和维护一些。
2.5.4 并行化
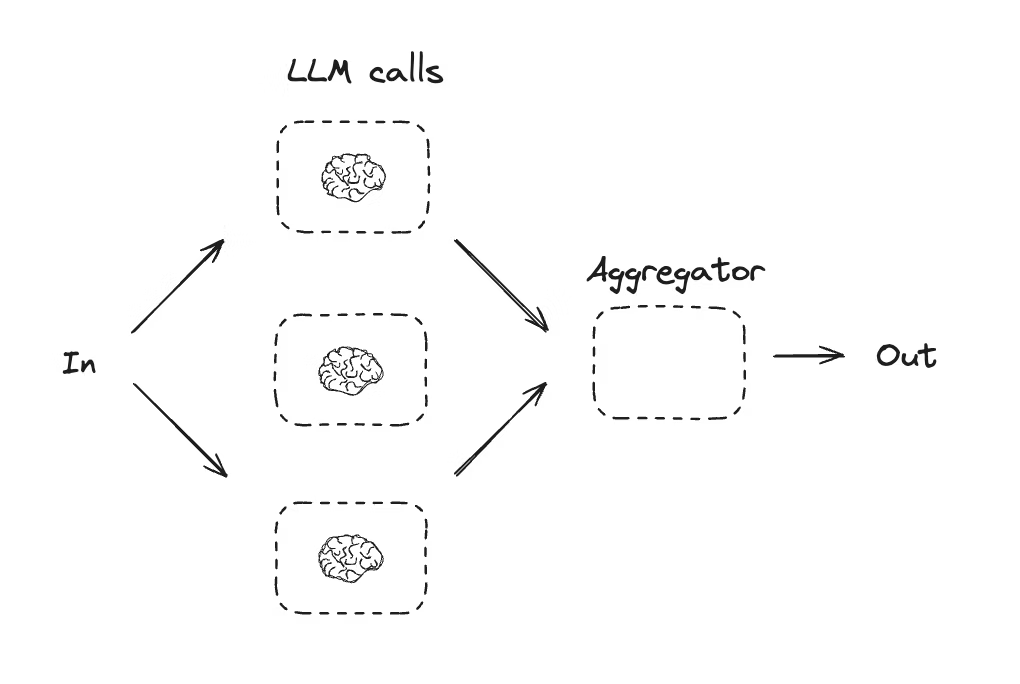
在并行化模式下,大语言模型会同时处理任务。这通常通过两种方式实现:要么同时运行多个独立的子任务,要么多次运行同一个任务以检查不同的输出结果。
并行化通常用于:
- 拆分并并行运行子任务,以此提高速度。
- 多次运行任务以检查不同的输出,以此增加置信度。
一些例子包括:
- 运行一个子任务从文档中提取关键词,同时运行另一个子任务检查格式错误。
- 多次运行任务,根据不同的标准(如引用数量、使用的来源数量以及来源质量)对文档的准确性进行评分。
# Graph state
class State(TypedDict):
    topic: str
    joke: str
    story: str
    poem: str
    combined_output: str


# Nodes
def call_llm_1(state: State):
    """First LLM call to generate initial joke"""

    msg = llm.invoke(f"Write a joke about {state['topic']}")
    return {"joke": msg.content}


def call_llm_2(state: State):
    """Second LLM call to generate story"""

    msg = llm.invoke(f"Write a story about {state['topic']}")
    return {"story": msg.content}

#图式API
def call_llm_3(state: State):
    """Third LLM call to generate poem"""

    msg = llm.invoke(f"Write a poem about {state['topic']}")
    return {"poem": msg.content}


def aggregator(state: State):
    """Combine the joke, story and poem into a single output"""

    combined = f"Here's a story, joke, and poem about {state['topic']}!\n\n"
    combined += f"STORY:\n{state['story']}\n\n"
    combined += f"JOKE:\n{state['joke']}\n\n"
    combined += f"POEM:\n{state['poem']}"
    return {"combined_output": combined}


# Build workflow
parallel_builder = StateGraph(State)

# Add nodes
parallel_builder.add_node("call_llm_1", call_llm_1)
parallel_builder.add_node("call_llm_2", call_llm_2)
parallel_builder.add_node("call_llm_3", call_llm_3)
parallel_builder.add_node("aggregator", aggregator)

# Add edges to connect nodes
parallel_builder.add_edge(START, "call_llm_1")
parallel_builder.add_edge(START, "call_llm_2")
parallel_builder.add_edge(START, "call_llm_3")
parallel_builder.add_edge("call_llm_1", "aggregator")
parallel_builder.add_edge("call_llm_2", "aggregator")
parallel_builder.add_edge("call_llm_3", "aggregator")
parallel_builder.add_edge("aggregator", END)
parallel_workflow = parallel_builder.compile()

# Show workflow
display(Image(parallel_workflow.get_graph().draw_mermaid_png()))

# Invoke
state = parallel_workflow.invoke({"topic": "cats"})
print(state["combined_output"])
#函数式API
@task
def call_llm_1(topic: str):
"""First LLM call to generate initial joke"""
msg = llm.invoke(f"Write a joke about {topic}")
return msg.content
@task
def call_llm_2(topic: str):
"""Second LLM call to generate story"""
msg = llm.invoke(f"Write a story about {topic}")
return msg.content
@task
def call_llm_3(topic):
"""Third LLM call to generate poem"""
msg = llm.invoke(f"Write a poem about {topic}")
return msg.content
@task
def aggregator(topic, joke, story, poem):
"""Combine the joke and story into a single output"""
combined = f"Here's a story, joke, and poem about {topic}!\n\n"
combined += f"STORY:\n{story}\n\n"
combined += f"JOKE:\n{joke}\n\n"
combined += f"POEM:\n{poem}"
return combined
# Build workflow
@entrypoint()
def parallel_workflow(topic: str):
joke_fut = call_llm_1(topic)
story_fut = call_llm_2(topic)
poem_fut = call_llm_3(topic)
return aggregator(
topic, joke_fut.result(), story_fut.result(), poem_fut.result()
).result()
# Invoke
for step in parallel_workflow.stream("cats", stream_mode="updates"):
print(step)
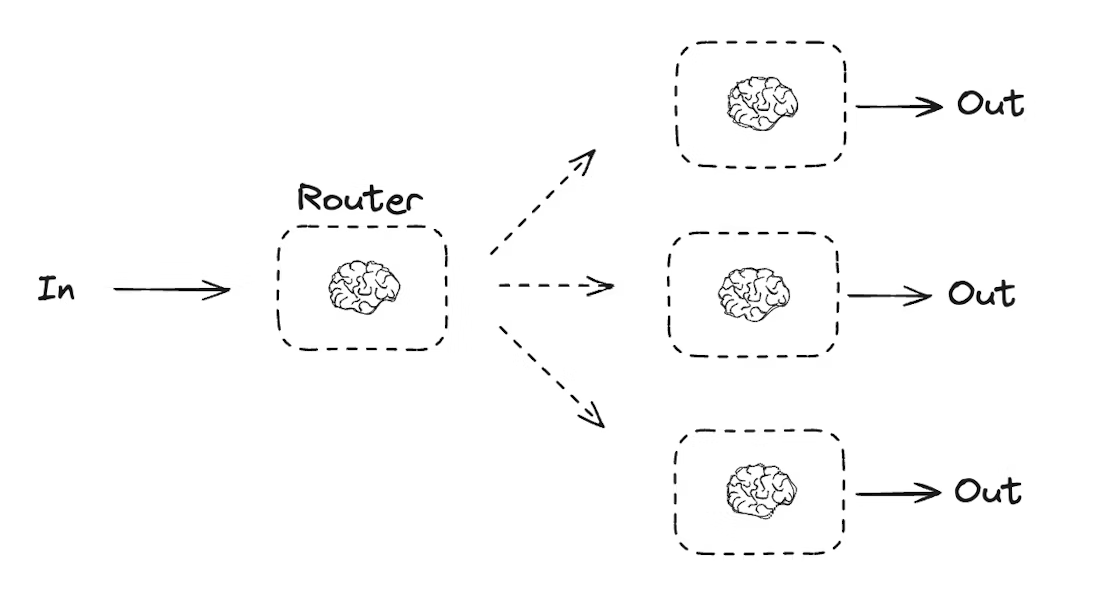
print("\n")2.5.5 路由
路由工作流会先处理输入内容,然后将其导向特定上下文的任务。这让你能够为复杂的任务定义专门的流程。举个例子,一个旨在回答产品相关问题的构建工作流,可能会先分析问题的类型,然后将请求路由到处理价格、退款、退货等的具体流程中
from typing_extensions import Literal
from langchain.messages import HumanMessage, SystemMessage


# Schema for structured output to use as routing logic
class Route(BaseModel):
    step: Literal["poem", "story", "joke"] = Field(
        None, description="The next step in the routing process"
    )


# Augment the LLM with schema for structured output
router = llm.with_structured_output(Route)


# State
class State(TypedDict):
    input: str
    decision: str
    output: str


# Nodes
def llm_call_1(state: State):
    """Write a story"""

    result = llm.invoke(state["input"])
    return {"output": result.content}


def llm_call_2(state: State):
    """Write a joke"""

    result = llm.invoke(state["input"])
    return {"output": result.content}


def llm_call_3(state: State):
    """Write a poem"""

    result = llm.invoke(state["input"])
    return {"output": result.content}


def llm_call_router(state: State):
    """Route the input to the appropriate node"""

    # Run the augmented LLM with structured output to serve as routing logic
    decision = router.invoke(
        [
            SystemMessage(
                content="Route the input to story, joke, or poem based on the user's request."
            ),
            HumanMessage(content=state["input"]),
        ]
    )

    return {"decision": decision.step}


# Conditional edge function to route to the appropriate node
def route_decision(state: State):
    # Return the node name you want to visit next
    if state["decision"] == "story":
        return "llm_call_1"
    elif state["decision"] == "joke":
        return "llm_call_2"
    elif state["decision"] == "poem":
        return "llm_call_3"


# Build workflow
router_builder = StateGraph(State)

# Add nodes
router_builder.add_node("llm_call_1", llm_call_1)
router_builder.add_node("llm_call_2", llm_call_2)
router_builder.add_node("llm_call_3", llm_call_3)
router_builder.add_node("llm_call_router", llm_call_router)

# Add edges to connect nodes
router_builder.add_edge(START, "llm_call_router")
router_builder.add_conditional_edges(
    "llm_call_router",
    route_decision,
    {  # Name returned by route_decision : Name of next node to visit
        "llm_call_1": "llm_call_1",
        "llm_call_2": "llm_call_2",
        "llm_call_3": "llm_call_3",
    },
)
router_builder.add_edge("llm_call_1", END)
router_builder.add_edge("llm_call_2", END)
router_builder.add_edge("llm_call_3", END)

# Compile workflow
router_workflow = router_builder.compile()

# Show the workflow
display(Image(router_workflow.get_graph().draw_mermaid_png()))

# Invoke
state = router_workflow.invoke({"input": "Write me a joke about cats"})
print(state["output"])
from typing_extensions import Literal
from pydantic import BaseModel
from langchain.messages import HumanMessage, SystemMessage
# Schema for structured output to use as routing logic
class Route(BaseModel):
step: Literal["poem", "story", "joke"] = Field(
None, description="The next step in the routing process"
)
# Augment the LLM with schema for structured output
router = llm.with_structured_output(Route)
@task
def llm_call_1(input_: str):
"""Write a story"""
result = llm.invoke(input_)
return result.content
@task
def llm_call_2(input_: str):
"""Write a joke"""
result = llm.invoke(input_)
return result.content
@task
def llm_call_3(input_: str):
"""Write a poem"""
result = llm.invoke(input_)
return result.content
def llm_call_router(input_: str):
"""Route the input to the appropriate node"""
# Run the augmented LLM with structured output to serve as routing logic
decision = router.invoke(
[
SystemMessage(
content="Route the input to story, joke, or poem based on the user's request."
),
HumanMessage(content=input_),
]
)
return decision.step
# Create workflow
@entrypoint()
def router_workflow(input_: str):
next_step = llm_call_router(input_)
if next_step == "story":
llm_call = llm_call_1
elif next_step == "joke":
llm_call = llm_call_2
elif next_step == "poem":
llm_call = llm_call_3
return llm_call(input_).result()
# Invoke
for step in router_workflow.stream("Write me a joke about cats", stream_mode="updates"):
print(step)
print("\n")2.5.6 编排-工作者
在编排器-工作者配置中,编排器负责:
- 将任务拆解为子任务
- 将子任务委派给工作者
- 将工作者的输出综合为最终结果
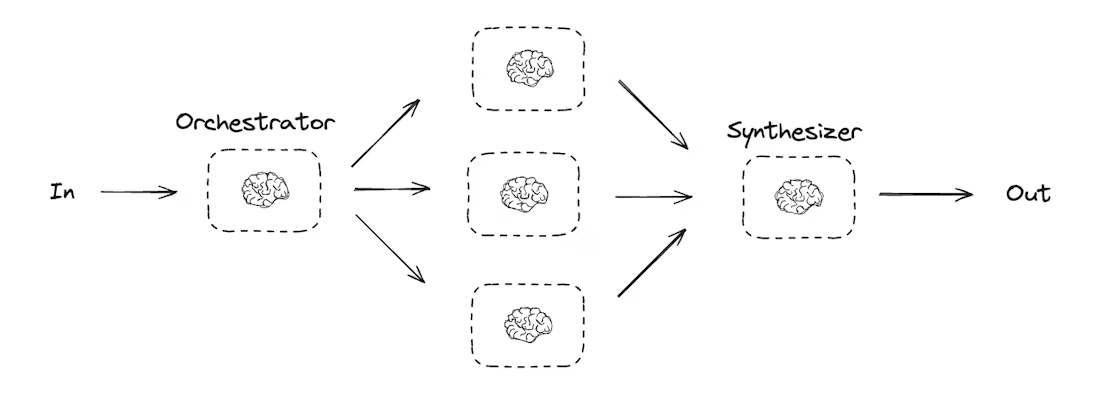
编排器-工作者工作流提供了更高的灵活性,通常用于那些无法像并行化那样预先定义子任务的场景。这在编写代码或需要跨多个文件更新内容的工作流中非常常见。
举个例子,如果一个工作流需要在数量未知的文档中更新多个 Python 库的安装说明,就可能会使用这种模式。
from typing import Annotated, List
import operator


# Schema for structured output to use in planning
class Section(BaseModel):
    name: str = Field(
        description="Name for this section of the report.",
    )
    description: str = Field(
        description="Brief overview of the main topics and concepts to be covered in this section.",
    )


class Sections(BaseModel):
    sections: List[Section] = Field(
        description="Sections of the report.",
    )


# Augment the LLM with schema for structured output
planner = llm.with_structured_output(Sections)
这段代码有点抽象,看起向自动创建任务,而不是固定好任务,这里的任务就是格式化输出,可能并行执行N个。
#函数式API和上面的区别比较大
from typing import List


# Schema for structured output to use in planning
class Section(BaseModel):
    name: str = Field(
        description="Name for this section of the report.",
    )
    description: str = Field(
        description="Brief overview of the main topics and concepts to be covered in this section.",
    )


class Sections(BaseModel):
    sections: List[Section] = Field(
        description="Sections of the report.",
    )


# Augment the LLM with schema for structured output
planner = llm.with_structured_output(Sections)


@task
def orchestrator(topic: str):
    """Orchestrator that generates a plan for the report"""
    # Generate queries
    report_sections = planner.invoke(
        [
            SystemMessage(content="Generate a plan for the report."),
            HumanMessage(content=f"Here is the report topic: {topic}"),
        ]
    )

    return report_sections.sections


@task
def llm_call(section: Section):
    """Worker writes a section of the report"""

    # Generate section
    result = llm.invoke(
        [
            SystemMessage(content="Write a report section."),
            HumanMessage(
                content=f"Here is the section name: {section.name} and description: {section.description}"
            ),
        ]
    )

    # Write the updated section to completed sections
    return result.content


@task
def synthesizer(completed_sections: list[str]):
    """Synthesize full report from sections"""
    final_report = "\n\n---\n\n".join(completed_sections)
    return final_report


@entrypoint()
def orchestrator_worker(topic: str):
    sections = orchestrator(topic).result()
    section_futures = [llm_call(section) for section in sections]
    final_report = synthesizer(
        [section_fut.result() for section_fut in section_futures]
    ).result()
    return final_report

# Invoke
report = orchestrator_worker.invoke("Create a report on LLM scaling laws")
from IPython.display import Markdown
Markdown(report)
在 LangGraph 中创建工作者
编排器-工作者工作流非常普遍,而 LangGraph 对此提供了内置支持。Send API 允许你动态创建工作者节点,并向它们发送特定的输入。每个工作者都拥有独立的状态,而所有工作者的输出都会被写入一个共享状态键中,供编排器图表访问。这使得编排器能够获取所有工作者的输出,并将它们综合成最终结果。下面的示例将遍历一个章节列表,并使用 Send API 将每个章节发送给对应的工作者
from langgraph.types import Send
# Graph state
class State(TypedDict):
topic: str # Report topic
sections: list[Section] # List of report sections
completed_sections: Annotated[
list, operator.add
] # All workers write to this key in parallel
final_report: str # Final report
# Worker state
class WorkerState(TypedDict):
section: Section
completed_sections: Annotated[list, operator.add]
# Nodes
def orchestrator(state: State):
"""Orchestrator that generates a plan for the report"""
# Generate queries
report_sections = planner.invoke(
[
SystemMessage(content="Generate a plan for the report."),
HumanMessage(content=f"Here is the report topic: {state['topic']}"),
]
)
return {"sections": report_sections.sections}
def llm_call(state: WorkerState):
"""Worker writes a section of the report"""
# Generate section
section = llm.invoke(
[
SystemMessage(
content="Write a report section following the provided name and description. Include no preamble for each section. Use markdown formatting."
),
HumanMessage(
content=f"Here is the section name: {state['section'].name} and description: {state['section'].description}"
),
]
)
# Write the updated section to completed sections
return {"completed_sections": [section.content]}
def synthesizer(state: State):
"""Synthesize full report from sections"""
# List of completed sections
completed_sections = state["completed_sections"]
# Format completed section to str to use as context for final sections
completed_report_sections = "\n\n---\n\n".join(completed_sections)
return {"final_report": completed_report_sections}
# Conditional edge function to create llm_call workers that each write a section of the report
def assign_workers(state: State):
"""Assign a worker to each section in the plan"""
# Kick off section writing in parallel via Send() API
return [Send("llm_call", {"section": s}) for s in state["sections"]]
# Build workflow
orchestrator_worker_builder = StateGraph(State)
# Add the nodes
orchestrator_worker_builder.add_node("orchestrator", orchestrator)
orchestrator_worker_builder.add_node("llm_call", llm_call)
orchestrator_worker_builder.add_node("synthesizer", synthesizer)
# Add edges to connect nodes
orchestrator_worker_builder.add_edge(START, "orchestrator")
orchestrator_worker_builder.add_conditional_edges(
"orchestrator", assign_workers, ["llm_call"]
)
orchestrator_worker_builder.add_edge("llm_call", "synthesizer")
orchestrator_worker_builder.add_edge("synthesizer", END)
# Compile the workflow
orchestrator_worker = orchestrator_worker_builder.compile()
# Show the workflow
display(Image(orchestrator_worker.get_graph().draw_mermaid_png()))
# Invoke
state = orchestrator_worker.invoke({"topic": "Create a report on LLM scaling laws"})
from IPython.display import Markdown
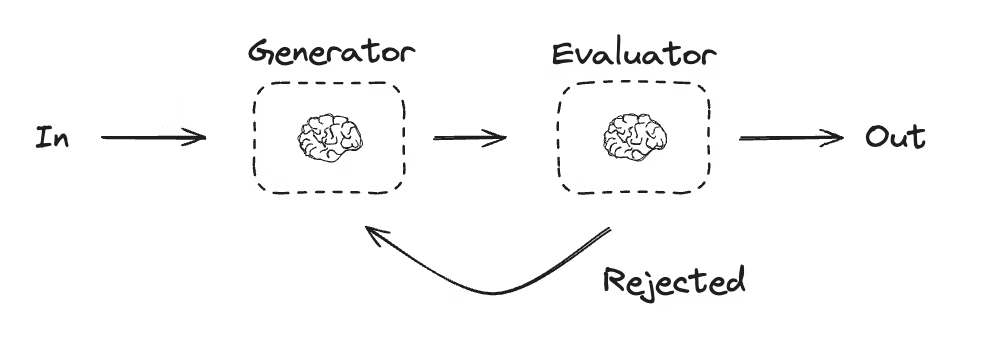
Markdown(state["final_report"])2.5.7 评估与优化
在评估者-优化者工作流中,一次大模型调用负责生成回答,另一次调用则负责评估这个回答。如果评估者(或者是参与循环的人类)认为回答需要改进,就会提供反馈,然后重新生成回答。这个循环会一直持续,直到生成令人满意的回答为止。这种工作流通常用于那些有特定成功标准,但需要多次迭代才能达标的任务。举个例子,在两种语言之间进行文本翻译时,并不总能一次性达到完美匹配。可能需要经过几次迭代,才能生成一个在两种语言中含义都完全一致的译文
# Graph state
class State(TypedDict):
    joke: str
    topic: str
    feedback: str
    funny_or_not: str


# Schema for structured output to use in evaluation
class Feedback(BaseModel):
    grade: Literal["funny", "not funny"] = Field(
        description="Decide if the joke is funny or not.",
    )
    feedback: str = Field(
        description="If the joke is not funny, provide feedback on how to improve it.",
    )


# Augment the LLM with schema for structured output
evaluator = llm.with_structured_output(Feedback)


# Nodes
def llm_call_generator(state: State):
    """LLM generates a joke"""

    if state.get("feedback"):
        msg = llm.invoke(
            f"Write a joke about {state['topic']} but take into account the feedback: {state['feedback']}"
        )
    else:
        msg = llm.invoke(f"Write a joke about {state['topic']}")
    return {"joke": msg.content}


def llm_call_evaluator(state: State):
    """LLM evaluates the joke"""

    grade = evaluator.invoke(f"Grade the joke {state['joke']}")
    return {"funny_or_not": grade.grade, "feedback": grade.feedback}


# Conditional edge function to route back to joke generator or end based upon feedback from the evaluator
def route_joke(state: State):
    """Route back to joke generator or end based upon feedback from the evaluator"""

    if state["funny_or_not"] == "funny":
        return "Accepted"
    elif state["funny_or_not"] == "not funny":
        return "Rejected + Feedback"


# Build workflow
optimizer_builder = StateGraph(State)

# Add the nodes
optimizer_builder.add_node("llm_call_generator", llm_call_generator)
optimizer_builder.add_node("llm_call_evaluator", llm_call_evaluator)

# Add edges to connect nodes
optimizer_builder.add_edge(START, "llm_call_generator")
optimizer_builder.add_edge("llm_call_generator", "llm_call_evaluator")
optimizer_builder.add_conditional_edges(
    "llm_call_evaluator",
    route_joke,
    {  # Name returned by route_joke : Name of next node to visit
        "Accepted": END,
        "Rejected + Feedback": "llm_call_generator",
    },
)

# Compile the workflow
optimizer_workflow = optimizer_builder.compile()

# Show the workflow
display(Image(optimizer_workflow.get_graph().draw_mermaid_png()))

# Invoke
state = optimizer_workflow.invoke({"topic": "Cats"})
print(state["joke"])
#function api
# Schema for structured output to use in evaluation
class Feedback(BaseModel):
grade: Literal["funny", "not funny"] = Field(
description="Decide if the joke is funny or not.",
)
feedback: str = Field(
description="If the joke is not funny, provide feedback on how to improve it.",
)
# Augment the LLM with schema for structured output
evaluator = llm.with_structured_output(Feedback)
# Nodes
@task
def llm_call_generator(topic: str, feedback: Feedback):
"""LLM generates a joke"""
if feedback:
msg = llm.invoke(
f"Write a joke about {topic} but take into account the feedback: {feedback}"
)
else:
msg = llm.invoke(f"Write a joke about {topic}")
return msg.content
@task
def llm_call_evaluator(joke: str):
"""LLM evaluates the joke"""
feedback = evaluator.invoke(f"Grade the joke {joke}")
return feedback
@entrypoint()
def optimizer_workflow(topic: str):
feedback = None
while True:
joke = llm_call_generator(topic, feedback).result()
feedback = llm_call_evaluator(joke).result()
if feedback.grade == "funny":
break
return joke
# Invoke
for step in optimizer_workflow.stream("Cats", stream_mode="updates"):
print(step)
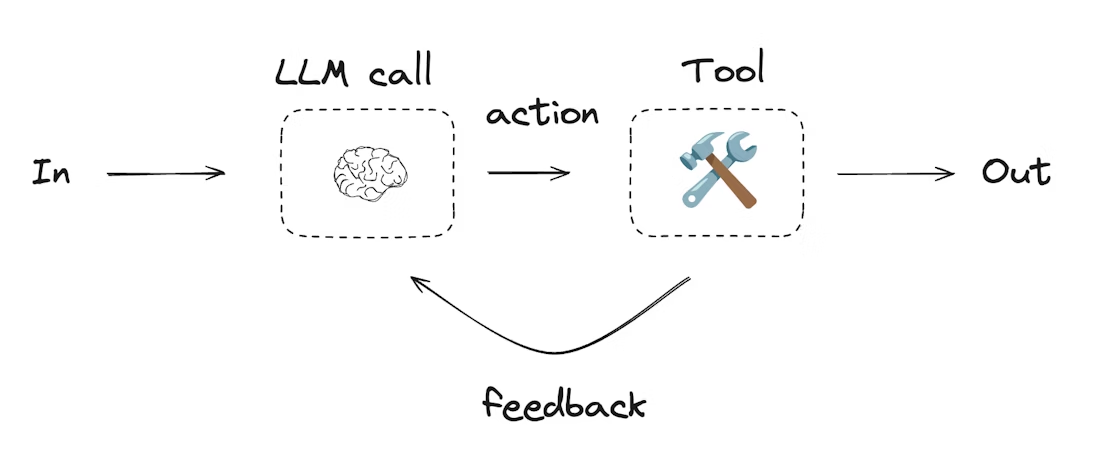
print("\n")2.5.8 智能体
智能体通常是通过大语言模型利用工具执行操作来实现的。
它们在持续的反馈循环中运行,通常用于解决那些问题和解决方案都不可预测的场景。
与工作流相比,智能体拥有更高的自主权,能够自主决定使用哪些工具以及如何解决问题。当然,你仍然可以定义可用的工具集以及智能体的行为准则
from langchain.tools import tool


# Define tools
@tool
def multiply(a: int, b: int) -> int:
    """Multiply `a` and `b`.

    Args:
        a: First int
        b: Second int
    """
    return a * b


@tool
def add(a: int, b: int) -> int:
    """Adds `a` and `b`.

    Args:
        a: First int
        b: Second int
    """
    return a + b


@tool
def divide(a: int, b: int) -> float:
    """Divide `a` and `b`.

    Args:
        a: First int
        b: Second int
    """
    return a / b


# Augment the LLM with tools
tools = [add, multiply, divide]
tools_by_name = {tool.name: tool for tool in tools}
llm_with_tools = llm.bind_tools(tools)
from langgraph.graph import MessagesState
from langchain.messages import SystemMessage, HumanMessage, ToolMessage
# Nodes
def llm_call(state: MessagesState):
"""LLM decides whether to call a tool or not"""
return {
"messages": [
llm_with_tools.invoke(
[
SystemMessage(
content="You are a helpful assistant tasked with performing arithmetic on a set of inputs."
)
]
+ state["messages"]
)
]
}
def tool_node(state: dict):
"""Performs the tool call"""
result = []
for tool_call in state["messages"][-1].tool_calls:
tool = tools_by_name[tool_call["name"]]
observation = tool.invoke(tool_call["args"])
result.append(ToolMessage(content=observation, tool_call_id=tool_call["id"]))
return {"messages": result}
#图API 模拟上面的代码
# Conditional edge function to route to the tool node or end based upon whether the LLM made a tool call
def should_continue(state: MessagesState) -> Literal["tool_node", END]:
"""Decide if we should continue the loop or stop based upon whether the LLM made a tool call"""
messages = state["messages"]
last_message = messages[-1]
# If the LLM makes a tool call, then perform an action
if last_message.tool_calls:
return "tool_node"
# Otherwise, we stop (reply to the user)
return END
# Build workflow
agent_builder = StateGraph(MessagesState)
# Add nodes
agent_builder.add_node("llm_call", llm_call)
agent_builder.add_node("tool_node", tool_node)
# Add edges to connect nodes
agent_builder.add_edge(START, "llm_call")
agent_builder.add_conditional_edges(
"llm_call",
should_continue,
["tool_node", END]
)
agent_builder.add_edge("tool_node", "llm_call")
# Compile the agent
agent = agent_builder.compile()
# Show the agent
display(Image(agent.get_graph(xray=True).draw_mermaid_png()))
# Invoke
messages = [HumanMessage(content="Add 3 and 4.")]
messages = agent.invoke({"messages": messages})
for m in messages["messages"]:
m.pretty_print()from langgraph.graph import add_messages
from langchain.messages import (
SystemMessage,
HumanMessage,
ToolCall,
)
from langchain_core.messages import BaseMessage
@task
def call_llm(messages: list[BaseMessage]):
"""LLM decides whether to call a tool or not"""
return llm_with_tools.invoke(
[
SystemMessage(
content="You are a helpful assistant tasked with performing arithmetic on a set of inputs."
)
]
+ messages
)
@task
def call_tool(tool_call: ToolCall):
"""Performs the tool call"""
tool = tools_by_name[tool_call["name"]]
return tool.invoke(tool_call)
@entrypoint()
def agent(messages: list[BaseMessage]):
llm_response = call_llm(messages).result()
while True:
if not llm_response.tool_calls:
break
# Execute tools
tool_result_futures = [
call_tool(tool_call) for tool_call in llm_response.tool_calls
]
tool_results = [fut.result() for fut in tool_result_futures]
messages = add_messages(messages, [llm_response, *tool_results])
llm_response = call_llm(messages).result()
messages = add_messages(messages, llm_response)
return messages
# Invoke
messages = [HumanMessage(content="Add 3 and 4.")]
for chunk in agent.stream(messages, stream_mode="updates"):
print(chunk)
print("\n")总结
本章主要介绍了图的设计和两种API实现方式,以及工作流和只能体的一些架构设计。后续内容请参看下篇能力

AtomGit 是由开放原子开源基金会联合 CSDN 等生态伙伴共同推出的新一代开源与人工智能协作平台。平台坚持“开放、中立、公益”的理念,把代码托管、模型共享、数据集托管、智能体开发体验和算力服务整合在一起,为开发者提供从开发、训练到部署的一站式体验。
更多推荐

 7
7 0
0- 0


 已为社区贡献8条内容

所有评论(0)