如何实现——————YOLOV8+Pycharm+Anaconda 深度学习中如何构建并实现_基于深度学习的yolov8水果蔬菜识别系统+pyqt5 UI 实现对水果蔬菜进行识别
如何实现——————YOLOV8+Pycharm+Anaconda 深度学习中如何构建并实现_基于深度学习的yolov8水果蔬菜识别系统+pyqt5 UI 实现对水果蔬菜进行识别
基于深度学习的水果蔬菜识别系统

你要是也可以——训练好模型,配置好环境可直接使用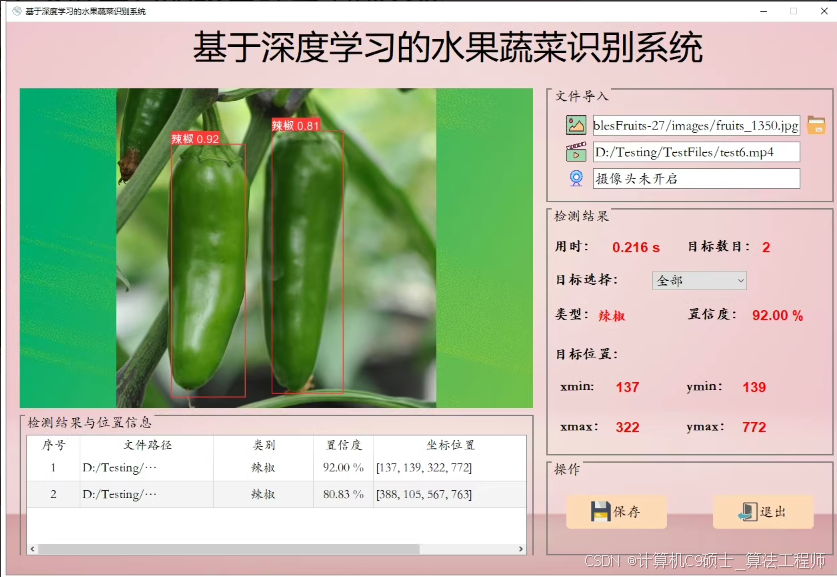
项目介绍:
模型:YOLOV8
软件:Pycharm+Anaconda
环境:python=3.9 opencv_python PyQt5
文件:
1.完整程序文件(.py等)
2.UI界面源文件、图标(.ui、.qrc、.py等)
3.测试图片、视频文件(.jpeg、.mp4、.avi等)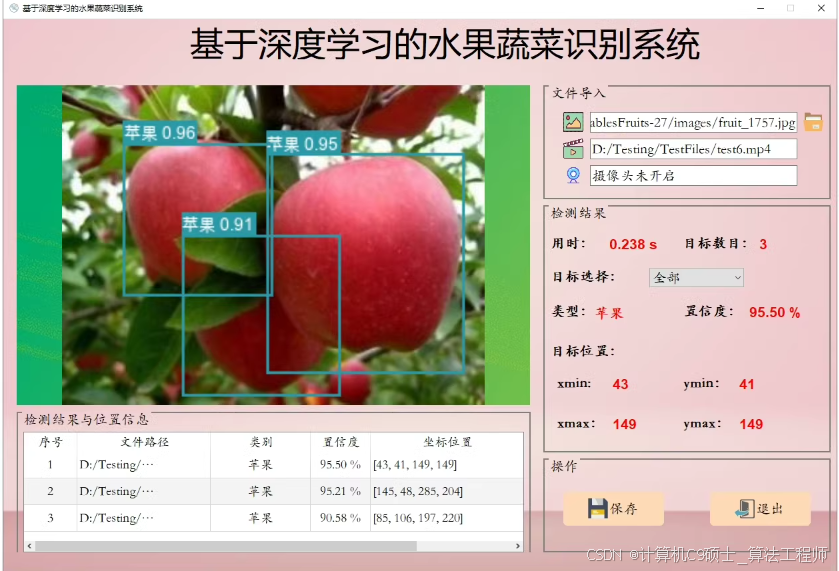
功能: 系统实现了对于多种水果蔬菜的识别检测功能:包括通过选择图片、视频、摄像头进行实时识别;检测速度快、识别精度较高。
①选择图片识别水果蔬菜。
②选择视频识别水果蔬菜。
③摄像头检测识别水果蔬菜。
创建一个基于深度学习的水果蔬菜识别系统,使用YOLOv8作为检测模型,并结合PyQt5构建图形用户界面(GUI),可以分为以下几个步骤:
1. 环境搭建
首先确保你的开发环境中安装了必要的库。你可以使用Anaconda来管理环境和依赖。
创建并激活conda环境
conda create -n fruit_vegetable_recognition python=3.9
conda activate fruit_vegetable_recognition
安装依赖包
conda install opencv pyqt
pip install ultralytics # YOLOv8库
pip install PyQt5
pip install qdarkstyle # 可选:用于美化PyQt5应用程序的样式表
2. 准备YOLOv8模型
下载或训练好YOLOv8模型,这里假设你已经有了预训练好的模型文件yolov8n.pt(或其他版本)。如果需要训练自己的模型,请参考YOLOv8官方文档。
3. 编写代码
主程序文件 main.py
import sys
from PyQt5.QtWidgets import QApplication, QMainWindow, QLabel, QPushButton, QVBoxLayout, QWidget, QFileDialog, QMessageBox
from PyQt5.QtGui import QPixmap, QImage
from PyQt5.QtCore import Qt, QTimer
import cv2
import numpy as np
from ultralytics import YOLO

class FruitVegetableRecognition(QMainWindow):
    def __init__(self):
        super().__init__()
        self.initUI()
        self.model = YOLO('yolov8n.pt')  # 加载YOLOv8模型
        self.cap = None
        self.timer = QTimer(self)
        self.timer.timeout.connect(self.update_frame)

    def initUI(self):
        self.setWindowTitle('水果蔬菜识别系统')
        self.setGeometry(100, 100, 800, 600)

        self.image_label = QLabel(self)
        self.image_label.setAlignment(Qt.AlignCenter)

        button_layout = QVBoxLayout()
        self.button_load_image = QPushButton('选择图片', self)
        self.button_load_video = QPushButton('选择视频', self)
        self.button_start_camera = QPushButton('摄像头检测', self)
        self.button_stop_camera = QPushButton('停止检测', self)

        self.button_load_image.clicked.connect(self.load_image)
        self.button_load_video.clicked.connect(self.load_video)
        self.button_start_camera.clicked.connect(self.start_camera)
        self.button_stop_camera.clicked.connect(self.stop_camera)

        button_layout.addWidget(self.button_load_image)
        button_layout.addWidget(self.button_load_video)
        button_layout.addWidget(self.button_start_camera)
        button_layout.addWidget(self.button_stop_camera)

        main_layout = QVBoxLayout()
        main_layout.addWidget(self.image_label)
        main_layout.addLayout(button_layout)

        container = QWidget()
        container.setLayout(main_layout)
        self.setCentralWidget(container)

    def load_image(self):
        file_name, _ = QFileDialog.getOpenFileName(self, "选择图片", "", "Image Files (*.png *.jpg *.jpeg)")
        if file_name:
            image = cv2.imread(file_name)
            results = self.model(image)
            annotated_image = self.annotate_results(image, results)
            self.display_image(annotated_image)

    def load_video(self):
        file_name, _ = QFileDialog.getOpenFileName(self, "选择视频", "", "Video Files (*.mp4 *.avi)")
        if file_name:
            self.cap = cv2.VideoCapture(file_name)
            self.timer.start(30)  # 每30ms刷新一次帧

    def start_camera(self):
        self.cap = cv2.VideoCapture(0)
        self.timer.start(30)

    def stop_camera(self):
        if self.cap is not None:
            self.cap.release()
            self.cap = None
        self.timer.stop()
        self.image_label.clear()

    def update_frame(self):
        ret, frame = self.cap.read()
        if ret:
            results = self.model(frame)
            annotated_frame = self.annotate_results(frame, results)
            self.display_image(annotated_frame)
        else:
            self.stop_camera()

    def annotate_results(self, image, results):
        for result in results[0].boxes.data.tolist():
            x1, y1, x2, y2, score, class_id = result
            label = f'{self.model.names[int(class_id)]} {score:.2f}'
            cv2.rectangle(image, (int(x1), int(y1)), (int(x2), int(y2)), (0, 255, 0), 2)
            cv2.putText(image, label, (int(x1), int(y1) - 10), cv2.FONT_HERSHEY_SIMPLEX, 0.5, (0, 255, 0), 2)
        return image

    def display_image(self, image):
        rgb_image = cv2.cvtColor(image, cv2.COLOR_BGR2RGB)
        h, w, ch = rgb_image.shape
        bytes_per_line = ch * w
        convert_to_Qt_format = QImage(rgb_image.data, w, h, bytes_per_line, QImage.Format_RGB888)
        p = convert_to_Qt_format.scaled(800, 600, Qt.KeepAspectRatio)
        self.image_label.setPixmap(QPixmap.fromImage(p))

if __name__ == '__main__':
    app = QApplication(sys.argv)
    ex = FruitVegetableRecognition()
    ex.show()
    sys.exit(app.exec_())
UI界面源文件 ui_main_window.ui
要实现这个界面,使用Python的PyQt5库来构建GUI,并结合YOLOv8模型进行水果蔬菜识别。
#### 安装依赖包
```bash
conda install opencv pyqt
pip install ultralytics # YOLOv8库
pip install PyQt5
. 准备YOLOv8模型
下载或训练好YOLOv8模型,这里假设你已经有了预训练好的模型文件yolov8n.pt(或其他版本)。
. 编写代码
主程序文件 main.py
import sys
from PyQt5.QtWidgets import QApplication, QMainWindow, QLabel, QPushButton, QVBoxLayout, QWidget, QFileDialog, QMessageBox
from PyQt5.QtGui import QPixmap, QImage
from PyQt5.QtCore import Qt, QTimer
import cv2
import numpy as np
from ultralytics import YOLO

class FruitVegetableRecognition(QMainWindow):
    def __init__(self):
        super().__init__()
        self.initUI()
        self.model = YOLO('yolov8n.pt')  # 加载YOLOv8模型
        self.cap = None
        self.timer = QTimer(self)
        self.timer.timeout.connect(self.update_frame)

    def initUI(self):
        self.setWindowTitle('基于深度学习的水果蔬菜识别系统')
        self.setGeometry(100, 100, 1200, 800)

        # 左侧图像显示区域
        self.image_label = QLabel(self)
        self.image_label.setAlignment(Qt.AlignCenter)
        self.image_label.setGeometry(20, 100, 600, 600)

        # 右侧文件导入区域
        file_layout = QVBoxLayout()
        self.file_label = QLabel('文件导入', self)
        self.file_path_label = QLabel('', self)
        self.load_image_button = QPushButton('选择图片', self)
        self.load_video_button = QPushButton('选择视频', self)
        self.camera_button = QPushButton('摄像头检测', self)
        self.stop_camera_button = QPushButton('停止检测', self)

        self.load_image_button.clicked.connect(self.load_image)
        self.load_video_button.clicked.connect(self.load_video)
        self.camera_button.clicked.connect(self.start_camera)
        self.stop_camera_button.clicked.connect(self.stop_camera)

        file_layout.addWidget(self.file_label)
        file_layout.addWidget(self.file_path_label)
        file_layout.addWidget(self.load_image_button)
        file_layout.addWidget(self.load_video_button)
        file_layout.addWidget(self.camera_button)
        file_layout.addWidget(self.stop_camera_button)

        # 右侧检测结果区域
        result_layout = QVBoxLayout()
        self.result_label = QLabel('检测结果', self)
        self.time_label = QLabel('', self)
        self.target_count_label = QLabel('', self)
        self.target_type_label = QLabel('', self)
        self.confidence_label = QLabel('', self)
        self.position_label = QLabel('', self)

        result_layout.addWidget(self.result_label)
        result_layout.addWidget(self.time_label)
        result_layout.addWidget(self.target_count_label)
        result_layout.addWidget(self.target_type_label)
        result_layout.addWidget(self.confidence_label)
        result_layout.addWidget(self.position_label)

        # 操作按钮
        button_layout = QVBoxLayout()
        self.save_button = QPushButton('保存', self)
        self.exit_button = QPushButton('退出', self)

        button_layout.addWidget(self.save_button)
        button_layout.addWidget(self.exit_button)

        # 总布局
        main_layout = QVBoxLayout()
        main_layout.addWidget(self.image_label)
        main_layout.addLayout(file_layout)
        main_layout.addLayout(result_layout)
        main_layout.addLayout(button_layout)

        container = QWidget()
        container.setLayout(main_layout)
        self.setCentralWidget(container)

    def load_image(self):
        file_name, _ = QFileDialog.getOpenFileName(self, "选择图片", "", "Image Files (*.png *.jpg *.jpeg)")
        if file_name:
            image = cv2.imread(file_name)
            results = self.model(image)
            annotated_image = self.annotate_results(image, results)
            self.display_image(annotated_image)
            self.update_result_labels(results)

    def load_video(self):
        file_name, _ = QFileDialog.getOpenFileName(self, "选择视频", "", "Video Files (*.mp4 *.avi)")
        if file_name:
            self.cap = cv2.VideoCapture(file_name)
            self.timer.start(30)  # 每30ms刷新一次帧

    def start_camera(self):
        self.cap = cv2.VideoCapture(0)
        self.timer.start(30)

    def stop_camera(self):
        if self.cap is not None:
            self.cap.release()
            self.cap = None
        self.timer.stop()
        self.image_label.clear()

    def update_frame(self):
        ret, frame = self.cap.read()
        if ret:
            results = self.model(frame)
            annotated_frame = self.annotate_results(frame, results)
            self.display_image(annotated_frame)
            self.update_result_labels(results)
        else:
            self.stop_camera()

    def annotate_results(self, image, results):
        for result in results[0].boxes.data.tolist():
            x1, y1, x2, y2, score, class_id = result
            label = f'{self.model.names[int(class_id)]} {score:.2f}'
            cv2.rectangle(image, (int(x1), int(y1)), (int(x2), int(y2)), (0, 255, 0), 2)
            cv2.putText(image, label, (int(x1), int(y1) - 10), cv2.FONT_HERSHEY_SIMPLEX, 0.5, (0, 255, 0), 2)
        return image

    def display_image(self, image):
        rgb_image = cv2.cvtColor(image, cv2.COLOR_BGR2RGB)
        h, w, ch = rgb_image.shape
        bytes_per_line = ch * w
        convert_to_Qt_format = QImage(rgb_image.data, w, h, bytes_per_line, QImage.Format_RGB888)
        p = convert_to_Qt_format.scaled(600, 600, Qt.KeepAspectRatio)
        self.image_label.setPixmap(QPixmap.fromImage(p))

    def update_result_labels(self, results):
        time_label_text = f'用时: {results.info["time"]:.3f} s'
        target_count_label_text = f'目标数目: {len(results[0].boxes)}'
        target_type_label_text = f'类型: {self.model.names[int(results[0].boxes.cls[0])]}'
        confidence_label_text = f'置信度: {results[0].boxes.conf[0]:.2f} %'
        position_label_text = f'位置: xmin: {int(results[0].boxes.xyxy[0][0])}, ymin: {int(results[0].boxes.xyxy[0][1])}, xmax: {int(results[0].boxes.xyxy[0][2])}, ymax: {int(results[0].boxes.xyxy[0][3])}'

        self.time_label.setText(time_label_text)
        self.target_count_label.setText(target_count_label_text)
        self.target_type_label.setText(target_type_label_text)
        self.confidence_label.setText(confidence_label_text)
        self.position_label.setText(position_label_text)

if __name__ == '__main__':
    app = QApplication(sys.argv)
    ex = FruitVegetableRecognition()
    ex.show()
    sys.exit(app.exec_())
4. 运行项目
确保所有文件都在同一个项目目录下,然后在命令行中执行以下命令启动应用程序:
python main.py
测试图片、视频文件
将测试用的图片和视频放置在一个特定的目录中,比如test_data/,并在运行时选择这些文件进行测试。
4. 运行项目
确保所有文件都在同一个项目目录下,然后在命令行中执行以下命令启动应用程序:
python main.py

AtomGit 是由开放原子开源基金会联合 CSDN 等生态伙伴共同推出的新一代开源与人工智能协作平台。平台坚持“开放、中立、公益”的理念,把代码托管、模型共享、数据集托管、智能体开发体验和算力服务整合在一起,为开发者提供从开发、训练到部署的一站式体验。
更多推荐

 14
14 0
0- 0


 已为社区贡献43条内容

所有评论(0)