AI心理咨询助手
一:搭建流程起步
npm create vite@latest
使用vite创建项目
node版本使用24.12.0
使用trae编译器自动引入element plus(直接引入的完整版,体积会比较大
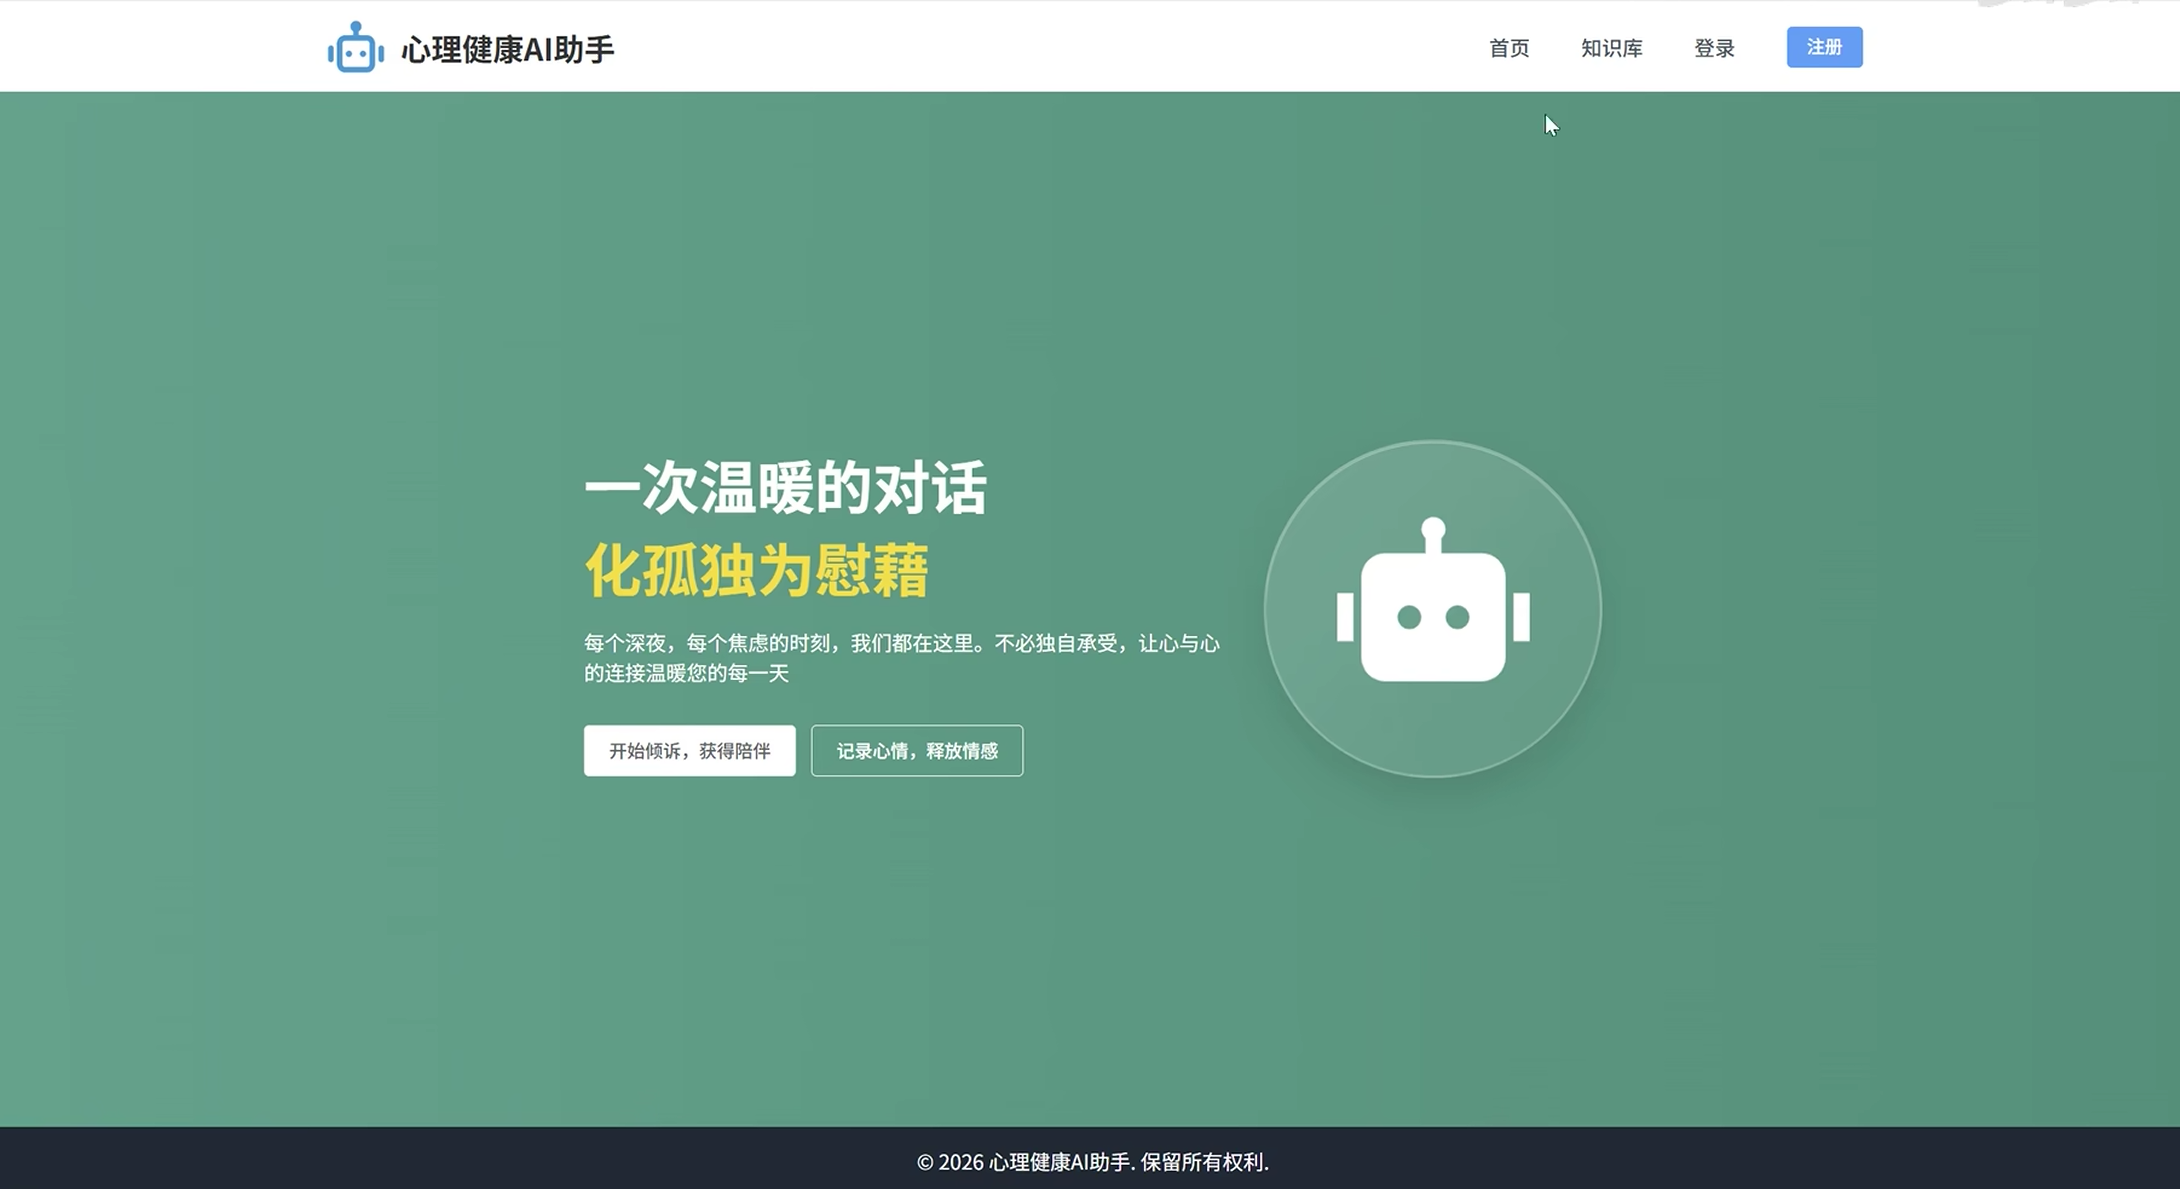
最终效果
首页
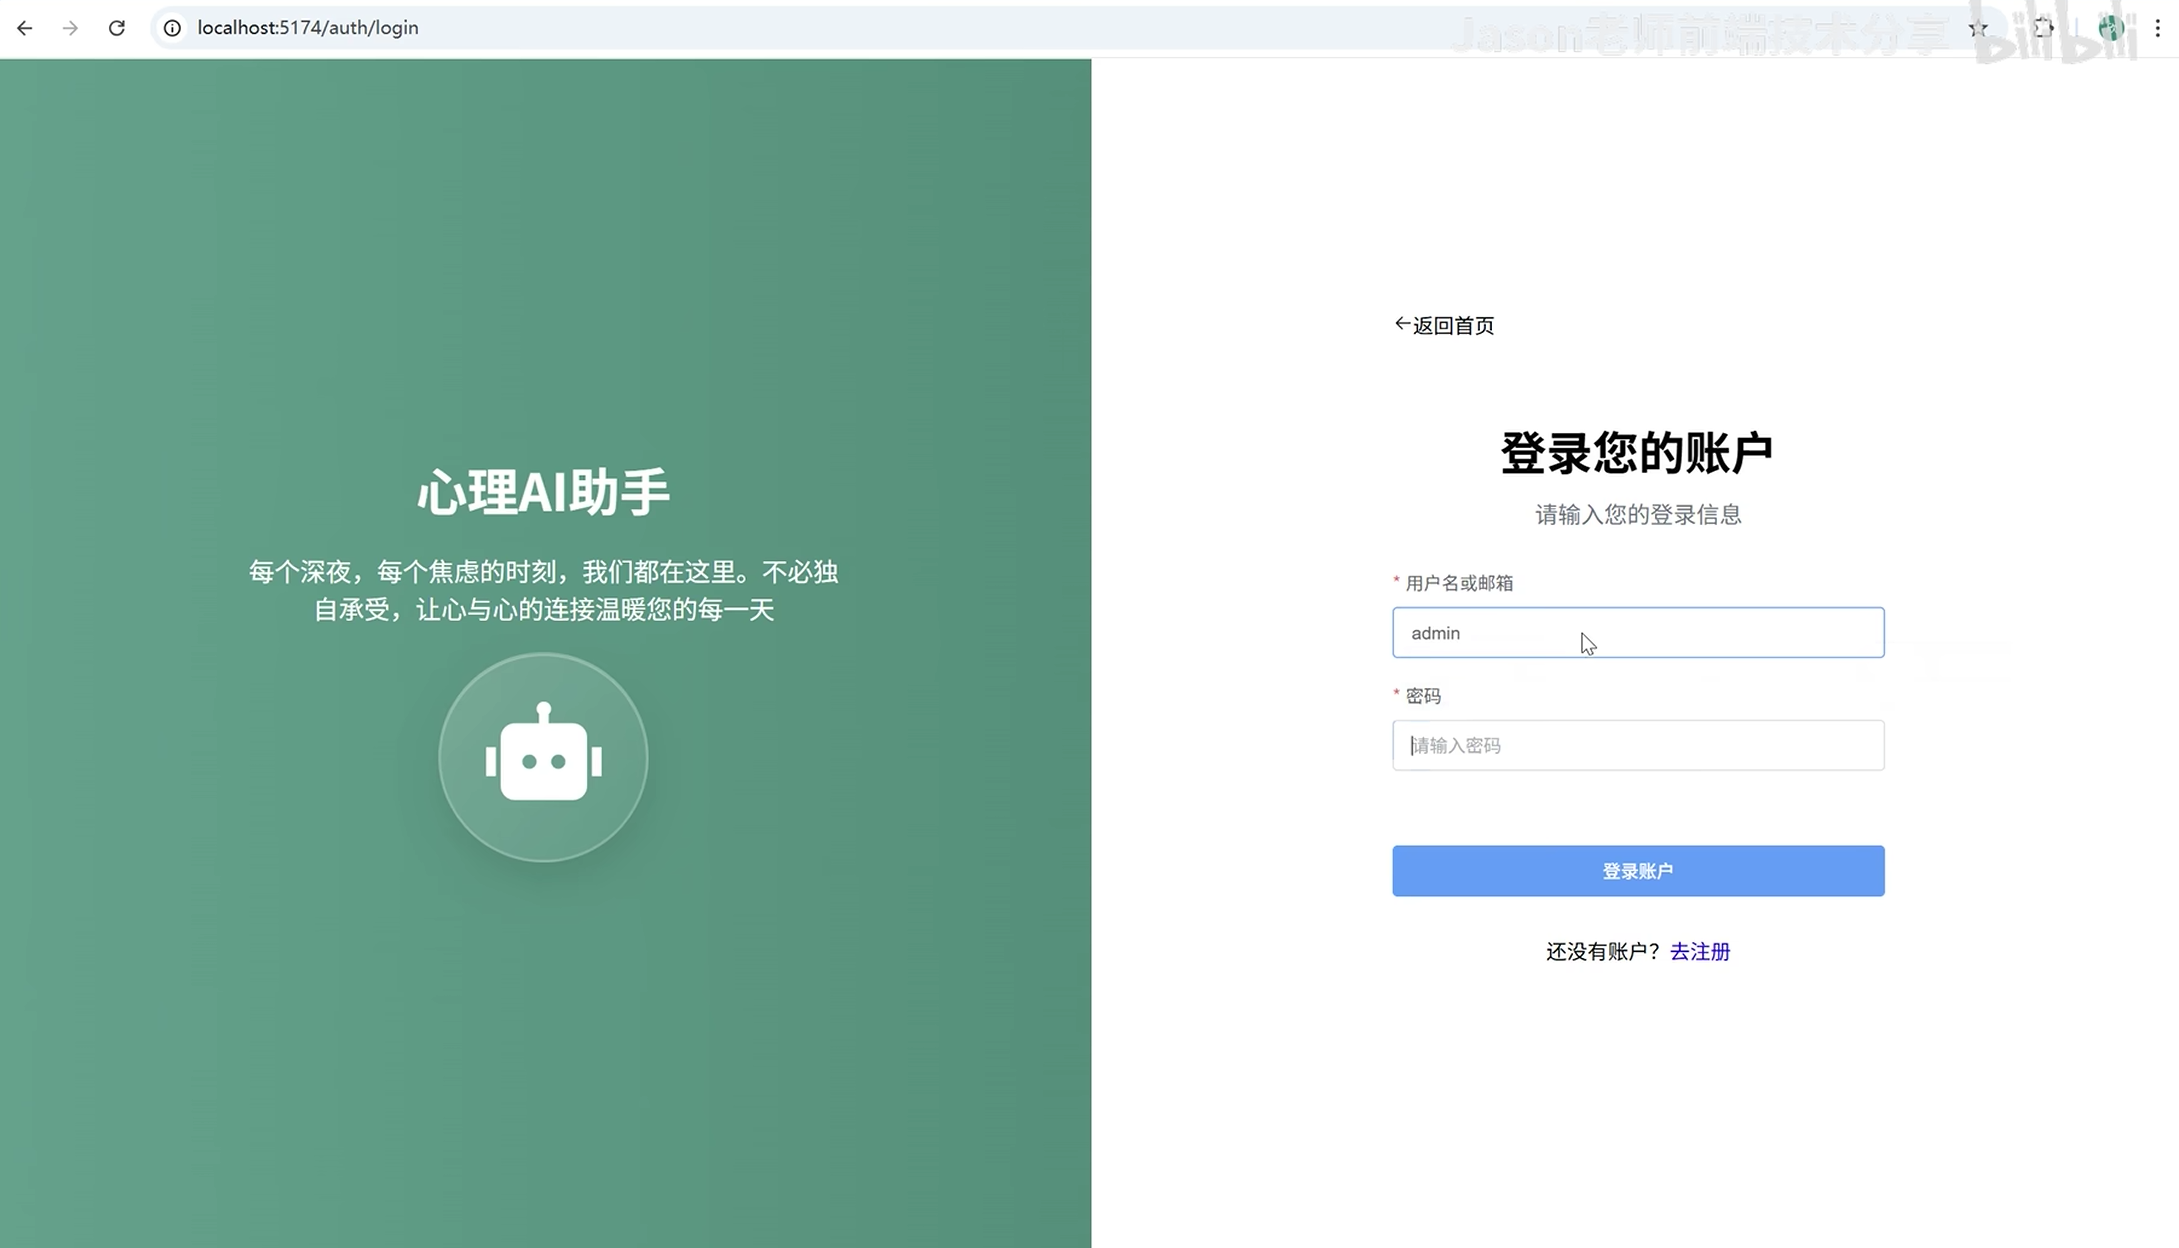
登录页面
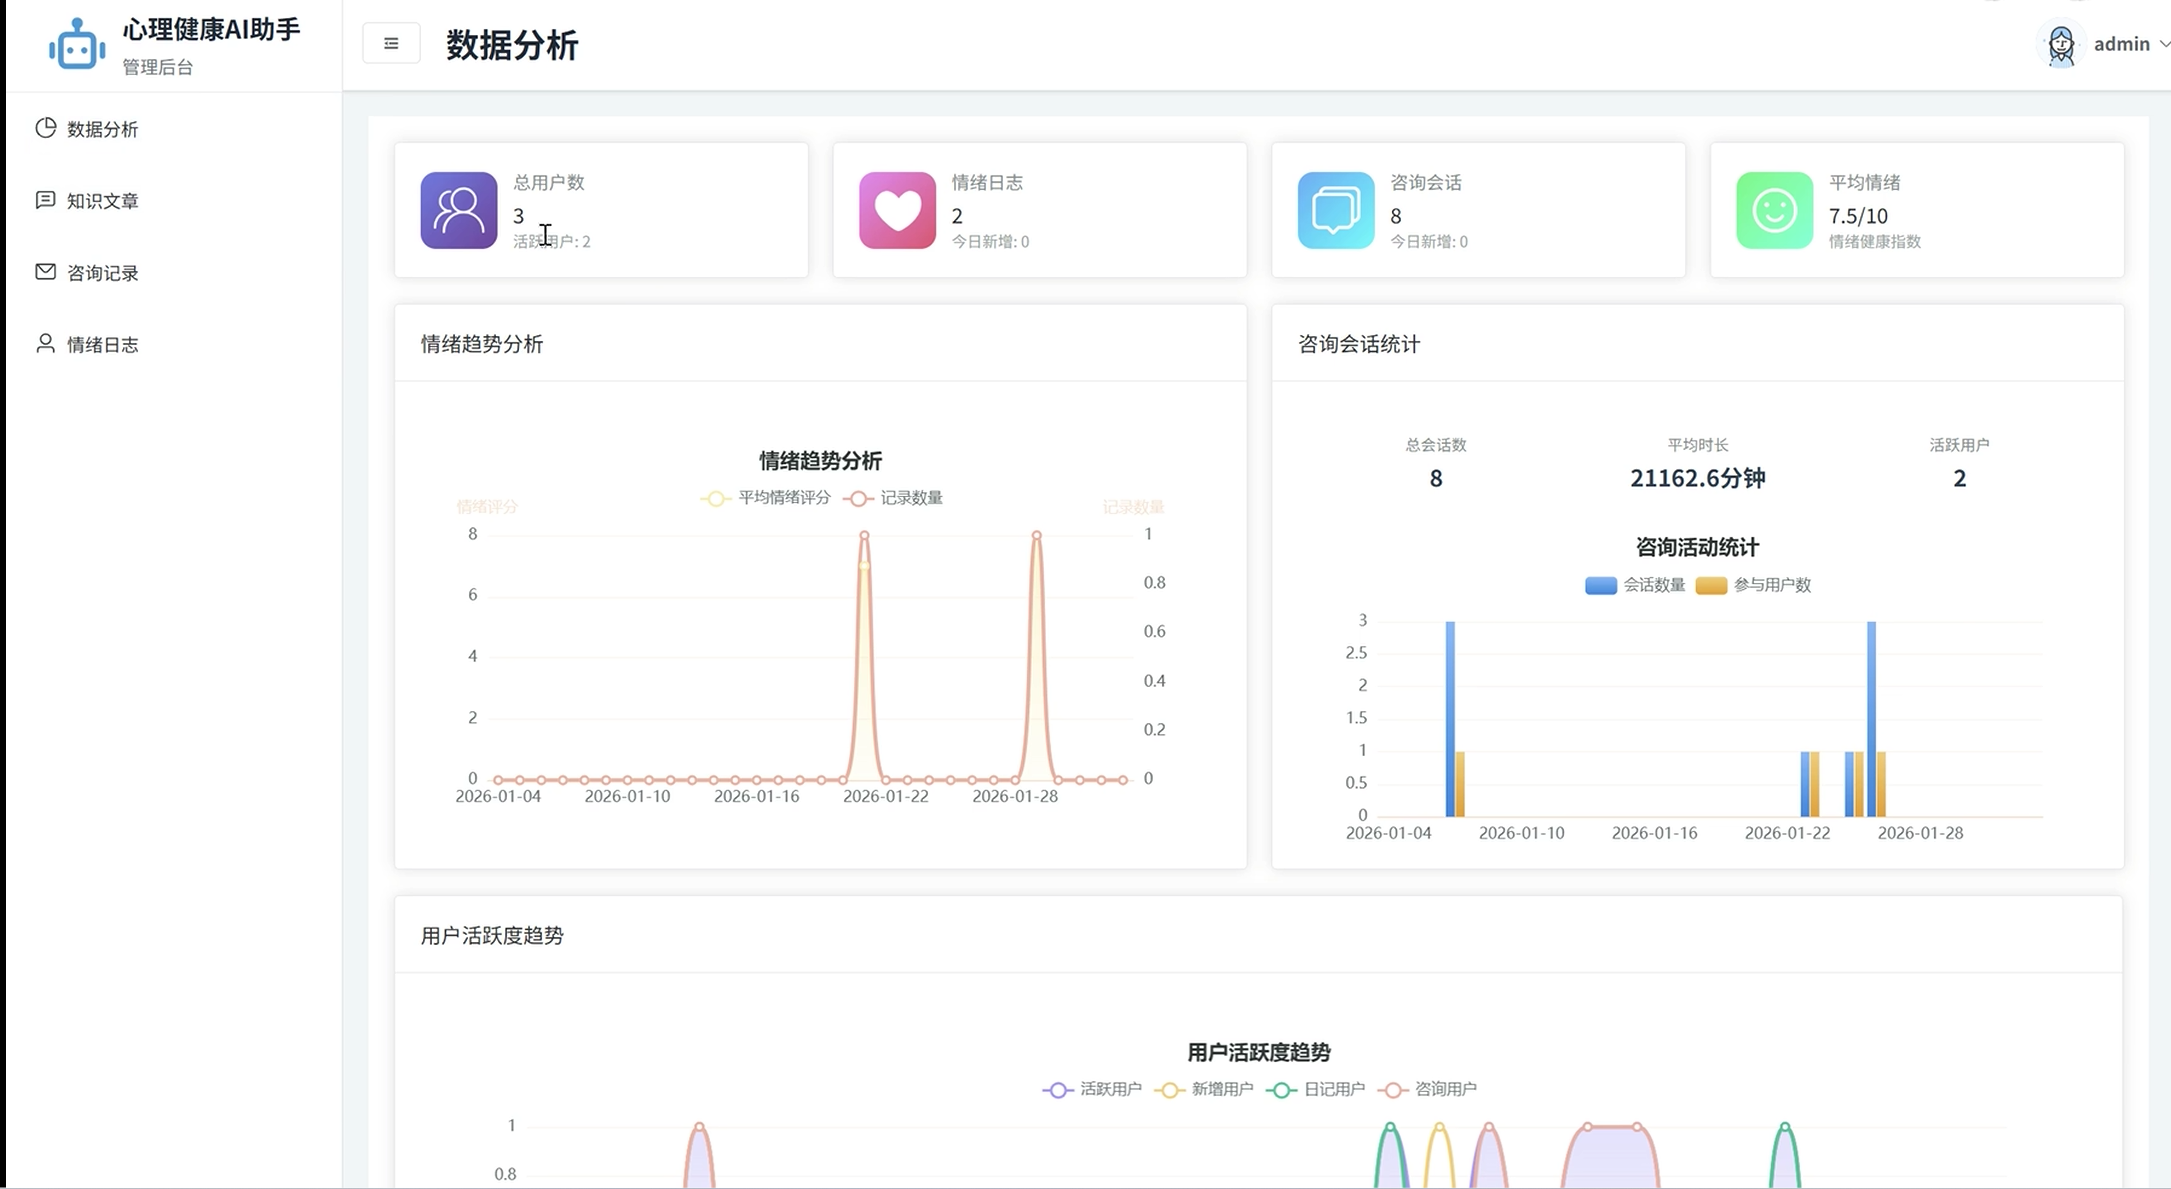
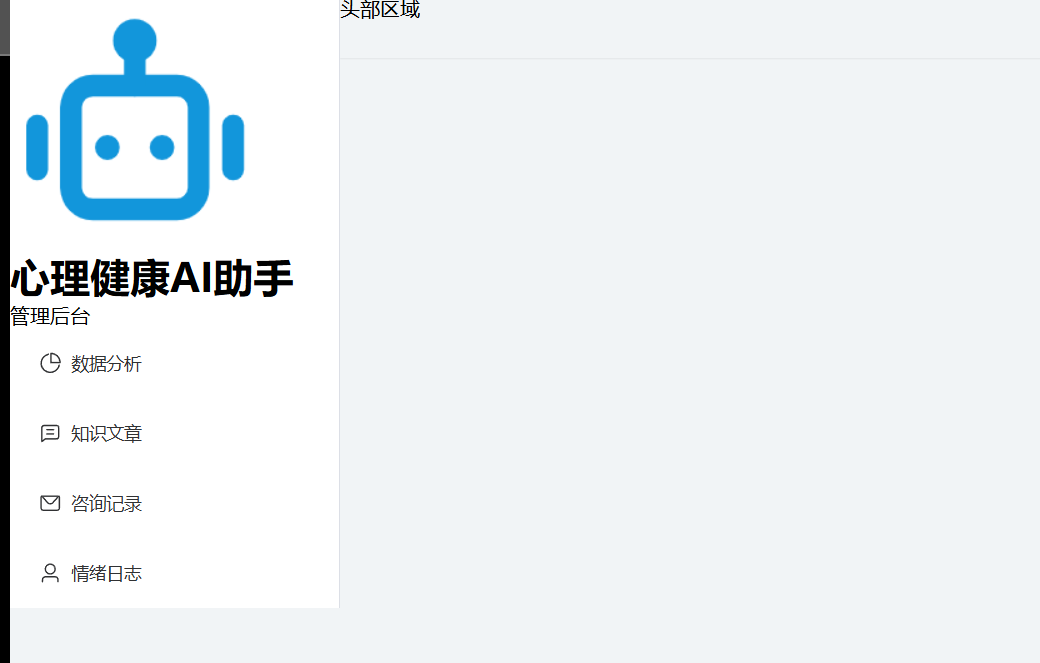
后台区域
有项目前端和后端,暂时不暂时上去
后台区域会随着点击进行跳转,所以需要用的vue router插件,
https://router.vuejs.org/zh/installation.html
npm install vue-router@4
1.1现在需要配置路由
首先在src下面创建一个router文件,随后创建一个index.js文件
引入vue-router
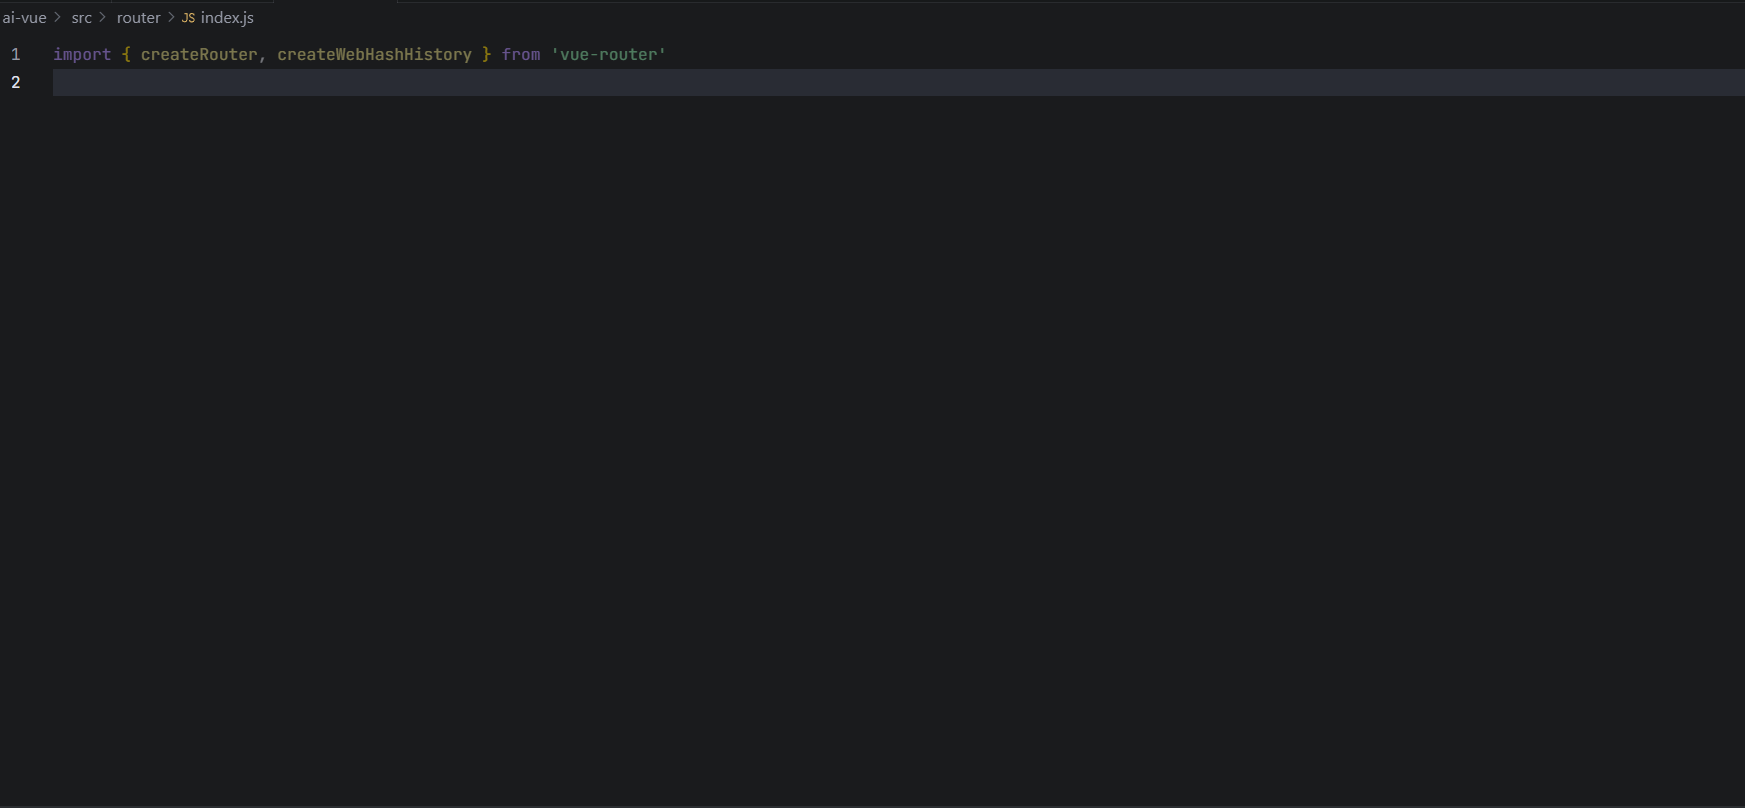
解释一下:hash模式就是在url里面有#这个东西,history没有
import { createRouter, createWebHashHistory } from 'vue-router'
//createRouter创建实例
// createWebHashHistory创建hash模式的路由, createWebHistory创建hash模式路由
import { createRouter, createWebHistory } from 'vue-router'
import BackendLayout from '@/components/BackendLayout.vue'

const backendRoutes = [
    {
        path: '/backend',
        component: BackendLayout,
        children: [

        ]
    }
]

//创建router实例
const router = createRouter({
    history: createWebHistory(),
    routes: backendRoutes
})

export default router
在mian.js引入随后挂载进来
import { createApp } from 'vue'
import './style.css'
import App from './App.vue'
import ElementPlus from 'element-plus'
import 'element-plus/dist/index.css'
import router from './router'

createApp(App).use(ElementPlus).use(router).mount('#app')
做个小总结:
1.创建vue框架
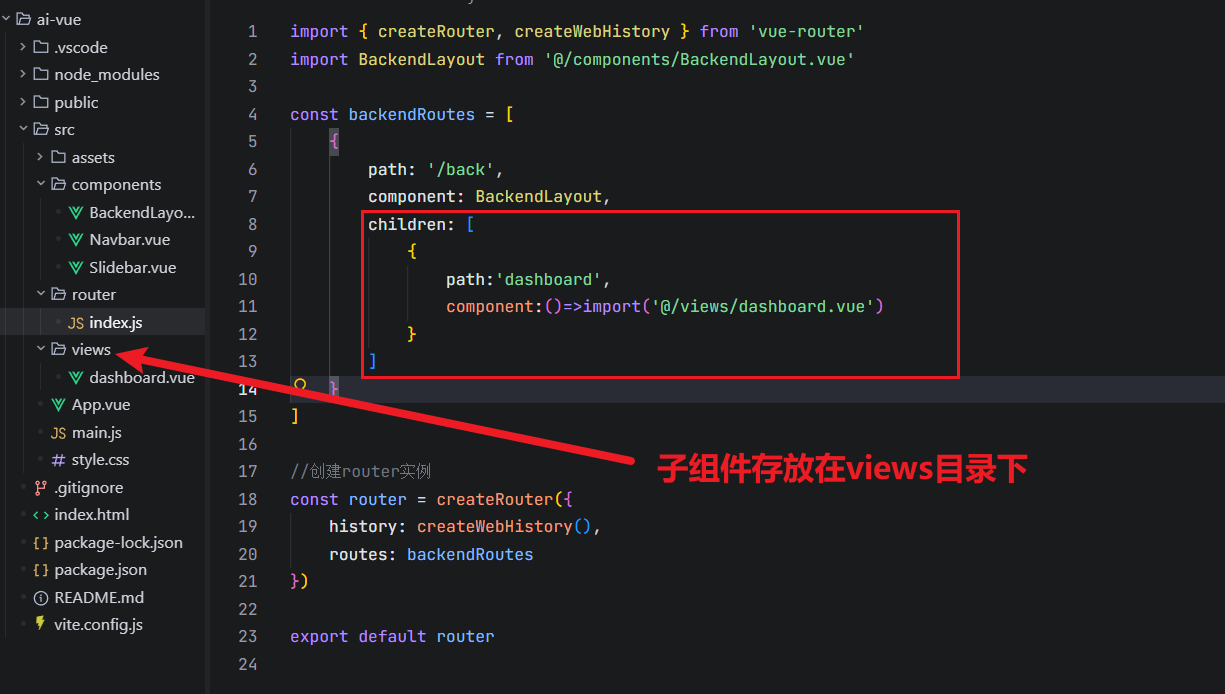
2.根据结构在src/router文件夹里面创建好路由
(路由包含url的名称以及对应要展示的组件)
3.因为router是一个脚本,所以需要你在main.js里面使用该脚本,引入随后使用
4.在compoments里面创建组件,该组件需要在APP组件里面使用
注意事项:
因为要兼容vue2,所以组件里面仍然用一个根元素
要使用@的情况下,得先在config里面配置好
使用sass样式:
npm i sass@1.97.2
二:开始搭建大致框架
2.1创建基础布局
首先查看组件库,element-plus查看是否有符合的结构
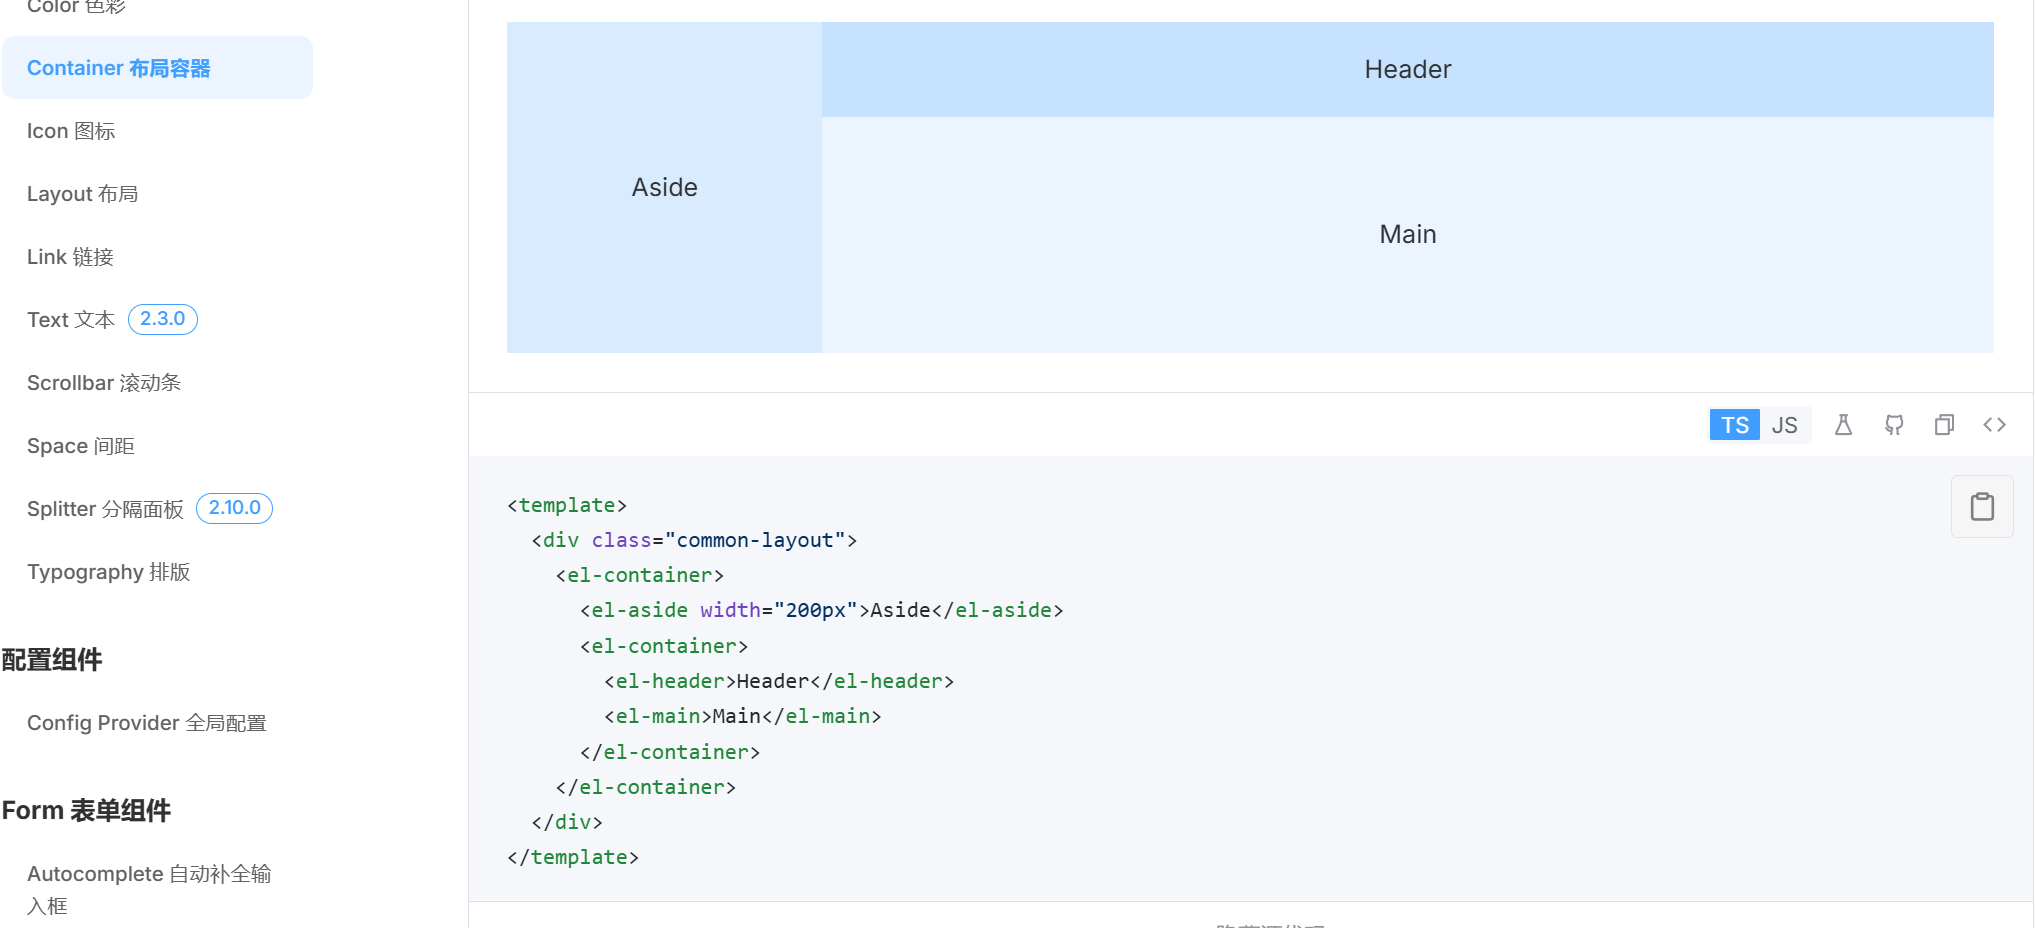
复制代码到后台组件,BackendLayout.vue中设置好后台所需要的框架结构
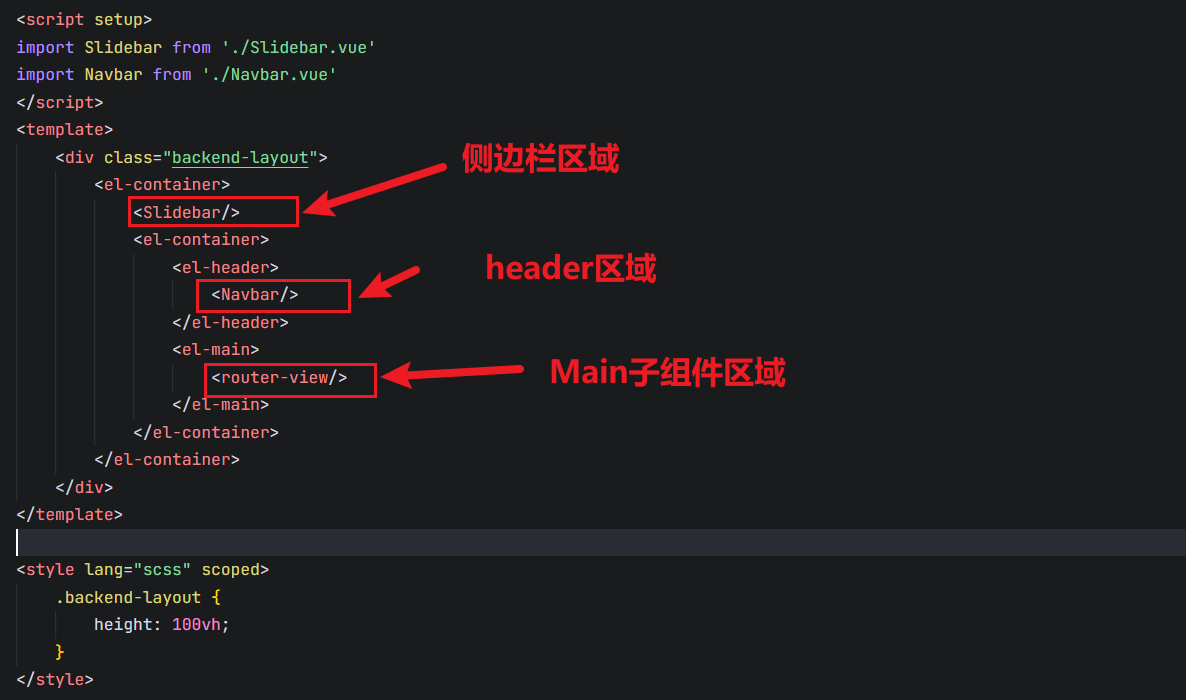
这里设置了一个子组件的出口,router-view所以需要在路由里面设置一个子组件
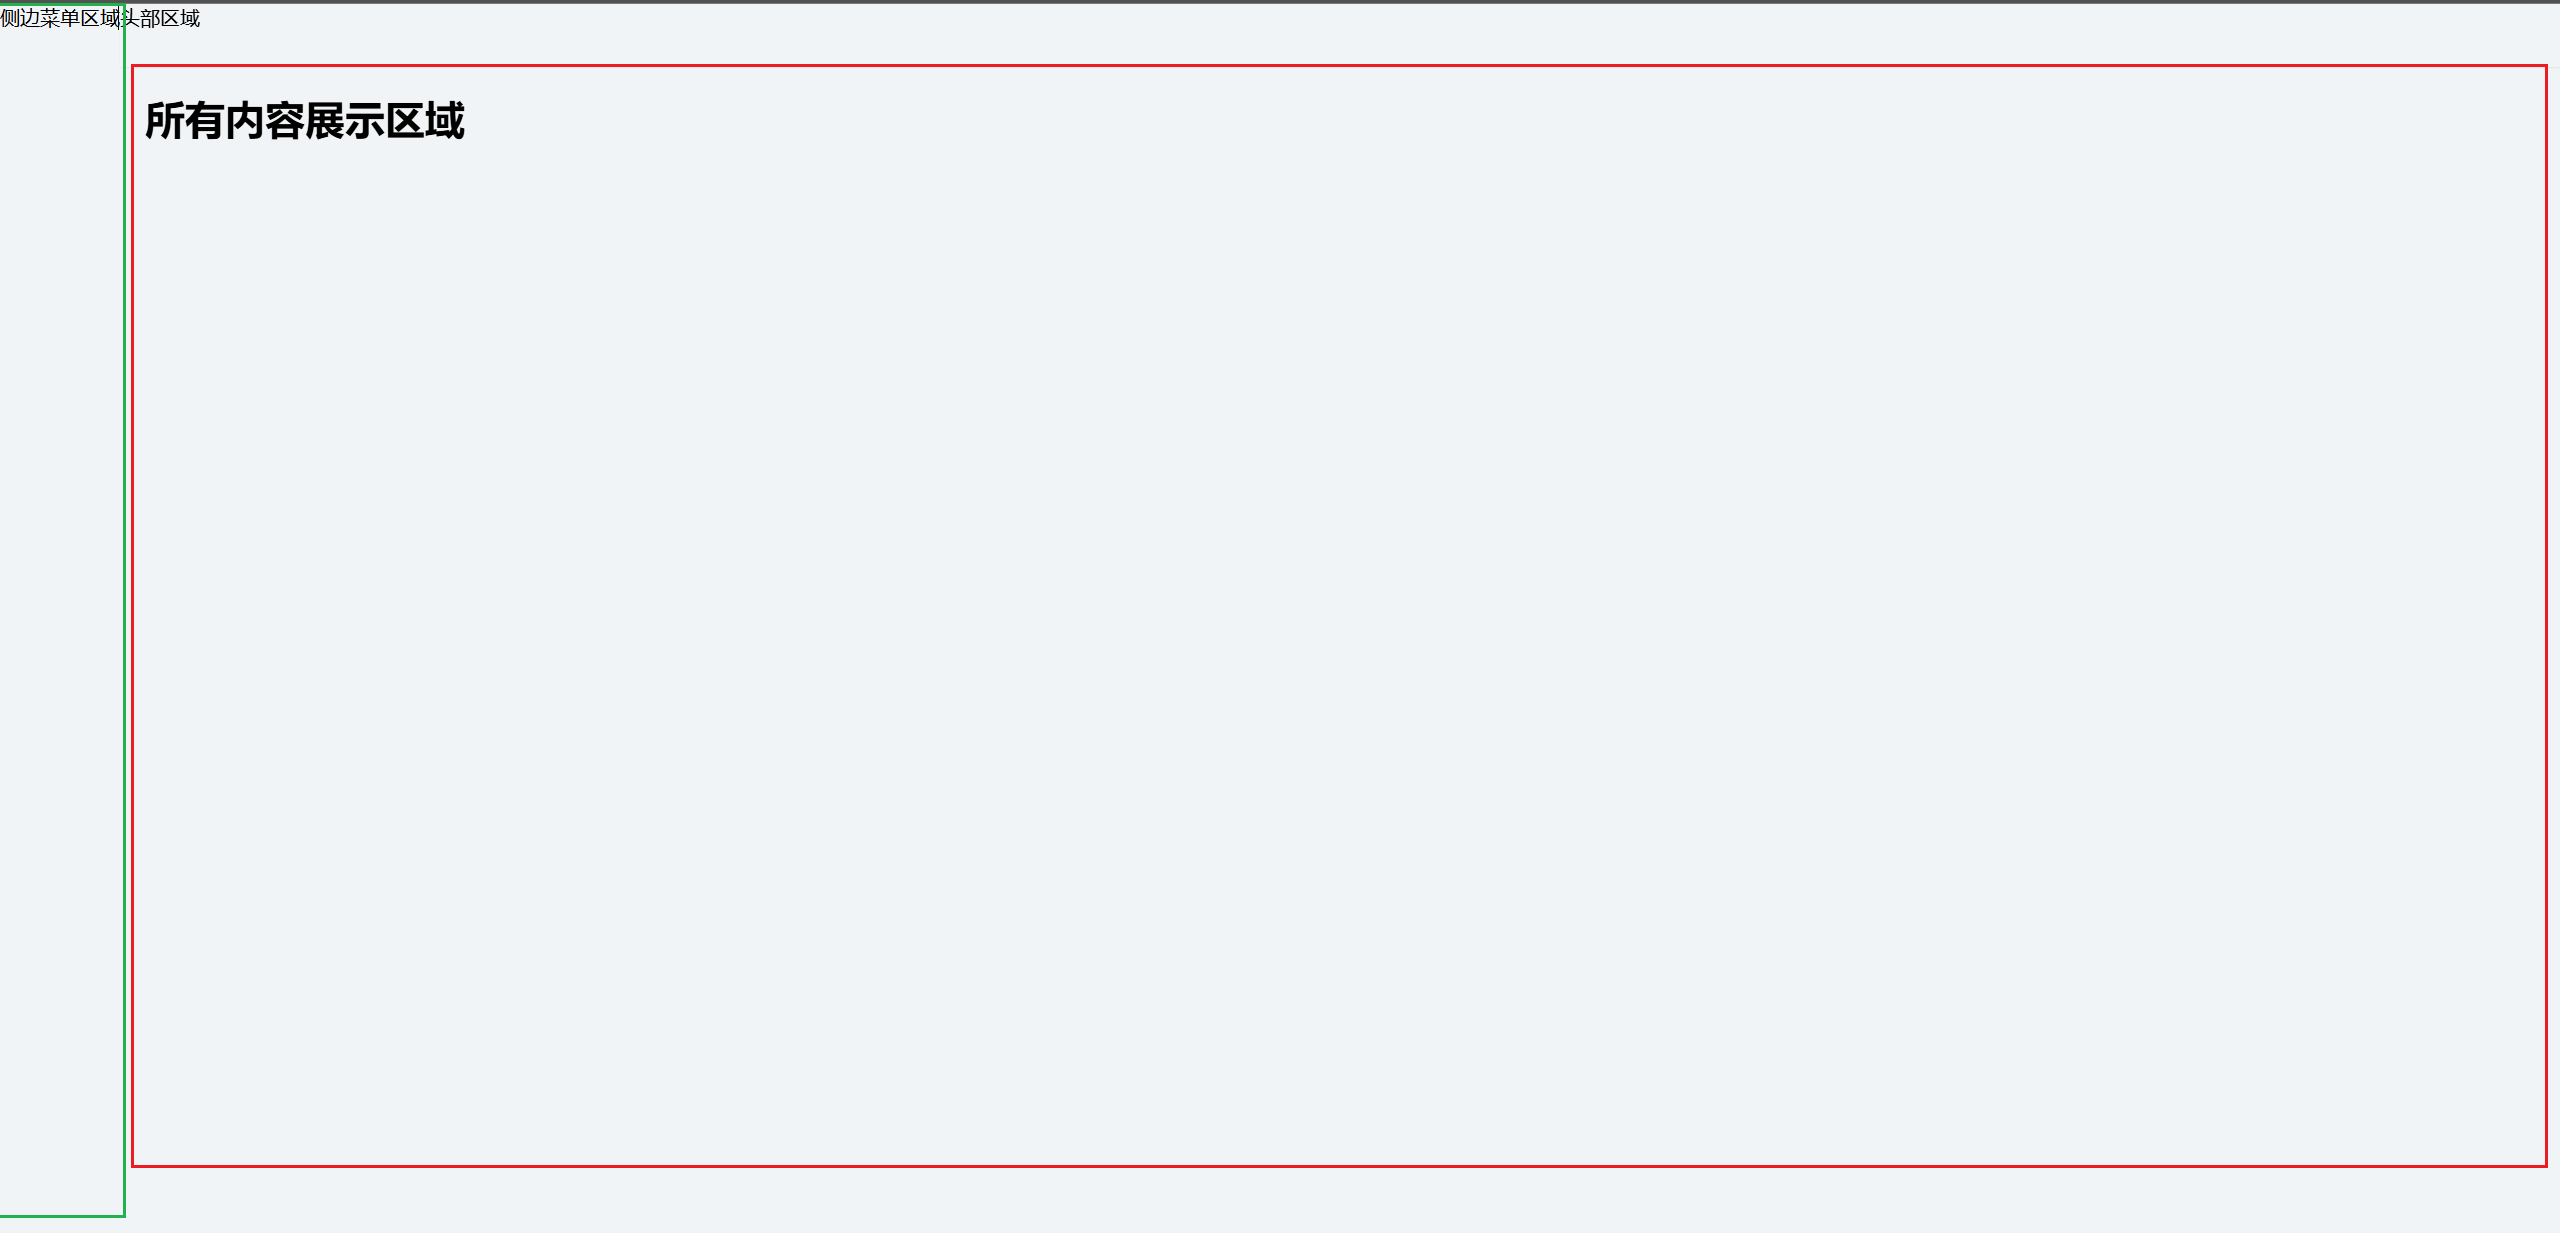
2.2优化基础布局-Aside区域
2.2.1 首先查找素材库

为什么要加入<el-aside>:
- <el-aside> 是 Element Plus 提供的布局组件之一,与 <el-container> 、 <el-header> 、 <el-main> 、 <el-footer> 一起构成完整的布局系统
- 这些组件设计为相互配合使用,形成响应式的页面布局结构
- <el-aside> 提供了默认的侧边栏样式和布局行为
- 与 <el-container> 配合使用时,会自动处理宽度、间距等布局细节
- 确保侧边栏在不同屏幕尺寸下的正确显示
- 使用 <el-aside> 使代码结构更清晰,语义更明确
- 明确区分侧边栏区域和主内容区域,提高代码可读性和可维护性
- 与其他布局组件(如 <el-header> 、 <el-main> )保持风格一致
- 遵循 Element Plus 的设计规范,确保整体布局协调
如果不加会怎么样:
- 没有 <el-aside> 的默认样式,需要自己设置宽度、间距等
- 可能需要额外的 CSS 来确保布局正确
- 布局结构不完整 :
- 缺少布局组件的语义化结构
- 与其他布局组件的配合可能不够协调
- 响应式处理 :
- 需要自己处理响应式布局逻辑,而 <el-aside> 会与其他布局组件自动配合
2.2.2 侧边栏路由设计
bc:点击每个侧边栏,都会跳转到相应的组件界面
这时候就需要对content创建4个子组件以供点击的时候跳转到对应组件
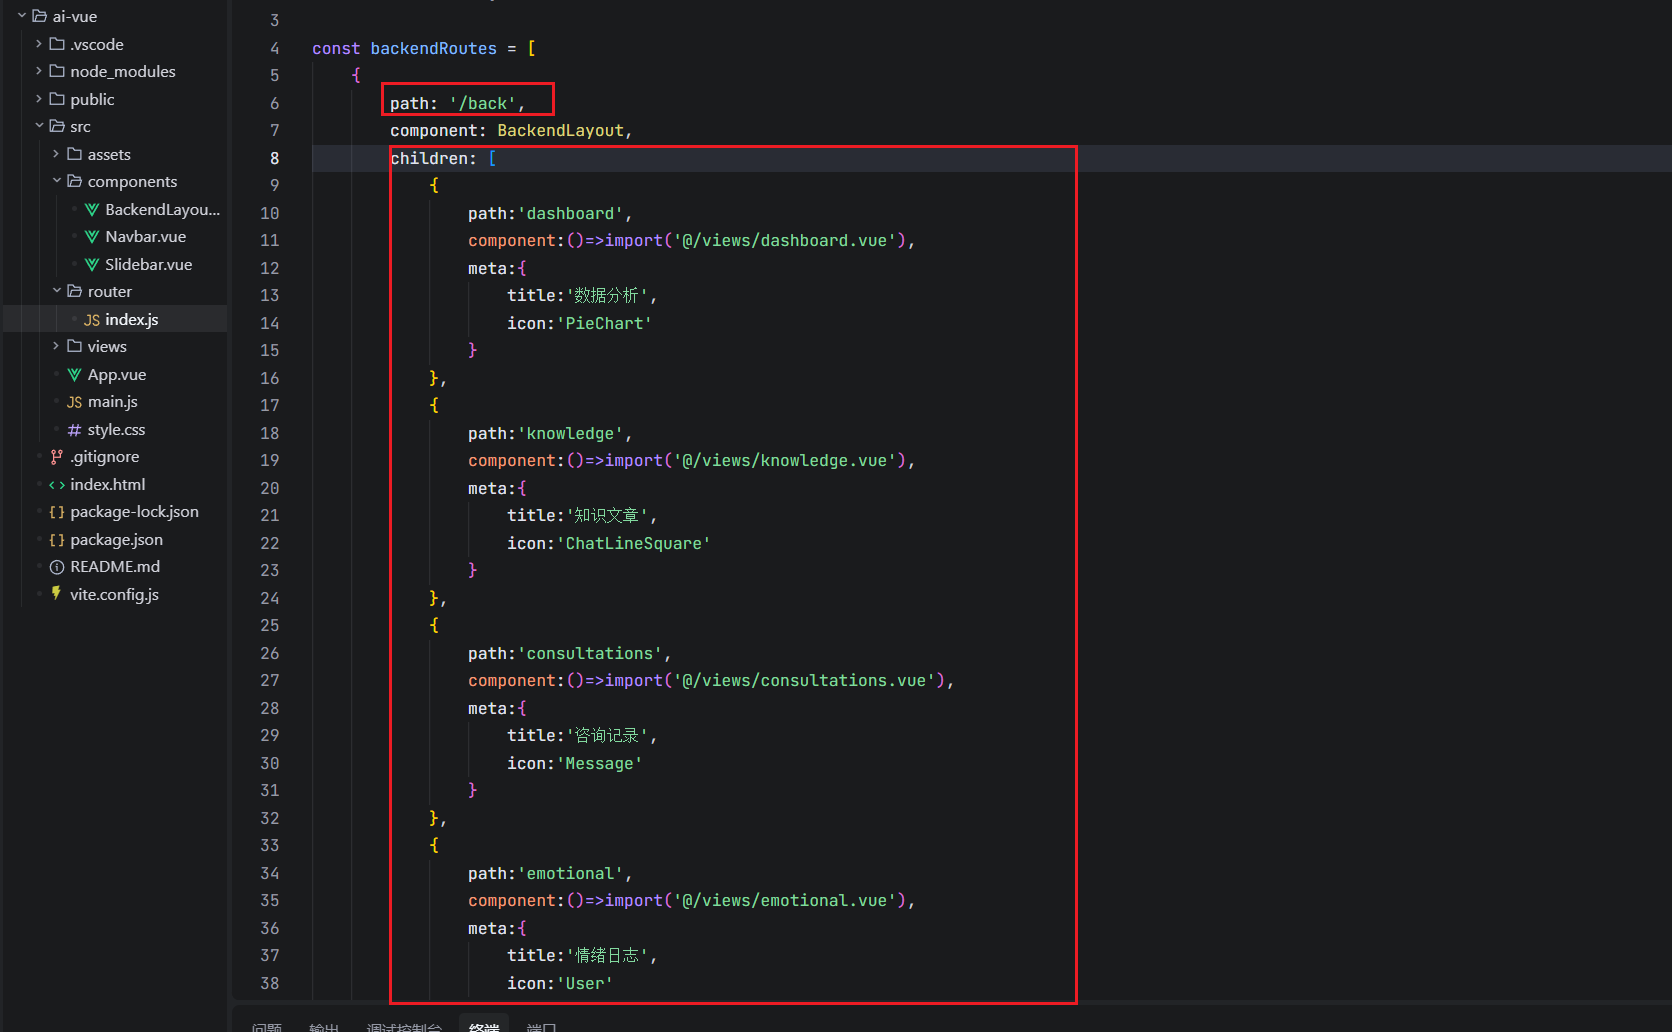
这里你可能会想,为什么要在/back这里添加子组件
很简单,这就是后台页面里面的区域跳转,叫做嵌套路由
只需要理解嵌套在那个路由里面就行,little case
import { createRouter, createWebHistory } from 'vue-router'
import BackendLayout from '@/components/BackendLayout.vue'

const backendRoutes = [
    {
        path: '/back',
        component: BackendLayout,
        children: [
            {
                path:'dashboard',
                component:()=>import('@/views/dashboard.vue'),
                meta:{
                    title:'数据分析'
                }
            },
            {
                path:'dashboard',
                component:()=>import('@/views/dashboard.vue'),
                meta:{
                    title:'数据分析'
                }
            },
            {
                path:'dashboard',
                component:()=>import('@/views/dashboard.vue'),
                meta:{
                    title:'数据分析'
                }
            },
            {
                path:'dashboard',
                component:()=>import('@/views/dashboard.vue'),
                meta:{
                    title:'数据分析'
                }
            }
        ]
    }
]

//创建router实例
const router = createRouter({
    history: createWebHistory(),
    routes: backendRoutes
})

export default router
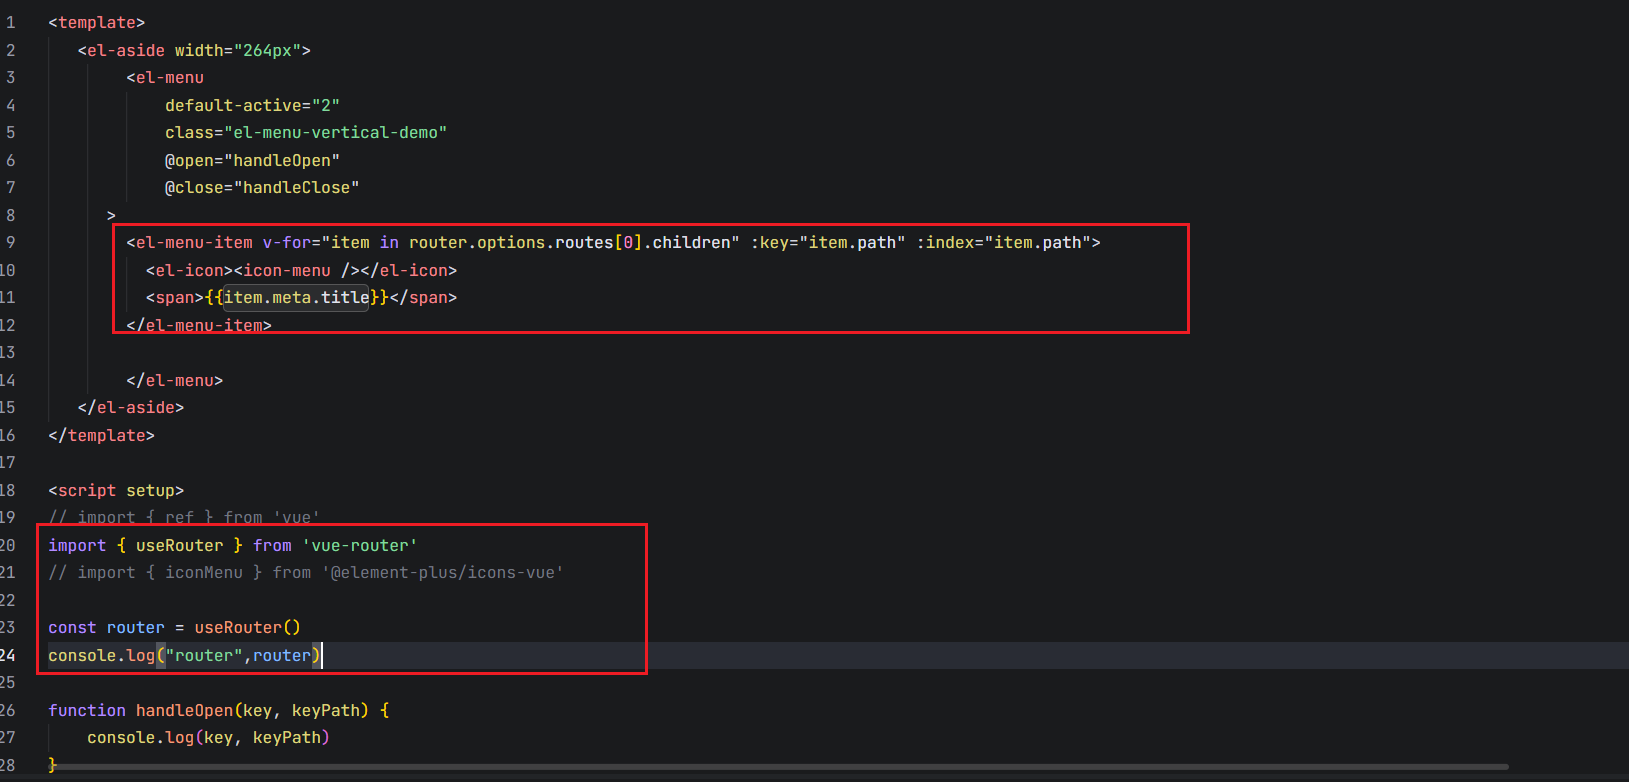
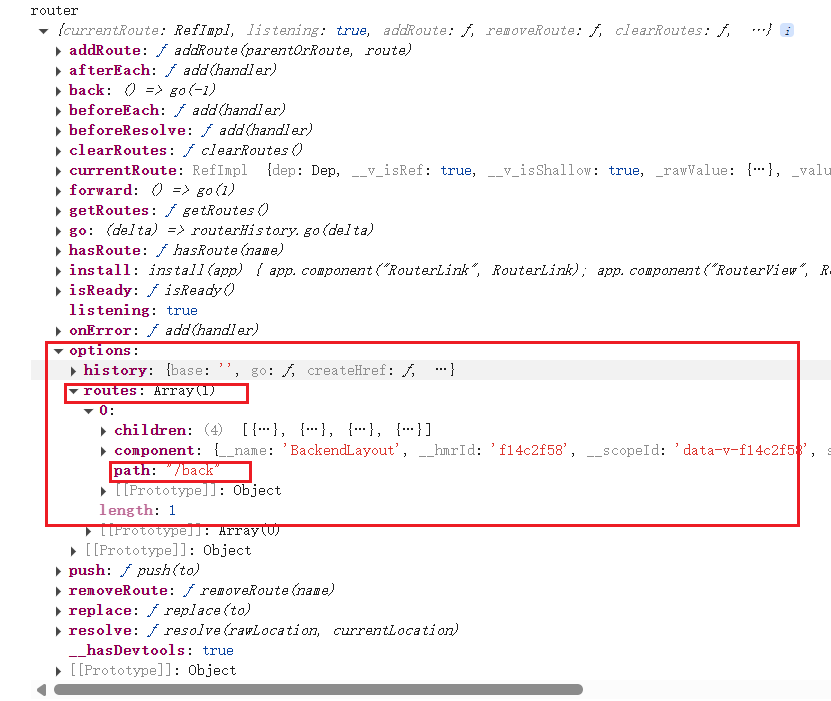
ok,现在我们在路由上定义好了所需要的meta。那么怎么拿到这个我们自己定义的数据呢?
在vue-router里面的useRouter里面可以拿到数据
npm install @element-plus/icons-vue
先引入图标库
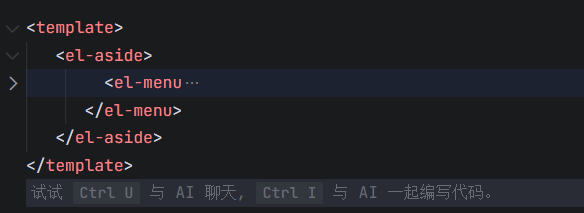
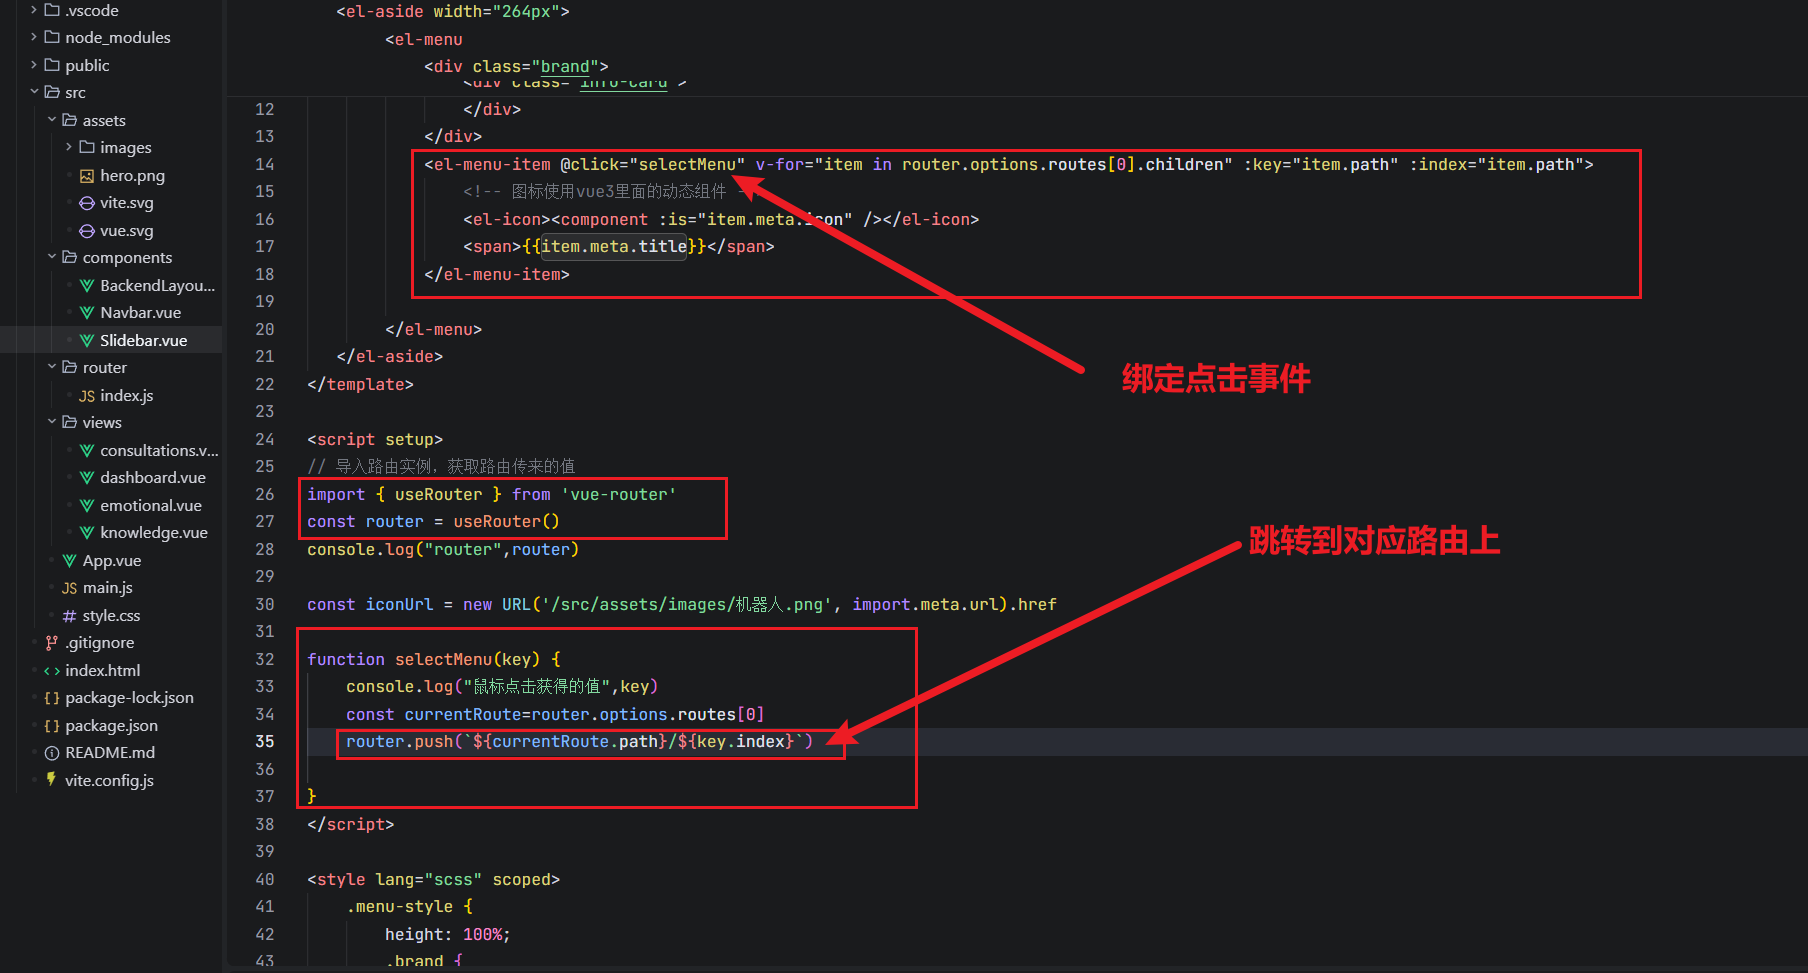
<el-menu-item v-for="item in router.options.routes[0].children" :key="item.path" :index="item.path">
            <!-- 图标使用vue3里面的动态组件 -->
          <el-icon><component :is="item.meta.icon" /></el-icon>
          <span>{{item.meta.title}}</span>
        </el-menu-item>
同样的需要注册,main.js
import { createApp } from 'vue'
import './style.css'
import App from './App.vue'
import ElementPlus from 'element-plus'
import 'element-plus/dist/index.css'
import router from './router'
import * as ElementPlusIconsVue from '@element-plus/icons-vue'
const app = createApp(App)
app.use(ElementPlus).use(router).mount('#app')
for (const [key, component] of Object.entries(ElementPlusIconsVue)) {
app.component(key, component)
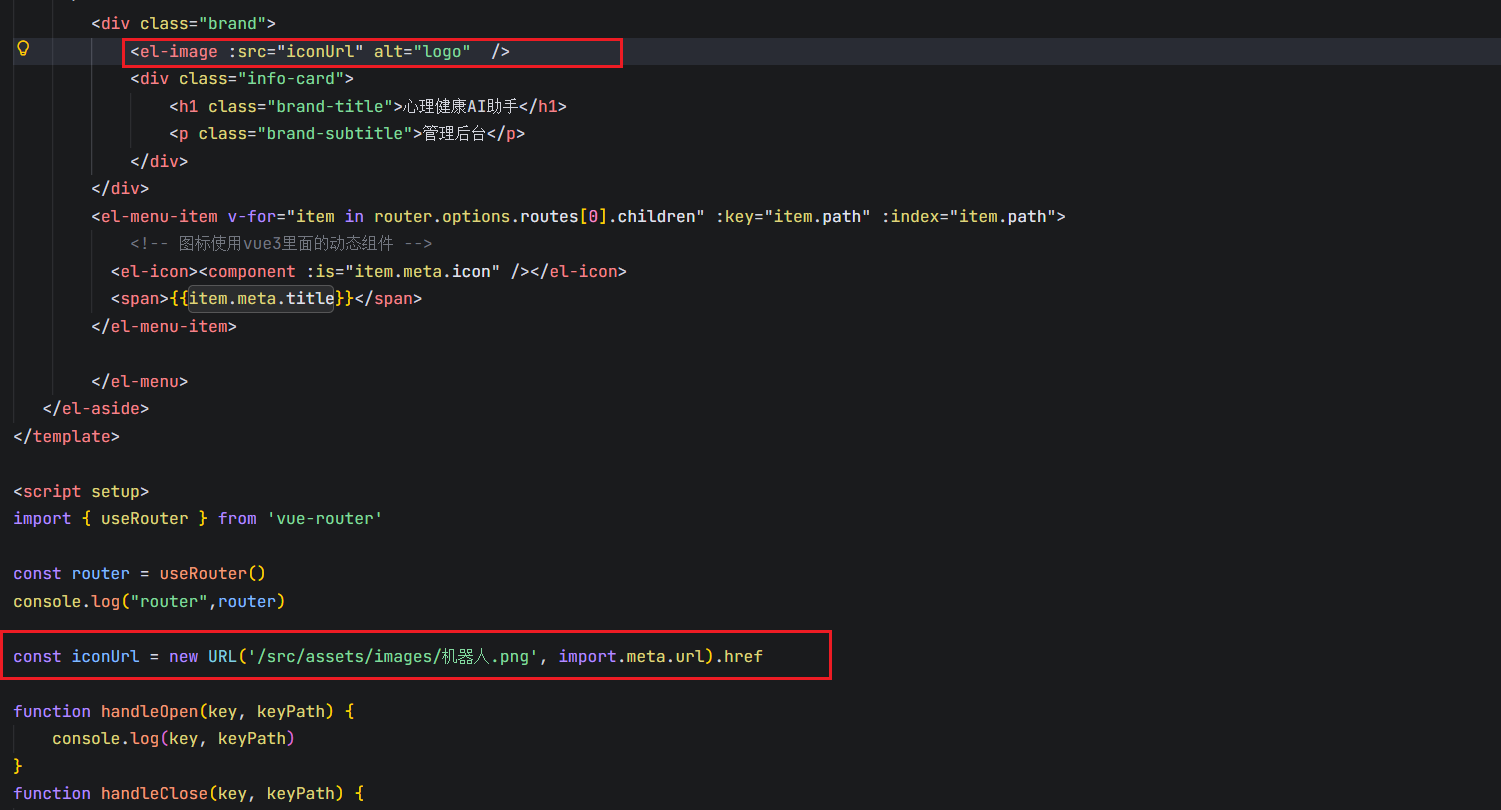
}Vite中如何引入图标呢
为什么要这么引入?
确保在打包的时候打包的路径是没有问题的
他会在内部进行一个特殊处理
更改一下样式
更改样式思路:
1.设置100%高度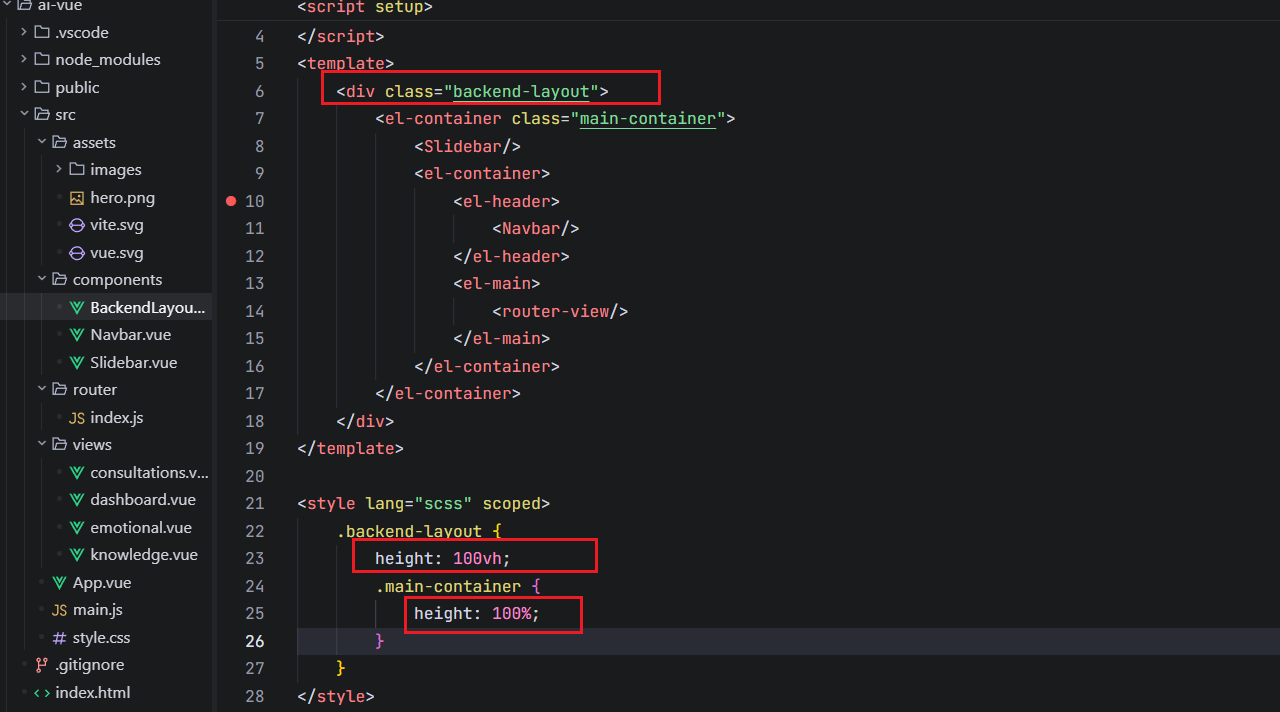
2. 设置图片大小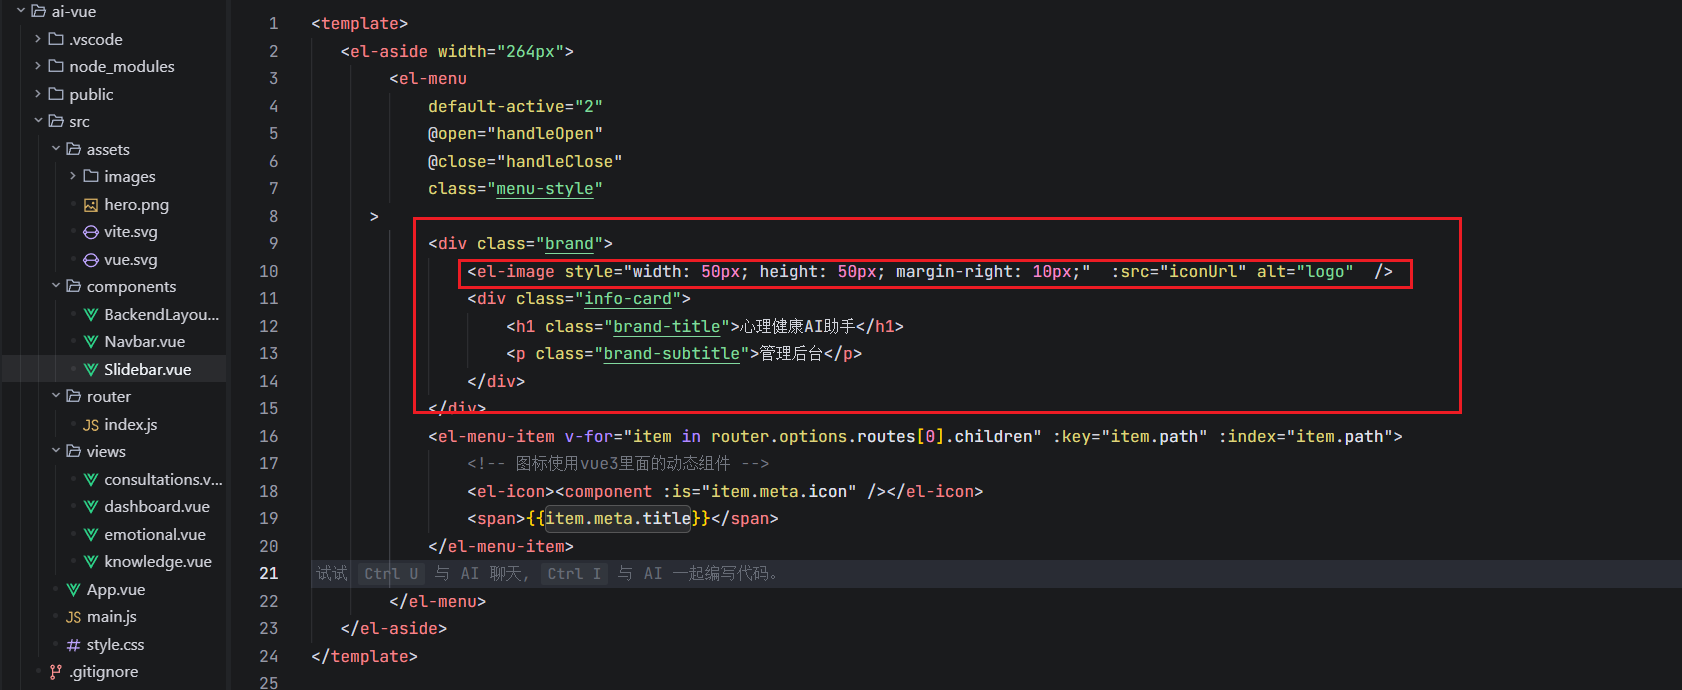
3.一些其他样式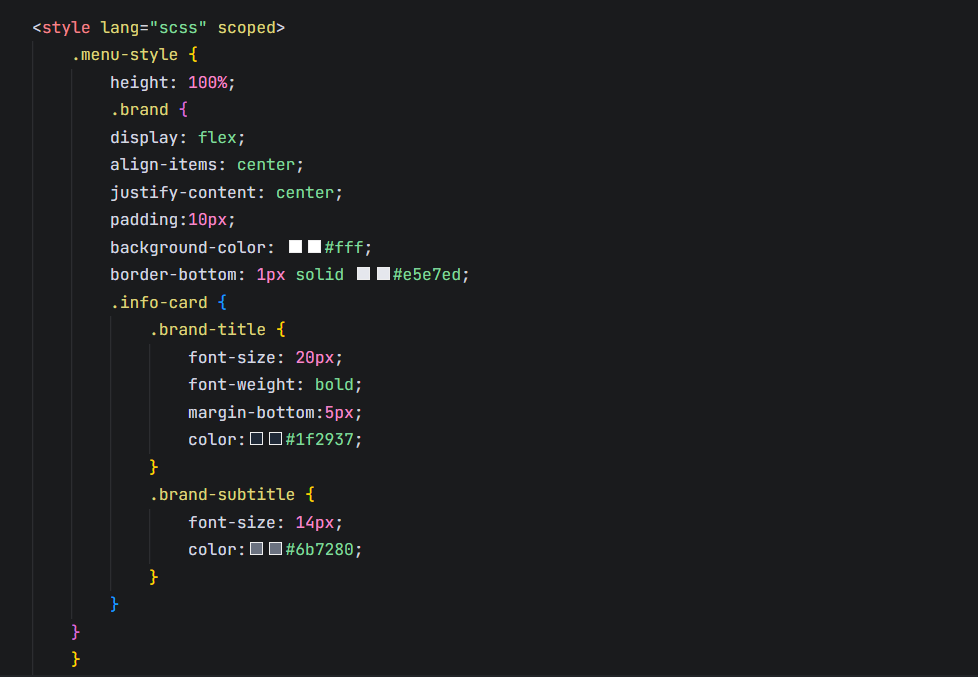

2.2.3 添加点击事件跳转路由
创建路由信息
首先你得导入vue-router导入路由实例
路由实例会给你当前的路由信息
import { useRouter } from 'vue-router'
const router = useRouter()
console.log("router",router)
当前的路由数据
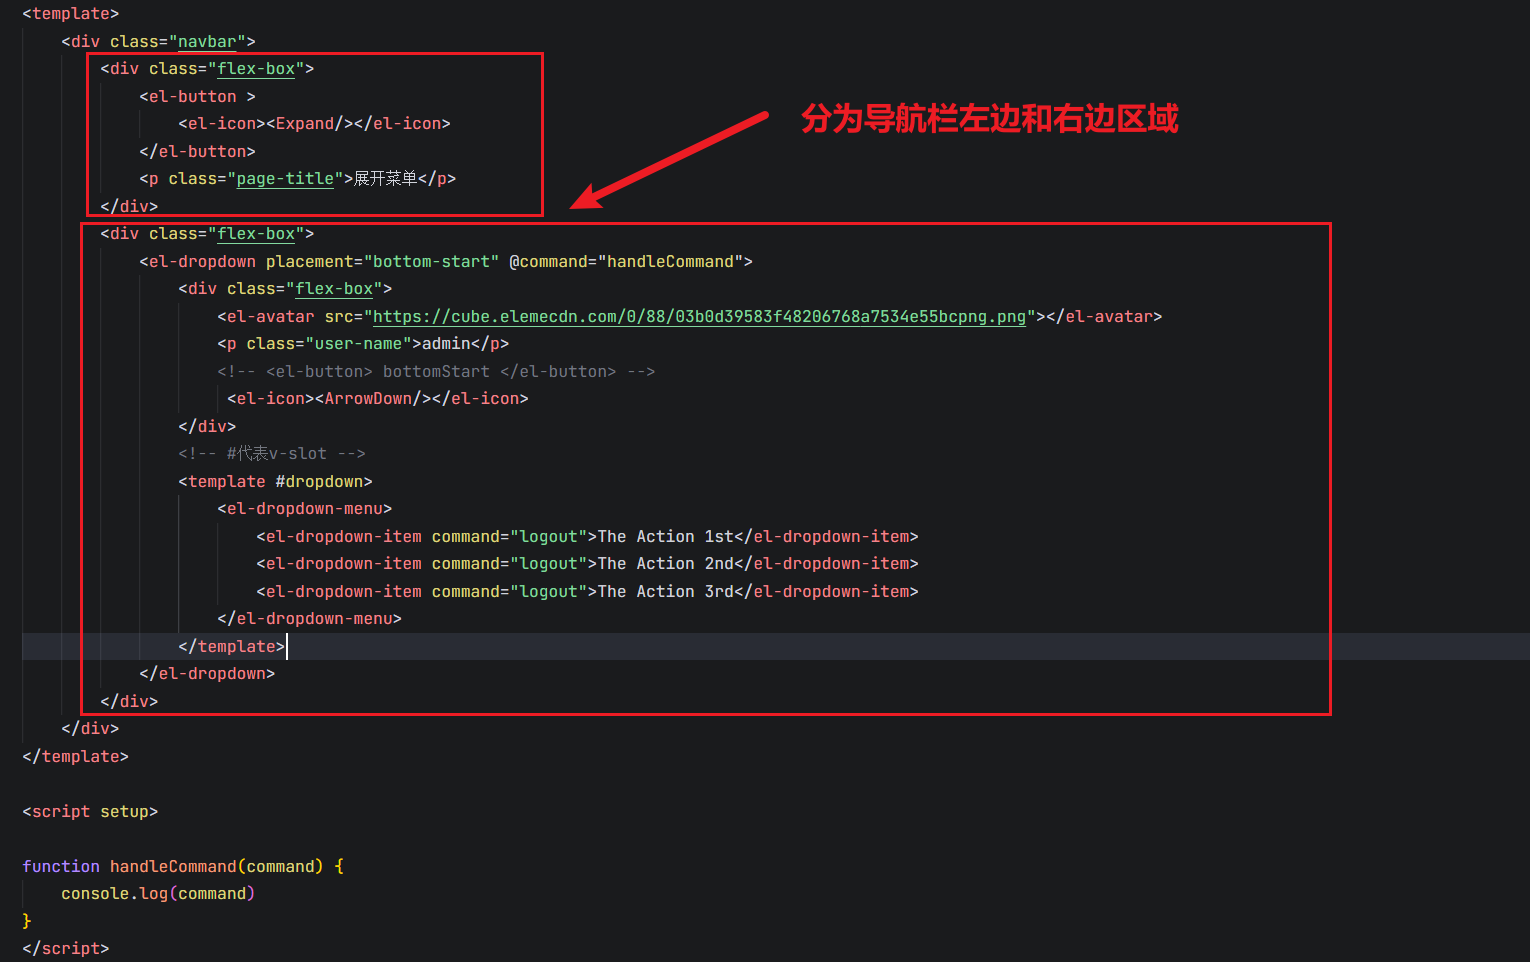
2.3 优化基础布局-Header区域
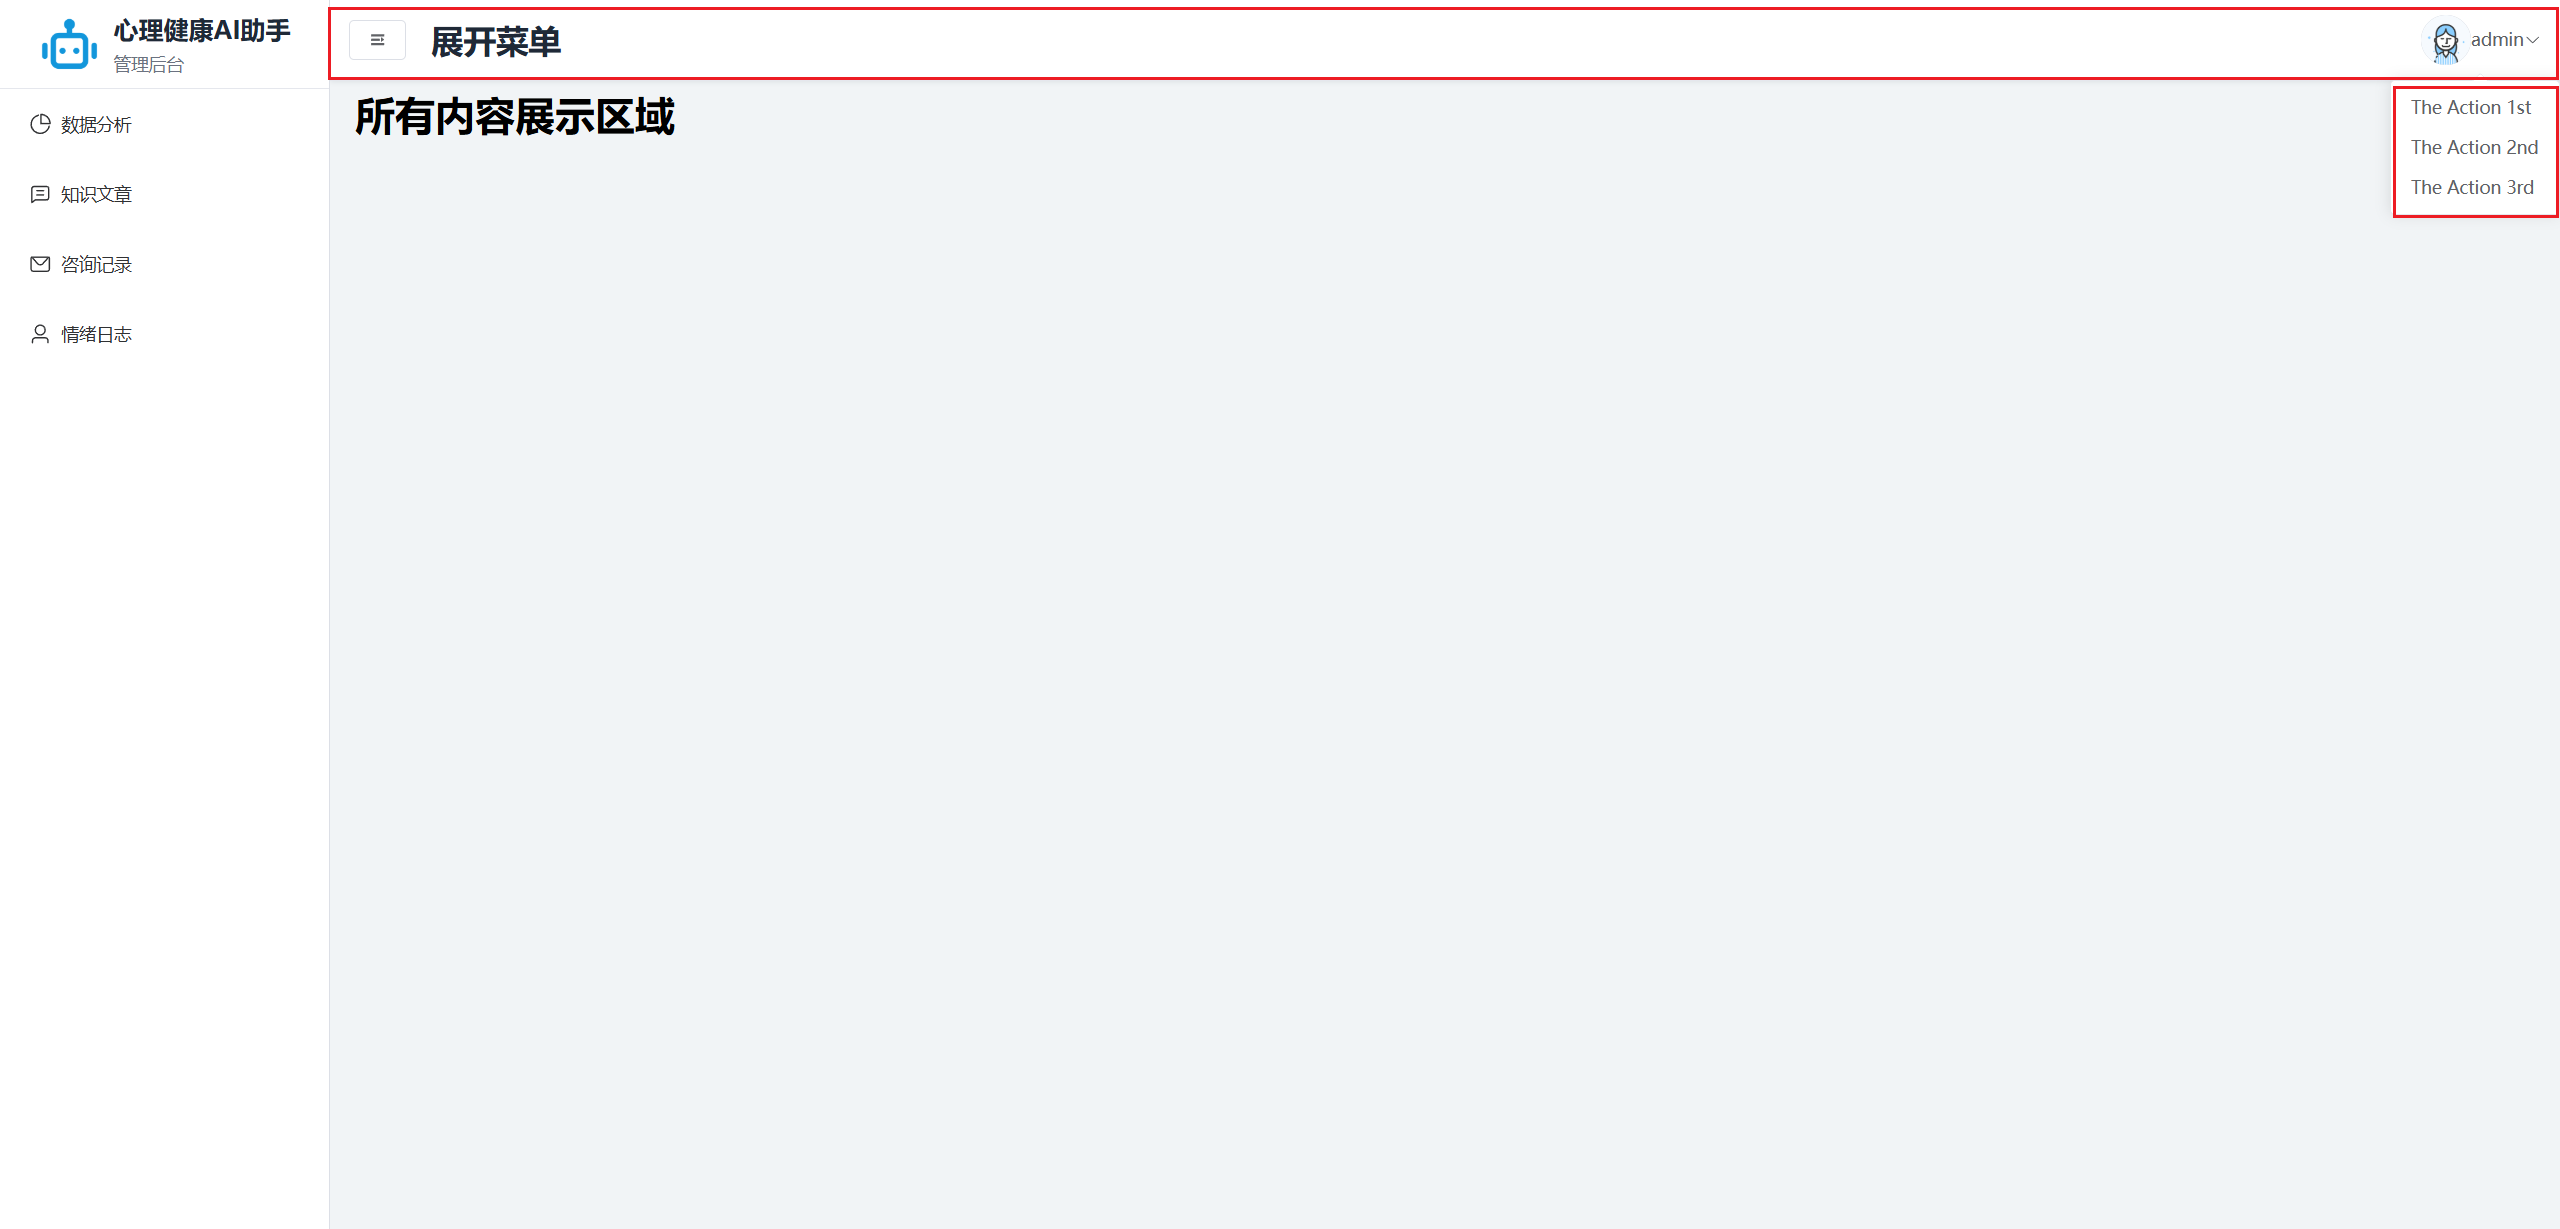
2.4 主体内容设置-Main区域
首先分析页面结构
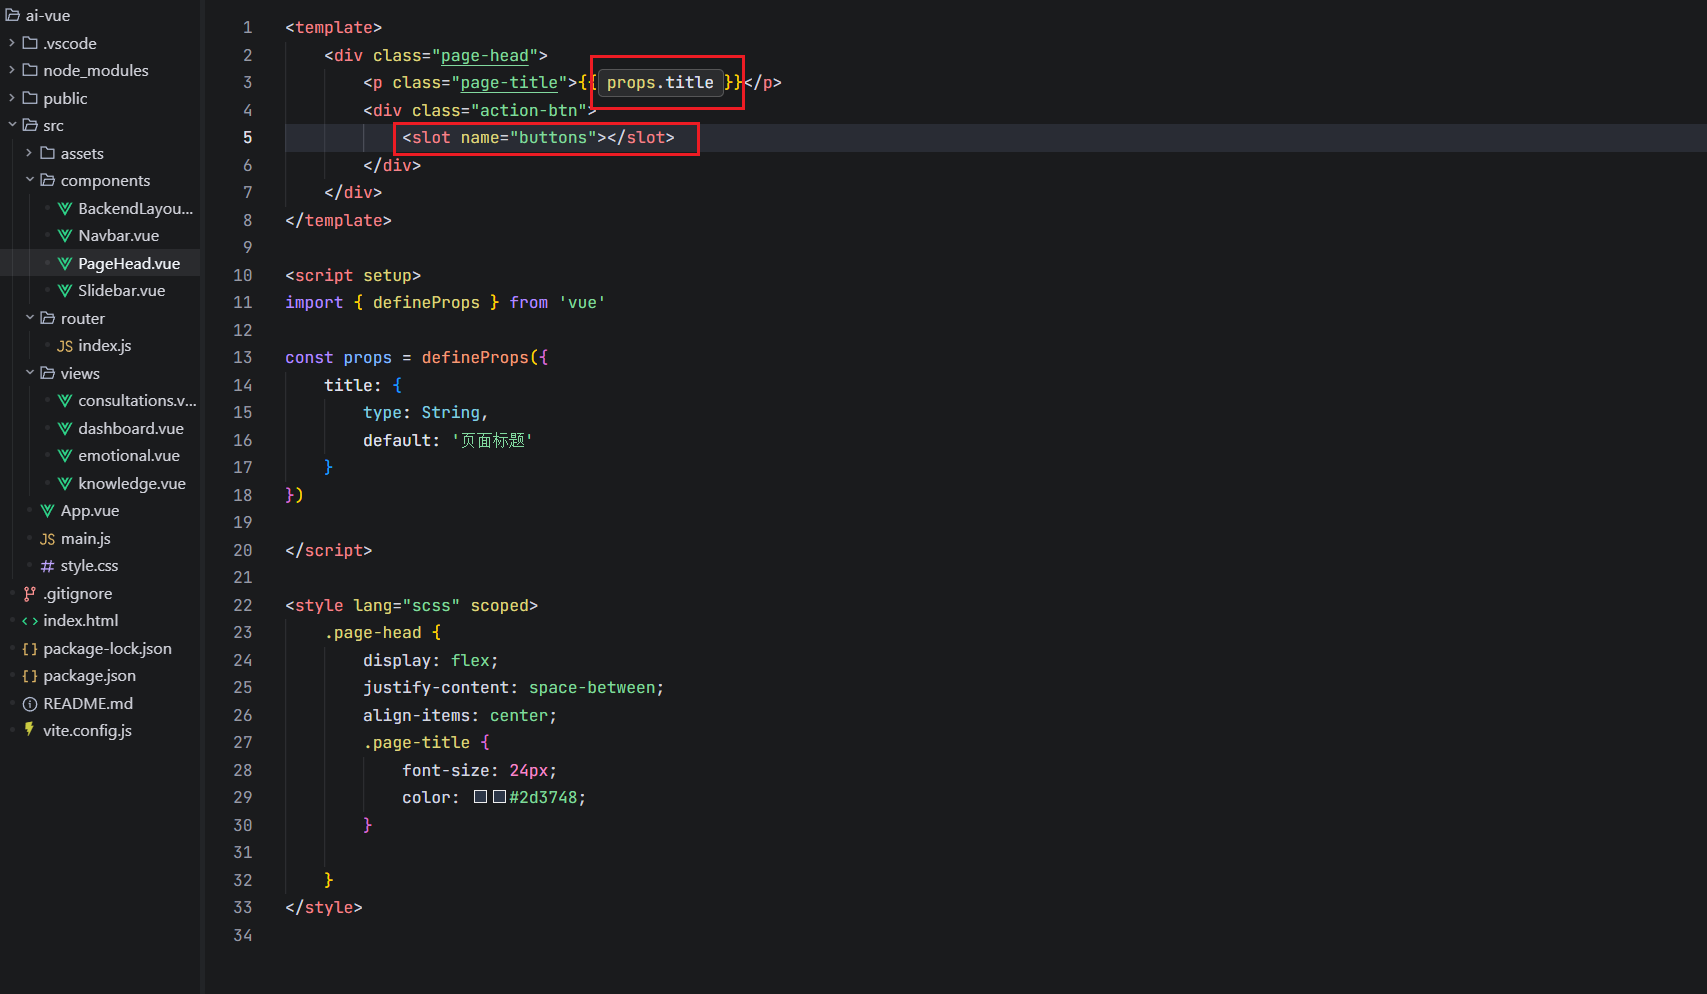
Main区域每个顶部栏都一样。所以选择使用一个组件来统领所有的顶部栏
其中有一部分没有按钮
则使用具名插槽来解决
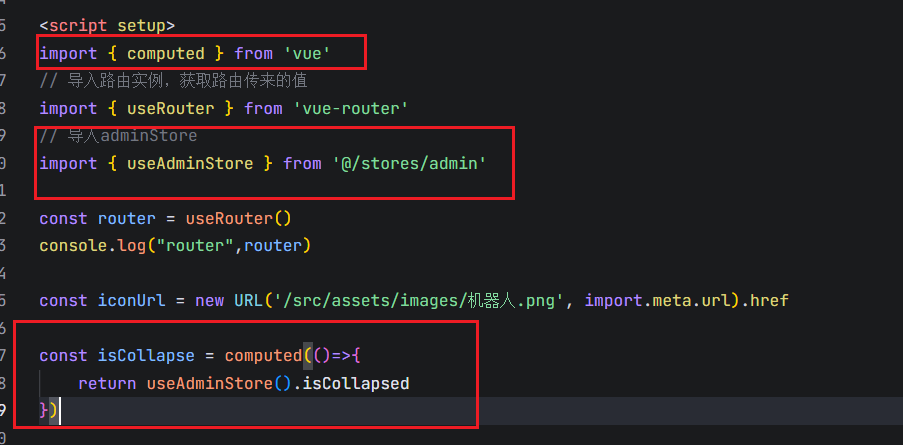
2.5 点击收缩和展开sliderbar区域
影响兄弟组件,所以需要采用组件中的通信
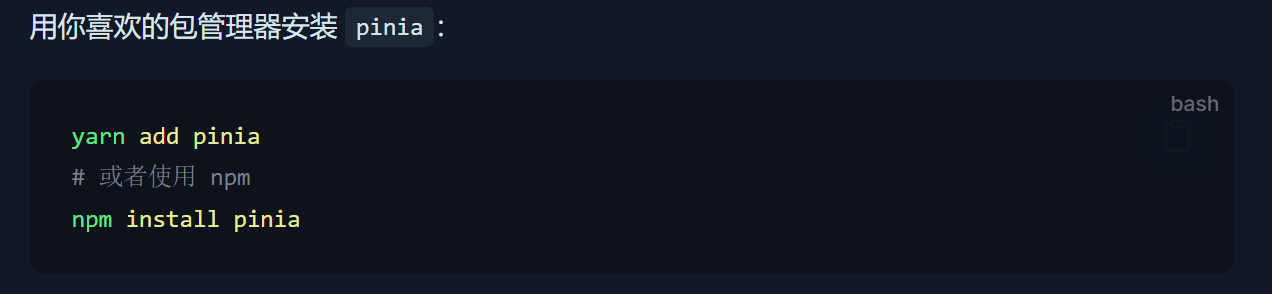
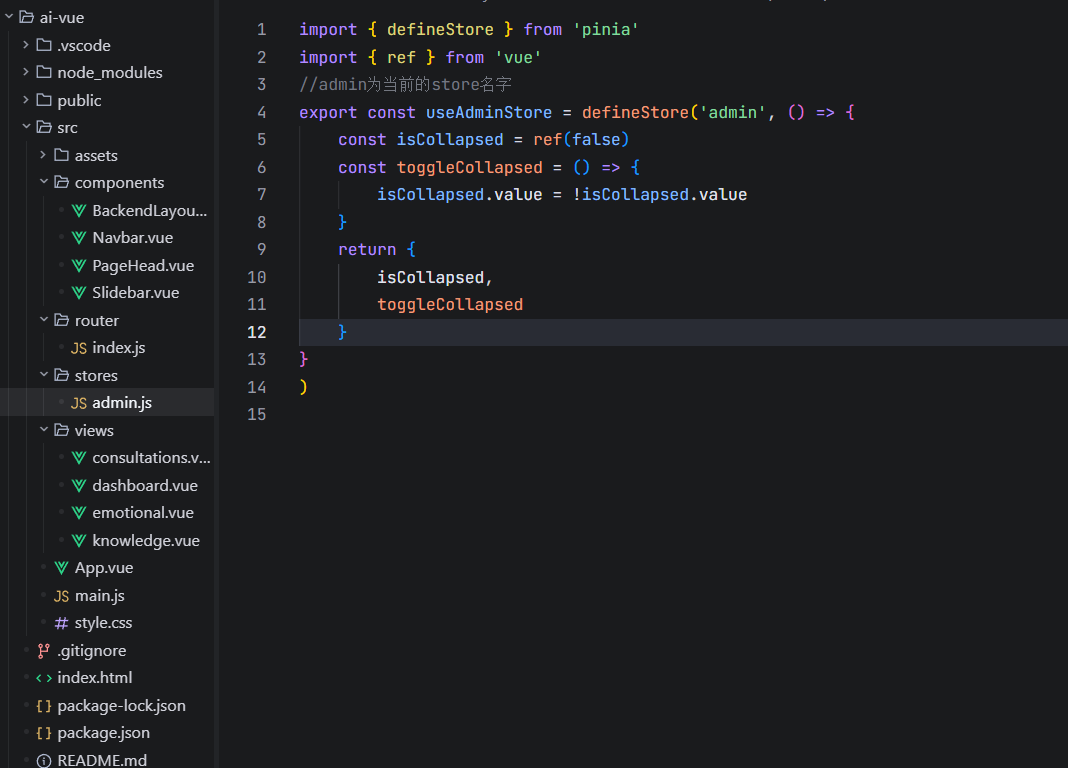
我们使用pinia进行状态管理
创建stores文件夹,定义isCollapsed, toggleCollapsed对外使用
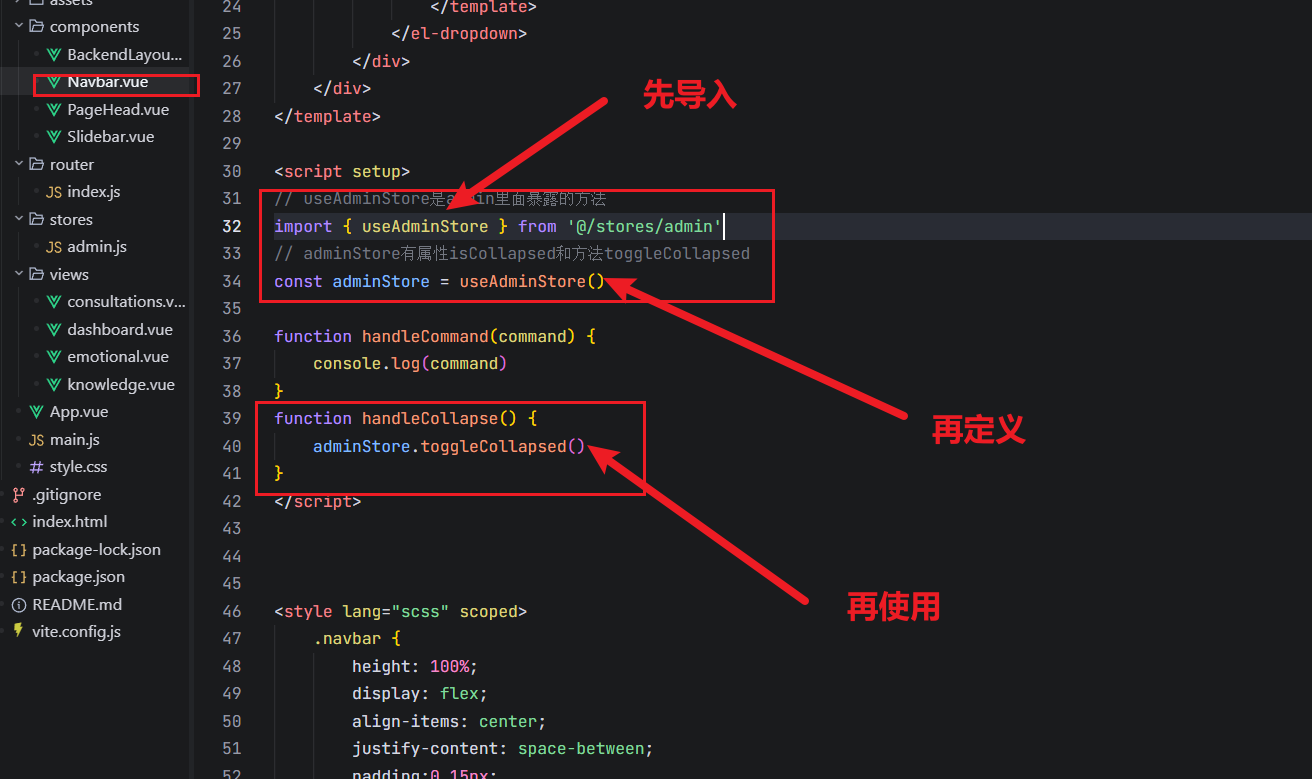
如何使用,在Navbar的button里面定义一个点击函数handleCollapse
发现组件内有个参数collapse,可以自定义收缩和扩张
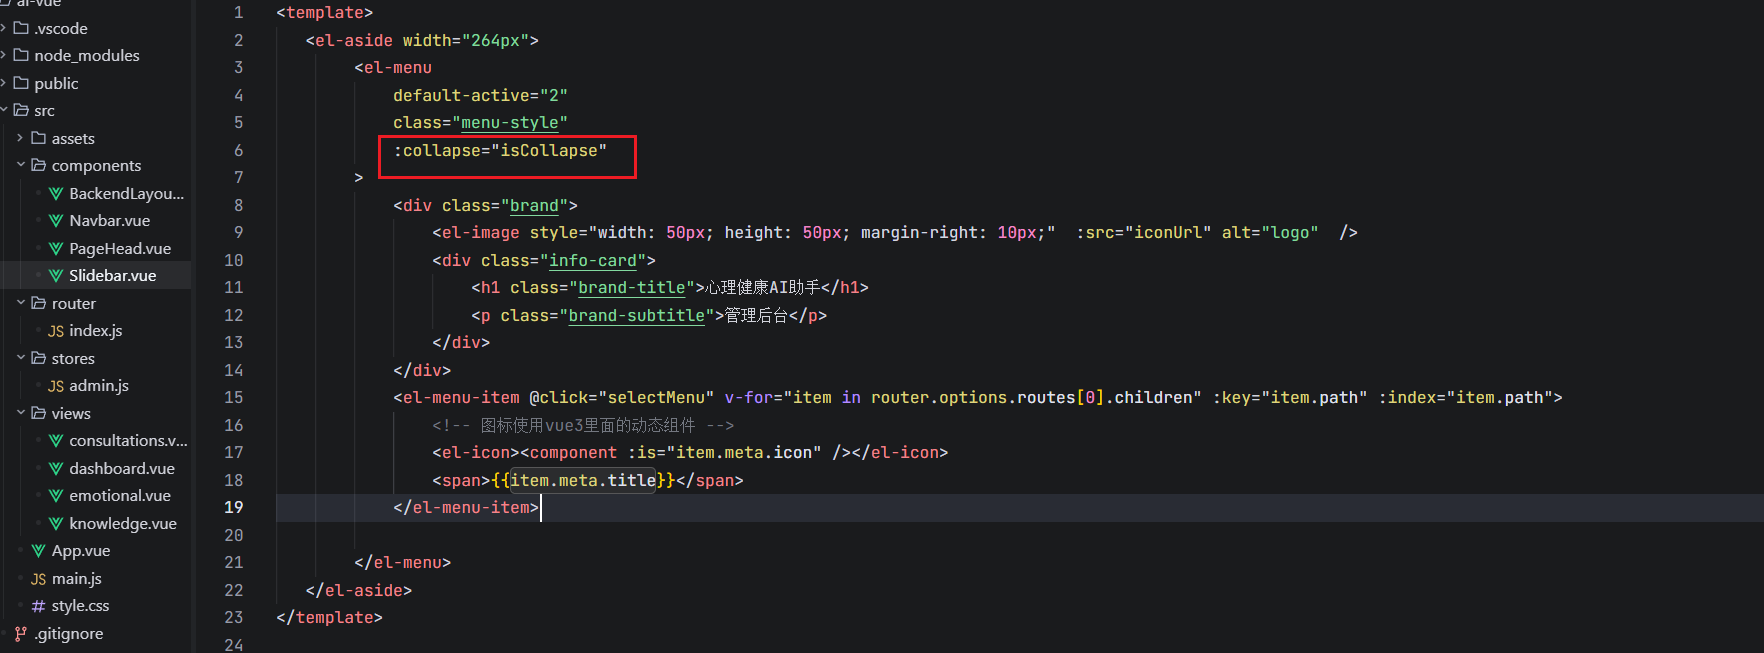
这里使用了computed函数来确定iscollapse的值
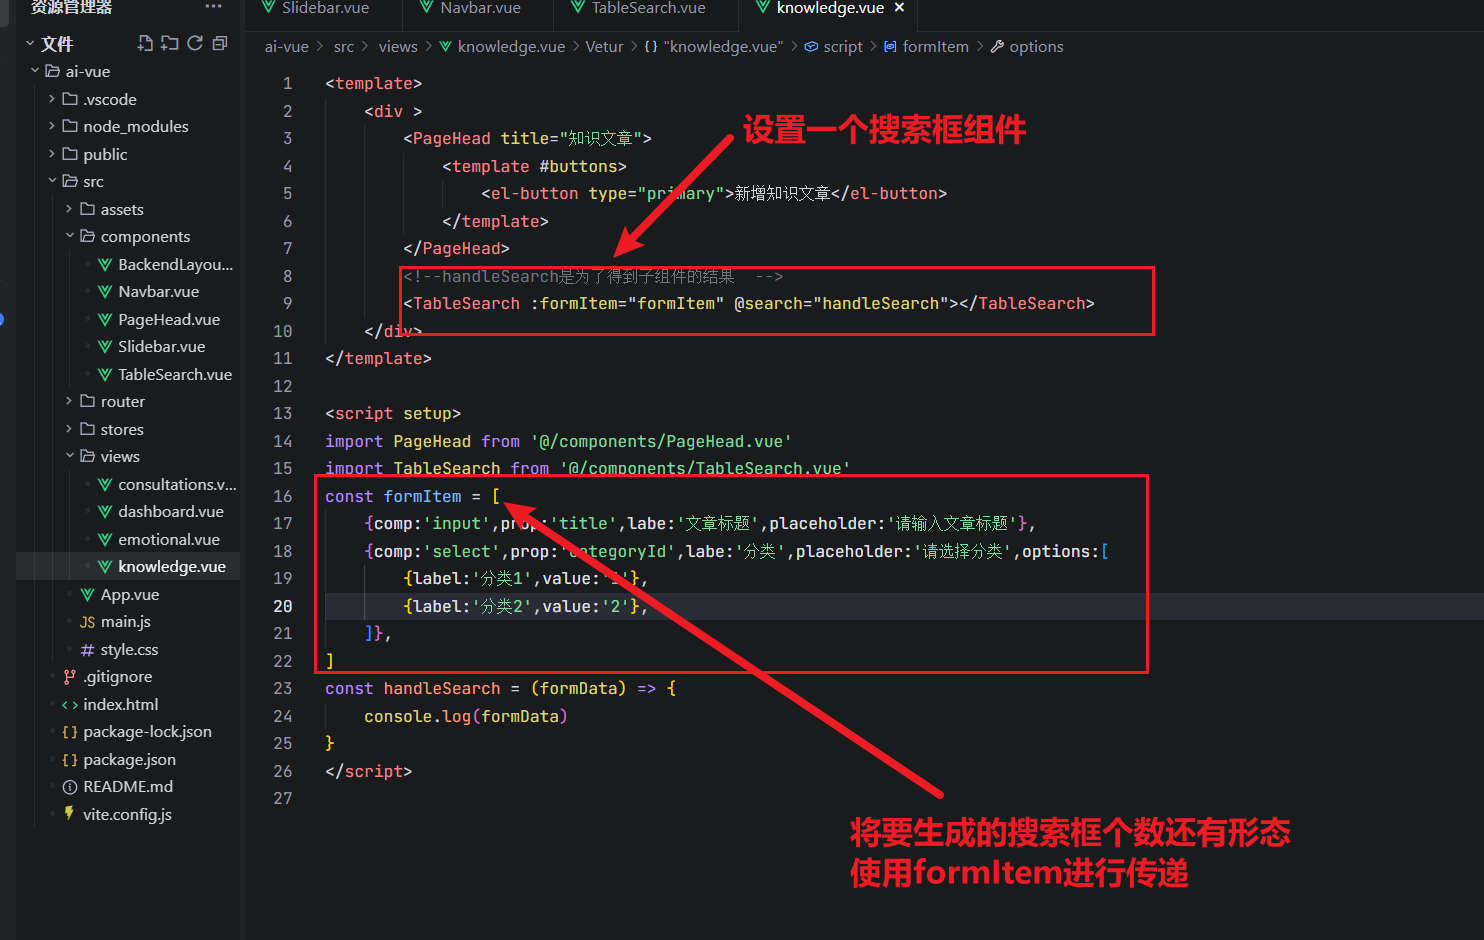
2.6 Main区域的搜索框设置
表单必须先使用v-model进行双向绑定,不然会导致页面没有数据,你也输入不上去数据
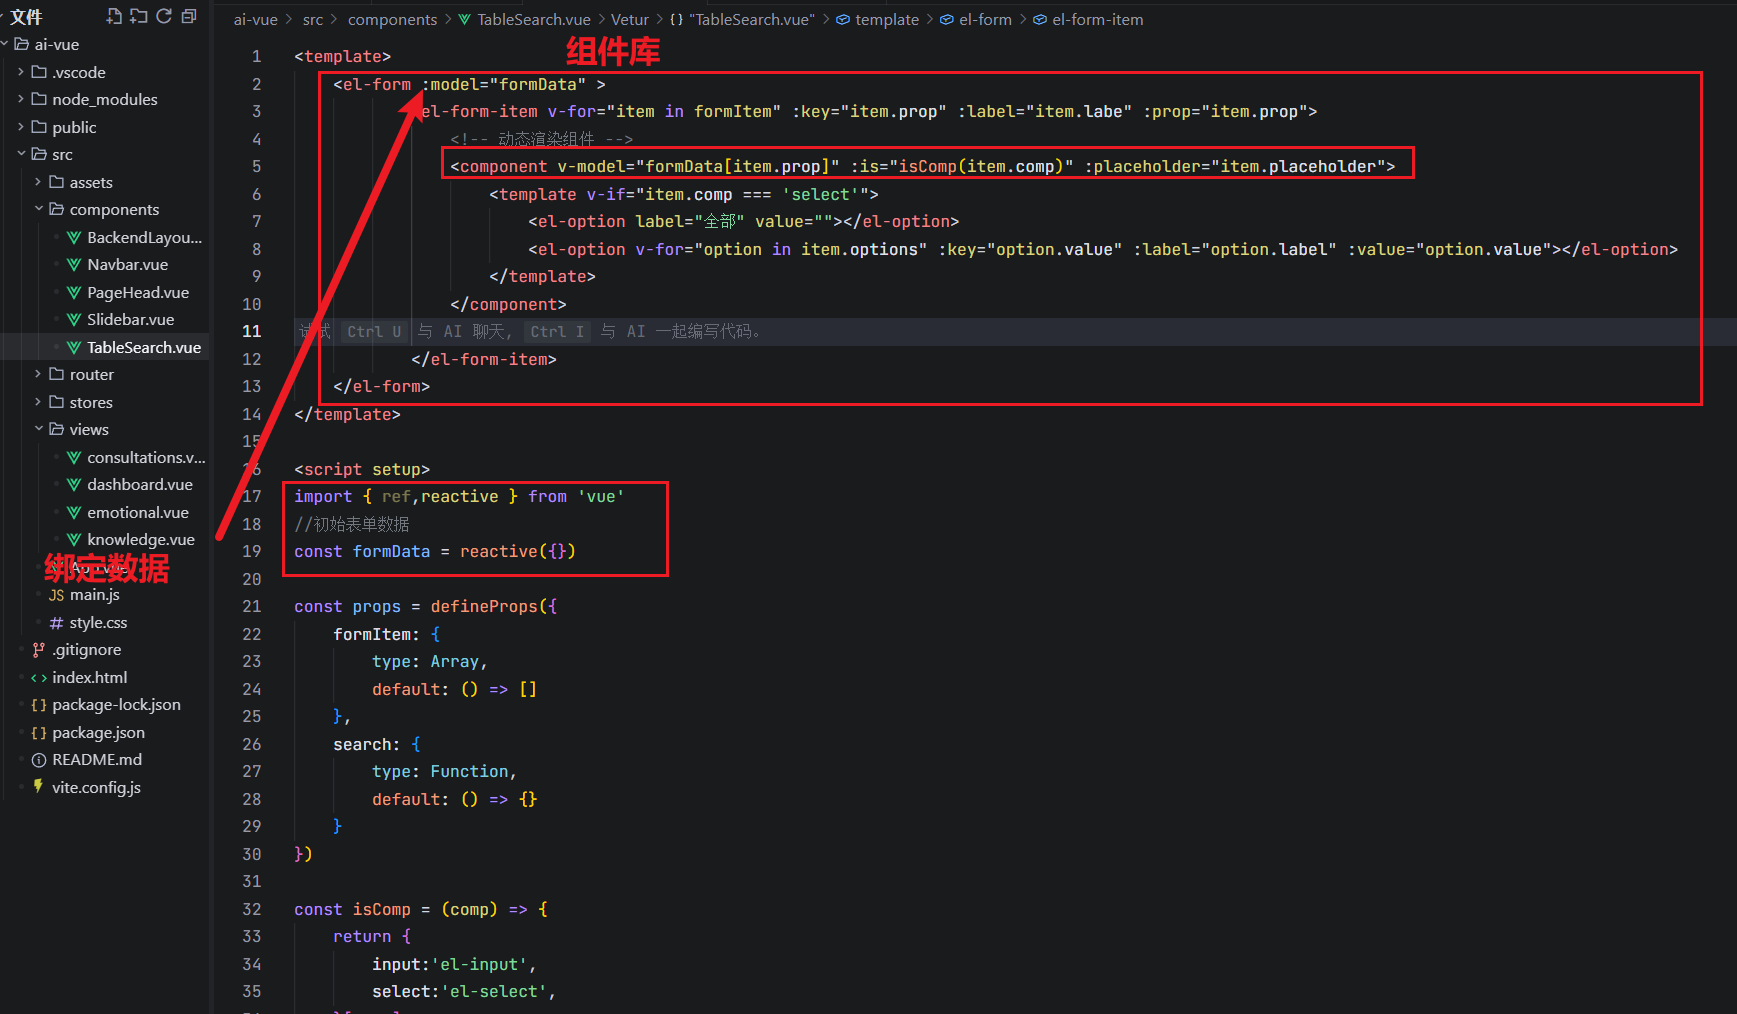
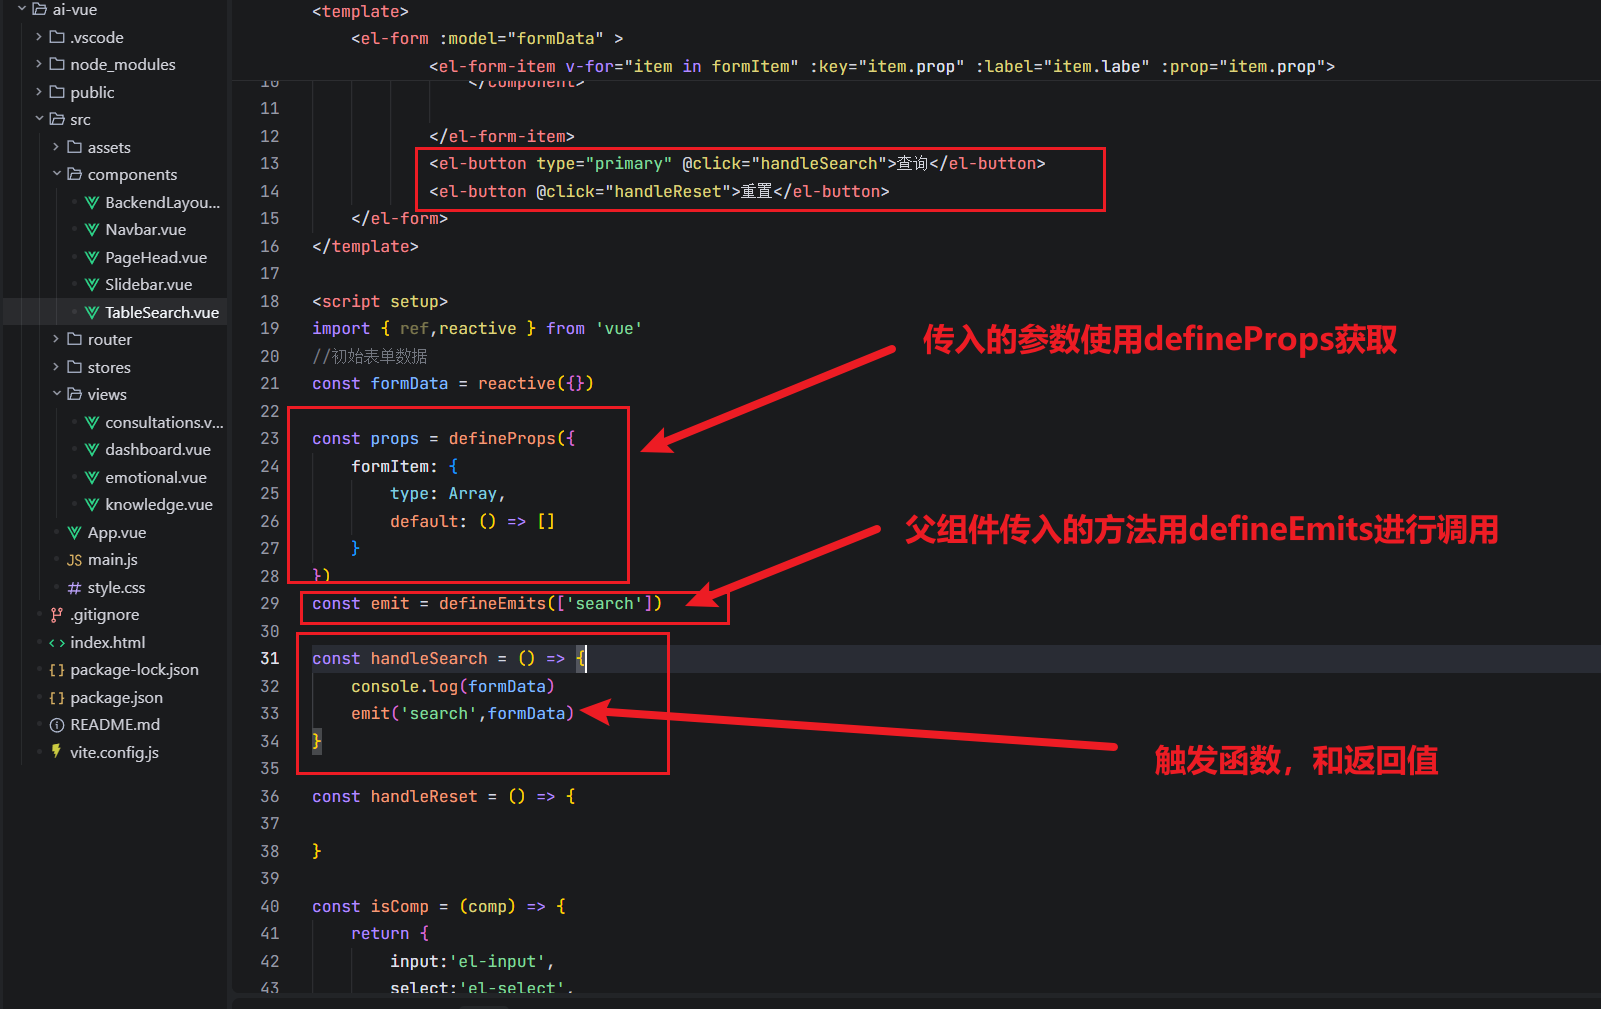
看看父组件是怎么传递函数过来的
三栏设置-使用组件
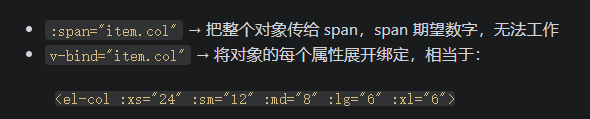
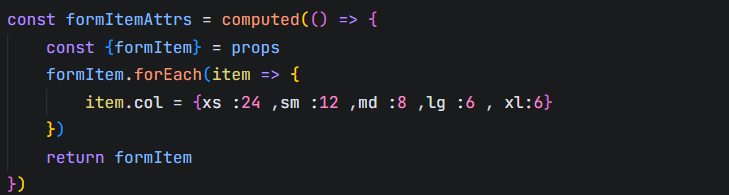
使用el-row和el-col
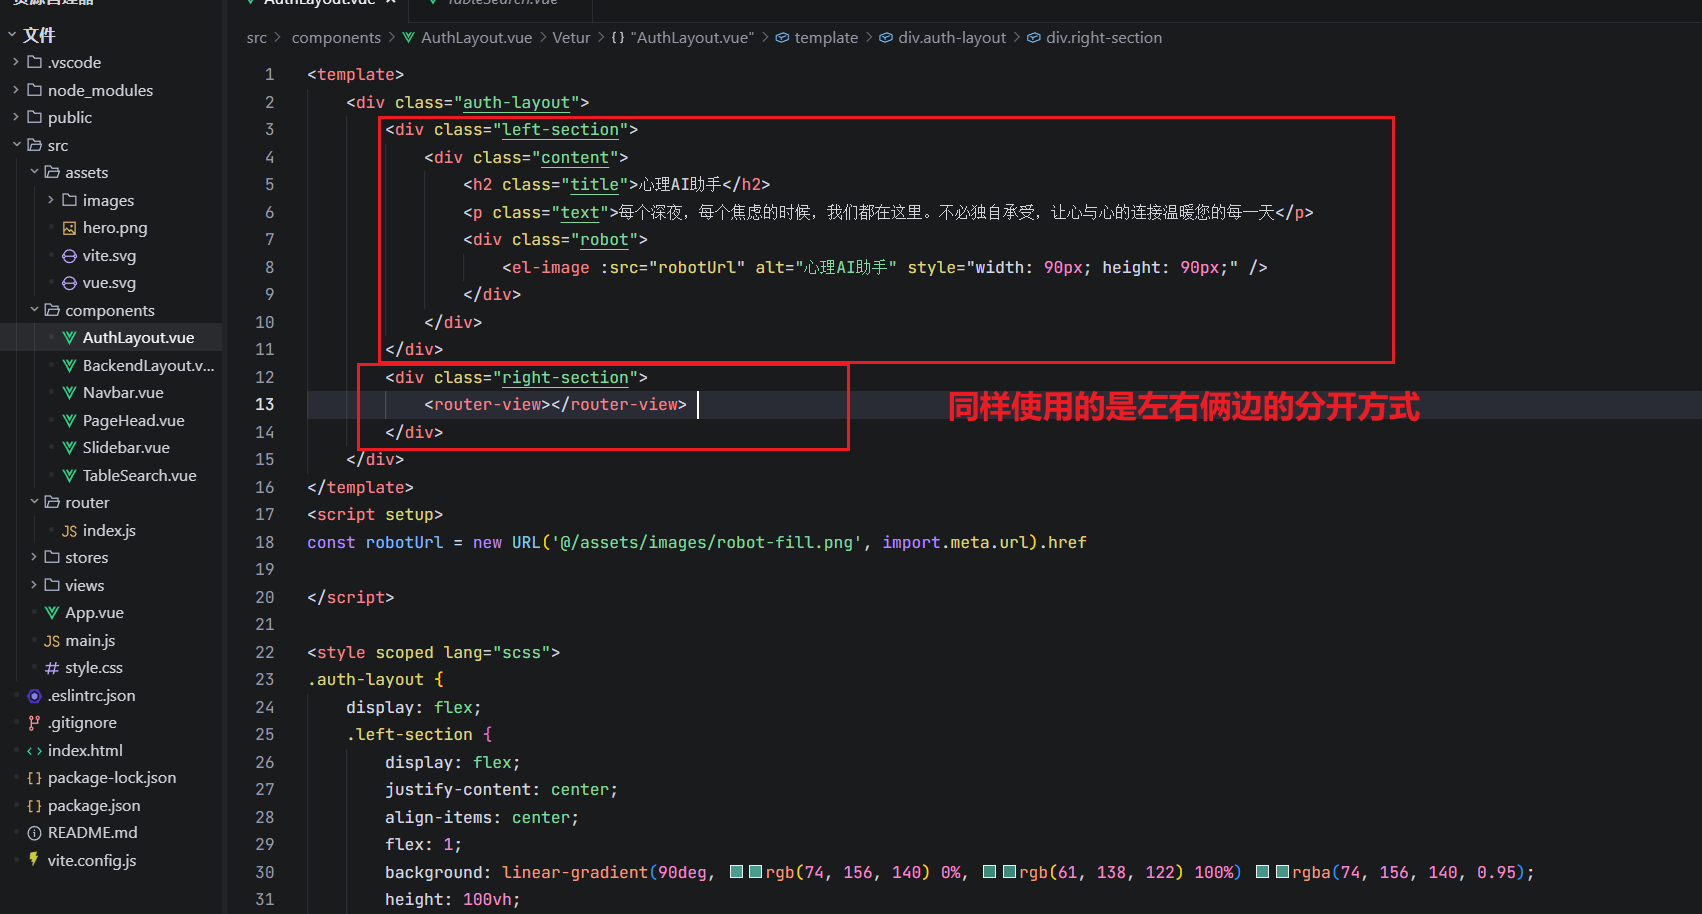
2.7 登录页
首先仍然是创建一个路由
仍旧使用的是嵌套路由方式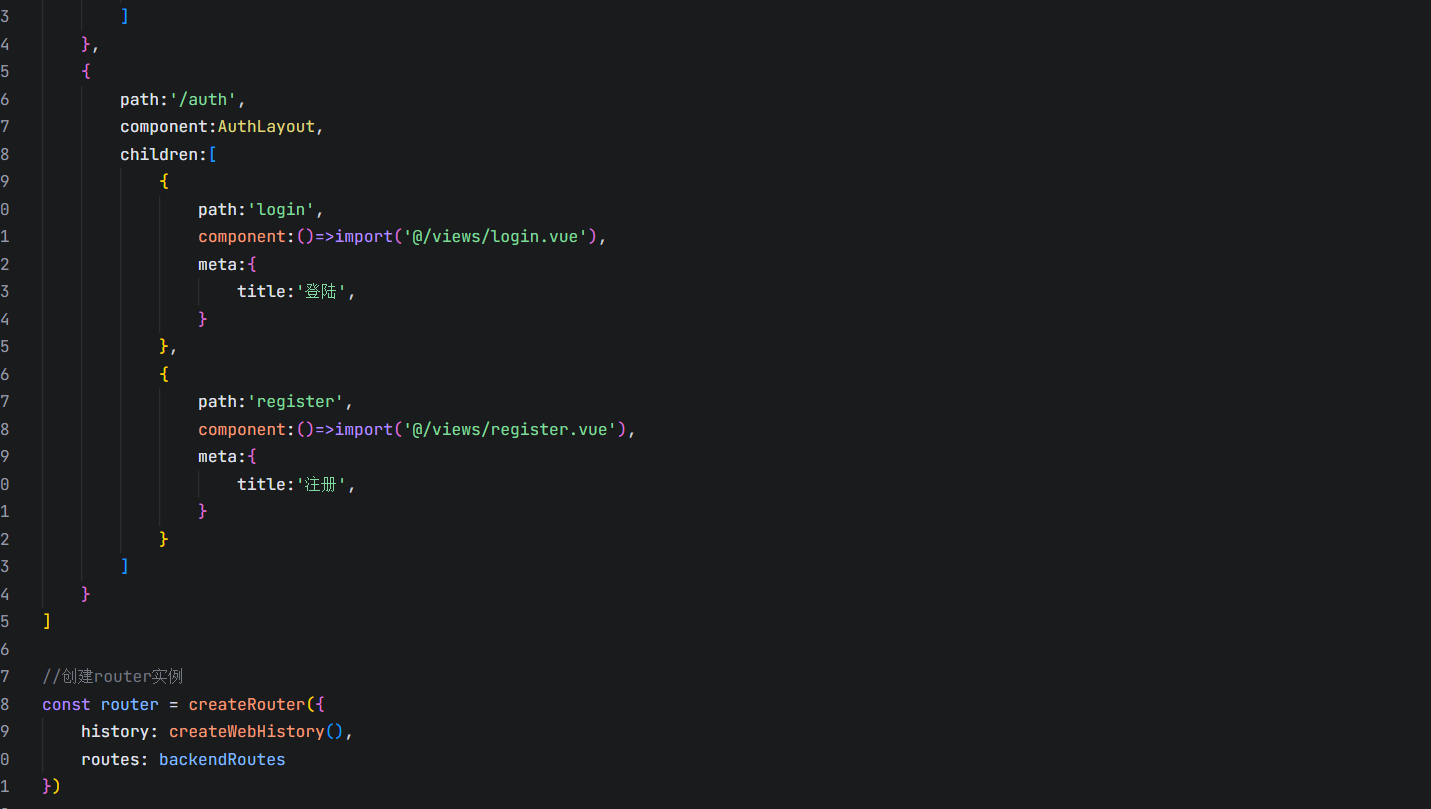
<template>
    <div class="container">
        <div class="title">
            <div class="back-home">
                <el-icon><Back /></el-icon>
                <span>返回首页</span>
            </div>
            <div class="title-text">
                <h2>登录您的账户</h2>
                <p>请输入您的登录信息</p>
            </div>
        </div>
        <div class="form-container">
            <el-form
                 ref="ruleFormRef"
                 :model="formData"
                 :rules="rules"
                 label-position="top"
            >
                <el-form-item label="用户名和邮箱" prop="username">
                    <el-input v-model="formData.username" size="large" placeholder="请输入用户名" />
                </el-form-item>
                <el-form-item label="密码" prop="password">
                    <el-input v-model="formData.password" size="large" placeholder="请输入密码" type="password" show-password />
                </el-form-item>
            </el-form>
            <div class="footer">
                <el-button class="btn" type="primary" size="large" @click="submitForm(ruleFormRef)">登录账户</el-button>
                <p>还没有账户? <router-link to="/auth/register">去注册</router-link> </p>
            </div>
        </div>
    </div>
</template>
<script setup>
    import { ref, reactive } from 'vue'
    const ruleFormRef = ref()
    const formData = reactive(
        {
            username: '',
            password: ''
        }
    )
    const rules = reactive(
        {
            username: [
                { required: true, message: '请输入用户名', trigger: 'blur' }
            ],
            password: [
                { required: true, message: '请输入密码', trigger: 'blur' }
            ]
        }
    )
    const submitForm = async (formEl) => {
        if(!formEl) return
        // valid 校验是否通过
        // fields 校验通过的字段
        await formEl.validate((valid,fields)=>{
            if(valid){
                console.log(fields)
            }
        })
    }
</script>
<style lang="scss" scoped>
    .container {
        width:384px;
        .title{
            .back-home{
                margin-bottom: 60px;
            }
            .title-text{
                text-align: center;
                margin-bottom: 20px;
                h2{
                    font-size: 36px;
                    margin-bottom: 10px;
                }
                p{
                    font-size: 14px;
                    color:#6b7280;
                }
            }
        }
        .form-container{
            margin-top: 30px;
            .btn{
                margin-top:40px;
                width:100%;
            }
            .footer{
                padding:0 30px;
                text-align: center;
            }
        }
    }
</style>
2.8 axios导入数据
首先仍然是需要先安装axios插件
npm i axios
axios很简单,一般我们是封装成一个工具类的方法
import axios from 'axios'
import { ElMessage } from 'element-plus'
//创建axios实例
const service = axios.create({
// 请求前缀
baseURL: '/api',
timeout: 5000
})
//创建请求拦截器
service.interceptors.request.use(
config => {
//在发送请求之前做些什么
//获取token
const token = localStorage.getItem('token')
//如果存在token,添加到请求头
if(token){
config.headers['token'] = token
}
return config
},
error => {
//对请求错误做些什么
return Promise.reject(error)
}
)
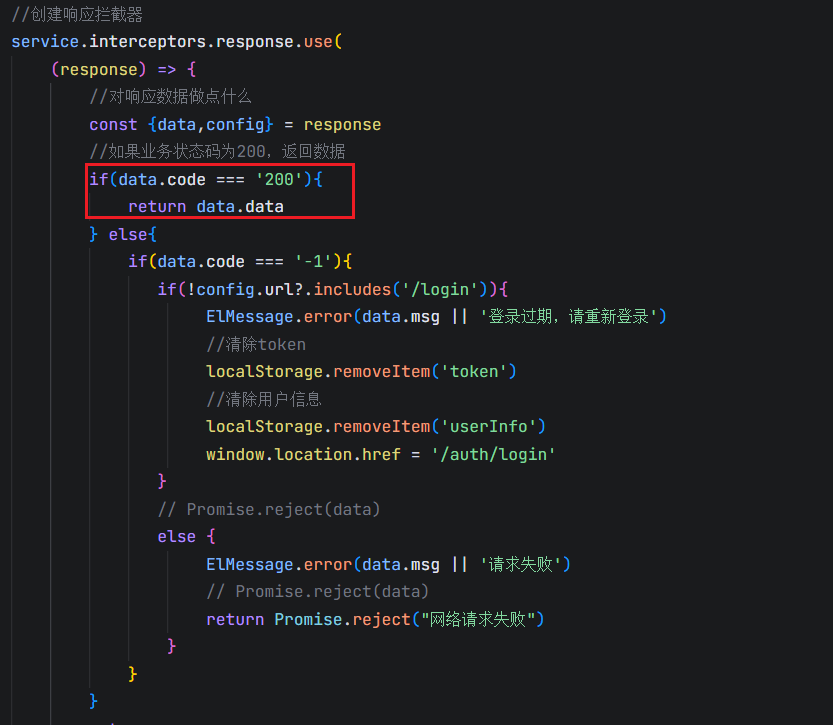
//创建响应拦截器
service.interceptors.response.use(
response => {
//对响应数据做点什么
const {data,config} = response
//如果状态码为200,返回数据
if(data.code === 200){
return data.data
} else{
if(data.code === '-1'){
if(!config.url?.includes('/login')){
ElMessage.error(data.msg || '登录过期,请重新登录')
//清除token
localStorage.removeItem('token')
//清除用户信息
localStorage.removeItem('userInfo')
window.location.href = '/auth/login'
}
// Promise.reject(data)
else {
ElMessage.error(data.msg || '请求失败')
// Promise.reject(data)
return Promise.reject("网络请求失败")
}
}
}
return response
},
error => {
//对响应错误做点什么
return Promise.reject(error)
}
)
export default service定义好service的工具包之后可以直接调用该工具包,一般我们需要发送请求的时候会在src/api下定义一个对应的js文件。
注意这里我的接口地址写错了,所以一直状态码返回500,改死我了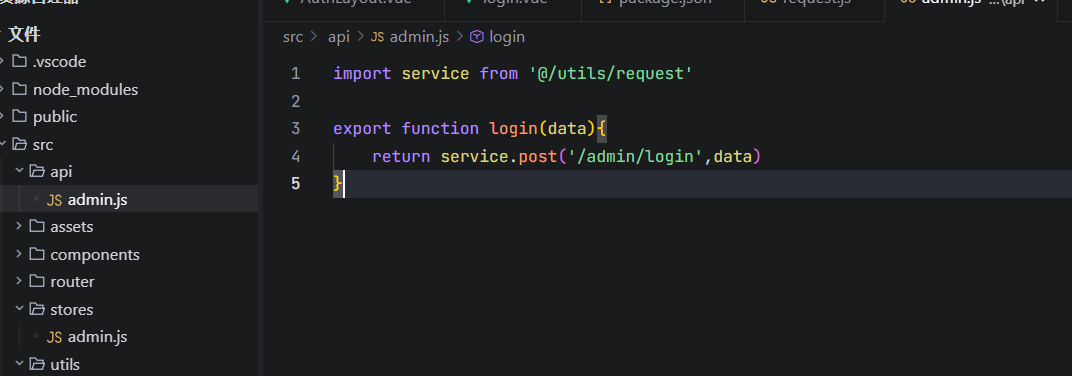
使用axios请求后端接口。这里有表单验证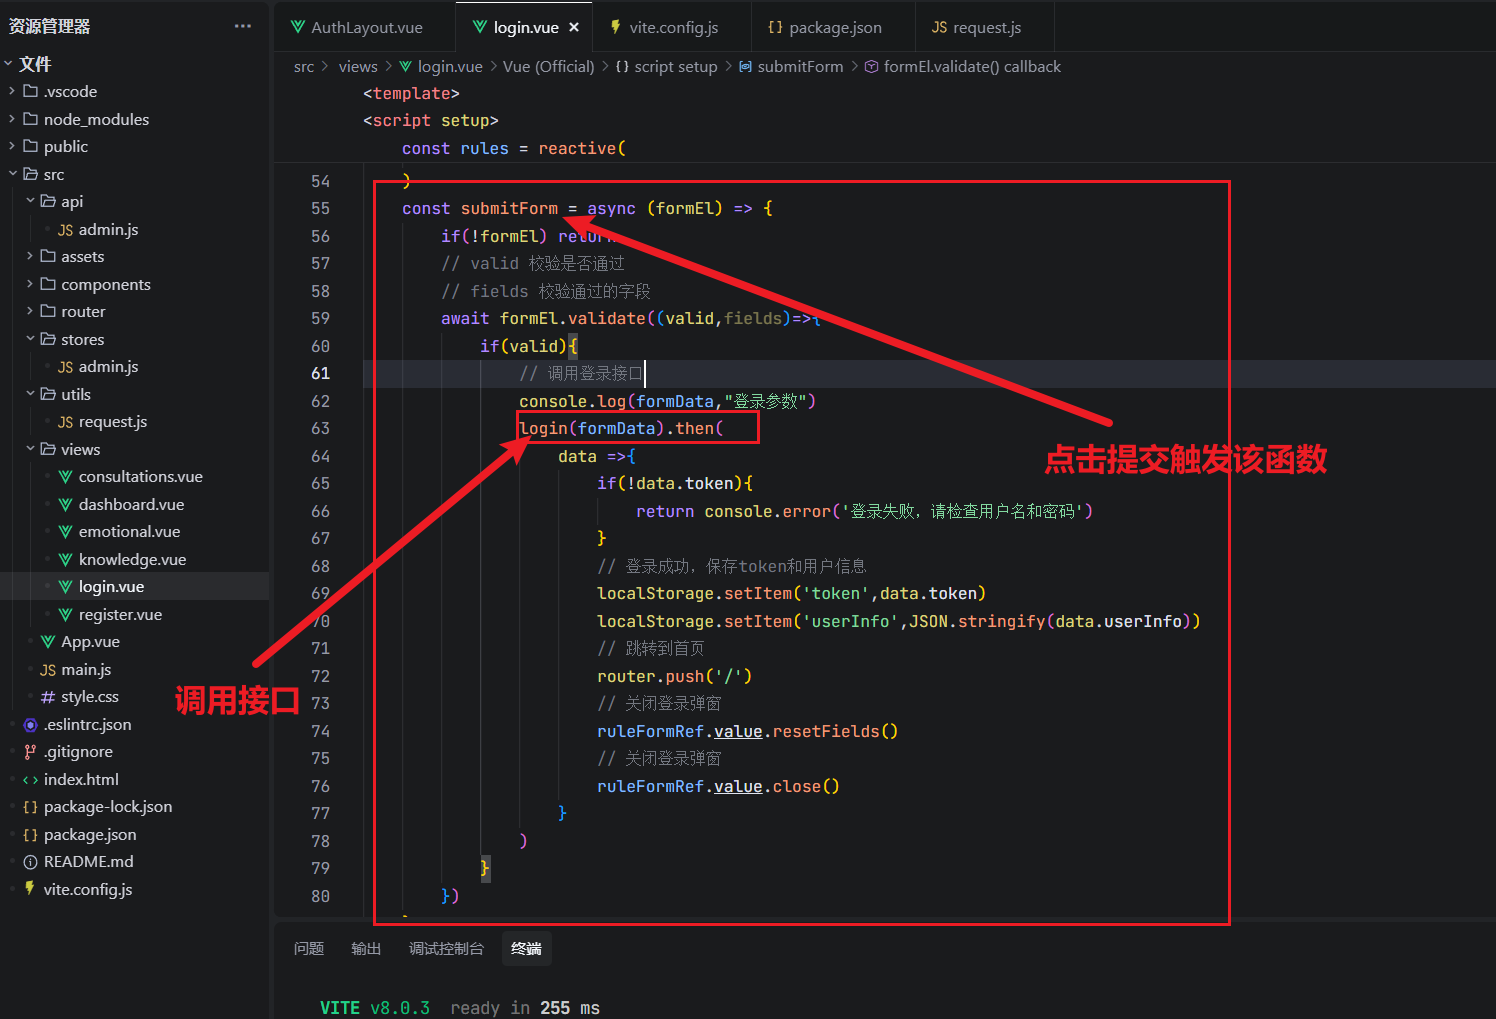
这里直接调用接口会导致跨域问题所以需要我们配置代理解决跨域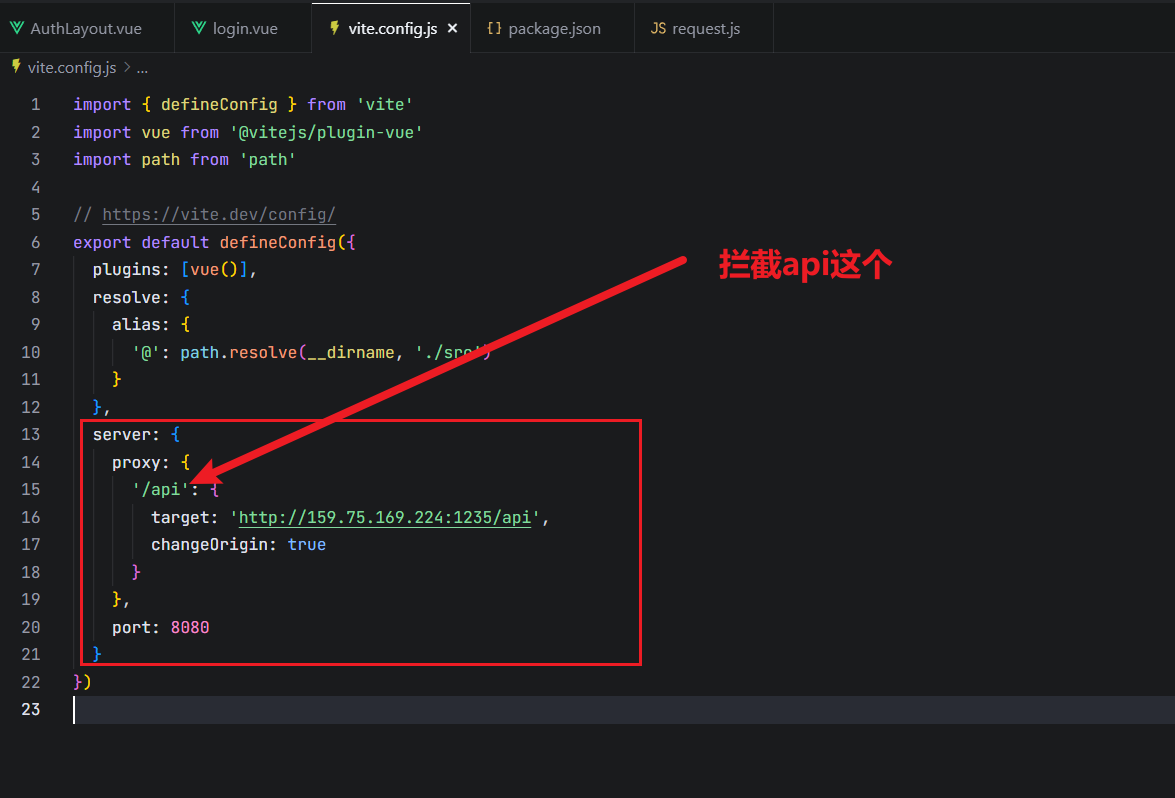
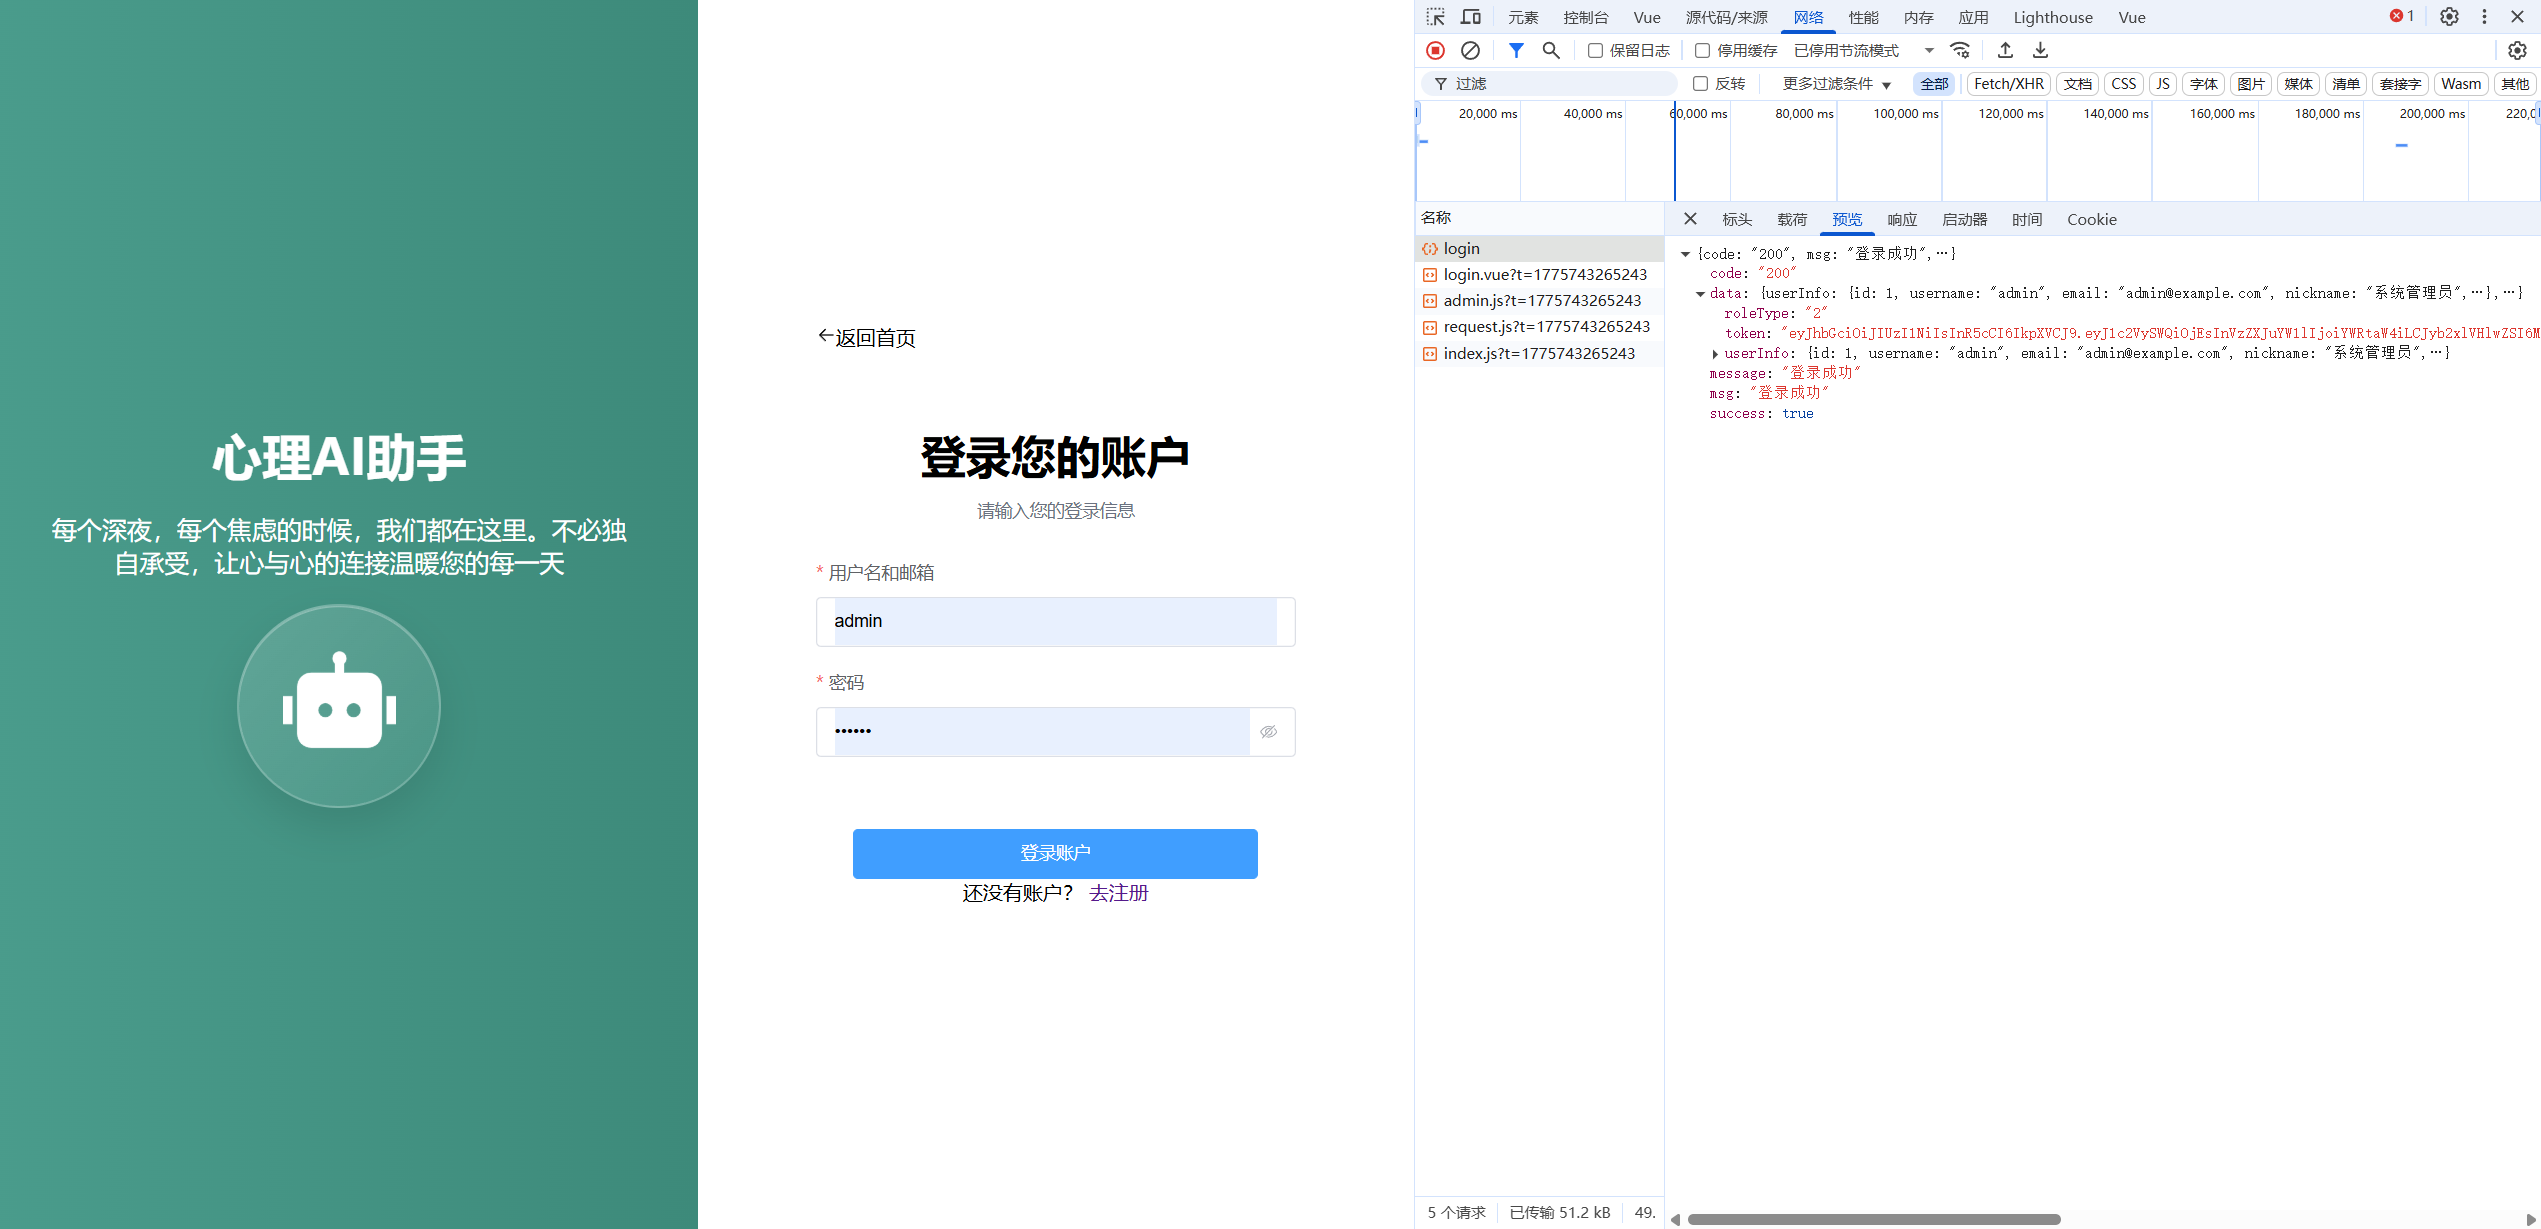
2.9 根据得到的roleType决定要跳转的位置
在这里我也有个报错
状态码竟然是字符串,我没加‘’直接返回了response,导致一直拿不到data.data
导致这里不能正常跳转到后台

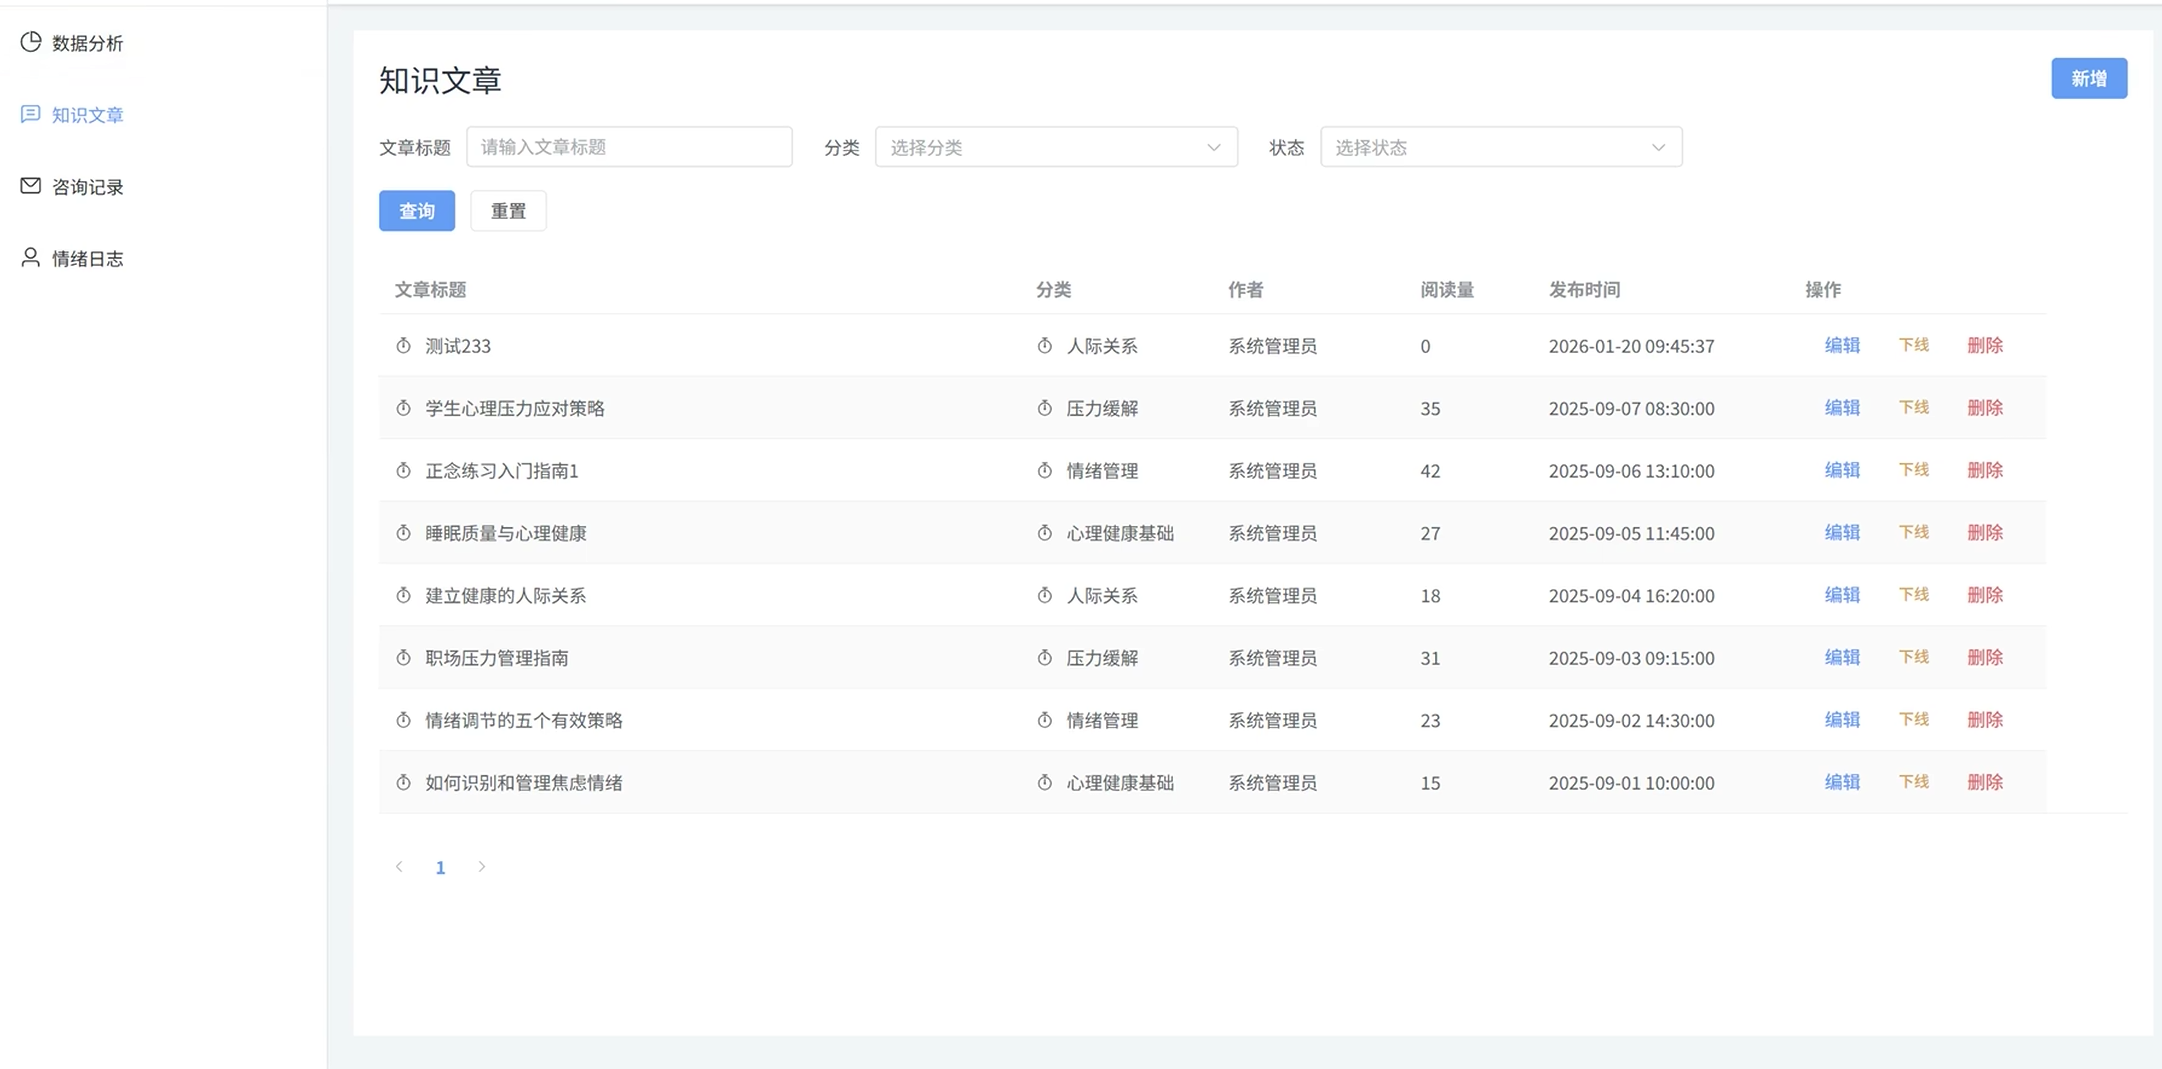
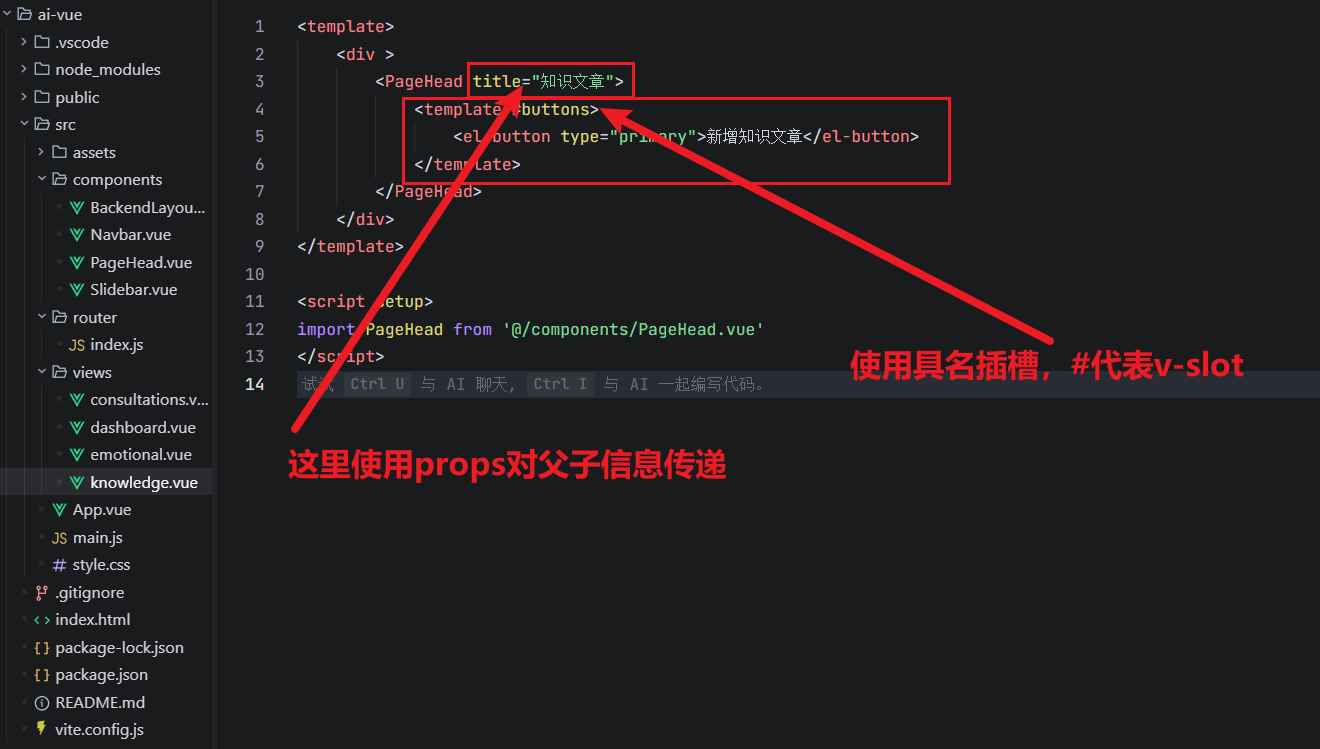
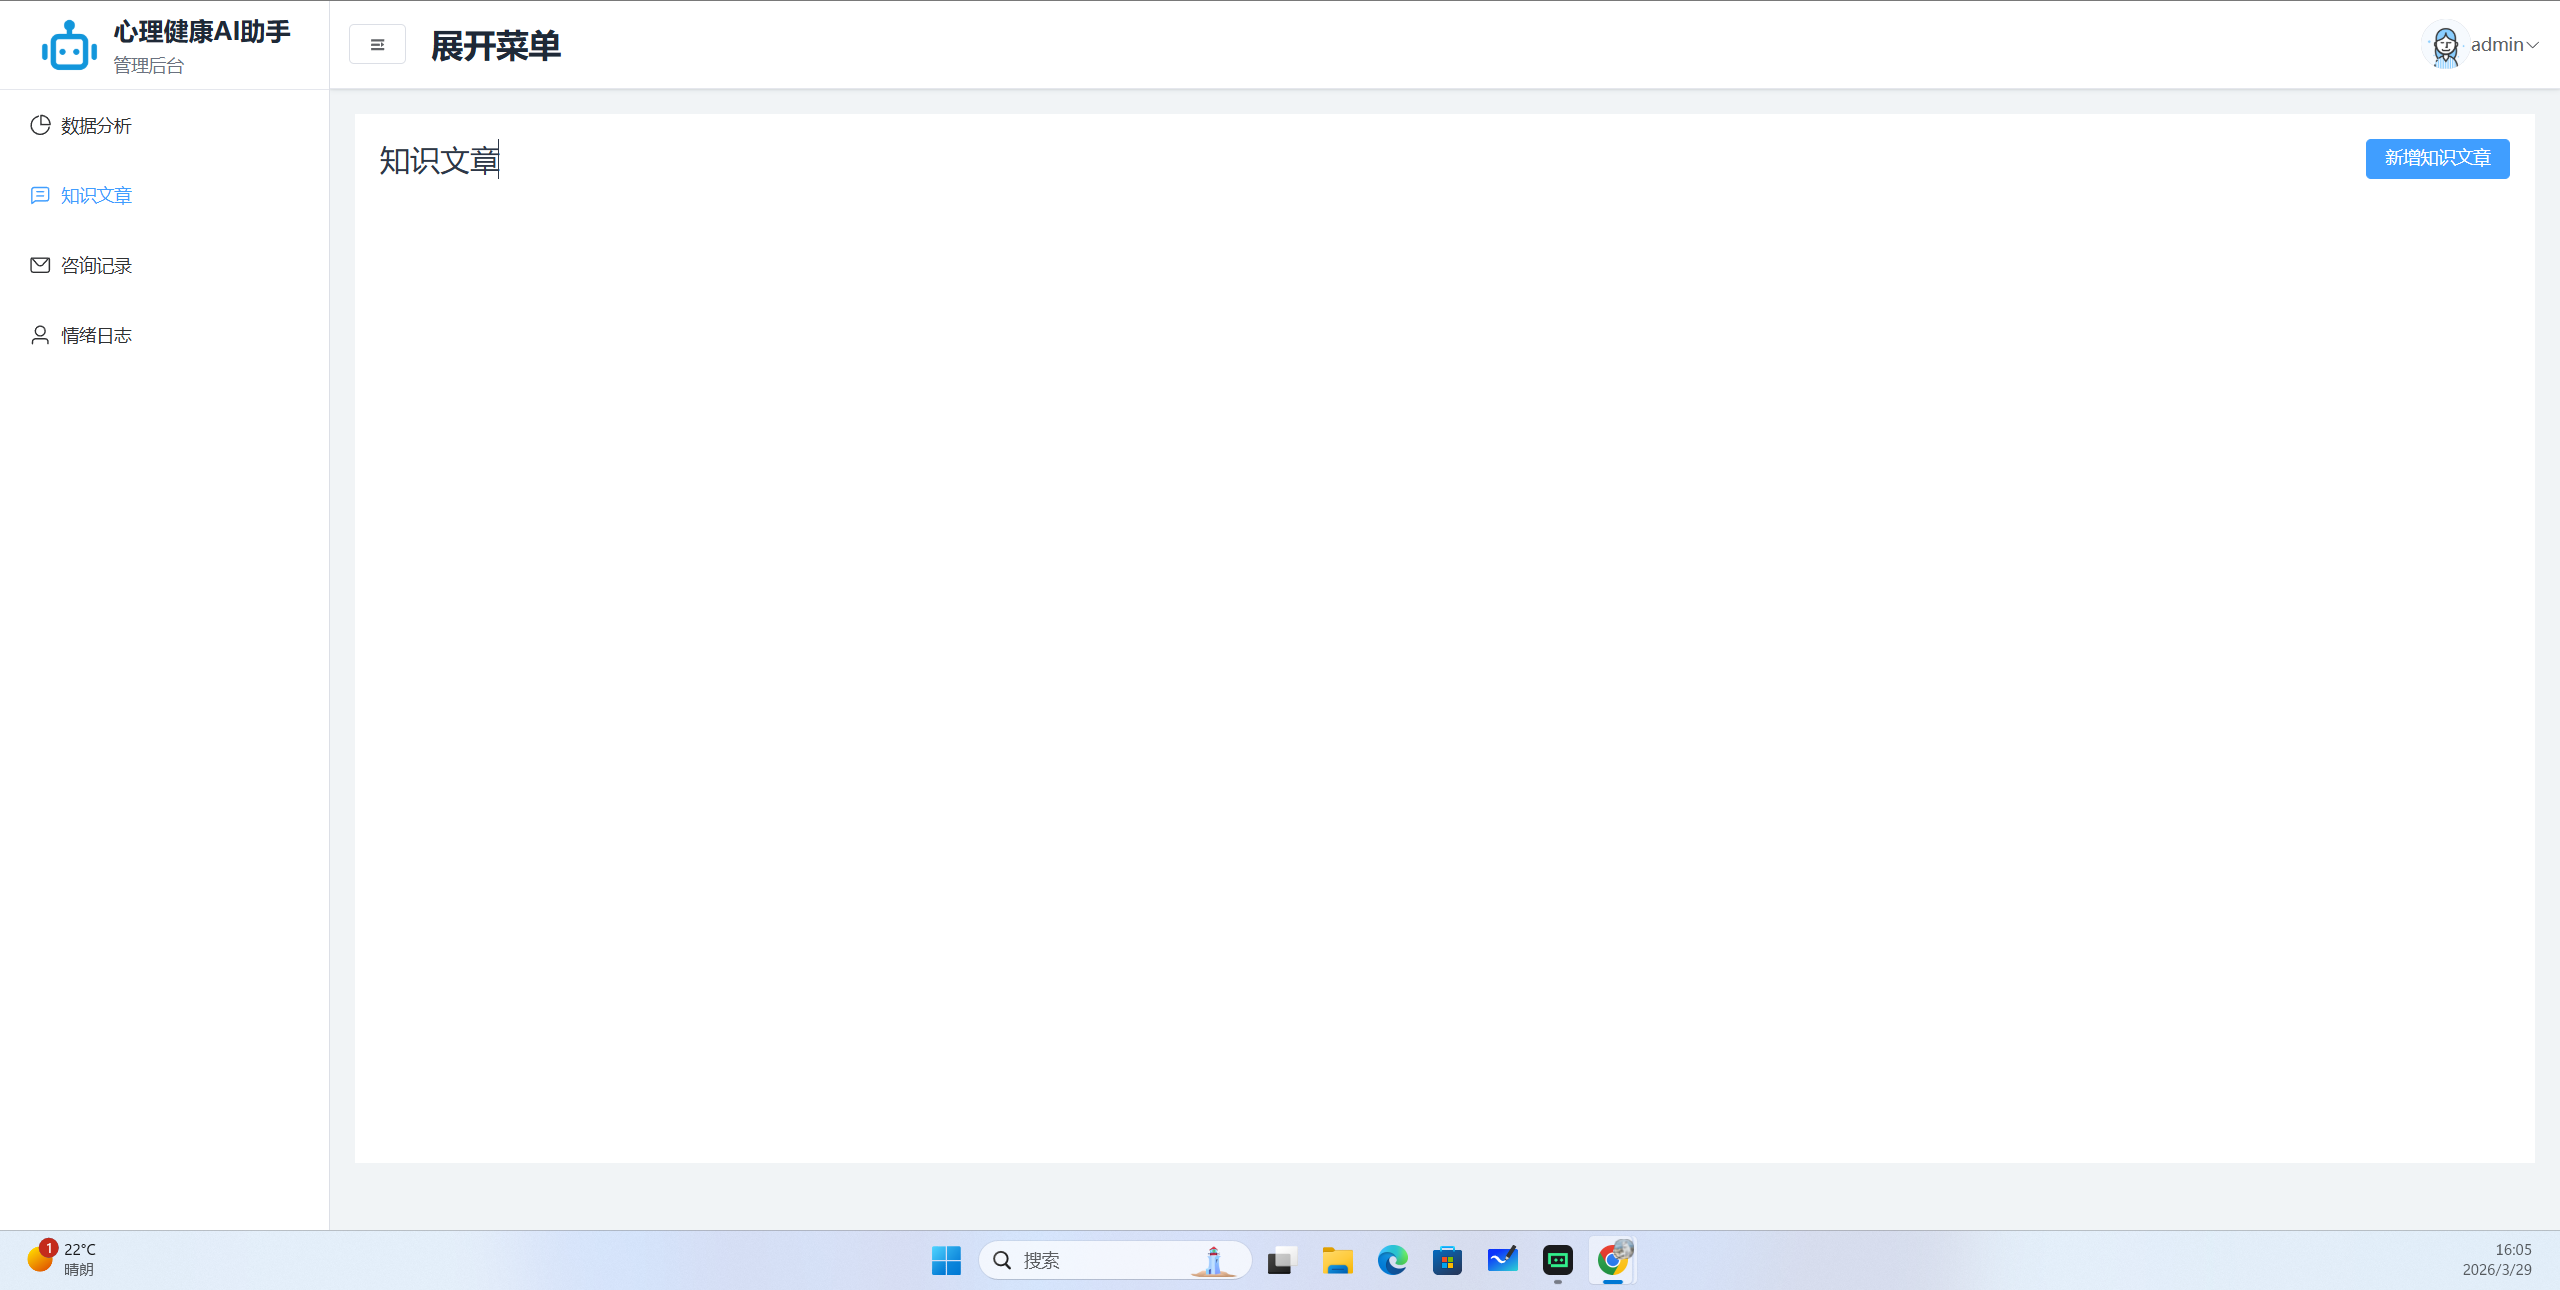
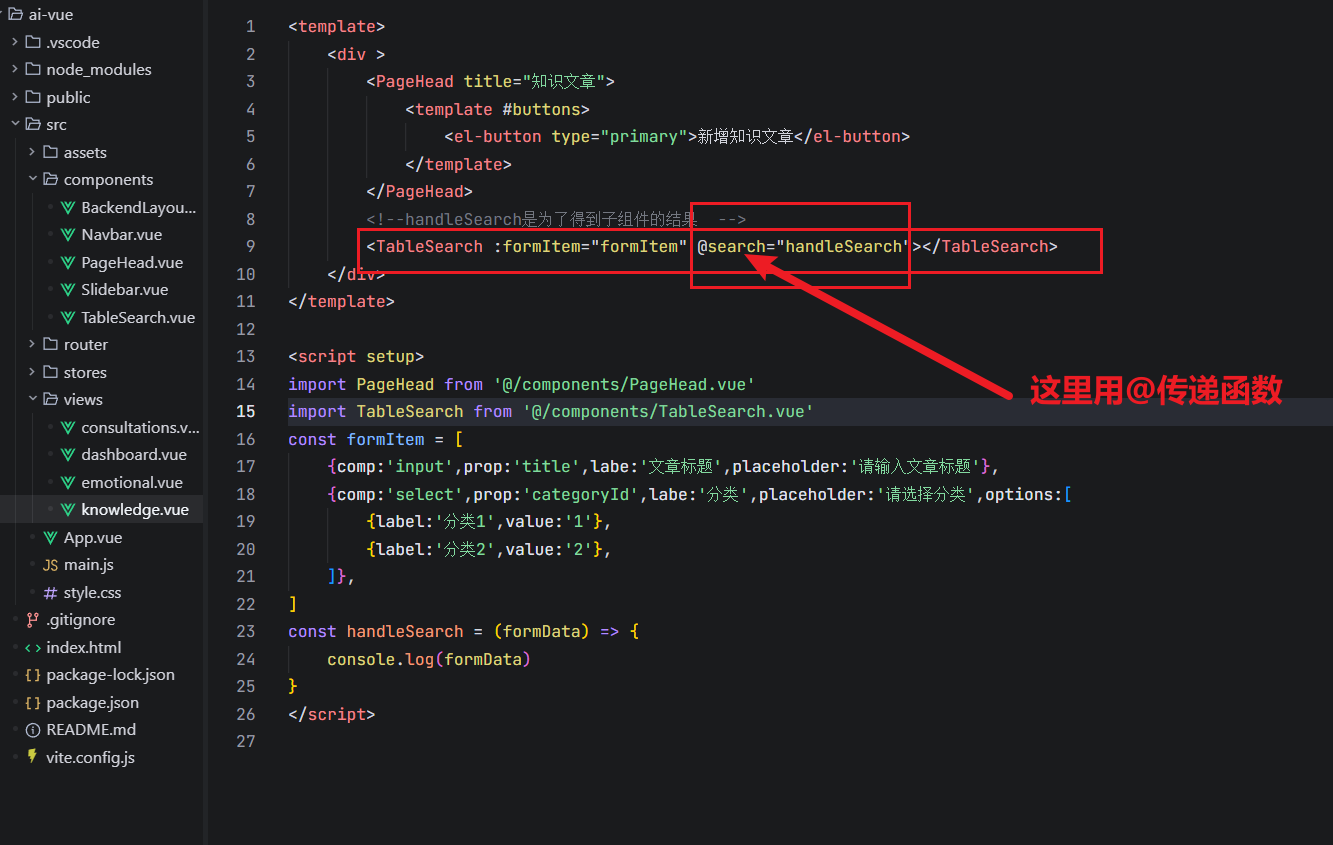
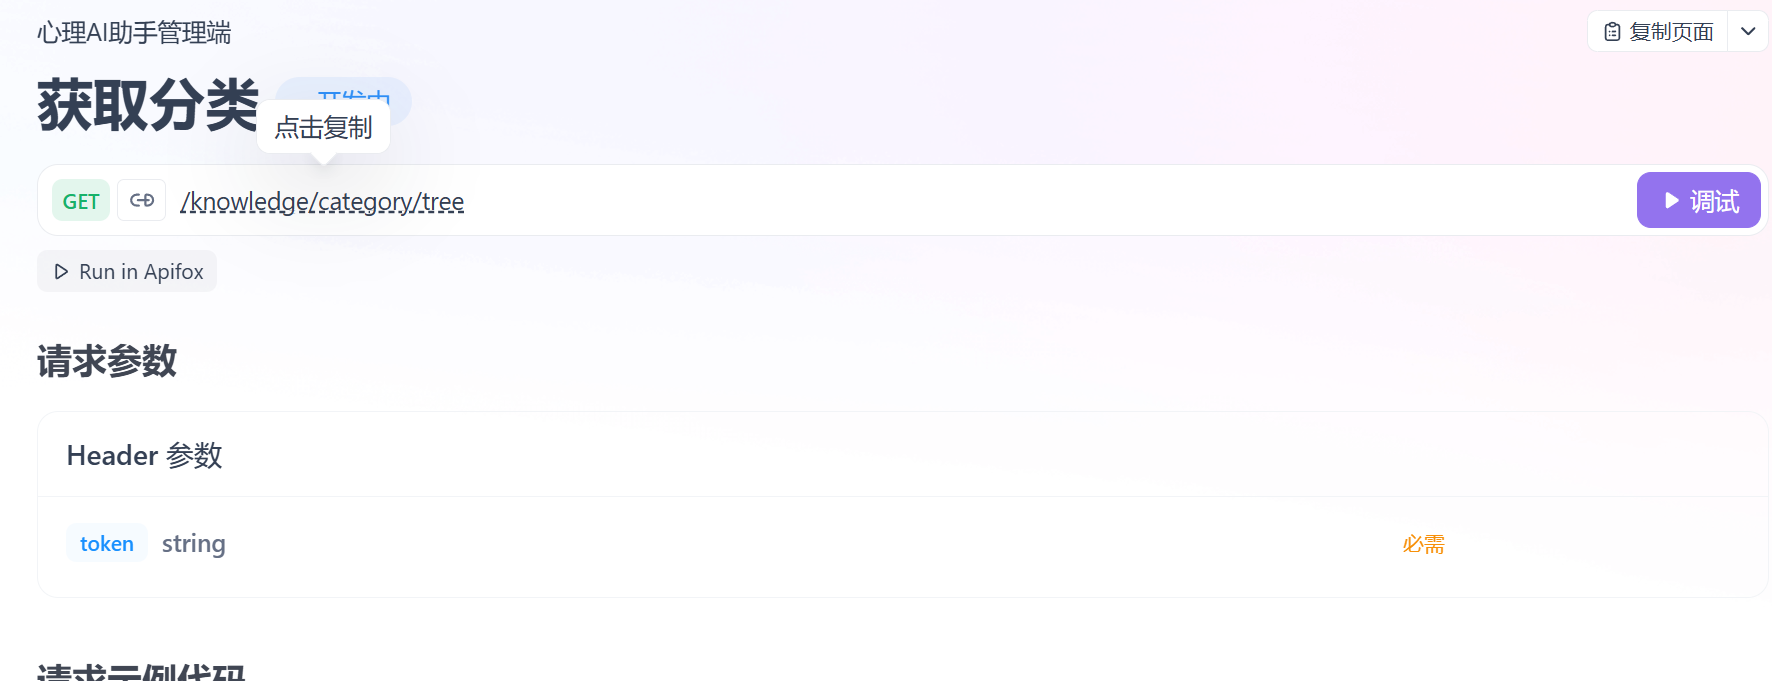
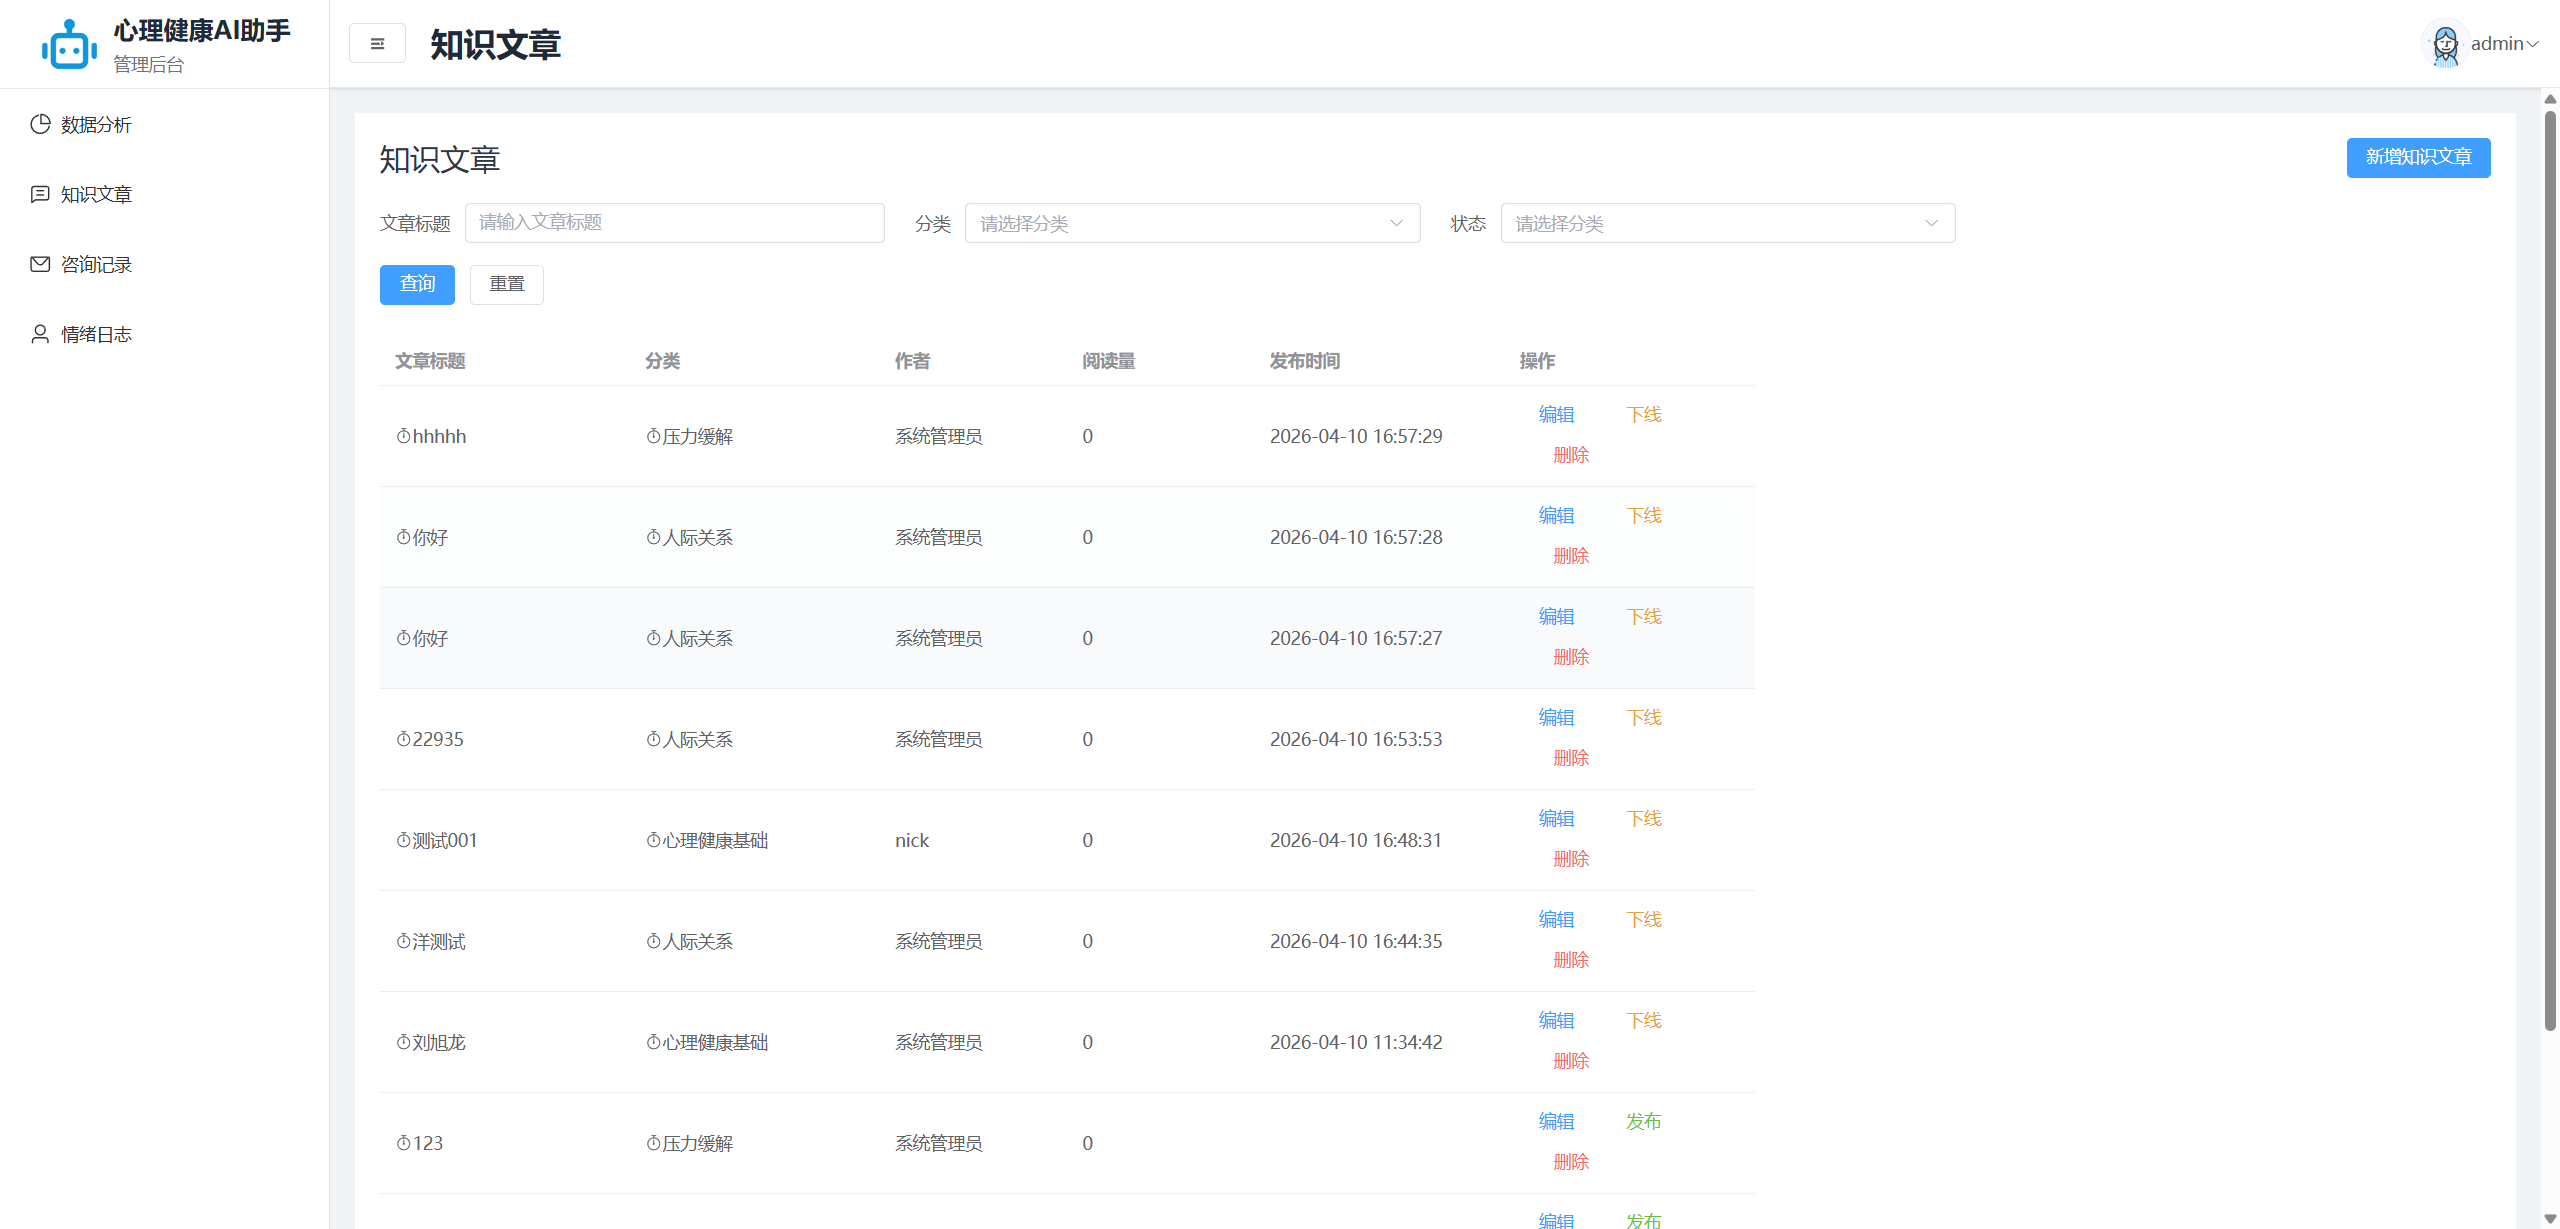
2.10 知识文章页面调用接口获取数据
<template>
<div >
<PageHead title="知识文章">
<template #buttons>
<el-button type="primary">新增知识文章</el-button>
</template>
</PageHead>
<!--handleSearch是为了得到子组件的结果 -->
<TableSearch :formItem="formItem" @search="handleSearch"></TableSearch>
</div>
</template>
<script setup>
import { onMounted ,ref ,reactive} from 'vue'
import PageHead from '@/components/PageHead.vue'
import TableSearch from '@/components/TableSearch.vue'
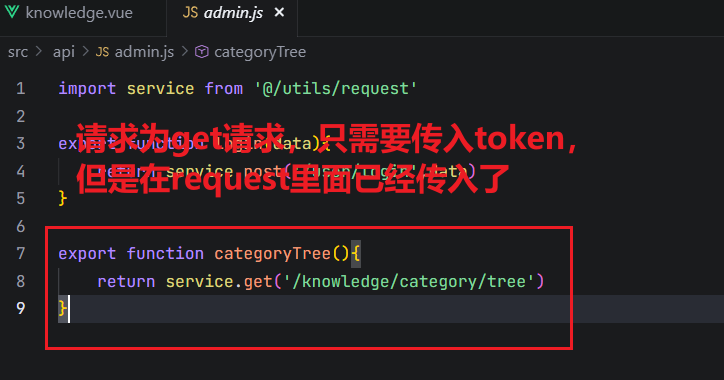
import { categoryTree } from '@/api/admin'
const formItem = [
{comp:'input',prop:'title',labe:'文章标题',placeholder:'请输入文章标题'},
{comp:'select',prop:'categoryId',labe:'分类',placeholder:'请选择分类'},
{comp:'select',prop:'status',labe:'状态',placeholder:'请选择分类',options:[
{
label:'草稿',
value:'0'
},
{
label:'已发布',
value:'1'
},
{
label:'已下线',
value:'2'
},
]},
]
const handleSearch = (formData) => {
console.log(formData,'查询参数')
}
// 分类映射
const categoryMap = reactive({})
// 分类列表
const categories = ref([])
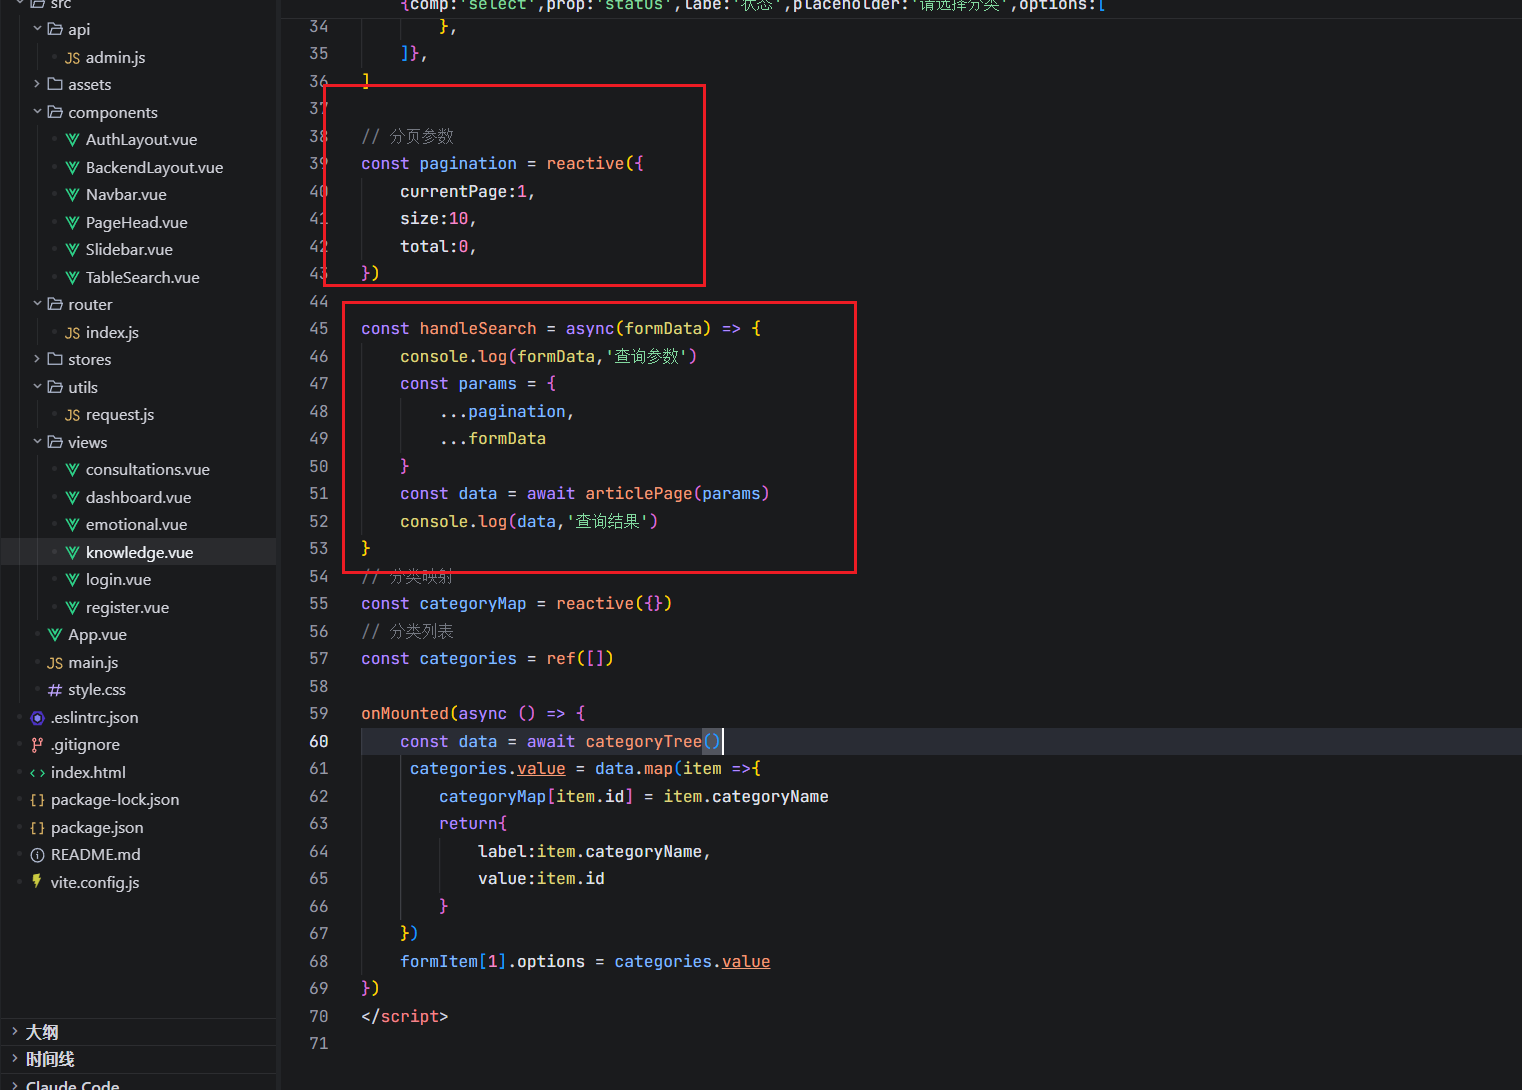
onMounted(async () => {
const data = await categoryTree()
categories.value = data.map(item =>{
categoryMap[item.id] = item.categoryName
return{
label:item.categoryName,
value:item.id
}
})
formItem[1].options = categories.value
})
</script>
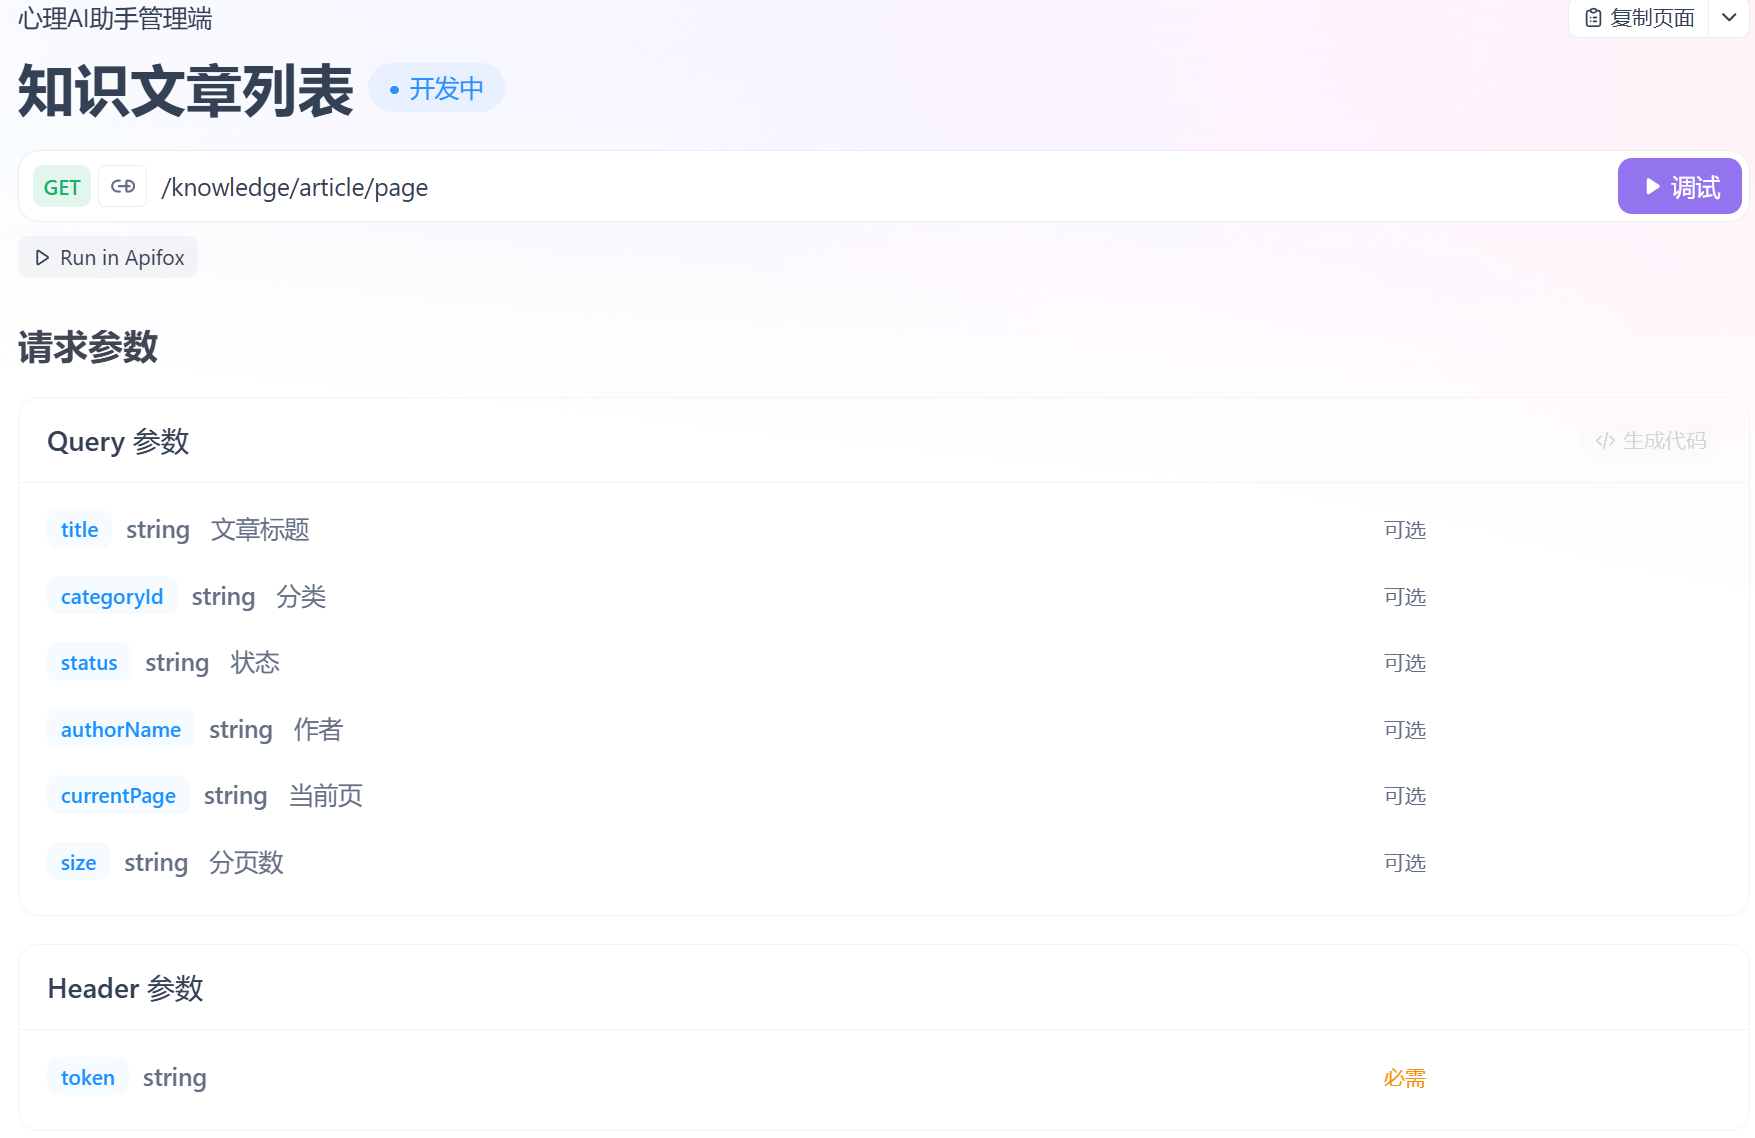
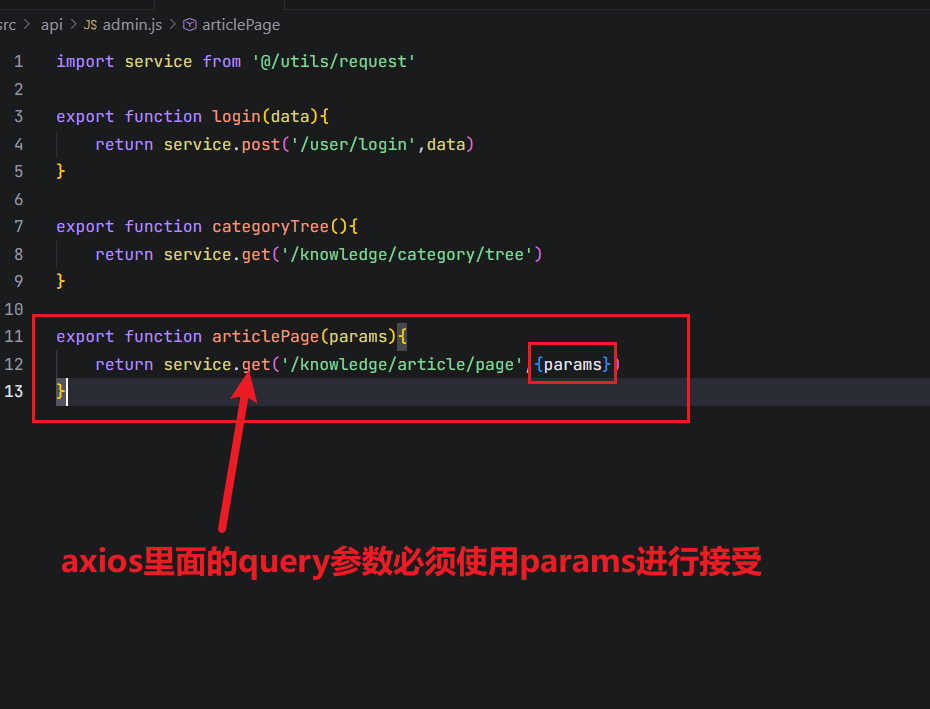
2.10.1 知识文章列表数据获取
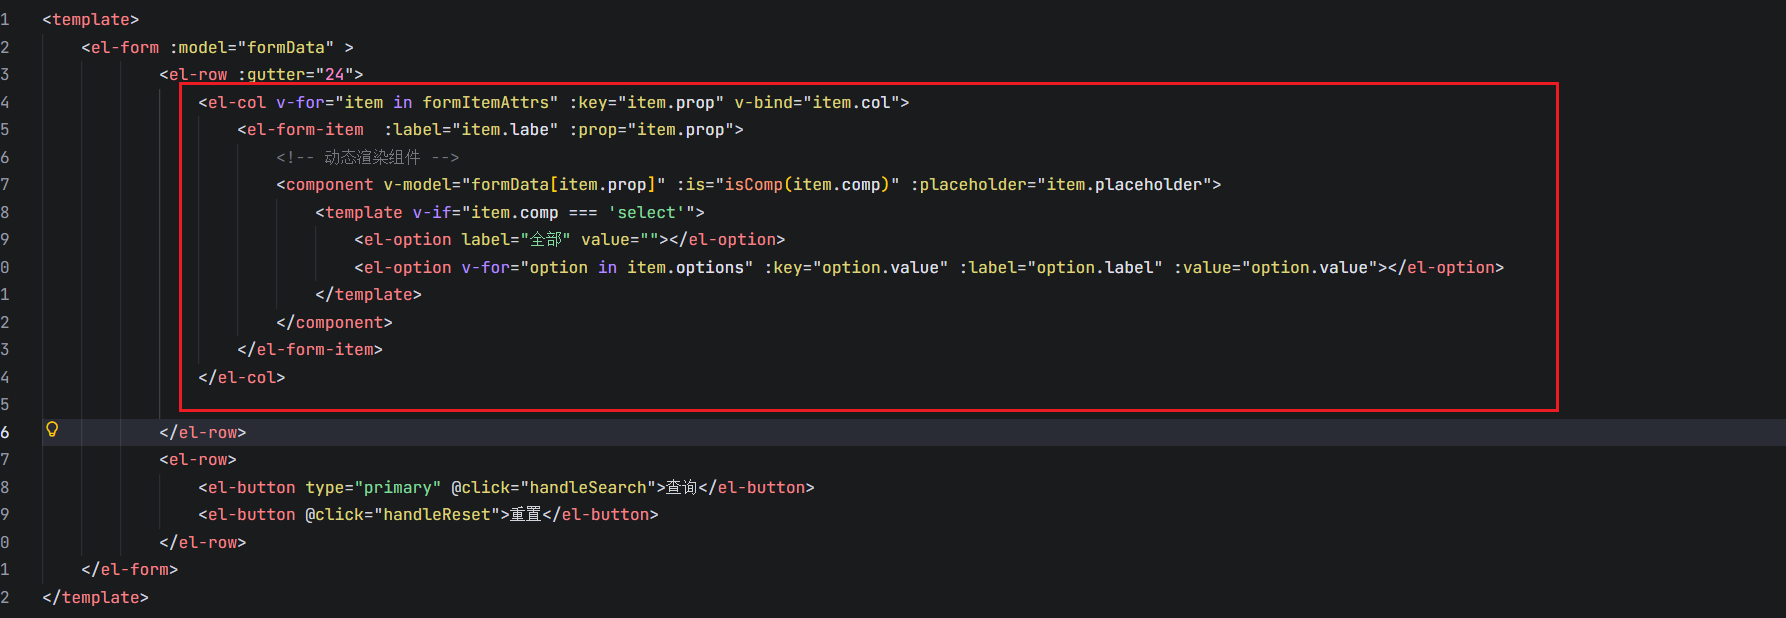
2.10.2 使用element渲染表单
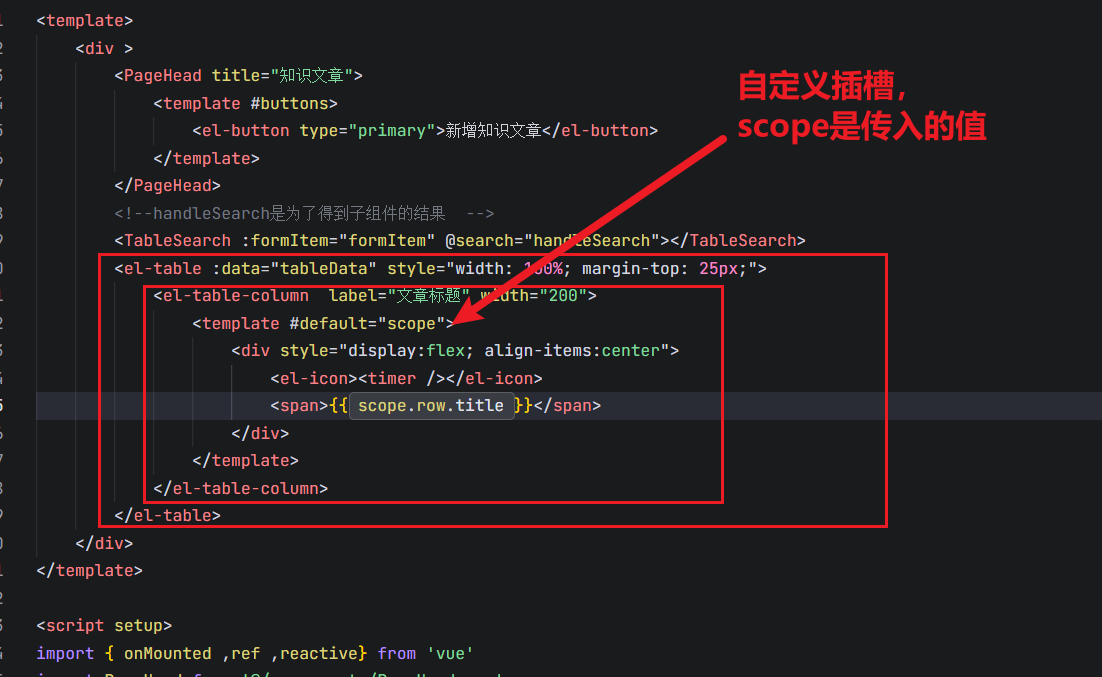
        <el-table :data="tableData" style="width: 100%; margin-top: 25px;">
            <el-table-column  label="文章标题" width="200">
                <template #default="scope">
                    <div style="display:flex; align-items:center">
                        <el-icon><timer /></el-icon>
                        <span>{{ scope.row.title }}</span>
                    </div>
                </template>
            </el-table-column>
            <el-table-column  label="分类" width="200">
                <template #default="scope">
                    <div style="display:flex; align-items:center">
                        <el-icon><timer /></el-icon>
                        <span>{{ categoryMap[scope.row.categoryId] }}</span>
                    </div>
                </template>
            </el-table-column>
            <el-table-column prop="authorName" label="作者" width="150">
            </el-table-column>
            <el-table-column prop="readCount" label="阅读量" width="150">
            </el-table-column>
            <el-table-column prop="publishedAt" label="发布时间" width="200">
            </el-table-column>
            <el-table-column  label="操作" width="200">
                <template #default="scope">
                    <el-button text type="primary" size="mini">编辑</el-button>
                    <el-button v-if="scope.row.status == 0 || scope.row.status == 2" text type="success" size="mini">发布</el-button>
                    <el-button v-if="scope.row.status == 1" text type="warning" size="mini">下线</el-button>
                    <el-button text type="danger" size="mini">删除</el-button>
                </template>
            </el-table-column>
        </el-table>
设置好了发现有一些样式问题
分析:
操作栏换行了 给的宽度不够
没有占满整个页面 因为每个都给了固定的宽度
解决样式问题
文章标题列去除自己设置的宽度
操作栏给240px
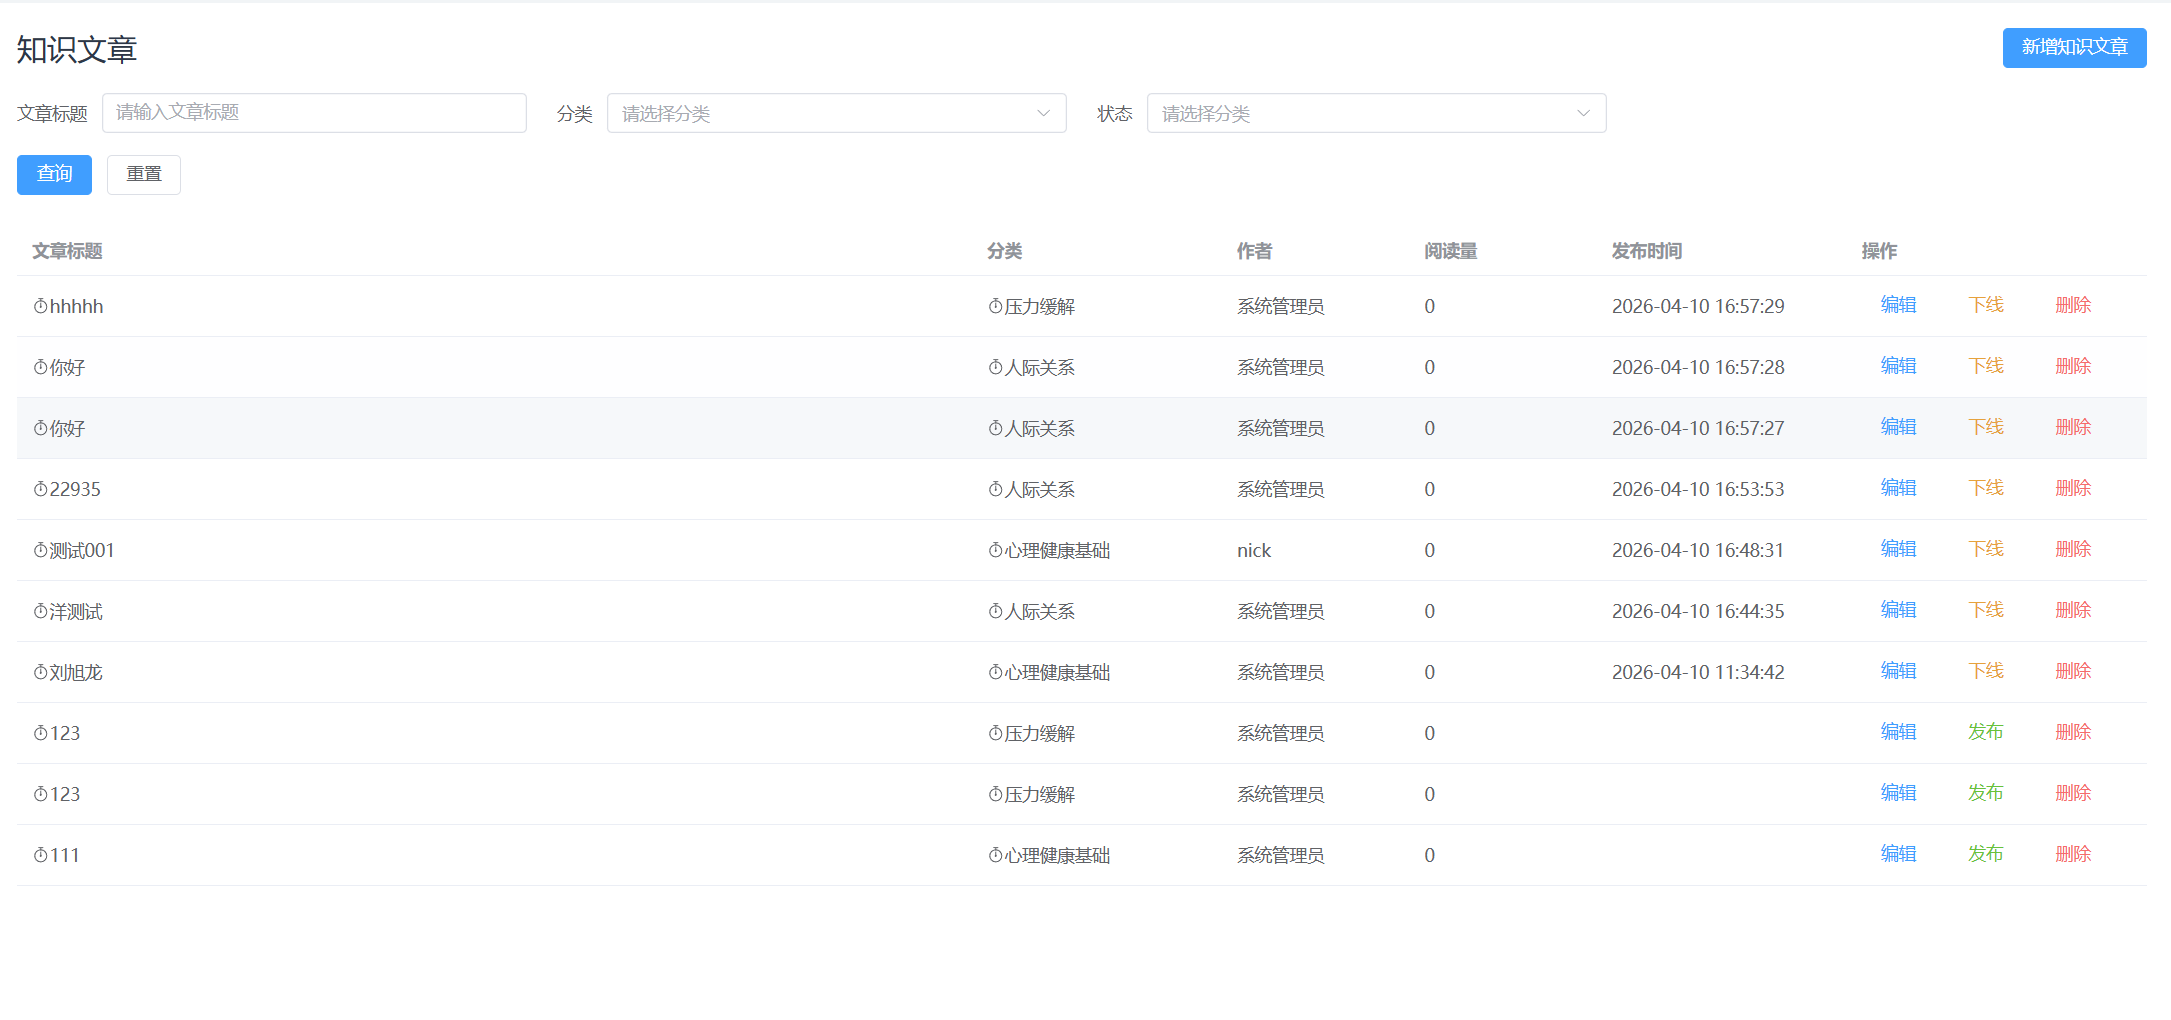
还有个问题,当屏幕缩小的时候,会有布局乱以及看不全的情况
折叠效果怎么实现?
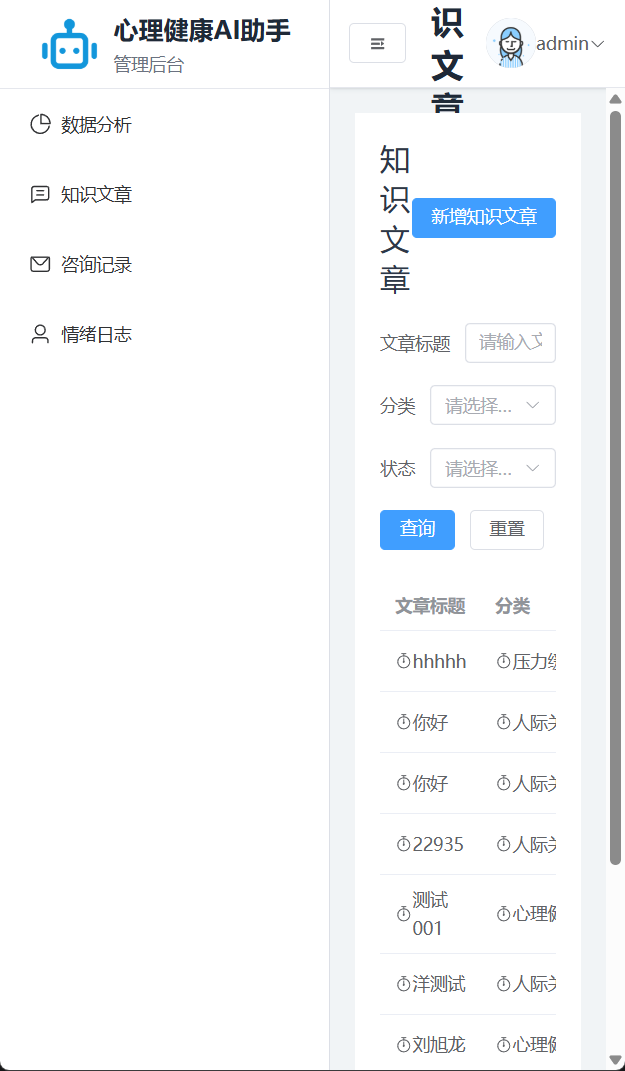
<el-table-column label="文章标题" fixed="left">
fiexed属性
<el-table-column width="200" label="文章标题" fixed="left">
2.10.3 分页以及编辑的弹窗
同样的使用组件
total是一共有多少数据,page-size是一页显示多少行数据
<el-pagination
    style="margin-top: 25px;"
    :page-size="pagination.size"   <!-- 每页几条 -->
    :total="pagination.total"     <!-- 总条数 -->
    layout="prev, pager, next"     <!-- 显示上一页、页码、下一页 -->
    @change="handleChange"         <!-- 页码变了,自动触发这个函数 -->
/>
const handleChange = (page) => {
pagination.currentPage = page
handleSearch()
}编辑弹窗设计:
封装成一个组件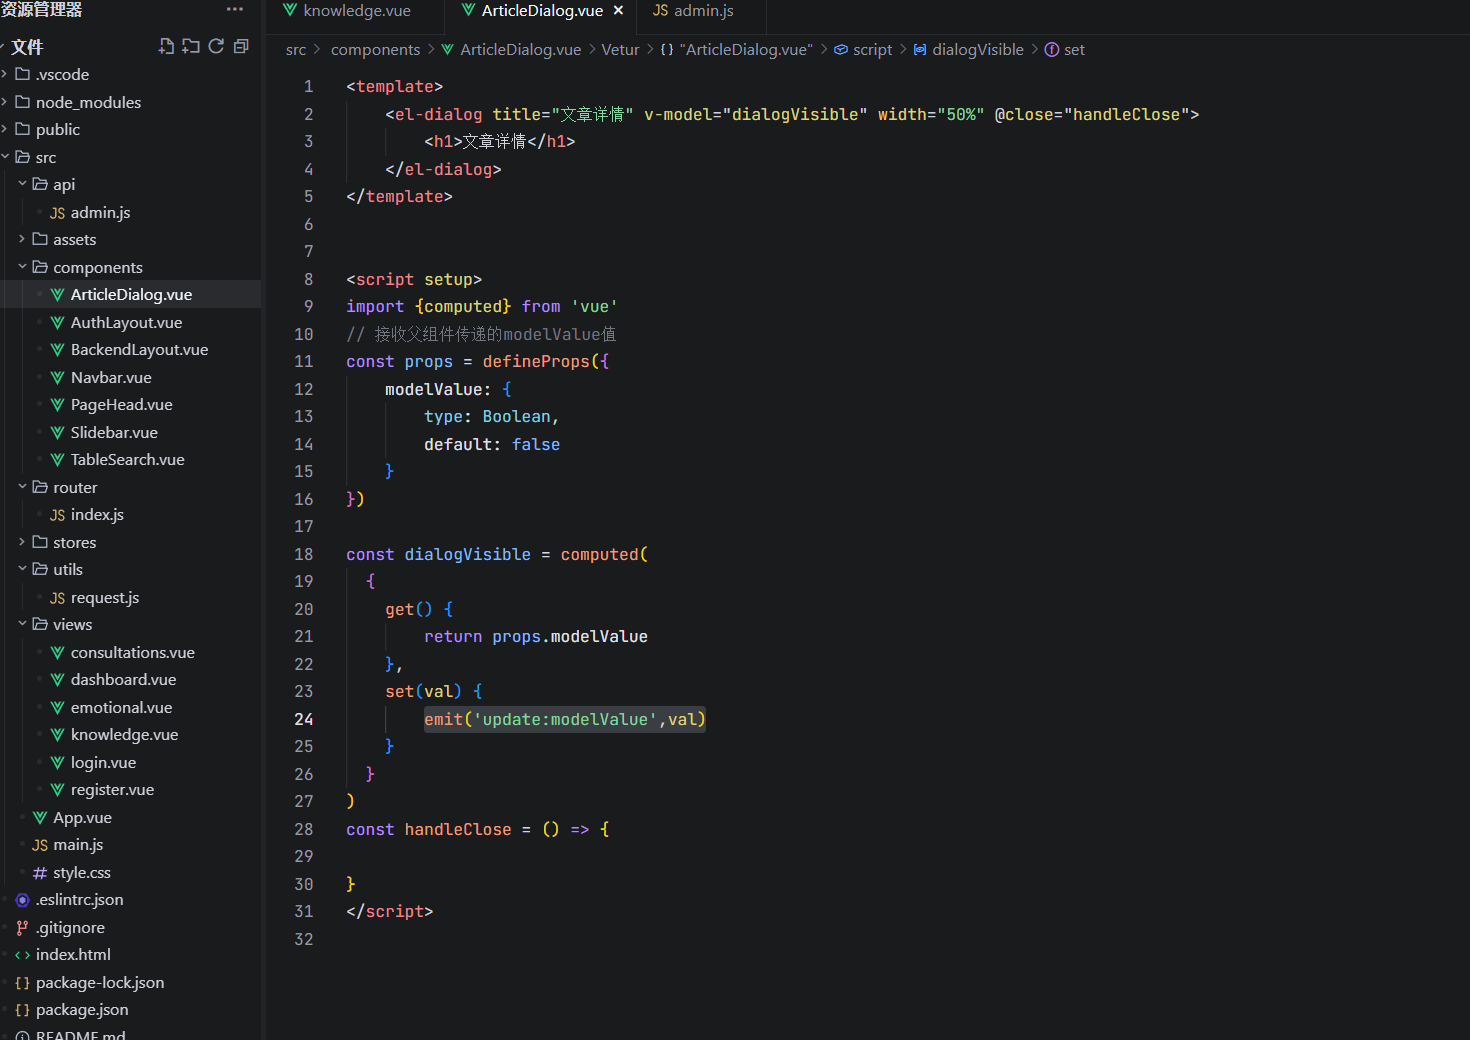
父组件这么写
<ArticleDialog v-model:modelValue="dialogVisible"></ArticleDialog>解析:
<ArticleDialog
:modelValue="dialogVisible" <!-- 父→子:把父组件的 dialogVisible 传给子组件的 modelValue prop -->
@update:modelValue="dialogVisible = $event" <!-- 父监听子组件的 update:modelValue 事件,收到后自动更新 dialogVisible -->
/>这里是有点难理解的
1)父组件使用了v-model是简写形式,不仅定义了父子也定义了子传父的function即@update:modelValue
2)子组件el-dialogue点击×的时候会自动将dialogVisible变成false,封装了一个计算属性
3)dialogVisible改变会自动触发计算属性,导致set函数启动,值val就是false
4)emit触发事件,emit('update:modelValue',val)通知父组件修改modelValue的值
2.10.3.1 新增所需要的表单
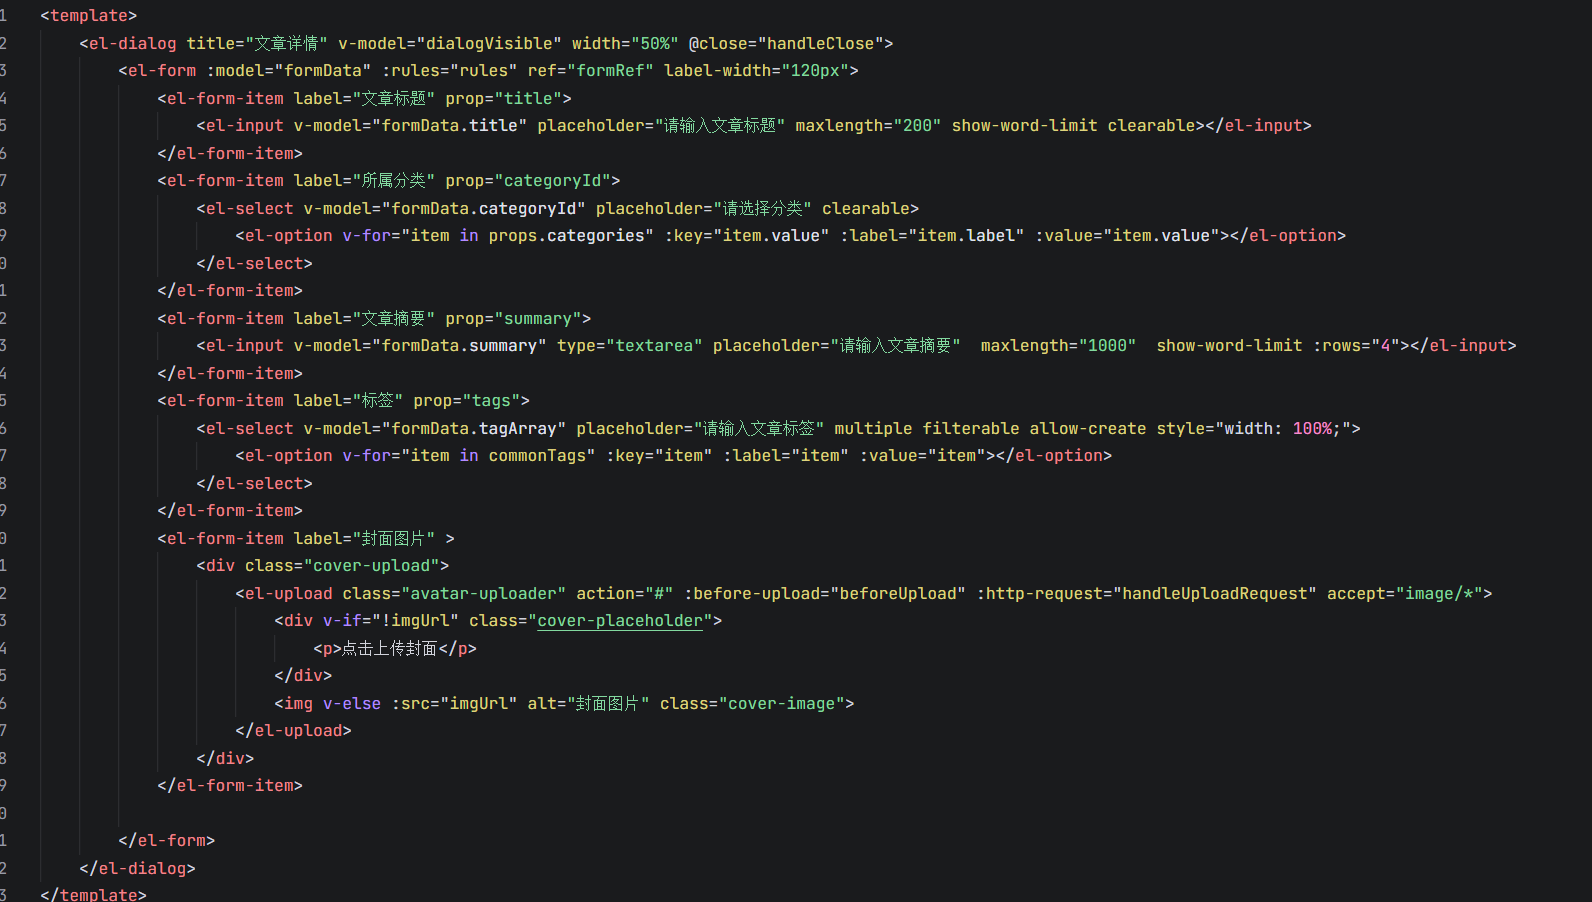
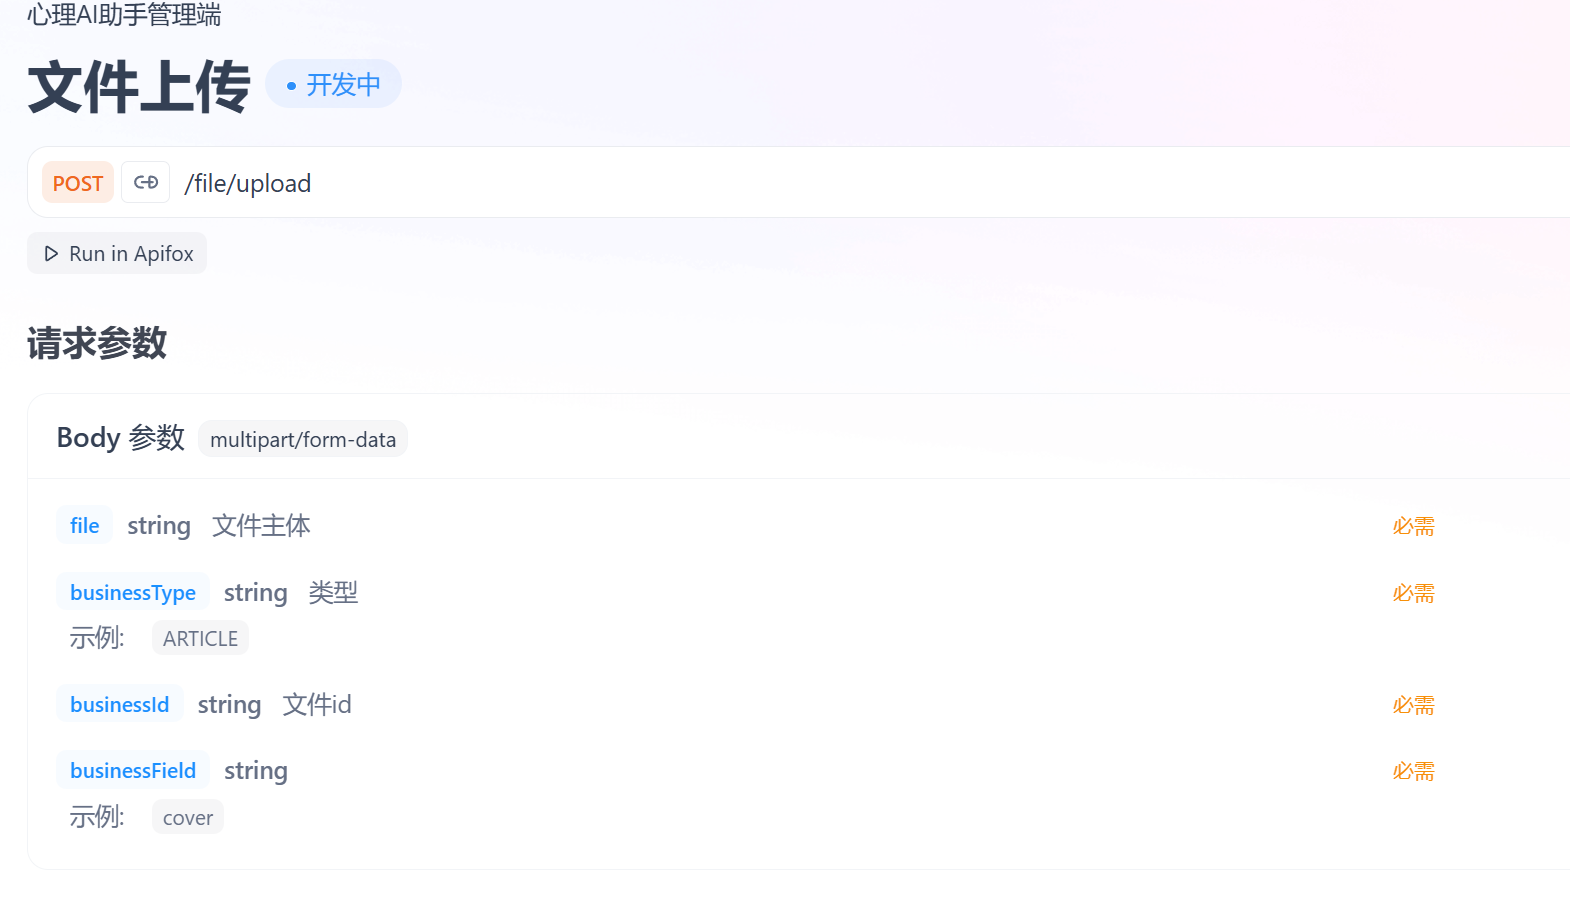
着重介绍一下如何上传图片
当然也是使用组件 el-upload
俩个function,beforeupload(上传前进行验证),handleuploadrequest(处理上传请求
<el-form-item label="封面图片" >
<div class="cover-upload">
<el-upload
class="avatar-uploader"
action="#"
:before-upload="beforeUpload"
:http-request="handleUploadRequest"
accept="image/*"
:show-file-list="false" >
<div v-if="!imgUrl" class="cover-placeholder">
<p>点击上传封面</p>
</div>
<img v-else :src="imgUrl" alt="封面图片" class="cover-image">
</el-upload>
<div v-if="imgUrl" class="cover-remove">
<el-button type="danger" size="mini" @click="handleRemove">移除封面</el-button>
</div>
</div>
</el-form-item>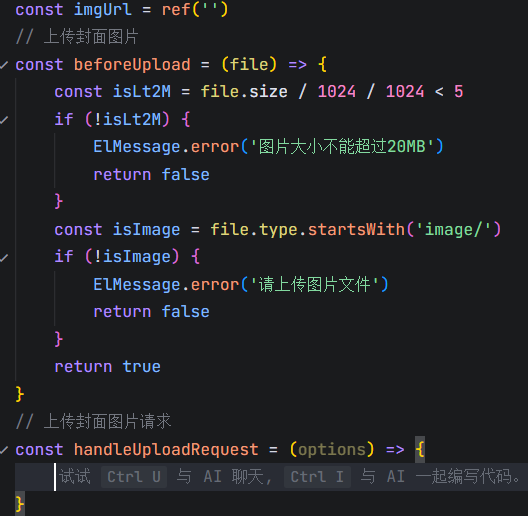
// 上传封面图片请求
const handleUploadRequest = async({file}) => {
// uuid生成
const businessId = crypto.randomUUID()
const fileRes = await uploadFile(file, {
businessId: businessId
})
imgUrl.value = fileBaseUrl + fileRes.filePath
formData.coverImage = fileRes.filePath
}
// 移除封面图片
const handleRemove = () => {
imgUrl.value = ''
formData.coverImage = ''
}其中这里的fileBaseUrl是后端服务器的图片存储地址,一般我们会在src/config下面建立一个index.js文件存放该地址
export const fileBaseUrl = 'http://159.75.169.224:1235'图像上传的接口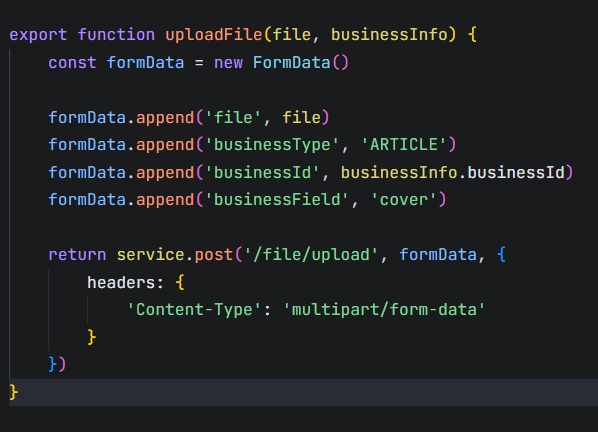
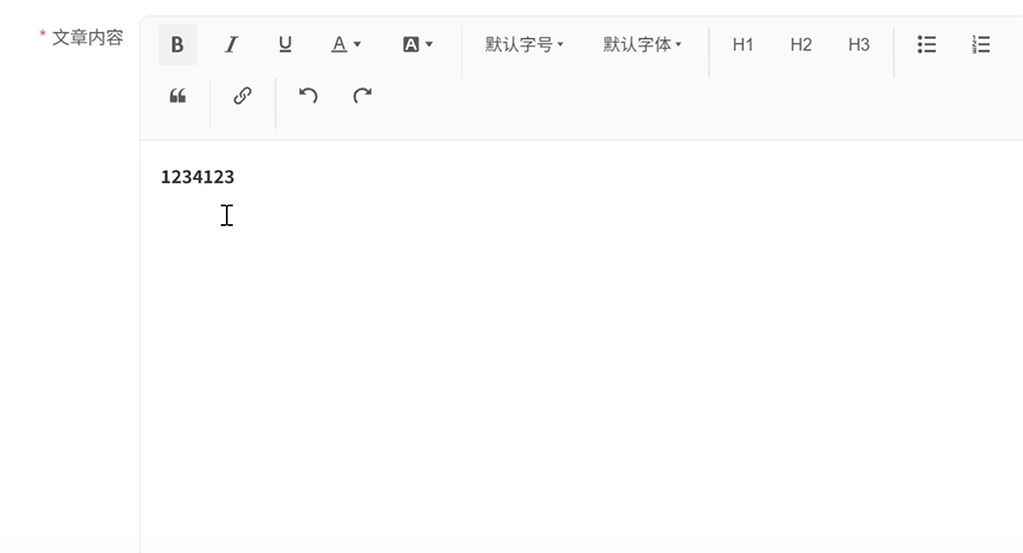
2.10.3.2 富文本编辑器
还得在表单里面添加点东西进去 2026/4/11 0:52
使用一个新的插件https://www.wangeditor.com/。ok简历上又可以把这个ui库写进去了
先安装
npm install @wangeditor/editor --save npm install @wangeditor/editor-for-vue@next --save这里老师已经写好了富文本的组件不需要手写看懂就行
<template>
<div class="rich-text-editor">
<!-- 富文本编辑器 -->
<div class="editor-container">
<WangToolbar
:editor="editorRef"
:defaultConfig="toolbarConfig"
mode="default"
class="editor-toolbar"
/>
<WangEditor
v-model="content"
:defaultConfig="editorConfig"
mode="default"
class="wang-editor"
@onCreated="handleEditorCreated"
@onChange="handleEditorChange"
@onDestroyed="handleEditorDestroyed"
/>
</div>
<!-- 字数统计 -->
<div v-if="showWordCount" class="editor-footer">
<div class="word-count">
<span class="count-text">{{ currentCharCount }} / {{ maxCharCount }}</span>
<div class="progress-bar">
<div
class="progress-fill"
:style="{ width: Math.min((currentCharCount / maxCharCount) * 100, 100) + '%' }"
></div>
</div>
</div>
</div>
</div>
</template>
<script setup>
import { ref, reactive, computed, onBeforeUnmount, shallowRef, watch } from 'vue'
import { ElMessage } from 'element-plus'
import '@wangeditor/editor/dist/css/style.css'
import { Editor as WangEditor, Toolbar as WangToolbar } from '@wangeditor/editor-for-vue'
// Props
const props = defineProps({
modelValue: {
type: String,
default: ''
},
placeholder: {
type: String,
default: '请输入内容...'
},
maxCharCount: {
type: Number,
default: 2000
},
showWordCount: {
type: Boolean,
default: true
},
showSecurityTip: {
type: Boolean,
default: true
},
toolbarKeys: {
type: Array,
default: () => [
'bold', 'italic', 'underline', 'color', 'bgColor', '|',
'fontSize', 'fontFamily', '|',
'header1', 'header2', 'header3', '|',
'bulletedList', 'numberedList', 'blockquote', '|',
'insertLink', '|',
'undo', 'redo'
]
},
minHeight: {
type: String,
default: '300px'
}
})
// Emits
const emit = defineEmits(['update:modelValue', 'change', 'created'])
// 响应式数据
const editorRef = shallowRef(null)
const currentCharCount = ref(0)
// 计算属性
const content = computed({
get: () => props.modelValue,
set: (value) => emit('update:modelValue', value)
})
// 编辑器配置
const editorConfig = reactive({
placeholder: props.placeholder,
MENU_CONF: {
fontSize: {
fontSizeList: [
'12px', '13px', '14px', '15px', '16px', '17px', '18px',
'19px', '20px', '22px', '24px', '26px', '28px', '30px', '32px', '36px'
]
},
fontFamily: {
fontFamilyList: [
'Arial',
'Tahoma',
'Verdana',
'"Times New Roman"',
'"Courier New"',
'"Microsoft YaHei"',
'"微软雅黑"',
'"SimSun"',
'"宋体"',
'"SimHei"',
'"黑体"',
'"KaiTi"',
'"楷体"'
]
},
color: {
colors: [
// 基础颜色
'#000000', '#333333', '#666666', '#999999', '#CCCCCC',
// 治愈系主题色
'#4A90E2', '#7ED321', '#F5A623', '#9013FE',
// 红色系
'#FF6B6B', '#FF4757', '#FF3838', '#FF2D2D', '#DC3545',
// 橙色系
'#FFA502', '#FF6348', '#FF7675', '#FDCB6E', '#F39C12',
// 黄色系
'#FFC312', '#F1C40F', '#F39801', '#FFD93D', '#FFDD59',
// 绿色系
'#2ED573', '#1DD1A1', '#10AC84', '#00B894', '#00A085',
// 蓝色系
'#3742FA', '#2F3542', '#40739E', '#487EB0', '#0984E3',
// 紫色系
'#8E44AD', '#9B59B6', '#A55EEA', '#3D5AFE', '#667AFA',
// 粉色系
'#FD79A8', '#E84393', '#FF7675', '#FF6B9D', '#FF5722'
]
},
bgColor: {
colors: [
// 基础背景色
'#FFFFFF', '#F8F9FA', '#E9ECEF', '#DEE2E6', '#CED4DA',
// 浅色治愈系
'#E3F2FD', '#E8F5E8', '#FFF3E0', '#F3E5F5',
// 浅红色系
'#FFEBEE', '#FCE4EC', '#F8BBD9', '#F48FB1',
// 浅橙色系
'#FFF3E0', '#FFE0B2', '#FFCC80', '#FFB74D',
// 浅黄色系
'#FFFDE7', '#FFF9C4', '#FFF176', '#FFEB3B',
// 浅绿色系
'#E8F5E8', '#C8E6C9', '#A5D6A7', '#81C784',
// 浅蓝色系
'#E3F2FD', '#BBDEFB', '#90CAF9', '#64B5F6',
// 浅紫色系
'#F3E5F5', '#E1BEE7', '#CE93D8', '#BA68C8',
// 浅灰色系
'#FAFAFA', '#F5F5F5', '#EEEEEE', '#E0E0E0'
]
},
// 添加更多功能配置
lineHeight: {
lineHeightList: ['1', '1.15', '1.2', '1.5', '1.75', '2', '2.5', '3']
}
}
})
// 工具栏配置
const toolbarConfig = reactive({
toolbarKeys: props.toolbarKeys
})
// 方法
const handleEditorCreated = (editor) => {
editorRef.value = editor
// 初始化字数统计
updateCharCount()
// 调试信息 - 检查字体配置
console.log('编辑器实例:', editor)
console.log('工具栏配置:', editor.getConfig())
// 检查字体菜单
const menus = editor.getAllMenuKeys()
console.log('所有可用菜单:', menus)
if (menus.includes('fontFamily')) {
console.log('字体菜单已启用')
} else {
console.warn('字体菜单未启用')
}
// 触发创建事件
emit('created', editor)
console.log('富文本编辑器已创建')
}
const handleEditorChange = (editor) => {
updateCharCount()
// 触发变更事件
emit('change', {
html: editor.getHtml(),
text: editor.getText()
})
}
const handleEditorDestroyed = () => {
editorRef.value = null
console.log('富文本编辑器已销毁')
}
const updateCharCount = () => {
if (!editorRef.value) return
const text = editorRef.value.getText()
const cleanText = text.replace(/\s+/g, ' ').trim()
currentCharCount.value = cleanText === '' ? 0 : cleanText.length
// 检查字数限制
if (currentCharCount.value > props.maxCharCount) {
ElMessage.warning(`内容长度不能超过 ${props.maxCharCount} 字符`)
}
}
// 公开方法
const getHtml = () => {
return editorRef.value ? editorRef.value.getHtml() : ''
}
const getText = () => {
return editorRef.value ? editorRef.value.getText() : ''
}
const setHtml = (html) => {
if (editorRef.value) {
editorRef.value.setHtml(html)
}
}
const clear = () => {
if (editorRef.value) {
editorRef.value.clear()
}
}
const insertText = (text) => {
if (editorRef.value) {
editorRef.value.insertText(text)
}
}
const focus = () => {
if (editorRef.value) {
editorRef.value.focus()
}
}
// 暴露方法给父组件
defineExpose({
getHtml,
getText,
setHtml,
clear,
insertText,
focus,
editor: editorRef
})
// 监听 placeholder 变化
watch(() => props.placeholder, (newPlaceholder) => {
editorConfig.placeholder = newPlaceholder
})
// 组件销毁时清理
onBeforeUnmount(() => {
if (editorRef.value) {
editorRef.value.destroy()
}
})
</script>
<style scoped>
.rich-text-editor {
border: 1px solid #e5e7eb;
border-radius: 0.5rem;
overflow: hidden;
background: white;
}
/* 编辑器容器 */
.editor-container {
display: flex;
flex-direction: column;
}
.editor-toolbar {
border-bottom: 1px solid #e5e7eb;
}
.wang-editor {
min-height: v-bind(minHeight);
}
/* 工具栏样式 */
:deep(.w-e-toolbar) {
border: none;
background: #f9fafb;
padding: 0.5rem;
flex-wrap: wrap;
}
:deep(.w-e-toolbar .w-e-bar-item) {
margin: 0 0.125rem;
border-radius: 0.25rem;
height: 28px;
min-width: 28px;
}
:deep(.w-e-toolbar .w-e-bar-item:hover) {
background: #e5e7eb;
}
:deep(.w-e-toolbar .w-e-bar-item.w-e-bar-item-active) {
background: #eaf2ff !important;
color: #2563eb !important;
outline: 1px solid #bfdbfe;
}
:deep(.w-e-toolbar .w-e-bar-divider) {
margin: 0 0.25rem;
}
/* 编辑器内容区域样式 */
:deep(.w-e-text-container) {
background: white;
padding: 1rem;
position: relative;
}
:deep(.w-e-text-container [data-slate-editor]) {
min-height: v-bind(minHeight);
padding: 0;
text-align: left !important;
line-height: 1.6;
/* 不设置默认字体,让用户自由选择 */
}
:deep(.w-e-text-container [data-slate-editor] p) {
text-align: left !important;
margin: 0 0 0.5rem 0;
padding: 0;
line-height: inherit;
}
/* 确保字体样式正确应用 - 简化版本 */
:deep(.w-e-text-container [data-slate-editor] *) {
/* 不设置任何强制字体,让编辑器处理 */
}
/* 颜色面板样式优化 */
:deep(.w-e-color-panel) {
max-width: 300px;
padding: 8px;
}
:deep(.w-e-color-panel .w-e-color-list) {
display: grid;
grid-template-columns: repeat(8, 1fr);
gap: 4px;
}
:deep(.w-e-color-panel .w-e-color-item) {
width: 24px;
height: 24px;
border-radius: 4px;
border: 1px solid #e5e7eb;
cursor: pointer;
transition: all 0.2s ease;
}
:deep(.w-e-color-panel .w-e-color-item:hover) {
transform: scale(1.1);
border-color: #4A90E2;
box-shadow: 0 2px 4px rgba(74, 144, 226, 0.3);
}
/* 字体面板样式优化 */
:deep(.w-e-select-list) {
max-height: 200px;
overflow-y: auto;
}
:deep(.w-e-select-list .w-e-select-list-item) {
padding: 8px 12px;
cursor: pointer;
transition: background-color 0.2s ease;
}
:deep(.w-e-select-list .w-e-select-list-item:hover) {
background-color: #f8f9fa;
}
:deep(.w-e-select-list .w-e-select-list-item.selected) {
background-color: #e3f2fd;
color: #4A90E2;
}
:deep(.w-e-text-placeholder) {
color: #9ca3af;
font-style: normal;
text-align: left !important;
padding: 0;
margin: 0;
line-height: 1.6;
position: absolute;
top: 1rem;
left: 1rem;
right: 1rem;
pointer-events: none;
white-space: pre-wrap;
font-family: "Source Han Sans CN", "Microsoft YaHei", sans-serif;
}
/* 下拉面板样式 */
:deep(.w-e-panel) {
z-index: 3000 !important;
pointer-events: auto;
box-shadow: 0 4px 12px rgba(0, 0, 0, 0.1);
border-radius: 0.375rem;
border: 1px solid #e5e7eb;
background: white;
max-width: 320px;
}
/* 字体选择面板样式 */
:deep(.w-e-panel .w-e-panel-content .w-e-panel-content-font-family) {
max-height: 200px;
overflow-y: auto;
}
/* 为不同字体添加预览样式 - 简化版本 */
:deep(.w-e-panel .w-e-panel-content .w-e-panel-content-font-family .w-e-panel-content-font-family-item) {
padding: 8px 12px;
cursor: pointer;
border-bottom: 1px solid #f0f0f0;
font-size: 14px;
line-height: 1.4;
}
:deep(.w-e-panel .w-e-panel-content .w-e-panel-content-font-family .w-e-panel-content-font-family-item:hover) {
background-color: #f8f9fa;
}
:deep(.w-e-panel .w-e-panel-content .w-e-panel-content-font-family .w-e-panel-content-font-family-item.selected) {
background-color: #e3f2fd;
color: #4A90E2;
font-weight: 500;
}
/* 字号选择面板样式 */
:deep(.w-e-panel .w-e-panel-content .w-e-panel-content-font-size) {
display: grid;
grid-template-columns: repeat(4, 1fr);
gap: 4px;
padding: 8px;
}
:deep(.w-e-panel .w-e-panel-content .w-e-panel-content-font-size .w-e-panel-content-font-size-item) {
padding: 6px 8px;
text-align: center;
cursor: pointer;
border-radius: 4px;
border: 1px solid #e5e7eb;
transition: all 0.2s ease;
}
:deep(.w-e-panel .w-e-panel-content .w-e-panel-content-font-size .w-e-panel-content-font-size-item:hover) {
background-color: #f8f9fa;
border-color: #4A90E2;
}
:deep(.w-e-panel .w-e-panel-content .w-e-panel-content-font-size .w-e-panel-content-font-size-item.selected) {
background-color: #4A90E2;
color: white;
border-color: #4A90E2;
}
:deep(.w-e-select-list .selected::after) {
content: '✔';
position: absolute;
right: 8px;
top: 50%;
transform: translateY(-50%);
color: #4A90E2;
font-size: 12px;
}
/* 编辑器底部 */
.editor-footer {
display: flex;
justify-content: space-between;
align-items: center;
padding: 0.5rem 1rem;
background: #f9fafb;
border-top: 1px solid #e5e7eb;
}
.word-count {
display: flex;
align-items: center;
gap: 0.5rem;
font-size: 0.75rem;
color: #6b7280;
}
.count-text {
font-weight: 500;
}
.progress-bar {
width: 60px;
height: 4px;
background: #e5e7eb;
border-radius: 2px;
overflow: hidden;
}
.progress-fill {
height: 100%;
background: #4A90E2;
transition: all 0.3s ease;
border-radius: 2px;
}
.security-tip {
display: flex;
align-items: center;
gap: 0.25rem;
font-size: 0.75rem;
color: #6B7280;
padding: 0.5rem 1rem;
background: #f9fafb;
border-top: 1px solid #e5e7eb;
}
.security-tip i {
color: #10B981;
}
/* 响应式设计 */
@media (max-width: 768px) {
:deep(.w-e-toolbar) {
padding: 0.375rem;
}
:deep(.w-e-toolbar .w-e-bar-item) {
margin: 0 0.0625rem;
height: 24px;
min-width: 24px;
font-size: 0.875rem;
}
:deep(.w-e-text-container) {
padding: 0.75rem;
}
.editor-footer {
padding: 0.375rem 0.75rem;
}
}
</style>如何通信如下nextTick 是 Vue 的核心 API,作用是:等待 Vue 完成当前所有 DOM 更新 / 组件初始化后,再执行回调函数里的代码。在你的代码中,它就是为了等富文本编辑器完全加载就绪后,再设置内容,防止设置内容失效。
Vue 的核心机制:异步更新 DOM
Vue 不会数据一变就立刻更新 DOM,而是会缓存所有更新,等当前同步代码执行完,再一次性更新 DOM(提升性能)。
说人话就是,编辑器刚刚创建,还没等Vue进行更新(再缓存里面),你就立马要给他加东西,那当然不会成功,所以加入nexttick等dom或者组件初始化之后再改内容才会成功
<el-form-item label="文章内容" prop="content">
<RichTextEditor
v-model="formData.content"
placeholder="请输入文章内容"
:maxCharCount="5000"
@change="handleContentChange"
@created="handleEditorCreated"
min-height="400px"
/>
</el-form-item>
//传入俩个函数给富文本组件,change和created
//change在富文本改变的时候进行调用,created在创建的时候进行调用
// 文章内容改变时触发
const handleContentChange = (data) => {
formData.content = data.html
}
const editorInstance = ref(null)
// 文章内容改变时触发
const handleEditorCreated = (editor) => {
editorInstance.value = editor
// 编辑
if (formData.content && editor) {
nextTick(() => {
editor.setHtml(formData.content)
})
}
}
//子组件内
const handleEditorChange = (editor) => {
updateCharCount()
// 触发变更事件
emit('change', {
html: editor.getHtml(),
text: editor.getText()
})
}2.10.3.3 弹窗底部

<div v-if="btnPreview">
<h3>内容预览</h3>
<div v-html="formData.content"></div>
</div>
<template #footer>
<el-button @click="btnPreview = !btnPreview">{{ btnPreview ? '隐藏预览' : '预览效果' }}</el-button>
<el-button type="primary" @click="handleClose">取消</el-button>
<!-- 避免重复提交所以添加一个loading状态变量 -->
<el-button type="primary" @click="handleSubmit" :loading="loading">{{ isEdit ? '更新文章' : '新增文章' }}</el-button>
</template>btnPreview用来看内容预览是否开启 点击 新增文章->触发handleSubmit->进行表单验证->根据接口传递数据到后端-> 告诉父组件更新列表状态->更新列表
const btnPreview =ref(false)
//提交,表单校验
const formRef = ref(null)
const loading = ref(false)
const handleSubmit = () => {
// 首先要进行表单校验
formRef.value.validate((valid,fields) => {
if (valid) {
// 校验通过,提交表单
loading.value = true
}
console.log(formData, 'FormData')
const submitData = {
...formData,
tags: formData.tagArray.join(',')
}
delete submitData.tagArray
createArticle(submitData).then(res => {
loading.value = false
emit('success')
})
})
}编辑和新增逻辑没看懂,对应视频26,之后再来琢磨一下
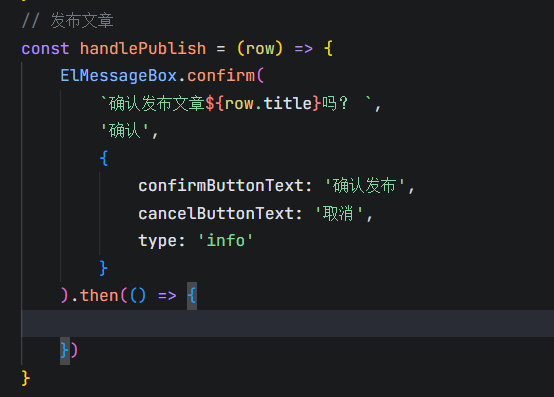
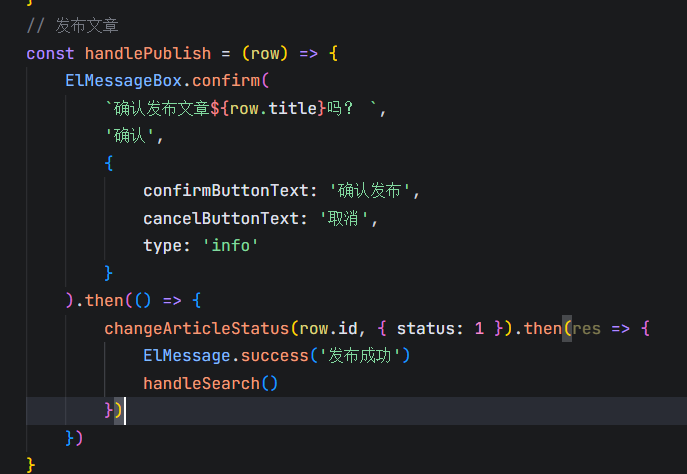
2.10.3.4 知识文章发布删除
首先定义俩个函数

点击下线会有个提示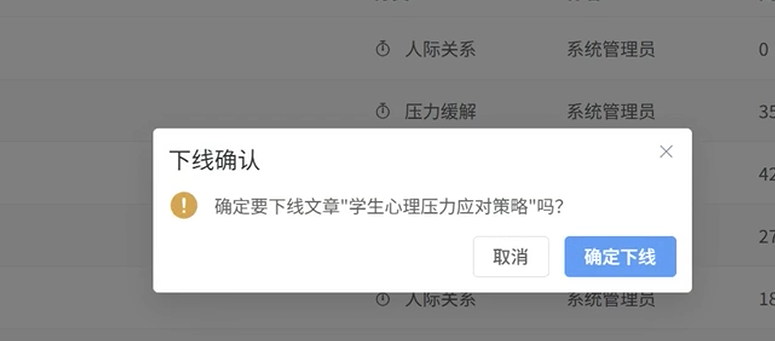
使用组件ElMessageBox二次确认
import { ElMessageBox } from 'element-plus
点击确认之后进入then,调用接口改变状态
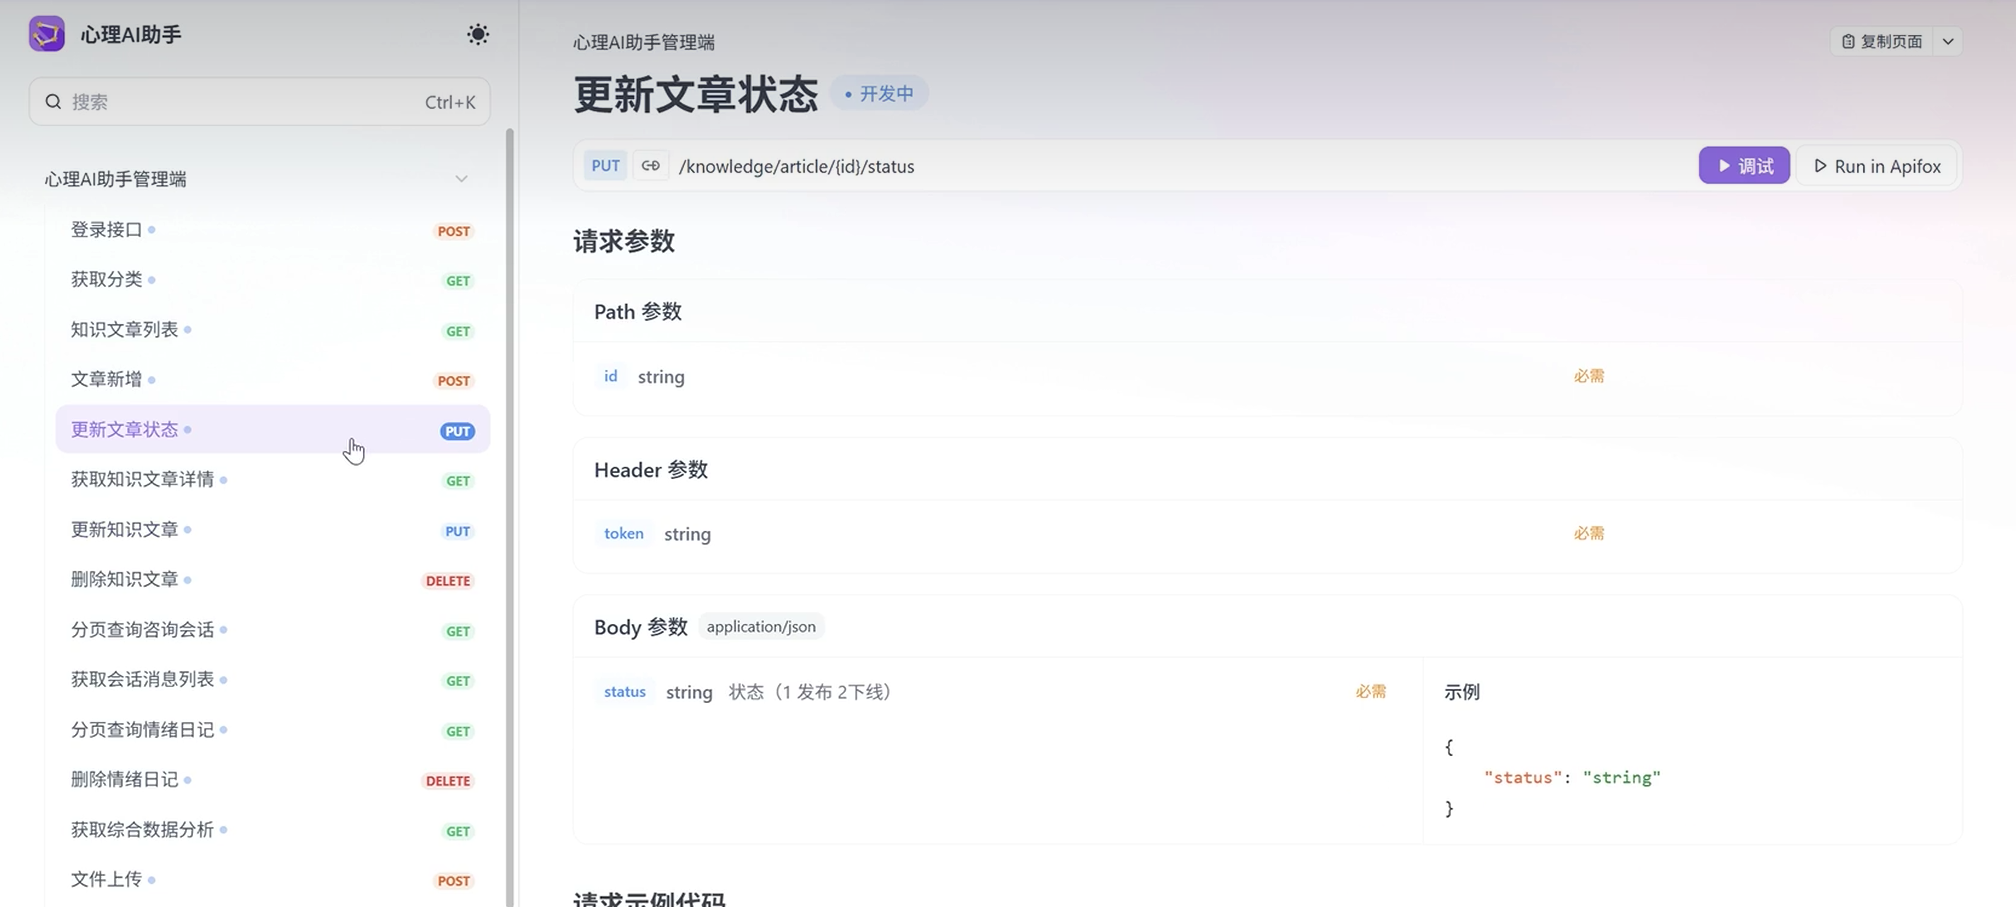
定义接口
export function changeArticleStatus(id, data) {
return service.put(`/knowledge/article/${id}/status`, data)
}
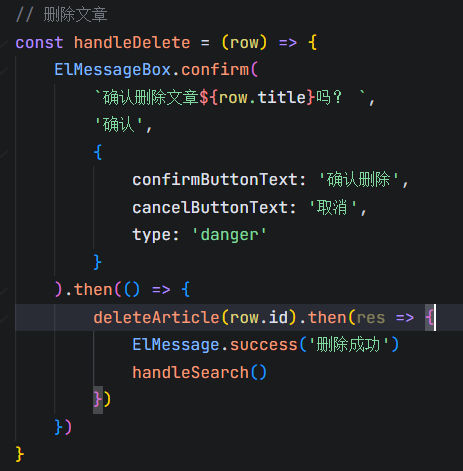
删除
2.11 咨询记录页面
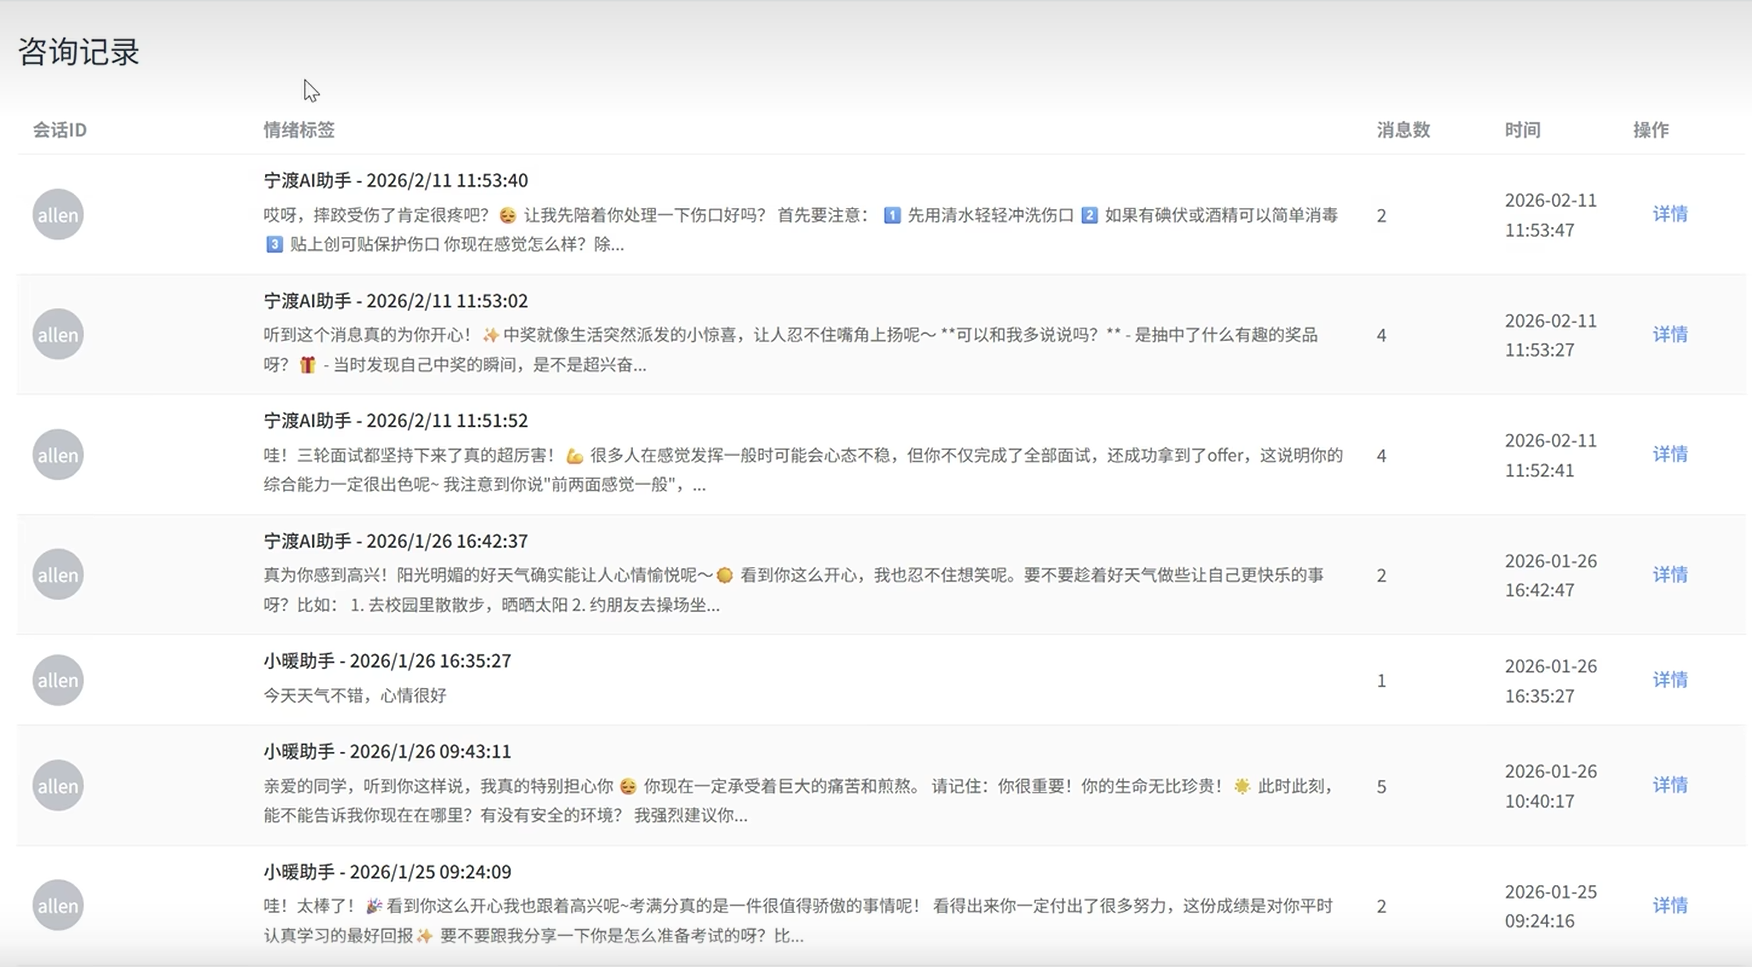
接口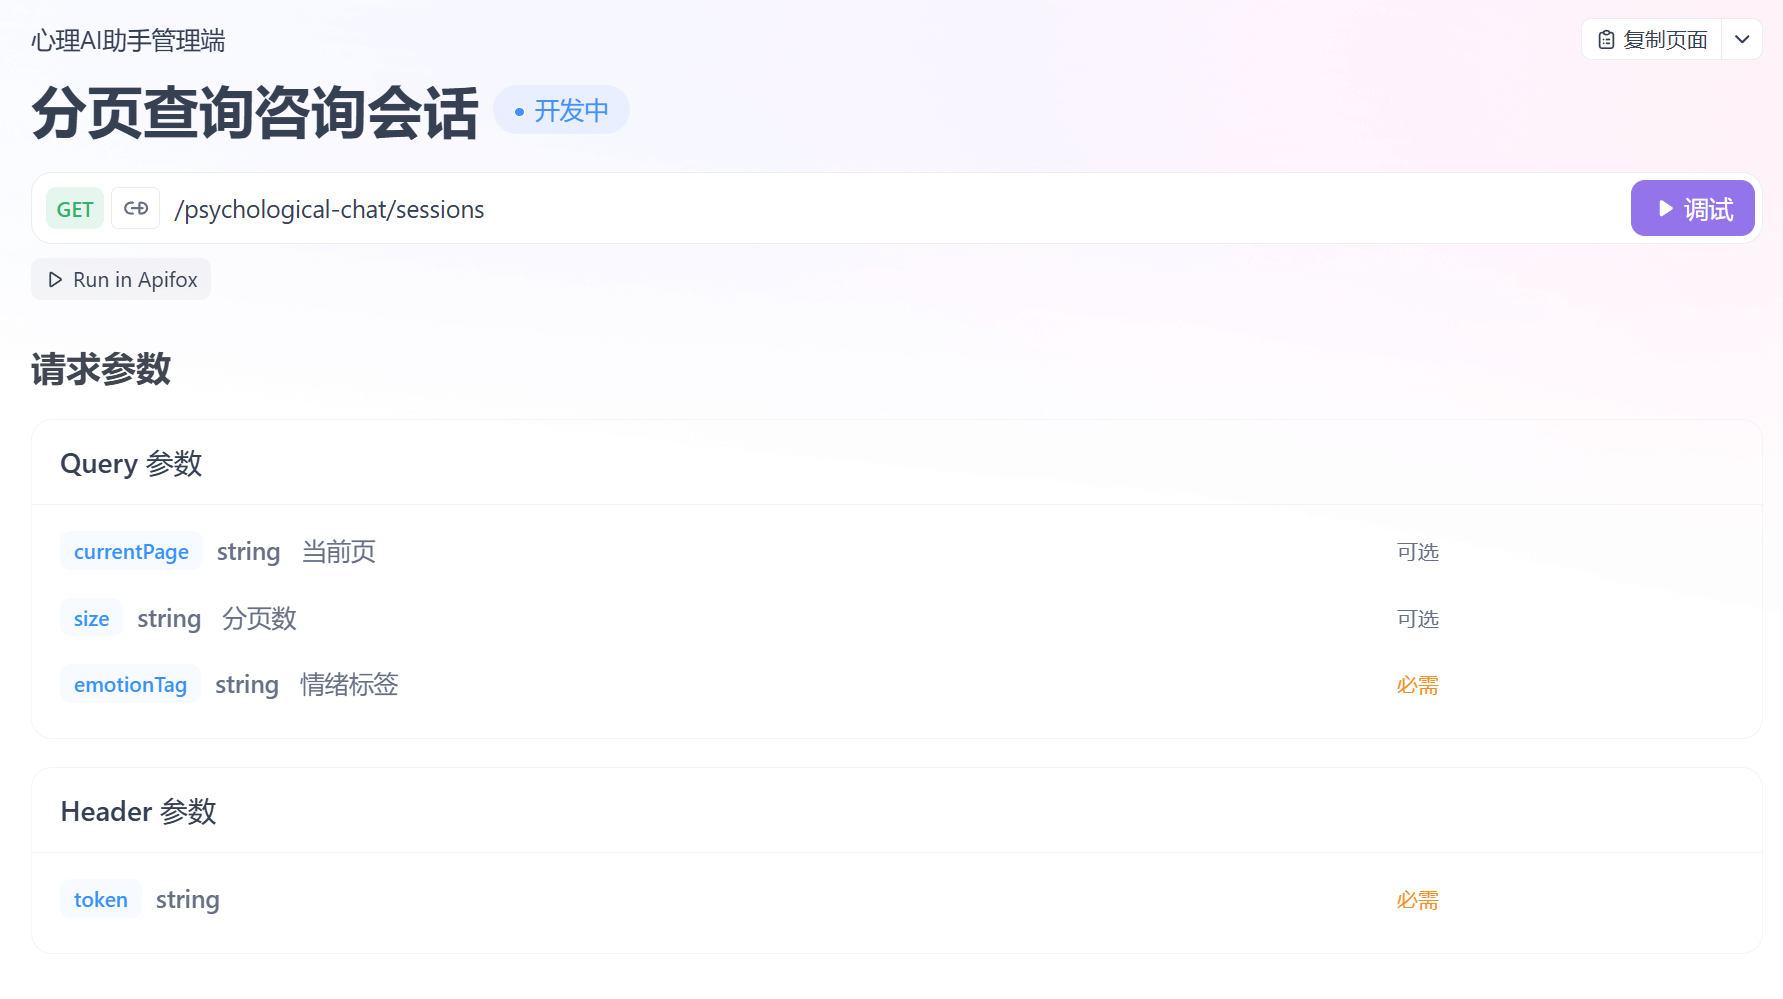
首先使用el-table先定义列表和分页组件

核心函数就是这个handleSearch执行调用后端接口引入当前页的数据,挂载的时候调用一次
点击分页的时候调用一次,点击分页的时候会将点击的数值page传给CHange函数,修改当前页。
随后调用后端接口返回数据

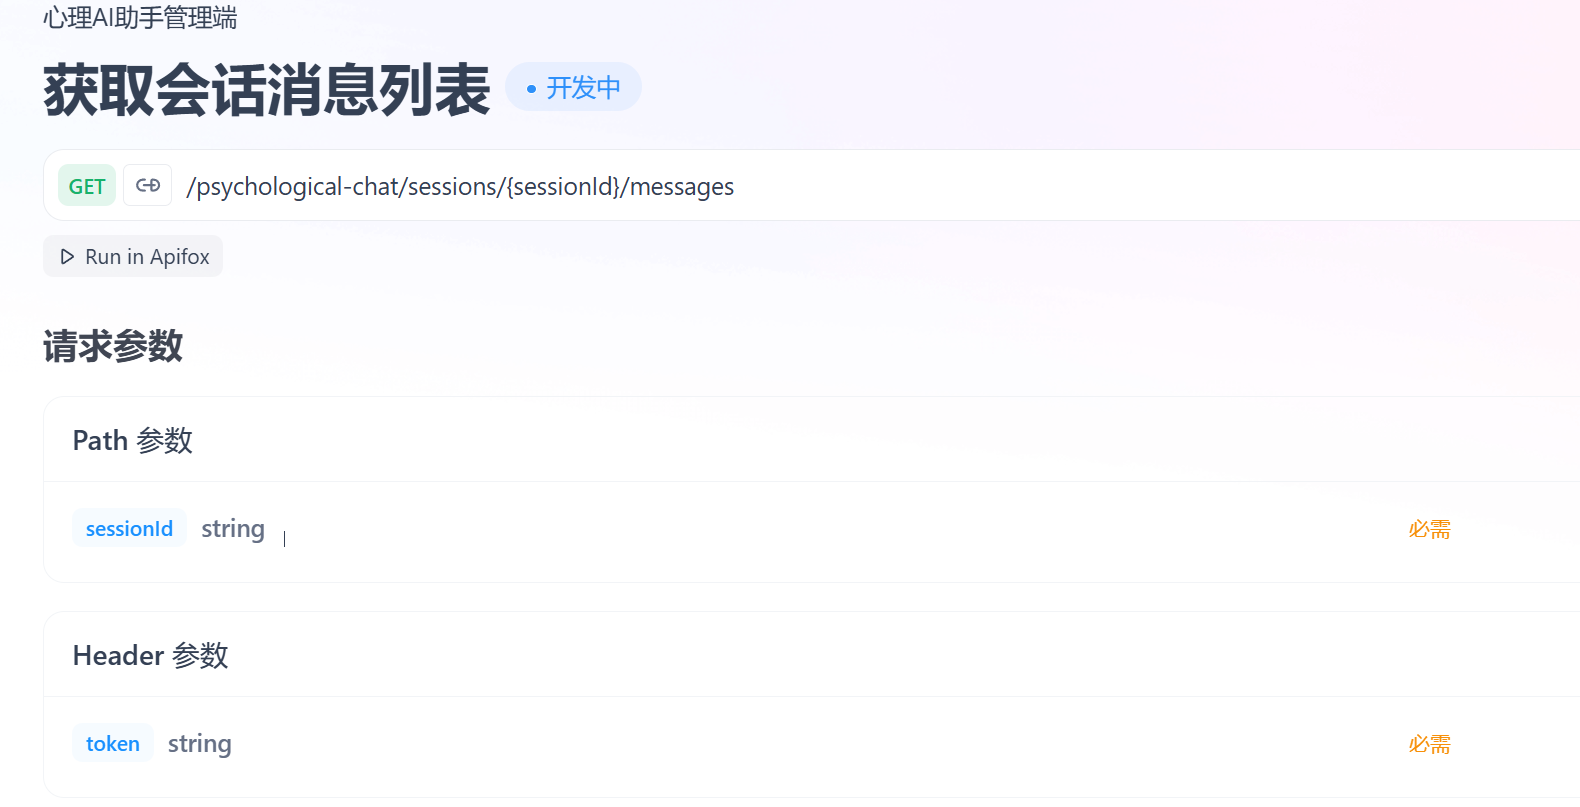
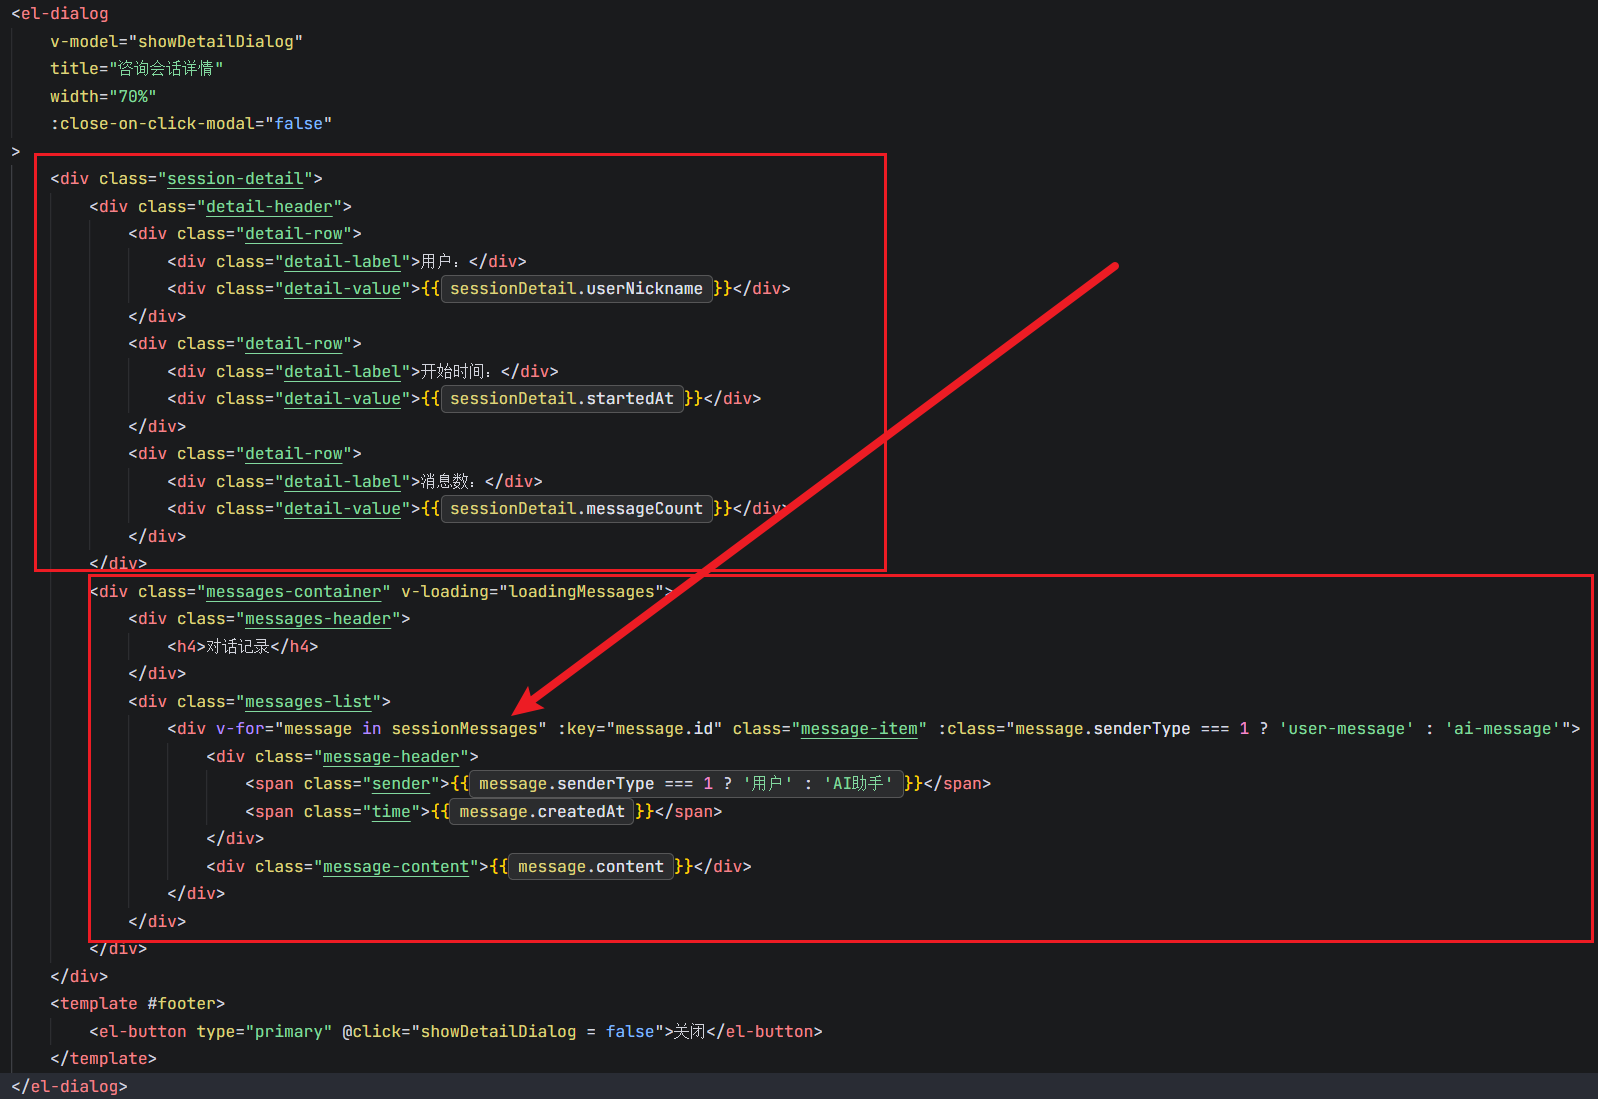
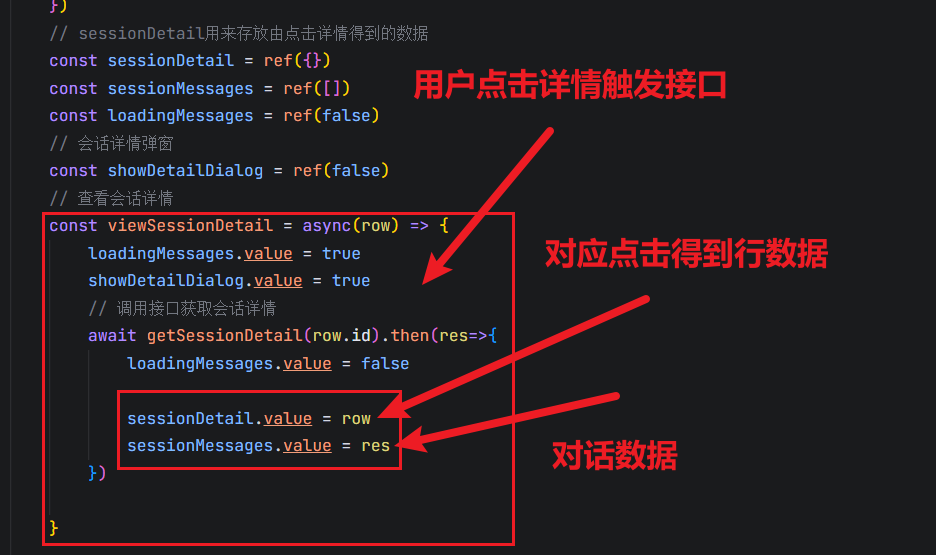
现在该页面就差一个点击详情获得一个弹窗
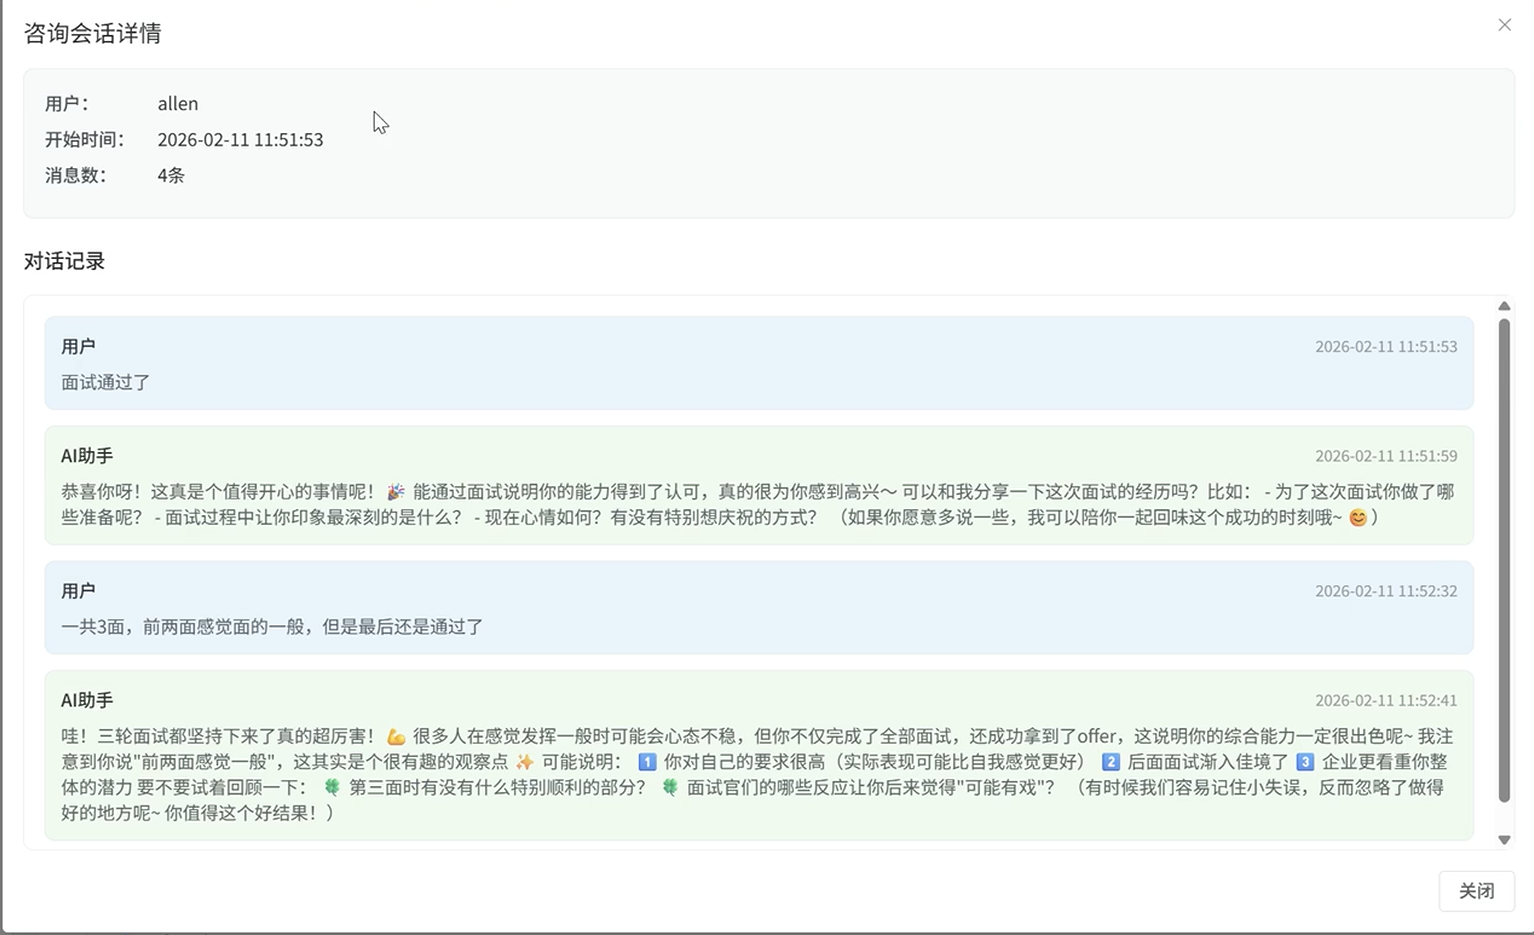
点击详情的时候获取对话记录信息,调用后端接口
2.12 情绪日志界面
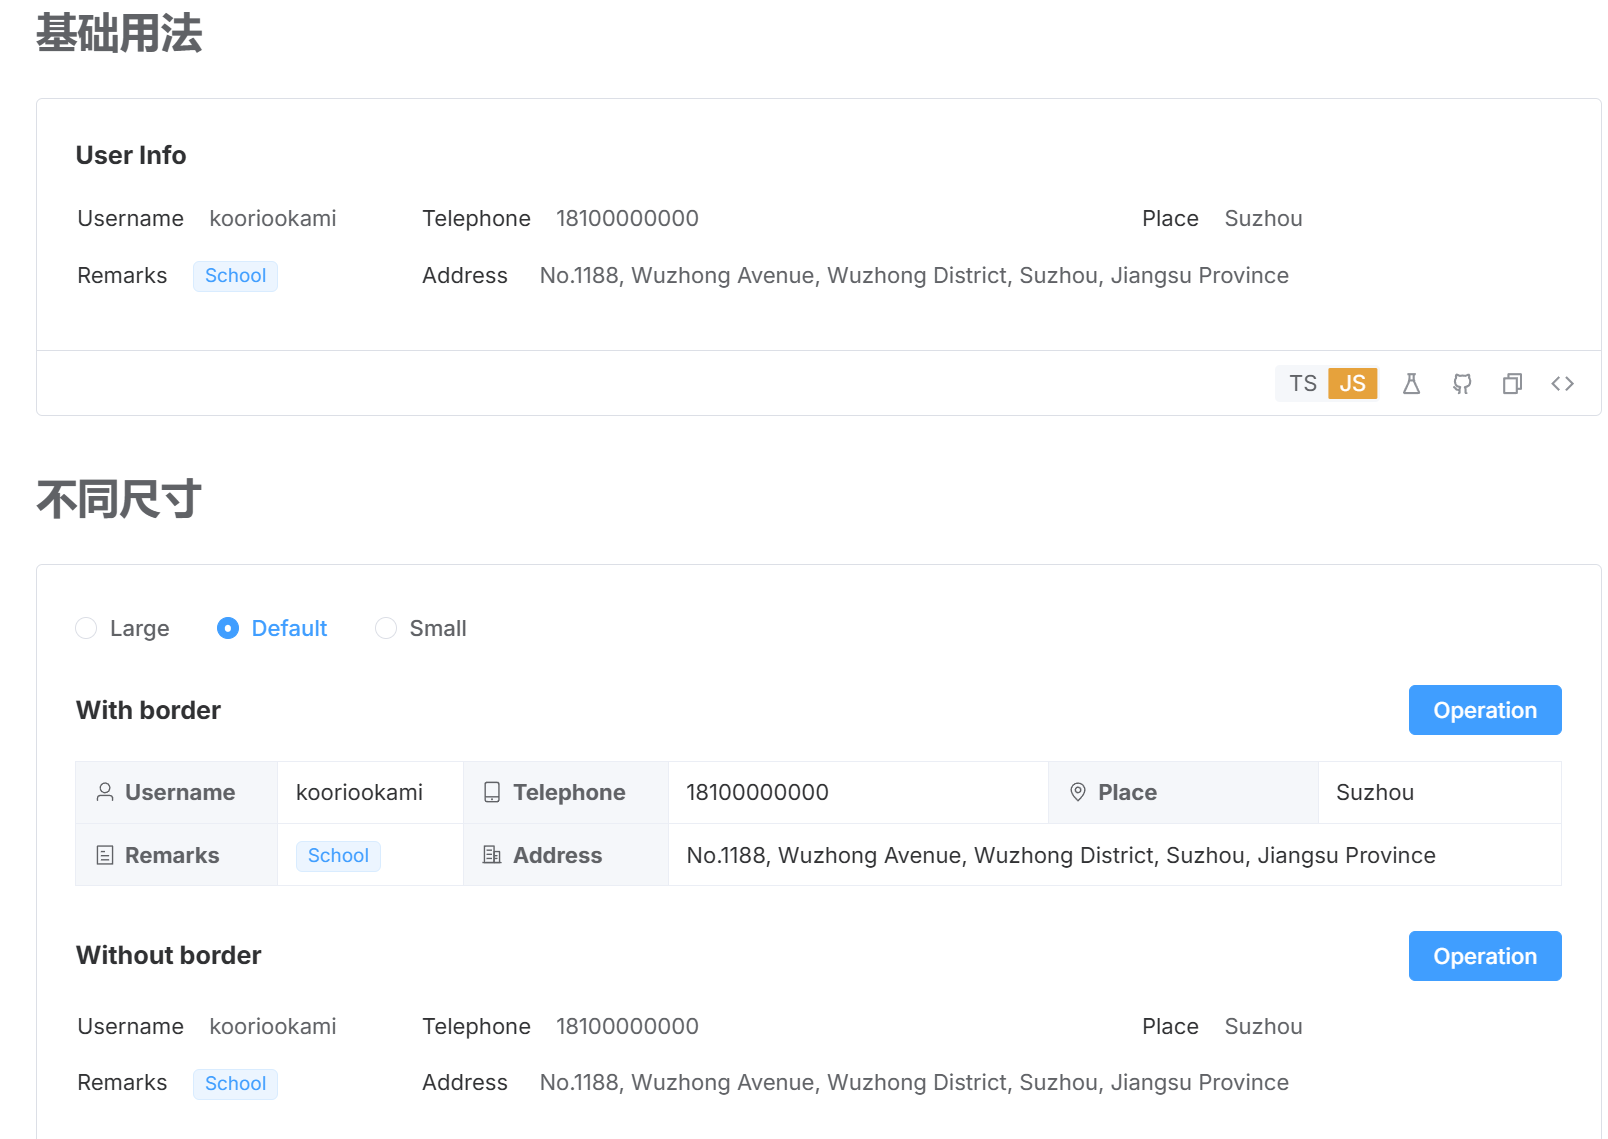
老三样了不想写,唯独个新的就是描述列表了,用的也是element-plus的组件库
<el-dialog
v-model="detailDialogVisible"
title="情绪日志详情"
width="800px"
:close-on-click-modal="false"
>
<div v-if="currentDetail">
<div class="detail-section">
<h4>用户信息</h4>
<el-descriptions :column="2" border>
<el-descriptions-item label="用户名">{{ currentDetail.username }}</el-descriptions-item>
<el-descriptions-item label="昵称">{{ currentDetail.nickname }}</el-descriptions-item>
<el-descriptions-item label="用户ID">{{ currentDetail.userId }}</el-descriptions-item>
<el-descriptions-item label="记录日期">{{ currentDetail.diaryDate }}</el-descriptions-item>
</el-descriptions>
</div>
</div>
</el-dialog>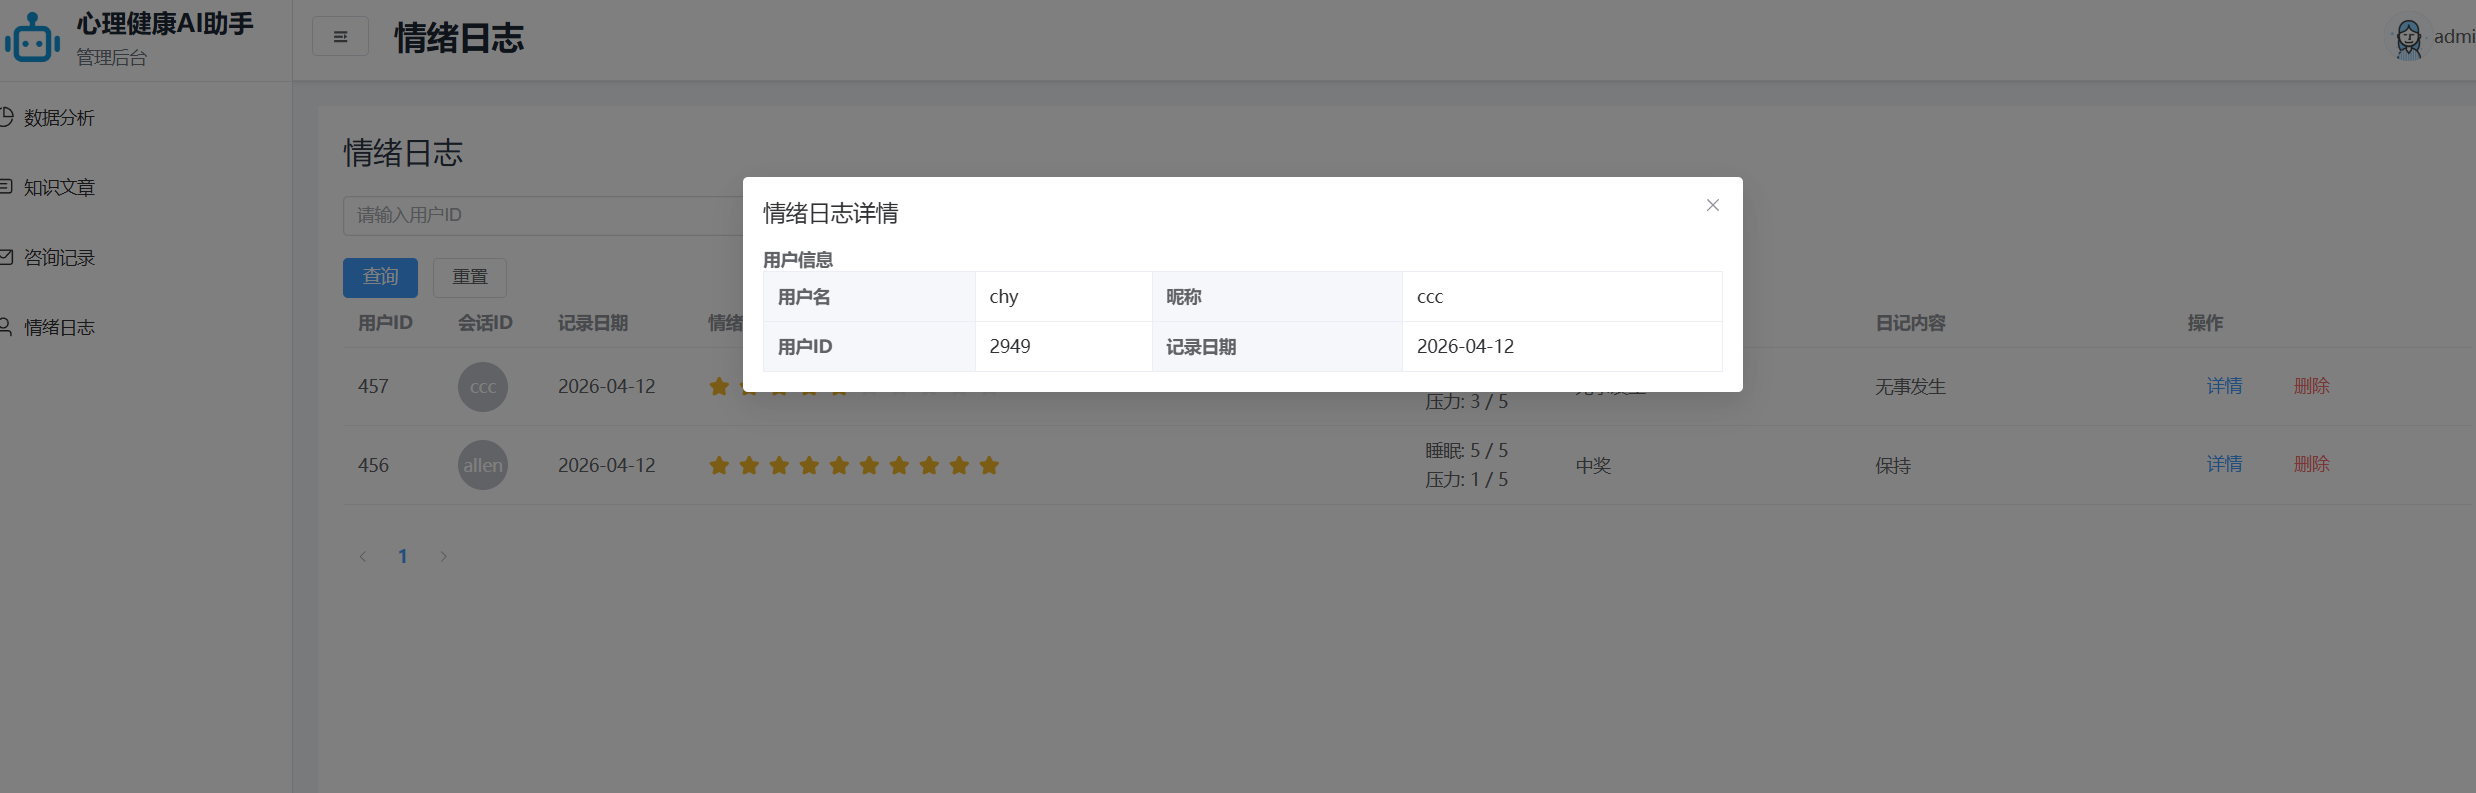
<template>
<div >
<PageHead title="情绪日志">
<!-- <template #buttons>
<el-button type="primary">新增情绪日志</el-button>
</template> -->
</PageHead>
<TableSearch :formItem="formItem" @search="handleSearch"></TableSearch>
<el-table :data="tableData" style="width: 100%">
<el-table-column prop="id" label="用户ID" width="80" />
<el-table-column label="会话ID" width="80">
<template #default="scope">
<el-avatar>{{ scope.row.nickname }}</el-avatar>
</template>
</el-table-column>
<el-table-column prop="diaryDate" label="记录日期" width="120" />
<el-table-column label="情绪评分" >
<template #default="scope">
<el-rate :model-value="scope.row.moodScore" :max="10" disabled />
</template>
</el-table-column>
<el-table-column label="生活指标" width="120">
<template #default="scope">
<div>
<p>睡眠: {{ scope.row.sleepQuality }} / 5</p>
<p>压力: {{ scope.row.stressLevel }} / 5</p>
</div>
</template>
</el-table-column>
<el-table-column prop="emotionTriggers" label="情绪触发因素" width="240" />
<el-table-column prop="diaryContent" label="日记内容" width="250" />
<el-table-column label="操作" width="240" fixed="right">
<template #default="scope">
<el-button @click="ViewSessionDetail(scope.row)" text type="primary">详情</el-button>
<el-button @click="handleDelete(scope.row)" text type="danger" >删除</el-button>
</template>
</el-table-column>
</el-table>
<el-pagination
style="margin-top: 25px;"
:page-size="pagination.size"
:total="pagination.total"
layout="prev, pager, next"
@change="handleChange"
/>
<el-dialog
v-model="detailDialogVisible"
title="情绪日志详情"
width="800px"
:close-on-click-modal="false"
>
<div class="detail-content" v-if="currentDetail">
<div class="detail-section">
<h4>用户信息</h4>
<el-descriptions :column="2" border>
<el-descriptions-item label="用户名">{{ currentDetail.username }}</el-descriptions-item>
<el-descriptions-item label="昵称">{{ currentDetail.nickname }}</el-descriptions-item>
<el-descriptions-item label="用户ID">{{ currentDetail.userId }}</el-descriptions-item>
<el-descriptions-item label="记录日期">{{ currentDetail.diaryDate }}</el-descriptions-item>
</el-descriptions>
</div>
<div class="detail-section">
<h4>情绪评分</h4>
<el-descriptions :column="2" border>
<el-descriptions-item label="情绪评分">
<el-rate :model-value="currentDetail.moodScore" :max="10" disabled />
</el-descriptions-item>
<el-descriptions-item label="主要情绪">
<el-tag :type="getEmotionTagType(currentDetail.dominantEmotion)">{{ currentDetail.dominantEmotion || '-' }}</el-tag>
</el-descriptions-item>
<el-descriptions-item label="睡眠质量">{{ currentDetail.sleepQuality || '-' }} / 5</el-descriptions-item>
<el-descriptions-item label="压力水平">{{ currentDetail.stressLevel || '-' }} / 5</el-descriptions-item>
</el-descriptions>
</div>
<div class="detail-section">
<h4>日记内容</h4>
<el-descriptions :column="1" border>
<el-descriptions-item label="情绪触发因素">{{ currentDetail.emotionTriggers || '无' }}</el-descriptions-item>
<el-descriptions-item label="日记内容">{{ currentDetail.diaryContent || '无' }}</el-descriptions-item>
</el-descriptions>
</div>
<div class="detail-section">
<h4>AI情绪分析结果</h4>
<div class="ai-analysis-result">
<el-descriptions :column="2" border>
<el-descriptions-item label="主要情绪">
<el-tag :type="getAiEmotionTagType(aiData.primaryEmotion)">{{ aiData.primaryEmotion }}</el-tag>
</el-descriptions-item>
<el-descriptions-item label="情绪强度">
<el-progress :percentage="aiData.emotionScore" :color="getEmotionScoreColor(aiData.emotionScore)" :stroke-width="8" />
</el-descriptions-item>
<el-descriptions-item label="风险等级">
<el-tag :type="getAiEmotionTagType(aiData.riskLevel)">{{ aiData.riskLevel }}</el-tag>
</el-descriptions-item>
<el-descriptions-item label="情绪性质">
<el-tag :type="aiData.isNegative ? 'danger' : 'success'">{{ aiData.isNegative ? '负面情绪' : '正面情绪' }}</el-tag>
</el-descriptions-item>
</el-descriptions>
<div class="ai-suggestion-section">
<h5>专业建议</h5>
<div class="suggestion-content">{{ aiData.suggestion || '无' }}</div>
</div>
<div class="ai-risk-section">
<h5>风险描述</h5>
<div class="risk-content">{{ aiData.riskDescription || '无' }}</div>
</div>
<div class="ai-improvements-section">
<h5>改善建议</h5>
<ul class="improvement-list">
<li v-for="item in aiData.improvementSuggestions" :key="item">{{ item }}</li>
</ul>
</div>
</div>
</div>
<div class="detail-section">
<h4>时间信息</h4>
<el-descriptions :column="2" border>
<el-descriptions-item label="创建时间">{{ currentDetail.createdAt }}</el-descriptions-item>
<el-descriptions-item label="更新时间">{{ currentDetail.updatedAt }}</el-descriptions-item>
</el-descriptions>
</div>
</div>
<template #footer>
<el-button type="primary" @click="detailDialogVisible = false">
关闭
</el-button>
</template>
</el-dialog>
</div>
</template>
<script setup>
import { ref,reactive,onMounted } from 'vue'
import { getEmotionalPage, deleteEmotional } from '@/api/admin'
import PageHead from '@/components/PageHead.vue'
import TableSearch from '@/components/TableSearch.vue'
import { ElMessageBox } from 'element-plus'
const getEmotionTagType = (emotion) => {
const emotionTypes = {
'快乐': 'success',
'平静': 'info',
'兴奋': 'warning',
'愤怒': 'danger',
'悲伤': 'info',
'焦虑': 'warning'
}
return emotionTypes[emotion] || 'info'
}
const getAiEmotionTagType = (emotion) => {
const emotionTagMap = {
'快乐': 'success',
'平静': 'success',
'兴奋': 'warning',
'满足': 'success',
'愤怒': 'danger',
'悲伤': 'info',
'焦虑': 'warning',
'恐惧': 'danger',
'沮丧': 'info',
'压力': 'warning'
}
return emotionTagMap[emotion] || 'info'
}
const getEmotionScoreColor = (score) => {
if (score >= 80) return '#f56c6c'
if (score >= 60) return '#e6a23c'
if (score >= 40) return '#909399'
return '#67c23a'
}
const getRiskLevelTagType = (riskLevel) => {
const riskTagMap = {
0: 'success',
1: 'info',
2: 'warning',
3: 'danger'
}
return riskTagMap[riskLevel] || 'info'
}
const getRiskLevelText = (riskLevel) => {
const riskTextMap = {
0: '正常',
1: '关注',
2: '预警',
3: '危机'
}
return riskTextMap[riskLevel] || '未知风险等级'
}
const formItem = [
{ comp: 'input', prop: 'userId', label: '用户ID', placeholder: '请输入用户ID' },
{
comp: 'select',
prop: 'moodScreRange',
label: '情绪评分',
placeholder: '请选择评分范围',
options: [
{ label: '低分(1-3)', value: '1-3' },
{ label: '中分(4-6)', value: '4-6' },
{ label: '高分(7-10)', value: '7-10' }
]
}
]
const tableData = ref([])
// 分页参数
const pagination = reactive({
currentPage: 1,
size: 10,
total: 0
})
const handleChange = (page) => {
    pagination.currentPage = page
    handleSearch()
}
const handleSearch = async (formData) => {
const params = {
...pagination,
...formData
}
const { records, total } = await getEmotionalPage(params)
tableData.value = records
pagination.total = total
}
// 详情弹窗
const detailDialogVisible = ref(false)
const currentDetail = ref(null)
const aiData = ref(null)
const ViewSessionDetail = (row) => {
detailDialogVisible.value = true
currentDetail.value = row
if(row.aiEmotionAnalysis){
aiData.value = JSON.parse(row.aiEmotionAnalysis)
}else{
aiData.value = {}
}
}
// 删除
const handleDelete = (row) => {
ElMessageBox.confirm(
`确认删除情绪记录${row.id}吗? `,
'确认',
{
confirmButtonText: '确认删除',
cancelButtonText: '取消',
type: 'danger'
}
).then(() => {
deleteEmotional(row.id).then(res => {
handleSearch()
})
})
}
onMounted(() => {
handleSearch()
})
</script>
<style lang="scss" scoped>
.detail-content {
.detail-section {
margin-bottom: 24px;
h4 {
margin: 0 0 16px 0;
color: #303133;
font-size: 16px;
i {
margin-right: 8px;
color: #409eff;
}
}
}
}
// AI分析相关样式
.ai-analysis-status {
.ai-status-tag {
margin-bottom: 4px;
i {
margin-right: 4px;
}
}
.ai-analysis-preview {
font-size: 11px;
color: #909399;
margin-top: 2px;
}
}
.ai-analysis-result {
.ai-keywords-section,
.ai-suggestion-section,
.ai-risk-section,
.ai-improvements-section {
margin-top: 16px;
padding: 12px;
background-color: #f8f9fa;
border-radius: 4px;
h5 {
margin: 0 0 8px 0;
color: #606266;
font-size: 14px;
font-weight: 600;
i {
margin-right: 6px;
color: #909399;
}
}
}
.keywords-container {
display: flex;
flex-wrap: wrap;
gap: 6px;
.keyword-tag {
background-color: #e1f3d8;
color: #67c23a;
border-color: #b3d8a4;
}
}
.suggestion-content,
.risk-content {
line-height: 1.6;
color: #606266;
background-color: white;
padding: 8px;
border-radius: 4px;
border: 1px solid #ebeef5;
}
.improvement-list {
margin: 0;
padding-left: 20px;
li {
margin-bottom: 4px;
color: #606266;
line-height: 1.5;
}
}
.ai-analysis-meta {
margin-top: 16px;
padding-top: 12px;
border-top: 1px solid #ebeef5;
.analysis-time {
margin: 0;
font-size: 12px;
color: #909399;
i {
margin-right: 4px;
}
}
}
.el-progress {
.el-progress__text {
font-size: 12px !important;
}
}
}
</style>
2.13 数据分析页面(最后一个后端页面了!!!!!)
思路是先导入数据,分析页面布局
首先是使用了组件里面的布局方式,会随着页面变化而变化el-row,但我不知道span和里面的gutter是啥意思
其次用了卡片样式
卡片内部加入标题需要使用具名插槽的方式
表格使用了EChart插件!!!!谁懂!简历上又可以写个精通了
npm i echarts路由前置守卫设计
三:用户端设计
不想写了家人们将就着结尾吧

AtomGit 是由开放原子开源基金会联合 CSDN 等生态伙伴共同推出的新一代开源与人工智能协作平台。平台坚持“开放、中立、公益”的理念,把代码托管、模型共享、数据集托管、智能体开发体验和算力服务整合在一起,为开发者提供从开发、训练到部署的一站式体验。
更多推荐
 8
8 0
0- 0


 已为社区贡献1条内容

所有评论(0)