AI 辅助通用三方库鸿蒙化适配搞定从环境搭建到交叉编译(MAC篇)
·
大家好,我是胡琦!又停更了很久了,最近一直沉迷于 AI Agent 的学习和探索,这不带来了 OpenCode + 华为云 MaaS 的 glm-5.1 辅助实操通用三方库鸿蒙化适配:交叉编译和测试验证。
准备阶段
- 已安装 DevEcho Studio 以及 OpenHarmony SDK
- 开发板已安装 OpenHarmony 系统
- 设置环境变量
此处以 Mac Mini M4 + 触觉智能 Purple PI OH 开发版为例:
- MacOS 已安装 DevEco Studio 6.0.2 Release
DevEco Studio 6.0.2 Release
构建版本:6.0.2.650, built on March 27, 2026
Runtime version: 21.0.8+9-b1038.71 aarch64 (JCEF 122.1.9)
VM: OpenJDK 64-Bit Server VM by JetBrains s.r.o.
Toolkit: sun.lwawt.macosx.LWCToolkit
macOS 26.4.1
GC: G1 Young Generation, G1 Concurrent GC, G1 Old Generation
Memory: 2048M
Cores: 10
Metal Rendering is ON
Registry:
  ds.ide.experimental.ui=true
  idea.plugins.compatible.build=IC-243.24978.46
并安装了 OpenHarmony SDK API 20:
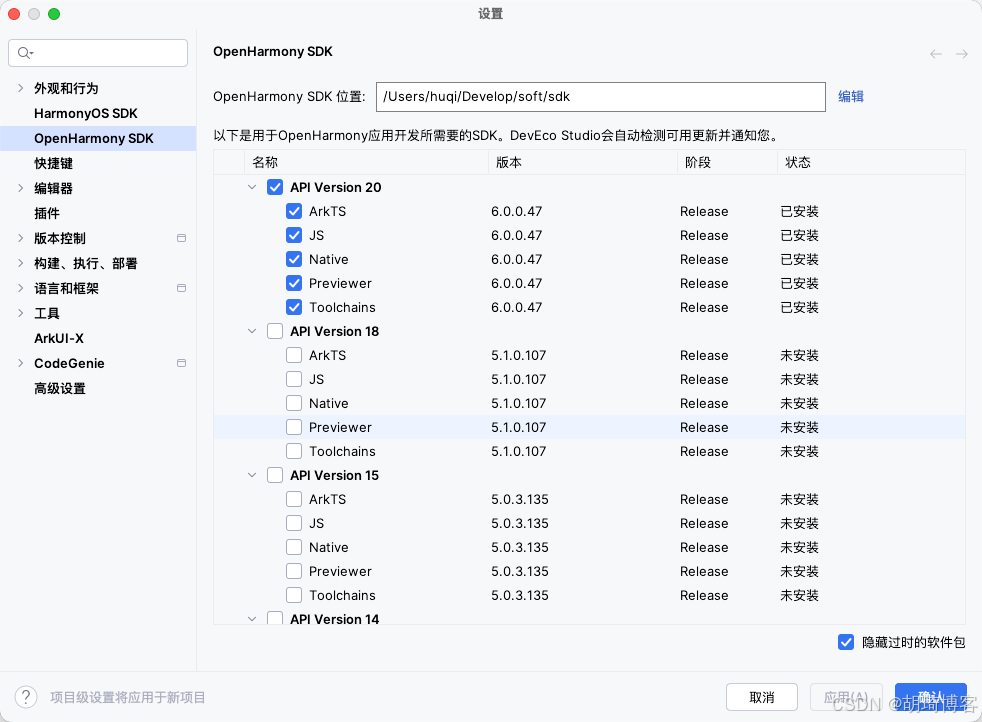
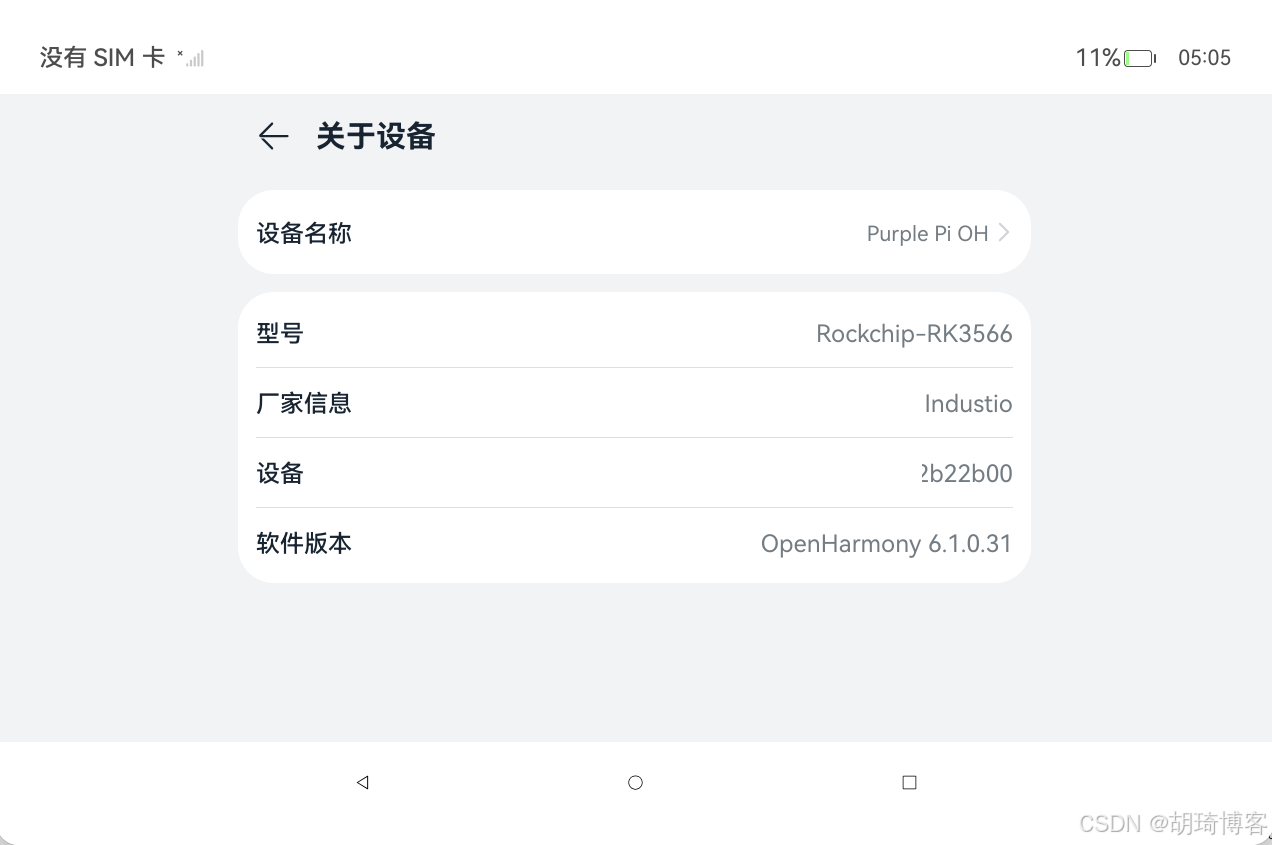
- 开发板已经安装了 OpenHarmony 6.1.0.31 (PS: 基本兼容 API 20)
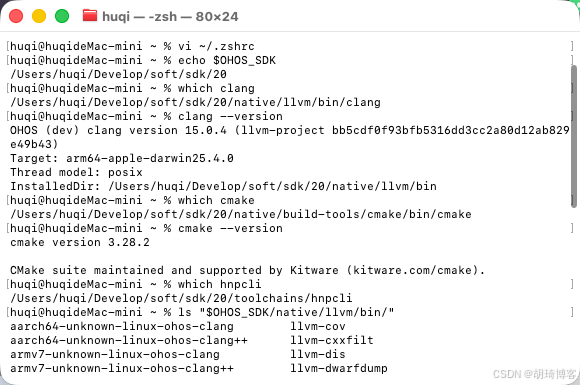
- 设置 OHOS_SDK 相关的环境变量,如:
# 通过 vi ~/.zshrc  添加下述环境变量

# OpenHarmony
export OHOS_SDK=/Users/huqi/Develop/soft/sdk/20

# 添加到 PATH
export PATH="$OHOS_SDK/native/llvm/bin:$PATH"
export PATH="$OHOS_SDK/native/build-tools/cmake/bin:$PATH"
# hnpcli 可能在 toolchains 根目录或 toolchains/bin,两处均加入可避免版本差异
export PATH="$OHOS_SDK/toolchains/bin:$PATH"
export PATH="$OHOS_SDK/toolchains:$PATH"

# 通过 source ~/.zshrc 让环境变量生效
验证 SDK 配置
# 检查 SDK 路径
echo $OHOS_SDK

# 检查工具是否在 PATH 中
which clang
which cmake
which hnpcli

# 检查 SDK 工具目录
ls "$OHOS_SDK/native/llvm/bin/"
ls "$OHOS_SDK/native/build-tools/cmake/bin/"
ls "$OHOS_SDK/toolchains/"

# 验证工具版本
clang --version
cmake --version

# hnpcli --version
# 本次的 hnpcli 版本随 OHOS Command Line Tools 发布,没有独立版本查询方式。知道 SDK API 20 就够了。
补充可能缺少的库(可选)
brew install cmake make autoconf automake libtool pkg-config ninja curl wget
也可以等编译的时候看报错信息缺哪些包再安装也行
拉取代码
git clone https://atomgit.com/openharmony-sig/tpc_c_cplusplus
cd tpc_c_cplusplus
# 可以借助 AI 工具熟悉一下,如 opencode 的 /init 指令生成 AGENTS.md , 尽量用 free 模型
# tpc_c_cplusplus — OpenHarmony C/C++ Third-Party Library Porting

## What This Repo Is

Shell-based cross-compilation framework for porting ~330 C/C++ libraries to OpenHarmony. The repo contains **build scripts only** — no library source code (downloaded at build time). Hosted on Gitee, not GitHub.

## Core Rule

**Never patch library source code or its build scripts.** If patching is absolutely necessary, it must be reviewed with full justification. Business patches are not accepted.

## Build & Test Commands

```bash
# Build (from lycium/ directory)
cd lycium
./build.sh                          # build all libraries
./build.sh cJSON openssl curl       # build specific libraries (must include deps)

# Test on OpenHarmony device (requires CI tools installed on device)
./test.sh                           # test all
./test.sh cJSON                     # test specific library


### Prerequisites

- `OHOS_SDK` env var must point to the OpenHarmony SDK path (build.sh exits if unset)
- Host tools required: gcc, g++, cmake, make, pkg-config, autoconf, autoreconf, automake, patch, unzip, tar, git, ninja, curl, sha512sum, wget
- On-device CI tools (cmake, make, ctest, perl, busybox): see `lycium/CItools/README_zh.md` and prebuilt binaries at https://gitee.com/han_jin_fei/lycium-citools

## Architecture

thirdparty/<lib>/     # 330+ libraries — each has HPKBUILD (required), HPKCHECK (optional), SHA512SUM (optional)
community/<lib>/      # 154 community libs — implicit deps only, not standalone build targets
lycium/               # Build framework
  build.sh            # Top-level build orchestrator
  test.sh             # On-device test runner (runs on OH device, not host)
  script/envset.sh    # Cross-compilation env vars (setarm32ENV, setarm64ENV, setx86_64ENV)
  script/build_hpk.sh # Per-library build: download → checksum → unpack → per-arch build
  Buildtools/         # Host build environment setup
  CItools/            # On-device test environment setup
  template/           # HPKBUILD and HPKCHECK templates
  usr/<lib>/<ARCH>/   # Build output (headers + libs per arch)


## HPKBUILD Key Variables

| Variable | Purpose |
|----------|---------|
| `pkgname` | Library name (required) |
| `pkgver` | Version tag (required) |
| `archs` | `("armeabi-v7a" "arm64-v8a")` default, some add `"x86_64"` |
| `buildtools` | `cmake` (default), `configure`, or `make` |
| `depends` | Dependency lib directory names — must be included in build.sh args |
| `source` | Download URL (gitee mirrors preferred over GitHub) |

Key functions: `prepare()`, `build()`, `package()`, `check()`, `cleanbuild()`

## HPKCHECK Pattern

Sources HPKBUILD, defines `openharmonycheck()` which typically runs `ctest` or `make check` in the build directory. Logs go to `${LYCIUM_THIRDPARTY_ROOT}/${pkgname}/${pkgname}_${ARCH}_${OHOS_SDK_VER}_test.log`.

## Cross-Compilation Env

Configure/make-based libs must `source envset.sh` for arch-specific CC, CXX, AR, RANLIB, CFLAGS, LDFLAGS etc. Key flags: `-DOHOS_NDK -fPIC -D__MUSL__=1`.

## On-Device Testing with hdc

```bash
# Quick test without CI tools — run test binaries directly
hdc shell "cd /path/to/arm64-v8a-build/tests && export LD_LIBRARY_PATH=/path/to/arm64-v8a-build && ./test_binary"

# Full ctest — requires CI tools on device
hdc shell "cd /path/to/arm64-v8a-build && ctest --timeout 40000"

# Screenshot
hdc shell "uitest screenCap /data/local/tmp/screenshot.jpeg"
hdc file recv /data/local/tmp/screenCap_*.png ~/Downloads/


## Key Conventions

- Build artifacts: `lycium/usr/$pkgname/$ARCH/` (lib + include)
- Build logs: `thirdparty/$pkgname/$pkgname-$pkgver-$ARCH-lycium_build.log`
- Source mirrors: use `gitee.com/mirrors/` or `gitee.com/lycium_pkg_mirror/` when GitHub is slow
- Copyright: Apache 2.0 headers on all project files (enforced by OAT.xml)
- SDK version: Command Line Tools 5.0.3.706+ (api12), DevEco Studio NEXT Developer Beta6 5.0.3.706+
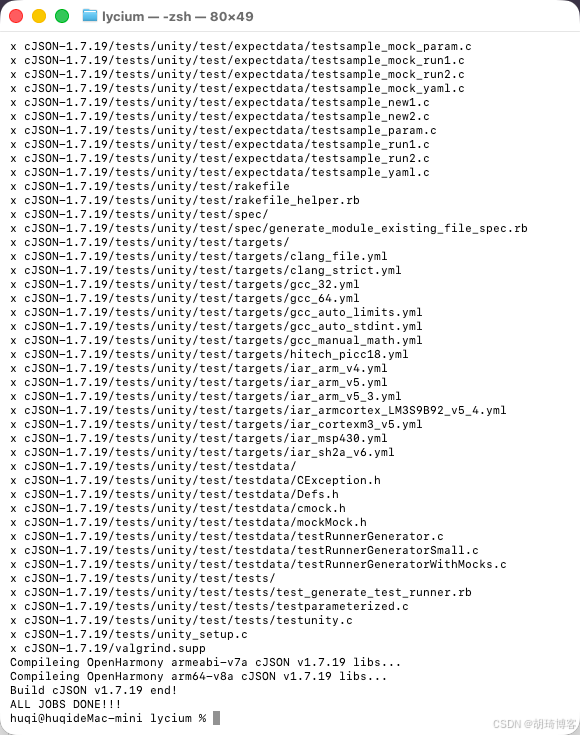
以编译 cJSON 为例
cd tpc_c_cplusplus/lycium
./build.sh cJSON

# ⚠️如果非首次编译,需先删除 lycium/usr 再重新编译
在开发板上测试
我这里是直接使用 AI 工具 opencode 来完成设备连接、测试推送的。
如何使用 hdc 连接设备

hdc list targets

如何在这个设备上测试 thirdparty/cJSON
具体它是如何做的呢?
前提条件
- 本地已编译 cJSON(
lycium/usr/cJSON/arm64-v8a/目录存在) - 开发板已通过 hdc 连接(
hdc list targets可见设备) - 确认设备架构为 64 位(
hdc shell getconf LONG_BIT返回 64)
步骤 1:在设备上创建目录结构
hdc shell "mkdir -p /data/local/tmp/tpc_c_cplusplus/thirdparty/cJSON/cJSON-1.7.19/arm64-v8a-build/tests/inputs"
步骤 2:推送编译产物和测试文件
推送共享库
hdc file send thirdparty/cJSON/cJSON-1.7.19/arm64-v8a-build/libcjson.so.1 /data/local/tmp/tpc_c_cplusplus/thirdparty/cJSON/cJSON-1.7.19/arm64-v8a-build/
推送 CTest 配置文件
hdc file send thirdparty/cJSON/cJSON-1.7.19/arm64-v8a-build/CTestTestfile.cmake /data/local/tmp/tpc_c_cplusplus/thirdparty/cJSON/cJSON-1.7.19/arm64-v8a-build/
hdc file send thirdparty/cJSON/cJSON-1.7.19/arm64-v8a-build/Makefile /data/local/tmp/tpc_c_cplusplus/thirdparty/cJSON/cJSON-1.7.19/arm64-v8a-build/
hdc file send thirdparty/cJSON/cJSON-1.7.19/arm64-v8a-build/tests/CTestTestfile.cmake /data/local/tmp/tpc_c_cplusplus/thirdparty/cJSON/cJSON-1.7.19/arm64-v8a-build/tests/
hdc file send thirdparty/cJSON/cJSON-1.7.19/arm64-v8a-build/tests/Makefile /data/local/tmp/tpc_c_cplusplus/thirdparty/cJSON/cJSON-1.7.19/arm64-v8a-build/tests/
推送测试二进制文件
TESTS_DIR="thirdparty/cJSON/cJSON-1.7.19/arm64-v8a-build/tests"
REMOTE_DIR="/data/local/tmp/tpc_c_cplusplus/thirdparty/cJSON/cJSON-1.7.19/arm64-v8a-build/tests"

for bin in cjson_add compare_tests minify_tests misc_tests parse_array parse_examples \
           parse_hex4 parse_number parse_object parse_string parse_value parse_with_opts \
           print_array print_number print_object print_string print_value readme_examples; do
  hdc file send "$TESTS_DIR/$bin" "$REMOTE_DIR/"
done
推送测试输入数据和依赖库
# 测试输入文件
for f in $(ls "$TESTS_DIR/inputs"); do
  hdc file send "$TESTS_DIR/inputs/$f" "$REMOTE_DIR/inputs/"
done

# unity 测试框架静态库
hdc file send "$TESTS_DIR/libunity.a" "$REMOTE_DIR/"
步骤 3:在设备上运行测试
方式 A:直接运行测试二进制(无需 CI 工具)
hdc shell "cd /data/local/tmp/tpc_c_cplusplus/thirdparty/cJSON/cJSON-1.7.19/arm64-v8a-build/tests \
  && chmod +x * \
  && export LD_LIBRARY_PATH=/data/local/tmp/tpc_c_cplusplus/thirdparty/cJSON/cJSON-1.7.19/arm64-v8a-build:$LD_LIBRARY_PATH \
  && for t in parse_number parse_string parse_array parse_object parse_value parse_with_opts \
             parse_hex4 parse_examples print_number print_string print_array print_object \
             print_value compare_tests minify_tests cjson_add readme_examples misc_tests; do \
       echo '=== '$t' ===' && ./$t; \
     done"
方式 B:使用 ctest(需设备已安装 CI 工具)
hdc shell "cd /data/local/tmp/tpc_c_cplusplus/thirdparty/cJSON/cJSON-1.7.19/arm64-v8a-build \
  && ctest --timeout 40000"
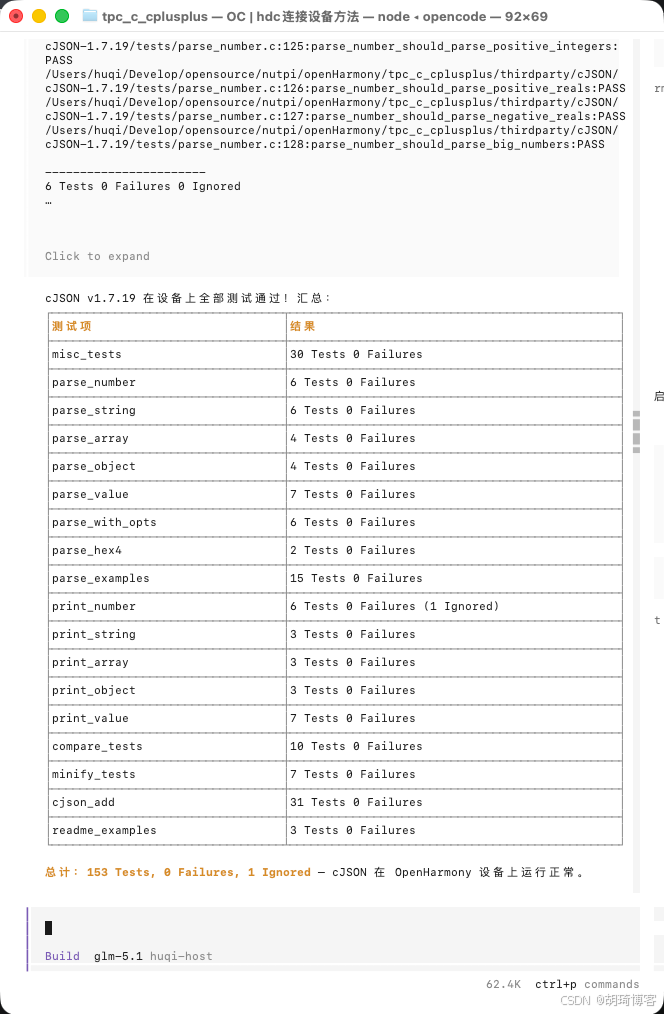
测试结果
| 测试项 | 用例数 | 失败 | 忽略 |
|---|---|---|---|
| misc_tests | 30 | 0 | 0 |
| parse_number | 6 | 0 | 0 |
| parse_string | 6 | 0 | 0 |
| parse_array | 4 | 0 | 0 |
| parse_object | 4 | 0 | 0 |
| parse_value | 7 | 0 | 0 |
| parse_with_opts | 6 | 0 | 0 |
| parse_hex4 | 2 | 0 | 0 |
| parse_examples | 15 | 0 | 0 |
| print_number | 6 | 0 | 1 |
| print_string | 3 | 0 | 0 |
| print_array | 3 | 0 | 0 |
| print_object | 3 | 0 | 0 |
| print_value | 7 | 0 | 0 |
| compare_tests | 10 | 0 | 0 |
| minify_tests | 7 | 0 | 0 |
| cjson_add | 31 | 0 | 0 |
| readme_examples | 3 | 0 | 0 |
| 总计 | 153 | 0 | 1 |
关键注意事项
LD_LIBRARY_PATH必须设置,否则测试二进制找不到libcjson.so- 测试二进制需要
chmod +x,hdc 推送后默认无执行权限 - inputs 目录的测试数据必须推送,
parse_examples等测试依赖tests/inputs/下的文件 - 无 ctest 时可直接运行测试二进制,效果等同于 ctest,且无需在设备上安装 CI 工具
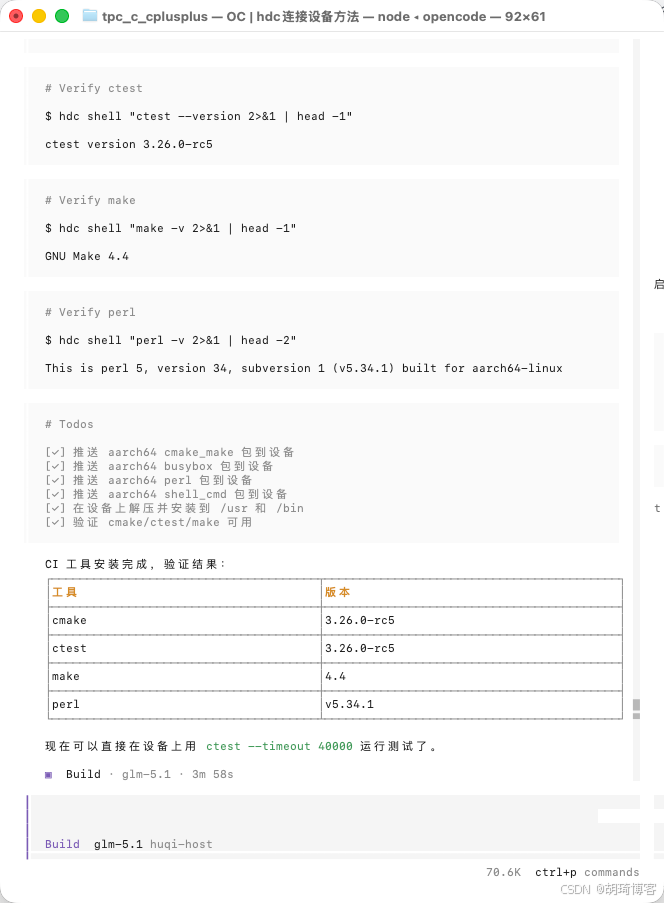
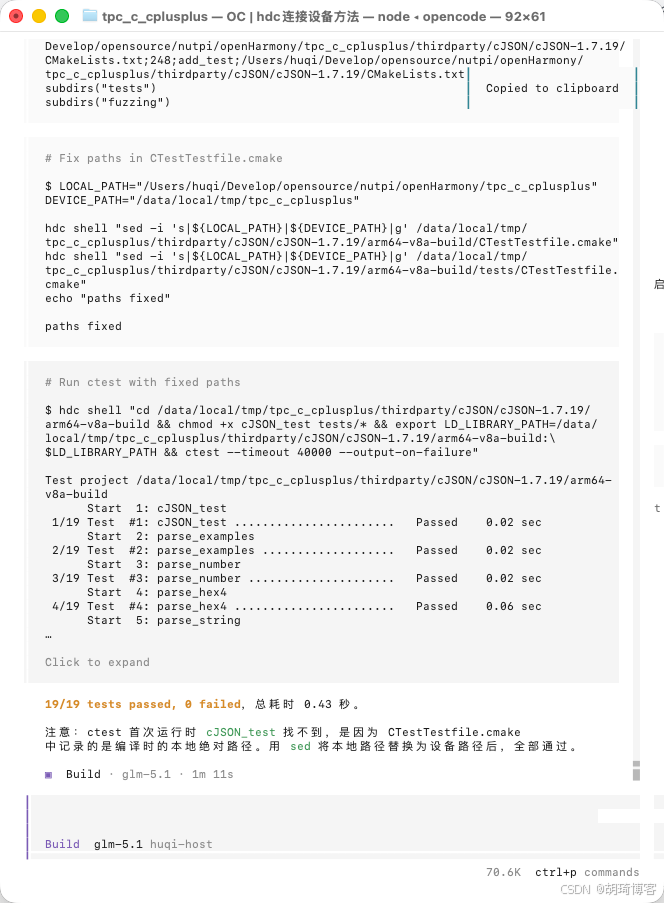
如果非要使用 ctest
开发板如何安装 ctest 呢
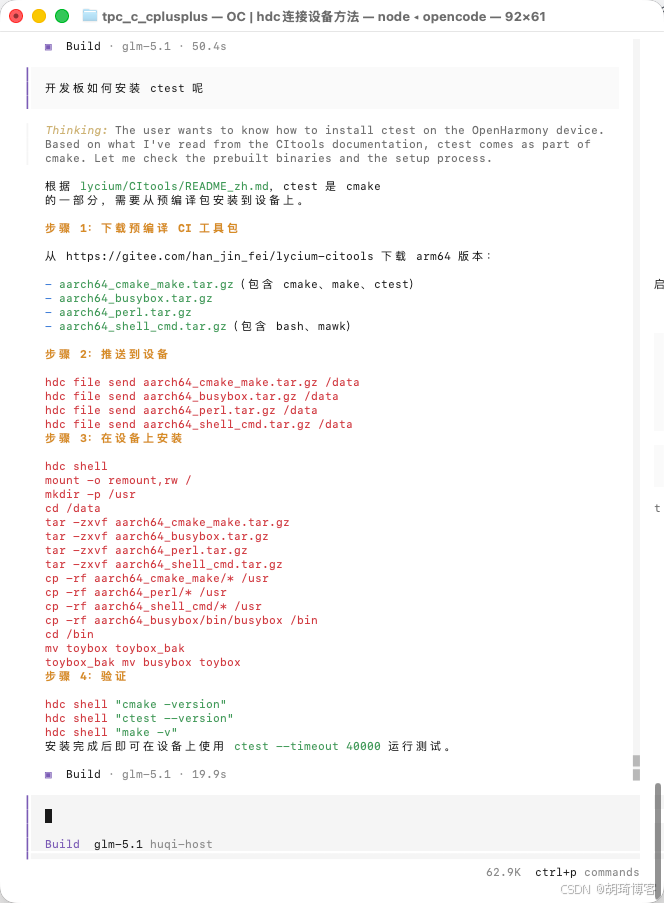
帮我在开发板安装 ctest ,方便后续测试
使用 ctest 再跑一遍 cJSON 的test
🔚 至此,我们已经完成了 cJSON 库的编译和迁移,并在开发板上进行了测试。
如文章有不当之处,欢迎和感谢各位大佬批评指正~

AtomGit 是由开放原子开源基金会联合 CSDN 等生态伙伴共同推出的新一代开源与人工智能协作平台。平台坚持“开放、中立、公益”的理念,把代码托管、模型共享、数据集托管、智能体开发体验和算力服务整合在一起,为开发者提供从开发、训练到部署的一站式体验。
更多推荐
 10
10 0
0- 0


 已为社区贡献1条内容

所有评论(0)