OpenGL 模型加载
到目前为止,我们所有的操作(纹理加载,着色器编译链接,模型渲染等)都在 main 函数里,为了使代码逻辑更加清晰,我们将不同模块的代码封装到不同的类中。
Shader 类代码
- 编写顶点着色器代码
#version 330 core
layout (location = 0) in vec3 aPos;
layout (location = 1) in vec2 aTexCoord;
uniform mat4 model;
uniform mat4 view;
uniform mat4 projection;
out vec2 TexCoord;
void main()
{
   gl_Position = projection * view * model * vec4(aPos, 1.0);
   TexCoord = aTexCoord;
}
layout (location = 0) in vec3 aPos;
layout (location = 1) in vec2 aTexCoord;
输入分别为顶点坐标以及纹理坐标
uniform mat4 model;
uniform mat4 view;
uniform mat4 projection;
这三个为把模型坐标映射到裁剪空间所用到的矩阵
out vec2 TexCoord;
输出分别为纹理坐标
- 编写片段着色器代码
#version 330 core
in vec2 TexCoord;
uniform sampler2D texture_diffuse[16];

out vec4 FragColor;
void main()
{

   FragColor = texture(texture_diffuse[0], TexCoord);
}
使用纹理采样器对纹理进行采样,纹理采样器命名为 texture_diffuse1 是因为一个模型可能有多种纹理,每种纹理可能也有多个纹理。比如金属和非金属在对光线的反射不一样,需要分别处理。我们这里暂时不考虑那么多,只使用一个漫反射纹理。
- 然后我们把这两个着色器代码放到单独的资源文件里,在 Shader 构造函数里去加载它们
Shader::Shader(const std::string& vertexShaderPath, const std::string& fragmentShaderPath)
{
    std::string vertexCode;
    std::string fragmentCode;
    std::ifstream vShaderFile;
    std::ifstream fShaderFile;
    vShaderFile.exceptions (std::ifstream::failbit | std::ifstream::badbit);
    fShaderFile.exceptions (std::ifstream::failbit | std::ifstream::badbit);
    try {
        vShaderFile.open(vertexShaderPath);
        fShaderFile.open(fragmentShaderPath);
        std::stringstream vShaderStream;
        std::stringstream fShaderStream;
        vShaderStream << vShaderFile.rdbuf();
        fShaderStream << fShaderFile.rdbuf();
        vShaderFile.close();
        fShaderFile.close();
        vertexCode = vShaderStream.str();
        fragmentCode = fShaderStream.str();
    }
    catch (std::ifstream::failure& e) {
        std::cout << "ERROR::SHADER::FILE_NOT_SUCCESSFULLY_READ: " << e.what() << std::endl;
    }
	// 编译并链接着色器代码
    compileAndLink(vertexCode.c_str(), fragmentCode.c_str());
}
- 编译并链接着色器代码
void Shader::compileAndLink(const char* vShaderCode, const char* fShaderCode)
{
    // 编译着色器
    unsigned int vertexShader = glCreateShader(GL_VERTEX_SHADER);
    glShaderSource(vertexShader, 1, &vShaderCode, NULL);
    glCompileShader(vertexShader);
    int success;
    char infoLog[512];
    glGetShaderiv(vertexShader, GL_COMPILE_STATUS, &success);
    if (!success) {
        glGetShaderInfoLog(vertexShader, 512, NULL, infoLog);
        std::cout << "ERROR::SHADER::VERTEX::COMPILATION_FAILED\n" << infoLog << std::endl;
    }

    unsigned int fragmentShader = glCreateShader(GL_FRAGMENT_SHADER);
    glShaderSource(fragmentShader, 1, &fShaderCode, NULL);
    glCompileShader(fragmentShader);
    glGetShaderiv(fragmentShader, GL_COMPILE_STATUS, &success);
    if (!success) {
        glGetShaderInfoLog(fragmentShader, 512, NULL, infoLog);
        std::cout << "ERROR::SHADER::FRAGMENT::COMPILATION_FAILED\n" << infoLog << std::endl;
    }

    // 创建和链接着色器程序
    m_shaderProgram = glCreateProgram();
    glAttachShader(m_shaderProgram, vertexShader);
    glAttachShader(m_shaderProgram, fragmentShader);
    glLinkProgram(m_shaderProgram);
    glGetProgramiv(m_shaderProgram, GL_LINK_STATUS, &success);
    if (!success) {
        glGetProgramInfoLog(m_shaderProgram, 512, NULL, infoLog);
        std::cout << "ERROR::SHADER::PROGRAM::LINKING_FAILED\n" << infoLog << std::endl;
    }
    glDeleteShader(vertexShader);
    glDeleteShader(fragmentShader);
}
- 最后我们需要提供接口,供外部激活这个着色器程序,设置投影矩阵,纹理等
void Shader::use() {
    glUseProgram(m_shaderProgram);
}

void Shader::setBool(const std::string& name, bool value) const {
    glUniform1i(glGetUniformLocation(m_shaderProgram, name.c_str()), (int)value);
}

void Shader::setInt(const std::string& name, int value) const {
    glUniform1i(glGetUniformLocation(m_shaderProgram, name.c_str()), value);
}

void Shader::setFloat(const std::string& name, float value) const {
    glUniform1f(glGetUniformLocation(m_shaderProgram, name.c_str()), value);
}

void Shader::setVec2(const std::string& name, const glm::vec2& value) const {
    glUniform2fv(glGetUniformLocation(m_shaderProgram, name.c_str()), 1, &value[0]);
}

void Shader::setVec3(const std::string& name, const glm::vec3& value) const {
    glUniform3fv(glGetUniformLocation(m_shaderProgram, name.c_str()), 1, &value[0]);
}

void Shader::setVec4(const std::string& name, const glm::vec4& value) const {
    glUniform4fv(glGetUniformLocation(m_shaderProgram, name.c_str()), 1, &value[0]);
}

void Shader::setMat2(const std::string& name, const glm::mat2& mat) const {
    glUniformMatrix2fv(glGetUniformLocation(m_shaderProgram, name.c_str()), 1, GL_FALSE, &mat[0][0]);
}

void Shader::setMat3(const std::string& name, const glm::mat3& mat) const {
    glUniformMatrix3fv(glGetUniformLocation(m_shaderProgram, name.c_str()), 1, GL_FALSE, &mat[0][0]);
}

void Shader::setMat4(const std::string& name, const glm::mat4& mat) const {
    glUniformMatrix4fv(glGetUniformLocation(m_shaderProgram, name.c_str()), 1, GL_FALSE, &mat[0][0]);
}
Camera 类代码
我们需要一个 Camera 类来维护 view 矩阵,比如游戏中,主角前进后退时,我们的视角也会跟着变换,我们通过 Camera 来及时更新 view 矩阵,当然,目前我们还不需要这些,所以我们的 Camera 很简单。
- 传入相机位置,视觉中心,上向量来构建 view 矩阵
Camera::Camera(glm::vec3 position, glm::vec3 center, glm::vec3 up, double distance)
    : m_position(position)
    , m_center(center)
    , m_up(up)
{
    m_view = glm::lookAt(m_position, m_center, up);
}
- 一个接口用于获取 view 矩阵
glm::mat4 getViewMat() const { return m_view; }
在进行下一步之前,我们先做些准备工作
Assimp
Assimp (Open Asset Import Library) 是一个模型导入库。我们可以使用 Assimp 加载模型文件,然后获取模型的顶点坐标,纹理坐标,法线,纹理等属性。
Assimp 的名词解释
网格 (Mesh ) 包含了一个物体的顶点信息(位置,法线,纹理坐标等),以及索引(用于定义如何将顶点连接成图元)
模型 (Mode ) 包含了一个或者多个网格,比如一个人物可以分成头,身体,四肢多个网格,以及纹理,变换矩阵等。
材质(Material) 包含了纹理,漫反射颜色,环境光颜色,光泽度,折射率等。
它的数据结构如下

加载模型后 Assimp 后会返回一个 aiScene 对象,我们通过这个对象去访问模型数据。
- aiScene
mRootNode (aiNode*): 模型场景的根节点
mMeshes (aiMesh**): 存储场景中所有网格数据的数组
mNumMeshes: 网格数量
mMaterials (aiMaterial**): 存储场景中所有材质数据的数组
mNumMaterials: 材质数量 - aiNode
mMeshes (unsigned int*): 网格索引数组,虽然这里的变量名和 aiScene 一致,但是这里存储的只是索引(感觉它应该换个名称会好些)
mNumMeshes: 网格索引数量
mChildren (aiNode*): 子节点数组
mNumChildren: 子节点数量 - aiMesh
mVertices: 顶点坐标数组
mNumVertices: 顶点数量
mNormals: 法线向量数组
mTextureCoords[0]: 第一套纹理坐标数组
mFaces (aiFace *): 面数组,一个 3 维物体总可以由一个个平面组成,这个存储的就是每个平面的信息,aiFace 有个成员变量 unsigned int *mIndices 存储的就是组成这个平面顶点的索引
mMaterialIndex: 材质索引数组
Mesh 网格类
在 Mesh 类中我们需要完成顶点数据的加载和绘制
struct Vertex
{
    glm::vec3 position;
    glm::vec3 normal;
    glm::vec2 texCoords;
};

struct Texture {
    unsigned int id;
    std::string type;
};
我们定义两个结构体,用于存储顶点数据和纹理。
Mesh::Mesh(std::vector<Vertex> vertices, std::vector<unsigned int> indices, std::vector<Texture> textures)
{
    m_vertices = vertices;
    m_indices = indices;
    m_textures = textures;
    setupMesh();
}
传入顶点数据,顶点索引,以及纹理。
void Mesh::setupMesh()
{
    // 创建 VBO, EBO, VAO
    glGenVertexArrays(1, &m_VAO);
    glGenBuffers(1, &m_VBO);
    glGenBuffers(1, &m_EBO);

    glBindVertexArray(m_VAO);
    glBindBuffer(GL_ARRAY_BUFFER, m_VBO);
    glBufferData(GL_ARRAY_BUFFER, m_vertices.size() * sizeof(Vertex), &m_vertices[0], GL_STATIC_DRAW);
    glBindBuffer(GL_ELEMENT_ARRAY_BUFFER, m_EBO);
    glBufferData(GL_ELEMENT_ARRAY_BUFFER, m_indices.size() * sizeof(unsigned int), &m_indices[0], GL_STATIC_DRAW);

    // 设置顶点属性指针
    glEnableVertexAttribArray(0);
    glVertexAttribPointer(0, 3, GL_FLOAT, GL_FALSE, sizeof(Vertex), (void*)0);
    glEnableVertexAttribArray(1);
    glVertexAttribPointer(1, 2, GL_FLOAT, GL_FALSE, sizeof(Vertex), (void*)offsetof(Vertex, texCoords));

    glBindVertexArray(0);
    glBindBuffer(GL_ARRAY_BUFFER, 0);
    glBindBuffer(GL_ELEMENT_ARRAY_BUFFER, 0);
}
绑定顶点和纹理数据
void Mesh::draw(Shader& shader)
{
    // 绑定纹理
    unsigned int diffuseNr  = 0;
    unsigned int specularNr = 0;
    unsigned int normalNr = 0;
    unsigned int heightNr = 0;
    for(unsigned int i = 0; i < m_textures.size(); i++) {
        glActiveTexture(GL_TEXTURE0 + i);
        std::string name = m_textures[i].type;
        std::string uniformName;

        if(name == "texture_diffuse") {
            uniformName = "texture_diffuse[" + std::to_string(diffuseNr++) + "]";
        } else if(name == "texture_specular") {
            uniformName = "texture_specular[" + std::to_string(specularNr++) + "]";
        } else if(name == "texture_normal") {
            uniformName = "texture_normal[" + std::to_string(normalNr++) + "]";
        } else if(name == "texture_height") {
            uniformName = "texture_height[" + std::to_string(heightNr++) + "]";
        }

        shader.setInt(uniformName, i);
        glBindTexture(GL_TEXTURE_2D, m_textures[i].id);
    }

    shader.setVec3("ambient", m_material.ambient);
    shader.setVec3("diffuse", m_material.diffuse);
    shader.setVec3("specular", m_material.specular);
    shader.setFloat("shininess", m_material.shininess);

    // 绘制
    glBindVertexArray(m_VAO);
    glDrawElements(GL_TRIANGLES, static_cast<unsigned int>(m_indices.size()), GL_UNSIGNED_INT, 0);
    glBindVertexArray(0);
}
绘制。这里绑定了多个纹理,并根据纹理的类型(漫反射纹理,镜面反射纹理,法线纹理, 高度纹理)来绑定到对应的纹理采样器,然后纹理采样器再根据不同纹理类型计算片段着色器应该返回的颜色。不过我们暂时可以先不考虑这些,我们的片段着色器只用到了第一个漫反射纹理。
Model 模型类
model 用于模型加载,纹理加载
Model::Model(const std::string& path)
    : m_modelPath(path)
{
    loadModel(path);
}
void Model::loadModel(const std::string& path)
{
    std::cout << "Loading model from: " << path << std::endl;
    Assimp::Importer importer;
    const aiScene* scene = importer.ReadFile(path, aiProcess_Triangulate | aiProcess_GenSmoothNormals | aiProcess_CalcTangentSpace);

    if (!scene || scene->mFlags & AI_SCENE_FLAGS_INCOMPLETE || !scene->mRootNode)
    {
        std::cout << "ERROR::ASSIMP::" << importer.GetErrorString() << std::endl;
        return;
    }

    std::cout << "Model loaded successfully, processing " << scene->mNumMeshes << " meshes" << std::endl;
    processNode(scene->mRootNode, scene);
}
使用 assimp 加载模型,获取到 aiScene* 对象,解析 Node
void Model::processNode(aiNode* node, const aiScene* scene)
{
    // 处理当前节点的所有网格
    for (unsigned int i = 0; i < node->mNumMeshes; i++) {
        aiMesh* mesh = scene->mMeshes[node->mMeshes[i]];
        m_meshes.push_back(processMesh(mesh, scene));
    }

    // 递归处理所有子节点
    for (unsigned int i = 0; i < node->mNumChildren; i++) {
        processNode(node->mChildren[i], scene);
    }
}
processNode 递归处理 Node 节点,processMesh 则用于把网格对象转换成我们的数据结构,上文中我们提到 aiNode 中只存储了 Mesh 的索引,所以 网格数据需要通过 aiMesh* mesh = scene->mMeshes[node->mMeshes[i]]; 获取。
Mesh Model::processMesh(aiMesh* mesh, const aiScene* scene)
{
    std::vector<Vertex> vertices;
    std::vector<unsigned int> indices;
    std::vector<Texture> textures;

    // Process vertices
    for (unsigned int i = 0; i < mesh->mNumVertices; i++) {
        Vertex vertex;
        vertex.position = glm::vec3(mesh->mVertices[i].x, mesh->mVertices[i].y, mesh->mVertices[i].z);
        if (mesh->mNormals) {
            vertex.normal = glm::vec3(mesh->mNormals[i].x, mesh->mNormals[i].y, mesh->mNormals[i].z);
        }
        if (mesh->mTextureCoords[0]) {
            vertex.texCoords = glm::vec2(mesh->mTextureCoords[0][i].x, mesh->mTextureCoords[0][i].y);
        }
        vertices.push_back(vertex);
    }

    for (unsigned int i = 0; i < mesh->mNumFaces; i++) {
        aiFace face = mesh->mFaces[i];
        for (unsigned int j = 0; j < face.mNumIndices; j++) {
            indices.push_back(face.mIndices[j]);
        }
    }

    // 处理材质和纹理
    aiMaterial* material = scene->mMaterials[mesh->mMaterialIndex];
    if (material) {
        // 加载漫反射纹理
        std::vector<Texture> diffuseMaps = loadMaterialTextures(material, aiTextureType_DIFFUSE, "texture_diffuse");
        textures.insert(textures.end(), diffuseMaps.begin(), diffuseMaps.end());
        // 加载镜面反射纹理
        std::vector<Texture> specularMaps = loadMaterialTextures(material, aiTextureType_SPECULAR, "texture_specular");
        textures.insert(textures.end(), specularMaps.begin(), specularMaps.end());
        // 加载法线纹理
        std::vector<Texture> normalMaps = loadMaterialTextures(material, aiTextureType_HEIGHT, "texture_normal");
        textures.insert(textures.end(), normalMaps.begin(), normalMaps.end());
    }

    return Mesh(vertices, indices, textures);
}
processMesh 用于加载顶点,索引数据,调用 loadMaterialTextures 获取纹理数据,并构建 Mesh 对象。
加载法线纹理中,我们用的是 aiTextureType_HEIGHT,这个是历史遗留问题,有的 obj 文件中 aiTextureType_HEIGHT 存的是法线纹理数据。
std::vector<Texture> Model::loadMaterialTextures(aiMaterial* mat, aiTextureType type, std::string typeName)
{
    std::vector<Texture> textures;
    for(unsigned int i = 0; i < mat->GetTextureCount(type); i++) {
        aiString str;
        mat->GetTexture(type, i, &str);
        std::string directory = m_modelPath.substr(0, m_modelPath.find_last_of('/'));
        std::string filename = directory + '/' + str.C_Str();
        unsigned int textureID = loadTextureFromFile(filename);
        if (textureID != 0) {
            Texture texture;
            texture.id = textureID;
            texture.type = typeName;
            textures.push_back(texture);
        }
    }
    return textures;
}
通过 GetTexture 来获取纹理文件的路径,然后使用 stb_image 加载纹理即可
unsigned int Model::loadTextureFromFile(const std::string& path)
{
    // 检查缓存中是否已有此纹理
    auto it = m_textureCache.find(path);
    if (it != m_textureCache.end()) {
        return it->second;
    }

    unsigned int textureID;
    glGenTextures(1, &textureID);

    int width, height, nrComponents;
    unsigned char *data = stbi_load(path.c_str(), &width, &height, &nrComponents, 0);
    if (data) {
        GLenum format;
        if (nrComponents == 1)
            format = GL_RED;
        else if (nrComponents == 3)
            format = GL_RGB;
        else if (nrComponents == 4)
            format = GL_RGBA;

        glBindTexture(GL_TEXTURE_2D, textureID);
        glTexImage2D(GL_TEXTURE_2D, 0, format, width, height, 0, format, GL_UNSIGNED_BYTE, data);
        glGenerateMipmap(GL_TEXTURE_2D);

        glTexParameteri(GL_TEXTURE_2D, GL_TEXTURE_WRAP_S, GL_REPEAT);
        glTexParameteri(GL_TEXTURE_2D, GL_TEXTURE_WRAP_T, GL_REPEAT);
        glTexParameteri(GL_TEXTURE_2D, GL_TEXTURE_MIN_FILTER, GL_LINEAR_MIPMAP_LINEAR);
        glTexParameteri(GL_TEXTURE_2D, GL_TEXTURE_MAG_FILTER, GL_LINEAR);

        stbi_image_free(data);
        std::cout << "Texture loaded: " << path << " (" << width << "x" << height << ")" << std::endl;

        // 添加到缓存
        m_textureCache[path] = textureID;
        return textureID;
    }
    else {
        std::cout << "Texture failed to load at path: " << path << std::endl;
        stbi_image_free(data);
        return 0;
    }
}
这里我们把已经加载过的纹理保存在 m_textureCache,如果这个纹理已经加载过,那么会直接返回对应的纹理,避免重复加载,这是因为不同 mesh 可能都用到了同一个纹理。细心的读者可能会发现我们没有调用 stbi_set_flip_vertically_on_load(true),这是因为 Assimp 加载的纹理坐标也是和 OpenGL y轴方向不同。当然我们也可以使用 aiProcess_FlipUVs const aiScene *scene = importer.ReadFile(path, aiProcess_Triangulate | aiProcess_FlipUVs);来翻转y轴的纹理坐标,然后加载纹理时使用 stbi_set_flip_vertically_on_load(true)。
最后在我们的 main 函数里创建窗口,并使用我们封装好的类加载并渲染模型
#include <glad/glad.h>
#include <GLFW/glfw3.h>
#include <iostream>
#include <filesystem>
#include <vector>
#include <string>
#define STB_IMAGE_IMPLEMENTATION
#include "stb_image/stb_image.h"
#include <glm/glm.hpp>
#include <glm/gtc/matrix_transform.hpp>
#include <glm/gtc/type_ptr.hpp>
#include <cmrc/cmrc.hpp>
#include "Shader.h"
#include "Model.h"
#include "Camera.h"

namespace fs = std::filesystem;


void framebuffer_size_callback(GLFWwindow* window, int width, int height);
void processInput(GLFWwindow *window, Camera* camera);

// settings
const unsigned int SCR_WIDTH = 800;
const unsigned int SCR_HEIGHT = 800;
int window_width = SCR_WIDTH;
int window_height = SCR_HEIGHT;

int main()
{
    // glfw: initialize and configure
    // ------------------------------
    glfwInit();
    glfwWindowHint(GLFW_CONTEXT_VERSION_MAJOR, 3);
    glfwWindowHint(GLFW_CONTEXT_VERSION_MINOR, 3);
    glfwWindowHint(GLFW_OPENGL_PROFILE, GLFW_OPENGL_CORE_PROFILE);

#ifdef __APPLE__
    glfwWindowHint(GLFW_OPENGL_FORWARD_COMPAT, GL_TRUE);
#endif

    // glfw window creation
    // --------------------
    std::cout << "Creating GLFW window..." << std::endl;
    GLFWwindow* window = glfwCreateWindow(SCR_WIDTH, SCR_HEIGHT, "LearnOpenGL", NULL, NULL);
    if (window == NULL) {
        std::cout << "Failed to create GLFW window" << std::endl;
        glfwTerminate();
        return -1;
    }
    std::cout << "GLFW window created successfully" << std::endl;
    glfwMakeContextCurrent(window);
    glfwSetFramebufferSizeCallback(window, framebuffer_size_callback);

    // glad: load all OpenGL function pointers
    // ---------------------------------------
    if (!gladLoadGLLoader((GLADloadproc)glfwGetProcAddress)) {
        std::cout << "Failed to initialize GLAD" << std::endl;
        return -1;
    }
    glEnable(GL_DEPTH_TEST);

    // 创建相机
    Camera camera(glm::vec3(0.0f, 0.0f, 10.0f), glm::vec3(0.0f, 0.0f, 0.0f), glm::vec3(0.0f, 1.0f, 0.0f));

    // 设置回调
    glfwSetMouseButtonCallback(window, mouseButtonCallback);
    glfwSetCursorPosCallback(window, cursorPosCallback);
    glfwSetScrollCallback(window, scrollCallback);

    Shader shader("resource/glsl/vertexShader.glsl", "resource/glsl/fragmentShader.glsl");

    // 加载 obj 模型
    std::vector<Model> models;
    std::string modelsDir = "resource/models/backpack";
    for (const auto& entry : fs::directory_iterator(modelsDir)) {
        if (entry.path().extension() == ".obj") {
            std::cout << "Loading model: " << entry.path().string() << std::endl;
            try {
                models.emplace_back(entry.path().string());
            } catch (const std::exception& e) {
                std::cerr << "Error loading model " << entry.path().string() << ": " << e.what() << std::endl;
            }
        }
    }

    while (!glfwWindowShouldClose(window))
    {
        processInput(window, &camera);

        glClearColor(0.0f, 0.0f, 0.0f, 1.0f);
        glClear(GL_COLOR_BUFFER_BIT | GL_DEPTH_BUFFER_BIT);

        shader.use();

        glm::mat4 model = glm::mat4(1.0f);
        glm::mat4 view = camera.getViewMat();
        glm::mat4 projection = glm::perspective(glm::radians(45.0f), (float)window_width / (float)window_height, 0.1f, 100.0f);

        transform.setViewCenter(camera.getViewCenter());
        transform.setViewMatrix(view);
        transform.setProjectionMatrix(projection);

        shader.setMat4("model", model);
        shader.setMat4("view", view);
        shader.setMat4("projection", projection);

        float xOffset = 0.0f;
        float zOffset = 0.0f;
        int modelsPerRow = 5;
        float spacing = 3.0f;
        for (size_t i = 0; i < models.size(); ++i) {
            models[i].draw(shader);
        }

        glfwSwapBuffers(window);
        glfwPollEvents();
    }
    glfwTerminate();
    return 0;
}

void processInput(GLFWwindow *window, Camera* camera)
{
    if (glfwGetKey(window, GLFW_KEY_ESCAPE) == GLFW_PRESS)
        glfwSetWindowShouldClose(window, true);
}

// glfw: whenever the window size changed (by OS or user resize) this callback function executes
// ---------------------------------------------------------------------------------------------
void framebuffer_size_callback(GLFWwindow* window, int width, int height)
{
    // make sure the viewport matches the new window dimensions; note that width and
    // height will be significantly larger than specified on retina displays.
    glViewport(0, 0, width, height);
    window_width = width;
    window_height = height;
}
模型文件可以在这里(源自 learnopengl) 下载。
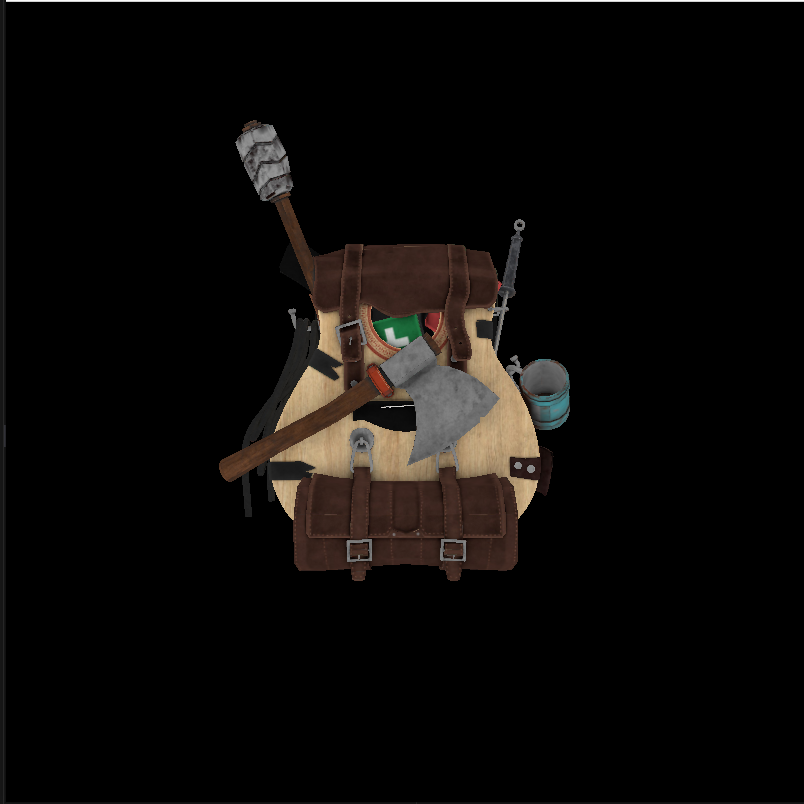
最后我们的结果应该是这样的。
这里可以找到本章的代码
由于笔者水平有限,错误不足之处,烦请各位读者斧正。

AtomGit 是由开放原子开源基金会联合 CSDN 等生态伙伴共同推出的新一代开源与人工智能协作平台。平台坚持“开放、中立、公益”的理念,把代码托管、模型共享、数据集托管、智能体开发体验和算力服务整合在一起,为开发者提供从开发、训练到部署的一站式体验。
更多推荐



 23
23 0
0- 0


 已为社区贡献4条内容

所有评论(0)