深入剖析 Label Studio【从入门到精通的数据标注实践】(上)
文章目录
第一章:Label Studio入门基础
1.1 数据标注与Label Studio概述
在人工智能项目的生命周期中,数据标注占据着至关重要的地位。高质量的训练数据是机器学习模型性能的基石,而数据标注正是将原始数据转化为结构化、可训练格式的核心环节。研究表明,AI项目约80%的时间都花费在数据准备和标注上,这直接决定了模型的准确性和泛化能力。
Label Studio简介:开源数据标注平台
Label Studio是一个功能强大的开源数据标注工具,由Heartex公司开发并维护。它提供了一个统一的Web界面,支持多种数据类型和标注任务,使数据科学家、机器学习工程师和标注团队能够高效协作。作为开源项目,Label Studio具有完全透明的代码库,允许用户根据特定需求进行定制和扩展。
支持的数据类型:图像、文本、音频、视频、时间序列
Label Studio的设计哲学是"一次部署,多种用途",它原生支持:
- 图像数据:支持JPEG、PNG、TIFF等常见格式,提供丰富的视觉标注工具
- 文本数据:处理纯文本、HTML、Markdown等格式,支持自然语言处理任务
- 音频数据:兼容MP3、WAV、FLAC等音频格式,提供波形可视化界面
- 视频数据:支持MP4、AVI、MOV等视频文件,支持逐帧标注
- 时间序列数据:专门为传感器数据、金融时间序列等设计的标注界面
核心优势:灵活性、可扩展性、团队协作
Label Studio的三大核心优势使其在众多标注工具中脱颖而出:
- 灵活性:通过自定义标注模板和配置,可以适应几乎任何标注场景
- 可扩展性:支持插件系统,可以集成机器学习模型进行预标注和主动学习
- 团队协作:内置用户管理、任务分配和质量控制功能,支持大规模标注项目
1.2 环境安装与配置
系统要求与环境准备
Label Studio对系统环境的要求相对宽松,但为确保最佳性能,建议满足以下条件:
- 操作系统:Linux(推荐Ubuntu 18.04+)、macOS 10.14+、Windows 10+
- 内存:至少4GB RAM(大型项目建议8GB以上)
- 存储:至少10GB可用磁盘空间
- Python版本:3.6及以上
多种安装方式详解
Docker快速部署
对于希望快速启动且避免环境依赖问题的用户,Docker是最佳选择:
# 拉取最新Label Studio镜像
docker pull heartexlabs/label-studio:latest

# 运行Label Studio容器
docker run -it -p 8080:8080 \
  -v $(pwd)/mydata:/label-studio/data \
  -v $(pwd)/mydb:/label-studio/label_studio.sqlite3 \
  --env LABEL_STUDIO_HOST=http://localhost:8080 \
  heartexlabs/label-studio:latest
这种部署方式自动包含所有依赖项,适合生产环境部署。
pip安装与虚拟环境配置
对于开发者和研究人员,pip安装提供了更大的灵活性:
# 创建虚拟环境(推荐)
python -m venv label-studio-env
source label-studio-env/bin/activate  # Linux/macOS
# 或 label-studio-env\Scripts\activate  # Windows

# 安装Label Studio
pip install label-studio

# 启动服务
label-studio start
使用虚拟环境可以避免包冲突,确保项目依赖的隔离性。
源码编译安装
对于需要深度定制或贡献代码的高级用户,可以从源码安装:
# 克隆仓库
git clone https://github.com/HumanSignal/label-studio.git
cd label-studio

# 安装开发依赖
pip install -e .

# 启动开发服务器
label-studio start
基础配置与初始化
首次启动Label Studio后,需要进行基础配置:
- 访问管理界面:在浏览器中打开 http://localhost:8080
- 创建管理员账户:设置用户名、邮箱和密码
- 配置存储后端:选择本地存储或云存储(AWS S3、Google Cloud Storage等)
- 设置数据库:默认使用SQLite,生产环境建议配置PostgreSQL
用户管理与权限设置
Label Studio提供多级用户权限系统:
- 管理员:完全控制权限,可以管理所有项目和用户
- 标注者:只能访问分配的任务,进行标注操作
- 审核者:可以查看和修改所有标注结果
- 项目管理员:特定项目的管理权限
可以通过Web界面或API管理用户和权限,支持LDAP/Active Directory集成。
第二章:核心功能详解
2.1 项目创建与管理
创建第一个标注项目
在Label Studio中创建新项目是一个直观的过程:
- 登录后点击"Create Project"按钮
- 输入项目名称和描述
- 选择标注类型或导入自定义模板
- 配置数据源和存储设置
- 定义标注规范和指南
项目设置详解:名称、描述、标注类型
项目设置决定了整个标注流程的框架:
- 项目名称:应具有描述性,便于团队成员识别
- 项目描述:详细说明标注目标、数据特点和注意事项
- 标注类型:选择预定义模板或创建自定义配置
- 质量控制:设置审核流程、一致性检查等参数
数据导入方式:本地文件、云存储、API接口
Label Studio支持多种数据导入方式,适应不同场景:
本地文件导入
# 使用Python SDK导入数据
from label_studio_sdk import Client

client = Client(url='http://localhost:8080', api_key='your-api-key')
project = client.get_project(1)

# 导入本地文件
project.import_tasks([
    {'data': {'image': '/absolute/path/to/image.jpg'}},
    {'data': {'text': 'Sample text for annotation'}}
])
云存储集成
支持AWS S3、Google Cloud Storage、Azure Blob Storage等主流云存储服务,支持自动同步。
API接口
提供RESTful API,支持程序化数据导入和管理:
curl -X POST http://localhost:8080/api/projects/1/import \
  -H "Content-Type: application/json" \
  -H "Authorization: Token your-token" \
  -d '{"tasks": [{"data": {"text": "API导入的文本数据"}}]}'
项目模板选择与自定义
Label Studio提供丰富的预定义模板,同时支持完全自定义:
使用预定义模板
- 图像分类:多标签、单标签分类
- 目标检测:边界框、多边形标注
- 文本分类:情感分析、主题分类
- 命名实体识别:实体抽取和分类
- 语音识别:音频转录和时间标注
创建自定义模板
通过XML格式的标签配置定义自定义标注界面:
<View>
  <Image name="image" value="$image"/>
  <RectangleLabels name="label" toName="image">
    <Label value="Car" background="green"/>
    <Label value="Pedestrian" background="blue"/>
  </RectangleLabels>
</View>
2.2 标注界面与工具使用
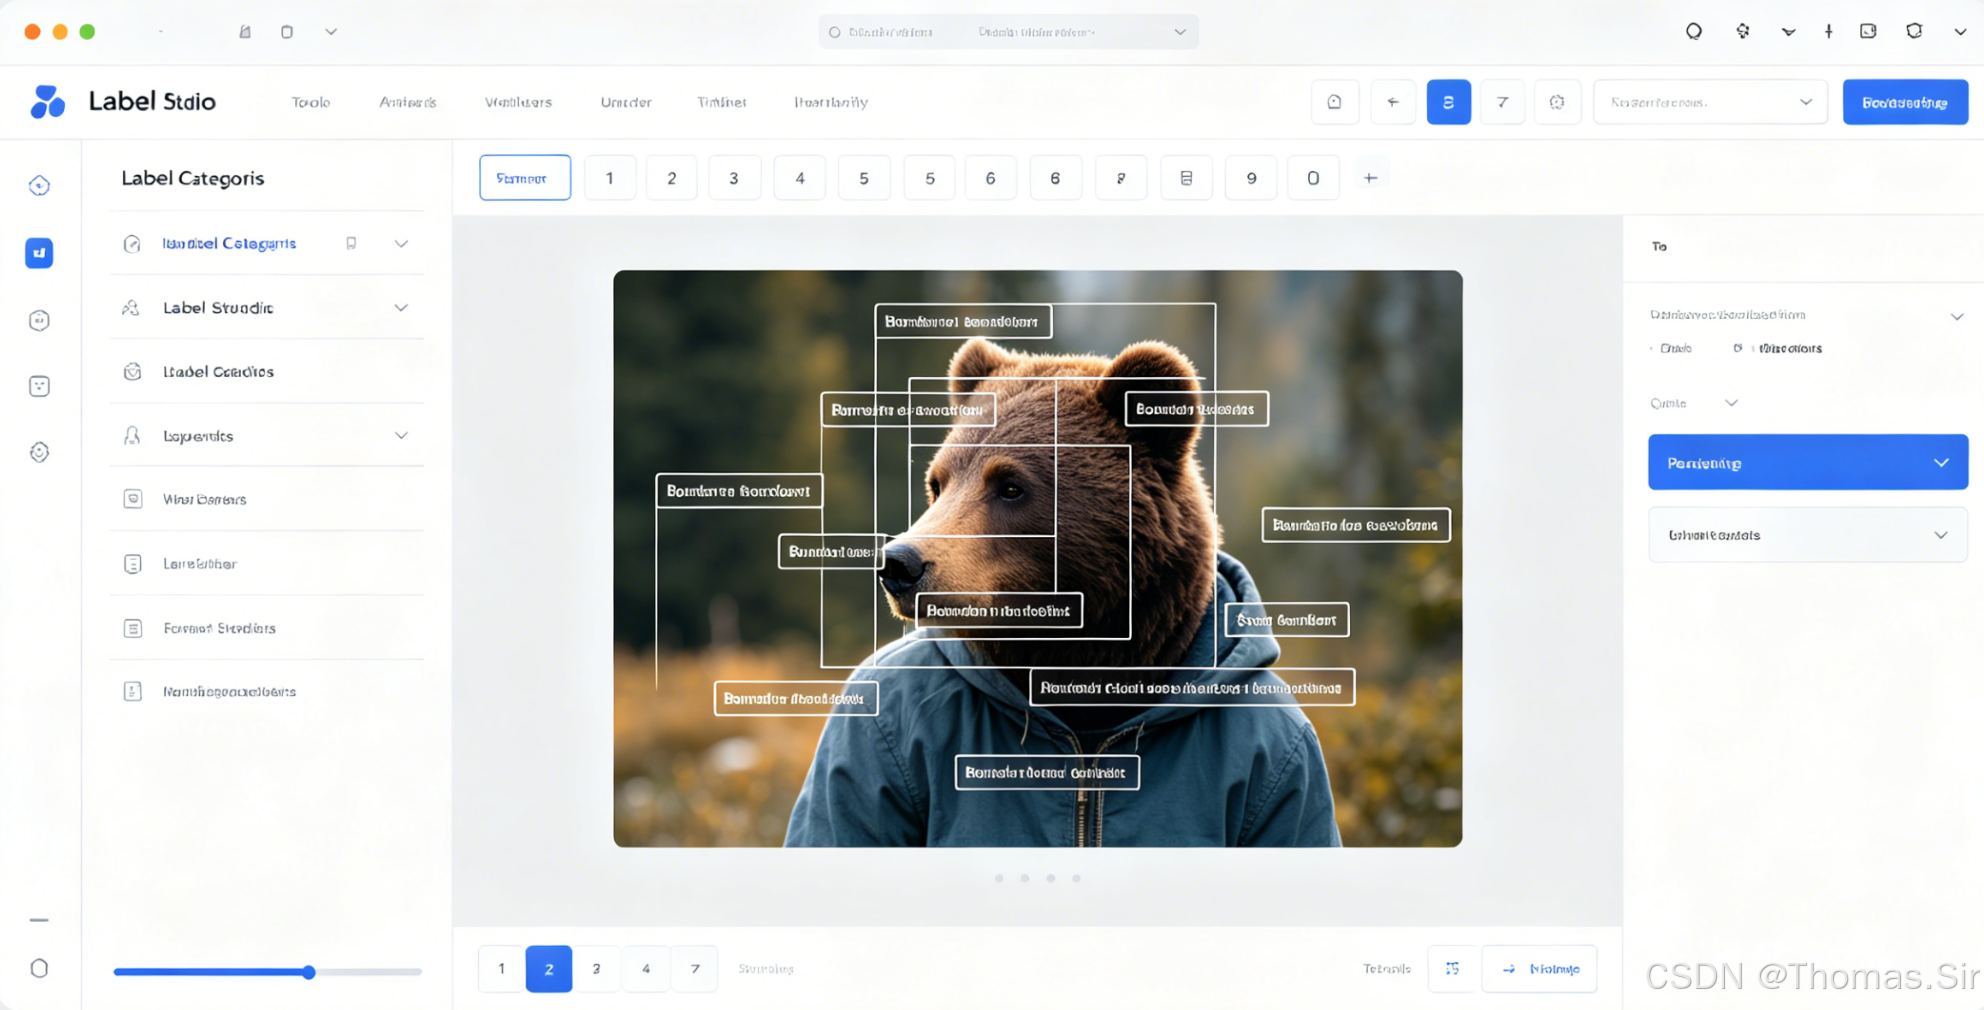
标注界面布局解析
Label Studio的标注界面经过精心设计,兼顾功能性和用户体验:
- 数据面板:显示当前标注任务和进度
- 标注区域:核心工作区,显示待标注数据
- 工具面板:提供标注工具和快捷键
- 标签面板:显示可用标签和分类
- 历史记录:跟踪标注修改历史
- 预览面板:查看标注结果预览
基础标注工具介绍
图像标注工具
-
矩形框标注
- 用途:目标检测、区域选择
- 操作:点击拖动创建矩形,支持调整大小和位置
- 快捷键:
R键快速选择矩形工具
-
多边形标注
- 用途:语义分割、不规则物体标注
- 操作:点击创建顶点,双击完成多边形
- 高级功能:支持贝塞尔曲线、自动边缘检测
-
关键点标注
- 用途:姿态估计、特征点标注
- 操作:点击添加关键点,支持连接线显示
- 配置:可定义关键点名称、颜色和连接关系
文本标注工具
-
命名实体识别
- 用途:实体抽取、信息提取
- 操作:选择文本片段,分配实体类型
- 支持:嵌套实体、不连续实体标注
-
文本分类
- 用途:情感分析、主题分类
- 操作:为整个文本或段落分配类别
- 支持:多标签分类、层次分类
-
关系标注
- 用途:实体关系抽取
- 操作:连接两个实体,定义关系类型
- 可视化:支持关系箭头和标签显示
音频标注工具
-
时间片段标注
- 用途:音频事件检测、语音分段
- 操作:在波形图上选择时间区间
- 功能:支持多轨道、音量可视化
-
音频转录
- 用途:语音转文字、字幕制作
- 操作:边听边输入文字,自动时间对齐
- 支持:多语言、专业术语词典
快捷键与效率技巧
掌握快捷键可以显著提高标注效率:
通用快捷键
Space:播放/暂停(音频/视频)Ctrl+Z/Cmd+Z:撤销Ctrl+Y/Cmd+Y:重做Ctrl+S/Cmd+S:保存Tab:在工具间切换
图像标注快捷键
R:选择矩形工具P:选择多边形工具K:选择关键点工具Esc:取消当前标注Delete:删除选中标注
文本标注快捷键
双击:选择单词三击:选择段落Ctrl+单击:添加不连续选择Shift+方向键:扩展选择范围
效率提升技巧
- 批量操作:使用
Shift+选择进行多选,统一修改标签 - 模板复用:保存常用标注模式为模板
- 预标注:集成机器学习模型进行自动预标注
- 质量检查:定期进行标注一致性评估
- 团队协作:合理分配任务,设置审核流程
高级功能:智能标注
Label Studio支持与机器学习模型集成,实现智能标注流程:
- 预标注:使用训练好的模型对数据进行初步标注
- 主动学习:系统自动选择最需要人工标注的样本
- 在线学习:标注过程中实时更新模型
- 集成主流框架:支持PyTorch、TensorFlow、scikit-learn等
# 示例:集成自定义模型进行预标注
from label_studio_ml.model import LabelStudioMLBase

class MyModel(LabelStudioMLBase):
    def predict(self, tasks, **kwargs):
        predictions = []
        for task in tasks:
            # 调用模型进行预测
            result = self.model.predict(task['data'])
            predictions.append({
                'result': result,
                'score': 0.95  # 置信度分数
            })
        return predictions
通过合理利用Label
Studio的各项功能,数据标注团队可以显著提高工作效率,确保标注质量,为AI项目提供可靠的数据基础。无论是小规模研究项目还是企业级生产环境,Label Studio都能提供合适的解决方案。
第三章:标注配置与模板
3.1 Labeling Config配置语言
Label Studio的核心在于其强大的配置语言,这套基于XML的配置系统让用户能够灵活定义任何类型的标注任务。
基础语法结构解析
Labeling Config的基本结构由<View>标签包裹,内部包含数据展示、交互工具和标签定义三个主要部分:
<View>
  <!-- 数据展示部分 -->
  <Image name="image" value="$image" zoom="true"/>
  <Text name="text" value="$text"/>

  <!-- 交互工具部分 -->
  <RectangleLabels name="rect" toName="image">
    <!-- 标签定义部分 -->
    <Label value="Car" background="green"/>
    <Label value="Person" background="blue"/>
  </RectangleLabels>
</View>
关键概念解析:
<View>:配置的根元素,定义整个标注界面name属性:用于标识组件,在结果中引用value属性:使用$变量名语法绑定任务数据toName属性:指定交互工具作用的数据组件
常用标签类型详解
- 数据展示标签
<!-- 图像显示 -->
<Image name="img" value="$image" zoom="true" zoomControl="true" maxWidth="100%"/>

<!-- 文本显示 -->
<Text name="content" value="$text" granularity="word"/>

<!-- 音频显示 -->
<Audio name="audio" value="$audio" hotkey="space"/>

<!-- 视频显示 -->
<Video name="video" value="$video" framerate="30"/>

<!-- 时间序列 -->
<Timeseries name="ts" value="$ts_data">
  <Channel column="value"/>
  <Channel column="prediction"/>
</Timeseries>
- 交互工具标签
<!-- 分类选择 -->
<Choices name="sentiment" toName="text" choice="single">
  <Choice value="Positive"/>
  <Choice value="Negative"/>
  <Choice value="Neutral"/>
</Choices>

<!-- 矩形框标注 -->
<RectangleLabels name="bbox" toName="image" strokeWidth="3">
  <Label value="Car" background="#FF0000"/>
  <Label value="Pedestrian" background="#00FF00"/>
</RectangleLabels>

<!-- 多边形标注 -->
<PolygonLabels name="segmentation" toName="image" strokeWidth="2">
  <Label value="Road" background="#666666"/>
  <Label value="Building" background="#888888"/>
</PolygonLabels>

<!-- 文本标注 -->
<Labels name="ner" toName="text">
  <Label value="PERSON" background="#ffa500"/>
  <Label value="ORG" background="#008000"/>
</Labels>
条件逻辑与规则配置
Label Studio支持复杂条件逻辑,实现动态标注界面:
<View>
  <!-- 根据图像大小决定是否显示标注工具 -->
  <Filter name="filter" toName="image" minWidth="100" minHeight="100"/>

  <!-- 条件显示:只有满足条件时才显示矩形框工具 -->
  <RectangleLabels name="bbox" toName="image" whenTagName="filter" whenTagValue="true">
    <Label value="Object"/>
  </RectangleLabels>

  <!-- 动态标签 -->
  <Choices name="object_type" toName="image" perRegion="true">
    <Choice value="Vehicle" whenLabelName="bbox" whenLabelValue="Object"/>
    <Choice value="Animal" whenLabelName="bbox" whenLabelValue="Object"/>
  </Choices>

  <!-- 基于已做选择的条件 -->
  <Choices name="vehicle_type" toName="image" perRegion="true"
           visibleWhen="region-selected"
           whenTagName="object_type"
           whenChoiceValue="Vehicle">
    <Choice value="Car"/>
    <Choice value="Truck"/>
  </Choices>
</View>
多标签与嵌套配置
复杂标注任务需要多层嵌套配置:
<View>
  <!-- 文档标注示例 -->
  <View style="display: flex;">
    <!-- 左侧:文档图像 -->
    <View style="width: 70%; padding: 10px;">
      <Image name="doc" value="$document" zoom="true"/>
      <RectangleLabels name="field" toName="doc">
        <Label value="Name" background="#FF6B6B"/>
        <Label value="Date" background="#4ECDC4"/>
        <Label value="Amount" background="#45B7D1"/>
      </RectangleLabels>
    </View>

    <!-- 右侧:属性编辑 -->
    <View style="width: 30%; padding: 10px;">
      <Header value="字段属性"/>

      <!-- 字段类型分类 -->
      <Choices name="field_type" toName="doc" perRegion="true">
        <Choice value="Printed Text"/>
        <Choice value="Handwritten"/>
        <Choice value="Stamp"/>
        <Choice value="Signature"/>
      </Choices>

      <!-- 文本转录 -->
      <TextArea name="transcription" toName="doc" perRegion="true"
                rows="3" placeholder="输入识别文本"/>

      <!-- 置信度评分 -->
      <Rating name="confidence" toName="doc" perRegion="true"
              maxRating="5" defaultValue="3"/>

      <!-- 质量标记 -->
      <Choices name="quality" toName="doc" perRegion="true" choice="multiple">
        <Choice value="Blurry"/>
        <Choice value="Occluded"/>
        <Choice value="Incomplete"/>
      </Choices>
    </View>
  </View>
</View>
3.2 预定义模板与自定义
内置模板库介绍
Label Studio提供丰富的预定义模板,覆盖常见标注场景:
-
计算机视觉模板
- 图像分类(单标签/多标签)
- 目标检测(边界框)
- 语义分割(多边形)
- 实例分割
- 关键点检测
- 光学字符识别(OCR)
-
自然语言处理模板
- 文本分类
- 命名实体识别
- 情感分析
- 文本摘要
- 关系抽取
- 机器翻译评估
-
音频处理模板
- 语音识别
- 说话人分离
- 音频事件检测
- 情感识别
-
多模态模板
- 图像描述生成
- 视觉问答
- 视频动作识别
图像分类模板配置
单标签分类配置:
<View>
  <Image name="image" value="$image"/>
  <Choices name="class" toName="image" choice="single">
    <Choice value="Cat"/>
    <Choice value="Dog"/>
    <Choice value="Bird"/>
    <Choice value="Other"/>
  </Choices>
</View>
多标签分类配置:
<View>
  <Image name="image" value="$image"/>
  <Choices name="tags" toName="image" choice="multiple" showInline="true">
    <Choice value="Outdoor"/>
    <Choice value="Daytime"/>
    <Choice value="People"/>
    <Choice value="Vehicle"/>
    <Choice value="Building"/>
  </Choices>
</View>
目标检测模板配置
基础目标检测:
<View>
  <Image name="image" value="$image"/>
  <RectangleLabels name="objects" toName="image">
    <Label value="Car" background="#FF6B6B"/>
    <Label value="Pedestrian" background="#4ECDC4"/>
    <Label value="Cyclist" background="#45B7D1"/>
    <Label value="Traffic Light" background="#96CEB4"/>
    <Label value="Traffic Sign" background="#FFEAA7"/>
  </RectangleLabels>
</View>
带属性的目标检测:
<View>
  <Image name="image" value="$image"/>
  <RectangleLabels name="bbox" toName="image">
    <Label value="Vehicle" background="#FF6B6B"/>
    <Label value="Person" background="#4ECDC4"/>
  </RectangleLabels>

  <!-- 车辆属性 -->
  <Choices name="vehicle_color" toName="image" perRegion="true"
           whenTagName="bbox" whenLabelValue="Vehicle">
    <Choice value="White"/>
    <Choice value="Black"/>
    <Choice value="Red"/>
    <Choice value="Blue"/>
  </Choices>

  <!-- 行人属性 -->
  <Choices name="person_action" toName="image" perRegion="true"
           whenTagName="bbox" whenLabelValue="Person">
    <Choice value="Walking"/>
    <Choice value="Running"/>
    <Choice value="Standing"/>
    <Choice value="Sitting"/>
  </Choices>
</View>
文本分类与NER模板
分层文本分类:
<View>
  <Text name="text" value="$text"/>

  <!-- 一级分类 -->
  <Choices name="category" toName="text">
    <Choice value="News"/>
    <Choice value="Review"/>
    <Choice value="Social Media"/>
  </Choices>

  <!-- 新闻子类 -->
  <Choices name="news_type" toName="text"
           whenTagName="category" whenChoiceValue="News">
    <Choice value="Politics"/>
    <Choice value="Sports"/>
    <Choice value="Technology"/>
  </Choices>

  <!-- 情感分析 -->
  <Choices name="sentiment" toName="text">
    <Choice value="Positive"/>
    <Choice value="Neutral"/>
    <Choice value="Negative"/>
  </Choices>
</View>
复杂NER配置:
<View>
  <Labels name="entities" toName="text">
    <!-- 一级实体 -->
    <Label value="PERSON" background="#FF6B6B"/>
    <Label value="ORGANIZATION" background="#4ECDC4"/>
    <Label value="LOCATION" background="#45B7D1"/>
    <Label value="DATE" background="#96CEB4"/>

    <!-- 嵌套实体 -->
    <Label value="MEDICAL_TERM" background="#FFEAA7"/>
  </Labels>

  <Text name="text" value="$text"/>

  <!-- 医学实体子类 -->
  <Choices name="medical_type" toName="text" perRegion="true"
           whenTagName="entities" whenLabelValue="MEDICAL_TERM">
    <Choice value="Disease"/>
    <Choice value="Symptom"/>
    <Choice value="Treatment"/>
    <Choice value="Medication"/>
  </Choices>

  <!-- 关系标注 -->
  <Relations>
    <Relation value="Works_For"/>
    <Relation value="Located_In"/>
    <Relation value="Treated_With"/>
  </Relations>
</View>
自定义模板开发
开发复杂自定义模板的完整示例:
<View>
  <!-- 医疗影像标注模板 -->
  <View style="display: flex; height: 800px;">

    <!-- 左侧:图像和标注区域 -->
    <View style="width: 70%; padding: 20px; border-right: 1px solid #ccc;">
      <Image name="scan" value="$dicom_image" zoom="true" zoomControl="true"/>

      <!-- 异常区域标注 -->
      <PolygonLabels name="anomaly" toName="scan" smart="true" smartOnly="true">
        <Label value="Lesion" background="#FF6B6B"/>
        <Label value="Tumor" background="#FF8E53"/>
        <Label value="Cyst" background="#FFB26B"/>
      </PolygonLabels>

      <!-- 测量工具 -->
      <RectangleLabels name="measurement" toName="scan">
        <Label value="Size" background="#4ECDC4"/>
      </RectangleLabels>
    </View>

    <!-- 右侧:属性面板 -->
    <View style="width: 30%; padding: 20px;">
      <Header value="诊断信息"/>

      <!-- 诊断分类 -->
      <Choices name="diagnosis" toName="scan">
        <Choice value="Normal"/>
        <Choice value="Benign"/>
        <Choice value="Malignant"/>
        <Choice value="Uncertain"/>
      </Choices>

      <!-- 异常属性(条件显示) -->
      <View whenTagName="diagnosis" whenChoiceValue="Benign">
        <Header value="良性特征"/>
        <Choices name="benign_features" toName="scan" choice="multiple">
          <Choice value="Well-defined"/>
          <Choice value="Homogeneous"/>
          <Choice value="No enhancement"/>
        </Choices>
      </View>

      <View whenTagName="diagnosis" whenChoiceValue="Malignant">
        <Header value="恶性特征"/>
        <Choices name="malignant_features" toName="scan" choice="multiple">
          <Choice value="Irregular shape"/>
          <Choice value="Heterogeneous"/>
          <Choice value="Enhancement"/>
        </Choices>
      </View>

      <!-- 测量结果 -->
      <Header value="测量数据"/>
      <Number name="size_cm" toName="scan" perRegion="true"
              whenTagName="measurement" min="0" max="20" step="0.1"
              placeholder="输入尺寸(cm)"/>

      <!-- 置信度 -->
      <Header value="置信度"/>
      <Rating name="confidence" toName="scan" maxRating="5"
              defaultValue="3" perRegion="true"/>

      <!-- 注释 -->
      <Header value="医师注释"/>
      <TextArea name="notes" toName="scan" rows="4"
                placeholder="输入诊断注释..." perRegion="true"/>
    </View>
  </View>
</View>

<!-- 自定义CSS样式 -->
<Style>
  .lsf-annotation {
    font-family: Arial, sans-serif;
  }
  .lsf-annotation__header {
    background-color: #f8f9fa;
    padding: 10px;
    border-bottom: 2px solid #dee2e6;
  }
  .lsf-choices {
    margin: 10px 0;
  }
  .lsf-choices__choice {
    padding: 8px 12px;
    margin: 4px;
    border-radius: 4px;
  }
</Style>
第四章:数据管理与工作流
4.1 数据导入与预处理
支持的数据格式详解
Label Studio支持多种数据格式,每种格式都有其适用场景:
- JSON格式(推荐)
[
  {
    "id": 1,
    "data": {
      "image": "s3://bucket/images/001.jpg",
      "text": "这是一张产品图片",
      "meta": {
        "source": "camera_1",
        "timestamp": "2024-01-01T10:00:00Z"
      }
    },
    "annotations": [],
    "predictions": []
  }
]
- CSV/TSV格式
image,text,category
"images/001.jpg","这是一只猫","animal"
"images/002.jpg","这是一辆车","vehicle"
- 纯文本格式
images/001.jpg
images/002.jpg
images/003.jpg
- COCO格式(计算机视觉)
{
  "images": [...],
  "annotations": [...],
  "categories": [...]
}
- Pascal VOC格式
<annotation>
  <filename>001.jpg</filename>
  <size>
    <width>800</width>
    <height>600</height>
  </size>
  <object>
    <name>car</name>
    <bndbox>
      <xmin>100</xmin>
      <ymin>200</ymin>
      <xmax>300</xmax>
      <ymax>400</ymax>
    </bndbox>
  </object>
</annotation>
批量导入技巧
高效数据导入策略:
- 分批次导入
# 分批导入大文件
split -l 1000 large_dataset.json dataset_part_
for file in dataset_part_*; do
  label-studio import my_project --input "$file"
  sleep 5  # 避免服务器过载
done
- 并行导入
from concurrent.futures import ThreadPoolExecutor
import requests

def import_task(task_data):
    response = requests.post(
        'http://localhost:8080/api/tasks',
        json=task_data,
        headers={'Authorization': 'Token YOUR_TOKEN'}
    )
    return response.status_code

# 并行导入1000个任务
with ThreadPoolExecutor(max_workers=10) as executor:
    futures = []
    for i in range(1000):
        task = {
            "data": {"image": f"images/{i:04d}.jpg"},
            "project": 1
        }
        futures.append(executor.submit(import_task, task))

    results = [f.result() for f in futures]
- 增量导入
import os
import json
from datetime import datetime

def incremental_import(project_id, data_dir, last_import_file='last_import.txt'):
    # 读取上次导入时间
    if os.path.exists(last_import_file):
        with open(last_import_file, 'r') as f:
            last_import = datetime.fromisoformat(f.read().strip())
    else:
        last_import = datetime.min

    # 获取新增文件
    new_files = []
    for root, dirs, files in os.walk(data_dir):
        for file in files:
            filepath = os.path.join(root, file)
            mtime = datetime.fromtimestamp(os.path.getmtime(filepath))
            if mtime > last_import:
                new_files.append(filepath)

    # 导入新文件
    for filepath in new_files:
        task_data = {"data": {"image": filepath}}
        # 调用导入API
        import_task_to_label_studio(project_id, task_data)

    # 更新导入时间
    with open(last_import_file, 'w') as f:
        f.write(datetime.now().isoformat())
数据预处理与转换
数据预处理流水线:
- 图像预处理
from PIL import Image
import cv2
import numpy as np

def preprocess_image(image_path, output_path, size=(1024, 768)):
    """预处理图像:调整大小、增强、格式转换"""
    # 读取图像
    img = cv2.imread(image_path)

    # 调整大小(保持宽高比)
    h, w = img.shape[:2]
    scale = min(size[0]/w, size[1]/h)
    new_w, new_h = int(w * scale), int(h * scale)
    img_resized = cv2.resize(img, (new_w, new_h))

    # 应用增强
    img_enhanced = apply_enhancements(img_resized)

    # 保存为标准格式
    cv2.imwrite(output_path, img_enhanced,
                [cv2.IMWRITE_JPEG_QUALITY, 90])

    return {
        "image": output_path,
        "original_size": (w, h),
        "processed_size": (new_w, new_h)
    }

def apply_enhancements(img):
    """应用图像增强"""
    # 对比度增强
    lab = cv2.cvtColor(img, cv2.COLOR_BGR2LAB)
    l, a, b = cv2.split(lab)
    clahe = cv2.createCLAHE(clipLimit=3.0, tileGridSize=(8,8))
    l = clahe.apply(l)
    enhanced = cv2.merge([l, a, b])
    enhanced = cv2.cvtColor(enhanced, cv2.COLOR_LAB2BGR)

    return enhanced
- 文本预处理
import re
from bs4 import BeautifulSoup
import nltk
from nltk.tokenize import word_tokenize

def preprocess_text(text, lang='english'):
    """预处理文本数据"""
    # 清理HTML标签
    soup = BeautifulSoup(text, 'html.parser')
    clean_text = soup.get_text()

    # 移除特殊字符
    clean_text = re.sub(r'[^\w\s.,!?-]', '', clean_text)

    # 标准化空白字符
    clean_text = re.sub(r'\s+', ' ', clean_text).strip()

    # 分词(可选)
    if lang in ['english', 'french', 'german']:
        tokens = word_tokenize(clean_text, language=lang)
        clean_text = ' '.join(tokens)

    return clean_text

def batch_preprocess_texts(texts, batch_size=100):
    """批量处理文本"""
    processed = []
    for i in range(0, len(texts), batch_size):
        batch = texts[i:i+batch_size]
        processed_batch = [preprocess_text(t) for t in batch]
        processed.extend(processed_batch)
    return processed
- 音频预处理
import librosa
import soundfile as sf
import numpy as np

def preprocess_audio(input_path, output_path,
                     target_sr=16000, duration=10):
    """预处理音频文件"""
    # 加载音频
    y, sr = librosa.load(input_path, sr=None)

    # 重采样
    if sr != target_sr:
        y = librosa.resample(y, orig_sr=sr, target_sr=target_sr)

    # 标准化长度
    if len(y) < target_sr * duration:
        # 填充静音
        padding = target_sr * duration - len(y)
        y = np.pad(y, (0, padding), mode='constant')
    else:
        # 截取
        y = y[:target_sr * duration]

    # 保存
    sf.write(output_path, y, target_sr)

    return {
        "audio": output_path,
        "duration": len(y) / target_sr,
        "sample_rate": target_sr
    }
外部数据源集成
- 云存储集成
# label_studio/data_storage.yml
aws:
  s3:
    bucket: "your-bucket-name"
    region: "us-west-2"
    access_key: "${AWS_ACCESS_KEY_ID}"
    secret_key: "${AWS_SECRET_ACCESS_KEY}"
    prefix: "datasets/"
    regex_filter: ".*\.(jpg|jpeg|png)$"
    use_blob_urls: true
    presign: true
    presign_ttl: 300
- 数据库集成
import psycopg2
from sqlalchemy import create_engine
import pandas as pd

class DatabaseImporter:
    def __init__(self, db_url):
        self.engine = create_engine(db_url)

    def import_from_table(self, table_name, project_id,
                         batch_size=1000):
        """从数据库表导入数据"""
        offset = 0
        while True:
            query = f"""
            SELECT * FROM {table_name}
            LIMIT {batch_size} OFFSET {offset}
            """

            df = pd.read_sql(query, self.engine)
            if df.empty:
                break

            # 转换格式
            tasks = self.convert_to_tasks(df, project_id)

            # 导入到Label Studio
            self.import_tasks(tasks)

            offset += batch_size

    def convert_to_tasks(self, df, project_id):
        """转换DataFrame为Label Studio任务格式"""
        tasks = []
        for _, row in df.iterrows():
            task = {
                "data": {
                    "id": row.get("id"),
                    "text": row.get("content"),
                    "image": row.get("image_url"),
                    "meta": {
                        "source": row.get("source"),
                        "timestamp": row.get("created_at").isoformat()
                    }
                },
                "project": project_id
            }
            tasks.append(task)
        return tasks
4.2 标注工作流设计
单步与多步标注流程
- 单步标注流程
# config.yml
label_config: |
  <View>
    <Image name="image" value="$image"/>
    <RectangleLabels name="bbox" toName="image">
      <Label value="Car"/>
      <Label value="Person"/>
    </RectangleLabels>
  </View>

workflow:
  type: "single_step"
  annotator_assign: "round_robin"
  auto_assignment: true
  overlap: 1
- 多步标注流程
workflow:
  steps:
    - name: "initial_annotation"
      role: "annotator"
      config: "basic_config.xml"
      assign: "auto"
      overlap: 2
      require_agreement: 0.7

    - name: "review"
      role: "reviewer"
      config: "review_config.xml"
      assign: "manual"
      source_step: "initial_annotation"
      condition: "confidence < 0.8"

    - name: "expert_review"
      role: "expert"
      config: "expert_config.xml"
      assign: "manual"
      source_step: "review"
      condition: "disagreement_flag = true"
质量控制机制
- 一致性检查配置
from label_studio_sdk import Client
from label_studio_sdk.project import Project

def setup_quality_control(project_id):
    client = Client(url='http://localhost:8080', api_key='your-api-key')
    project = client.get_project(project_id)

    # 设置重叠标注
    project.update_params({
        'maximum_annotations': 3,  # 每个任务3人标注
        'overlap_cohort_percentage': 100,  # 100%任务需要多人标注
        'skip_queue': 'REQUEUE_FOR_ME',
        'show_skip': True,
        'show_overlap_first': True
    })

    # 设置黄金标准任务
    golden_tasks = [
        {"id": 1, "expected_result": {...}},
        {"id": 2, "expected_result": {...}},
        {"id": 3, "expected_result": {...}}
    ]

    project.create_golden_tasks(golden_tasks)

    # 设置质量控制规则
    quality_config = {
        "label_agreement": {
            "min_agreement": 0.8,  # 最小一致性阈值
            "enabled": True
        },
        "annotation_review": {
            "enabled": True,
            "reviewer_role": "reviewer"
        },
        "annotator_performance": {
            "tracking": True,
            "min_accuracy": 0.85
        }
    }

    project.update_quality_config(quality_config)
- 实时质量监控
import dash
from dash import dcc, html
import plotly.graph_objects as go
from datetime import datetime, timedelta

def create_quality_dashboard(project_id):
    """创建质量监控仪表板"""
    app = dash.Dash(__name__)

    # 获取标注数据
    quality_metrics = get_quality_metrics(project_id)

    app.layout = html.Div([
        html.H1(f"项目 {project_id} 质量监控"),

        # 一致性图表
        dcc.Graph(
            id='agreement-chart',
            figure=create_agreement_chart(quality_metrics)
        ),

        # 标注员表现
        dcc.Graph(
            id='annotator-performance',
            figure=create_annotator_chart(quality_metrics)
        ),

        # 实时更新
        dcc.Interval(
            id='interval-component',
            interval=60*1000,  # 每分钟更新
            n_intervals=0
        )
    ])

    return app

def get_quality_metrics(project_id):
    """获取质量指标"""
    # 从Label Studio API获取数据
    # 包括:一致性分数、标注速度、错误率等
    pass
审核与修订流程
- 审核流程配置
# review_workflow.yml
review_process:
  enabled: true
  stages:
    - name: "automatic_check"
      type: "auto"
      checks:
        - type: "completeness"
          threshold: 0.95
        - type: "consistency"
          threshold: 0.8
      actions:
        - if: "all_passed"
          then: "mark_as_passed"
        - if: "any_failed"
          then: "send_to_manual_review"

    - name: "manual_review"
      type: "manual"
      assign_to: "senior_annotators"
      criteria:
        - "confidence < 0.7"
        - "agreement < 0.6"
        - "flagged_by_ai = true"
      actions:
        - type: "approve"
          can_edit: true
        - type: "reject"
          comment_required: true
          reassign_to: "original_annotator"

    - name: "expert_review"
      type: "manual"
      assign_to: "domain_experts"
      criteria:
        - "complexity = high"
        - "disagreement_count > 2"
      quota: 0.1  # 10%的任务
- 修订跟踪系统
class RevisionSystem:
    def __init__(self, project_id):
        self.project_id = project_id
        self.revision_history = []

    def create_revision(self, task_id, annotator_id,
                       changes, reason):
        """创建修订记录"""
        revision = {
            "task_id": task_id,
            "annotator_id": annotator_id,
            "timestamp": datetime.now().isoformat(),
            "changes": changes,
            "reason": reason,
            "previous_state": self.get_task_state(task_id),
            "new_state": self.apply_changes(task_id, changes)
        }

        self.revision_history.append(revision)
        self.save_revision(revision)

        # 通知相关人员
        self.notify_stakeholders(revision)

        return revision

    def get_revision_history(self, task_id):
        """获取任务的修订历史"""
        return [r for r in self.revision_history
                if r["task_id"] == task_id]

    def revert_to_revision(self, task_id, revision_id):
        """回滚到特定修订版本"""
        revision = next(
            r for r in self.revision_history
            if r["id"] == revision_id
        )

        # 恢复状态
        self.restore_task_state(task_id, revision["previous_state"])

        # 记录回滚
        self.create_revision(
            task_id=task_id,
            annotator_id="system",
            changes={"type": "revert", "to_revision": revision_id},
            reason="Reverted to previous version"
        )
团队协作与任务分配
- 智能任务分配系统
from typing import List, Dict
from dataclasses import dataclass
from datetime import datetime, timedelta

@dataclass
class Annotator:
    id: str
    role: str
    skills: List[str]
    capacity: int
    current_load: int
    performance: Dict[str, float]
    availability: List[datetime]

@dataclass
class Task:
    id: str
    complexity: str
    required_skills: List[str]
    priority: int
    estimated_time: int
    dependencies: List[str]

class TaskAllocator:
    def __init__(self, annotators: List[Annotator]):
        self.annotators = annotators
        self.task_queue = []

    def allocate_task(self, task: Task) -> str:
        """分配任务给最合适的标注员"""
        candidates = []

        for annotator in self.annotators:
            # 检查能力
            if not self.check_capability(annotator, task):
                continue

            # 计算匹配度
            score = self.calculate_match_score(annotator, task)

            candidates.append({
                "annotator": annotator,
                "score": score
            })

        if not candidates:
            return None

        # 选择最佳匹配
        best_match = max(candidates, key=lambda x: x["score"])
        best_annotator = best_match["annotator"]

        # 更新标注员负载
        best_annotator.current_load += 1

        return best_annotator.id

    def check_capability(self, annotator: Annotator, task: Task) -> bool:
        """检查标注员是否有能力完成任务"""
        # 检查技能匹配
        if not set(task.required_skills).issubset(annotator.skills):
            return False

        # 检查容量
        if annotator.current_load >= annotator.capacity:
            return False

        # 检查可用性
        if not self.check_availability(annotator, task.estimated_time):
            return False

        return True

    def calculate_match_score(self, annotator: Annotator, task: Task) -> float:
        """计算标注员与任务的匹配分数"""
        score = 0.0

        # 技能匹配度
        skill_match = len(set(annotator.skills) & set(task.required_skills))
        skill_match /= len(task.required_skills)
        score += skill_match * 0.4

        # 性能权重
        performance = annotator.performance.get(task.complexity, 0.5)
        score += performance * 0.3

        # 负载均衡
        load_ratio = annotator.current_load / annotator.capacity
        load_score = 1 - load_ratio
        score += load_score * 0.2

        # 优先级考虑
        if task.priority > 7:
            # 高优先级任务分配给高性能标注员
            score *= (1 + performance * 0.2)

        return score

    def check_availability(self, annotator: Annotator,
                          estimated_time: int) -> bool:
        """检查标注员是否有足够时间"""
        # 实现可用性检查逻辑
        return True
- 团队协作配置
# team_config.yml
team:
  roles:
    - name: "annotator"
      permissions:
        - "view_tasks"
        - "submit_annotations"
        - "view_guidelines"
      quotas:
        daily_tasks: 100
        quality_threshold: 0.8

    - name: "reviewer"
      permissions:
        - "view_all_tasks"
        - "review_annotations"
        - "edit_annotations"
        - "escalate_issues"
      quotas:
        daily_reviews: 50

    - name: "manager"
      permissions:
        - "manage_tasks"
        - "manage_users"
        - "view_reports"
        - "configure_workflow"

  workflows:
    standard:
      - role: "annotator"
        action: "annotate"
        next: "review"
        condition: "always"

      - role: "reviewer"
        action: "review"
        next: "complete"
        condition: "quality >= 0.9"

      - role: "reviewer"
        action: "rework"
        next: "annotator"
        condition: "quality < 0.9"

    expert:
      - role: "annotator"
        action: "annotate"
        next: "expert_review"
        condition: "complexity = high"

      - role: "expert"
        action: "expert_review"
        next: "complete"
        condition: "always"

  notifications:
    enabled: true
    channels:
      - type: "email"
        events: ["task_assigned", "review_requested", "quality_alert"]
      - type: "slack"
        events: ["urgent", "deadline_approaching"]
      - type: "in_app"
        events: ["all"]

    escalation:
      levels:
        - condition: "response_time > 24h"
          notify: ["team_lead"]
        - condition: "response_time > 48h"
          notify: ["project_manager"]
        - condition: "critical_issue = true"
          notify: ["all_managers"]
- 性能监控与优化
import pandas as pd
import numpy as np
from datetime import datetime, timedelta

class PerformanceMonitor:
    def __init__(self, project_id):
        self.project_id = project_id
        self.metrics = pd.DataFrame()

    def collect_metrics(self, time_range='7d'):
        """收集性能指标"""
        end_time = datetime.now()

        if time_range == '7d':
            start_time = end_time - timedelta(days=7)
        elif time_range == '30d':
            start_time = end_time - timedelta(days=30)
        else:
            start_time = end_time - timedelta(days=1)

        # 从数据库或API获取数据
        metrics = self.fetch_metrics(start_time, end_time)

        # 计算关键指标
        self.calculate_kpis(metrics)

        return metrics

    def calculate_kpis(self, metrics_df):
        """计算关键绩效指标"""
        # 标注质量
        metrics_df['quality_score'] = (
            metrics_df['agreement_score'] * 0.4 +
            metrics_df['accuracy_score'] * 0.4 +
            metrics_df['completeness_score'] * 0.2
        )

        # 生产效率
        metrics_df['efficiency'] = (
            metrics_df['tasks_completed'] /
            metrics_df['active_hours']
        )

        # 一致性
        metrics_df['consistency'] = (
            1 - metrics_df['revision_rate']
        )

        return metrics_df

    def generate_report(self, time_range='7d'):
        """生成性能报告"""
        metrics = self.collect_metrics(time_range)

        report = {
            "summary": {
                "total_tasks": metrics['tasks_completed'].sum(),
                "average_quality": metrics['quality_score'].mean(),
                "average_efficiency": metrics['efficiency'].mean(),
                "total_annotators": metrics['annotator_id'].nunique()
            },
            "by_annotator": self.analyze_by_annotator(metrics),
            "trends": self.analyze_trends(metrics),
            "recommendations": self.generate_recommendations(metrics)
        }

        return report

    def analyze_by_annotator(self, metrics):
        """按标注员分析"""
        annotator_stats = metrics.groupby('annotator_id').agg({
            'tasks_completed': 'sum',
            'quality_score': 'mean',
            'efficiency': 'mean',
            'active_hours': 'sum'
        }).reset_index()

        # 分类标注员
        annotator_stats['category'] = pd.cut(
            annotator_stats['quality_score'],
            bins=[0, 0.7, 0.85, 1.0],
            labels=['needs_improvement', 'good', 'excellent']
        )

        return annotator_stats.to_dict('records')
通过合理配置标注工作流、实施严格的质量控制机制、设计高效的团队协作流程,Label
Studio能够支持从小型研究项目到企业级生产环境的各种数据标注需求。这些功能的灵活组合使得Label
Studio成为一个真正强大且可扩展的数据标注平台。
第五章:高级功能与集成
5.1 机器学习辅助标注
模型集成原理
Label Studio的机器学习辅助标注功能基于其可扩展的后端架构,支持与任何机器学习框架集成。核心原理是通过创建一个机器学习后端,将训练好的模型部署为服务,在标注过程中提供智能辅助。
-
系统架构
数据流: 原始数据 → Label Studio前端 → 机器学习后端 → 预测结果 → 预标注界面 控制流: 用户交互 → 触发预测 → 模型推理 → 更新标注建议 -
集成模式
- 预标注模式:在标注开始前批量运行模型,生成初始标注
- 交互模式:在标注过程中实时调用模型,提供智能建议
- 主动学习模式:模型主动选择不确定性高的样本供人工标注
预标注功能使用
- 配置机器学习后端
# 创建机器学习后端配置
# ml_backend_config.py
from label_studio_ml.model import LabelStudioMLBase
from label_studio_ml.utils import get_image_local_path
import torch
import torchvision
from PIL import Image
import numpy as np

class ImageClassifier(LabelStudioMLBase):
    def __init__(self, **kwargs):
        super().__init__(**kwargs)
        # 从配置中加载模型
        self.model = self.load_model()
        self.labels = ['cat', 'dog', 'bird', 'other']

    def load_model(self):
        """加载预训练模型"""
        # 这里使用ResNet作为示例
        model = torchvision.models.resnet50(pretrained=True)
        model.eval()
        return model

    def predict(self, tasks, **kwargs):
        """预测任务"""
        predictions = []

        for task in tasks:
            # 获取图像路径
            image_path = get_image_local_path(task['data']['image'])

            # 预处理图像
            img = self.preprocess_image(image_path)

            # 模型推理
            with torch.no_grad():
                outputs = self.model(img)
                probs = torch.nn.functional.softmax(outputs, dim=1)
                confidence, pred = torch.max(probs, dim=1)

            # 构建预测结果
            predictions.append({
                'result': [{
                    'from_name': 'choice',
                    'to_name': 'image',
                    'type': 'choices',
                    'value': {
                        'choices': [self.labels[pred.item()]]
                    }
                }],
                'score': confidence.item(),
                'model_version': 'v1.0'
            })

        return predictions

    def preprocess_image(self, image_path):
        """图像预处理"""
        img = Image.open(image_path).convert('RGB')
        img = img.resize((224, 224))
        img = np.array(img) / 255.0
        img = (img - [0.485, 0.456, 0.406]) / [0.229, 0.224, 0.225]
        img = torch.FloatTensor(img).permute(2, 0, 1).unsqueeze(0)
        return img
- 启动机器学习后端服务
# 启动机器学习后端
label-studio-ml init my_ml_backend --script ml_backend_config.py
label-studio-ml start my_ml_backend

# 连接到Label Studio
label-studio start --init --ml-backends http://localhost:9090
- 配置预标注
# 通过Python SDK配置预标注
from label_studio_sdk import Client

client = Client(url='http://localhost:8080', api_key='your-api-key')
project = client.get_project(1)

# 设置机器学习后端
project.set_ml_backend('http://localhost:9090')

# 启用预标注
project.update_params({
    'ml_backend': {
        'enabled': True,
        'auto_annotation': True,
        'preannotations_from_predictions': True
    }
})
主动学习配置
主动学习通过智能选择最有价值的样本进行标注,最大化标注效率:
- 不确定性采样策略
# active_learning.py
import numpy as np
from sklearn.ensemble import RandomForestClassifier
from modAL.models import ActiveLearner
from modAL.uncertainty import entropy_sampling

class ActiveLearningModel:
    def __init__(self, n_initial=100):
        self.learner = ActiveLearner(
            estimator=RandomForestClassifier(n_estimators=100),
            query_strategy=entropy_sampling,
            X_training=None,
            y_training=None
        )
        self.n_initial = n_initial
        self.labeled_data = []
        self.unlabeled_data = []

    def get_next_batch(self, unlabeled_pool, batch_size=10):
        """获取下一批需要标注的样本"""
        if len(self.labeled_data) < self.n_initial:
            # 初始阶段:随机选择
            indices = np.random.choice(
                len(unlabeled_pool),
                min(batch_size, len(unlabeled_pool)),
                replace=False
            )
        else:
            # 主动学习阶段:选择不确定性最高的样本
            probabilities = self.learner.predict_proba(unlabeled_pool)
            uncertainties = 1 - np.max(probabilities, axis=1)
            indices = np.argsort(uncertainties)[-batch_size:]

        return indices

    def update_model(self, X_new, y_new):
        """用新标注的数据更新模型"""
        self.learner.teach(X_new, y_new)

    def integrate_with_label_studio(self, project_id):
        """与Label Studio集成"""
        # 获取未标注数据
        unlabeled_tasks = self.get_unlabeled_tasks(project_id)

        # 选择需要标注的样本
        indices = self.get_next_batch(unlabeled_tasks)

        # 创建标注任务
        tasks_to_label = [unlabeled_tasks[i] for i in indices]

        # 分配任务给标注员
        self.assign_tasks(project_id, tasks_to_label)
- 多样性采样策略
from sklearn.cluster import KMeans
from sklearn.metrics import pairwise_distances

class DiversitySampling:
    def __init__(self, cluster_n=10):
        self.cluster_n = cluster_n
        self.kmeans = KMeans(n_clusters=cluster_n)

    def select_diverse_samples(self, unlabeled_data, labeled_data, batch_size=10):
        """选择多样化的样本"""
        # 将所有数据合并
        all_data = np.vstack([labeled_data, unlabeled_data])

        # 如果已标注数据不足,使用随机采样
        if len(labeled_data) < batch_size:
            cluster_labels = self.kmeans.fit_predict(all_data)
        else:
            # 计算每个簇中的样本数
            cluster_labels = self.kmeans.fit_predict(labeled_data)
            cluster_counts = np.bincount(cluster_labels, minlength=self.cluster_n)

            # 优先选择样本数少的簇
            selected_indices = []
            for cluster in np.argsort(cluster_counts):
                cluster_mask = cluster_labels == cluster
                cluster_samples = unlabeled_data[cluster_mask]

                if len(cluster_samples) > 0:
                    # 选择距离簇中心最远的样本
                    cluster_center = self.kmeans.cluster_centers_[cluster]
                    distances = pairwise_distances(
                        cluster_samples,
                        cluster_center.reshape(1, -1)
                    ).flatten()
                    farthest_idx = np.argmax(distances)

                    original_idx = np.where(cluster_mask)[0][farthest_idx]
                    selected_indices.append(original_idx)

                    if len(selected_indices) >= batch_size:
                        break

        return selected_indices
模型训练与迭代
- 持续学习流水线
# continuous_learning.py
import pandas as pd
import numpy as np
from datetime import datetime, timedelta
import joblib
from sklearn.metrics import accuracy_score, f1_score

class ContinuousLearningPipeline:
    def __init__(self, project_id, model_path='model.pkl'):
        self.project_id = project_id
        self.model_path = model_path
        self.model = None
        self.retrain_interval = timedelta(hours=1)
        self.last_retrain = None

    def initialize_model(self):
        """初始化模型"""
        # 加载已有模型或创建新模型
        try:
            self.model = joblib.load(self.model_path)
            print(f"加载已有模型: {self.model_path}")
        except:
            self.model = self.create_base_model()
            print("创建新模型")

    def create_base_model(self):
        """创建基础模型"""
        from sklearn.ensemble import RandomForestClassifier
        return RandomForestClassifier(
            n_estimators=100,
            max_depth=10,
            random_state=42
        )

    def get_new_annotations(self, since=None):
        """获取新的标注数据"""
        if since is None and self.last_retrain:
            since = self.last_retrain

        # 调用Label Studio API获取新标注
        new_annotations = self.fetch_annotations_since(since)

        # 转换格式
        X_new, y_new = self.prepare_training_data(new_annotations)

        return X_new, y_new

    def retrain_model(self, incremental=True):
        """重新训练模型"""
        print("开始重新训练模型...")

        # 获取新数据
        X_new, y_new = self.get_new_annotations()

        if len(X_new) == 0:
            print("没有新的标注数据")
            return

        if incremental and self.model:
            # 增量学习
            self.model.fit(X_new, y_new)
            print(f"增量训练完成,新增样本: {len(X_new)}")
        else:
            # 全量重新训练
            X_all, y_all = self.get_all_annotations()
            self.model.fit(X_all, y_all)
            print(f"全量训练完成,总样本: {len(X_all)}")

        # 评估模型
        self.evaluate_model()

        # 保存模型
        joblib.dump(self.model, self.model_path)

        # 更新重新训练时间
        self.last_retrain = datetime.now()

        # 更新Label Studio的预标注
        self.update_preannotations()

    def evaluate_model(self, test_size=0.2):
        """评估模型性能"""
        X, y = self.get_all_annotations()

        if len(X) < 10:
            print("数据不足,跳过评估")
            return

        # 划分训练测试集
        split_idx = int(len(X) * (1 - test_size))
        X_train, X_test = X[:split_idx], X[split_idx:]
        y_train, y_test = y[:split_idx], y[split_idx:]

        # 训练评估模型
        eval_model = self.create_base_model()
        eval_model.fit(X_train, y_train)

        # 预测
        y_pred = eval_model.predict(X_test)

        # 计算指标
        accuracy = accuracy_score(y_test, y_pred)
        f1 = f1_score(y_test, y_pred, average='weighted')

        print(f"模型评估结果:")
        print(f"  准确率: {accuracy:.4f}")
        print(f"  F1分数: {f1:.4f}")
        print(f"  测试样本数: {len(X_test)}")

        # 保存评估结果
        self.save_evaluation_metrics({
            'accuracy': accuracy,
            'f1_score': f1,
            'test_size': len(X_test),
            'timestamp': datetime.now().isoformat()
        })

    def update_preannotations(self):
        """更新预标注"""
        # 获取未标注数据
        unlabeled_data = self.get_unlabeled_data()

        if len(unlabeled_data) == 0:
            print("没有未标注数据")
            return

        # 生成预测
        predictions = self.model.predict(unlabeled_data)
        probabilities = self.model.predict_proba(unlabeled_data)

        # 转换为Label Studio格式
        preannotations = self.create_preannotations(
            unlabeled_data,
            predictions,
            probabilities
        )

        # 上传到Label Studio
        self.upload_preannotations(preannotations)

        print(f"更新了{len(preannotations)}个预标注")
- A/B测试框架
# ab_testing.py
import random
from typing import List, Dict, Any
from dataclasses import dataclass
from datetime import datetime

@dataclass
class ModelVariant:
    name: str
    model: Any
    weight: float
    metrics: Dict[str, float]

class ABTestingFramework:
    def __init__(self, variants: List[ModelVariant]):
        self.variants = variants
        self.total_requests = 0
        self.variant_requests = {v.name: 0 for v in variants}
        self.variant_success = {v.name: 0 for v in variants}

    def select_model(self) -> ModelVariant:
        """选择模型变体(基于权重)"""
        total_weight = sum(v.weight for v in self.variants)
        r = random.random() * total_weight
        cumulative = 0

        for variant in self.variants:
            cumulative += variant.weight
            if r <= cumulative:
                return variant

        return self.variants[0]

    def get_prediction(self, data, variant_name=None):
        """获取预测结果"""
        if variant_name:
            variant = next(v for v in self.variants if v.name == variant_name)
        else:
            variant = self.select_model()

        # 记录使用情况
        self.total_requests += 1
        self.variant_requests[variant.name] += 1

        # 获取预测
        prediction = variant.model.predict([data])[0]

        return {
            'prediction': prediction,
            'variant': variant.name,
            'confidence': self.get_confidence(variant.model, data)
        }

    def update_metrics(self, variant_name, correct):
        """更新模型指标"""
        if correct:
            self.variant_success[variant_name] += 1

        # 计算成功率
        requests = self.variant_requests[variant_name]
        successes = self.variant_success[variant_name]
        success_rate = successes / requests if requests > 0 else 0

        # 更新权重(成功率高则权重增加)
        total_success_rate = sum(
            self.variant_success[v.name] / max(self.variant_requests[v.name], 1)
            for v in self.variants
        ) / len(self.variants)

        for variant in self.variants:
            variant_success = self.variant_success[variant.name]
            variant_requests = self.variant_requests[variant.name]
            variant_rate = variant_success / variant_requests if variant_requests > 0 else 0

            # 调整权重
            if variant_requests > 100:  # 确保有足够样本
                performance_ratio = variant_rate / total_success_rate
                variant.weight = min(1.0, max(0.1, variant.weight * 0.9 + performance_ratio * 0.1))

    def get_confidence(self, model, data):
        """获取预测置信度"""
        if hasattr(model, 'predict_proba'):
            proba = model.predict_proba([data])[0]
            confidence = max(proba)
        else:
            confidence = 1.0

        return confidence

    def generate_report(self):
        """生成A/B测试报告"""
        report = {
            'timestamp': datetime.now().isoformat(),
            'total_requests': self.total_requests,
            'variants': []
        }

        for variant in self.variants:
            requests = self.variant_requests[variant.name]
            successes = self.variant_success[variant.name]
            success_rate = successes / requests if requests > 0 else 0

            report['variants'].append({
                'name': variant.name,
                'requests': requests,
                'successes': successes,
                'success_rate': success_rate,
                'weight': variant.weight,
                'requests_percentage': requests / self.total_requests if self.total_requests > 0 else 0
            })

        return report
5.2 API与自动化
REST API接口详解
Label Studio提供完整的REST API,支持所有功能的程序化访问:
- 认证与授权
import requests
from requests.auth import HTTPBasicAuth

class LabelStudioAPI:
    def __init__(self, base_url, api_token):
        self.base_url = base_url.rstrip('/')
        self.api_token = api_token
        self.session = requests.Session()
        self.session.headers.update({
            'Authorization': f'Token {api_token}',
            'Content-Type': 'application/json'
        })

    def _make_request(self, method, endpoint, **kwargs):
        """发送API请求"""
        url = f"{self.base_url}/api{endpoint}"
        response = self.session.request(method, url, **kwargs)
        response.raise_for_status()
        return response.json()
- 项目管理API
class ProjectAPI(LabelStudioAPI):
    def list_projects(self, page=1, page_size=20):
        """列出所有项目"""
        params = {'page': page, 'page_size': page_size}
        return self._make_request('GET', '/projects/', params=params)

    def create_project(self, title, description, label_config):
        """创建新项目"""
        data = {
            'title': title,
            'description': description,
            'label_config': label_config
        }
        return self._make_request('POST', '/projects/', json=data)

    def get_project(self, project_id):
        """获取项目详情"""
        return self._make_request('GET', f'/projects/{project_id}/')

    def update_project(self, project_id, **kwargs):
        """更新项目"""
        return self._make_request('PATCH', f'/projects/{project_id}/', json=kwargs)

    def delete_project(self, project_id):
        """删除项目"""
        return self._make_request('DELETE', f'/projects/{project_id}/')
- 任务管理API
class TaskAPI(LabelStudioAPI):
    def import_tasks(self, project_id, tasks):
        """导入任务"""
        return self._make_request('POST', f'/projects/{project_id}/import', json=tasks)

    def list_tasks(self, project_id, view_type='data', page=1, page_size=100):
        """列出项目任务"""
        params = {
            'project': project_id,
            'view': view_type,
            'page': page,
            'page_size': page_size
        }
        return self._make_request('GET', '/tasks/', params=params)

    def get_task(self, task_id):
        """获取任务详情"""
        return self._make_request('GET', f'/tasks/{task_id}/')

    def update_task(self, task_id, data):
        """更新任务"""
        return self._make_request('PATCH', f'/tasks/{task_id}/', json=data)

    def delete_task(self, task_id):
        """删除任务"""
        return self._make_request('DELETE', f'/tasks/{task_id}/')
- 标注管理API
class AnnotationAPI(LabelStudioAPI):
    def create_annotation(self, task_id, result, completed=False):
        """创建标注"""
        data = {
            'task': task_id,
            'result': result,
            'completed': completed
        }
        return self._make_request('POST', '/annotations/', json=data)

    def update_annotation(self, annotation_id, result=None, completed=None):
        """更新标注"""
        data = {}
        if result is not None:
            data['result'] = result
        if completed is not None:
            data['completed'] = completed

        return self._make_request('PATCH', f'/annotations/{annotation_id}/', json=data)

    def delete_annotation(self, annotation_id):
        """删除标注"""
        return self._make_request('DELETE', f'/annotations/{annotation_id}/')

    def get_task_annotations(self, task_id):
        """获取任务的所有标注"""
        params = {'task': task_id}
        return self._make_request('GET', '/annotations/', params=params)
Python SDK使用
Label Studio官方Python SDK提供高级封装,简化开发:
- 安装与初始化
pip install label-studio-sdk
- 基础使用
from label_studio_sdk import Client
from label_studio_sdk.project import Project
from label_studio_sdk.data_manager import Filters, Column

# 初始化客户端
client = Client(
    url='http://localhost:8080',
    api_key='your-api-key'
)

# 连接到现有项目
project = client.get_project(1)

# 或创建新项目
new_project = client.create_project(
    title='图像分类项目',
    label_config='''
    <View>
      <Image name="image" value="$image"/>
      <Choices name="class" toName="image">
        <Choice value="Cat"/>
        <Choice value="Dog"/>
      </Choices>
    </View>
    '''
)
- 数据管理
# 导入数据
tasks = []
for i in range(100):
    task = {
        'data': {
            'image': f'/data/images/{i:04d}.jpg',
            'meta': {'source': 'camera_1'}
        }
    }
    tasks.append(task)

# 批量导入
project.import_tasks(tasks)

# 使用数据管理器
data_manager = project.get_data_manager()

# 过滤数据
filters = Filters.create(Filters.OR, [
    Filters.item('completed', Filters.EQUAL, True),
    Filters.item('annotations__result', Filters.CONTAINS, 'Cat')
])

# 获取过滤后的任务
filtered_tasks = data_manager.get_tasks(filters=filters)

# 添加自定义列
data_manager.add_column(
    Column(
        name='confidence',
        title='置信度',
        data_key='predictions__result__score',
        column_type=Column.TYPE_NUMBER
    )
)
- 批量操作
# 批量更新标注
for task in project.get_tasks():
    if task['annotations']:
        annotation = task['annotations'][0]
        if annotation['result']:
            # 更新结果
            annotation['result'][0]['value']['choices'] = ['Dog']
            project.update_annotation(annotation['id'], annotation['result'])

# 批量导出
export_url = project.export_tasks(
    export_type='JSON',
    download_all_tasks=True
)

# 批量删除
project.delete_tasks([1, 2, 3, 4, 5])
自动化标注脚本开发
- 数据预处理流水线
# auto_labeling_pipeline.py
import os
import json
import logging
from pathlib import Path
from datetime import datetime
from concurrent.futures import ThreadPoolExecutor, as_completed

class AutoLabelingPipeline:
    def __init__(self, project_id, config):
        self.project_id = project_id
        self.config = config
        self.setup_logging()

    def setup_logging(self):
        """设置日志"""
        logging.basicConfig(
            level=logging.INFO,
            format='%(asctime)s - %(name)s - %(levelname)s - %(message)s',
            handlers=[
                logging.FileHandler('auto_labeling.log'),
                logging.StreamHandler()
            ]
        )
        self.logger = logging.getLogger(__name__)

    def process_directory(self, data_dir, batch_size=100):
        """处理整个目录的数据"""
        data_dir = Path(data_dir)

        # 获取所有文件
        image_extensions = {'.jpg', '.jpeg', '.png', '.bmp', '.gif'}
        image_files = [
            f for f in data_dir.rglob('*')
            if f.suffix.lower() in image_extensions
        ]

        self.logger.info(f"找到 {len(image_files)} 个图像文件")

        # 分批处理
        for i in range(0, len(image_files), batch_size):
            batch = image_files[i:i+batch_size]
            self.process_batch(batch, batch_num=i//batch_size + 1)

    def process_batch(self, files, batch_num):
        """处理一批文件"""
        self.logger.info(f"处理批次 {batch_num}: {len(files)} 个文件")

        tasks = []
        for file_path in files:
            try:
                task = self.create_task_from_file(file_path)
                tasks.append(task)
            except Exception as e:
                self.logger.error(f"处理文件失败 {file_path}: {e}")

        if tasks:
            self.import_tasks(tasks)
            self.logger.info(f"成功导入 {len(tasks)} 个任务")

    def create_task_from_file(self, file_path):
        """从文件创建任务"""
        # 预处理文件
        processed_info = self.preprocess_file(file_path)

        # 创建任务数据
        task = {
            'data': {
                'image': str(processed_info['path']),
                'filename': file_path.name,
                'size': processed_info.get('size'),
                'format': processed_info.get('format'),
                'meta': {
                    'source_path': str(file_path),
                    'processed_at': datetime.now().isoformat(),
                    'processing_params': processed_info.get('params', {})
                }
            },
            'predictions': self.generate_predictions(processed_info) if self.config.get('preannotate') else []
        }

        return task

    def preprocess_file(self, file_path):
        """预处理文件"""
        # 这里可以根据需要实现图像处理逻辑
        # 例如:调整大小、格式转换、增强等
        return {
            'path': file_path,
            'size': os.path.getsize(file_path),
            'format': file_path.suffix[1:].upper()
        }

    def generate_predictions(self, file_info):
        """生成预标注"""
        if self.config.get('model_path'):
            # 使用模型生成预测
            predictions = self.model_predict(file_info['path'])
        else:
            # 使用规则生成预测
            predictions = self.rule_based_predict(file_info)

        return predictions

    def model_predict(self, file_path):
        """使用模型预测"""
        # 这里集成实际的模型预测逻辑
        return []

    def rule_based_predict(self, file_info):
        """基于规则的预测"""
        predictions = []

        # 示例:根据文件名猜测类别
        filename = Path(file_info['path']).name.lower()

        if 'cat' in filename:
            predictions.append({
                'model_version': 'rule_based_v1',
                'result': [{
                    'from_name': 'choice',
                    'to_name': 'image',
                    'type': 'choices',
                    'value': {'choices': ['Cat']}
                }],
                'score': 0.7
            })
        elif 'dog' in filename:
            predictions.append({
                'model_version': 'rule_based_v1',
                'result': [{
                    'from_name': 'choice',
                    'to_name': 'image',
                    'type': 'choices',
                    'value': {'choices': ['Dog']}
                }],
                'score': 0.7
            })

        return predictions

    def import_tasks(self, tasks):
        """导入任务到Label Studio"""
        # 调用Label Studio API导入任务
        pass
- 自动质量检查
# auto_quality_check.py
import pandas as pd
import numpy as np
from typing import List, Dict, Any

class AutoQualityChecker:
    def __init__(self, project):
        self.project = project

    def check_annotations(self, annotations, rules=None):
        """检查标注质量"""
        if rules is None:
            rules = self.get_default_rules()

        issues = []

        for annotation in annotations:
            for rule in rules:
                violations = rule.check(annotation)
                if violations:
                    issues.extend(violations)

        return issues

    def get_default_rules(self):
        """获取默认检查规则"""
        return [
            CompletenessRule(),
            ConsistencyRule(),
            FormatRule(),
            BusinessRule()
        ]

    def generate_quality_report(self, task_ids=None):
        """生成质量报告"""
        if task_ids is None:
            tasks = self.project.get_tasks()
        else:
            tasks = [self.project.get_task(tid) for tid in task_ids]

        report_data = []

        for task in tasks:
            task_report = self.analyze_task(task)
            report_data.append(task_report)

        # 生成报告
        report = self.create_report(report_data)

        return report

    def analyze_task(self, task):
        """分析单个任务"""
        annotations = task.get('annotations', [])

        analysis = {
            'task_id': task['id'],
            'total_annotations': len(annotations),
            'completion_rate': self.calc_completion_rate(annotations),
            'agreement_score': self.calc_agreement_score(annotations),
            'quality_score': self.calc_quality_score(annotations),
            'issues': self.check_annotations(annotations)
        }

        return analysis

class QualityRule:
    """质量检查规则基类"""
    def check(self, annotation):
        raise NotImplementedError

class CompletenessRule(QualityRule):
    def check(self, annotation):
        issues = []
        result = annotation.get('result', [])

        if not result:
            issues.append({
                'type': 'completeness',
                'severity': 'high',
                'message': '标注结果为空'
            })

        return issues

class ConsistencyRule(QualityRule):
    def check(self, annotation):
        issues = []
        result = annotation.get('result', [])

        # 检查标注内部一致性
        if len(result) > 1:
            # 检查重叠、冲突等
            pass

        return issues
与CI/CD流水线集成
- GitLab CI集成
# .gitlab-ci.yml
variables:
  LABEL_STUDIO_URL: "https://label-studio.example.com"
  LABEL_STUDIO_TOKEN: "${LABEL_STUDIO_TOKEN}"

stages:
  - data_preparation
  - model_training
  - deployment
  - monitoring

data_preparation:
  stage: data_preparation
  image: python:3.9
  script:
    - pip install label-studio-sdk pandas numpy
    - python scripts/prepare_data.py
    - python scripts/import_to_label_studio.py
  only:
    - schedules
    - web

model_training:
  stage: model_training
  image: python:3.9
  script:
    - pip install -r requirements.txt
    - python scripts/export_annotations.py
    - python scripts/train_model.py
    - python scripts/evaluate_model.py
  artifacts:
    paths:
      - models/
      - reports/
    expire_in: 1 week
  only:
    - schedules
    - merge_requests

deployment:
  stage: deployment
  image: python:3.9
  script:
    - pip install label-studio-sdk
    - python scripts/deploy_model.py
    - python scripts/update_preannotations.py
  environment:
    name: production
    url: https://label-studio.example.com
  only:
    - main

monitoring:
  stage: monitoring
  image: python:3.9
  script:
    - python scripts/monitor_quality.py
    - python scripts/generate_report.py
  artifacts:
    paths:
      - reports/
    expire_in: 1 month
  only:
    - schedules
- GitHub Actions集成
# .github/workflows/label-studio-ci.yml
name: Label Studio CI/CD

on:
  schedule:
    - cron: '0 2 * * *'  # 每天凌晨2点运行
  push:
    branches: [ main ]
  pull_request:
    branches: [ main ]

jobs:
  data-sync:
    runs-on: ubuntu-latest
    steps:
    - uses: actions/checkout@v2

    - name: Set up Python
      uses: actions/setup-python@v2
      with:
        python-version: '3.9'

    - name: Install dependencies
      run: |
        python -m pip install --upgrade pip
        pip install label-studio-sdk pandas numpy

    - name: Export annotations
      env:
        LABEL_STUDIO_URL: ${{ secrets.LABEL_STUDIO_URL }}
        LABEL_STUDIO_TOKEN: ${{ secrets.LABEL_STUDIO_TOKEN }}
      run: |
        python scripts/export_annotations.py

    - name: Upload artifacts
      uses: actions/upload-artifact@v2
      with:
        name: annotations
        path: data/annotations/

  model-training:
    runs-on: ubuntu-latest
    needs: data-sync
    steps:
    - uses: actions/checkout@v2

    - name: Download annotations
      uses: actions/download-artifact@v2
      with:
        name: annotations

    - name: Train model
      run: |
        python scripts/train_model.py

    - name: Evaluate model
      run: |
        python scripts/evaluate_model.py

    - name: Upload model
      uses: actions/upload-artifact@v2
      with:
        name: model
        path: models/

  deploy:
    runs-on: ubuntu-latest
    needs: model-training
    if: github.ref == 'refs/heads/main'
    steps:
    - uses: actions/checkout@v2

    - name: Download model
      uses: actions/download-artifact@v2
      with:
        name: model

    - name: Deploy to Label Studio
      env:
        LABEL_STUDIO_URL: ${{ secrets.LABEL_STUDIO_URL }}
        LABEL_STUDIO_TOKEN: ${{ secrets.LABEL_STUDIO_TOKEN }}
        MODEL_ENDPOINT: ${{ secrets.MODEL_ENDPOINT }}
      run: |
        python scripts/deploy_model.py
- 持续监控流水线
# monitor_pipeline.py
import schedule
import time
from datetime import datetime
import logging
from typing import Dict, Any

class MonitoringPipeline:
    def __init__(self, config: Dict[str, Any]):
        self.config = config
        self.setup_logging()
        self.setup_schedules()

    def setup_logging(self):
        """设置日志"""
        logging.basicConfig(
            level=logging.INFO,
            format='%(asctime)s - %(name)s - %(levelname)s - %(message)s',
            handlers=[
                logging.FileHandler('monitoring.log'),
                logging.StreamHandler()
            ]
        )
        self.logger = logging.getLogger(__name__)

    def setup_schedules(self):
        """设置定时任务"""
        # 每小时检查一次
        schedule.every().hour.do(self.check_data_quality)

        # 每天凌晨2点训练模型
        schedule.every().day.at("02:00").do(self.retrain_model)

        # 每周一生成报告
        schedule.every().monday.at("08:00").do(self.generate_weekly_report)

    def check_data_quality(self):
        """检查数据质量"""
        self.logger.info("开始数据质量检查")

        try:
            # 获取最新标注
            new_annotations = self.get_new_annotations_since_last_check()

            # 检查质量
            quality_issues = self.quality_checker.check(new_annotations)

            if quality_issues:
                self.logger.warning(f"发现 {len(quality_issues)} 个质量问题")
                self.send_alert(quality_issues)

            # 更新统计数据
            self.update_statistics(new_annotations)

            self.logger.info("数据质量检查完成")

        except Exception as e:
            self.logger.error(f"数据质量检查失败: {e}")

    def retrain_model(self):
        """重新训练模型"""
        self.logger.info("开始模型重新训练")

        try:
            # 导出最新标注
            annotations = self.export_annotations()

            if len(annotations) < self.config.get('min_training_samples', 100):
                self.logger.info("标注数据不足,跳过训练")
                return

            # 训练模型
            model = self.train_model(annotations)

            # 评估模型
            metrics = self.evaluate_model(model, annotations)

            # 如果性能提升,部署模型
            if self.should_deploy_model(metrics):
                self.deploy_model(model)
                self.update_preannotations(model)

            self.logger.info("模型重新训练完成")

        except Exception as e:
            self.logger.error(f"模型训练失败: {e}")

    def generate_weekly_report(self):
        """生成周报"""
        self.logger.info("开始生成周报")

        try:
            # 收集数据
            report_data = {
                'weekly_stats': self.get_weekly_statistics(),
                'annotator_performance': self.get_annotator_performance(),
                'model_performance': self.get_model_performance(),
                'quality_metrics': self.get_quality_metrics(),
                'issues_summary': self.get_issues_summary()
            }

            # 生成报告
            report = self.create_report(report_data)

            # 发送报告
            self.send_report(report)

            self.logger.info("周报生成完成")

        except Exception as e:
            self.logger.error(f"报告生成失败: {e}")

    def run(self):
        """运行监控流水线"""
        self.logger.info("启动监控流水线")

        while True:
            schedule.run_pending()
            time.sleep(60)  # 每分钟检查一次
【第六至七章】请点击我

AtomGit 是由开放原子开源基金会联合 CSDN 等生态伙伴共同推出的新一代开源与人工智能协作平台。平台坚持“开放、中立、公益”的理念,把代码托管、模型共享、数据集托管、智能体开发体验和算力服务整合在一起,为开发者提供从开发、训练到部署的一站式体验。
更多推荐
 14
14 0
0- 0


 已为社区贡献220条内容

所有评论(0)