dlib——人脸识别(附人脸关键点检测、微笑检测)
一、dlib
1.1简介
dlib是一个适用于C++和Python的第三方库。包含机器学习、计算机视觉和图像处理的工具包,被广泛的应用于机器人、嵌入式设备、移动电话和大型高性能计算环境。是开源许可用户免费使用。
1.2 dlib与opencv对比
opencv优缺点:
核心技术:Haar 特征 + 级联分类器,通过灰度变化判断人脸
优点:
1)可以在CPU上实时工作;
2)简单的架构;
3)可以检测不同比例的人脸。
缺点:
1)会出现大量的把非人脸预测为人脸的情况;
2)不适用于非正面人脸图像;
3)不抗遮挡。
dlib优缺点:
核心技术:方向梯度直方图(HOG)+ 滑动窗口 + 金字塔结构
优点:
1)适用于正面和略微非正面的人脸;
2)语法极简单
3)再小的遮挡下仍可工作。
缺点:
1)不能检测小脸,因为它训练数据的最小人脸尺寸为80×80,较小尺寸的人脸数据需自己训练检测器;
2)边界框通常排除前额的一部分甚至下巴的一部分;
3)不适用于侧面和极端非正面,如俯视或仰视。
二、dlib——人脸检测
2.1 重要参数讲解
import dlib

detector=dlib.get_frontal_face_detector()# 构造脸部位置检测器HOG

faces=detector(image,upsample_num_times=0)
对于detect中的参数:
image:传入要检测的图片,必须为OpenCV 读取的图片格式,彩色图和灰度图均可
upsample_num_times:表示采用上采样的次数。上采样会让图像变大,能够检测到更多人脸对象,提高小人脸的检测效果
返回值:
faces:人脸的左上角坐标和右下角坐标
![]()
2.2 图片检测
流程为:读取图像→检测人脸→绘制框选→显示结果
读取的图片:

代码实现:
import cv2
import dlib


detector=dlib.get_frontal_face_detector()# 构造脸部位置检测器HOG
img=cv2.imread(r"..\data\people_face.jpeg")


faces=detector(img,0)
for face in faces:  #对每个人脸框进行逐个处理
    # 获取人脸框的四个顶点坐标(left/top为左上角,right/bottom为右下角)
    x1=face.left()  # 左边界
    y1=face.top()    # 上边界
    x2=face.right()   # 右边界
    y2=face.bottom()   # 下边界
    # 绘制人脸框
    cv2.rectangle(img, (x1,y1), (x2,y2), (0,255,0), thickness=2)

# 显示捕获到的各个人脸框
cv2.imshow("result",img)
cv2.waitKey(0)
cv2.destroyAllWindows()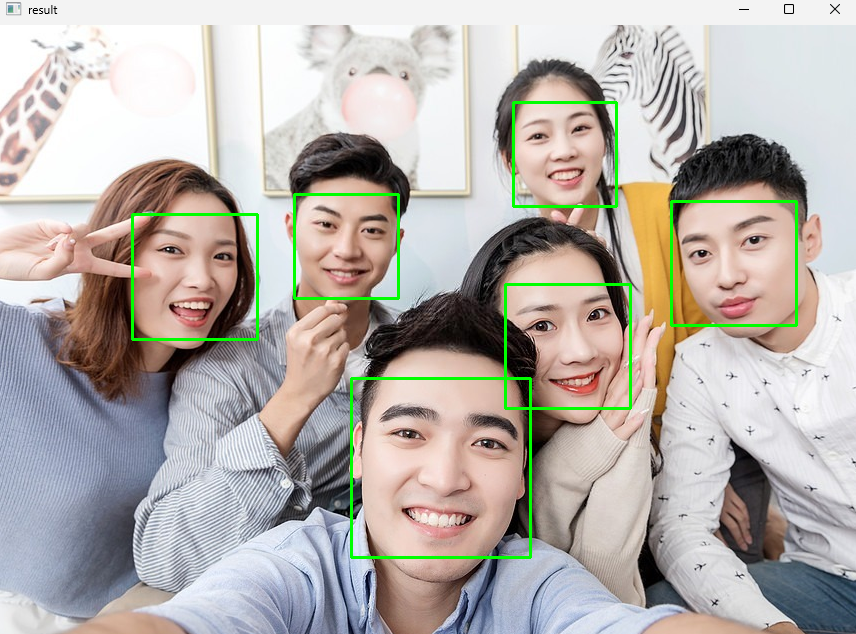
2.3 摄像头检测
import cv2
import dlib

detector = dlib.get_frontal_face_detector()

cap= cv2.VideoCapture(0)
if not cap.isOpened():
    print('Cannot open video')
    exit()

while True:
    ret, frame = cap.read()
    if not ret:
        break


    faces = detector(frame, 0)

    cv2.imshow('video',frame)

    for face in faces:  # 对每个人脸框进行逐个处理
        # 获取人脸框的坐标
        x1 = face.left()
        y1 = face.top()
        x2 = face.right()
        y2 = face.bottom()
        # 绘制人脸框
        cv2.rectangle(frame, (x1, y1), (x2, y2), (0, 255, 0), thickness=2)

    cv2.imshow("video", frame)

    if cv2.waitKey(60) == 27:
        break

cap.release()
cv2.destroyAllWindows()
三、人脸关键点位的识别及点位轮廓绘制
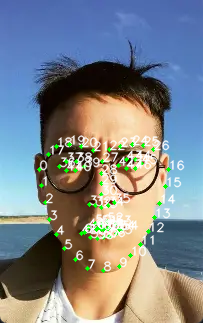
3.1 图片关键点位的识别
3.1.1 shape_predictor_68_face_landmarks.dat
简介:shape_predictor_68_face_landmarks 是 dlib 库中的一个预训练模型,用于预测面部的 68 个关键点(landmarks)。这些关键点涵盖了面部的各个部位,包括眼睛、鼻子、嘴巴、眉毛等,可以用于进行面部特征分析、姿态估计、表情识别等应用。
github地址:https://github.com/davisking/dlib-models
原理:
dlib 生成的面部标志遵循可索引的列表,如下:

代码示例:
输入图像:

import numpy as np
import cv2
import dlib

img = cv2.imread(r".\data\img.png")# 读取图像
detector = dlib.get_frontal_face_detector()#构造人脸检测器
faces = detector(img, 0)#检测人脸

predictor = dlib.shape_predictor("shape_predictor_68_face_landmarks.dat")
for face in faces:  #获取每一张脸的关键点(实现检测)
    shape=predictor(img, face)# 获取关键点

    landmarks = np.array([[p.x, p.y] for p in shape.parts()])

    for idx, point in enumerate(landmarks):

        pos = [point[0],point[1]]# 当前关键的坐标

        cv2.circle(img, pos, radius=2, color=(0, 255, 0),thickness=-1)
                                            # 普通大小的等宽字体
        cv2.putText(img, str(idx), pos, cv2.FONT_HERSHEY_SIMPLEX, fontScale=0.4,
                    color=(255, 255, 255), thickness=1, lineType=cv2.LINE_AA)  # 线条类型:抗锯齿线条。

cv2.imshow("img", img)
cv2.waitKey()
cv2.destroyAllWindows()
输出:
3.2 摄像头关键点位的识别
import cv2
import dlib
import numpy as np
cap=cv2.VideoCapture(0)# 摄像头初始化
detector=dlib.get_frontal_face_detector()# 获得脸部位置检测器
predictor = dlib.shape_predictor("shape_predictor_68_face_landmarks.dat")
# 针对每一帧进行处理
while True:
ret,img=cap.read() # 捕获一帧
img=cv2.flip(img, flipCode=1) # 图片翻转,水平翻转(镜像)
if ret is None: # 没有捕获到帧,直接退出
break
# 可以将当前帧处理为灰度,方便后续计算
gray=cv2.cvtColor(img,cv2.COLOR_BGR2GRAY)
faces=detector(gray,0)
for face in faces: #对每个人脸框进行逐个处理
shape = predictor(img, face)
landmarks = np.array([[p.x, p.y] for p in shape.parts()])
for idx, point in enumerate(landmarks):
pos = [point[0], point[1]] # 当前关键的坐标
cv2.circle(img, pos, 2, color=(0, 255, 0))
# 普通大小的等宽字体
cv2.putText(img, str(idx), pos, cv2.FONT_HERSHEY_SIMPLEX,0.4, (255, 255, 255),1, cv2.LINE_AA)
# 显示当前帧,及捕获到的各个人脸框
cv2.imshow( "68points",img)
# 如果按下Ecs键,则退出(Esc的ASCII码为27)
if cv2.waitKey(10)==27:
break
cap.release()
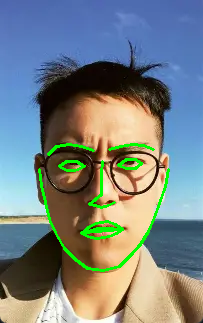
cv2.destroyAllWindows()3.3 摄像头关键点位轮廓绘制
import numpy as np
import dlib
import cv2

# 4个用法
def drawLine(start,end):
    #将指定的点连接起来
    pts = shape[start:end] # 获取点集
    for l in range(1, len(pts)):
        ptA = tuple(pts[l - 1])
        ptB = tuple(pts[l])
        cv2.line(image, ptA, ptB, color=(0, 255, 0), thickness=2)

def drawConvexHull(start,end):
    #将指定的点构成一个凸包,绘制轮廓,一般眼睛、嘴使用凸包来绘制
    Facial = shape[start:end+1]
    mouthHull = cv2.convexHull(Facial) # 凸包函数
    cv2.drawContours(image,[mouthHull], -1, color=(0, 255, 0), thickness=2)

image=cv2.imread(r".\data\img.png")
detector = dlib.get_frontal_face_detector()# 构造脸部位置检测器
faces = detector(image, 0)#检测人脸方框位置
#读取人脸关键点定位模型
predictor = dlib.shape_predictor("shape_predictor_68_face_landmarks.dat")
for face in faces:# 对检测到的rects,逐个遍历
    shape = predictor(image, face)  # 获取关键点
    # 将关键点转换为坐标(x,y)的形式
    shape = np.array([[p.x, p.y] for p in shape.parts()])
    drawConvexHull(start=36, end=41)   # 绘制右眼凸包
    drawConvexHull(start=42, end=47)   # 绘制左眼凸包
    drawConvexHull(start=48, end=59)   #绘制嘴外部凸包
    drawConvexHull(start=60, end=67)   # 绘制嘴内部凸包

    drawLine(start=0, end=17)  # 绘制脸颊点线
    drawLine(start=17, end=22) # 绘制左眉毛点线
    drawLine(start=22, end=27) # 绘制右眉毛点线
    drawLine(start=27, end=36) # 绘制鼻子点线

cv2.imshow("Frame", image)
cv2.waitKey()
cv2.destroyAllWindows()
结果:
四、微笑检测
原理:
人在微笑时,嘴角会上扬,嘴的宽度和与整个脸颊(下颌)的宽度之比变
大笑示意图:
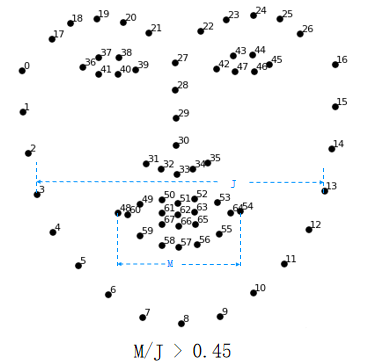
0.45是自己设定的阈值,可更改。
微笑示意图:
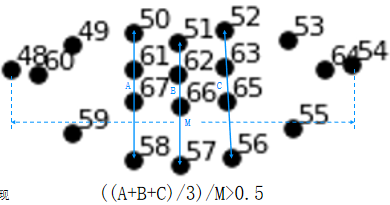
这里取50-58,51-57,52-56欧式距离和的均值,0.5为自定义阈值,可根据实际情况修改。
import numpy as np
import dlib
import cv2
from sklearn.metrics.pairwise import euclidean_distances
from PIL import Image, ImageDraw, ImageFont
# 1个用法
def MAR(shape):  # 计算嘴的宽高比
    A = euclidean_distances(shape[50].reshape(1, 2),shape[58].reshape(1, 2))
    B = euclidean_distances(shape[51].reshape(1, 2),shape[57].reshape(1, 2))
    C = euclidean_distances(shape[52].reshape(1, 2),shape[56].reshape(1, 2))
    D = euclidean_distances(shape[48].reshape(1, 2),shape[54].reshape(1, 2))
    return ((A+B+C)/3)/D

# 1个用法
def MJR(shape):  #计算嘴宽度、脸颊宽度的比值
    M = euclidean_distances(shape[48].reshape(1, 2), shape[54].reshape(1, 2))  #嘴宽度
    J = euclidean_distances(shape[3].reshape(1, 2), shape[13].reshape(1, 2))  #下颌的宽度
    return M/J

def cv2AddChineseText(img, text, position, textColor=(0, 255, 0), textSize=30):
    """向图片中添加中文"""
    if isinstance(img, np.ndarray):  # 判断是否OpenCV图片类型
        img = Image.fromarray(cv2.cvtColor(img, cv2.COLOR_BGR2RGB))#实现array到image的转换
    draw = ImageDraw.Draw(img) #在img图片上创建一个绘图的对象
    # 字体的格式
    fontStyle = ImageFont.truetype( "simsun.ttc", textSize, encoding="utf-8")
    draw.text(position, text, textColor, font=fontStyle) # 绘制文本
    return cv2.cvtColor(np.asarray(img), cv2.COLOR_RGB2BGR)# 转换回OpenCV格式

detector = dlib.get_frontal_face_detector()  # 构造脸部位置检测器
predictor = dlib.shape_predictor("shape_predictor_68_face_landmarks.dat")#读取人脸关键点定位模型
cap=cv2.VideoCapture(0)

while True:
    ret,frame = cap.read()
    faces = detector(frame, 0)   # 获取图片中全部人脸位置
    for face in faces:
        shape = predictor(frame, face)  #获取关键点
        # 将关键点转换为坐标(x,y)的形式
        shape = np.array([[p.x, p.y] for p in shape.parts()])
        mar = MAR(shape)   #计算嘴部的高宽比
        mjr = MJR(shape)   #计算"嘴宽/脸颊宽"
        result="正常"    #默认是正常表情
        print("mar",mar,"\tmjr",mjr)  #测试一下实际值,可以根据该值确定
        if mar > 0.5:    #可更具项目要求调整阈值。
            result="大笑"
        elif mjr>0.45 :  # 超过阈值为微笑
            result="微笑"
        # frame = cv2AddChineseText(frame, result, (50, 100))#输出中文
        # cv2.putText()#输出英文
        mouthHull = cv2.convexHull(shape[48:61])  # 嘴型构造凸包
        # 多人脸
        frame = cv2AddChineseText(frame, result, mouthHull[0,0])
        cv2.drawContours(frame, [mouthHull], -1, (0, 255, 0), 1)

    cv2.imshow(  "Frame", frame)
    if cv2.waitKey(1) == 27:
        break
cv2.destroyAllWindows()
cap.release()
AtomGit 是由开放原子开源基金会联合 CSDN 等生态伙伴共同推出的新一代开源与人工智能协作平台。平台坚持“开放、中立、公益”的理念,把代码托管、模型共享、数据集托管、智能体开发体验和算力服务整合在一起,为开发者提供从开发、训练到部署的一站式体验。
更多推荐
 19
19 0
0- 0


 已为社区贡献6条内容

所有评论(0)