langchain AI应用框架研究【核心概念-篇一】
引言
langchain新版本1.1.0 出来了,老版的api看了一些,api写法看起来有些凌乱,感觉还是SpringAI相对好好记忆一些。不知到1.x版本的会好使一些不。我们先来看看新版的langchain、langgraph、deepagents。
python vscode安装了一个backformater插件,这玩意没卵用,格式化不了。python这个玩意使用缩进表达代码块,实际上没法判断你的代码在块,选中代码格式化完全没反应。即使因为缩进出现了错误(IDE都发现了),这家伙还是不会格式化。python用缩进体现代码块出这个幺蛾子不好解决了,要是它有动作,也有可能把逻辑搞乱。python用缩进做代码块,鼓吹的就是简洁优雅,实际上优雅个毛线,真的是很智障,经常手动补空格。语言充满陷阱,这玩意就只适合用来打草稿,感觉不太好,每次提到python都要吐槽😂,如果对python感兴趣可以看看我另外一篇文章,内容看起来有点多,但是都是核心部分,python不是表面上的简单。
typescript也是因为javascript这玩意也是动态类型语言,可读性和ide支持都不好,写大型AI应用或者后台服务不太好使,因为要兼容javascript,所以语法上还是有些怪。python加了个类型提示,稍微再可读性上好一点,但是需要鼠标移动到函数上从IDE提示上才能看出来。搞不好以后可能出现一个TypePython。
感兴趣的朋友可以订阅、关注和转发。你们的关注会成为我会更有动力,写得可能会更仔细一些,更新可能也会更快。
在实战中了解框架,所以内容会很多,算的上一部免费电子书了,分享一个也发发自己的光和热😘,所有内容都要经过一定验证才会写出来,不是ppt风格,只是想了解一下技术,这个就可能不太适合,因为内容会越来越多,因为篇幅较大,本文主要讲langchain。
LangChain:基础开发框架
LangChain 是一个用于开发由大语言模型(LLM)驱动的应用程序的开源框架。它的核心目标是提供一个统一的抽象层,让开发者可以方便地组合各种组件,而无需关心底层与不同模型API对接的细节。
- 核心定位:Agent 与 LLM 应用的开发框架(DSL)。它解决了“从零到一”的构建问题。
- 主要能力:
- 标准化模型接口:统一封装不同厂商(如 OpenAI、Anthropic)的模型,支持流式输出、工具调用等,避免供应商锁定。
- 结构化提示词:提供
PromptTemplate等工具,将提示词工程化、可维护。 - 工具抽象:将函数封装成 LLM 可以理解和调用的“工具”(Tool),赋予智能体行动能力。
- 预构建的智能体循环:内置了 ReAct 等经典智能体模式,可以快速搭建一个能与工具交互的智能体。
总而言之,LangChain 提供了构建智能体所需的基础组件,但它本身并不解决智能体在长时间运行中的可靠性、状态持久化等问题。
LangGraph:状态化执行引擎
LangGraph 是一个低级别的编排框架,可以看作是 LangChain 的扩展,专门用于构建和管理长期运行、有状态的智能体。它将智能体的执行过程建模为一个图(Graph),从而实现对复杂工作流的精确控制。
- 核心定位:面向智能体的状态化执行引擎(Stateful Runtime)。它解决了智能体“如何跑得稳”的问题。
- 主要能力:
- 基于图的执行模型:将智能体的工作流建模为有向图,节点(Node)代表功能模块(如 LLM 调用、工具执行),边(Edge)代表控制流。这使得支持循环、条件分支等复杂逻辑变得非常简单。
- 显式状态管理:维护一个中央状态对象(State),图中的每个节点都可以读写这个状态。这让智能体的行为变得可观测、可解释。
- 持久化执行(Durable Execution):能够自动保存执行过程中的检查点(Checkpoint)。即使任务因故障中断,也能从断点处恢复,保证了长时间运行任务的工程级可靠性。
- 人在循环(Human-in-the-loop):支持在执行过程中暂停,等待人工审核或干预,修改状态后再继续执行,这对于需要人类监督的关键任务至关重要。
LangGraph 将 LangChain 的组件作为“砖瓦”,并提供了让它们稳定、可靠、有序运行的“地基”和“脚手架”。
DeepAgents:高级智能体应用框架
DeepAgents 是一个构建在 LangChain 和 LangGraph 之上的高级智能体开发库,旨在快速构建具备自主规划、长期记忆等高级能力的复杂智能体。它不是一个从零开始的框架,而是一个“开箱即用”的智能体脚手架(Harness)。
- 核心定位:面向长期自治任务的智能体能力整合层(Harness)。它解决了如何让智能体从“稳定运行”到“高度自主”的问题。
- 主要能力:
- 任务规划与拆解:内置
write_todos等规划工具,智能体可以自动将复杂目标拆解为一系列离散的步骤,并跟踪进度。 - 上下文管理(文件系统):提供
ls,read_file,write_file等类操作系统工具,允许智能体将大量上下文信息外置到文件系统中,有效避免了上下文窗口溢出的问题。 - 子智能体生成(Subagent Spawning):主智能体可以动态创建并委派任务给专门的子智能体,实现上下文隔离和任务的并行或专注处理。
- 长期记忆:依托 LangGraph 的存储能力,实现跨会话的持久化记忆,使智能体能够记住历史交互信息,适用于个人助理、客服等场景。
- 任务规划与拆解:内置
| 组件 | 类比 | 核心职责 | 解决的问题 |
|---|---|---|---|
| LangChain | 标准零件库 | 提供电机、传感器、机械臂等通用组件。 | 解决“从零到一”的构建问题。 |
| LangGraph | 工厂控制系统 | 负责零件的组装流程、状态监控、故障恢复和人工干预。 | 解决“从一到稳定”的运行问题。 |
| DeepAgents | 高级自动化生产线 | 在控制系统之上,实现自主排产、物料管理、任务分发等高级功能。 | 解决“从稳定到自主”的智能问题。 |
1 三者关系
这三者并非相互独立的三个选项,而是一个层层递进、相互依赖的技术栈。你可以把它们看作是一个从底层到顶层的完整生态系统。为了让你一目了然,我们可以用“建造和运营一座自动化工厂”来类比它们的关系:
🧱 LangChain:基础开发框架(标准零件库)
- 角色:“提供砖瓦”
- 关系:它是整个体系的基础。LangGraph 和 DeepAgents 都构建在 LangChain 提供的抽象之上。
- 类比:它就像一个巨大的标准零件库,里面装满了电机、传感器、机械臂(即:模型接口、提示词模板、工具抽象)。它解决了“从零到一”的构建问题,让你不用自己去造轮子(比如不用自己去写连接 OpenAI 的底层代码)。
⚙️ LangGraph:状态化执行引擎(工厂控制系统)
- 角色:“提供地基与骨架”
- 关系:它是 LangChain 的扩展与核心运行时。实际上,最新版的 LangChain(1.0+)底层就是基于 LangGraph 构建的。
- 类比:它就像工厂的控制系统和地基。它负责把 LangChain 提供的零件组装起来,并确保流水线能稳定运行。它解决了“从一到稳”的问题,比如处理循环逻辑、故障恢复(持久化执行)和人工干预。
🚀 DeepAgents:高级智能体应用框架(精装生产线)
- 角色:“提供精装房”
- 关系:它构建在 LangChain 之上,并利用 LangGraph 的运行能力。它是这个技术栈的顶层应用。
- 类比:它就像一条开箱即用的精装生产线。它不仅仅是给你零件,而是直接给了你一个具备“自主规划”、“文件读写”、“长期记忆”等高级能力的智能体脚手架。它解决了“从稳到智”的问题,让你快速拥有一个像“数字员工”一样的智能体。
2 选择
简单流程:LangChain
你可以把一个简单的线性流程(A → B → C)看作是 LangGraph 图结构中最基础的一种形态。
- 如何实现:在 LangGraph 中,你只需要定义几个节点(Node),然后用普通的边(Edge)把它们按顺序连接起来即可。
- 是否必要:对于一个纯粹的、没有任何分支和循环的简单任务,直接使用 LangChain 的 LCEL 表达式会更简洁、更高效。用 LangGraph 来做,虽然完全可以,但有点像“杀鸡用牛刀”,会引入一些不必要的图结构定义代码。
复杂流程:LangGraph
LangGraph 的真正价值在于它原生支持复杂流程,这是传统线性框架的短板。
- 循环 (Loops):可以轻松实现“生成 → 审核 → 不满意则返回重新生成”的循环逻辑。
- 分支 (Branching):可以根据上一步的结果,动态决定下一步走向哪个节点。例如,根据用户意图,将流程路由到“客服节点”或“技术支持节点”。
- 状态管理 (State):在整个复杂流程中,有一个全局共享的状态对象,所有节点都可以读写,确保数据在不同步骤间无缝传递。
- 持久化 (Persistence):支持“时间旅行”功能,可以将流程的每一步状态保存下来。即使程序中断,也能从断点恢复,这对于长时间运行的复杂任务至关重要。
进阶:DeepAgents
这是你的加速器。 当你发现 LangChain 写起来太累,或者你需要一个能“自己干活”的智能体时,选它。
- 适用场景:
- 需要智能体自主规划任务(比如:“帮我调研一下竞品,写个报告”)。
- 任务非常长,需要跨会话记忆(比如:个人助理,需要记住你上周的偏好)。
- 需要处理大量文件(利用其内置的文件系统工具)。
- 理由:
- 开箱即用:它帮你把规划、记忆、文件读写这些复杂功能都写好了,你直接配置一下就能用,不用自己造轮子。
📜 官方建议翻译
LangChain 对比 LangGraph 对比 Deep Agents
如果你打算构建一个智能体,我们建议你从 Deep Agents 开始。它采用了“开箱即用”的模式,内置了各种现代特性,例如:长对话的自动压缩、虚拟文件系统,以及用于管理和隔离上下文的子智能体生成能力。
Deep Agents 本质上是 LangChain 智能体的具体实现。如果你不需要上述这些高级能力,或者希望为自己的智能体和自主应用进行深度定制,那么请从 LangChain 开始。
当你有更高级的需求,需要结合“确定性工作流”与“智能体工作流”,并且需要进行大量定制化开发时,请使用 LangGraph —— 这是我们底层的智能体编排框架和运行时引擎。
说了这么多,基本上有一定的认识,具体也要用了之后应该就能体会更深刻,下面主要针对1.1.0最新稳定的版本
官方哲学
LangChain 的核心信念可以概括为以下几点:
- 大型语言模型(LLM)是一项强大且极具潜力的新技术。
- 当 LLM 与外部数据源相结合时,其能力将得到更进一步的提升。
- LLM 将重塑未来应用的形态。具体而言,未来的应用将越来越趋向于“智能体化”(agentic)。
- 目前,这场变革仍处于非常早期的阶段。
- 尽管构建此类智能体化应用的原型相对容易,但要开发出足够可靠、能够投入生产环境的智能体,仍然极具挑战。
所以这个还处于迅速发展阶段,工程化要有所选择,不然就是你都还没有投产,新的又来了,搞得你无所适从。
3 quick start
本地python版本使用的是3.13.5 官方推荐是3.10+
3.1 安装langchain
使用命令:poetry add langchain 安装
Using version ^1.2.14 for langchain

Updating dependencies
Resolving dependencies... (7.9s)

Package operations: 32 installs, 0 updates, 0 removals

  - Installing certifi (2026.2.25)
  - Installing charset-normalizer (3.4.6)
  - Installing h11 (0.16.0)
  - Installing idna (3.11)
  - Installing typing-extensions (4.15.0)
  - Installing urllib3 (2.6.3)
  - Installing annotated-types (0.7.0)
  - Installing anyio (4.13.0)
  - Installing requests (2.33.1)
  - Installing pydantic-core (2.41.5)
  - Installing typing-inspection (0.4.2)
  - Installing httpcore (1.0.9)
  - Installing orjson (3.11.8)
  - Installing packaging (26.0)
  - Installing requests-toolbelt (1.0.0)
  - Installing pydantic (2.12.5)
  - Installing jsonpointer (3.1.1)
  - Installing uuid-utils (0.14.1)
  - Installing httpx (0.28.1)
  - Installing xxhash (3.6.0)
  - Installing zstandard (0.25.0)
  - Installing jsonpatch (1.33)
  - Installing langsmith (0.7.23)
  - Installing tenacity (9.1.4)
  - Installing pyyaml (6.0.3)
  - Installing langchain-core (1.2.23)
  - Installing ormsgpack (1.12.2)
  - Installing langgraph-checkpoint (4.0.1)
  - Installing langgraph-prebuilt (1.0.8)
  - Installing langgraph-sdk (0.3.12)
  - Installing langgraph (1.1.4)
  - Installing langchain (1.2.14)
看上面的版本,已经到了1.2.14,发展很快,AI应用API是在快速发展中,这玩意要是重度使用,每次迁移成本都很高。python语言和其生态兼容性都比较差,大家都是图块,没人会管你,有些人搞烂了,就开始想找工程师做工程化收拾烂摊子,实际上只有自己搞的人才是最适合收拾烂摊子的,图快总得付出点代价😊。python本身工程化能力就很弱,现在各种标准和最佳实践还在演进。
安装langchain的同时也安装了langgraph,版本是1.1.4,没有看见deepagents
3.2 安装langchain-ollama
这里我使用ollama安装本地模型,所以安装这个模型依赖,其他的可以根据具体需求安装
poetry add langchain-ollama
# Installing the OpenAI integration
pip install -U langchain-openai

# Installing the Anthropic integration
pip install -U langchain-anthropic
3.3 简单聊天测试
3.3.1 模型直接调用
from langchain_ollama import ChatOllama

def test_chat_model():
    # 初始化模型,默认连接 http://localhost:11434
    llm = ChatOllama(
        model="qwen3:8b",  # 替换为你通过 `ollama pull` 下载的模型名
        temperature=0.7,
        base_url="http://localhost:11434",
    )
    response = llm.invoke("你好,请介绍一下自己")
    print(response)

test_chat_model()

print('finish')
输出是一个AIMessage 对象,这玩意一点都不好跟踪代码,点击进去看源码,感觉就是一团糟。不先写个response.content,你直接在response对象上还跳不到AIMessage,IDE提示不了。要么通过invoke跳过去,再通过类型提示跳到源码。我也是醉了。
content='你好!我是通义千问,由通义实验室研发的超大规模语言模型。我具备广泛的知识和强大的语言理解能力,可以回答各种问题、创作文字、编程、逻辑推理等。我的目标是成为您可靠的助手,帮助您解决各种问题和完成任务。有什么我可以帮您的吗?' additional_kwargs={} response_metadata={'model': 'qwen3:8b', 'created_at': '2026-04-01T03:41:06.349658Z', 'done': True, 'done_reason': 'stop', 'total_duration': 88827315600, 'load_duration': 76283938800, 'prompt_eval_count': 14, 'prompt_eval_duration': 417483900, 'eval_count': 377, 'eval_duration': 12089060800, 'logprobs': None, 'model_name': 'qwen3:8b', 'model_provider': 'ollama'} id='lc_run--019d4720-0aba-7cc3-9c23-9f3ef121dcea-0' tool_calls=[] invalid_tool_calls=[] usage_metadata={'input_tokens': 14, 'output_tokens': 377, 'total_tokens': 391}实际上需要用的是content,我也看过别人写热文章,也是慢慢分析返回的字段内容来找想要的而结果。我这里用的是本地模型,如果要用网上的,需要到对应官网开通权限,拿到访问的API_KEY,设置环境变量,才可以访问。如果是像java这种强静态类型语言,直接看response结构,基本上能知道会拿到什么结果,那些字段是自己想要的。
3.2.2 模型参数
原始模型参数,这玩意参数,多
pip install -U langchain
# Requires Python 3.10+

class ChatOllama(
    name: str | None,
    cache: BaseCache | bool | None,
    verbose: bool,
    callbacks: Callbacks,
    tags: list[str] | None,
    metadata: dict[str, Any] | None,
    custom_get_token_ids: ((str) -> list[int]) | None,
    rate_limiter: BaseRateLimiter | None,
    disable_streaming: bool | Literal['tool_calling'],
    output_version: str | None,
    profile: ModelProfile | None,
    model: str,
    reasoning: bool | str | None,
    validate_model_on_init: bool,
    mirostat: int | None,
    mirostat_eta: float | None,
    mirostat_tau: float | None,
    num_ctx: int | None,
    num_gpu: int | None,
    num_thread: int | None,
    num_predict: int | None,
    repeat_last_n: int | None,
    repeat_penalty: float | None,
    temperature: float | None,
    seed: int | None,
    stop: list[str] | None,
    tfs_z: float | None,
	top_k: int | None,
    top_p: float | None,
    format: JsonSchemaValue | Literal['', 'json'] | None,
    keep_alive: int | str | None,
    base_url: str | None,
    client_kwargs: dict | None,
    async_client_kwargs: dict | None,
    sync_client_kwargs: dict | None
)
网上查了一些解释
# Requires Python 3.10+

class ChatOllama(
    # === 核心基础参数 ===
    model: str,  # [必填] 模型名称,例如 "qwen2.5:7b" 或 "llama3"。必须与 Ollama 本地运行的模型名称匹配。

    # === 核心推理参数 (最常用) ===
    temperature: float | None,  # [推荐] 采样温度 (0.0 - 1.0)。值越低越确定(适合逻辑/代码),值越高越随机(适合创意写作)。
    top_p: float | None,  # [推荐] 核采样阈值。与 temperature 配合使用,通常建议二选一,不要同时调整。
    top_k: int | None,  # [推荐] 限制采样时考虑的 top-k 个 token 数量。
    num_predict: int | None,  # [推荐] 模型生成的最大 token 数量(即回答的长度)。
    stop: list[str] | None,  # [推荐] 停止生成的词元列表。遇到列表中的任何一个词元,生成即停止。

    # === 上下文与窗口 ===
    num_ctx: int | None,  # [重要] 上下文窗口大小(最大 token 数)。默认通常为 2048。如果对话变长或输入文本很大,需要调大此值。

    # === 高级推理控制 ===
    repeat_penalty: float | None,  # 重复惩罚系数。值越大,模型越不容易重复生成相同的短语。
    repeat_last_n: int | None,  # 考虑重复惩罚的最近 n 个 token 数量。
    seed: int | None,  # 随机种子。设置固定的种子可以保证生成的确定性(如果其他参数也固定)。
    tfs_z: float | None,  # 尾部自由采样 (Tail-Free Sampling)。用于减少低概率 token 的长尾影响。
    mirostat: int | None,  # 启用 Mirostat 采样算法 (1 或 2)。这是一种控制生成文本惊喜度的算法。
    mirostat_tau: float | None,  # Mirostat 算法的目标熵值(控制输出的随机性)。
    mirostat_eta: float | None,  # Mirostat 算法的学习率。

    # === 硬件与性能 ===
    num_thread: int | None,  # 运行时使用的 CPU 线程数。
    num_gpu: int | None,  # 指定使用的 GPU 层数(用于控制显存占用)。

    # === 连接与客户端配置 ===
    base_url: str | None,  # Ollama API 的基础 URL。默认为 "http://localhost:11434"。
    keep_alive: int | str | None,  # 模型在 Ollama 中保持加载状态的时间(例如 "5m" 或 300 秒)。
    client_kwargs: dict | None,  # 传递给同步 HTTP 客户端的额外参数。
    async_client_kwargs: dict | None,  # 传递给异步 HTTP 客户端的额外参数。
    sync_client_kwargs: dict | None,  # 传递给同步客户端的特定参数。

    # === 输出格式控制 ===
    format: JsonSchemaValue | Literal['', 'json'] | None,  # 强制输出格式。设置为 "json" 可强制模型返回 JSON 格式,或传入 JSON Schema 进行结构化输出。

    # === LangChain 集成与内部参数 (通常无需手动修改) ===
    name: str | None,  # 此 LLM 实例在 LangChain 链中的名称。
    cache: BaseCache | bool | None,  # 是否启用响应缓存。
    verbose: bool,  # 是否打印详细的调试信息。
    callbacks: Callbacks,  # LangChain 的回调函数列表。
    tags: list[str] | None,  # 用于标记此 LLM 实例的标签。
    metadata: dict[str, Any] | None,  # 附加的元数据。
    custom_get_token_ids: ((str) -> list[int]) | None,  # 自定义的 Tokenizer 函数。
    rate_limiter: BaseRateLimiter | None,  # 速率限制器,防止请求过快。
    disable_streaming: bool | Literal['tool_calling'],  # 是否禁用流式输出。
    output_version: str | None,  # 输出消息的版本格式。
    profile: ModelProfile | None,  # 模型配置文件,用于自动调整参数。
    reasoning: bool | str | None,  # 是否启用推理模式(针对特定模型)。
    validate_model_on_init: bool  # 初始化时是否验证模型是否存在。
)
搞了一个表格
| 参数名称 | 类型 | 说明 |
|---|---|---|
| 核心基础 | ||
model |
str |
[必填] 模型名称,如 "qwen2.5:7b"。需与本地 Ollama 运行的模型一致。 |
| 推理控制 | ||
temperature |
float |
[常用] 采样温度 (0.0 - 1.0)。越低越确定(逻辑/代码),越高越随机(创意)。 |
top_p |
float |
[常用] 核采样阈值。通常与 temperature 二选一调整。 |
top_k |
int |
[常用] 限制采样时考虑的 top-k 个 token 数量。 |
num_predict |
int |
[常用] 模型生成的最大 token 数量(回答长度)。 |
stop |
list[str] |
[常用] 停止词元列表。遇到任意一个即停止生成。 |
repeat_penalty |
float |
重复惩罚系数。值越大,越不容易重复生成相同的短语。 |
repeat_last_n |
int |
考虑重复惩罚的最近 n 个 token 数量。 |
seed |
int |
随机种子。固定种子可保证生成的确定性。 |
tfs_z |
float |
尾部自由采样。用于减少低概率 token 的长尾影响。 |
mirostat |
int |
启用 Mirostat 采样算法 (1 或 2),用于控制生成文本的惊喜度。 |
mirostat_tau |
float |
Mirostat 算法的目标熵值(控制输出的随机性)。 |
mirostat_eta |
float |
Mirostat 算法的学习率。 |
| 上下文与硬件 | ||
num_ctx |
int |
[重要] 上下文窗口大小(最大 token 数)。默认通常 2048,长文本需调大。 |
num_thread |
int |
运行时使用的 CPU 线程数。 |
num_gpu |
int |
指定使用的 GPU 层数(用于控制显存占用)。 |
| 连接与配置 | ||
base_url |
str |
Ollama API 地址。默认 "http://localhost:11434"。 |
keep_alive |
int/str |
模型在 Ollama 中保持加载状态的时间(如 "5m" 或 300)。 |
client_kwargs |
dict |
传递给同步 HTTP 客户端的额外参数。 |
async_client_kwargs |
dict |
传递给异步 HTTP 客户端的额外参数。 |
sync_client_kwargs |
dict |
传递给同步客户端的特定参数。 |
| 输出格式 | ||
format |
str/dict |
强制输出格式。设为 "json" 强制返回 JSON,或传入 JSON Schema。 |
| LangChain 集成 | ||
name |
str |
此 LLM 实例在 LangChain 链中的名称。 |
cache |
bool |
是否启用响应缓存。 |
verbose |
bool |
是否打印详细的调试信息。 |
callbacks |
Callbacks |
LangChain 的回调函数列表。 |
tags |
list[str] |
用于标记此 LLM 实例的标签。 |
metadata |
dict |
附加的元数据。 |
custom_get_token_ids |
func |
自定义的 Tokenizer 函数。 |
rate_limiter |
BaseRateLimiter |
速率限制器,防止请求过快。 |
disable_streaming |
bool |
是否禁用流式输出。 |
output_version |
str |
输出消息的版本格式。 |
profile |
ModelProfile |
模型配置文件,用于自动调整参数。 |
reasoning |
bool/str |
是否启用推理模式(针对特定模型)。 |
validate_model_on_init |
bool |
初始化时是否验证模型是否存在。 |
基本的都加粗了。
3.4 工具调用
这里演示一个直接注册工具的一个官方例子
3.4.1 调用工具代码
from langchain.agents import create_agent
from langchain_ollama import ChatOllama

def get_weather(city: str) -> str:
    """Get weather for a given city."""
    return f"It's always sunny in {city}!"

def test_tool_call_by_agents():
    modelStr = "qwen3:8b";
    chatModel = ChatOllama(
        model=modelStr,
        temperature=0.7,
        base_url="http://localhost:11434",
    )
    agent = create_agent(
        # model=modelStr,
        model=chatModel,
        tools=[get_weather],
        system_prompt="You are a helpful assistant",
    )
    # Run the agent
    result = agent.invoke(
        {"messages": [{"role": "user", "content": "what is the weather in sf"}]}
    )
    print(result)


test_tool_call_by_agents()
3.4.2 返回值
result是个字典,草这玩意真是,就像看见一个java程序员,所有入参和返回值都用Ojbect一样。
{
  "messages": [
    {
      "role": "user",
      "type": "HumanMessage",
      "content": "what is the weather in sf",
      "id": "a1261883-6677-4082-84d9-cbd9a2f24209"
    },
    {
      "role": "assistant",
      "type": "AIMessage",
      "content": "",
      "id": "lc_run--019d47cc-9c2b-7433-ab56-ecb9909de0a5-0",
      "tool_calls": [
        {
          "id": "36886be6-6441-49d5-b364-cab6137452b0",
          "name": "get_weather",
          "args": {
            "city": "San Francisco"
          },
          "type": "tool_call"
        }
      ],
      "usage_metadata": {
        "input_tokens": 148,
        "output_tokens": 105,
        "total_tokens": 253
      },
      "response_metadata": {
        "model": "qwen3:8b",
        "created_at": "2026-04-01T06:48:11.9092517Z",
        "model_provider": "ollama"
      }
    },
    {
      "role": "tool",
      "type": "ToolMessage",
      "name": "get_weather",
      "content": "It's always sunny in San Francisco!",
      "id": "0c827960-37e2-4c37-b37a-4d76ed4f3321",
      "tool_call_id": "36886be6-6441-49d5-b364-cab6137452b0"
    },
    {
      "role": "assistant",
      "type": "AIMessage",
      "content": "The weather in San Francisco is sunny! ☀️ It's one of the best things about the city—always a bright day ahead. Let me know if you need more details!",
      "id": "lc_run--019d47cc-b789-78b1-9a0a-dad8552c7eef-0",
      "tool_calls": [],
      "usage_metadata": {
        "input_tokens": 188,
        "output_tokens": 136,
        "total_tokens": 324
      },
      "response_metadata": {
        "model": "qwen3:8b",
        "created_at": "2026-04-01T06:48:16.6699577Z",
        "model_provider": "ollama"
      }
    }
  ],
  "finish": "finish"
}
这一条是调用工具返回的信息
    {
      "role": "tool",
      "type": "ToolMessage",
      "name": "get_weather",
      "content": "It's always sunny in San Francisco!",
      "id": "0c827960-37e2-4c37-b37a-4d76ed4f3321",
      "tool_call_id": "36886be6-6441-49d5-b364-cab6137452b0"
    }
下面这一条是模型拿到工具返回信息后,优化的内容
    {
      "role": "assistant",
      "type": "AIMessage",
      "content": "The weather in San Francisco is sunny! ☀️ It's one of the best things about the city—always a bright day ahead. Let me know if you need more details!",
      "id": "lc_run--019d47cc-b789-78b1-9a0a-dad8552c7eef-0",
      "tool_calls": [],
      "usage_metadata": {
        "input_tokens": 188,
        "output_tokens": 136,
        "total_tokens": 324
      },
      "response_metadata": {
        "model": "qwen3:8b",
        "created_at": "2026-04-01T06:48:16.6699577Z",
        "model_provider": "ollama"
      }
    }
这家伙这又返回一个字典,内部带数组,取内容都不好取,这玩意写多了,这屁股有点难擦,写代码通常都不是一个人写,烂代码会传染,有很多人都会复制以前的代码,或者写得更乱,没有强限制很难搞。难怪有些公司想找个搞工程化的,他又不知道问题出在哪里,出问题的人一般是不知道问题就出在自己身上,所以总是找不到适合的人处理这个问题,一上来就问题有没有深入研究、算法,有没有看过源码,有点搞笑哈。学习研究,个人玩python这玩意可以,但是供工程化最好是结合其他更适合的语言,可以先查查工程化的含义,在看看你选则的技术栈是否符合工程化要求。最简单的一条就是傻瓜都能轻易看懂你的套路,按你的套路干,不会跳出你套路破坏可维护性。
函数最重要的两个信息就是入参和返回值,很多时候不需要去看源码的,看源码一般只是抽样的看,python类型提示稍微在这方面起到了一些作用。
3.5 一个更真实的Agent
下面是一个官方说的更接近真实世界的例子,看看是不是更好使用
3.5.1 定义提示词
SYSTEM_PROMPT = """You are an expert weather forecaster, who speaks in puns.

You have access to two tools:

- get_weather_for_location: use this to get the weather for a specific location
- get_user_location: use this to get the user's location

If a user asks you for the weather, make sure you know the location. If you can tell from the question that they mean wherever they are, use the get_user_location tool to find their location."""
这个提示词涉及两个工具调用,获取天气和获取用户位置,看这个提示词的意图是想让大模型根据提示词,先获得用户位置,再通过用户位置获得天气信息。这个已经又一个简单的有先后顺序的任务流了。
3.5.2 创建工具
from dataclasses import dataclass
from langchain.tools import tool, ToolRuntime

@dataclass
class Context:
    """Custom runtime context schema."""
    user_id: str


@tool
def get_weather_for_location(city: str) -> str:
    """Get weather for a given city."""
    return f"It's always sunny in {city}!"


@tool
def get_user_location(runtime: ToolRuntime[Context]) -> str:
    """Retrieve user information based on user ID."""
    user_id = runtime.context.user_id
    return "Florida" if user_id == "1" else "SF"
我们解读一下这段代码,定义了两个工具,和一个上下文容器,这个容器封装了一个用户ID。代码用到了两个装饰器看起啦有点像java注解,其实机制不太一样,装饰器是一个高阶函数,以后都叫装饰器,不要叫注解哈,下面解释一下@tool和@dataclass。
1. @tool 的作用
核心功能:将普通 Python 函数“包装”成 AI 可以理解和调用的工具。
在你的代码中,@tool 装饰器(来自 langchain.tools)起到了以下关键作用:
- 注册工具:它告诉 LangChain 框架,
get_weather_for_location和get_user_location不仅仅是普通函数,而是 Agent 可以使用的“技能”。 - 生成元数据:它会自动读取函数的名称、类型提示(如
city: str)和文档字符串(即"""Get weather..."""这部分)。- AI 模型会根据文档字符串来判断这个工具是做什么的。
- AI 会根据类型提示来构建正确的参数。
- 标准化调用:它将函数转换为 LangChain 内部通用的
BaseTool格式,使其能被 Agent 在运行时动态调用。
2. @dataclass 的作用
核心功能:自动生成“样板代码”,简化数据类的定义。
在你的代码中,@dataclass(来自 Python 标准库 dataclasses)主要用于定义 Context 类,这玩意感觉有点像java record类,不知道是谁在学谁,或者说只是个巧合:
- 自动生成方法:它自动为
Context类生成了__init__(构造函数)、__repr__(打印信息)和__eq__(比较相等)等方法。 - 简化代码:如果没有它,你需要手动写很多代码来定义
user_id的初始化和属性存储。用了它,你只需要声明user_id: str,Python 就会自动帮你处理好底层的存储逻辑。 - 数据结构化:在这里,它定义了一个结构清晰的数据容器,专门用来存放运行时上下文(如用户 ID),供工具函数读取。
| 装饰器 | 来源 | 作用对象 | 核心目的 | 你的代码中的体现 |
|---|---|---|---|---|
@tool |
LangChain 库 | 函数 | 让 AI 能调用函数 | 把 get_weather... 变成 AI 可调用的技能,AI 知道它的描述和参数。 |
@dataclass |
Python 标准库 | 类 | 减少写类的重复代码 | 把 Context 变成一个轻量级的数据容器,自动处理 user_id 的初始化。 |
3.有无@tool差异
细心的朋友可能已经发现了,前面没加这玩意也能被工具调用,我查了一下AI,看看AI是怎么解释的:
不加 @tool(隐式包装)
省事:写个函数就能用,适合快速写脚本。
完全依赖代码推断:Agent 对工具的理解完全取决于你的函数名和文档字符串。你没法在不改函数源码的情况下,修改 Agent 看到的“说明书”。
加上 @tool(显式包装)
解耦:你可以把工具的“定义”和“实现”分开。
定制元数据:你可以手动指定 name、description 或 args_schema
| 特性 | 不加 @tool (普通函数) |
加上 @tool (Tool 对象) |
|---|---|---|
| 对象类型 | function |
Tool (继承自 BaseTool) |
| Agent 可见性 | 不可见,无法调用 | 可见,可以被理解和调用 |
| 包含元数据 | 无 (只有代码逻辑) | 有 (名称、描述、参数模式) |
| 主要作用 | 供 Python 代码直接调用 | 供 AI Agent 在推理时自主调用 |
3.5.3 定义模型
1 代码
from langchain.chat_models import init_chat_model

model = init_chat_model(
    model='qwen3:8b',
    model_provider="ollama",
    temperature=0.7,
    base_url="http://localhost:11434",
)
这个定义模型使用了一个init_chat_model方法,看起来抽象程度更好一些,下面是老模式
chatModel = ChatOllama(
        model=modelStr,
        temperature=0.7,
        base_url="http://localhost:11434",
    )
AI应用api目前都是在高速发展中,pyhon ai这体系是真的更新很快,老代码要升级会做出很多改动。
2 init_chat_model参数
(function) def init_chat_model(
    model: str,
    *,
    model_provider: str | None = None,
    configurable_fields: None = None,
    config_prefix: str | None = None,
    **kwargs: Any
) -> BaseChatModel
model参数类型提示是个字符串,和create_agent 不太一样model: str | BaseChatModel,如果需要更多参数,可能需要分析*号后面的字典参数够不够用,不够用的化可能还是需要使用模型参数形式,很多人看见方法定义中的*参数有点懵逼哈(这个其实是个分割符,要求后面的参数都按字典形式传值)
3.5.4 定义格式化输出
前面不是吐槽这个家伙给我返回一个字典对象吗,我自己需要格式化去分析他的输出。现在它自己觉得过意不去,搞了一些解析办法,我们来看看代码
from dataclasses import dataclass

# We use a dataclass here, but Pydantic models are also supported.
@dataclass
class ResponseFormat:
    """Response schema for the agent."""
    # A punny response (always required)
    punny_response: str
    # Any interesting information about the weather if available
    weather_conditions: str | None = None
3.5.5 内存记忆
from langgraph.checkpoint.memory import InMemorySaver

checkpointer = InMemorySaver()
这玩意有点经验一样就看出来有问题哈,可能会撑爆内存,没有任何参数明显只能用于快速学习研究,有些无脑的就直接搞到生产哈,这种事情不是没有。
3.5.6 创建和运行agents
from langchain.agents.structured_output import ToolStrategy

agent = create_agent(
    model=model,
    system_prompt=SYSTEM_PROMPT,
    tools=[get_user_location, get_weather_for_location],
    context_schema=Context,
    response_format=ToolStrategy(ResponseFormat),
    checkpointer=checkpointer
)

# `thread_id` is a unique identifier for a given conversation.
config = {"configurable": {"thread_id": "1"}}

response = agent.invoke(
    {"messages": [{"role": "user", "content": "what is the weather outside?"}]},
    config=config,
    context=Context(user_id="1")
)

print(response)
# ResponseFormat(
#     punny_response="Florida is still having a 'sun-derful' day! The sunshine is playing 'ray-dio' hits all day long! I'd say it's the perfect weather for some 'solar-bration'! If you were hoping for rain, I'm afraid that idea is all 'washed up' - the forecast remains 'clear-ly' brilliant!",
#     weather_conditions="It's always sunny in Florida!"
# )


# Note that we can continue the conversation using the same `thread_id`.
response = agent.invoke(
    {"messages": [{"role": "user", "content": "thank you!"}]},
    config=config,
    context=Context(user_id="1")
)

print(response)
# ResponseFormat(
#     punny_response="You're 'thund-erfully' welcome! It's always a 'breeze' to help you stay 'current' with the weather. I'm just 'cloud'-ing around waiting to 'shower' you with more forecasts whenever you need them. Have a 'sun-sational' day in the Florida sunshine!",
#     weather_conditions=None
# )
这个代码简单解释一下,关键的地方在于create_agent传入了模型、工具注册和模型上下文、格式化提示类。看起来比较奇葩的地方是print(response['structured_response']),这玩意怎么知道structured_response这个key是我们想要的输出的。我看看看response类型是个字典dict[str, Any]🤣。上下文使用user_id="1"来获取历史对话记录。我们来实际运行一下看看实际效果,我使用的是qwen,所以可能输出会有一些区别。
第一个完整输出
{
  "messages": [
    {
      "type": "HumanMessage",
      "content": "what is the weather outside?",
      "additional_kwargs": {},
      "response_metadata": {},
      "id": "86e4ec1b-a773-4fe9-be3a-12d6794f2462"
    },
    {
      "type": "AIMessage",
      "content": "",
      "additional_kwargs": {},
      "response_metadata": {
        "model": "qwen3:8b",
        "created_at": "2026-04-02T03:12:23.4085592Z",
        "done": true,
        "done_reason": "stop",
        "total_duration": 8523581900,
        "load_duration": 79723300,
        "prompt_eval_count": 326,
        "prompt_eval_duration": 282148600,
        "eval_count": 250,
        "eval_duration": 8151050400,
        "logprobs": null,
        "model_name": "qwen3:8b",
        "model_provider": "ollama"
      },
      "id": "lc_run--019d4c2d-5632-7642-9dc0-804526a970e9-0",
      "tool_calls": [
        {
          "name": "get_user_location",
          "args": {},
          "id": "a85dc12d-f1e2-4654-87dc-3a24cfaa8f30",
          "type": "tool_call"
        }
      ],
      "invalid_tool_calls": [],
      "usage_metadata": {
        "input_tokens": 326,
        "output_tokens": 250,
        "total_tokens": 576
      }
    },
    {
      "type": "ToolMessage",
      "content": "Florida",
      "name": "get_user_location",
      "id": "1018185d-0141-4461-9d55-c3bc4ff4ce72",
      "tool_call_id": "a85dc12d-f1e2-4654-87dc-3a24cfaa8f30"
    },
    {
      "type": "AIMessage",
      "content": "",
      "additional_kwargs": {},
      "response_metadata": {
        "model": "qwen3:8b",
        "created_at": "2026-04-02T03:12:45.485162Z",
        "done": true,
        "done_reason": "stop",
        "total_duration": 22070023700,
        "load_duration": 75188700,
        "prompt_eval_count": 357,
        "prompt_eval_duration": 269243700,
        "eval_count": 659,
        "eval_duration": 21710923700,
        "logprobs": null,
        "model_name": "qwen3:8b",
        "model_provider": "ollama"
      },
      "id": "lc_run--019d4c2d-7f76-7cb3-9a0f-9e7eac23e5c6-0",
      "tool_calls": [
        {
          "name": "get_weather_for_location",
          "args": {
            "city": "Miami"
          },
          "id": "53b2260a-120e-4f28-a705-3343cbf36805",
          "type": "tool_call"
        }
      ],
      "invalid_tool_calls": [],
      "usage_metadata": {
        "input_tokens": 357,
        "output_tokens": 659,
        "total_tokens": 1016
      }
    },
    {
      "type": "ToolMessage",
      "content": "It's always sunny in Miami!",
      "name": "get_weather_for_location",
      "id": "d4c98d34-a635-4959-a202-c2955dfdfcfc",
      "tool_call_id": "53b2260a-120e-4f28-a705-3343cbf36805"
    },
    {
      "type": "AIMessage",
      "content": "",
      "additional_kwargs": {},
      "response_metadata": {
        "model": "qwen3:8b",
        "created_at": "2026-04-02T03:12:58.7350557Z",
        "done": true,
        "done_reason": "stop",
        "total_duration": 13244458600,
        "load_duration": 71120600,
        "prompt_eval_count": 397,
        "prompt_eval_duration": 323181100,
        "eval_count": 391,
        "eval_duration": 12837693300,
        "logprobs": null,
        "model_name": "qwen3:8b",
        "model_provider": "ollama"
      },
      "id": "lc_run--019d4c2d-d5b1-7321-a459-c17c99302ae0-0",
      "tool_calls": [
        {
          "name": "ResponseFormat",
          "args": {
            "punny_response": "Why don't skeletons ever get cold in Miami? Because they're always sun-kissed!",
            "weather_conditions": "It's always sunny in Miami!"
          },
          "id": "1661d4ad-51b8-4ce7-8839-ad53533af1bb",
          "type": "tool_call"
        }
      ],
      "invalid_tool_calls": [],
      "usage_metadata": {
        "input_tokens": 397,
        "output_tokens": 391,
        "total_tokens": 788
      }
    },
    {
      "type": "ToolMessage",
      "content": "Returning structured response: ResponseFormat(punny_response=\"Why don't skeletons ever get cold in Miami? Because they're always sun-kissed!\", weather_conditions=\"It's always sunny in Miami!\")",
      "name": "ResponseFormat",
      "id": "3fe7f79f-7e2a-480b-91a6-e245297b4331",
      "tool_call_id": "1661d4ad-51b8-4ce7-8839-ad53533af1bb"
    }
  ],
  "structured_response": {
    "type": "ResponseFormat",
    "punny_response": "Why don't skeletons ever get cold in Miami? Because they're always sun-kissed!",
    "weather_conditions": "It's always sunny in Miami!"
  }
}
经过仔细分析这个执行流程和输出都是对的哈,qwen3输出有点不稳,有时候没有structured_response,导致print(response['structured_response']) 报错)
"structured_response": {
    "type": "ResponseFormat",
    "punny_response": "Why don't skeletons ever get cold in Miami? Because they're always sun-kissed!",
    "weather_conditions": "It's always sunny in Miami!"
  }
输出也和官方不太一样使用的是Miami,不是Florida,因为qwen认为Florida是一个州,参数是城市,传一个城市更适合,这个看起比官方解释更牛逼一点。但是行为有点水机,并不是每次都是这样。
第二个完整输出
{
  "messages": [
    {
      "type": "HumanMessage",
      "content": "what is the weather outside?",
      "additional_kwargs": {},
      "response_metadata": {},
      "id": "86e4ec1b-a773-4fe9-be3a-12d6794f2462"
    },
    {
      "type": "AIMessage",
      "content": "",
      "additional_kwargs": {},
      "response_metadata": {
        "model": "qwen3:8b",
        "created_at": "2026-04-02T03:12:23.4085592Z",
        "done": true,
        "done_reason": "stop",
        "total_duration": 8523581900,
        "load_duration": 79723300,
        "prompt_eval_count": 326,
        "prompt_eval_duration": 282148600,
        "eval_count": 250,
        "eval_duration": 8151050400,
        "logprobs": null,
        "model_name": "qwen3:8b",
        "model_provider": "ollama"
      },
      "id": "lc_run--019d4c2d-5632-7642-9dc0-804526a970e9-0",
      "tool_calls": [
        {
          "name": "get_user_location",
          "args": {},
          "id": "a85dc12d-f1e2-4654-87dc-3a24cfaa8f30",
          "type": "tool_call"
        }
      ],
      "invalid_tool_calls": [],
      "usage_metadata": {
        "input_tokens": 326,
        "output_tokens": 250,
        "total_tokens": 576
      }
    },
    {
      "type": "ToolMessage",
      "content": "Florida",
      "name": "get_user_location",
      "id": "1018185d-0141-4461-9d55-c3bc4ff4ce72",
      "tool_call_id": "a85dc12d-f1e2-4654-87dc-3a24cfaa8f30"
    },
    {
      "type": "AIMessage",
      "content": "",
      "additional_kwargs": {},
      "response_metadata": {
        "model": "qwen3:8b",
        "created_at": "2026-04-02T03:12:45.485162Z",
        "done": true,
        "done_reason": "stop",
        "total_duration": 22070023700,
        "load_duration": 75188700,
        "prompt_eval_count": 357,
        "prompt_eval_duration": 269243700,
        "eval_count": 659,
        "eval_duration": 21710923700,
        "logprobs": null,
        "model_name": "qwen3:8b",
        "model_provider": "ollama"
      },
      "id": "lc_run--019d4c2d-7f76-7cb3-9a0f-9e7eac23e5c6-0",
      "tool_calls": [
        {
          "name": "get_weather_for_location",
          "args": {
            "city": "Miami"
          },
          "id": "53b2260a-120e-4f28-a705-3343cbf36805",
          "type": "tool_call"
        }
      ],
      "invalid_tool_calls": [],
      "usage_metadata": {
        "input_tokens": 357,
        "output_tokens": 659,
        "total_tokens": 1016
      }
    },
    {
      "type": "ToolMessage",
      "content": "It's always sunny in Miami!",
      "name": "get_weather_for_location",
      "id": "d4c98d34-a635-4959-a202-c2955dfdfcfc",
      "tool_call_id": "53b2260a-120e-4f28-a705-3343cbf36805"
    },
    {
      "type": "AIMessage",
      "content": "",
      "additional_kwargs": {},
      "response_metadata": {
        "model": "qwen3:8b",
        "created_at": "2026-04-02T03:12:58.7350557Z",
        "done": true,
        "done_reason": "stop",
        "total_duration": 13244458600,
        "load_duration": 71120600,
        "prompt_eval_count": 397,
        "prompt_eval_duration": 323181100,
        "eval_count": 391,
        "eval_duration": 12837693300,
        "logprobs": null,
        "model_name": "qwen3:8b",
        "model_provider": "ollama"
      },
      "id": "lc_run--019d4c2d-d5b1-7321-a459-c17c99302ae0-0",
      "tool_calls": [
        {
          "name": "ResponseFormat",
          "args": {
            "punny_response": "Why don't skeletons ever get cold in Miami? Because they're always sun-kissed!",
            "weather_conditions": "It's always sunny in Miami!"
          },
          "id": "1661d4ad-51b8-4ce7-8839-ad53533af1bb",
          "type": "tool_call"
        }
      ],
      "invalid_tool_calls": [],
      "usage_metadata": {
        "input_tokens": 397,
        "output_tokens": 391,
        "total_tokens": 788
      }
    },
    {
      "type": "ToolMessage",
      "content": "Returning structured response: ResponseFormat(punny_response=\"Why don't skeletons ever get cold in Miami? Because they're always sun-kissed!\", weather_conditions=\"It's always sunny in Miami!\")",
      "name": "ResponseFormat",
      "id": "3fe7f79f-7e2a-480b-91a6-e245297b4331",
      "tool_call_id": "1661d4ad-51b8-4ce7-8839-ad53533af1bb"
    },
    {
      "type": "HumanMessage",
      "content": "thank you!",
      "additional_kwargs": {},
      "response_metadata": {},
      "id": "9e5429db-47e0-4057-b6d2-1f0b8a7cd8b3"
    },
    {
      "type": "AIMessage",
      "content": "You're welcome! Stay sun-kissed! 😊",
      "additional_kwargs": {},
      "response_metadata": {
        "model": "qwen3:8b",
        "created_at": "2026-04-02T03:13:04.2339338Z",
        "done": true,
        "done_reason": "stop",
        "total_duration": 5491461700,
        "load_duration": 75473000,
        "prompt_eval_count": 506,
        "prompt_eval_duration": 1476569700,
        "eval_count": 120,
        "eval_duration": 3930683300,
        "logprobs": null,
        "model_name": "qwen3:8b",
        "model_provider": "ollama"
      },
      "id": "lc_run--019d4c2e-0976-70f2-a43b-bcb1a7d5de91-0",
      "tool_calls": [],
      "invalid_tool_calls": [],
      "usage_metadata": {
        "input_tokens": 506,
        "output_tokens": 120,
        "total_tokens": 626
      }
    }
  ],
  "structured_response": {
    "type": "ResponseFormat",
    "punny_response": "Why don't skeletons ever get cold in Miami? Because they're always sun-kissed!",
    "weather_conditions": "It's always sunny in Miami!"
  }
}
这轮整体输出整体上还是对的,就是响应有点问题用的还是structured_respons第一轮对话的结果,可以使用官网的模型验证一下,官网的是不是和它说的输出一致。
"structured_response": {
    "type": "ResponseFormat",
    "punny_response": "Why don't skeletons ever get cold in Miami? Because they're always sun-kissed!",
    "weather_conditions": "It's always sunny in Miami!"
  }
qwenAI是这样解释的,步知道实际模型是不是这样干的,这里没法验证:
虽然你输入了 "thank you!",但 invoke 函数运行结束后,它把 response 变量指向了当前内存中保存的最新状态对象。由于你的 Agent 定义了 response_format=ToolStrategy(ResponseFormat),LangGraph 会始终尝试将最后一次成功的结构化输出映射到这个对象上,并将其作为返回值。第二轮对话并没有生成新的 ResponseFormat
请仔细看第一轮和第二轮的区别:
第一轮(问天气):
模型必须执行工具 -> 获取数据 -> 最终调用 ResponseFormat 工具来输出符合你要求的 JSON 结构。因此,状态中产生了一个新的 ResponseFormat 对象。
第二轮(说谢谢):
用户说 "thank you!"。
模型回复:"You're welcome! Stay sun-kissed! 😊"。
关键点: 模型认为这只是一个普通的闲聊,它并没有再次调用 ResponseFormat 工具。它只是输出了普通的文本(AIMessage 的 content 字段)。
预期的输出应该类似如下内容,不统一的化就不好解析,要是换个模型格式搞得不一样,那么和模型无关就是一个屁话。有时候语言或者框架开发这都只说好的,程序员其实很多也不老实🤣🤣,理想的输出应该类似如下:
"structured_response": {
    "type": "ResponseFormat",
    "punny_response": "You're welcome! Stay sun-kissed! 😊",
    "weather_conditions": ""
  }
到这里基本这个完整的示例就讲结束了,后面才开始进入专题
4 agents
4.1 agents
通过前面的代码,已经发现了agents的身影,我们来看看官方的解释:
- 智能体将语言模型与工具相结合,从而构建出能够对任务进行推理、决定使用哪些工具,并迭代式地朝着解决方案推进的系统。
- create_agent 提供了一个可用于生产环境的智能体实现方案。
- 一个 LLM 智能体通过循环运行工具来达成目标。智能体会一直运行,直到满足停止条件——即当模型输出最终结果,或达到迭代次数限制时为止
我们一点一点来解读一下这三条:
1. 智能体的集合模型和工具才能做出推理和行动,模型像神经中枢,其他器官像工具。神经指挥工具,agents就是这样的一个存在。只能体能够进行一些逻辑推理,如果你有多个工具他会根据提示信息和你的要求决定调用的先后顺序,处理结果和传参。
2 create_agent提供了一个创建agents的方法。这个上面的代码中已经有所说明,langchain的执行流程底层已经架设在langgraph上,agents的执行流程构成了一个图结构,图由节点(步骤)和边(连接)组成,它们定义了智能体处理信息的方式。智能体在图中流转,依次执行各类节点,例如模型节点(负责调用模型)、工具节点(负责执行工具)或中间件
3 只能体会不断的调用工具来处理你的任务,知道满足要求为止。但是这个一般是设置上限,不然容易出现死循环。
4.2 models
模型是智能体的推理引擎。它支持多种指定方式,包括静态和动态的模型选择。
静态模型
静态模型在创建智能体时配置一次,并在整个执行过程中保持不变。这是最常见且最直接的方法。静态模型的创建在前面已经介绍过代码了,这里就不介绍了。
动态模型
动态模型是根据当前状态和上下文在运行时进行选择的。这种方式能够实现复杂的路由逻辑和成本优化,我们就拿官网的这个代码来看看
from langchain_openai import ChatOpenAI
from langchain.agents import create_agent
from langchain.agents.middleware import wrap_model_call, ModelRequest, ModelResponse


basic_model = ChatOpenAI(model="gpt-4.1-mini")
advanced_model = ChatOpenAI(model="gpt-4.1")

@wrap_model_call
def dynamic_model_selection(request: ModelRequest, handler) -> ModelResponse:
    """Choose model based on conversation complexity."""
    message_count = len(request.state["messages"])

    if message_count > 10:
        # Use an advanced model for longer conversations
        model = advanced_model
    else:
        model = basic_model

    return handler(request.override(model=model))

agent = create_agent(
    model=basic_model,  # Default model
    tools=tools,
    middleware=[dynamic_model_selection]
)
这里有个关键参数,middlware。这玩意Django框架中也有,叫中间件,换个名字可能你就好理解了,就像java中的切面,最典型的用户就是拦截器。我们在来看看@wrap_model_call的作用
| 钩子类型 | 作用时机 | 能力限制 | 典型用途 |
|---|---|---|---|
@before_model |
调用前 | 只能修改输入或中断,无法捕获调用异常 | 修改提示词、检查 Token 限额 |
@after_model |
调用后 | 只能处理输出结果 | 记录日志、审查输出内容 |
@wrap_model_call |
包裹全程 | 最高权限:可控制调用次数、捕获异常、替换模型 | 重试、缓存、动态路由、限流 |
这里最大的作用就是做模型选择,因为不同的模型有不同的转场,生产上可能部署具有不同转场的小模型,用这个做路由。这里官网有个黄色警告

就是说你创建agents的时候,传的模型不要提前绑定工具
# ❌ 错误:传入了预绑定模型的函数
def get_model():
    return model.bind_tools([my_tool]) # 不要在这里 bind_tools

#下面的basic_model就不能像绑定工具,这个理解应该是没啥问题的
agent = create_agent(
    model=basic_model,  # Default model
    tools=tools,
    middleware=[dynamic_model_selection]
)
4.3 tools
Agent(智能体) 相比于简单的模型工具绑定(Tool Binding)到底强在哪里。简单来说,工具赋予了 Agent “行动”的能力,而 Agent 的核心价值在于它能更聪明、更自主地驾驭这些工具。
具体来看,它通过以下几个方面实现了超越:
- 序列化工具调用:能够根据用户的单次提示,自动规划并连续调用多个工具(比如先搜索信息,再根据结果调用计算器)。
- 并行工具调用:在合适的情况下,能够同时执行多个任务以提高效率。
- 动态工具选择:能够根据上一步工具返回的结果,灵活决定下一步该用哪个工具。
- 容错与重试机制:具备处理错误和自动重试的逻辑,不会因为一点小报错就“罢工”。
- 跨调用状态持久化:在多次工具调用的过程中,能够“记住”之前的上下文和状态,保持连贯性
静态工具
静态工具是在创建 Agent 时定义的,并且在执行过程中保持不变。这是最常见且最直接的方法。前面的例子中就是静态工具用法。
动态工具
使用动态工具时,智能体可用的工具集是在运行时进行修改的,而不是一开始就全部定义好。
并非每个工具都适用于每种情况。过多的工具可能会让模型不堪重负(导致上下文过载)并增加错误率;而工具太少则会限制智能体的能力。动态工具选择使得能够根据认证状态、用户权限、功能开关或对话阶段来调整可用的工具集。
这上面有个很关键的信息,工具注册会增大模型上下文信息。你想一下,如果模型不知道工具信息,它怎么知道调用那个工具。
有两种定义动态工具方式:
- 过滤预注册的工具:你先把所有可能用到的工具都定义好(预注册),然后在运行时根据情况(比如用户权限)从中筛选出一部分给模型用。
- 运行时工具注册:你不需要提前把所有工具都定死,而是在程序跑起来之后,根据当时的具体情况,临时添加或注册新的工具。
如果在创建智能体的时候,就已经确定了所有可能用到的工具,那么你可以先把它们全部预注册进去。随后,根据当前的状态、权限或上下文,动态地过滤(筛选)出具体哪些工具需要暴露给模型使用
状态过滤的例子
from langchain.agents import create_agent
from langchain.agents.middleware import wrap_model_call, ModelRequest, ModelResponse
from typing import Callable

@wrap_model_call
def state_based_tools(
    request: ModelRequest,
    handler: Callable[[ModelRequest], ModelResponse]
) -> ModelResponse:
    """Filter tools based on conversation State."""
    # Read from State: check if user has authenticated
    state = request.state
    is_authenticated = state.get("authenticated", False)
    message_count = len(state["messages"])

    # Only enable sensitive tools after authentication
    if not is_authenticated:
        tools = [t for t in request.tools if t.name.startswith("public_")]
        request = request.override(tools=tools)
    elif message_count < 5:
        # Limit tools early in conversation
        tools = [t for t in request.tools if t.name != "advanced_search"]
        request = request.override(tools=tools)

    return handler(request)

agent = create_agent(
    model="gpt-4.1",
    tools=[public_search, private_search, advanced_search],
    middleware=[state_based_tools]
)
基于store过滤
from dataclasses import dataclass
from langchain.agents import create_agent
from langchain.agents.middleware import wrap_model_call, ModelRequest, ModelResponse
from typing import Callable
from langgraph.store.memory import InMemoryStore

@dataclass
class Context:
    user_id: str

@wrap_model_call
def store_based_tools(
    request: ModelRequest,
    handler: Callable[[ModelRequest], ModelResponse]
) -> ModelResponse:
    """Filter tools based on Store preferences."""
    user_id = request.runtime.context.user_id

    # Read from Store: get user's enabled features
    store = request.runtime.store
    feature_flags = store.get(("features",), user_id)

    if feature_flags:
        enabled_features = feature_flags.value.get("enabled_tools", [])
        # Only include tools that are enabled for this user
        tools = [t for t in request.tools if t.name in enabled_features]
        request = request.override(tools=tools)

    return handler(request)

agent = create_agent(
    model="gpt-4.1",
    tools=[search_tool, analysis_tool, export_tool],
    middleware=[store_based_tools],
    context_schema=Context,
    store=InMemoryStore()
)
基于上下文的过滤
from dataclasses import dataclass
from langchain.agents import create_agent
from langchain.agents.middleware import wrap_model_call, ModelRequest, ModelResponse
from typing import Callable

@dataclass
class Context:
    user_role: str

@wrap_model_call
def context_based_tools(
    request: ModelRequest,
    handler: Callable[[ModelRequest], ModelResponse]
) -> ModelResponse:
    """Filter tools based on Runtime Context permissions."""
    # Read from Runtime Context: get user role
    if request.runtime is None or request.runtime.context is None:
        # If no context provided, default to viewer (most restrictive)
        user_role = "viewer"
    else:
        user_role = request.runtime.context.user_role

    if user_role == "admin":
        # Admins get all tools
        pass
    elif user_role == "editor":
        # Editors can't delete
        tools = [t for t in request.tools if t.name != "delete_data"]
        request = request.override(tools=tools)
    else:
        # Viewers get read-only tools
        tools = [t for t in request.tools if t.name.startswith("read_")]
        request = request.override(tools=tools)

    return handler(request)

agent = create_agent(
    model="gpt-4.1",
    tools=[read_data, write_data, delete_data],
    middleware=[context_based_tools],
    context_schema=Context
)上面接种过滤方式,最后的本质都是一样的,最适用于以下场景:
- 在编译或启动时,就已经明确了所有可能的工具;
- 你需要根据权限、功能开关(feature flags)或对话状态来进行筛选;
- 工具集本身是静态固定的,但它们的可用性是动态变化的。
运行时工具注册例子
当工具是在运行时被发现或创建时(比如从 MCP 服务器加载、根据用户数据生成,或者从远程注册表获取),你不仅需要注册这些工具,还必须能够动态地处理它们的执行。
这需要用到两个中间件钩子:
- wrap_model_call:用于在请求中注入动态工具;
- wrap_tool_call:用于处理那些动态添加工具的执行逻辑。
from langchain.tools import tool
from langchain.agents import create_agent
from langchain.agents.middleware import AgentMiddleware, ModelRequest, ToolCallRequest

# A tool that will be added dynamically at runtime
@tool
def calculate_tip(bill_amount: float, tip_percentage: float = 20.0) -> str:
    """Calculate the tip amount for a bill."""
    tip = bill_amount * (tip_percentage / 100)
    return f"Tip: ${tip:.2f}, Total: ${bill_amount + tip:.2f}"

class DynamicToolMiddleware(AgentMiddleware):
    """Middleware that registers and handles dynamic tools."""

    def wrap_model_call(self, request: ModelRequest, handler):
        # Add dynamic tool to the request
        # This could be loaded from an MCP server, database, etc.
        updated = request.override(tools=[*request.tools, calculate_tip])
        return handler(updated)

    def wrap_tool_call(self, request: ToolCallRequest, handler):
        # Handle execution of the dynamic tool
        if request.tool_call["name"] == "calculate_tip":
            return handler(request.override(tool=calculate_tip))
        return handler(request)

agent = create_agent(
    model="gpt-4o",
    tools=[get_weather],  # Only static tools registered here
    middleware=[DynamicToolMiddleware()],
)

# The agent can now use both get_weather AND calculate_tip
result = agent.invoke({
    "messages": [{"role": "user", "content": "Calculate a 20% tip on $85"}]
})
这段代码本质也是一个中间件,只是第一个方式用@wrap_model_call装饰器转成了MiddleWare(非常隐晦),第二个直接继承了AgentMiddleWare。
前面的例子,动态工具和动态模型本质上都是基于MiddleWare来实现。
4.4 工具错误处理
工具错误处理使用了@wrap_tool_call 装饰器包装成了MiddleWare
from langchain.agents import create_agent
from langchain.agents.middleware import wrap_tool_call
from langchain.messages import ToolMessage


@wrap_tool_call
def handle_tool_errors(request, handler):
    """Handle tool execution errors with custom messages."""
    try:
        return handler(request)
    except Exception as e:
        # Return a custom error message to the model
        return ToolMessage(
            content=f"Tool error: Please check your input and try again. ({str(e)})",
            tool_call_id=request.tool_call["id"]
        )

agent = create_agent(
    model="gpt-4.1",
    tools=[search, get_weather],
    middleware=[handle_tool_errors]
)
4.5 ReAct loop
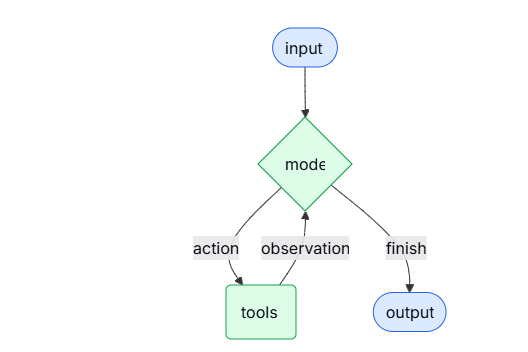
AI 代理遵循 ReAct(“推理 + 行动”)模式,它们在“简短的推理步骤”与“针对性的工具调用”之间交替循环,并将产生的观察结果作为输入反馈给后续的决策过程,如此反复,直到最终给出答案。
这段话揭示了 Agent 并不是一步到位的,而是一个循环迭代的过程:
- Reasoning (推理):Agent 先想一下“我现在该干嘛?”(思考)。
- Acting (行动):Agent 决定调用一个工具(比如搜索或查数据库)。
- Observation (观察):工具返回结果(比如搜索到了某条新闻)。
- Loop (循环):Agent 拿着这个结果,回到第一步,再次思考“根据这个新信息,我下一步该干嘛?”。
这个过程一直持续,直到 Agent 觉得信息够了,才会输出 Final Answer (最终答案)。
4.6 系统提示词
静态工具是在创建 Agent 时定义的,并且在执行过程中保持不变。这是最常见且最直接的方法,如果没有提供系统提示词,代理将直接根据对话消息来推断其任务。如果没有提供系统提示词,代理将直接根据对话消息来推断其任务。
agent = create_agent(
    model,
    tools,
    system_prompt="You are a helpful assistant. Be concise and accurate."
)
system_prompt 参数既接受字符串(str),也接受 SystemMessage 对象。使用 SystemMessage 能让你更精细地掌控提示词的结构,这对于利用特定服务商的特性(比如 Anthropic 的提示词缓存)非常有用。
from langchain.agents import create_agent
from langchain.messages import SystemMessage, HumanMessage

literary_agent = create_agent(
    model="anthropic:claude-sonnet-4-5",
    system_prompt=SystemMessage(
        content=[
            {
                "type": "text",
                "text": "You are an AI assistant tasked with analyzing literary works.",
            },
            {
                "type": "text",
                "text": "<the entire contents of 'Pride and Prejudice'>",
                "cache_control": {"type": "ephemeral"}
            }
        ]
    )
)

result = literary_agent.invoke(
    {"messages": [HumanMessage("Analyze the major themes in 'Pride and Prejudice'.")]}
)
"cache_control": {"type": "ephemeral"} 做临时缓存,这会告诉 Anthropic 缓存该内容块,从而减少重复请求(在使用相同系统提示词时)的延迟和成本。下面是查到的一些信息,其他的服务商还得看具体情况。
Anthropic 的缓存机制是基于时间窗口的。
- 有效期:当你发送第一段包含长提示词的请求后,该内容会被缓存在内存中,有效期通常为 5 分钟。
- 续期:如果你在这 5 分钟内发送了新的请求,并且该请求再次使用了相同的缓存内容(通过
SystemMessage或特定的cache_control标记),缓存的计时器会重置,内容会继续保留。 - 过期:如果超过 5 分钟没有任何请求使用这段缓存内容,它就会被自动清除。下次再想用,就得重新“预热”(即重新发送完整内容以建立新的缓存)。
动态提示词
from typing import TypedDict

from langchain.agents import create_agent
from langchain.agents.middleware import dynamic_prompt, ModelRequest


class Context(TypedDict):
    user_role: str

@dynamic_prompt
def user_role_prompt(request: ModelRequest) -> str:
    """Generate system prompt based on user role."""
    user_role = request.runtime.context.get("user_role", "user")
    base_prompt = "You are a helpful assistant."

    if user_role == "expert":
        return f"{base_prompt} Provide detailed technical responses."
    elif user_role == "beginner":
        return f"{base_prompt} Explain concepts simply and avoid jargon."

    return base_prompt

agent = create_agent(
    model="gpt-4.1",
    tools=[web_search],
    middleware=[user_role_prompt],
    context_schema=Context
)

# The system prompt will be set dynamically based on context
result = agent.invoke(
    {"messages": [{"role": "user", "content": "Explain machine learning"}]},
    context={"user_role": "expert"}
)
@dynamic_prompt 这个玩意把函数转化成了中间件,通过中间件实现。
4.7 agent取名
前面示例都只涉及一个agent,所以不用区分,如果涉及多agent,比如agent是多agent系统子图中的一员时,可以加一个名字标示agent。
agent = create_agent(
    model,
    tools,
    name="research_assistant"
)
注意名字规范

4.8 agent调用
你可以通过向 Agent 的状态(State)传递更新来调用它。所有的 Agent 在其状态中都包含一系列消息;要调用 Agent,只需传入一条新消息即可。
result = agent.invoke(
    {"messages": [{"role": "user", "content": "What's the weather in San Francisco?"}]}
)
4.9 结构化输出
langchain agents通过 response_format参数控制工具调用格式化输出。
ToolStrategy 利用“人工工具调用”来生成结构化输出。它适用于任何支持工具调用的模型。当无法使用或不信任服务商原生的结构化输出功能(即 ProviderStrategy)时,就应该使用 ToolStrategy
from pydantic import BaseModel
from langchain.agents import create_agent
from langchain.agents.structured_output import ToolStrategy
from langchain.chat_models import init_chat_model


class ContactInfo(BaseModel):
    name: str
    email: str
    phone: str

qwen3Ollama = init_chat_model(
    model="qwen3:8b",           # 1. 你本地 Ollama 中的模型名称
    model_provider="ollama",    # 2. 【关键】明确指定提供商为 ollama
    base_url="http://localhost:11434", # 3. Ollama 的默认服务地址
    temperature=0.7,            # 4. 通用参数:温度
)
agent = create_agent(
    model=qwen3Ollama,
    tools=[],
    response_format=ToolStrategy(ContactInfo)
)

result = agent.invoke({
    "messages": [{"role": "user", "content": "Extract contact info from: John Doe, john@example.com, (555) 123-4567"}]
})

print(result)
print(result["structured_response"])
# ContactInfo(name='John Doe', email='john@example.com', phone='(555) 123-4567')
完整输出:
{
  "messages": [
    {
      "content": "Extract contact info from: John Doe, john@example.com, (555) 123-4567",
      "additional_kwargs": {},
      "response_metadata": {},
      "id": "65898ed0-66b1-48de-bc00-2eb150c9b7db"
    },
    {
      "content": "",
      "additional_kwargs": {},
      "response_metadata": {
        "model": "qwen3:8b",
        "created_at": "2026-04-03T03:07:10.8559514Z",
        "done": true,
        "done_reason": "stop",
        "total_duration": 9117973800,
        "load_duration": 77158200,
        "prompt_eval_count": 169,
        "prompt_eval_duration": 201344200,
        "eval_count": 273,
        "eval_duration": 8814552300,
        "logprobs": null,
        "model_name": "qwen3:8b",
        "model_provider": "ollama"
      },
      "id": "lc_run--019d514e-eaef-7cd0-95f8-4fbf11ea997a-0",
      "tool_calls": [
        {
          "name": "ContactInfo",
          "args": {
            "email": "john@example.com",
            "name": "John Doe",
            "phone": "(555) 123-4567"
          },
          "id": "9fe76cca-c585-4022-9a39-50d5ac47e16d",
          "type": "tool_call"
        }
      ],
      "invalid_tool_calls": [],
      "usage_metadata": {
        "input_tokens": 169,
        "output_tokens": 273,
        "total_tokens": 442
      }
    },
    {
      "content": "Returning structured response: name='John Doe' email='john@example.com' phone='(555) 123-4567'",
      "name": "ContactInfo",
      "id": "9afaabe3-0174-4f74-8ce3-ba6143094f93",
      "tool_call_id": "9fe76cca-c585-4022-9a39-50d5ac47e16d"
    }
  ],
  "structured_response": {
    "name": "John Doe",
    "email": "john@example.com",
    "phone": "(555) 123-4567"
  }
}
信息中出现了工具调用,ToolStrategy 的工作机制导致的。虽然你在 create_agent 时传入了空的 tools=[],但 ToolStrategy 为了实现结构化输出,会在内部自动生成并注入一个“隐式工具”。
简单来说,ToolStrategy 把你的 Pydantic 模型(ContactInfo)自动转换成了一个工具定义。
但是,ToolStrategy 注入的工具属于系统级/策略级工具。在 LangChain 的底层实现中,策略定义的“输出工具”通常会与用户定义的 tools 合并。
- 用户工具:空列表 []。
- 策略工具:[ContactInfo (自动生成的工具定义)]。
- 最终发送给模型的工具列表:[ContactInfo]
name='John Doe' email='john@example.com' phone='(555) 123-4567'ProviderStrategy 利用模型提供商(如 OpenAI、Anthropic)原生的结构化输出生成功能。这种方式更加可靠,但仅适用于那些支持原生结构化输出的提供商ProviderStrategy 利用模型提供商(如 OpenAI、Anthropic)原生的结构化输出生成功能。这种方式更加可靠,但仅适用于那些支持原生结构化输出的提供商
from langchain.agents.structured_output import ProviderStrategy

agent = create_agent(
    model="gpt-4.1",
    response_format=ProviderStrategy(ContactInfo)
)
langchain 1.0, 简单传模式 (e.g., response_format=ContactInfo) ,如果模型支持本地化结构输出,将会用 ProviderStrategy 否则就会退回到ToolStrategy 。
4.10 记忆
智能体默认会自动记录对话历史(通过消息列表,生产不可能这么做),但你也可以自定义一个“状态结构”,让智能体在对话过程中记住更多特定的信息。存在状态里面的信息,对agent来说类似于短期记忆功能。
自定义状态模式(Schema)必须以 TypedDict 的形式继承 AgentState,有两种方式自定义状态:1 通过MiddleWare。2 通过agent的state_schema
1 通过MiddleWare
当你的自定义状态(Custom State)需要被特定的中间件钩子(Hooks)或者绑定在该中间件上的工具访问时,请使用中间件(Middleware)来定义这个状态
from langchain.agents import AgentState
from langchain.agents.middleware import AgentMiddleware
from typing import Any


class CustomState(AgentState):
    user_preferences: dict

class CustomMiddleware(AgentMiddleware):
    state_schema = CustomState
    tools = [tool1, tool2]

    def before_model(self, state: CustomState, runtime) -> dict[str, Any] | None:
        ...

agent = create_agent(
    model,
    tools=tools,
    middleware=[CustomMiddleware()]
)

# The agent can now track additional state beyond messages
result = agent.invoke({
    "messages": [{"role": "user", "content": "I prefer technical explanations"}],
    "user_preferences": {"style": "technical", "verbosity": "detailed"},
})
还是通过中间见实现。agent.invoke调用时,要和CustomState的user_preferences一样才能对应,通过before_model钩子函数实现访问状态的行为
2 通过state_schema
状态只有工具访问时就用state_schema
from langchain.agents import AgentState


class CustomState(AgentState):
    user_preferences: dict

agent = create_agent(
    model,
    tools=[tool1, tool2],
    state_schema=CustomState
)
# The agent can now track additional state beyond messages
result = agent.invoke({
    "messages": [{"role": "user", "content": "I prefer technical explanations"}],
    "user_preferences": {"style": "technical", "verbosity": "detailed"},
})
3 与context对比
前面3.5例子中我们涉及用context传数据,在tools工具中访问,这个似乎和这里的状态功能有些重复,我们看看区别:
| 特性 | 使用 Context | 使用 State |
|---|---|---|
| 数据性质 | 配置/元数据 (User ID, API Key, 权限等级) | 业务数据 (聊天记录, 搜索结果, 中间变量) |
| 读写权限 | 只读 (工具只能看,不能改) | 读写 (工具可以修改、追加) |
| 持久化 | 不持久化 (用完即弃,下次重传) | 持久化 (存入 Checkpointer,长期记忆) |
| 可见性 | 仅工具/代码可见 (LLM 看不到) | LLM 可见 (作为 Prompt 的一部分) |
| 例子 | “当前用户是 VIP” | “用户刚才问了天气” |
4.11 流式输出
当你的自定义状态(Custom State)需要被特定的中间件钩子(Hooks)或者绑定在该中间件上的工具访问时,请使用中间件(Middleware)来定义这个状态我们已经见识过如何用 invoke 来调用 Agent 并获取最终回复了。但如果 Agent 需要执行多个步骤(比如反复思考、调用工具),这可能会花上一阵子。为了展示中间的进度,我们可以采用‘流式’的方式,让消息一产生就实时回传出来
from langchain.messages import AIMessage, HumanMessage

for chunk in agent.stream({
    "messages": [{"role": "user", "content": "Search for AI news and summarize the findings"}]
}, stream_mode="values"):
    # Each chunk contains the full state at that point
    latest_message = chunk["messages"][-1]
    if latest_message.content:
        if isinstance(latest_message, HumanMessage):
            print(f"User: {latest_message.content}")
        elif isinstance(latest_message, AIMessage):
            print(f"Agent: {latest_message.content}")
    elif latest_message.tool_calls:
print(f"Calling tools: {[tc['name'] for tc in latest_message.tool_calls]}")agent.stream:这是核心。它告诉 Agent:“别等全做完了再给我结果,做一步就吐出来一步。”stream_mode="values":这个参数非常关键。它的意思是“每次给我完整的状态快照”。- 如果不加这个,你可能只能看到“新增了什么”。
- 加了
values,每次循环里的chunk都是当前这一刻 Agent 的全部记忆和状态
4.12 中间件
Middleware(中间件,就像拦截器功能,AOP)为定制 Agent 的执行行为提供了强大的扩展能力,允许你在执行流程的不同阶段进行干预。你可以利用中间件实现以下功能:
- 在模型调用前处理状态(例如:消息修剪、上下文注入)
- 修改或校验模型的响应(例如:安全护栏、内容过滤)
- 使用自定义逻辑处理工具执行错误
- 基于状态或上下文实现动态模型选择
- 添加自定义日志、监控或分析功能
到此官网agents解读结束
5 models
LLM(大语言模型) 是强大的人工智能工具,能够像人类一样理解和生成文本。它们非常全能,无需针对每个任务进行专门训练,就能撰写内容、翻译语言、进行摘要和回答问题。
除了文本生成,许多模型还支持:
- 工具调用:调用外部工具(如数据库查询或 API 请求),并在回复中使用结果。
- 结构化输出:将模型的响应限制为遵循定义的格式。
- 多模态:处理和返回文本以外的数据,如图像、音频和视频。
- 推理:模型执行多步推理以得出结论。
模型是 Agent 的“推理引擎”。 它们驱动着 Agent 的决策过程,决定调用哪些工具、如何解释结果,以及何时给出最终答案。你选择的模型的质量和能力,直接决定了 Agent 的基准可靠性和性能。不同的模型擅长不同的任务——有些更擅长遵循复杂的指令,有些擅长结构化推理,还有一些支持更大的上下文窗口以处理更多信息。LangChain 的标准化模型接口让你能够接入许多不同的提供商集成,这使得尝试和切换模型变得非常容易,从而为你的用例找到最合适的选择。
5.1 基本使用
模型有两种使用方式:
- 独立使用:模型可以不依赖agent,独立用于文本生成、分类、或者提取
- 和agent一起使用:创建agent的时候指定模型
5.2 初始模型
最简单的初始化模型,先安装依赖(pip install -U "langchain[openai]")然后使用init_chat_model或者类构造器
import os
#init_chat_model
from langchain.chat_models import init_chat_model

os.environ["OPENAI_API_KEY"] = "sk-..."

model = init_chat_model("gpt-5.2")
import os
# 类构造器
from langchain_openai import ChatOpenAI
os.environ["OPENAI_API_KEY"] = "sk-..."
model = ChatOpenAI(model="gpt-5.2")实际应用中,可能会涉及连接多个模型,设置相应的API_KEY和创建多个模型就行了。各个模型厂商的写法需要的时候查一下文档就行了。初始话的时候能用init_chat_model就用这个,这个封装性更好一些。
模型有三个关键方法:invoke、stream、batch
5.3 init_chat_model参数
聊天模型接收用于配置其行为的参数。支持的完整参数集因模型和提供商而异,但标准参数包括:
| 参数名 | 类型 | 必需/默认 | 说明 |
|---|---|---|---|
| model | 字符串 | 必需 | 你想要使用的模型的名称或标识符。你也可以使用 : 格式在单个参数中同时指定模型及其提供商,例如 openai:o1。 |
| api_key | 字符串 | 可选 | 用于与模型提供商进行身份验证的密钥。这通常在你注册模型访问权限时获得。通常通过设置环境变量来访问。 |
| temperature | 数字 | 可选 | 控制模型输出的随机性。数值越高,回复越有创造性;数值越低,回复越确定。 |
| max_tokens | 数字 | 可选 | 限制响应中的总 token 数量,从而有效地控制输出的长度。 |
| timeout | 数字 | 可选 | 在取消请求之前,等待模型响应的最长时间(以秒为单位)。 |
| max_retries | 数字 | 默认: 6 |
如果请求因网络超时或速率限制等问题而失败,系统将尝试重新发送请求的最大次数。重试会使用带有抖动的指数退避策略。网络错误、速率限制 (429) 和服务器错误 (5xx) 会自动重试。客户端错误(如 401 未授权或 404 未找到)不会被重试。对于在不可靠网络上运行的长时间代理任务,可以考虑将此值增加到 10-15。 |
5.4 调用
调用有三种模式:
5.4.1 Invoke
使用单个消息或者列表消息调用模型是最简单直接的方式
#单个消息
response = model.invoke("Why do parrots have colorful feathers?")
print(response)
#字典形式消息列表
#消息列表可以包含历史会话信息,每条消息的角色能告诉模型是谁发出的消息
conversation = [
{"role": "system", "content": "You are a helpful assistant that translates English to French."},
{"role": "user", "content": "Translate: I love programming."},
{"role": "assistant", "content": "J'adore la programmation."},
{"role": "user", "content": "Translate: I love building applications."}
]
response = model.invoke(conversation)
print(response) # AIMessage("J'adore créer des applications.")#对象形式消息列表,用起来更方便,更易于维护
from langchain.messages import HumanMessage, AIMessage, SystemMessage
conversation = [
SystemMessage("You are a helpful assistant that translates English to French."),
HumanMessage("Translate: I love programming."),
AIMessage("J'adore la programmation."),
HumanMessage("Translate: I love building applications.")
]
response = model.invoke(conversation)
print(response) # AIMessage("J'adore créer des applications.")提示:
如果你的调用返回类型是字符串,请确保你使用的是聊天模型,而不是 LLM。传统的文本补全 LLM 会直接返回字符串。LangChain 的聊天模型以“Chat”为前缀,例如 ChatOpenAI。这里可能有点抽象,我们搞个例子看看
#传统 这是旧式的文本补全模型。当你调用它时,它直接给你一个字符串。
from langchain_community.llms import OpenAI

# 注意这里使用的是 langchain_community.llms 下的 OpenAI,不是 ChatOpenAI
llm = OpenAI(temperature=0)

# 调用
response = llm.invoke("讲个笑话")

# 验证类型
print(type(response))
# 输出: <class 'str'> (直接就是字符串)

print(response)
# 输出: 有一天,0碰到了8,0不屑地看了8一眼说:“胖就胖呗,还系什么腰带啊!”
#这是现代的标准。当你调用它时,它返回一个包含文本和其他元数据(如响应元数据、使用量等)的对象
from langchain_openai import ChatOpenAI

# 注意这里使用的是 ChatOpenAI
chat_model = ChatOpenAI(temperature=0)

# 调用
response = chat_model.invoke("讲个笑话")

# 验证类型
print(type(response))
# 输出: <class 'langchain_core.messages.ai.AIMessage'> (是一个消息对象)

# 如果你想获取里面的字符串内容,需要访问 .content 属性
print(response.content)
# 输出: 有一天,0碰到了8,0不屑地看了8一眼说:“胖就胖呗,还系什么腰带啊!”
5.4.2 stream
大多数模型能够在生成内容的同时进行流式输出。通过逐步显示输出结果,流式传输能够显著改善用户体验,尤其是对于较长的回复。能实现打字机效果,刚开始的时候会觉得新奇,后面的你应该都不会看它在哪里一个一个输出,所以这玩意不能滥用。
调用 stream() 方法会返回一个迭代器,该迭代器会在生成输出时逐步产出内容块。你可以使用循环来实时处理每一个内容块。下面看看两种写法例子
#基本文本流
for chunk in model.stream("Why do parrots have colorful feathers?"):
    print(chunk.text, end="|", flush=True)
#响应内容通过类型区分是谁输出的
for chunk in model.stream("What color is the sky?"):
for block in chunk.content_blocks:
if block["type"] == "reasoning" and (reasoning := block.get("reasoning")):
print(f"Reasoning: {reasoning}")
elif block["type"] == "tool_call_chunk":
print(f"Tool call chunk: {block}")
elif block["type"] == "text":
print(block["text"])
else:
... 与 invoke() 不同,invoke() 是在模型完成整个响应生成后才返回单个 AIMessage,而 stream() 则返回多个 AIMessageChunk 对象,每个对象包含输出文本的一部分。重要的是,流中的每个分块都设计为可以通过累加汇总成一条完整的消息:
full = None  # None | AIMessageChunk
for chunk in model.stream("What color is the sky?"):
    full = chunk if full is None else full + chunk
    print(full.text)

# The
# The sky
# The sky is
# The sky is typically
# The sky is typically blue
# ...

print(full.content_blocks)
# [{"type": "text", "text": "The sky is typically blue..."}]
生成的消息可以与使用 invoke() 生成的消息一样处理——例如,它可以被聚合到消息历史中,并作为对话上下文传回给模型。
只有当程序中的所有步骤都知道如何处理数据块流时,流式传输才能正常工作。例如,一个不具备流式处理能力的应用程序,可能是那种需要先将整个输出内容存储在内存中,然后才能进行处理的应用。
上面这段话其实要说的就是假如你的下游需要接收一个完整的内容,但是你的产出是一个流,下游是没有办法用的。如果你真要这样干,你就需要像上面一样等汇总所有数据成一个完整内容。
高级流主题
1 流事件
LangChain 聊天模型还可以使用 astream_events() 来流式传输语义事件。
这简化了基于事件类型和其他元数据的过滤过程,并会在后台自动聚合完整的消息。请参见下方的示例:
async for event in model.astream_events("Hello"):

    if event["event"] == "on_chat_model_start":
        print(f"Input: {event['data']['input']}")

    elif event["event"] == "on_chat_model_stream":
        print(f"Token: {event['data']['chunk'].text}")

    elif event["event"] == "on_chat_model_end":
        print(f"Full message: {event['data']['output'].text}")

    else:
        pass
输出
| Input: Hello Token: Hi Token: there Token: ! Token: How Token: can Token: I ... Full message: Hi there! How can I help today? |
2 自动流聊天模型
LangChain 简化了聊天模型的流式传输,它会在特定情况下自动启用流式模式,即使你没有显式调用流式方法。当你使用非流式的 invoke 方法,但仍希望流式传输整个应用程序(包括聊天模型的中间结果)时,这一点特别有用。例如,在 LangGraph 代理中,你可以在节点内调用 model.invoke(),但如果在流式模式下运行,LangChain 会自动委托给流式处理。
🛠️ 工作原理
当你调用 invoke() 时,如果 LangChain 检测到你要流式传输整个应用程序,它会自动切换到内部流式模式。对于使用 invoke 的代码而言,调用的结果是一样的;然而,在聊天模型进行流式传输时,LangChain 会负责在其回调系统中触发 on_llm_new_token 事件。回调事件允许 LangGraph 的 stream() 和 astream_events() 实时呈现聊天模型的输出。
5.4.3 批调用
对模型的多个独立请求进行批处理可以显著提高性能并降低成本,因为处理过程可以并行进行
responses = model.batch([
    "Why do parrots have colorful feathers?",
    "How do airplanes fly?",
    "What is quantum computing?"
])
for response in responses:
    print(response)
本节介绍聊天模型的 batch() 方法,该方法在客户端并行执行模型调用。它与 OpenAI 或 Anthropic 等推理服务商提供的批处理 API 不同
默认情况下,batch() 只会返回整个批次的最终输出。如果你希望在每个输入生成完成后就立即收到其输出,可以使用 batch_as_completed() 来流式获取结果。
for response in model.batch_as_completed([
    "Why do parrots have colorful feathers?",
    "How do airplanes fly?",
    "What is quantum computing?"
]):
    print(response)

#使用这种模式可能会乱序,输出中有index可以和原始顺序对应
当调用batch,需要处理大量输出时,需要传入最大并行度参数
model.batch(
    list_of_inputs,
    config={
        'max_concurrency': 5,  # Limit to 5 parallel calls
    }
)
5.5 工具调用
模型可以请求调用工具来执行各种任务,例如从数据库获取数据、搜索网页或运行代码。工具由以下两部分组成:
- 模式:包括工具的名称、描述和/或参数定义(通常是 JSON Schema)。
- 要执行的函数或协程
下面是用户与模型之间基本的工具调用流程:
为了使模型能够使用你定义的工具,必须使用 bind_tools 将它们绑定。在后续的调用中,模型可以根据需要选择调用任何已绑定的工具。某些模型提供商提供了内置工具,可以通过模型参数或调用参数来启用(例如 ChatOpenAI、ChatAnthropic)。有关详情,请查阅相应提供商的参考文档。前面提到如果使用agent,提前绑定会和结构化冲突,这点要注意。
from langchain.tools import tool

@tool
def get_weather(location: str) -> str:
    """Get the weather at a location."""
    return f"It's sunny in {location}."


model_with_tools = model.bind_tools([get_weather])

response = model_with_tools.invoke("What's the weather like in Boston?")
for tool_call in response.tool_calls:
    # View tool calls made by the model
    print(f"Tool: {tool_call['name']}")
print(f"Args: {tool_call['args']}")当绑定用户定义的工具时,模型的响应会包含执行工具的请求,如果你是在不配合智能体(Agent)的情况下单独使用模型,那么你需要负责执行所请求的工具(如果不结合agent使用,模型只会思考,根据提问会推理到要调用工具,但是不会实际调用,也就是不会真正触发get_weather执行),并将结果返回给模型,以便其在后续的推理中使用,而如果你使用的是智能体,那么智能体循环会自动为你处理工具的整个执行流程。
工具执行循环
当模型返回工具调用请求时,你需要执行相应的工具,并将结果回传给模型。
这就形成了一个对话循环,模型可以利用工具的返回结果来生成最终的回答。LangChain 提供的智能体(Agent)抽象封装可以替你自动处理这种编排工作
# Bind (potentially multiple) tools to the model
model_with_tools = model.bind_tools([get_weather])

# Step 1: Model generates tool calls
messages = [{"role": "user", "content": "What's the weather in Boston?"}]
ai_msg = model_with_tools.invoke(messages)
messages.append(ai_msg)

# Step 2: Execute tools and collect results
for tool_call in ai_msg.tool_calls:
    # Execute the tool with the generated arguments
    tool_result = get_weather.invoke(tool_call)
    messages.append(tool_result)

# Step 3: Pass results back to model for final response
final_response = model_with_tools.invoke(messages)
print(final_response.text)
# "The current weather in Boston is 72°F and sunny."
工具返回的每个 ToolMessage 都包含一个 tool_call_id,它与最初的工具调用相匹配,帮助模型将结果与请求关联起来。
强制调用工具
默认情况下,模型可以根据用户的输入自由选择使用哪个已绑定的工具。不过,你可能想要强制指定工具的选择,确保模型使用某个特定的工具,或者只能从给定的列表中选用工具
#强制使用工具
model_with_tools = model.bind_tools([tool_1], tool_choice="any")
#强制使用指定的工具
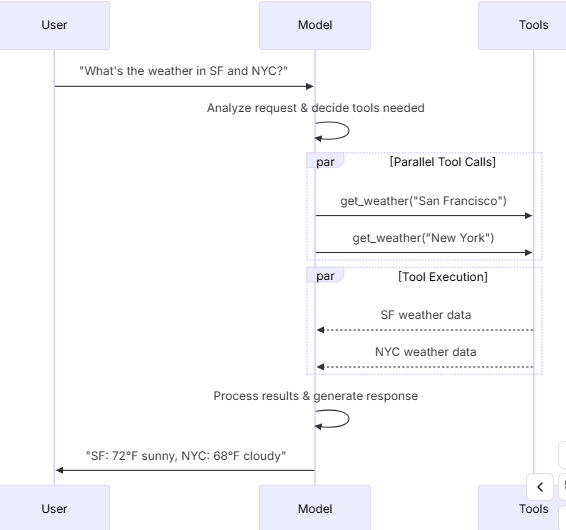
model_with_tools = model.bind_tools([tool_1], tool_choice="tool_1")并行工具调用
许多模型都支持在适当的时候并行调用多个工具。这使得模型能够同时从不同来源收集信息
model_with_tools = model.bind_tools([get_weather])

response = model_with_tools.invoke(
    "What's the weather in Boston and Tokyo?"
)


# The model may generate multiple tool calls
print(response.tool_calls)
# [
#   {'name': 'get_weather', 'args': {'location': 'Boston'}, 'id': 'call_1'},
#   {'name': 'get_weather', 'args': {'location': 'Tokyo'}, 'id': 'call_2'},
# ]


# Execute all tools (can be done in parallel with async)
results = []
for tool_call in response.tool_calls:
    if tool_call['name'] == 'get_weather':
        result = get_weather.invoke(tool_call)
    ...
    results.append(result)
上面这段代码的意思模型给你了解析了入参,自己拿去做并行调用,一般不会这么干,后面都应该会用agent代理。模型会根据所请求操作之间的独立性,智能地判断何时适合进行并行执行。
大多数支持工具调用的模型默认都开启了并行工具调用功能。有些模型(包括 OpenAI 和 Anthropic)允许你禁用此功能。若要禁用,请设置 parallel_tool_calls=False。
model.bind_tools([get_weather], parallel_tool_calls=False)流式工具调用
在流式响应中,工具调用是通过 ToolCallChunk 逐步构建的。这让你能够在工具调用生成时就实时看到,而无需等待完整的响应结束。
for chunk in model_with_tools.stream(
    "What's the weather in Boston and Tokyo?"
):
    # Tool call chunks arrive progressively
    for tool_chunk in chunk.tool_call_chunks:
        if name := tool_chunk.get("name"):
            print(f"Tool: {name}")
        if id_ := tool_chunk.get("id"):
            print(f"ID: {id_}")
        if args := tool_chunk.get("args"):
            print(f"Args: {args}")

# Output:
# Tool: get_weather
# ID: call_SvMlU1TVIZugrFLckFE2ceRE
# Args: {"lo
# Args: catio
# Args: n": "B
# Args: osto
# Args: n"}
# Tool: get_weather
# ID: call_QMZdy6qInx13oWKE7KhuhOLR
# Args: {"lo
# Args: catio
# Args: n": "T
# Args: okyo
# Args: "}
5.6 结构化输出
我们可以要求模型按照给定的模式(Schema)来提供响应。这样做的好处是,能确保输出结果很容易被解析,方便后续的处理流程。LangChain 支持多种模式类型,也提供了多种方法来强制实施结构化输出
#pydantic 属于第三方库,要安装,看起来还行
from pydantic import BaseModel, Field

class Movie(BaseModel):
    """A movie with details."""
    title: str = Field(description="The title of the movie")
    year: int = Field(description="The year the movie was released")
    director: str = Field(description="The director of the movie")
    rating: float = Field(description="The movie's rating out of 10")

model_with_structure = model.with_structured_output(Movie)
response = model_with_structure.invoke("Provide details about the movie Inception")
print(response)  # Movie(title="Inception", year=2010, director="Christopher Nolan", rating=8.8)
#typing_extensions 这玩意也需要安装,语法看起来怪怪的,还有省略号
#这该死的玩意连AI都费解,不行就叫黑魔法哈哈🤣
from typing_extensions import TypedDict, Annotated

class MovieDict(TypedDict):
    """A movie with details."""
    title: Annotated[str, ..., "The title of the movie"]
    year: Annotated[int, ..., "The year the movie was released"]
    director: Annotated[str, ..., "The director of the movie"]
    rating: Annotated[float, ..., "The movie's rating out of 10"]

model_with_structure = model.with_structured_output(MovieDict)
response = model_with_structure.invoke("Provide details about the movie Inception")
print(response)  # {'title': 'Inception', 'year': 2010, 'director': 'Christopher Nolan', 'rating': 8.8}
import json
json_schema = {
"title": "Movie",
"description": "A movie with details",
"type": "object",
"properties": {
"title": {
"type": "string",
"description": "The title of the movie"
},
"year": {
"type": "integer",
"description": "The year the movie was released"
},
"director": {
"type": "string",
"description": "The director of the movie"
},
"rating": {
"type": "number",
"description": "The movie's rating out of 10"
}
},
"required": ["title", "year", "director", "rating"]
}
model_with_structure = model.with_structured_output(
json_schema,
method="json_schema",
)
response = model_with_structure.invoke("Provide details about the movie Inception")
print(response) # {'title': 'Inception', 'year': 2010, ...}看来第一个写法更好看(实际上用了和第二个类似的黑魔法,去它娘的黑魔法🤣),第二个也是黑魔法,不过把黑魔法暴露出来了,第三个看起来有不简洁。
我们来看看第一个的黑魔法:
#Field 能同时满足int,或者str Field返回...作为占位符,
#类定义阶段赋的值(Field),是用来定义规则的;而你在实例化阶段传的值("星际穿越")
title: str = Field(description="The title of the movie")
year: int = Field(description="The year the movie was released")
方法参数
不同的 AI 提供商支持不同的结构化输出方法。你可以通过 method 参数来指定使用哪种方式:
'json_schema':- 含义:使用提供商提供的专用结构化输出功能。
- 特点:这是目前最先进、最可靠的方法。模型会严格遵循你定义的 JSON 结构,甚至会在生成时进行强制约束。
'function_calling':- 含义:通过强制调用工具来实现结构化输出。
- 特点:这其实是个“障眼法”。你把想要的结构伪装成一个“工具/函数”,强制 AI 调用这个工具。AI 返回的工具参数就是你要的结构化数据。
'json_mode':- 含义:这是
'json_schema'的前身(较旧的方法)。 - 特点:它只能保证 AI 输出的是合法的 JSON 格式,但不能保证 JSON 里的内容完全符合你的字段要求。你需要自己在提示词里反复强调“必须包含这些字段”,否则模型可能会漏掉字段。
- 含义:这是
包含原始数据
- 设置
include_raw=True:- 如果你需要同时获取解析后的数据(比如 Python 字典)和原始的 AI 消息对象(包含 token 用量、原始文本等元数据),可以开启这个选项。
数据验证
- Pydantic 模型:
- 自带验证。如果 AI 输出的数据格式不对(比如该填数字的地方填了文字),Pydantic 会自动报错或尝试修正,非常省心。
- TypedDict 和 JSON Schema:
- 需要手动验证。LangChain 拿到数据后,不会自动检查数据对不对,你需要自己写代码去校验。
时返回原始的 AIMessage 对象和解析后的数据往往非常有用,因为这样你就能获取到像 Token 用量这类的响应元数据。想要实现这一点,只需在调用 with_structured_output 时设置 include_raw=True 即可
from pydantic import BaseModel, Field

class Movie(BaseModel):
    """A movie with details."""
    title: str = Field(description="The title of the movie")
    year: int = Field(description="The year the movie was released")
    director: str = Field(description="The director of the movie")
    rating: float = Field(description="The movie's rating out of 10")

model_with_structure = model.with_structured_output(Movie, include_raw=True)
response = model_with_structure.invoke("Provide details about the movie Inception")
response
# {
#     "raw": AIMessage(...),
#     "parsed": Movie(title=..., year=..., ...),
#     "parsing_error": None,
# }
模式能被内嵌
#pydantic
from pydantic import BaseModel, Field

class Actor(BaseModel):
    name: str
    role: str

class MovieDetails(BaseModel):
    title: str
    year: int
    cast: list[Actor]
    genres: list[str]
    budget: float | None = Field(None, description="Budget in millions USD")

model_with_structure = model.with_structured_output(MovieDetails)
#TypedDict
from typing_extensions import Annotated, TypedDict
class Actor(TypedDict):
name: str
role: str
class MovieDetails(TypedDict):
title: str
year: int
cast: list[Actor]
genres: list[str]
budget: Annotated[float | None, ..., "Budget in millions USD"]
model_with_structure = model.with_structured_output(MovieDetails)5.7 高级主题
5.7.1 模型档案
LangChain 聊天模型可以通过一个 profile 属性来展示其支持的功能和能力的字典
model.profile
# {
#   "max_input_tokens": 400000,
#   "image_inputs": True,
#   "reasoning_output": True,
#   "tool_calling": True,
#   ...
# }
#这里只是一个例子,更多的设置参考API文档
大部分模型档案数据由 models.dev 项目提供支持,这是一个提供模型能力数据的开源项目。为了适配 LangChain 的使用场景,这些数据被增加了额外的字段。随着上游项目的演进,这些增补内容也会保持同步更新。模型档案数据使得应用程序能够动态地适应模型的能力(或绕过其限制)。例如:
- 摘要中间件可以根据模型的上下文窗口大小来触发摘要操作。
- create_agent 中的结构化输出策略可以被自动推断(例如,通过检查是否支持原生的结构化输出功能)。
- 可以根据支持的模态(如文本、图像)和最大输入令牌数,对模型输入进行门控控制。
- Deep Agents CLI 会过滤交互式模型切换器,仅显示那些档案中报告支持
tool_calling(工具调用)和文本 I/O 的模型,并在选择器的详情视图中显示上下文窗口大小和能力标志。
模型档案目前还是测试版功能,其格式可能会发生变化。如果模型档案数据缺失、过时或不正确,可以对其进行更改
选择1(快速修复)
你可以使用任何有效的档案(profile)来实例化一个聊天模型
custom_profile = {
    "max_input_tokens": 100_000,
    "tool_calling": True,
    "structured_output": True,
    # ...
}
model = init_chat_model("...", profile=custom_profile)
该档案(profile)也是一个普通的字典,可以直接进行原地更新。如果模型实例是共享的,请考虑使用 model_copy 来避免修改共享状态。
new_profile = model.profile | {"key": "value"}
model.model_copy(update={"profile": new_profile})
选择2(上游修复数据)
数据的主要来源是 models.dev 项目。这些数据会与 LangChain 集成包中的额外字段和覆盖配置进行合并,并随这些包一起发布。
可以通过以下流程更新模型档案数据:
- (如有需要)通过向 GitHub 上的仓库提交 Pull Request,更新
models.dev的源数据。 - (如有需要)通过向 LangChain 集成包提交 Pull Request,更新
langchain_<package>/data/profile_augmentations.toml中的额外字段和覆盖配置。 - 使用
langchain-model-profiles命令行工具从models.dev拉取最新数据,合并增强配置,并更新档案数据。
pip install langchain-model-profiles

langchain-profiles refresh --provider <provider> --data-dir <data_dir>
该命令会执行以下操作:
- 从
models.dev下载<provider>(提供商)的最新数据 - 合并
<data_dir>(数据目录)中profile_augmentations.toml文件里的增强配置 - 将合并后的档案写入
<data_dir>目录下的profiles.py文件中
例如
uv run --with langchain-model-profiles --provider anthropic --data-dir langchain_anthropic/data5.7.2 多模态
某些模型能够处理并返回图像、音频和视频等非文本数据。你可以通过提供内容块,将非文本数据传递给模型。所有具备底层多模态能力的 LangChain 聊天模型均支持以下格式:
- 跨提供商标准格式的数据(请参阅我们的消息指南)
- OpenAI 聊天补全格式
- 特定提供商的原生格式(例如,Anthropic 模型接受 Anthropic 原生格式)
有些模型能够在响应中返回多模态数据。如果被调用执行此操作,生成的 AI 消息将包含具有多模态类型的内容块
response = model.invoke("Create a picture of a cat")
print(response.content_blocks)
# [
#     {"type": "text", "text": "Here's a picture of a cat"},
#     {"type": "image", "base64": "...", "mime_type": "image/jpeg"},
# ]
5.7.3 推理
许多模型都能够执行多步推理来得出结论。这涉及将复杂的问题分解为更小、更易于管理的步骤。如果底层模型支持,你可以将这一推理过程展示出来,以便更好地理解模型是如何得出最终答案的。
#流式
for chunk in model.stream("Why do parrots have colorful feathers?"):
    reasoning_steps = [r for r in chunk.content_blocks if r["type"] == "reasoning"]
    print(reasoning_steps if reasoning_steps else chunk.text)

#一次给出结果
response = model.invoke("Why do parrots have colorful feathers?")
reasoning_steps = [b for b in response.content_blocks if b["type"] == "reasoning"]
print(" ".join(step["reasoning"] for step in reasoning_steps))
根据模型的不同,你有时可以指定它在推理上投入的精力水平。同样,你也可以要求模型完全关闭推理功能。这种设置的形式可能是分类式的“层级”(例如“低”或“高”),也可能是以整数表示的 Token 预算
5.7.4 本地模型
LangChain 支持在你自己的硬件上本地运行模型。这在数据隐私至关重要、你想要调用自定义模型,或者希望避免使用云端模型所产生的费用时,非常有用。Ollama 是在本地运行聊天和嵌入模型的最简单方法之一。
5.7.5 提示词缓存
许多服务提供商都提供提示词缓存功能,以减少重复处理相同 Token 时的延迟和成本。这些功能可以分为隐式和显式两种:
- 隐式提示词缓存: 当请求命中缓存时,服务提供商会自动给予成本优惠。例如:OpenAI 和 Gemini。
- 显式缓存: 服务提供商允许你手动指定缓存点,从而获得更大的控制权或确保成本节省。例如:
ChatOpenAI(通过 prompt_cache_key 参数)
Anthropic 的 AnthropicPromptCachingMiddleware
Gemini
AWS Bedrock
5.7.6 服务端工具使用
某些服务提供商支持服务端工具调用循环:模型可以在单次对话回合中,与网络搜索、代码解释器和其他工具进行交互,并分析结果。如果模型在服务端调用了工具,响应消息的内容将包含代表该工具调用及其结果的内容。访问响应消息的内容块,将以一种与提供商无关的格式返回服务端工具调用和结果:
#Invoke with server-side tool use
from langchain.chat_models import init_chat_model

model = init_chat_model("gpt-4.1-mini")

tool = {"type": "web_search"}
model_with_tools = model.bind_tools([tool])

response = model_with_tools.invoke("What was a positive news story from today?")
print(response.content_blocks)
这段话其实是在告诉你,现在的模型不仅能“陪聊”,还能“干活”,而且这个“干活”的过程是全自动的:
- 单次对话回合: 以前可能需要你问一句,模型调个工具,你再问一句,模型分析结果。现在,你只需要问一句,模型自己就能完成“调用工具 -> 获取结果 -> 分析结果”这一整套流程。
- 内容块: 模型在返回最终答案的同时,也会把“我调用了什么工具”以及“工具返回了什么结果”这些信息,打包在“内容块”里一起给你。
- 与提供商无关的格式: 不管你是用的 OpenAI、Anthropic 还是其他家的模型,LangChain 都会把这些工具调用的信息,统一转换成一种标准的格式,让你不用去管不同服务商之间的差异。
[
    {
        "type": "server_tool_call",
        "name": "web_search",
        "args": {
            "query": "positive news stories today",
            "type": "search"
        },
        "id": "ws_abc123"
    },
    {
        "type": "server_tool_result",
        "tool_call_id": "ws_abc123",
        "status": "success"
    },
    {
        "type": "text",
        "text": "Here are some positive news stories from today...",
        "annotations": [
            {
                "end_index": 410,
                "start_index": 337,
                "title": "article title",
                "type": "citation",
                "url": "..."
            }
        ]
    }
]
5.7.7 速率限制
许多聊天模型服务提供商都会限制在给定时间段内可以进行的调用次数。如果你达到了速率限制,通常会收到来自服务商的速率限制错误响应,并且需要等待一段时间才能发出更多请求。
为了帮助管理速率限制,聊天模型集成接受一个 rate_limiter 参数,可以在初始化时提供该参数,以控制发出请求的速率。LangChain 自带一个(可选的)内置内存速率限制器。这个限制器是线程安全的,可以在同一个进程中被多个线程共享使用
from langchain_core.rate_limiters import InMemoryRateLimiter

rate_limiter = InMemoryRateLimiter(
    requests_per_second=0.1,  # 1 request every 10s
    check_every_n_seconds=0.1,  # Check every 100ms whether allowed to make a request
    max_bucket_size=10,  # Controls the maximum burst size.
)

model = init_chat_model(
    model="gpt-5",
    model_provider="openai",
    rate_limiter=rate_limiter
)
上面提供的速率限制器只能限制单位时间内的请求数量。如果你还需要根据请求的大小(比如 Token 数量或数据量)来进行限制,它就帮不上忙了。
5.7.8 基础URL与代理设置
对于那些实现了 OpenAI 聊天补全 API 的服务提供商,你可以配置一个自定义的基础 URL。也就是说实现了OpengAI,协议的其他供应商,只需要改一下url地址就行了。
设置 model_provider="openai"(或直接使用 ChatOpenAI)是针对官方 OpenAI API 规范的。来自路由器和代理的特定于提供商的字段可能无法被提取或保留。
对于 OpenRouter 和 LiteLLM,建议使用专用的集成方式:
- OpenRouter: 通过
ChatOpenRouter(来自langchain-openrouter包) - LiteLLM: 通过
ChatLiteLLM或ChatLiteLLMRouter(来自langchain-litellm包)
虽然很多服务都兼容 OpenAI 的格式,但它们也有自己的“私房话”(特有参数):
- 通用接口的局限: 如果你用标准的
ChatOpenAI去连 OpenRouter 或 LiteLLM,虽然能通,但就像是用“普通话”聊天,对方的一些“方言”(特有功能或参数)你可能听不懂,或者传不过去。 - 专用接口的优势: 官方专门为这些服务写了特定的类(比如
ChatOpenRouter),这些类不仅懂“普通话”,还懂对方的“方言”,能把所有高级功能都用起来。
简单来说,就是虽然通用的 OpenAI 接口能连上这些服务,但为了能用全它们的所有功能(比如特定的路由策略或参数),最好还是安装并使用官方专门为它们准备的“专用连接器”。
#自定义BASE_URL
model = init_chat_model(
    model="MODEL_NAME",
    model_provider="openai",
    base_url="BASE_URL",
    api_key="YOUR_API_KEY",
)
对于需要 HTTP 代理的部署环境,部分模型集成支持代理配置
from langchain_openai import ChatOpenAI

model = ChatOpenAI(
    model="gpt-4.1",
    openai_proxy="http://proxy.example.com:8080"
)
5.7.9 对数概率
某些模型可以配置为返回词元(token)级别的对数概率,这代表了某个词元出现的可能性。你只需在初始化模型时设置 logprobs 参数即可实现
model = init_chat_model(
    model="gpt-4.1",
    model_provider="openai"
).bind(logprobs=True)

response = model.invoke("Why do parrots talk?")
print(response.response_metadata["logprobs"])
5.7.10 token使用
许多模型提供商会在调用响应中返回令牌(Token)使用量信息。只要提供了这些信息,它们就会被包含在相应模型生成的 AIMessage 对象里
有些提供商的 API(特别是 OpenAI 和 Azure OpenAI 的聊天补全接口),要求用户必须主动选择加入,才能在流式传输(streaming) 的场景下接收令牌使用量数据。通俗点说,平时一次性获取结果时,账单信息(Token 用量)通常是直接给的;但在流式传输(像打字机一样一个字一个字往外蹦)时,为了节省带宽或出于隐私设置,OpenAI 默认是不发这个数据的,你得显式地告诉它:“嘿,我要统计用量,请把 Token 数据发给我。”
你可以使用回调函数或者上下文管理器来追踪整个应用中所有模型的令牌累计数量,如下所示
#回调处理器
from langchain.chat_models import init_chat_model
from langchain_core.callbacks import UsageMetadataCallbackHandler

model_1 = init_chat_model(model="gpt-4.1-mini")
model_2 = init_chat_model(model="claude-haiku-4-5-20251001")

callback = UsageMetadataCallbackHandler()
result_1 = model_1.invoke("Hello", config={"callbacks": [callback]})
result_2 = model_2.invoke("Hello", config={"callbacks": [callback]})
print(callback.usage_metadata)
#上下文管理
from langchain.chat_models import init_chat_model
from langchain_core.callbacks import get_usage_metadata_callback
model_1 = init_chat_model(model="gpt-4.1-mini")
model_2 = init_chat_model(model="claude-haiku-4-5-20251001")
with get_usage_metadata_callback() as cb:
model_1.invoke("Hello")
model_2.invoke("Hello")
print(cb.usage_metadata)5.7.11 调用配置
在调用模型时,你可以通过 config 参数传入一个 RunnableConfig 字典来传递额外的配置。这能让你在运行时灵活地控制执行行为、回调函数以及元数据追踪
response = model.invoke(
    "Tell me a joke",
    config={
        "run_name": "joke_generation",      # Custom name for this run
        "tags": ["humor", "demo"],          # Tags for categorization
        "metadata": {"user_id": "123"},     # Custom metadata
        "callbacks": [my_callback_handler], # Callback handlers
    }
)
这些配置值在以下几种情况中特别有用:
- 利用 LangSmith 进行调试和链路追踪
- 实现自定义的日志记录或系统监控
- 在生产环境中控制资源的使用情况
- 在复杂的处理流水线中追踪每一次调用
5.7.12 可配置模型
你还可以通过指定 configurable_fields 来创建一个运行时可配置的模型。如果你没有显式指定 model 的值,那么默认情况下,model 和 model_provider 这两个参数就是可配置的
from langchain.chat_models import init_chat_model

configurable_model = init_chat_model(temperature=0)

configurable_model.invoke(
    "what's your name",
    config={"configurable": {"model": "gpt-5-nano"}},  # Run with GPT-5-Nano
)
configurable_model.invoke(
    "what's your name",
    config={"configurable": {"model": "claude-sonnet-4-6"}},  # Run with Claude
)我们可以创建一个带有默认模型值的可配置模型,指定哪些参数是可配置的,并且还可以给这些可配置的参数添加前缀。你不仅可以预设好积木的样子(默认值),决定哪几块能换(指定参数),还能给它们贴上专属标签(添加前缀)以防搞混。
first_model = init_chat_model(
        model="gpt-4.1-mini",
        temperature=0,
        configurable_fields=("model", "model_provider", "temperature", "max_tokens"),
        config_prefix="first",  # Useful when you have a chain with multiple models
)

first_model.invoke("what's your name")
first_model.invoke(
"what's your name",
config={
"configurable": {
"first_model": "claude-sonnet-4-6",
"first_temperature": 0.5,
"first_max_tokens": 100,
}
},
) 我们可以在可配置模型上调用诸如 bind_tools、with_structured_output、with_configurable 等声明性操作,并且可以像使用普通实例化的聊天模型对象一样,将可配置模型串联(chain)起来使用
from pydantic import BaseModel, Field


class GetWeather(BaseModel):
    """Get the current weather in a given location"""

        location: str = Field(description="The city and state, e.g. San Francisco, CA")


class GetPopulation(BaseModel):
    """Get the current population in a given location"""

        location: str = Field(description="The city and state, e.g. San Francisco, CA")


model = init_chat_model(temperature=0)
model_with_tools = model.bind_tools([GetWeather, GetPopulation])

model_with_tools.invoke(
    "what's bigger in 2024 LA or NYC", config={"configurable": {"model": "gpt-4.1-mini"}}
).tool_calls
下面是模型的一个推理调用产出,前面的两个类只是一个工具模板信息,并不是真正可以调用执行的工具。
[
    {
        'name': 'GetPopulation',
        'args': {'location': 'Los Angeles, CA'},
        'id': 'call_Ga9m8FAArIyEjItHmztPYA22',
        'type': 'tool_call'
    },
    {
        'name': 'GetPopulation',
        'args': {'location': 'New York, NY'},
        'id': 'call_jh2dEvBaAHRaw5JUDthOs7rt',
        'type': 'tool_call'
    }
]
model_with_tools.invoke(
"what's bigger in 2024 LA or NYC",
config={"configurable": {"model": "claude-sonnet-4-6"}},
).tool_calls[
{
'name': 'GetPopulation',
'args': {'location': 'Los Angeles, CA'},
'id': 'toolu_01JMufPf4F4t2zLj7miFeqXp',
'type': 'tool_call'
},
{
'name': 'GetPopulation',
'args': {'location': 'New York City, NY'},
'id': 'toolu_01RQBHcE8kEEbYTuuS8WqY1u',
'type': 'tool_call'
}
]到此,官方整个说明就解读的差不多了,有些很细的东西可以翻看官方连接。
6 messages
消息是 LangChain 中模型上下文的基本单位。它们代表了模型的输入和输出,承载着在与大语言模型交互时,描述对话状态所需的内容和元数据。
消息是包含以下内容的对象:
- 角色:识别消息类型(例如:系统、用户)
- 内容:代表消息的实际内容(如文本、图像、音频、文档等)
- 元数据:可选字段,例如响应信息、消息 ID 和令牌使用量
LangChain 提供了一种标准的消息类型,适用于所有模型提供商,确保无论调用哪种模型,都能表现出一致的行为。
6.1 基本使用
使用消息最简单的方法,就是创建消息对象,然后在调用模型时把它们传进去
from langchain.chat_models import init_chat_model
from langchain.messages import HumanMessage, AIMessage, SystemMessage

model = init_chat_model("gpt-5-nano")

system_msg = SystemMessage("You are a helpful assistant.")
human_msg = HumanMessage("Hello, how are you?")

# Use with chat models
messages = [system_msg, human_msg]
response = model.invoke(messages)  # Returns AIMessage
文本提示词
文本提示词就是字符串——非常适合那些不需要保留对话历史的简单生成任务。
response = model.invoke("Write a haiku about spring")在以下情况请使用文本提示词:
- 你只有一个独立的请求(单次任务)
- 你不需要保留对话历史(不用记性)
- 你想要代码复杂度最低(怎么简单怎么来)
消息提示词
你也可以通过提供一个消息对象列表,将一组消息传给模型
from langchain.messages import SystemMessage, HumanMessage, AIMessage

messages = [
    SystemMessage("You are a poetry expert"),
    HumanMessage("Write a haiku about spring"),
    AIMessage("Cherry blossoms bloom...")
]
response = model.invoke(messages)
在以下情况请使用消息提示词:
- 管理多轮对话(需要模型有记性)
- 处理多模态内容(比如图片、音频、文件)
- 需要包含系统指令(给模型立规矩)
字典格式消息
你也可以直接使用 OpenAI 聊天补全格式来指定消息
messages = [
    {"role": "system", "content": "You are a poetry expert"},
    {"role": "user", "content": "Write a haiku about spring"},
    {"role": "assistant", "content": "Cherry blossoms bloom..."}
]
response = model.invoke(messages)
6.2 消息类型
有四类消息
- 系统消息:告诉模型该如何表现,并为交互提供背景设定(相当于给演员的“剧本”或“人设”)。
- 人类消息:代表用户的输入和与模型的交互(就是“你”说的话)。
- AI 消息:模型生成的回复,包括文本内容、工具调用指令以及元数据(就是“它”说的话或做的动作)。
- 工具消息:代表工具调用的输出结果(就是“外部工具”反馈给模型的数据)
6.2.1 System message
SystemMessage(系统消息)代表了一组初始指令,用来预热模型的行为。你可以使用系统消息来设定基调、定义模型的角色,并建立回复的准则
#基本指导
system_msg = SystemMessage("You are a helpful coding assistant.")

messages = [
    system_msg,
    HumanMessage("How do I create a REST API?")
]
response = model.invoke(messages)
#人设细节
from langchain.messages import SystemMessage, HumanMessage
system_msg = SystemMessage("""
You are a senior Python developer with expertise in web frameworks.
Always provide code examples and explain your reasoning.
Be concise but thorough in your explanations.
""")
messages = [
system_msg,
HumanMessage("How do I create a REST API?")
]
response = model.invoke(messages)6.2.2 Human message
HumanMessage(人类消息)代表用户的输入和交互。它们可以包含文本、图像、音频、文件以及任何其他形式的多模态内容
#使用消息对象
response = model.invoke([
  HumanMessage("What is machine learning?")
])

# Using a string is a shortcut for a single HumanMessage
response = model.invoke("What is machine learning?")

#还可以添加元数据
human_msg = HumanMessage(
    content="Hello!",
    name="alice",  # Optional: identify different users
    id="msg_123",  # Optional: unique identifier for tracing
)
6.2.3 AI message
AIMessage(AI 消息)代表模型调用后的输出。它们可以包含多模态数据、工具调用指令,以及你稍后可以访问的特定于提供商的元数据
response = model.invoke("Explain AI")
print(type(response))  # <class 'langchain.messages.AIMessage'>
AIMessage 对象是调用模型时返回的结果,它包含了响应中所有的相关元数据。不同的服务提供商对各类消息的权重和处理方式有所不同,这意味着有时手动创建一个新的 AIMessage 对象,并把它作为“仿佛是模型生成的”内容插入到消息历史中,是非常有帮助的
高级玩法(手动伪造):
有时候,为了让对话更顺畅或者绕过某些限制,你可以“作弊”。比如:
这时候,你就可以自己写代码手动造一个 AIMessage,把它塞进聊天记录里。对模型来说,这看起来就像是它自己刚才说过这话一样。
- 你不想让 AI 废话,想直接替它回答;
- 或者你想在历史记录里“植入”一个假的 AI 回复来引导后续的对话。
from langchain.messages import AIMessage, SystemMessage, HumanMessage

# Create an AI message manually (e.g., for conversation history)
ai_msg = AIMessage("I'd be happy to help you with that question!")

# Add to conversation history
messages = [
    SystemMessage("You are a helpful assistant"),
    HumanMessage("Can you help me?"),
    ai_msg,  # Insert as if it came from the model
    HumanMessage("Great! What's 2+2?")
]

response = model.invoke(messages)| 属性名 | 类型 | 说明 |
|---|---|---|
| text | 字符串 | 消息的文本内容(最直观的文字部分)。 |
| content | 字符串 或 字典列表 | 消息的原始内容(保留了最原始的数据结构)。 |
| content_blocks | 内容块列表 | 消息的标准化内容块(LangChain 统一处理后的格式)。 |
| tool_calls | 字典列表 或 空 | 模型发起的工具调用指令。如果没有调用工具,则为空。 |
| id | 字符串 | 消息的唯一身份证号(由 LangChain 生成或由服务商返回)。 |
| usage_metadata | 字典 或 空 | 用量元数据,通常包含 Token 消耗统计(比如花了多少钱、用了多少字)。 |
| response_metadata | 元数据对象 或 空 | 响应元数据,包含服务商返回的其他技术细节信息。 |
📖 text(纯文本)
- 是什么:它只包含纯文本字符串。
- 作用:它是从原始数据里提取出来的文字部分。
- 场景:当你只想把 AI 说的话打印出来给用户看,或者做简单的字符串处理时,直接用这个。
- 注意:如果 AI 回复的是一张图片或者一个复杂的图表,这个属性通常是空的,或者只包含图片的描述。
📦 content(原始内容)
- 是什么:它保留了完整的原始数据结构。
- 作用:它是一个容器,可能包含文本,也可能包含其他多模态数据(比如图片的 Base64 编码、JSON 对象等)。
- 场景:当你需要处理复杂内容(比如 AI 画了图、写了代码、或者回复了结构化数据)时,你需要看这个属性。
工具调用
工具调用后的消息属于AIMessage,其他结构化数据,比如推理过程或引用来源,也可能出现在消息内容中
from langchain.chat_models import init_chat_model

model = init_chat_model("gpt-5-nano")

def get_weather(location: str) -> str:
    """Get the weather at a location."""
    ...

model_with_tools = model.bind_tools([get_weather])
response = model_with_tools.invoke("What's the weather in Paris?")

for tool_call in response.tool_calls:
    print(f"Tool: {tool_call['name']}")
    print(f"Args: {tool_call['args']}")
    print(f"ID: {tool_call['id']}")
token使用
AIMessage 可以在其 usage_metadata 字段中保存 Token 计数和其他用量元数据
from langchain.chat_models import init_chat_model

model = init_chat_model("gpt-5-nano")

response = model.invoke("Hello!")
response.usage_metadata
{'input_tokens': 8,
'output_tokens': 304,
'total_tokens': 312,
'input_token_details': {'audio': 0, 'cache_read': 0},
'output_token_details': {'audio': 0, 'reasoning': 256}}streaming和chunks
在流式传输过程中,你会收到 AIMessageChunk 对象,它们可以被组合成一个完整的消息对象
chunks = []
full_message = None
for chunk in model.stream("Hi"):
    chunks.append(chunk)
    print(chunk.text)
    full_message = chunk if full_message is None else full_message + chunk
6.2.4 Tool message
对于支持工具调用的模型,AI 消息中可以包含工具调用指令。Tool Message(工具消息)则是用来将单次工具执行的结果传回给模型的,工具可以直接生成 ToolMessage 对象。下面,我们展示一个简单的例子
from langchain.messages import AIMessage
from langchain.messages import ToolMessage

# After a model makes a tool call
# (Here, we demonstrate manually creating the messages for brevity)
ai_message = AIMessage(
    content=[],
    tool_calls=[{
        "name": "get_weather",
        "args": {"location": "San Francisco"},
        "id": "call_123"
    }]
)

# Execute tool and create result message
weather_result = "Sunny, 72°F"
tool_message = ToolMessage(
    content=weather_result,
    tool_call_id="call_123"  # Must match the call ID
)

# Continue conversation
messages = [
    HumanMessage("What's the weather in San Francisco?"),
    ai_message,  # Model's tool call
    tool_message,  # Tool execution result
]
response = model.invoke(messages) # Model processes the result| 属性名 | 类型 | 说明 |
|---|---|---|
| content | 字符串 (必填) | 工具调用的输出结果(转成字符串格式)。这是 AI 能看到的“答案”。 |
| tool_call_id | 字符串 (必填) | 这个回复所对应的工具调用 ID。必须和 AI 之前发出的那个调用 ID 一模一样,用来“对暗号”。 |
| name | 字符串 (必填) | 被调用的工具名称(比如 get_weather 或 search)。 |
| artifact | 字典 (可选) | 工件/附加数据。这部分数据不会发给模型(AI 看不见),但程序员可以在代码里读取使用。 |
artifact 字段用于存储补充数据,这些数据不会发送给模型,但可以通过代码进行访问。这对于存储原始结果、调试信息或供下游处理使用的数据非常有用,同时还能避免弄乱模型的上下文,举个例子,一个检索工具可以从文档中检索出一段文字供模型参考。在这种情况下,消息内容包含的是模型将要引用的文本,而 artifact 则可以包含文档标识符或其他元数据,供应用程序使用(例如用于渲染页面)。请看下面的例子
from langchain.messages import ToolMessage

# Sent to model
message_content = "It was the best of times, it was the worst of times."

# Artifact available downstream
artifact = {"document_id": "doc_123", "page": 0}

tool_message = ToolMessage(
    content=message_content,
    tool_call_id="call_123",
    name="search_books",
    artifact=artifact,
)
6.3 消息内容
你可以把消息的 content 想象成发送给模型的数据载荷。消息有一个 content 属性,它的类型比较宽松,既支持字符串,也支持未类型化的对象列表(比如字典)。这使得 LangChain 聊天模型能够直接支持服务商原生的结构,例如多模态内容和其他数据。另外,LangChain 也为文本、推理过程、引用、多模态数据、服务端工具调用以及其他消息内容提供了专用的内容类型(即标准块)。详见下方的“内容块”。LangChain 聊天模型接受 content 属性中的消息内容。它可以包含以下任一形式:
- 一个字符串
- 一个服务商原生格式的内容块列表
- 一个 LangChain 标准格式的内容块列表
from langchain.messages import HumanMessage

# String content
human_message = HumanMessage("Hello, how are you?")

# Provider-native format (e.g., OpenAI),字典
human_message = HumanMessage(content=[
    {"type": "text", "text": "Hello, how are you?"},
    {"type": "image_url", "image_url": {"url": "https://example.com/image.jpg"}}
])

# List of standard content blocks,比上面一种由更强类型检查
human_message = HumanMessage(content_blocks=[
    {"type": "text", "text": "Hello, how are you?"},
    {"type": "image", "url": "https://example.com/image.jpg"},
])
在初始化消息时指定 content_blocks 依然会填充消息的 content 属性,但它为此提供了一个类型安全的接口。
- 直接写
content:像是在白纸上写字,容易写错格式,程序运行时才可能发现报错。 - 用
content_blocks:像是填空题,有固定的格子,写的时候就知道对不对,开发体验更好,更不容易出 Bug。
6.3.1 标准内容块
LangChain 提供了一种跨服务商通用的标准消息内容表示法。消息对象实现了一个 content_blocks 属性,它会按需(懒加载)将 content 属性解析为标准、类型安全的表示形式。举个例子,由 ChatAnthropic 或 ChatOpenAI 生成的消息,其思考或推理块(thinking/reasoning)原本是服务商各自的格式,但可以通过按需解析,转换成统一的 ReasoningContentBlock(推理内容块)表示。
#Anthropic
from langchain.messages import AIMessage

message = AIMessage(
    content=[
        {"type": "thinking", "thinking": "...", "signature": "WaUjzkyp..."},
        {"type": "text", "text": "..."},
    ],
    response_metadata={"model_provider": "anthropic"}
)
message.content_blocks


[{'type': 'reasoning',
  'reasoning': '...',
  'extras': {'signature': 'WaUjzkyp...'}},
 {'type': 'text', 'text': '...'}]

@---------------------------------

#OpenAI
from langchain.messages import AIMessage

message = AIMessage(
    content=[
        {
            "type": "reasoning",
            "id": "rs_abc123",
            "summary": [
                {"type": "summary_text", "text": "summary 1"},
                {"type": "summary_text", "text": "summary 2"},
            ],
        },
        {"type": "text", "text": "...", "id": "msg_abc123"},
    ],
    response_metadata={"model_provider": "openai"}
)
message.content_blocks


[{'type': 'reasoning', 'id': 'rs_abc123', 'reasoning': 'summary 1'},
 {'type': 'reasoning', 'id': 'rs_abc123', 'reasoning': 'summary 2'},
 {'type': 'text', 'text': '...', 'id': 'msg_abc123'}]
如果 LangChain 外部的应用程序需要访问标准的内容块表示,你可以选择将内容块直接存储在消息内容中。要实现这一点,你可以将环境变量 LC_OUTPUT_VERSION 设置为 v1。或者,在初始化任何聊天模型时设置 output_version="v1"。
默认情况下,LangChain 为了省事,只存原生格式(Provider-native)。但如果你写的程序不在 LangChain 内部(比如你要把数据存到数据库,或者传给另一个不懂 LangChain 的微服务),你就拿不到那个“按需解析”的功能了。这时候,你就需要强制开启 v1 模式:
- 效果:LangChain 会立刻把所有内容都转换成标准块(Standard Blocks)存起来。
- 好处:不管谁拿到这个消息对象,看到的都是统一的、标准的格式,不需要再做任何转换。
6.3.2 多模态
多模态指的是处理多种不同形式数据(如文本、音频、图像和视频)的能力。LangChain 包含了针对这些数据的标准类型,可以在不同的服务商之间通用。聊天模型既可以接收多模态数据作为输入,也可以生成多模态数据作为输出。下面我们将展示包含多模态数据的输入消息的简短示例。
#图片输入
# From URL
message = {
    "role": "user",
    "content": [
        {"type": "text", "text": "Describe the content of this image."},
        {"type": "image", "url": "https://example.com/path/to/image.jpg"},
    ]
}

# From base64 data
message = {
    "role": "user",
    "content": [
        {"type": "text", "text": "Describe the content of this image."},
        {
            "type": "image",
            "base64": "AAAAIGZ0eXBtcDQyAAAAAGlzb21tcDQyAAACAGlzb2...",
            "mime_type": "image/jpeg",
        },
    ]
}

# From provider-managed File ID
message = {
    "role": "user",
    "content": [
        {"type": "text", "text": "Describe the content of this image."},
        {"type": "image", "file_id": "file-abc123"},
    ]
}
#pdf 输入
# From URL
message = {
"role": "user",
"content": [
{"type": "text", "text": "Describe the content of this document."},
{"type": "file", "url": "https://example.com/path/to/document.pdf"},
]
}
# From base64 data
message = {
"role": "user",
"content": [
{"type": "text", "text": "Describe the content of this document."},
{
"type": "file",
"base64": "AAAAIGZ0eXBtcDQyAAAAAGlzb21tcDQyAAACAGlzb2...",
"mime_type": "application/pdf",
},
]
}
# From provider-managed File ID
message = {
"role": "user",
"content": [
{"type": "text", "text": "Describe the content of this document."},
{"type": "file", "file_id": "file-abc123"},
]
}#音频输入
# From base64 data
message = {
"role": "user",
"content": [
{"type": "text", "text": "Describe the content of this audio."},
{
"type": "audio",
"base64": "AAAAIGZ0eXBtcDQyAAAAAGlzb21tcDQyAAACAGlzb2...",
"mime_type": "audio/wav",
},
]
}
# From provider-managed File ID
message = {
"role": "user",
"content": [
{"type": "text", "text": "Describe the content of this audio."},
{"type": "audio", "file_id": "file-abc123"},
]
}#视频输入
# From base64 data
message = {
"role": "user",
"content": [
{"type": "text", "text": "Describe the content of this video."},
{
"type": "video",
"base64": "AAAAIGZ0eXBtcDQyAAAAAGlzb21tcDQyAAACAGlzb2...",
"mime_type": "video/mp4",
},
]
}
# From provider-managed File ID
message = {
"role": "user",
"content": [
{"type": "text", "text": "Describe the content of this video."},
{"type": "video", "file_id": "file-abc123"},
]
} 可以在内容块的顶层包含额外的键(Extra keys),也可以将它们嵌套在 "extras": {"key": value} 中。例如,OpenAI 和 AWS Bedrock Converse 在处理 PDF 文件时,就要求必须提供一个文件名(filename)。具体细节请查看你所选模型的服务商页面
并不是所有的模型都支持所有的文件类型。请查看模型服务商的参考文档,了解支持的格式和大小限制
6.3.3 内容块引用
内容块(无论是创建消息时,还是访问 content_blocks 属性时)都表示为类型化字典的列表。列表中的每一项都必须符合以下某种块类型:
- Core
- Multimodal
- Toll Calling
- Sever-Side Toll Execution
- Provider-Specific Blocks
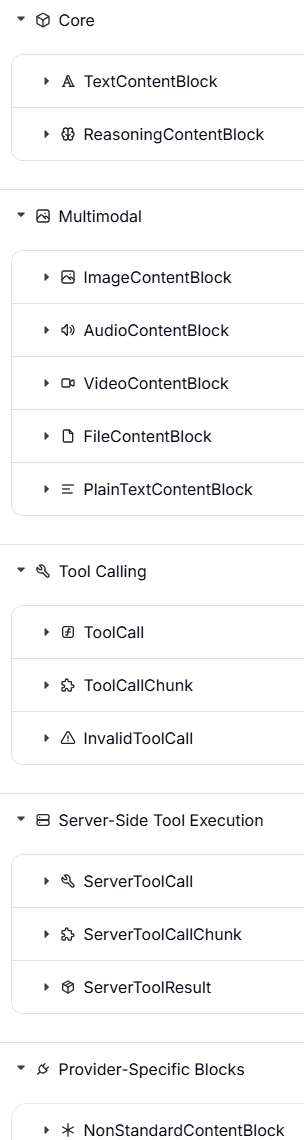
内容块是在 LangChain v1 中引入的消息新属性,旨在标准化跨服务商的内容格式,同时保持与现有代码的向后兼容性。内容块并不是要取代 content 属性,而是一个新增的属性,用于以标准化格式访问消息内容
6.4 与模型一起使用
聊天模型接受一系列消息对象作为输入,并返回一个 AIMessage 作为输出。由于交互通常是无态的,所以一个简单的对话循环涉及使用不断增长的消息列表来调用模型。需要请参考以下指南了解更多:
- 用于持久化和管理对话历史的内置功能(解决“怎么存”的问题)
- 管理上下文窗口的策略,包括修剪和总结消息(解决“怎么省”的问题)
7 tools
工具扩展了智能体的能力——让它们能够获取实时数据、执行代码、查询外部数据库,并在现实世界中采取行动。在底层,工具是带有明确定义输入和输出的可调用函数,它们会被传递给聊天模型。模型会根据对话上下文决定何时调用工具,以及提供什么样的输入参数
7.1 创建工具
基本工具定义
创建工具最简单的方法是使用 @tool 装饰器。默认情况下,函数的 文档字符串 会成为该工具的描述,这有助于模型理解何时使用它
from langchain.tools import tool

@tool
def search_database(query: str, limit: int = 10) -> str:
    """Search the customer database for records matching the query.

    Args:
        query: Search terms to look for
        limit: Maximum number of results to return
    """
    return f"Found {limit} results for '{query}'"
类型提示是必须的,因为它们定义了工具的输入模式。文档字符串应该信息丰富且简洁,以帮助模型理解工具的用途
工具名称最好使用蛇形命名法(例如使用 web_search 而不是 Web Search)。有些模型服务商无法处理或会直接拒绝包含空格或特殊字符的名称,并报错。坚持使用字母数字字符、下划线和连字符,有助于提高跨服务商的兼容性
自定义工具属性
自定义工具名:默认情况下,工具的名称直接取自函数名。当你需要一个更具描述性的名称时,可以对其进行覆盖(重写)
@tool("web_search")  # Custom name
def search(query: str) -> str:
    """Search the web for information."""
    return f"Results for: {query}"

print(search.name)  # web_search
自定义工具描述:覆盖(重写)自动生成的工具描述,以便为模型提供更清晰的指导
@tool("calculator", description="Performs arithmetic calculations. Use this for any math problems.")
def calc(expression: str) -> str:
    """Evaluate mathematical expressions."""
    return str(eval(expression))
高级的模式定义
使用 Pydantic 模型或 JSON 模式来定义复杂的输入
#pydantic 模型
from pydantic import BaseModel, Field
from typing import Literal

class WeatherInput(BaseModel):
    """Input for weather queries."""
    location: str = Field(description="City name or coordinates")
    units: Literal["celsius", "fahrenheit"] = Field(
        default="celsius",
        description="Temperature unit preference"
    )
    include_forecast: bool = Field(
        default=False,
        description="Include 5-day forecast"
    )

@tool(args_schema=WeatherInput)
def get_weather(location: str, units: str = "celsius", include_forecast: bool = False) -> str:
    """Get current weather and optional forecast."""
    temp = 22 if units == "celsius" else 72
    result = f"Current weather in {location}: {temp} degrees {units[0].upper()}"
    if include_forecast:
        result += "\nNext 5 days: Sunny"
    return result
weather_schema = {
"type": "object",
"properties": {
"location": {"type": "string"},
"units": {"type": "string"},
"include_forecast": {"type": "boolean"}
},
"required": ["location", "units", "include_forecast"]
}
@tool(args_schema=weather_schema)
def get_weather(location: str, units: str = "celsius", include_forecast: bool = False) -> str:
"""Get current weather and optional forecast."""
temp = 22 if units == "celsius" else 72
result = f"Current weather in {location}: {temp} degrees {units[0].upper()}"
if include_forecast:
result += "\nNext 5 days: Sunny"
return result保留的参数名称
以下参数名称是保留的,不能用作工具的参数。使用这些名称会导致运行时错误
| 参数名称 | 用途 |
|---|---|
config |
系统内部保留,用于向工具传递 RunnableConfig 配置对象 |
runtime |
系统内部保留,用于传递 ToolRuntime 参数(访问状态、上下文、存储) |
若要访问运行时信息,请使用 ToolRuntime 参数,而不要把自己的参数命名为 config 或 runtime
7.2 访问上下文
当工具能够访问运行时信息(如对话历史、用户数据和持久化记忆)时,它们才真正发挥出最强大的威力。本节将介绍如何在工具内部访问和更新这些信息。工具可以通过 ToolRuntime 参数来访问运行时信息,它提供了以下功能
| 组件 | 描述 | 使用场景 |
|---|---|---|
| State | 短期记忆 —— 仅存在于当前对话中的可变数据(消息、计数器、自定义字段) | 访问对话历史,统计工具调用次数 |
| Context | 不可变配置 —— 在调用时传入的信息(用户 ID、会话信息) | 根据用户身份个性化回复 |
| Store | 长期记忆 —— 跨对话持久化保存的数据 | 保存用户偏好,维护知识库 |
| Stream Writer | 在工具执行期间发出实时更新 | 为长时间运行的操作显示进度 |
| Config | 当前执行的 RunnableConfig | 访问回调、标签和元数据 |
| Tool Call ID | 当前工具调用的唯一标识符 | 在日志和模型调用中关联工具调用 |

7.2.1 短期记忆
state 代表了存在于整个对话期间的短期记忆。它包括消息历史以及你在图状态(graph state)中定义的任何自定义字段。
在工具函数签名中加入 runtime: ToolRuntime 参数,以此来访问状态(State)。这个参数会被自动注入,并且对大语言模型(LLM)隐藏 —— 它不会出现在工具的模式(schema)中。
访问状态
from langchain.tools import tool, ToolRuntime
from langchain.messages import HumanMessage

@tool
def get_last_user_message(runtime: ToolRuntime) -> str:
    """Get the most recent message from the user."""
    messages = runtime.state["messages"]

    # Find the last human message
    for message in reversed(messages):
        if isinstance(message, HumanMessage):
            return message.content

    return "No user messages found"

# Access custom state fields
@tool
def get_user_preference(
    pref_name: str,
    runtime: ToolRuntime
) -> str:
    """Get a user preference value."""
    preferences = runtime.state.get("user_preferences", {})
    return preferences.get(pref_name, "Not set")
更新状态
使用 Command 来更新代理(Agent)的状态。这对于那些需要修改自定义状态字段的工具非常有用
from langgraph.types import Command
from langchain.tools import tool

@tool
def set_user_name(new_name: str) -> Command:
    """Set the user's name in the conversation state."""
    return Command(update={"user_name": new_name})
当工具更新状态变量时,请考虑为这些字段定义一个归约器(Reducer)。由于大语言模型(LLM)可以并行调用多个工具,归约器决定了当并发的工具调用更新同一个状态字段时,如何解决冲突。Reducer 就是一个“裁判函数”。它告诉系统:当新值进来时,该怎么跟旧值合并。
- 默认行为(覆盖):新值直接替换旧值(适合存“最新天气”这种数据)。
- 累加行为(求和):
旧值 + 新值(适合存“搜索次数”)。 - 追加行为(列表):
旧列表 + 新项(适合存“搜索历史记录”)。
import operator
from typing import Annotated

class AgentState(TypedDict):
    # 使用 operator.add 作为 reducer
    # 这意味着:每当有新值进来,就把它加到旧值上
    search_count: Annotated[int, operator.add]

    # 对于列表,通常使用 operator.iadd 或者自定义函数来追加
    history: Annotated[list, operator.iadd]
发生冲突时
- 初始状态:
search_count = 0 - 工具 A 返回:
Command(update={"search_count": 1}) - 工具 B 返回:
Command(update={"search_count": 1})
Reducer 介入
系统看到定义了 operator.add,于是执行:
- 先应用 A:
0 + 1 = 1 - 再应用 B:
1 + 1 = 2
最终结果:search_count = 2。完美解决了冲突!
#Command 基本用法
Command(
    update={...},   # 固定写法:用来更新 State
    result=...,     # 固定写法:用来返回给 LLM 结果
    goto=...        # 固定写法:用来指定下一个节点(可选)
)
在 LangGraph 中,工具不仅仅是“干活”的(比如搜索、计算),有时候它们还需要“记事”(比如更新计数器、记录用户偏好)。在旧版本或者简单的用法中,工具通常只返回一个字符串(结果)。如果你想同时更新 State(比如让 message_count + 1),这很难办到,因为工具只能返回一个值。现在的解决方案:Command,Command 是一个特殊的返回对象。它就像一个“双重包裹”:
- 包裹 A:给 LLM 看的结果(比如“搜索成功”)。
- 包裹 B:给系统看的指令(比如“把 State 里的
count加 1”)。
7.2.2 上下文
Context(上下文) 提供了在调用时传入的不可变配置数据。请将它用于用户 ID、会话详情或特定于应用程序的设置——这些数据在对话期间不应该被改变。请通过 runtime.context 来访问上下文。
from dataclasses import dataclass
from langchain_openai import ChatOpenAI
from langchain.agents import create_agent
from langchain.tools import tool, ToolRuntime


USER_DATABASE = {
    "user123": {
        "name": "Alice Johnson",
        "account_type": "Premium",
        "balance": 5000,
        "email": "alice@example.com"
    },
    "user456": {
        "name": "Bob Smith",
        "account_type": "Standard",
        "balance": 1200,
        "email": "bob@example.com"
    }
}

@dataclass
class UserContext:
    user_id: str

@tool
def get_account_info(runtime: ToolRuntime[UserContext]) -> str:
    """Get the current user's account information."""
    user_id = runtime.context.user_id

    if user_id in USER_DATABASE:
        user = USER_DATABASE[user_id]
        return f"Account holder: {user['name']}\nType: {user['account_type']}\nBalance: ${user['balance']}"
    return "User not found"

model = ChatOpenAI(model="gpt-4.1")
agent = create_agent(
    model,
    tools=[get_account_info],
    context_schema=UserContext,
    system_prompt="You are a financial assistant."
)

result = agent.invoke(
    {"messages": [{"role": "user", "content": "What's my current balance?"}]},
    context=UserContext(user_id="user123")
)
7.2.3 长期记忆
BaseStore 提供了能够在多次对话之间持久保存的存储空间。与状态(短期记忆)不同,保存到存储区的数据在未来的会话中依然可用。请通过 runtime.store 来访问该存储。该存储使用“命名空间/键”的模式来组织数据:
from typing import Any
from langgraph.store.memory import InMemoryStore
from langchain.agents import create_agent
from langchain.tools import tool, ToolRuntime
from langchain_openai import ChatOpenAI

# Access memory
@tool
def get_user_info(user_id: str, runtime: ToolRuntime) -> str:
    """Look up user info."""
    store = runtime.store
    user_info = store.get(("users",), user_id)
    return str(user_info.value) if user_info else "Unknown user"

# Update memory
@tool
def save_user_info(user_id: str, user_info: dict[str, Any], runtime: ToolRuntime) -> str:
    """Save user info."""
    store = runtime.store
    store.put(("users",), user_id, user_info)
    return "Successfully saved user info."

model = ChatOpenAI(model="gpt-4.1")

store = InMemoryStore()
agent = create_agent(
    model,
    tools=[get_user_info, save_user_info],
    store=store
)

# First session: save user info
agent.invoke({
    "messages": [{"role": "user", "content": "Save the following user: userid: abc123, name: Foo, age: 25, email: foo@langchain.dev"}]
})

# Second session: get user info
agent.invoke({
    "messages": [{"role": "user", "content": "Get user info for user with id 'abc123'"}]
})
# Here is the user info for user with ID "abc123":
# - Name: Foo
# - Age: 25
# - Email: foo@langchain.dev
这段代码看起了没啥问题,只是,下面的代码看起来理解不了,这也是python经常干的事情,解读一下
store.get(("users",), user_id)
store.put(("users",), user_id, user_info)
前面的是命名空间,后面就是键值对了,前面为哈看起来像多了一个逗号,实际上这是python单元组元素存在的一个问题,这里就不解释了。
对于生产环境的部署,请使用像 PostgresStore 这样的持久化存储实现,而不要使用 InMemoryStore。有关设置的详细信息,请参阅内存文档
7.3.4 流写入器
在工具执行期间,实时流式传输更新内容。这对于在长时间运行的操作中向用户提供进度反馈非常有用。请使用 runtime.stream_writer 来发送自定义更新。
from langchain.tools import tool, ToolRuntime

@tool
def get_weather(city: str, runtime: ToolRuntime) -> str:
    """Get weather for a given city."""
    writer = runtime.stream_writer

    # Stream custom updates as the tool executes
    writer(f"Looking up data for city: {city}")
    writer(f"Acquired data for city: {city}")

    return f"It's always sunny in {city}!"
如果你在工具中使用了 runtime.stream_writer,那么该工具必须在 LangGraph 执行上下文中被调用。详情请参阅“流式传输”部分。
7.3 工具节点
ToolNode 是一个预构建的节点,专门用于在 LangGraph 工作流中执行工具。它能自动处理工具的并行执行、错误处理以及状态注入。如果你需要构建自定义工作流,并且需要对工具的执行模式进行细粒度的控制,请使用 ToolNode 而不是 create_agent。它是支撑 Agent 工具执行的基础构建模块
7.3.1 基本使用
from langchain.tools import tool
from langgraph.prebuilt import ToolNode
from langgraph.graph import StateGraph, MessagesState, START, END

@tool
def search(query: str) -> str:
    """Search for information."""
    return f"Results for: {query}"

@tool
def calculator(expression: str) -> str:
    """Evaluate a math expression."""
    return str(eval(expression))

# Create the ToolNode with your tools
tool_node = ToolNode([search, calculator])

# Use in a graph
builder = StateGraph(MessagesState)
#tools是给节点起的名字
builder.add_node("tools", tool_node)
# ... add other nodes and edges
上面这个代码看看就行,牵涉到了langgraph
7.3.2 工具返回值
string
当工具需要提供纯文本供模型阅读并在其下一次回复中使用时,请返回一个字符串
from langchain.tools import tool


@tool
def get_weather(city: str) -> str:
    """Get weather for a city."""
    return f"It is currently sunny in {city}."
行为表现:
- 返回值会被转换成一个
ToolMessage(工具消息)。 - 模型会看到这段文字,并据此决定下一步该做什么。
- 除非模型或另一个工具后续进行了修改,否则智能体(Agent)的状态字段不会发生改变。
- 当结果本身就是人类可读的文本时,请使用这种方式
object
当你的工具生成的是结构化数据供模型检查时,请返回一个对象(例如字典)。
from langchain.tools import tool


@tool
def get_weather_data(city: str) -> dict:
    """Get structured weather data for a city."""
    return {
        "city": city,
        "temperature_c": 22,
        "conditions": "sunny",
    }
行为表现:
- 该对象会被序列化,并作为工具的输出结果传回。
- 模型可以读取其中的特定字段,并基于这些字段进行推理。
- 就像返回字符串一样,这不会直接更新图的状态。
- 当下游的推理过程受益于明确的字段(而非自由格式的文本)时,请使用此方式。
Command
当工具需要更新图状态时(例如,设置用户偏好或应用状态),请返回一个 Command 对象。
你可以选择是否附带 ToolMessage 来返回 Command。如果模型需要看到工具执行成功的反馈(例如,为了确认偏好设置已更改),请在更新中包含一个 ToolMessage,并使用 runtime.tool_call_id 作为 tool_call_id 参数。短期记忆一节也有涉及
from langchain.messages import ToolMessage
from langchain.tools import ToolRuntime, tool
from langgraph.types import Command


@tool
def set_language(language: str, runtime: ToolRuntime) -> Command:
    """Set the preferred response language."""
    return Command(
        update={
            "preferred_language": language,
            "messages": [
                ToolMessage(
                    content=f"Language set to {language}.",
                    tool_call_id=runtime.tool_call_id,
                )
            ],
        }
    )
Command 的“执行”(即状态的更新)发生在 工具函数执行完毕并返回之后。流程是这样的:
- 调用:LangGraph 调用
set_language函数。 - 构建:函数内部创建并返回
Command对象(此时状态还没变)。 - 处理:LangGraph 引擎接收到这个
Command对象。 - 应用:引擎读取
Command中的update字典,并将其合并到当前的全局状态中。
更新的是 LangGraph 的全局状态。
- 不是
runtime.state:ToolRuntime对象本身通常只包含上下文信息(如当前的tool_call_id、store 接口等),它不是用来直接存储图状态的变量。 - 而是
State:更新的是你定义 LangGraph 时传入的那个状态对象(通常是State类的一个实例)
行为表现:
- 该指令会使用
update方法来更新状态。 - 更新后的状态在同一个运行流程的后续步骤中是可用的。
- 对于可能会被并行工具调用更新的字段,请使用 Reducers(归约器)。
- 当工具不仅仅是返回数据,而是还要修改智能体(Agent)的状态时,请使用这种方式。
7.3.3 错误处理
配置工具错误的处理方式。请查阅 ToolNode API 参考文档以获取所有可用选项
from langgraph.prebuilt import ToolNode

# Default: catch invocation errors, re-raise execution errors
tool_node = ToolNode(tools)

# Catch all errors and return error message to LLM
tool_node = ToolNode(tools, handle_tool_errors=True)

# Custom error message
tool_node = ToolNode(tools, handle_tool_errors="Something went wrong, please try again.")

# Custom error handler
def handle_error(e: ValueError) -> str:
    return f"Invalid input: {e}"

tool_node = ToolNode(tools, handle_tool_errors=handle_error)

# Only catch specific exception types
tool_node = ToolNode(tools, handle_tool_errors=(ValueError, TypeError))
7.3.4 工具条件路由
使用 tools_condition 来进行条件路由,判断依据是 LLM(大语言模型)是否发起了工具调用
from langgraph.prebuilt import ToolNode, tools_condition
from langgraph.graph import StateGraph, MessagesState, START, END

builder = StateGraph(MessagesState)
builder.add_node("llm", call_llm)
builder.add_node("tools", ToolNode(tools))

builder.add_edge(START, "llm")
builder.add_conditional_edges("llm", tools_condition)  # Routes to "tools" or END
builder.add_edge("tools", "llm")

graph = builder.compile()
这段代码搭建了一个最经典的 Agent 循环(ReAct 模式)。你可以把它想象成一个“思考-行动-观察”的死循环,直到任务完成为止。简单了解一下即可
7.3.5 状态注入
工具可以通过 ToolRuntime 访问当前的图状态(Graph State),前面提到过,config和runtime是工具保留字,所以自己定义的参数不要取同样的名字。
from langchain.tools import tool, ToolRuntime
from langgraph.prebuilt import ToolNode

@tool
def get_message_count(runtime: ToolRuntime) -> str:
    """Get the number of messages in the conversation."""
    messages = runtime.state["messages"]
    return f"There are {len(messages)} messages."

tool_node = ToolNode([get_message_count])
这个和store不太一样的地方是没有命名空间(可以确认一下)
7.4 预构建工具
LangLangChain 提供了一系列预先构建好的工具和工具包,涵盖了网页搜索、代码解释、数据库访问等常见任务。这些开箱即用的工具可以直接集成到你的智能体中,无需编写自定义代码。
请查看工具和工具包集成页面,获取按类别整理的完整工具列表
7.5 服务端工具使用
某些聊天模型内置了由模型提供商在服务器端直接执行的工具。这包括网页搜索和代码解释器等功能,你无需自己定义或托管这些工具的逻辑。请参考各个聊天模型的集成页面和工具调用文档,了解如何启用和使用这些内置工具。
8 short-term memory
记忆是一个记录过往互动信息的系统。对于 AI 智能体来说,记忆至关重要,因为它能让智能体记住之前的交互、从反馈中学习并适应用户的偏好。随着智能体处理的任务越来越复杂、用户互动越来越频繁,这种能力对于提升效率和用户满意度来说,绝对是必不可少的。
短期记忆能让你的应用程序在单次线程或对话中记住之前的互动。线程的作用是将一个会话中的多次互动组织起来,这就好比电子邮件把往来邮件归类在同一个会话里一样。对话历史是最常见的一种短期记忆形式。但长对话给现在的 LLM(大语言模型)带来了不小的挑战;完整的历史记录可能无法塞进 LLM 的上下文窗口里,从而导致上下文丢失或报错。
即便你的模型支持超长上下文,大多数 LLM 在处理长文本时的表现依然不佳。它们很容易被那些过时的或跑题的内容“带偏”(分心),同时还会面临响应变慢和成本飙升的问题。
聊天模型是通过消息来接收上下文的,这些消息包括指令(系统消息)和输入(人类消息)。在聊天应用中,人类的输入和模型的回复交替进行,导致消息列表随着时间推移越来越长。由于上下文窗口是有限的,很多应用如果能利用技术手段来移除或“遗忘”那些过时的信息,效果会好得多。
想要在不同对话之间记住信息吗?那就使用长期记忆,在不同的线程和会话中存储并调用用户特定或应用级别的数据
8.1 用法
若要为智能体添加短期记忆(即线程级别的持久化),你需要在创建智能体时指定一个检查点。LangChain 的智能体会将短期记忆作为其状态的一部分进行管理。通过将这些信息存储在图的状态中,智能体既能获取特定对话的完整上下文,又能保持不同线程之间的隔离。状态会通过检查点持久化存储到数据库(或内存)中,以便随时恢复线程。短期记忆会在调用智能体或完成某个步骤(如工具调用)时更新,并在每个步骤开始时读取状态。
from langchain.agents import create_agent
from langgraph.checkpoint.memory import InMemorySaver
from langchain.chat_models import init_chat_model


qwen3Ollama = init_chat_model(
    model="qwen3:8b",           # 1. 你本地 Ollama 中的模型名称
    model_provider="ollama",    # 2. 【关键】明确指定提供商为 ollama
    base_url="http://localhost:11434", # 3. Ollama 的默认服务地址
    temperature=0.7,            # 4. 通用参数:温度
)

agent = create_agent(
    model=qwen3Ollama,           # 1. 你本地 Ollama 中的模型名称
    checkpointer=InMemorySaver(),
)

agent.invoke(
    {"messages": [{"role": "user", "content": "Hi! My name is Bob."}]},
    {"configurable": {"thread_id": "1"}},
)

response = agent.invoke(
    {"messages": [{"role": "user", "content": "What is my name"}]},
    {"configurable": {"thread_id": "1"}},
)

print(response)
{
"messages": [
{
"type": "HumanMessage",
"content": "Hi! My name is Bob.",
"additional_kwargs": {},
"response_metadata": {},
"id": "742476d5-e122-4f04-85eb-73bcc3b0b419"
},
{
"type": "AIMessage",
"content": "Hello, Bob! \nNice to meet you. How can I assist you today? 😊",
"additional_kwargs": {},
"response_metadata": {
"model": "qwen3:8b",
"created_at": "2026-04-06T08:14:38.5867912Z",
"done": true,
"done_reason": "stop",
"total_duration": 7476848200,
"load_duration": 1928523600,
"prompt_eval_count": 17,
"prompt_eval_duration": 247697800,
"eval_count": 97,
"eval_duration": 5273017000,
"logprobs": null,
"model_name": "qwen3:8b",
"model_provider": "ollama"
},
"id": "lc_run--019d61db-82c6-7373-bd81-cb269e968570-0",
"tool_calls": [],
"invalid_tool_calls": [],
"usage_metadata": {
"input_tokens": 17,
"output_tokens": 97,
"total_tokens": 114
}
},
{
"type": "HumanMessage",
"content": "What is my name",
"additional_kwargs": {},
"response_metadata": {},
"id": "3fd69288-d9ec-416d-bb0a-79bbc9436db0"
},
{
"type": "AIMessage",
"content": "Your name is Bob! 😊 I remember from our previous conversation. How can I help you today?",
"additional_kwargs": {},
"response_metadata": {
"model": "qwen3:8b",
"created_at": "2026-04-06T08:14:45.9520193Z",
"done": true,
"done_reason": "stop",
"total_duration": 7358897400,
"load_duration": 77325100,
"prompt_eval_count": 49,
"prompt_eval_duration": 363672000,
"eval_count": 126,
"eval_duration": 6851963200,
"logprobs": null,
"model_name": "qwen3:8b",
"model_provider": "ollama"
},
"id": "lc_run--019d61db-a800-7231-8672-9c1a6f428803-0",
"tool_calls": [],
"invalid_tool_calls": [],
"usage_metadata": {
"input_tokens": 49,
"output_tokens": 126,
"total_tokens": 175
}
}
]
}从输出中看出能输出历史信息,thread_id是固定的key,如果需要修改(一般没有必要)
# 在编译时指定 config_schema
graph = builder.compile(
    checkpointer=memory,
    # 告诉 LangGraph:如果看到 "xxx_id",请把它当作 "thread_id" 处理
    config_schema={"xxx_id": str}
)

# 现在这样写就能生效了
graph.invoke(inputs, {"configurable": {"xxx_id": "1"}})
生产上
使用数据库做检查点
pip install langgraph-checkpoint-postgresfrom langchain.agents import create_agent
from langgraph.checkpoint.postgres import PostgresSaver
DB_URI = "postgresql://postgres:postgres@localhost:5442/postgres?sslmode=disable"
with PostgresSaver.from_conn_string(DB_URI) as checkpointer:
checkpointer.setup() # auto create tables in PostgreSQL
agent = create_agent(
"gpt-5",
tools=[get_user_info],
checkpointer=checkpointer,
)存储的数据不会自动清理,需要额外程序处理。默认上下文窗口是允许的最大token数量,多了会被截断,这个一般不符合要求,需要定义一个缩减函数,有点麻烦
from langchain.agents import create_agent
from langgraph.checkpoint.memory import InMemorySaver
from langchain.chat_models import init_chat_model
from typing import Annotated, List
from langchain_core.messages import BaseMessage
from langgraph.graph.message import add_messages

# ==========================================
# 1. 定义自定义的状态缩减逻辑
# ==========================================

def keep_last_10(existing: List[BaseMessage], new: List[BaseMessage]):
    """
    这个函数决定了消息如何被保存。
    它接收旧消息和新消息,合并后只返回最后 10 条。
    """
    # 合并消息
    all_messages = existing + new

    # 【关键点】切片操作:只保留最后 10 条
    # 如果不满 10 条,它会返回所有;如果超过 10 条,它会丢弃最早的
    return all_messages[-10:]

# 定义状态结构
class AgentState(dict):
    # 告诉 LangGraph:处理 messages 字段时,使用 keep_last_10 函数
    messages: Annotated[List[BaseMessage], keep_last_10]

# ==========================================
# 2. 初始化模型和 Agent
# ==========================================

qwen3Ollama = init_chat_model(
    model="qwen3:8b",
    model_provider="ollama",
    base_url="http://localhost:11434",
    temperature=0.7,
)

agent = create_agent(
    model=qwen3Ollama,
    # 【关键】传入自定义的状态类,而不是使用默认的
    state_schema=AgentState,
    checkpointer=InMemorySaver(),
)

# ==========================================
# 3. 测试运行
# ==========================================

# 第一轮:告诉它名字
print("--- 第 1 轮:设置名字 ---")
agent.invoke(
    {"messages": [{"role": "user", "content": "Hi! My name is Bob."}]},
    {"configurable": {"thread_id": "1"}},
)

# ... 假设中间聊了很多 ...

# 第二轮:问名字
print("\n--- 第 2 轮:询问名字 ---")
response = agent.invoke(
    {"messages": [{"role": "user", "content": "What is my name"}]},
    {"configurable": {"thread_id": "1"}},
)

print(response)
8.2 自定义Agent记忆
默认情况下,Agent 使用 AgentState 来管理短期记忆,特别是通过 messages 键来存储对话历史。你可以扩展 AgentState 来添加额外的字段。自定义的状态模式(schema)会通过 state_schema 参数传递给 create_agent
from langchain.agents import create_agent, AgentState
from langgraph.checkpoint.memory import InMemorySaver


class CustomAgentState(AgentState):
    user_id: str
    preferences: dict

agent = create_agent(
    "gpt-5",
    tools=[get_user_info],
    state_schema=CustomAgentState,
    checkpointer=InMemorySaver(),
)

# Custom state can be passed in invoke
result = agent.invoke(
    {
        "messages": [{"role": "user", "content": "Hello"}],
        "user_id": "user_123",
        "preferences": {"theme": "dark"}
    },
    {"configurable": {"thread_id": "1"}})
8.3 常见模式
启用了短期记忆后,过长的对话可能会超出 LLM 的上下文窗口限制。常见的解决方案有:
- 修剪消息:删除第一条或者最后N条消息,
- 删除消息:从LangGraph状态永久删除消息
- 汇总消息:将历史消息替换成汇总后的消息
- 自定义策略:比如消息过滤
8.3.1 修剪消息
大多数大语言模型都有一个最大支持的上下文窗口(以 token 数量计算)。决定何时截断消息的一种方法是计算消息历史中的 token 数量,并在其接近该限制时进行截断。如果你正在使用 LangChain,可以使用 trim messages 工具,并指定要从列表中保留的 token 数量,以及用于处理边界的策略(例如,保留最后 max_tokens 个 token)。要在 agent 中修剪消息历史,请使用 @before_model 中间件装饰器
from langchain.messages import RemoveMessage
from langgraph.graph.message import REMOVE_ALL_MESSAGES
from langgraph.checkpoint.memory import InMemorySaver
from langchain.agents import create_agent, AgentState
from langchain.agents.middleware import before_model
from langgraph.runtime import Runtime
from langchain_core.runnables import RunnableConfig
from typing import Any


@before_model
def trim_messages(state: AgentState, runtime: Runtime) -> dict[str, Any] | None:
    """Keep only the last few messages to fit context window."""
    messages = state["messages"]

    if len(messages) <= 3:
        return None  # No changes needed
    #保留第一条
    first_msg = messages[0]
    #如果是奇数就保留最后三条,偶数就保留最后四条
    recent_messages = messages[-3:] if len(messages) % 2 == 0 else messages[-4:]
    new_messages = [first_msg] + recent_messages

    return {
        "messages": [
            RemoveMessage(id=REMOVE_ALL_MESSAGES),
            *new_messages
        ]
    }

agent = create_agent(
    your_model_here,
    tools=your_tools_here,
    middleware=[trim_messages],
    checkpointer=InMemorySaver(),
)

config: RunnableConfig = {"configurable": {"thread_id": "1"}}

agent.invoke({"messages": "hi, my name is bob"}, config)
agent.invoke({"messages": "write a short poem about cats"}, config)
agent.invoke({"messages": "now do the same but for dogs"}, config)
final_response = agent.invoke({"messages": "what's my name?"}, config)

final_response["messages"][-1].pretty_print()
"""
================================== Ai Message ==================================

Your name is Bob. You told me that earlier.
If you'd like me to call you a nickname or use a different name, just say the word.
"""
代码的重点是通过@beforemodel 将tim_message转化成中间件,修剪agent状态中的消息
8.3.2 删除消息
你可以从图状态(graph state)中删除消息,以此来管理消息历史。当你想要移除特定消息或清空整个消息历史时,这非常有用。要从图状态中删除消息,你可以使用 RemoveMessage。
为了让 RemoveMessage 正常工作,你需要使用带有 add_messages 归约器(reducer)的状态键(state key)。默认的 AgentState 已经提供了这个功能。
from langchain.messages import RemoveMessage

def delete_messages(state):
    messages = state["messages"]
    if len(messages) > 2:
        # remove the earliest two messages
        return {"messages": [RemoveMessage(id=m.id) for m in messages[:2]]}
删除所有消息
from langgraph.graph.message import REMOVE_ALL_MESSAGES

def delete_messages(state):
    return {"messages": [RemoveMessage(id=REMOVE_ALL_MESSAGES)]}
在删除消息时,请务必确保剩下的消息历史是有效的。请检查你所使用的 LLM 提供商的限制条件。例如:
- 开头限制:有些提供商要求消息历史必须以用户消息开头(而不是系统提示词或 AI 回复)。
- 工具调用配对:大多数提供商要求,如果包含带有工具调用的助手消息,那么其后必须紧跟相应的工具结果消息(不能只留调用不留结果,否则模型会一直在等回调)。
from langchain.messages import RemoveMessage
from langchain.agents import create_agent, AgentState
from langchain.agents.middleware import after_model
from langgraph.checkpoint.memory import InMemorySaver
from langgraph.runtime import Runtime
from langchain_core.runnables import RunnableConfig


@after_model
def delete_old_messages(state: AgentState, runtime: Runtime) -> dict | None:
    """Remove old messages to keep conversation manageable."""
    messages = state["messages"]
    if len(messages) > 2:
        # remove the earliest two messages
        return {"messages": [RemoveMessage(id=m.id) for m in messages[:2]]}
    return None


agent = create_agent(
    "gpt-5-nano",
    tools=[],
    system_prompt="Please be concise and to the point.",
    middleware=[delete_old_messages],
    checkpointer=InMemorySaver(),
)

config: RunnableConfig = {"configurable": {"thread_id": "1"}}

for event in agent.stream(
    {"messages": [{"role": "user", "content": "hi! I'm bob"}]},
    config,
    stream_mode="values",
):
    print([(message.type, message.content) for message in event["messages"]])

for event in agent.stream(
    {"messages": [{"role": "user", "content": "what's my name?"}]},
    config,
    stream_mode="values",
):
    print([(message.type, message.content) for message in event["messages"]])
[('human', "hi! I'm bob")]
[('human', "hi! I'm bob"), ('ai', 'Hi Bob! How can I assist you today?')]
[('human', "hi! I'm bob"), ('ai', 'Hi Bob! How can I assist you today?'), ('human', "what's my name?")]
[('human', "hi! I'm bob"), ('ai', 'Hi Bob! How can I assist you today?'), ('human', "what's my name?"), ('ai', 'Your name is Bob.')]
[('human', "what's my name?"), ('ai', 'Your name is Bob.')]逻辑是大于两条的时候在模型调用之后保留最新两条,最后是三条送入模型,模型自己有产生了一条,总共是四条,模型调用结束后触发删除消息中间件,所以只有两条了。
8.3.3 消息摘要
上面展示的截断或移除消息的方法,其问题在于你可能会因为剔除消息队列而丢失信息。正因如此,有些应用更适合采用一种更复杂的方法,即使用聊天模型对消息历史进行摘要
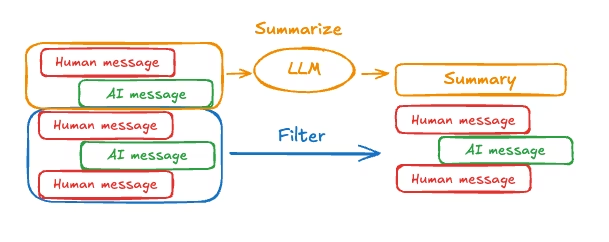
要在 Agent 中实现消息历史的摘要,请使用内置的 SummarizationMiddleware
from langchain.agents import create_agent
from langchain.agents.middleware import SummarizationMiddleware
from langgraph.checkpoint.memory import InMemorySaver
from langchain_core.runnables import RunnableConfig


checkpointer = InMemorySaver()

agent = create_agent(
    model="gpt-4.1",
    tools=[],
    middleware=[
        SummarizationMiddleware(
            model="gpt-4.1-mini",
            trigger=("tokens", 4000),
            keep=("messages", 20)
        )
    ],
    checkpointer=checkpointer,
)

config: RunnableConfig = {"configurable": {"thread_id": "1"}}
agent.invoke({"messages": "hi, my name is bob"}, config)
agent.invoke({"messages": "write a short poem about cats"}, config)
agent.invoke({"messages": "now do the same but for dogs"}, config)
final_response = agent.invoke({"messages": "what's my name?"}, config)

final_response["messages"][-1].pretty_print()
"""
================================== Ai Message ==================================

Your name is Bob!
"""
消息汇总是通过模型处理,应该是性能不太好,使用简版模型
8.4 读取记忆
你可以通过多种方式访问和修改 Agent 的短期记忆(状态)
8.4.1 工具
你可以使用 runtime 参数(类型为 ToolRuntime)在工具中访问 Agent 的短期记忆(状态)。这个 runtime 参数对工具签名是隐藏的(也就是说模型看不见它),但工具本身可以通过它来访问状态
从工具中读短期记忆数据
from langchain.agents import create_agent, AgentState
from langchain.tools import tool, ToolRuntime


class CustomState(AgentState):
    user_id: str

@tool
def get_user_info(
    runtime: ToolRuntime
) -> str:
    """Look up user info."""
    user_id = runtime.state["user_id"]
    return "User is John Smith" if user_id == "user_123" else "Unknown user"

agent = create_agent(
    model="gpt-5-nano",
    tools=[get_user_info],
    state_schema=CustomState,
)

result = agent.invoke({
    "messages": "look up user information",
    "user_id": "user_123"
})
print(result["messages"][-1].content)
# > User is John Smith.
这里补充一小点(前面中间件用的是Runtime)
| 特性 | Runtime | ToolRuntime |
|---|---|---|
| 使用位置 | 节点 (Nodes) 中 | 工具 (Tools) 函数中 |
| 对应角色 | 像是“管家”或“指挥官” | 像是“特种兵”或“执行者” |
| 主要职责 | 管理整个节点的执行上下文、流程控制 | 提供工具执行时所需的特定上下文(如用户信息) |
| 模型可见性 | 模型不可见(属于代码逻辑层) | 强制隐藏(模型调用工具时看不到这个参数) |
| 典型用途 | 获取全局配置、控制流程跳转 | 获取当前用户ID、数据库连接串等 |
从工具中写短期记忆数据
若要在执行期间修改 Agent 的短期记忆(状态),你可以直接从工具中返回状态更新。这对于持久化中间结果,或者让信息能够被后续的工具或提示词访问到,是非常有用的
from langchain.tools import tool, ToolRuntime
from langchain_core.runnables import RunnableConfig
from langchain.messages import ToolMessage
from langchain.agents import create_agent, AgentState
from langgraph.types import Command
from pydantic import BaseModel


class CustomState(AgentState):
    user_name: str

class CustomContext(BaseModel):
    user_id: str

@tool
def update_user_info(
    runtime: ToolRuntime[CustomContext, CustomState],
) -> Command:
    """Look up and update user info."""
    user_id = runtime.context.user_id
    name = "John Smith" if user_id == "user_123" else "Unknown user"
    return Command(update={
        "user_name": name,
        # update the message history
        "messages": [
            ToolMessage(
                "Successfully looked up user information",
                tool_call_id=runtime.tool_call_id
            )
        ]
    })

@tool
def greet(
    runtime: ToolRuntime[CustomContext, CustomState]
) -> str | Command:
    """Use this to greet the user once you found their info."""
    user_name = runtime.state.get("user_name", None)
    if user_name is None:
       return Command(update={
            "messages": [
                ToolMessage(
                    "Please call the 'update_user_info' tool it will get and update the user's name.",
                    tool_call_id=runtime.tool_call_id
                )
            ]
        })
    return f"Hello {user_name}!"

agent = create_agent(
    model="gpt-5-nano",
    tools=[update_user_info, greet],
    state_schema=CustomState,
    context_schema=CustomContext,
)

agent.invoke(
    {"messages": [{"role": "user", "content": "greet the user"}]},
    context=CustomContext(user_id="user_123"),
)
8.4.2 提示词
在中间件中访问短期记忆(状态),以便根据对话历史或自定义状态字段来创建动态提示词
from langchain.agents import create_agent
from typing import TypedDict
from langchain.agents.middleware import dynamic_prompt, ModelRequest


class CustomContext(TypedDict):
    user_name: str


def get_weather(city: str) -> str:
    """Get the weather in a city."""
    return f"The weather in {city} is always sunny!"

#发生在提示词发送到模型执行前
@dynamic_prompt
def dynamic_system_prompt(request: ModelRequest) -> str:
    user_name = request.runtime.context["user_name"]
    system_prompt = f"You are a helpful assistant. Address the user as {user_name}."
    return system_prompt


agent = create_agent(
    model="gpt-5-nano",
    tools=[get_weather],
    middleware=[dynamic_system_prompt],
    context_schema=CustomContext,
)

result = agent.invoke(
    {"messages": [{"role": "user", "content": "What is the weather in SF?"}]},
    context=CustomContext(user_name="John Smith"),
)
for msg in result["messages"]:
    msg.pretty_print()
官方给出的输出
================================ Human Message =================================

What is the weather in SF?
================================== Ai Message ==================================
Tool Calls:
  get_weather (call_WFQlOGn4b2yoJrv7cih342FG)
 Call ID: call_WFQlOGn4b2yoJrv7cih342FG
  Args:
    city: San Francisco
================================= Tool Message =================================
Name: get_weather

The weather in San Francisco is always sunny!
================================== Ai Message ==================================

Hi John Smith, the weather in San Francisco is always sunny!
qwen3:8b给出出输出没有提及JohnSmith
What is the weather in SF?
================================== Ai Message ==================================
Tool Calls:
  get_weather (a713a19c-9157-4527-80d4-a8e1d1b37e73)
 Call ID: a713a19c-9157-4527-80d4-a8e1d1b37e73
  Args:
    city: San Francisco
================================= Tool Message =================================
Name: get_weather

The weather in San Francisco is always sunny!
================================== Ai Message ==================================

The weather in San Francisco is currently sunny! 🌞 Why don't you enjoy some outdoor time while the weather is perfect?
8.4.3 模型执行前
在 @before_model 中间件中访问短期记忆(状态),以便在调用模型之前处理消息

from langchain.messages import RemoveMessage
from langgraph.graph.message import REMOVE_ALL_MESSAGES
from langgraph.checkpoint.memory import InMemorySaver
from langchain.agents import create_agent, AgentState
from langchain.agents.middleware import before_model
from langchain_core.runnables import RunnableConfig
from langgraph.runtime import Runtime
from typing import Any


@before_model
def trim_messages(state: AgentState, runtime: Runtime) -> dict[str, Any] | None:
    """Keep only the last few messages to fit context window."""
    messages = state["messages"]

    if len(messages) <= 3:
        return None  # No changes needed

    first_msg = messages[0]
    recent_messages = messages[-3:] if len(messages) % 2 == 0 else messages[-4:]
    new_messages = [first_msg] + recent_messages

    return {
        "messages": [
            RemoveMessage(id=REMOVE_ALL_MESSAGES),
            *new_messages
        ]
    }


agent = create_agent(
    "gpt-5-nano",
    tools=[],
    middleware=[trim_messages],
    checkpointer=InMemorySaver()
)

config: RunnableConfig = {"configurable": {"thread_id": "1"}}

agent.invoke({"messages": "hi, my name is bob"}, config)
agent.invoke({"messages": "write a short poem about cats"}, config)
agent.invoke({"messages": "now do the same but for dogs"}, config)
final_response = agent.invoke({"messages": "what's my name?"}, config)

final_response["messages"][-1].pretty_print()
"""
================================== Ai Message ==================================

Your name is Bob. You told me that earlier.
If you'd like me to call you a nickname or use a different name, just say the word.
"""
8.4.4 模型执行后
在 @after_model 中间件中访问短期记忆(状态),以便在模型调用之后处理消息。
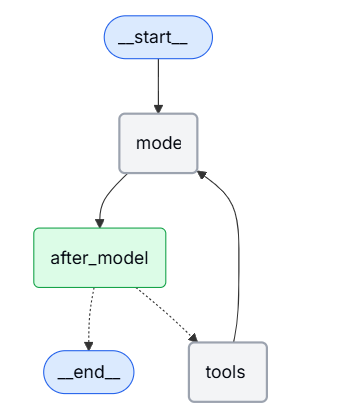
from langchain.messages import RemoveMessage
from langgraph.checkpoint.memory import InMemorySaver
from langchain.agents import create_agent, AgentState
from langchain.agents.middleware import after_model
from langgraph.runtime import Runtime


@after_model
def validate_response(state: AgentState, runtime: Runtime) -> dict | None:
    """Remove messages containing sensitive words."""
    STOP_WORDS = ["password", "secret"]
    last_message = state["messages"][-1]
    if any(word in last_message.content for word in STOP_WORDS):
        return {"messages": [RemoveMessage(id=last_message.id)]}
    return None

agent = create_agent(
    model="gpt-5-nano",
    tools=[],
    middleware=[validate_response],
    checkpointer=InMemorySaver(),
)
9 stream
LangChain 实现了一套流式系统,用于展示实时更新。流式传输对于提升基于大语言模型(LLM)的应用的响应速度至关重要。通过逐步显示输出内容——甚至在完整回复准备就绪之前就开始显示——流式传输能显著改善用户体验(UX),尤其是在应对大语言模型固有的延迟问题时LangChain 的流式系统允许你将 Agent 运行时的实时反馈直接展示在你的应用程序中。通过 LangChain 流式传输,你可以实现:
- 流式传输 Agent 进度:在 Agent 每执行完一个步骤后,获取状态更新。
- 流式传输 LLM 词元:像打字机一样,随着语言模型生成内容,实时流式传输生成的词元(Token)。
- 流式传输思考/推理词元:实时展示模型在生成最终答案之前的推理过程(即“思维链”)。
- 流式传输自定义更新:发送用户自定义的信号(例如:“已获取 10/100 条记录”)。
- 流式传输多种模式:你可以选择接收不同类型的流数据,包括更新(Agent 进度)、消息(LLM 词元 + 元数据)或自定义(任意用户数据)。
9.1 支持的流模式
将一个或多个下列流模式作为列表,传递给 stream 或 astream 方法
| 模式 | 描述 |
|---|---|
| updates | 在每个 Agent 步骤后流式传输状态更新。如果在同一步骤中发生了多次更新(例如运行了多个节点),这些更新会分别进行流式传输。 |
| messages | 从任何调用了 LLM 的图节点中,流式传输 (词元, 元数据) 的元组。 |
| custom | 使用流写入器,从你的图节点内部流式传输自定义数据。 |
9.2 Agent进度
若要流式传输 Agent 的进度,请使用 stream 或 astream 方法,并设置stream_mode="updates"。这会在每一个 Agent 步骤完成后发出一个事件。例如,如果你有一个调用了一次工具的 Agent,你应该会看到如下的更新序列:
- LLM 节点:包含工具调用请求的 AI 消息(AIMessage)
- 工具节点:包含执行结果的工具消息(ToolMessage)
- LLM 节点:最终的 AI 回复
from langchain.agents import create_agent


def get_weather(city: str) -> str:
    """Get weather for a given city."""

    return f"It's always sunny in {city}!"

agent = create_agent(
    model="gpt-5-nano",
    tools=[get_weather],
)
for chunk in agent.stream(
    {"messages": [{"role": "user", "content": "What is the weather in SF?"}]},
    stream_mode="updates",
    version="v2",
):
    if chunk["type"] == "updates":
        for step, data in chunk["data"].items():
            print(f"step: {step}")
            print(f"content: {data['messages'][-1].content_blocks}")
step: model
content: [{'type': 'tool_call', 'name': 'get_weather', 'args': {'city': 'San Francisco'}, 'id': 'call_OW2NYNsNSKhRZpjW0wm2Aszd'}]
step: tools
content: [{'type': 'text', 'text': "It's always sunny in San Francisco!"}]
step: model
content: [{'type': 'text', 'text': 'It's always sunny in San Francisco!'}]9.3 LLM token
若要流式传输 LLM 生成的词元(Token),请使用 stream_mode="messages"。在下面,你可以看到 Agent 流式传输工具调用以及最终回复的输出效果。
from langchain.agents import create_agent


def get_weather(city: str) -> str:
    """Get weather for a given city."""

    return f"It's always sunny in {city}!"

agent = create_agent(
    model="gpt-5-nano",
    tools=[get_weather],
)
for chunk in agent.stream(
    {"messages": [{"role": "user", "content": "What is the weather in SF?"}]},
    stream_mode="messages",
    version="v2",
):
    if chunk["type"] == "messages":
        token, metadata = chunk["data"]
        print(f"node: {metadata['langgraph_node']}")
        print(f"content: {token.content_blocks}")
        print("\n")
node: model
content: [{'type': 'tool_call_chunk', 'id': 'call_vbCyBcP8VuneUzyYlSBZZsVa', 'name': 'get_weather', 'args': '', 'index': 0}]
node: model
content: [{'type': 'tool_call_chunk', 'id': None, 'name': None, 'args': '{"', 'index': 0}]
node: model
content: [{'type': 'tool_call_chunk', 'id': None, 'name': None, 'args': 'city', 'index': 0}]
node: model
content: [{'type': 'tool_call_chunk', 'id': None, 'name': None, 'args': '":"', 'index': 0}]
node: model
content: [{'type': 'tool_call_chunk', 'id': None, 'name': None, 'args': 'San', 'index': 0}]
node: model
content: [{'type': 'tool_call_chunk', 'id': None, 'name': None, 'args': ' Francisco', 'index': 0}]
node: model
content: [{'type': 'tool_call_chunk', 'id': None, 'name': None, 'args': '"}', 'index': 0}]
node: model
content: []
node: tools
content: [{'type': 'text', 'text': "It's always sunny in San Francisco!"}]
node: model
content: []
node: model
content: [{'type': 'text', 'text': 'Here'}]
node: model
content: [{'type': 'text', 'text': ''s'}]
node: model
content: [{'type': 'text', 'text': ' what'}]
node: model
content: [{'type': 'text', 'text': ' I'}]
node: model
content: [{'type': 'text', 'text': ' got'}]
node: model
content: [{'type': 'text', 'text': ':'}]
node: model
content: [{'type': 'text', 'text': ' "'}]
node: model
content: [{'type': 'text', 'text': "It's"}]
node: model
content: [{'type': 'text', 'text': ' always'}]
node: model
content: [{'type': 'text', 'text': ' sunny'}]
node: model
content: [{'type': 'text', 'text': ' in'}]
node: model
content: [{'type': 'text', 'text': ' San'}]
node: model
content: [{'type': 'text', 'text': ' Francisco'}]
node: model
content: [{'type': 'text', 'text': '!"\n\n'}]qwen3:8b需要加一个if token.content_blocks,不然会又很多空输出
9.4 自定义更新
若要流式传输工具执行过程中的更新,你可以使用 get_stream_writer
from langchain.agents import create_agent
from langgraph.config import get_stream_writer


def get_weather(city: str) -> str:
    """Get weather for a given city."""
    writer = get_stream_writer()
    # stream any arbitrary data
    writer(f"Looking up data for city: {city}")
    writer(f"Acquired data for city: {city}")
    return f"It's always sunny in {city}!"

agent = create_agent(
    model="claude-sonnet-4-6",
    tools=[get_weather],
)

for chunk in agent.stream(
    {"messages": [{"role": "user", "content": "What is the weather in SF?"}]},
    stream_mode="custom",
    version="v2",
):
    if chunk["type"] == "custom":
        print(chunk["data"])
Looking up data for city: San Francisco
Acquired data for city: San Francisco 如果你在你的工具(Tool)内部使用了 get_stream_writer,那么你将无法在 LangGraph 的执行上下文之外单独调用该工具
环境依赖
get_stream_writer() 这个函数本质上是一个上下文获取器。它的作用是去当前的运行环境里找:“嘿,有没有正在进行的 LangGraph 运行任务?如果有,把那个负责写流的笔给我。”
执行流程
- 启动引擎:
create_agent创建的对象实际上是一个 LangGraph 的图(Graph)。当你调用.stream()时,你实际上是在启动 LangGraph 的执行引擎。 - 建立上下文:LangGraph 引擎启动后,会建立一个执行上下文,并在其中初始化一个流写入器。
- 工具调用:当 Agent 决定调用
get_weather时,它是在这个 LangGraph 的上下文里运行的。 - 获取写入器:此时,工具函数内部调用
get_stream_writer(),就能成功找到 LangGraph 引擎准备好的那个写入器,从而把数据发出来。
9.5 流多模式
你可以通过将流模式作为列表传递来指定多种流式传输模式:stream_mode=["updates", "custom"]。每一个流式传输的数据块都是一个 StreamPart 字典,包含 type(类型)、ns(命名空间)和 data(数据)这几个键。请使用 chunk["type"] 来判断流模式,并使用 chunk["data"] 来获取具体的负载内容
from langchain.agents import create_agent
from langgraph.config import get_stream_writer


def get_weather(city: str) -> str:
    """Get weather for a given city."""
    writer = get_stream_writer()
    writer(f"Looking up data for city: {city}")
    writer(f"Acquired data for city: {city}")
    return f"It's always sunny in {city}!"

agent = create_agent(
    model="gpt-5-nano",
    tools=[get_weather],
)

for chunk in agent.stream(
    {"messages": [{"role": "user", "content": "What is the weather in SF?"}]},
    stream_mode=["updates", "custom"],
    version="v2",
):
    print(f"stream_mode: {chunk['type']}")
    print(f"content: {chunk['data']}")
    print("\n")
stream_mode: updates
content: {'model': {'messages': [AIMessage(content='', response_metadata={'token_usage': {'completion_tokens': 280, 'prompt_tokens': 132, 'total_tokens': 412, 'completion_tokens_details': {'accepted_prediction_tokens': 0, 'audio_tokens': 0, 'reasoning_tokens': 256, 'rejected_prediction_tokens': 0}, 'prompt_tokens_details': {'audio_tokens': 0, 'cached_tokens': 0}}, 'model_provider': 'openai', 'model_name': 'gpt-5-nano-2025-08-07', 'system_fingerprint': None, 'id': 'chatcmpl-C9tlgBzGEbedGYxZ0rTCz5F7OXpL7', 'service_tier': 'default', 'finish_reason': 'tool_calls', 'logprobs': None}, id='lc_run--480c07cb-e405-4411-aa7f-0520fddeed66-0', tool_calls=[{'name': 'get_weather', 'args': {'city': 'San Francisco'}, 'id': 'call_KTNQIftMrl9vgNwEfAJMVu7r', 'type': 'tool_call'}], usage_metadata={'input_tokens': 132, 'output_tokens': 280, 'total_tokens': 412, 'input_token_details': {'audio': 0, 'cache_read': 0}, 'output_token_details': {'audio': 0, 'reasoning': 256}})]}}
stream_mode: custom
content: Looking up data for city: San Francisco
stream_mode: custom
content: Acquired data for city: San Francisco
stream_mode: updates
content: {'tools': {'messages': [ToolMessage(content="It's always sunny in San Francisco!", name='get_weather', tool_call_id='call_KTNQIftMrl9vgNwEfAJMVu7r')]}}
stream_mode: updates
content: {'model': {'messages': [AIMessage(content='San Francisco weather: It's always sunny in San Francisco!\n\n', response_metadata={'token_usage': {'completion_tokens': 764, 'prompt_tokens': 168, 'total_tokens': 932, 'completion_tokens_details': {'accepted_prediction_tokens': 0, 'audio_tokens': 0, 'reasoning_tokens': 704, 'rejected_prediction_tokens': 0}, 'prompt_tokens_details': {'audio_tokens': 0, 'cached_tokens': 0}}, 'model_provider': 'openai', 'model_name': 'gpt-5-nano-2025-08-07', 'system_fingerprint': None, 'id': 'chatcmpl-C9tljDFVki1e1haCyikBptAuXuHYG', 'service_tier': 'default', 'finish_reason': 'stop', 'logprobs': None}, id='lc_run--acbc740a-18fe-4a14-8619-da92a0d0ee90-0', usage_metadata={'input_tokens': 168, 'output_tokens': 764, 'total_tokens': 932, 'input_token_details': {'audio': 0, 'cache_read': 0}, 'output_token_details': {'audio': 0, 'reasoning': 704}})]}}9.6 常用模式
有些模型在给出最终答案之前,会进行内部的推理。你可以通过过滤标准内容块中类型为 "reasoning" 的部分,来实时流式传输这些思考/推理词元。前提条件是必须在模型上启用推理输出功能。配置详情请参阅“推理”部分以及你的服务提供商的集成页面以获取配置细节。若要快速检查某个模型是否支持推理,请访问 models.dev。若要从 Agent 流式传输思考词元,请使用 stream_mode="messages" 并过滤出推理类型的内容块:
9.6.1 流式思考/推理token
from langchain.agents import create_agent
from langchain.messages import AIMessageChunk
from langchain_anthropic import ChatAnthropic
from langchain_core.runnables import Runnable


def get_weather(city: str) -> str:
    """Get weather for a given city."""
    return f"It's always sunny in {city}!"


model = ChatAnthropic(
    model_name="claude-sonnet-4-6",
    timeout=None,
    stop=None,
    thinking={"type": "enabled", "budget_tokens": 5000},
)
agent: Runnable = create_agent(
    model=model,
    tools=[get_weather],
)

for token, metadata in agent.stream(
    {"messages": [{"role": "user", "content": "What is the weather in SF?"}]},
    stream_mode="messages",
):
    if not isinstance(token, AIMessageChunk):
        continue
    reasoning = [b for b in token.content_blocks if b["type"] == "reasoning"]
    text = [b for b in token.content_blocks if b["type"] == "text"]
    if reasoning:
        print(f"[thinking] {reasoning[0]['reasoning']}", end="")
    if text:
        print(text[0]["text"], end="")
[thinking] The user is asking about the weather in San Francisco. I have a tool
[thinking] available to get this information. Let me call the get_weather tool
[thinking] with "San Francisco" as the city parameter.
The weather in San Francisco is: It's always sunny in San Francisco!9.6.2 流式工具调用
你可能希望同时流式传输以下两种内容:
- 工具调用生成过程中的部分 JSON 数据。
- 执行时所需的已完成的、已解析的工具调用。
指定 stream_mode="messages" 将会流式传输 Agent 中所有 LLM 调用生成的增量消息块。若要访问带有已解析工具调用的完整消息:
- 如果这些消息被跟踪在状态中(就像在
create_agent的模型节点中那样),请使用stream_mode=["messages", "updates"]以便通过状态更新来访问完整消息(如下所示)。 - 如果这些消息未被跟踪在状态中,请使用自定义更新,或者在流式循环中聚合这些数据块(见下一节)。
- 如果你的 Agent 包含多个 LLM,请参考下面关于从子 Agent 进行流式传输的章节。
from typing import Any

from langchain.agents import create_agent
from langchain.messages import AIMessage, AIMessageChunk, AnyMessage, ToolMessage


def get_weather(city: str) -> str:
    """Get weather for a given city."""

    return f"It's always sunny in {city}!"


agent = create_agent("openai:gpt-5.2", tools=[get_weather])


def _render_message_chunk(token: AIMessageChunk) -> None:
    if token.text:
        print(token.text, end="|")
    if token.tool_call_chunks:
        print(token.tool_call_chunks)
    # N.B. all content is available through token.content_blocks


def _render_completed_message(message: AnyMessage) -> None:
    if isinstance(message, AIMessage) and message.tool_calls:
        print(f"Tool calls: {message.tool_calls}")
    if isinstance(message, ToolMessage):
        print(f"Tool response: {message.content_blocks}")


input_message = {"role": "user", "content": "What is the weather in Boston?"}
for chunk in agent.stream(
    {"messages": [input_message]},
    stream_mode=["messages", "updates"],
    version="v2",
):
    if chunk["type"] == "messages":
        token, metadata = chunk["data"]
        if isinstance(token, AIMessageChunk):
            _render_message_chunk(token)
    elif chunk["type"] == "updates":
        for source, update in chunk["data"].items():
            if source in ("model", "tools"):  # `source` captures node name
                _render_completed_message(update["messages"][-1])
[{'name': 'get_weather', 'args': '', 'id': 'call_D3Orjr89KgsLTZ9hTzYv7Hpf', 'index': 0, 'type': 'tool_call_chunk'}]
[{'name': None, 'args': '{"', 'id': None, 'index': 0, 'type': 'tool_call_chunk'}]
[{'name': None, 'args': 'city', 'id': None, 'index': 0, 'type': 'tool_call_chunk'}]
[{'name': None, 'args': '":"', 'id': None, 'index': 0, 'type': 'tool_call_chunk'}]
[{'name': None, 'args': 'Boston', 'id': None, 'index': 0, 'type': 'tool_call_chunk'}]
[{'name': None, 'args': '"}', 'id': None, 'index': 0, 'type': 'tool_call_chunk'}]
Tool calls: [{'name': 'get_weather', 'args': {'city': 'Boston'}, 'id': 'call_D3Orjr89KgsLTZ9hTzYv7Hpf', 'type': 'tool_call'}]
Tool response: [{'type': 'text', 'text': "It's always sunny in Boston!"}]
The| weather| in| Boston| is| **|sun|ny|**|.|访问完整的消息
如果完整的消息被记录在 Agent 的状态中,你可以像“流式传输工具调用”部分演示的那样,使用 stream_mode=["messages", "updates"] 在流式传输过程中访问完整的消息。但在某些情况下,完整的消息不会反映在状态更新中。如果你能访问 Agent 的内部结构,可以使用自定义更新来在流式传输期间获取这些消息。否则,你可以在流式循环中聚合消息块(见下文)。请看下面的示例,我们将一个流写入器整合到了一个简化的“护栏”中间件中。该中间件演示了工具调用,用于生成结构化的“安全/不安全”评估(当然,你也可以为此使用结构化输出)
from typing import Any, Literal

from langchain.agents.middleware import after_agent, AgentState
from langgraph.runtime import Runtime
from langchain.messages import AIMessage
from langchain.chat_models import init_chat_model
from langgraph.config import get_stream_writer
from pydantic import BaseModel


class ResponseSafety(BaseModel):
    """Evaluate a response as safe or unsafe."""
    evaluation: Literal["safe", "unsafe"]


safety_model = init_chat_model("openai:gpt-5.2")

@after_agent(can_jump_to=["end"])
def safety_guardrail(state: AgentState, runtime: Runtime) -> dict[str, Any] | None:
    """Model-based guardrail: Use an LLM to evaluate response safety."""
    stream_writer = get_stream_writer()
    # Get the model response
    if not state["messages"]:
        return None

    last_message = state["messages"][-1]
    if not isinstance(last_message, AIMessage):
        return None

    # Use another model to evaluate safety
    model_with_tools = safety_model.bind_tools([ResponseSafety], tool_choice="any")
    result = model_with_tools.invoke(
        [
            {
                "role": "system",
                "content": "Evaluate this AI response as generally safe or unsafe."
            },
            {
                "role": "user",
                "content": f"AI response: {last_message.text}"
            }
        ]
    )
    stream_writer(result)

    tool_call = result.tool_calls[0]
    if tool_call["args"]["evaluation"] == "unsafe":
        last_message.content = "I cannot provide that response. Please rephrase your request."

    return None
上面这段代码看起来稍显复杂,可读性有点差,简单说一下关键点
@after_agent:这是一个装饰器,意思是“在 Agent 跑完所有步骤之后运行我”。@after_agent这个装饰器,被注册成了一个“后置处理中间件”can_jump_to=["end"]:这很有趣,意味着如果这个安检员决定要拦截,流程可以直接跳到结束,不再继续
随后,我们可以将这个中间件整合到我们的 Agent 中,并包含其自定义的流式事件
from typing import Any

from langchain.agents import create_agent
from langchain.messages import AIMessageChunk, AIMessage, AnyMessage


def get_weather(city: str) -> str:
    """Get weather for a given city."""

    return f"It's always sunny in {city}!"


agent = create_agent(
    model="openai:gpt-5.2",
    tools=[get_weather],
    middleware=[safety_guardrail],
)

def _render_message_chunk(token: AIMessageChunk) -> None:
    if token.text:
        print(token.text, end="|")
    if token.tool_call_chunks:
        print(token.tool_call_chunks)


def _render_completed_message(message: AnyMessage) -> None:
    if isinstance(message, AIMessage) and message.tool_calls:
        print(f"Tool calls: {message.tool_calls}")
    if isinstance(message, ToolMessage):
        print(f"Tool response: {message.content_blocks}")


input_message = {"role": "user", "content": "What is the weather in Boston?"}
for chunk in agent.stream(
    {"messages": [input_message]},
    stream_mode=["messages", "updates", "custom"],
    version="v2",
):
    if chunk["type"] == "messages":
        token, metadata = chunk["data"]
        if isinstance(token, AIMessageChunk):
            _render_message_chunk(token)
    elif chunk["type"] == "updates":
        for source, update in chunk["data"].items():
            if source in ("model", "tools"):
                _render_completed_message(update["messages"][-1])
    elif chunk["type"] == "custom":
        # access completed message in stream
        print(f"Tool calls: {chunk['data'].tool_calls}")
[{'name': 'get_weather', 'args': '', 'id': 'call_je6LWgxYzuZ84mmoDalTYMJC', 'index': 0, 'type': 'tool_call_chunk'}]
[{'name': None, 'args': '{"', 'id': None, 'index': 0, 'type': 'tool_call_chunk'}]
[{'name': None, 'args': 'city', 'id': None, 'index': 0, 'type': 'tool_call_chunk'}]
[{'name': None, 'args': '":"', 'id': None, 'index': 0, 'type': 'tool_call_chunk'}]
[{'name': None, 'args': 'Boston', 'id': None, 'index': 0, 'type': 'tool_call_chunk'}]
[{'name': None, 'args': '"}', 'id': None, 'index': 0, 'type': 'tool_call_chunk'}]
Tool calls: [{'name': 'get_weather', 'args': {'city': 'Boston'}, 'id': 'call_je6LWgxYzuZ84mmoDalTYMJC', 'type': 'tool_call'}]
Tool response: [{'type': 'text', 'text': "It's always sunny in Boston!"}]
The| weather| in| **|Boston|**| is| **|sun|ny|**|.|[{'name': 'ResponseSafety', 'args': '', 'id': 'call_O8VJIbOG4Q9nQF0T8ltVi58O', 'index': 0, 'type': 'tool_call_chunk'}]
[{'name': None, 'args': '{"', 'id': None, 'index': 0, 'type': 'tool_call_chunk'}]
[{'name': None, 'args': 'evaluation', 'id': None, 'index': 0, 'type': 'tool_call_chunk'}]
[{'name': None, 'args': '":"', 'id': None, 'index': 0, 'type': 'tool_call_chunk'}]
[{'name': None, 'args': 'safe', 'id': None, 'index': 0, 'type': 'tool_call_chunk'}]
[{'name': None, 'args': '"}', 'id': None, 'index': 0, 'type': 'tool_call_chunk'}]
Tool calls: [{'name': 'ResponseSafety', 'args': {'evaluation': 'safe'}, 'id': 'call_O8VJIbOG4Q9nQF0T8ltVi58O', 'type': 'tool_call'}]或者,如果你无法向流中添加自定义事件,你可以在流式循环中聚合消息块:
input_message = {"role": "user", "content": "What is the weather in Boston?"}
full_message = None
for chunk in agent.stream(
    {"messages": [input_message]},
    stream_mode=["messages", "updates"],
    version="v2",
):
    if chunk["type"] == "messages":
        token, metadata = chunk["data"]
        if isinstance(token, AIMessageChunk):
            _render_message_chunk(token)
            full_message = token if full_message is None else full_message + token
            if token.chunk_position == "last":
                if full_message.tool_calls:
                    print(f"Tool calls: {full_message.tool_calls}")
                full_message = None
    elif chunk["type"] == "updates":
        for source, update in chunk["data"].items():
            if source == "tools":
                _render_completed_message(update["messages"][-1])
9.6.3 带有人类介入环节的流式传输
为了处理带有人类介入环节的断点,我们在上面的示例基础上进行构建:
- 我们使用带人类介入环节的中间件和一个检查点存储来配置 Agent。
- 我们在“updates”流式传输模式中收集生成的断点信号。
- 我们用一个指令来响应这些断点
from typing import Any

from langchain.agents import create_agent
from langchain.agents.middleware import HumanInTheLoopMiddleware
from langchain.messages import AIMessage, AIMessageChunk, AnyMessage, ToolMessage
from langgraph.checkpoint.memory import InMemorySaver
from langgraph.types import Command, Interrupt


def get_weather(city: str) -> str:
    """Get weather for a given city."""

    return f"It's always sunny in {city}!"


checkpointer = InMemorySaver()

agent = create_agent(
    "openai:gpt-5.2",
    tools=[get_weather],
    middleware=[
        HumanInTheLoopMiddleware(interrupt_on={"get_weather": True}),
    ],
    checkpointer=checkpointer,
)


def _render_message_chunk(token: AIMessageChunk) -> None:
    if token.text:
        print(token.text, end="|")
    if token.tool_call_chunks:
        print(token.tool_call_chunks)


def _render_completed_message(message: AnyMessage) -> None:
    if isinstance(message, AIMessage) and message.tool_calls:
        print(f"Tool calls: {message.tool_calls}")
    if isinstance(message, ToolMessage):
        print(f"Tool response: {message.content_blocks}")


def _render_interrupt(interrupt: Interrupt) -> None:
    interrupts = interrupt.value
    for request in interrupts["action_requests"]:
        print(request["description"])


input_message = {
    "role": "user",
    "content": (
        "Can you look up the weather in Boston and San Francisco?"
    ),
}
config = {"configurable": {"thread_id": "some_id"}}
interrupts = []
for chunk in agent.stream(
    {"messages": [input_message]},
    config=config,
    stream_mode=["messages", "updates"],
    version="v2",
):
    if chunk["type"] == "messages":
        token, metadata = chunk["data"]
        if isinstance(token, AIMessageChunk):
            _render_message_chunk(token)
    elif chunk["type"] == "updates":
        for source, update in chunk["data"].items():
            if source in ("model", "tools"):
                _render_completed_message(update["messages"][-1])
            if source == "__interrupt__":
                interrupts.extend(update)
                _render_interrupt(update[0])
[{'name': 'get_weather', 'args': '', 'id': 'call_GOwNaQHeqMixay2qy80padfE', 'index': 0, 'type': 'tool_call_chunk'}]
[{'name': None, 'args': '{"ci', 'id': None, 'index': 0, 'type': 'tool_call_chunk'}]
[{'name': None, 'args': 'ty": ', 'id': None, 'index': 0, 'type': 'tool_call_chunk'}]
[{'name': None, 'args': '"Bosto', 'id': None, 'index': 0, 'type': 'tool_call_chunk'}]
[{'name': None, 'args': 'n"}', 'id': None, 'index': 0, 'type': 'tool_call_chunk'}]
[{'name': 'get_weather', 'args': '', 'id': 'call_Ndb4jvWm2uMA0JDQXu37wDH6', 'index': 1, 'type': 'tool_call_chunk'}]
[{'name': None, 'args': '{"ci', 'id': None, 'index': 1, 'type': 'tool_call_chunk'}]
[{'name': None, 'args': 'ty": ', 'id': None, 'index': 1, 'type': 'tool_call_chunk'}]
[{'name': None, 'args': '"San F', 'id': None, 'index': 1, 'type': 'tool_call_chunk'}]
[{'name': None, 'args': 'ranc', 'id': None, 'index': 1, 'type': 'tool_call_chunk'}]
[{'name': None, 'args': 'isco"', 'id': None, 'index': 1, 'type': 'tool_call_chunk'}]
[{'name': None, 'args': '}', 'id': None, 'index': 1, 'type': 'tool_call_chunk'}]
Tool calls: [{'name': 'get_weather', 'args': {'city': 'Boston'}, 'id': 'call_GOwNaQHeqMixay2qy80padfE', 'type': 'tool_call'}, {'name': 'get_weather', 'args': {'city': 'San Francisco'}, 'id': 'call_Ndb4jvWm2uMA0JDQXu37wDH6', 'type': 'tool_call'}]
Tool execution requires approval
Tool: get_weather
Args: {'city': 'Boston'}
Tool execution requires approval
Tool: get_weather
Args: {'city': 'San Francisco'}接下来,我们将为每一个中断收集决策。重要的是,决策的顺序必须与我们收集到的动作顺序相匹配。为了演示这一点,我们将编辑其中一个工具调用,并接受另一个
def _get_interrupt_decisions(interrupt: Interrupt) -> list[dict]:
    return [
        {
            "type": "edit",
            "edited_action": {
                "name": "get_weather",
                "args": {"city": "Boston, U.K."},
            },
        }
        if "boston" in request["description"].lower()
        else {"type": "approve"}
        for request in interrupt.value["action_requests"]
    ]

decisions = {}
for interrupt in interrupts:
    decisions[interrupt.id] = {
        "decisions": _get_interrupt_decisions(interrupt)
    }

decisions
输出
{
    'a96c40474e429d661b5b32a8d86f0f3e': {
        'decisions': [
            {
                'type': 'edit',
                 'edited_action': {
                     'name': 'get_weather',
                     'args': {'city': 'Boston, U.K.'}
                 }
            },
            {'type': 'approve'},
        ]
    }
}
然后,我们可以通过将 Command 传入同一个流式循环来恢复运行
interrupts = []
for chunk in agent.stream(
    Command(resume=decisions),
    config=config,
    stream_mode=["messages", "updates"],
    version="v2",
):
    # Streaming loop is unchanged
    if chunk["type"] == "messages":
        token, metadata = chunk["data"]
        if isinstance(token, AIMessageChunk):
            _render_message_chunk(token)
    elif chunk["type"] == "updates":
        for source, update in chunk["data"].items():
            if source in ("model", "tools"):
                _render_completed_message(update["messages"][-1])
            if source == "__interrupt__":
                interrupts.extend(update)
                _render_interrupt(update[0])
到这里才是完整的一套代码,全部流程走完,这是一个相对复杂的代码
[{'name': 'get_weather', 'args': '{"city": "Boston"}', 'id': 'e71cd6ef-869b-405f-8cf7-062dfceca95b', 'index': None, 'type': 'tool_call_chunk'}]
[{'name': 'get_weather', 'args': '{"city": "San Francisco"}', 'id': '0b5fa3a1-5b13-48ef-9864-db3f4fab84f3', 'index': None, 'type': 'tool_call_chunk'}]
render_completed Tool calls: [{'name': 'get_weather', 'args': {'city': 'Boston'}, 'id': 'e71cd6ef-869b-405f-8cf7-062dfceca95b', 'type': 'tool_call'}, {'name': 'get_weather', 'args': {'city': 'San Francisco'}, 'id': '0b5fa3a1-5b13-48ef-9864-db3f4fab84f3', 'type': 'tool_call'}]
render_interrupt Tool execution requires approval

Tool: get_weather
Args: {'city': 'Boston'}
render_interrupt Tool execution requires approval

Tool: get_weather
Args: {'city': 'San Francisco'}


{'52c9660ec6fdcf8bd019e7447b007e76': {'decisions': [{'type': 'edit', 'edited_action': {'name': 'get_weather', 'args': {'city': 'Boston, U.K.'}}}, {'type': 'approve'}]}}
render_completed Tool response: [{'type': 'text', 'text': "It's always sunny in Boston, U.K.!"}]
render_completed Tool response: [{'type': 'text', 'text': "It's always sunny in San Francisco!"}]
Here|'s| the| weather| update|:

|-| **|Boston|,| U|.K|.|**:| ☀|️| It|'s| always| sunny|!
|-| **|San| Francisco|**:| ☀|️| It|'s| always| sunny|!

|Let| me| know| if| you| need| further| details|!|
9.6.4 sub-agent流
当 Agent 的任意环节涉及多个 LLM 时,通常需要在消息生成时区分其来源(消除歧义)。为此,请在创建每个 Agent 时传递一个 name 参数。当以 "messages" 模式进行流式传输时,该名称可以通过元数据中的 lc_agent_name 键获取。下面,我们更新流式工具调用的示例:
- 我们将工具替换为一个
call_weather_agent工具,该工具在内部调用一个 Agent; - 我们为每个 Agent 添加一个名称;
- 我们在创建流时指定
subgraphs=True; - 我们的流处理逻辑与之前相同,但我们添加了逻辑,利用
create_agent的name参数来跟踪当前是哪个 Agent 处于活动状态
当你在创建 Agent 时设置了 name,该名称也会被附加到该 Agent 生成的任何 AIMessage 上,首先创建agent
from typing import Any

from langchain.agents import create_agent
from langchain.chat_models import init_chat_model
from langchain.messages import AIMessage, AnyMessage


def get_weather(city: str) -> str:
    """Get weather for a given city."""

    return f"It's always sunny in {city}!"


weather_model = init_chat_model("openai:gpt-5.2")
weather_agent = create_agent(
    model=weather_model,
    tools=[get_weather],
    name="weather_agent",
)


def call_weather_agent(query: str) -> str:
    """Query the weather agent."""
    result = weather_agent.invoke({
        "messages": [{"role": "user", "content": query}]
    })
    return result["messages"][-1].text


supervisor_model = init_chat_model("openai:gpt-5.2")
agent = create_agent(
    model=supervisor_model,
    tools=[call_weather_agent],
    name="supervisor",
)
接下来,我们在流式循环中添加逻辑,以报告(显示)当前是哪个 Agent 正在输出 token
def _render_message_chunk(token: AIMessageChunk) -> None:
    if token.text:
        print(token.text, end="|")
    if token.tool_call_chunks:
        print(token.tool_call_chunks)


def _render_completed_message(message: AnyMessage) -> None:
    if isinstance(message, AIMessage) and message.tool_calls:
        print(f"Tool calls: {message.tool_calls}")
    if isinstance(message, ToolMessage):
        print(f"Tool response: {message.content_blocks}")


input_message = {"role": "user", "content": "What is the weather in Boston?"}
current_agent = None
for chunk in agent.stream(
    {"messages": [input_message]},
    stream_mode=["messages", "updates"],
    subgraphs=True,
    version="v2",
):
    if chunk["type"] == "messages":
        token, metadata = chunk["data"]
        if agent_name := metadata.get("lc_agent_name"):
            if agent_name != current_agent:
                print(f"🤖 {agent_name}: ")
                current_agent = agent_name
        if isinstance(token, AIMessage):
            _render_message_chunk(token)
    elif chunk["type"] == "updates":
        for source, update in chunk["data"].items():
            if source in ("model", "tools"):
                _render_completed_message(update["messages"][-1])
🤖 supervisor:
[{'name': 'call_weather_agent', 'args': '', 'id': 'call_asorzUf0mB6sb7MiKfgojp7I', 'index': 0, 'type': 'tool_call_chunk'}]
[{'name': None, 'args': '{"', 'id': None, 'index': 0, 'type': 'tool_call_chunk'}]
[{'name': None, 'args': 'query', 'id': None, 'index': 0, 'type': 'tool_call_chunk'}]
[{'name': None, 'args': '":"', 'id': None, 'index': 0, 'type': 'tool_call_chunk'}]
[{'name': None, 'args': 'Boston', 'id': None, 'index': 0, 'type': 'tool_call_chunk'}]
[{'name': None, 'args': ' weather', 'id': None, 'index': 0, 'type': 'tool_call_chunk'}]
[{'name': None, 'args': ' right', 'id': None, 'index': 0, 'type': 'tool_call_chunk'}]
[{'name': None, 'args': ' now', 'id': None, 'index': 0, 'type': 'tool_call_chunk'}]
[{'name': None, 'args': ' and', 'id': None, 'index': 0, 'type': 'tool_call_chunk'}]
[{'name': None, 'args': " today's", 'id': None, 'index': 0, 'type': 'tool_call_chunk'}]
[{'name': None, 'args': ' forecast', 'id': None, 'index': 0, 'type': 'tool_call_chunk'}]
[{'name': None, 'args': '"}', 'id': None, 'index': 0, 'type': 'tool_call_chunk'}]
Tool calls: [{'name': 'call_weather_agent', 'args': {'query': "Boston weather right now and today's forecast"}, 'id': 'call_asorzUf0mB6sb7MiKfgojp7I', 'type': 'tool_call'}]
🤖 weather_agent:
[{'name': 'get_weather', 'args': '', 'id': 'call_LZ89lT8fW6w8vqck5pZeaDIx', 'index': 0, 'type': 'tool_call_chunk'}]
[{'name': None, 'args': '{"', 'id': None, 'index': 0, 'type': 'tool_call_chunk'}]
[{'name': None, 'args': 'city', 'id': None, 'index': 0, 'type': 'tool_call_chunk'}]
[{'name': None, 'args': '":"', 'id': None, 'index': 0, 'type': 'tool_call_chunk'}]
[{'name': None, 'args': 'Boston', 'id': None, 'index': 0, 'type': 'tool_call_chunk'}]
[{'name': None, 'args': '"}', 'id': None, 'index': 0, 'type': 'tool_call_chunk'}]
Tool calls: [{'name': 'get_weather', 'args': {'city': 'Boston'}, 'id': 'call_LZ89lT8fW6w8vqck5pZeaDIx', 'type': 'tool_call'}]
Tool response: [{'type': 'text', 'text': "It's always sunny in Boston!"}]
Boston| weather| right| now|:| **|Sunny|**|.
|Today|'s| forecast| for| Boston|:| **|Sunny| all| day|**|.|Tool response: [{'type': 'text', 'text': 'Boston weather right now: **Sunny**.\n\nToday's forecast for Boston: **Sunny all day**.'}]
🤖 supervisor:
Boston| weather| right| now|:| **|Sunny|**|.
|Today|'s| forecast| for| Boston|:| **|Sunny| all| day|**|.|qwen3:8b 输出
🤖 supervisor:
[{'name': 'call_weather_agent', 'args': '{"query": "Boston"}', 'id': '627113c0-6354-45ba-834e-a58ec573cdb7', 'index': None, 'type': 'tool_call_chunk'}]
Tool calls: [{'name': 'call_weather_agent', 'args': {'query': 'Boston'}, 'id': '627113c0-6354-45ba-834e-a58ec573cdb7', 'type': 'tool_call'}]
🤖 weather_agent:
[{'name': 'get_weather', 'args': '{"city": "Boston"}', 'id': '612c20c6-c930-4304-ae81-8643279822d0', 'index': None, 'type': 'tool_call_chunk'}]
Tool calls: [{'name': 'get_weather', 'args': {'city': 'Boston'}, 'id': '612c20c6-c930-4304-ae81-8643279822d0', 'type': 'tool_call'}]
Tool response: [{'type': 'text', 'text': "It's always sunny in Boston!"}]
The| weather| in| Boston| is| currently| sunny|!| ☀|️| Let| me| know| if| you|'d| like| more| details| about| the| forecast|.|🤖 supervisor:
Tool response: [{'type': 'text', 'text': "The weather in Boston is currently sunny! ☀️ Let me know if you'd like more details about the forecast."}]
The| weather| in| Boston| is| currently| sunny|!| ☀|️| Let| me| know| if| you|'d| like| more| details| about| the| forecast|.|
9.7 禁用流
在某些应用场景中,你可能需要禁用特定模型的单个 token 流式传输。这在以下情况非常有用:
- 在多智能体系统中工作,以控制哪些智能体流式输出其结果;
- 混合使用支持流式和不支持流式的模型时;
- 部署到 LangSmith 并希望防止某些模型输出被流式传输到客户端时。
在初始化模型时设置 streaming=False
from langchain_openai import ChatOpenAI

model = ChatOpenAI(
    model="gpt-4.1",
    streaming=False
)
当部署到 LangSmith 时,请在任何你不希望将其输出流式传输到客户端的模型上设置 streaming=False。这需要在部署前的图(graph)代码中进行配置。
并非所有的聊天模型集成(Integrations)都支持 streaming 参数。如果你的模型不支持该参数,请改用 disable_streaming=True。这个参数通过基类在所有聊天模型中均可用
9.8 v2流格式
在调用 stream() 或 astream() 时传入 version="v2",即可获得统一的输出格式。此时,每一个数据块(chunk)都会变成一个包含 type、ns 和 data 键的 StreamPart 字典——无论你当前使用的是哪种流式模式,或者混合了多少种模式,返回的数据结构形状都是完全一致的。
# v2 Unified format — no more tuple unpacking
for chunk in agent.stream(
    {"messages": [{"role": "user", "content": "What is the weather in SF?"}]},
    stream_mode=["updates", "custom"],
    version="v2",
):
    print(chunk["type"])  # "updates" or "custom"
    print(chunk["data"])  # payload
# Must unpack (mode, data) tuples
for mode, chunk in agent.stream(
{"messages": [{"role": "user", "content": "What is the weather in SF?"}]},
stream_mode=["updates", "custom"],
):
print(mode) # "updates" or "custom"
print(chunk) # payload v2 格式同时也改进了 invoke() 方法 —— 它现在返回一个 GraphOutput 对象,该对象包含 .value 和 .interrupts 属性,从而清晰地将状态数据与中断元数据分离开来
result = agent.invoke(
    {"messages": [{"role": "user", "content": "Hello"}]},
    version="v2",
)
print(result.value)       # state (dict, Pydantic model, or dataclass)
print(result.interrupts)  # tuple of Interrupt objects (empty if none)
9.9 引用
- 前端流式传输:使用
useStream构建 React UI,实现实时智能体交互。 - 聊天模型流式传输:不依赖智能体或图,直接从聊天模型流式输出 Token。
- 聊天模型推理:配置并获取聊天模型的推理过程输出。
- 标准内容块:理解用于推理、文本及其他类型的标准化内容块格式。
- 人工介入流式传输:在处理人工审核中断的同时,流式展示智能体进度。
- LangGraph 流式传输:包含值流式、调试模式及子图流式在内的高级选项。
10 structed-output
结构化输出允许智能体以特定、可预测的格式返回数据。你不再需要解析自然语言回复,而是直接获取 JSON 对象、Pydantic 模型或数据类等结构化数据,以便应用程序直接使用。
本页面介绍如何在 create_agent 中使用结构化输出。如果你想直接在模型上使用结构化输出(不通过智能体),请参阅“模型 - 结构化输出”。
LangChain 的 create_agent 会自动处理结构化输出。用户只需设置所需的结构化输出模式,当模型生成结构化数据时,它会被捕获、验证,并返回到智能体状态的 structured_response 键中
def create_agent(
    ...
    response_format: Union[
        ToolStrategy[StructuredResponseT],
        ProviderStrategy[StructuredResponseT],
        type[StructuredResponseT],
        None,
    ]
10.1 响应格式
你可以使用 response_format 参数来控制代理(Agent)如何返回结构化数据:
- ToolStrategy[StructuredResponseT]:使用 工具调用 的方式来生成结构化输出。
- ProviderStrategy[StructuredResponseT]:使用 模型提供商原生 的结构化输出功能。
- type[StructuredResponseT]:直接传入 Schema 类型 —— 系统会根据模型的能力自动选择最佳策略。
- None:不显式请求结构化输出(即输出普通文本)
当你直接提供一个 Schema 类型(例如 Pydantic 模型或数据类)时,LangChain 会自动进行以下选择:
- 如果所选的模型和提供商支持 原生结构化输出(例如 OpenAI、Anthropic (Claude) 或 xAI (Grok)),它会使用 ProviderStrategy。
- 对于其他所有模型,它会使用 ToolStrategy
如果你使用的是 langchain>=1.1 版本,系统会动态地从模型配置文件中读取对“原生结构化输出”功能的支持情况。如果获取不到这些数据,请使用其他判断条件,或者手动指定策略
custom_profile = {
    "structured_output": True,
    # ...
}
model = init_chat_model("...", profile=custom_profile)
结构化响应结果会返回在代理(Agent)最终状态的 structured_response 键(key)中
10.2 供应商策略
某些模型提供商通过其 API 原生支持结构化输出(例如 OpenAI、xAI (Grok)、Gemini、Anthropic (Claude))。当此功能可用时,这是最可靠的方法
要使用此策略,请配置 ProviderStrategy
class ProviderStrategy(Generic[SchemaT]):
    schema: type[SchemaT]
    strict: bool | None = None #strict 参数需要 langchain>=1.2 版本
schema 必填
定义结构化输出格式的 Schema(模式)。支持以下类型:
- Pydantic 模型:继承自
BaseModel且带有字段验证的类。返回经过验证的 Pydantic 实例。 - Dataclasses:带有类型注解的 Python 数据类。返回字典。
- TypedDict:类型化字典类。返回字典。
- JSON Schema:包含 JSON 模式规范的字典。返回字典。
strict
一个可选的布尔参数,用于启用严格的 Schema 遵循模式。
- 支持情况:仅部分提供商支持(例如 OpenAI 和 xAI)。
- 默认值:默认为
None(即禁用)。
当你直接将 Schema 类型传递给 create_agent.response_format,且该模型支持原生结构化输出时,LangChain 会自动使用 ProviderStrategy
from pydantic import BaseModel, Field
from langchain.agents import create_agent

#pydantic
class ContactInfo(BaseModel):
    """Contact information for a person."""
    name: str = Field(description="The name of the person")
    email: str = Field(description="The email address of the person")
    phone: str = Field(description="The phone number of the person")

agent = create_agent(
    model="gpt-5",
    response_format=ContactInfo  # Auto-selects ProviderStrategy
)

result = agent.invoke({
    "messages": [{"role": "user", "content": "Extract contact info from: John Doe, john@example.com, (555) 123-4567"}]
})

print(result["structured_response"])
# ContactInfo(name='John Doe', email='john@example.com', phone='(555) 123-4567')
from dataclasses import dataclass
from langchain.agents import create_agent
#dataclass
@dataclass
class ContactInfo:
"""Contact information for a person."""
name: str # The name of the person
email: str # The email address of the person
phone: str # The phone number of the person
agent = create_agent(
model="gpt-5",
tools=tools,
response_format=ContactInfo # Auto-selects ProviderStrategy
)
result = agent.invoke({
"messages": [{"role": "user", "content": "Extract contact info from: John Doe, john@example.com, (555) 123-4567"}]
})
result["structured_response"]
# {'name': 'John Doe', 'email': 'john@example.com', 'phone': '(555) 123-4567'}from typing_extensions import TypedDict
from langchain.agents import create_agent
#TypedDict
class ContactInfo(TypedDict):
"""Contact information for a person."""
name: str # The name of the person
email: str # The email address of the person
phone: str # The phone number of the person
agent = create_agent(
model="gpt-5",
tools=tools,
response_format=ContactInfo # Auto-selects ProviderStrategy
)
result = agent.invoke({
"messages": [{"role": "user", "content": "Extract contact info from: John Doe, john@example.com, (555) 123-4567"}]
})
result["structured_response"]
# {'name': 'John Doe', 'email': 'john@example.com', 'phone': '(555) 123-4567'}from langchain.agents import create_agent
contact_info_schema = {
"type": "object",
"description": "Contact information for a person.",
"properties": {
"name": {"type": "string", "description": "The name of the person"},
"email": {"type": "string", "description": "The email address of the person"},
"phone": {"type": "string", "description": "The phone number of the person"}
},
"required": ["name", "email", "phone"]
}
agent = create_agent(
model="gpt-5",
tools=tools,
response_format=ProviderStrategy(contact_info_schema)
)
result = agent.invoke({
"messages": [{"role": "user", "content": "Extract contact info from: John Doe, john@example.com, (555) 123-4567"}]
})
result["structured_response"]
# {'name': 'John Doe', 'email': 'john@example.com', 'phone': '(555) 123-4567'}提供商原生的结构化输出具有高可靠性和严格的验证能力,因为这是由模型提供商直接在底层强制执行 Schema 的。只要可用,请务必使用它。
如果你的模型选择原生支持结构化输出,那么下面这两种写法在功能上是完全等价的:
response_format=ProductReviewresponse_format=ProviderStrategy(ProductReview)
在这两种情况下,如果(意外地)不支持结构化输出,代理都会自动回退(fallback)到工具调用策略
10.3 工具调用策略
对于那些不支持原生结构化输出的模型,LangChain 会使用工具调用来达到相同的结果。这种方法适用于所有支持工具调用的模型(大多数现代模型都支持)。若要使用此策略,请配置 ToolStrategy
class ToolStrategy(Generic[SchemaT]):
    schema: type[SchemaT]
    tool_message_content: str | None
    handle_errors: Union[
        bool,
        str,
        type[Exception],
        tuple[type[Exception], ...],
        Callable[[Exception], str],
    ]
schema 必填
定义结构化输出格式的 Schema(模式)。支持以下类型:
- Pydantic 模型:继承自
BaseModel且带有字段验证的类。返回经过验证的 Pydantic 实例。 - 数据类:带有类型注解的 Python 数据类。返回字典。
- TypedDict:类型化字典类。返回字典。
- JSON Schema:包含 JSON 模式规范的字典。返回字典。
- Union 类型:多个 Schema 选项。模型会根据上下文选择最合适的 Schema。
tool_message_content
自定义内容用于在生成结构化输出时返回的工具消息的内容。如果未提供,默认会显示一条包含结构化响应数据的消息。
handle_error
from pydantic import BaseModel, Field
from typing import Literal
from langchain.agents import create_agent
from langchain.agents.structured_output import ToolStrategy

#pydantic
class ProductReview(BaseModel):
    """Analysis of a product review."""
    rating: int | None = Field(description="The rating of the product", ge=1, le=5)
    sentiment: Literal["positive", "negative"] = Field(description="The sentiment of the review")
    key_points: list[str] = Field(description="The key points of the review. Lowercase, 1-3 words each.")

agent = create_agent(
    model="gpt-5",
    tools=tools,
    response_format=ToolStrategy(ProductReview)
)

result = agent.invoke({
    "messages": [{"role": "user", "content": "Analyze this review: 'Great product: 5 out of 5 stars. Fast shipping, but expensive'"}]
})
result["structured_response"]
# ProductReview(rating=5, sentiment='positive', key_points=['fast shipping', 'expensive'])
from dataclasses import dataclass
from typing import Literal
from langchain.agents import create_agent
from langchain.agents.structured_output import ToolStrategy
#dataclass
@dataclass
class ProductReview:
"""Analysis of a product review."""
rating: int | None # The rating of the product (1-5)
sentiment: Literal["positive", "negative"] # The sentiment of the review
key_points: list[str] # The key points of the review
agent = create_agent(
model="gpt-5",
tools=tools,
response_format=ToolStrategy(ProductReview)
)
result = agent.invoke({
"messages": [{"role": "user", "content": "Analyze this review: 'Great product: 5 out of 5 stars. Fast shipping, but expensive'"}]
})
result["structured_response"]
# {'rating': 5, 'sentiment': 'positive', 'key_points': ['fast shipping', 'expensive']}from typing import Literal
from typing_extensions import TypedDict
from langchain.agents import create_agent
from langchain.agents.structured_output import ToolStrategy
#TypeDict
class ProductReview(TypedDict):
"""Analysis of a product review."""
rating: int | None # The rating of the product (1-5)
sentiment: Literal["positive", "negative"] # The sentiment of the review
key_points: list[str] # The key points of the review
agent = create_agent(
model="gpt-5",
tools=tools,
response_format=ToolStrategy(ProductReview)
)
result = agent.invoke({
"messages": [{"role": "user", "content": "Analyze this review: 'Great product: 5 out of 5 stars. Fast shipping, but expensive'"}]
})
result["structured_response"]
# {'rating': 5, 'sentiment': 'positive', 'key_points': ['fast shipping', 'expensive']}from langchain.agents import create_agent
from langchain.agents.structured_output import ToolStrategy
#json sxhema
product_review_schema = {
"type": "object",
"description": "Analysis of a product review.",
"properties": {
"rating": {
"type": ["integer", "null"],
"description": "The rating of the product (1-5)",
"minimum": 1,
"maximum": 5
},
"sentiment": {
"type": "string",
"enum": ["positive", "negative"],
"description": "The sentiment of the review"
},
"key_points": {
"type": "array",
"items": {"type": "string"},
"description": "The key points of the review"
}
},
"required": ["sentiment", "key_points"]
}
agent = create_agent(
model="gpt-5",
tools=tools,
response_format=ToolStrategy(product_review_schema)
)
result = agent.invoke({
"messages": [{"role": "user", "content": "Analyze this review: 'Great product: 5 out of 5 stars. Fast shipping, but expensive'"}]
})
result["structured_response"]
# {'rating': 5, 'sentiment': 'positive', 'key_points': ['fast shipping', 'expensive']}from pydantic import BaseModel, Field
from typing import Literal, Union
from langchain.agents import create_agent
from langchain.agents.structured_output import ToolStrategy
#Union Types
class ProductReview(BaseModel):
"""Analysis of a product review."""
rating: int | None = Field(description="The rating of the product", ge=1, le=5)
sentiment: Literal["positive", "negative"] = Field(description="The sentiment of the review")
key_points: list[str] = Field(description="The key points of the review. Lowercase, 1-3 words each.")
class CustomerComplaint(BaseModel):
"""A customer complaint about a product or service."""
issue_type: Literal["product", "service", "shipping", "billing"] = Field(description="The type of issue")
severity: Literal["low", "medium", "high"] = Field(description="The severity of the complaint")
description: str = Field(description="Brief description of the complaint")
agent = create_agent(
model="gpt-5",
tools=tools,
response_format=ToolStrategy(Union[ProductReview, CustomerComplaint])
)
result = agent.invoke({
"messages": [{"role": "user", "content": "Analyze this review: 'Great product: 5 out of 5 stars. Fast shipping, but expensive'"}]
})
result["structured_response"]
# ProductReview(rating=5, sentiment='positive', key_points=['fast shipping', 'expensive'])10.3.1 自定义工具消息内容
tool_message_content 参数允许你自定义在生成结构化输出时,显示在对话历史中的消息内容
from pydantic import BaseModel, Field
from typing import Literal
from langchain.agents import create_agent
from langchain.agents.structured_output import ToolStrategy


class MeetingAction(BaseModel):
    """Action items extracted from a meeting transcript."""
    task: str = Field(description="The specific task to be completed")
    assignee: str = Field(description="Person responsible for the task")
    priority: Literal["low", "medium", "high"] = Field(description="Priority level")

agent = create_agent(
    model="gpt-5",
    tools=[],
    response_format=ToolStrategy(
        schema=MeetingAction,
        tool_message_content="Action item captured and added to meeting notes!"
    )
)

agent.invoke({
    "messages": [{"role": "user", "content": "From our meeting: Sarah needs to update the project timeline as soon as possible"}]
})
qwen3:8b带tool_message_content
{
  "messages": [
    {
      "content": "From our meeting: Sarah needs to update the project timeline as soon as possible",
      "type": "HumanMessage",
      "id": "f8233522-f798-47b1-840b-622e4c796fc5"
    },
    {
      "content": "",
      "type": "AIMessage",
      "id": "lc_run--019d6788-c592-7d73-855f-10413cb7ab44-0",
      "tool_calls": [
        {
          "name": "MeetingAction",
          "args": {
            "assignee": "Sarah",
            "priority": "high",
            "task": "update the project timeline"
          },
          "id": "725f68c6-83a6-4e2e-9a97-f1006fb0b3d0",
          "type": "tool_call"
        }
      ],
      "response_metadata": {
        "model": "qwen3:8b",
        "created_at": "2026-04-07T10:42:01.2416496Z",
        "total_duration": 9239776300,
        "eval_count": 160
      }
    },
    {
      "content": "Action item captured and added to meeting notes!",
      "type": "ToolMessage",
      "name": "MeetingAction",
      "id": "8a72d7f1-4c3c-41f6-b50a-13fd5a0d58b9",
      "tool_call_id": "725f68c6-83a6-4e2e-9a97-f1006fb0b3d0"
    }
  ],
  "structured_response": {
    "task": "update the project timeline",
    "assignee": "Sarah",
    "priority": "high"
  }
}
qwen3:8b不带tool_message_content
{
  "messages": [
    {
      "content": "From our meeting: Sarah needs to update the project timeline as soon as possible",
      "type": "HumanMessage",
      "id": "99dbe156-4264-4124-8387-08e00e73c280"
    },
    {
      "content": "",
      "type": "AIMessage",
      "id": "lc_run--019d6793-a132-7280-8a99-797efd48470f-0",
      "tool_calls": [
        {
          "name": "MeetingAction",
          "args": {
            "assignee": "Sarah",
            "priority": "high",
            "task": "update the project timeline"
          },
          "id": "56b42082-9a84-462d-9177-4cd19a6234fc",
          "type": "tool_call"
        }
      ],
      "response_metadata": {
        "model": "qwen3:8b",
        "created_at": "2026-04-07T10:54:02.0279226Z",
        "total_duration": 18449850300,
        "eval_count": 269
      }
    },
    {
      "content": "Returning structured response: task='update the project timeline' assignee='Sarah' priority='high'",
      "type": "ToolMessage",
      "name": "MeetingAction",
      "id": "dceead5e-03c8-46f7-8b98-fdce98558f5e",
      "tool_call_id": "56b42082-9a84-462d-9177-4cd19a6234fc"
    }
  ],
  "structured_response": {
    "task": "update the project timeline",
    "assignee": "Sarah",
    "priority": "high"
  }
}
10.3.2 错误处理
模型在通过工具调用生成结构化输出时可能会出错。LangChain 提供了智能重试机制,可自动处理这些错误。
多结构化输出错误
当模型错误地调用了多个结构化输出工具时,智能(Agent)会在 ToolMessage 中提供错误反馈,并提示模型进行重试
from pydantic import BaseModel, Field
from typing import Union
from langchain.agents import create_agent
from langchain.agents.structured_output import ToolStrategy


class ContactInfo(BaseModel):
    name: str = Field(description="Person's name")
    email: str = Field(description="Email address")

class EventDetails(BaseModel):
    event_name: str = Field(description="Name of the event")
    date: str = Field(description="Event date")

agent = create_agent(
    model="gpt-5",
    tools=[],
    response_format=ToolStrategy(Union[ContactInfo, EventDetails])  # Default: handle_errors=True
)

agent.invoke({
    "messages": [{"role": "user", "content": "Extract info: John Doe (john@email.com) is organizing Tech Conference on March 15th"}]
})
================================ Human Message =================================
Extract info: John Doe (john@email.com) is organizing Tech Conference on March 15th
None
================================== Ai Message ==================================
Tool Calls:
ContactInfo (call_1)
Call ID: call_1
Args:
name: John Doe
email: john@email.com
EventDetails (call_2)
Call ID: call_2
Args:
event_name: Tech Conference
date: March 15th
================================= Tool Message =================================
Name: ContactInfo
Error: Model incorrectly returned multiple structured responses (ContactInfo, EventDetails) when only one is expected.
Please fix your mistakes.
================================= Tool Message =================================
Name: EventDetails
Error: Model incorrectly returned multiple structured responses (ContactInfo, EventDetails) when only one is expected.
Please fix your mistakes.
================================== Ai Message ==================================
Tool Calls:
ContactInfo (call_3)
Call ID: call_3
Args:
name: John Doe
email: john@email.com
================================= Tool Message =================================
Name: ContactInfo
Returning structured response: {'name': 'John Doe', 'email': 'john@email.com'}为什么会发生这种情况?
-
贪婪的模型:当你要求模型提取信息时,它发现输入文本中既包含
ContactInfo所需的信息(姓名和邮箱),也包含EventDetails所需的信息(活动名称和日期)。因此,它“贪婪”地尝试一次性调用两个工具,返回两个结构体。 -
严格的策略:
ToolStrategy被设计为在单次响应中只处理一个工具调用。当它收到模型返回的多个工具调用时,会将其视为一个错误。 -
自动纠错循环:由于
handle_errors=True是默认值,ToolStrategy会自动将这个错误(“你返回了太多工具调用,只能返回一个!”)作为一条新的消息反馈给模型。模型接收到这个错误后,会进行自我修正,重新生成一个只包含单个工具调用的响应。
这就是你在日志中看到的过程:模型先尝试返回两个工具,然后收到错误,最后修正为只返回一个。这个应该不是你想要个的,本来不能返回两个值,但是代码能让你传,这是python本身的问题。
模式验证错误
当结构化输出与预期模式不匹配时,智能体会提供具体的错误反馈
from pydantic import BaseModel, Field
from langchain.agents import create_agent
from langchain.agents.structured_output import ToolStrategy


class ProductRating(BaseModel):
    rating: int | None = Field(description="Rating from 1-5", ge=1, le=5)
    comment: str = Field(description="Review comment")

agent = create_agent(
    model="gpt-5",
    tools=[],
    response_format=ToolStrategy(ProductRating),  # Default: handle_errors=True
    system_prompt="You are a helpful assistant that parses product reviews. Do not make any field or value up."
)

agent.invoke({
    "messages": [{"role": "user", "content": "Parse this: Amazing product, 10/10!"}]
})
================================ Human Message =================================
Parse this: Amazing product, 10/10!
================================== Ai Message ==================================
Tool Calls:
ProductRating (call_1)
Call ID: call_1
Args:
rating: 10
comment: Amazing product
================================= Tool Message =================================
Name: ProductRating
Error: Failed to parse structured output for tool 'ProductRating': 1 validation error for ProductRating.rating
Input should be less than or equal to 5 [type=less_than_equal, input_value=10, input_type=int].
Please fix your mistakes.
================================== Ai Message ==================================
Tool Calls:
ProductRating (call_2)
Call ID: call_2
Args:
rating: 5
comment: Amazing product
================================= Tool Message =================================
Name: ProductRating
Returning structured response: {'rating': 5, 'comment': 'Amazing product'}qwen3:8b没有报错,推理逻辑不太一样
{
  "messages": [
    {
      "content": "Parse this: Amazing product, 10/10!",
      "additional_kwargs": {},
      "response_metadata": {},
      "id": "1d015866-2477-44cb-a72a-fd015d9be3ee",
      "type": "HumanMessage"
    },
    {
      "content": "",
      "additional_kwargs": {},
      "response_metadata": {
        "model": "qwen3:8b",
        "created_at": "2026-04-07T14:17:23.9402011Z",
        "done": true,
        "done_reason": "stop",
        "total_duration": 14386904200,
        "load_duration": 1911242900,
        "prompt_eval_count": 177,
        "prompt_eval_duration": 1475356400,
        "eval_count": 198,
        "eval_duration": 10909973700,
        "logprobs": null,
        "model_name": "qwen3:8b",
        "model_provider": "ollama"
      },
      "id": "lc_run--019d684d-e0bb-7242-a5df-8ba9bee2e96c-0",
      "tool_calls": [
        {
          "name": "ProductRating",
          "args": {
            "comment": "Amazing product",
            "rating": 5
          },
          "id": "1c791944-968d-45a5-87fb-c0777fa147f8",
          "type": "tool_call"
        }
      ],
      "invalid_tool_calls": [],
      "usage_metadata": {
        "input_tokens": 177,
        "output_tokens": 198,
        "total_tokens": 375
      },
      "type": "AIMessage"
    },
    {
      "content": "Returning structured response: rating=5 comment='Amazing product'",
      "name": "ProductRating",
      "id": "bb8bb871-b3c0-48e9-8d36-a70196231d29",
      "tool_call_id": "1c791944-968d-45a5-87fb-c0777fa147f8",
      "type": "ToolMessage"
    }
  ],
  "structured_response": {
    "rating": 5,
    "comment": "Amazing product"
  }
}
10.3.3 错误处理策略
可以使用handle_errors参数自定义错误处理策略
自定义处理错误消息
ToolStrategy(
    schema=ProductRating,
    handle_errors="Please provide a valid rating between 1-5 and include a comment."
)
如果 handle_errors 被设置为一个字符串,智能体将始终使用该固定的工具消息提示模型进行重试
================================= Tool Message =================================
Name: ProductRating
Please provide a valid rating between 1-5 and include a comment.只处理指定异常
ToolStrategy(
schema=ProductRating,
handle_errors=ValueError # Only retry on ValueError, raise others
)如果 handle_errors 被设置为一个异常类型,那么只有当抛出的异常是该指定类型时,智能体才会(使用默认错误消息)进行重试。在所有其他情况下,异常将会被直接抛出
处理多种异常
ToolStrategy(
schema=ProductRating,
handle_errors=(ValueError, TypeError) # Retry on ValueError and TypeError
)如果 handle_errors 是一个异常类型的元组,那么只有当抛出的异常属于元组中指定的类型之一时,智能体才会(使用默认错误消息)进行重试。在所有其他情况下,异常将会被直接抛出
自定义异常处理函数
from langchain.agents.structured_output import StructuredOutputValidationError
from langchain.agents.structured_output import MultipleStructuredOutputsError
def custom_error_handler(error: Exception) -> str:
if isinstance(error, StructuredOutputValidationError):
return "There was an issue with the format. Try again."
elif isinstance(error, MultipleStructuredOutputsError):
return "Multiple structured outputs were returned. Pick the most relevant one."
else:
return f"Error: {str(error)}"
agent = create_agent(
model="gpt-5",
tools=[],
response_format=ToolStrategy(
schema=Union[ContactInfo, EventDetails],
handle_errors=custom_error_handler
) # Default: handle_errors=True
)
result = agent.invoke({
"messages": [{"role": "user", "content": "Extract info: John Doe (john@email.com) is organizing Tech Conference on March 15th"}]
})
for msg in result['messages']:
# If message is actually a ToolMessage object (not a dict), check its class name
if type(msg).__name__ == "ToolMessage":
print(msg.content)
# If message is a dictionary or you want a fallback
elif isinstance(msg, dict) and msg.get('tool_call_id'):
print(msg['content'])#格式异常输出
================================= Tool Message =================================
Name: ToolStrategy
There was an issue with the format. Try again.
#多格式异常
================================= Tool Message =================================
Name: ToolStrategy
Multiple structured outputs were returned. Pick the most relevant one.
#其他异常
================================= Tool Message =================================
Name: ToolStrategy
Error: <error message>
#不处理异常
response_format = ToolStrategy(
schema=ProductRating,
handle_errors=False # All errors raised
)到此基本核心概念了解完毕
11 MiddleWare(中间件)
MiddleWare是一个很重要的功能,几乎很多需要拦截和动态调整的地方都是通过中间件实现中间件提供了一种更精细地控制智能体内部行为的方式。中间件在以下场景中非常有用:
- 通过日志记录、数据分析和调试功能来追踪智能体的行为。
- 转换提示词、工具选择以及输出格式。
- 添加重试、回退和提前终止逻辑。
- 应用速率限制、安全护栏以及敏感信息检测。
可以通过将中间件传递给 create_agent 函数来添加它们
from langchain.agents import create_agent
from langchain.agents.middleware import SummarizationMiddleware, HumanInTheLoopMiddleware
agent = create_agent(
model="gpt-4.1",
tools=[...],
middleware=[
SummarizationMiddleware(...),
HumanInTheLoopMiddleware(...)
],
)智能体循环
智能体的核心循环包含三个主要步骤:调用模型,让模型选择并执行工具,最后在模型不再调用任何工具时结束流程。
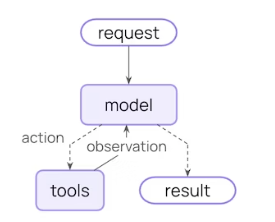
中间件在每个步骤之前或者之后暴露回调钩子
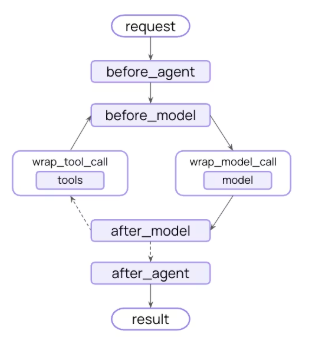
11.1 预构建供应商无关中间件
LangChain 和 Deep Agents 为常见用例提供了预构建的中间件。每个中间件均为生产就绪状态,并且可以根据您的具体需求进行配置,以下中间件供任何LLM应商都是支持的。
| 中间件名称 | 功能描述 |
|---|---|
| Summarization (摘要生成) | 当对话历史接近 Token 上限时,自动生成摘要。 |
| Human-in-the-loop (人机协同/人工介入) | 在执行工具调用前暂停,等待人工批准。 |
| Model call limit (模型调用限制) | 限制模型调用的次数,以防止成本过高。 |
| Tool call limit (工具调用限制) | 通过限制调用次数来控制工具的执行。 |
| Model fallback (模型回退) | 当主模型失败时,自动切换到备用模型。 |
| PII detection (敏感信息检测) | 检测并处理个人身份信息。 |
| To-do list (待办事项列表) | 为智能体配备任务规划和跟踪能力。 |
| LLM tool selector (大语言模型工具选择器) | 在调用主模型之前,使用大语言模型选择相关的工具。 |
| Tool retry (工具重试) | 使用指数退避策略自动重试失败的工具调用。 |
| Model retry (模型重试) | 使用指数退避策略自动重试失败的模型调用。 |
| LLM tool emulator (大语言模型工具模拟器) | 出于测试目的,使用大语言模型模拟工具执行。 |
| Context editing (上下文编辑) | 通过修剪或清除工具使用记录来管理对话上下文。 |
| Shell tool (Shell 工具) | 向智能体开放一个持久的 Shell 会话以执行命令。 |
| File search (文件搜索) | 提供针对文件系统文件的通配符和文本搜索工具。 |
| Filesystem (文件系统) | 为智能体提供文件系统,用于存储上下文和长期记忆。 |
| Subagent (子智能体) | 添加生成子智能体的能力。 |
11.1.1 摘要
当对话接近 token 限制时,自动总结对话历史,保留最近的消息,同时压缩较早的上下文。总结功能在以下情况下非常有用:
- 超出上下文窗口限制的长时间对话。
- 具有大量历史记录的多轮对话。
- 需要保留完整对话上下文的应用场景。
from langchain.agents import create_agent
from langchain.agents.middleware import SummarizationMiddleware
agent = create_agent(
model="gpt-4.1",
tools=[your_weather_tool, your_calculator_tool],
middleware=[
SummarizationMiddleware(
model="gpt-4.1-mini",
trigger=("tokens", 4000),
keep=("messages", 20),
),
],
)触发和保留的分数条件(如下所示)依赖于聊天模型的配置文件数据(如果使用 langchain>=1.1)。如果数据不可用,请使用其他条件或手动指定
from langchain.chat_models import init_chat_model
custom_profile = {
"max_input_tokens": 100_000,
# ...
}
model = init_chat_model("gpt-4.1", profile=custom_profile)参数配置说明
| 参数名 | 类型 | 是否必填 | 默认值 | 说明与用法 |
|---|---|---|---|---|
| model | string 或 BaseChatModel |
是 | 无 | 负责生成总结的模型。 可以传入模型标识符字符串(如 'openai:gpt-4.1-mini')或 BaseChatModel 实例。 |
| trigger | ContextSize 或 list |
是 | 无 | 触发总结的条件。 可以指定单个条件或条件列表(列表为“或”逻辑,满足任一即触发)。 条件类型: - fraction (float): 占模型上下文窗口的比例 (0-1)。- tokens (int): 绝对 Token 数量。- messages (int): 消息条数。 |
| keep | ContextSize |
否 | ('messages', 20) |
总结后保留的上下文量。 必须从以下选项中精确指定一个: - fraction (float): 保留模型上下文窗口的比例 (0-1)。- tokens (int): 保留的绝对 Token 数量。- messages (int): 保留最近的 N 条消息。 |
| token_counter | function |
否 | 基于字符计数 | 自定义 Token 计数函数。 如果不指定,默认使用基于字符的估算方式。 |
| summary_prompt | string |
否 | 内置模板 | 自定义总结提示词模板。 如果未指定,将使用内置模板。模板中必须包含 {messages} 占位符,用于插入对话历史。 |
| trim_tokens_to_summarize | number (int) |
否 | 4000 |
生成总结时包含的最大 Token 数。 在生成总结之前,旧的历史消息会被修剪以适应这个限制,防止发送给总结模型的输入过长。 |
一个较为完整的例子
总结中间件会实时监控消息的 Token 数量,并在达到设定阈值时自动对较早的消息进行总结。
触发条件控制总结何时运行:
- 单个条件对象:必须满足该指定条件。
- 条件数组:满足任意一个条件即可(“或”逻辑)。
- 每个条件可以使用 比例(占模型上下文大小的比例)、Token 数(绝对数量)或 消息数(消息条数)。
保留条件控制保留多少上下文(必须精确指定其中一项):
- 比例:保留模型上下文大小的比例。
- Token 数:保留的绝对 Token 数量。
- 消息数:保留最近的消息条数。
from langchain.agents import create_agent
from langchain.agents.middleware import SummarizationMiddleware
# Single condition: trigger if tokens >= 4000
agent = create_agent(
model="gpt-4.1",
tools=[your_weather_tool, your_calculator_tool],
middleware=[
SummarizationMiddleware(
model="gpt-4.1-mini",
trigger=("tokens", 4000),
keep=("messages", 20),
),
],
)
# Multiple conditions: trigger if number of tokens >= 3000 OR messages >= 6
agent2 = create_agent(
model="gpt-4.1",
tools=[your_weather_tool, your_calculator_tool],
middleware=[
SummarizationMiddleware(
model="gpt-4.1-mini",
trigger=[
("tokens", 3000),
("messages", 6),# 这个是触发条件,按理说应该比keep的message大一些才适合
],
keep=("messages", 20),
),
],
)
# Using fractional limits
agent3 = create_agent(
model="gpt-4.1",
tools=[your_weather_tool, your_calculator_tool],
middleware=[
SummarizationMiddleware(
model="gpt-4.1-mini",
trigger=("fraction", 0.8),
keep=("fraction", 0.3),
),
],
)11.1.2 人工参与控制
在工具调用执行之前,暂停代理(Agent)的运行,以便人类进行审批、编辑或拒绝。人机回环(Human-in-the-loop)机制适用于以下场景:
- 高风险操作:需要人类审批的关键步骤(例如:数据库写入、金融交易)。
- 合规工作流:强制要求有人类监督的流程。
- 长时对话:需要人类反馈来引导代理(Agent)方向的长时间对话。
人机回环(Human-in-the-loop)中间件需要一个检查点(checkpointer)来在中断期间维持状态
from langchain.agents import create_agent
from langchain.agents.middleware import HumanInTheLoopMiddleware
from langgraph.checkpoint.memory import InMemorySaver
def your_read_email_tool(email_id: str) -> str:
"""Mock function to read an email by its ID."""
return f"Email content for ID: {email_id}"
def your_send_email_tool(recipient: str, subject: str, body: str) -> str:
"""Mock function to send an email."""
return f"Email sent to {recipient} with subject '{subject}'"
agent = create_agent(
model="gpt-4.1",
tools=[your_read_email_tool, your_send_email_tool],
checkpointer=InMemorySaver(),
middleware=[
HumanInTheLoopMiddleware(
interrupt_on={
#这里是要确认的工具,下面的内容需要后续掉返回Command的恢复后续流程,前面也有例子
"your_send_email_tool": {
"allowed_decisions": ["approve", "edit", "reject"],
},
#这里不需要确认,实际上和不配置效果一样
"your_read_email_tool": False,
}
),
],
)参数说明
| 参数名 | 类型 | 是否必填 | 默认值 | 说明与用法 |
|---|---|---|---|---|
| interrupt_on | dict |
否 | None |
定义哪些工具需要拦截,以及允许人类做什么决策。 字典的键是工具名称,值定义了具体的交互规则(见下文详解)。 |
| default_decision | string |
否 | "approve" |
当人类未明确指定决策时的默认行为。 通常用于处理非标准情况,但在大多数审批流中,我们更关注具体的 allowed_decisions。 |
| allow_resubmission | bool |
否 | True |
是否允许在拒绝后重新提交。 如果为 True,当人类拒绝某个工具调用后,Agent 可以尝试修改参数再次请求调用;如果为 False,拒绝即终止该工具调用的尝试。 |
11.1.3 模型调用限制
限制模型调用的次数,以防止无限循环或产生过高的费用。模型调用限制功能适用于以下场景:
- 防止代理失控:避免陷入死循环的代理(Agent)发起过多的 API 请求。
- 生产环境成本控制:在正式部署中强制执行费用限额。
- 行为测试:在特定的调用预算范围内测试代理的行为表现。
from langchain.agents import create_agent
from langchain.agents.middleware import ModelCallLimitMiddleware
from langgraph.checkpoint.memory import InMemorySaver
agent = create_agent(
model="gpt-4.1",
checkpointer=InMemorySaver(), # Required for thread limiting
tools=[],
middleware=[
ModelCallLimitMiddleware(
thread_limit=10,
run_limit=5,
exit_behavior="end",
),
],
)参数说明
| 参数名 | 类型 | 是否必填 | 默认值 | 说明与用法 |
|---|---|---|---|---|
| run_limit | int |
否 | None |
单次运行的最大步数(模型调用次数)。 限制 Agent 在一次执行中最多能“思考”或“调用工具”多少次。防止单次任务死循环。 |
| thread_limit | int |
否 | None |
线程级别的总步数限制。 限制整个对话线程(可能包含多次用户交互)的总累积步数。防止跨多轮对话的资源耗尽。 |
| exit_behavior | str |
否 | "raise_error" |
达到限制后的退出行为。 控制当限制被触发时,系统是报错、结束还是回滚。 |
11.1.4 工具调用限制
通过限制工具调用的次数来控制代理(Agent)的执行,这种限制可以是针对所有工具的全局限制,也可以是针对特定工具的单独限制。限制工具调用次数主要有以下用途:
- 防止过度调用昂贵的外部 API。
- 限制网络搜索或数据库查询的次数。
- 对特定工具的使用强制执行速率限制。
- 防止代理陷入失控的死循环。
from langchain.agents import create_agent
from langchain.agents.middleware import ToolCallLimitMiddleware
agent = create_agent(
model="gpt-4.1",
tools=[search_tool, database_tool],
middleware=[
# Global limit
ToolCallLimitMiddleware(thread_limit=20, run_limit=10),
# Tool-specific limit
ToolCallLimitMiddleware(
tool_name="search",
thread_limit=5,
run_limit=3,
),
],
)参数说明
| 参数名称 | 类型 | 说明 |
|---|---|---|
| tool_name | string |
要限制的特定工具名称。 如果未提供,则限制将全局应用于所有工具。 |
| thread_limit | number |
线程(对话)中所有运行的最大工具调用次数。 在具有相同线程 ID 的多次调用中持续有效。需要检查点(checkpointer)来维护状态。 None 表示无线程限制。 |
| run_limit | number |
单次调用(一个用户消息 → 响应周期)的最大工具调用次数。 每条新用户消息都会重置计数。 None 表示无单次运行限制。注意:必须指定 thread_limit 或 run_limit 中的至少一个。 |
| exit_behavior | string默认值: "continue" |
达到限制时的行为: • 'continue' (默认) - 用错误消息阻止超出的工具调用,但允许其他工具和模型继续运行。模型根据错误消息决定何时结束。• 'error' - 抛出 ToolCallLimitExceededError 异常,立即停止执行。• 'end' - 立即停止执行,并针对超出的工具调用返回一个 ToolMessage 和 AI 消息。仅在限制单个工具时有效;如果有其他挂起的工具调用,将抛出 NotImplementedError。 |
完整示例
from langchain.agents import create_agent
from langchain.agents.middleware import ToolCallLimitMiddleware
global_limiter = ToolCallLimitMiddleware(thread_limit=20, run_limit=10)
search_limiter = ToolCallLimitMiddleware(tool_name="search", thread_limit=5, run_limit=3)
database_limiter = ToolCallLimitMiddleware(tool_name="query_database", thread_limit=10)
strict_limiter = ToolCallLimitMiddleware(tool_name="scrape_webpage", run_limit=2, exit_behavior="error")
agent = create_agent(
model="gpt-4.1",
tools=[search_tool, database_tool, scraper_tool],
middleware=[global_limiter, search_limiter, database_limiter, strict_limiter],
)11.1.5 模型回退
当主模型出现故障时,自动回退到备用模型。模型回退功能在以下场景中非常有用:
- 构建能够应对模型服务中断的弹性智能体。
- 通过回退到更便宜的模型来优化成本。
- 在 OpenAI、Anthropic 等不同服务商之间实现冗余备份
from langchain.agents import create_agent
from langchain.agents.middleware import ModelFallbackMiddleware
agent = create_agent(
model="gpt-4.1",
tools=[],
middleware=[
ModelFallbackMiddleware(
"gpt-4.1-mini",
"claude-3-5-sonnet-20241022",
),
],
)参数说明
| 参数名 | 类型 | 必填 | 说明 |
|---|---|---|---|
first_model |
string | BaseChatModel |
是 | 当主模型失败时首先尝试的回退模型。可以是模型标识符字符串(例如 'openai:gpt-4.1-mini')或 BaseChatModel 实例。 |
*additional_models |
string | BaseChatModel |
否 | 如果之前的模型失败,按顺序尝试的其他回退模型。 |
11.1.6 个人身份信息检测
使用可配置的策略来检测和处理对话中的个人身份信息。个人身份信息检测在以下场景中非常有用:
- 具有合规性要求的医疗保健和金融应用程序。
- 需要清理日志的客户服务代理。
- 任何处理敏感用户数据的应用程序
from langchain.agents import create_agent
from langchain.agents.middleware import PIIMiddleware
agent = create_agent(
model="gpt-4.1",
tools=[],
middleware=[
PIIMiddleware("email", strategy="redact", apply_to_input=True),
PIIMiddleware("credit_card", strategy="mask", apply_to_input=True),
],
)参数说明
| 参数名 | 类型 | 默认值 | 说明 |
|---|---|---|---|
pii_type |
string |
- | 必填。要检测的 PII 类型。可以是内置类型(email、credit_card、ip、mac_address、url)或自定义类型名称。 |
strategy |
string |
"redact" |
如何处理检测到的 PII。可选值: • 'block' - 检测到后抛出异常• 'redact' - 替换为 [REDACTED_{PII_TYPE}] 如[REDACTED_EMAIL]• 'mask' - 部分遮蔽(例如 ---1234)• 'hash' - 替换为确定性哈希值 |
detector |
function | regex |
- | 自定义检测函数或正则表达式模式。如果未提供,则使用该 PII 类型的内置检测器。 |
apply_to_input |
boolean |
True |
在调用模型之前检查用户消息。 |
apply_to_output |
boolean |
False |
在调用模型之后检查 AI 消息。 |
apply_to_tool_results |
boolean |
False |
在执行后检查工具结果消息。 |
自定义PII类型
你可以通过提供 detector 参数来创建自定义的 PII 类型。这让你能够检测超出内置类型范围、特定于你使用场景的模式。
创建自定义检测器有三种方式:
- 正则表达式字符串 - 简单的模式匹配
- 自定义函数 - 带有验证功能的复杂检测逻辑
from langchain.agents import create_agent
from langchain.agents.middleware import PIIMiddleware
import re
# Method 1: Regex pattern string
agent1 = create_agent(
model="gpt-4.1",
tools=[],
middleware=[
PIIMiddleware(
"api_key",
detector=r"sk-[a-zA-Z0-9]{32}",
strategy="block",
),
],
)
# Method 2: Compiled regex pattern
agent2 = create_agent(
model="gpt-4.1",
tools=[],
middleware=[
PIIMiddleware(
"phone_number",
detector=re.compile(r"\+?\d{1,3}[\s.-]?\d{3,4}[\s.-]?\d{4}"),
strategy="mask",
),
],
)
#检测函数必须接收一个字符串 (content) 并返回匹配结果:
#返回一个包含 text、start 和 end 键的字典列表
# Method 3: Custom detector function
def detect_ssn(content: str) -> list[dict[str, str | int]]:
"""Detect SSN with validation.
Returns a list of dictionaries with 'text', 'start', and 'end' keys.
"""
import re
matches = []
pattern = r"\d{3}-\d{2}-\d{4}"
for match in re.finditer(pattern, content):
ssn = match.group(0)
# Validate: first 3 digits shouldn't be 000, 666, or 900-999
first_three = int(ssn[:3])
if first_three not in [0, 666] and not (900 <= first_three <= 999):
matches.append({
"text": ssn,
"start": match.start(),
"end": match.end(),
})
return matches
agent3 = create_agent(
model="gpt-4.1",
tools=[],
middleware=[
PIIMiddleware(
"ssn",
detector=detect_ssn,
strategy="hash",
),
],
)针对自定义检测器:
- 对于简单的模式,使用正则字符串。
- 当你需要使用标志(例如不区分大小写的匹配)时,使用 RegExp 对象。
- 当你需要超出模式匹配范围的验证逻辑时,使用自定义函数。
- 自定义函数让你完全掌控检测逻辑,并且可以实现复杂的验证规则
11.1.7 代办列表
为智能体配备任务规划和跟踪能力,以处理复杂的多步骤任务。待办事项列表在以下场景中非常有用:
- 需要跨多个工具进行协调的复杂多步骤任务。
- 需要可见进度的长时间运行操作。
此中间件会自动为智能体提供 write_todos 工具和系统提示词,以指导其进行有效的任务规划
from langchain.agents import create_agent
from langchain.agents.middleware import TodoListMiddleware
agent = create_agent(
model="gpt-4.1",
tools=[read_file, write_file, run_tests],
middleware=[TodoListMiddleware()],
)参数说明
| 参数名 | 类型 | 说明 |
|---|---|---|
system_prompt |
string |
用于指导待办事项使用的自定义系统提示词。如果未指定,则使用内置提示词。 |
tool_description |
string |
write_todos 工具的自定义描述。如果未指定,则使用内置描述。 |
TodoListMiddleware 会自动向智能体注入一个名为 write_todos 的工具和相应的系统提示词。这使得智能体在创建时就具备了规划和跟踪任务的能力,无需你手动编写相关逻辑。
11.1.8 LLM工具选择器
利用大语言模型在主模型调用之前智能筛选相关工具。LLM 工具选择器在以下场景中非常有用:
- 工具繁多的智能体:适用于拥有大量工具(10个以上)的智能体,其中大部分工具对于特定查询并不相关。
- 降低 Token 消耗:通过过滤掉不相关的工具来减少 Token 使用量。
- 提升模型效果:提高模型的专注度和准确性。
该中间件利用结构化输出来询问 LLM 哪些工具与当前查询最相关。结构化输出模式定义了可用的工具名称和描述。模型提供商通常会在幕后将此结构化输出信息添加到系统提示词中
from langchain.agents import create_agent
from langchain.agents.middleware import LLMToolSelectorMiddleware
agent = create_agent(
model="gpt-4.1",
tools=[tool1, tool2, tool3, tool4, tool5, ...],
middleware=[
LLMToolSelectorMiddleware(
model="gpt-4.1-mini",
max_tools=3,
always_include=["search"],
),
],
)参数说明
| 参数名 | 类型 | 说明 |
|---|---|---|
| model | string | BaseChatModel |
用于工具选择的模型。 可以是模型标识符字符串(例如 'openai:gpt-4.1-mini'),也可以是 BaseChatModel 的实例。有关更多信息,请参阅 init_chat_model。默认值:代理的主模型。 |
| system_prompt | string |
选择模型的指令。 如果未指定,则使用内置的提示词。 |
| max_tools | number |
选择工具的最大数量。 如果模型选择的数量超过此值,将仅使用前 max_tools 个工具。如果未指定,则没有限制。 |
| always_include | list[string] |
始终包含的工具名称列表。 无论选择结果如何,这些工具都会被包含在内。这些工具不计入 max_tools 的限制。 |
11.1.9 工具重试
自动重试失败的工具调用,并支持可配置的指数退避策略。工具重试功能在以下场景中非常有用:
- 处理外部 API 调用的瞬时故障:应对外部服务临时的不稳定。
- 提升依赖网络的工具的可靠性:确保在网络波动时工具仍能成功执行。
- 构建具有韧性的智能体:使智能体能够从容应对临时错误,优雅地处理异常
from langchain.agents import create_agent
from langchain.agents.middleware import ToolRetryMiddleware
agent = create_agent(
model="gpt-4.1",
tools=[search_tool, database_tool],
middleware=[
ToolRetryMiddleware(
max_retries=3,
backoff_factor=2.0,
initial_delay=1.0,
),
],
)参数说明
| 参数名 | 类型 | 默认值 | 说明 |
|---|---|---|---|
| max_retries | number |
2 |
初始调用失败后的最大重试次数(默认值为 2 时,总共会尝试 3 次)。 |
| tools | list[BaseTool | str] |
None |
可选参数,指定要应用重试逻辑的工具列表或工具名称列表。如果为 None,则应用于所有工具。 |
| retry_on | tuple 或 callable |
(Exception,) |
指定触发重试的条件。可以是一个异常类型的元组,也可以是一个可调用对象(接收异常并返回 True 表示应重试)。 |
| on_failure | string 或 callable |
return_message |
当所有重试耗尽后的行为。选项包括: - 'return_message':返回包含错误详情的 ToolMessage(允许 LLM 处理失败)。- 'raise':重新抛出异常(停止代理执行)。- 自定义可调用对象:接收异常并返回字符串作为 ToolMessage 的内容。 |
| backoff_factor | number |
2.0 |
指数退避的乘数。每次重试的等待时间计算公式为:initial_delay * (backoff_factor retry_number) 秒。设置为 0.0 表示固定延迟。 |
| initial_delay | number |
1.0 |
第一次重试前的初始延迟时间(秒)。 |
| max_delay | number |
60.0 |
重试之间的最大延迟时间(秒),用于限制指数退避的增长上限。 |
| jitter | boolean |
true |
是否在延迟中添加随机抖动(±25%),以避免“惊群效应”。 |
完整示例
该中间件利用指数退避策略,自动重试失败的工具调用。
核心配置参数:
- max_retries:重试次数(默认为 2 次)。
- backoff_factor:指数退避的倍率(默认为 2.0)。
- initial_delay:初始等待延迟,单位为秒(默认为 1.0 秒)。
- max_delay:延迟增长的上限,单位为秒(默认为 60.0 秒)。
- jitter:是否添加随机扰动(默认为 True)。
失败处理机制 (on_failure):
on_failure='return_message':返回错误消息(让 LLM 知晓并处理)。on_failure='raise':重新抛出异常(中断执行)。- 自定义函数:传入一个返回错误消息字符串的函数。
from langchain.agents import create_agent
from langchain.agents.middleware import ToolRetryMiddleware
agent = create_agent(
model="gpt-4.1",
tools=[search_tool, database_tool, api_tool],
middleware=[
ToolRetryMiddleware(
max_retries=3,
backoff_factor=2.0,
initial_delay=1.0,
max_delay=60.0,
jitter=True,
tools=["api_tool"],
retry_on=(ConnectionError, TimeoutError),
on_failure="continue",
),
],
)11.1.10 模型重试
from langchain.agents import create_agent
from langchain.agents.middleware import ModelRetryMiddleware
agent = create_agent(
model="gpt-4.1",
tools=[search_tool, database_tool],
middleware=[
ModelRetryMiddleware(
max_retries=3,
backoff_factor=2.0,
initial_delay=1.0,
),
],
)自动重试失败的模型调用,并支持可配置的指数退避策略。模型重试功能在以下场景中非常有用:
- 处理模型 API 调用的瞬时故障:应对外部模型服务临时的不稳定。
- 提升依赖网络的模型请求的可靠性:确保在网络波动时请求仍能成功执行。
- 构建具有韧性的智能体:使智能体能够从容应对临时的模型错误,优雅地处理异常。
参数说明
| 参数名 | 类型 | 默认值 | 说明 |
|---|---|---|---|
| max_retries | number |
2 |
初始调用失败后的最大重试次数(默认值为 2 时,总共会尝试 3 次)。 |
| retry_on | tuple 或 callable |
(Exception,) |
指定触发重试的条件。可以是一个异常类型的元组,也可以是一个可调用对象(接收异常并返回 True 表示应重试)。 |
| on_failure | string 或 callable |
continue |
当所有重试耗尽后的行为。选项包括: - 'continue'(默认):返回包含错误详情的 AIMessage,允许智能体尝试优雅地处理失败。- 'error':重新抛出异常(停止智能体执行)。- 自定义可调用对象:接收异常并返回字符串作为 AIMessage 的内容。 |
| backoff_factor | number |
2.0 |
指数退避的乘数。每次重试的等待时间计算公式为:initial_delay * (backoff_factor retry_number) 秒。设置为 0.0 表示固定延迟。 |
| initial_delay | number |
1.0 |
第一次重试前的初始延迟时间(秒)。 |
| max_delay | number |
60.0 |
重试之间的最大延迟时间(秒),用于限制指数退避的增长上限。 |
| jitter | boolean |
true |
是否在延迟中添加随机抖动(±25%),以避免“惊群效应”。 |
该中间件会自动重试失败的模型调用,并采用指数退避策略
from langchain.agents import create_agent
from langchain.agents.middleware import ModelRetryMiddleware
# Basic usage with default settings (2 retries, exponential backoff)
agent = create_agent(
model="gpt-4.1",
tools=[search_tool],
middleware=[ModelRetryMiddleware()],
)
# Custom exception filtering
class TimeoutError(Exception):
"""Custom exception for timeout errors."""
pass
class ConnectionError(Exception):
"""Custom exception for connection errors."""
pass
# Retry specific exceptions only
retry = ModelRetryMiddleware(
max_retries=4,
retry_on=(TimeoutError, ConnectionError),
backoff_factor=1.5,
)
def should_retry(error: Exception) -> bool:
# Only retry on rate limit errors
if isinstance(error, TimeoutError):
return True
# Or check for specific HTTP status codes
if hasattr(error, "status_code"):
return error.status_code in (429, 503)
return False
retry_with_filter = ModelRetryMiddleware(
max_retries=3,
retry_on=should_retry,
)
# Return error message instead of raising
retry_continue = ModelRetryMiddleware(
max_retries=4,
on_failure="continue", # Return AIMessage with error instead of raising
)
# Custom error message formatting
def format_error(error: Exception) -> str:
return f"Model call failed: {error}. Please try again later."
retry_with_formatter = ModelRetryMiddleware(
max_retries=4,
on_failure=format_error,
)
# Constant backoff (no exponential growth)
constant_backoff = ModelRetryMiddleware(
max_retries=5,
backoff_factor=0.0, # No exponential growth
initial_delay=2.0, # Always wait 2 seconds
)
# Raise exception on failure
strict_retry = ModelRetryMiddleware(
max_retries=2,
on_failure="error", # Re-raise exception instead of returning message
)11.1.11 模型工具模拟器
使用 LLM 模拟工具执行以进行测试,用 AI 生成的响应来替代真实的工具调用。LLM 工具模拟器在以下场景中非常有用:
- 在不执行真实工具的情况下测试智能体的行为:验证逻辑是否正确,而不必担心误操作真实数据。
- 在外部工具不可用或成本高昂时开发智能体:比如某些付费 API 还没接通,或者调用太贵,可以先用模拟的。
- 在实现实际工具之前对智能体的工作流进行原型设计:先把流程跑通,再回头去写具体的工具代码
from langchain.agents import create_agent
from langchain.agents.middleware import LLMToolEmulator
agent = create_agent(
model="gpt-4.1",
tools=[get_weather, search_database, send_email],
middleware=[
LLMToolEmulator(), # Emulate all tools
],
)参数说明
| 参数名 | 类型 | 默认值 | 说明 |
|---|---|---|---|
| tools | list[str | BaseTool] |
None |
指定要模拟的工具名称(字符串)或 BaseTool 实例列表。- None (默认):模拟 所有 工具。- 空列表 []:不模拟任何工具(即全部执行真实调用)。- 指定列表:仅模拟列表中指定的工具,其余工具正常执行。 |
| model | string 或 BaseChatModel |
智能体当前模型 | 用于生成模拟工具响应的模型。可以是模型标识字符串(例如 'anthropic:claude-sonnet-4-6')或 BaseChatModel 实例。如果未指定,则默认使用智能体当前的模型。 |
完整示例
该中间件利用 LLM(大语言模型)为工具调用生成看似合理的响应,而不是真正去执行那些工具
from langchain.agents import create_agent
from langchain.agents.middleware import LLMToolEmulator
from langchain.tools import tool
@tool
def get_weather(location: str) -> str:
"""Get the current weather for a location."""
return f"Weather in {location}"
@tool
def send_email(to: str, subject: str, body: str) -> str:
"""Send an email."""
return "Email sent"
# Emulate all tools (default behavior)
agent = create_agent(
model="gpt-4.1",
tools=[get_weather, send_email],
middleware=[LLMToolEmulator()],
)
# Emulate specific tools only
agent2 = create_agent(
model="gpt-4.1",
tools=[get_weather, send_email],
middleware=[LLMToolEmulator(tools=["get_weather"])],
)
# Use custom model for emulation
agent4 = create_agent(
model="gpt-4.1",
tools=[get_weather, send_email],
middleware=[LLMToolEmulator(model="claude-sonnet-4-6")],
)使用qwen3:8b的一个测试代码
from langchain.agents import create_agent
from langchain.agents.middleware import LLMToolEmulator
from langchain.tools import tool
@tool
def get_weather(location: str) -> str:
"""Get the current weather for a location."""
return f"Weather in {location}"
@tool
def send_email(to: str, subject: str, body: str) -> str:
"""Send an email."""
return "Email sent"
from langchain.chat_models import init_chat_model
qwen3Ollama = init_chat_model(
model="qwen3:8b", # 1. 你本地 Ollama 中的模型名称
model_provider="ollama", # 2. 【关键】明确指定提供商为 ollama
base_url="http://localhost:11434", # 3. Ollama 的默认服务地址
temperature=0.7, # 4. 通用参数:温度
)
# Emulate all tools (default behavior)
agent = create_agent(
model=qwen3Ollama,
tools=[get_weather, send_email],
middleware=[LLMToolEmulator(model=qwen3Ollama)],
)
result = agent.invoke( {"messages": [{"role": "user", "content": "get the weather of BeiJing"}]})
print(result)
输出
{
"messages": [
{
"type": "HumanMessage",
"content": "get the weather of BeiJing"
},
{
"type": "AIMessage",
"content": "",
"tool_calls": [
{
"name": "get_weather",
"args": {
"location": "Beijing"
},
"id": "288a6ec1-7ca5-4217-9def-9ce6890e1c88"
}
]
},
{
"type": "ToolMessage",
"content": "Beijing: Partly Cloudy, Temperature: 19°C, Humidity: 72%, Wind: 12 km/h, UV Index: 5",
"name": "get_weather",
"tool_call_id": "288a6ec1-7ca5-4217-9def-9ce6890e1c88"
},
{
"type": "AIMessage",
"content": "The current weather in Beijing is **Partly Cloudy** with a temperature of **19°C**. \n- Humidity: 72% \n- Wind: 12 km/h \n- UV Index: 5 (Moderate; consider sunscreen!) \n\nLet me know if you need further details! ☀️"
}
]
}与只使用模型绑定工具调用对比
| 对比维度 | 工具模拟 | 只绑定工具调用模型 |
|---|---|---|
| 核心机制 | 用大语言模型生成看似合理的响应,替代真实工具执行 | 大语言模型仅输出结构化的工具调用指令(如JSON),由外部框架决定是否执行 |
| 执行结果 | 返回大语言模型伪造的假结果,不执行真实工具 | 模型不执行工具,仅生成调用计划;实际执行由外部系统完成 |
| 主要用途 | 测试智能体行为、原型开发、工具不可用或成本过高时的替代方案 | 实现智能体与外部工具的集成,扩展模型能力边界 |
| 是否依赖真实工具 | 不依赖,完全由大语言模型模拟响应 | 依赖,需要外部系统实现并执行真实工具 |
| 输出内容 | 模拟的工具响应数据(如“天气晴朗,25℃”) | 结构化的工具调用指令(如{"name": "search", "arguments": {"query": "天气"}}) |
| 适用场景 | 开发测试阶段、工具未就绪、避免真实调用成本 | 生产环境、需要真实执行工具功能的场景 |
11.1.12 上下文编辑
当达到 token 限制时,通过清除较早的工具调用输出来管理对话上下文,同时保留最近的结果。这有助于在包含大量工具调用的长对话中保持上下文窗口的可管理性。上下文编辑在以下情况下非常有用:
- 包含大量工具调用且超出 token 限制的长对话
- 通过移除不再相关的旧工具输出来降低 token 成本
- 仅在上下文中保留最近的 N 个工具结果
from langchain.agents import create_agent
from langchain.agents.middleware import ContextEditingMiddleware, ClearToolUsesEdit
agent = create_agent(
model="gpt-4.1",
tools=[],
middleware=[
ContextEditingMiddleware(
edits=[
ClearToolUsesEdit(
trigger=100000,
keep=3,
),
],
),
],
)ContextEditingMiddleware 参数说明
| 参数名称 | 类型 | 默认值 | 说明 |
|---|---|---|---|
| edits | 列表 | [ClearToolUsesEdit()] |
要应用的上下文编辑策略列表。 |
| token_count_method | 字符串 | "approximate" |
Token 计数方法。可选值:'approximate'(近似)或 'model'(模型)。 |
ClearToolUsesEdit 参数说明
| 参数名称 | 类型 | 默认值 | 说明 |
|---|---|---|---|
| trigger | 数字 | "100000" |
触发编辑的 Token 数量阈值。当对话超过此 Token 数量时,较旧的工具输出将被清除。 |
| clear_at_least | 数字 | "0" |
编辑运行时必须回收的最小 Token 数量。如果设置为 0,则按需清除。 |
| keep | 数字 | "3" |
必须保留的最近工具结果数量。这些结果永远不会被清除。 |
| clear_tool_inputs | 布尔值 | "False" |
是否清除 AI 消息中原始工具调用的参数。当为 True 时,工具调用参数将被替换为空对象。 |
| exclude_tools | 字符串列表 | () |
排除在清除之外的工具名称列表。这些工具的输出永远不会被清除。 |
| placeholder | 字符串 | "[cleared]" |
插入以替代已清除工具输出的占位符文本。这将替换原始的工具消息内容。 |
完整示例
当达到令牌限制时,中间件会应用上下文编辑策略。最常见的策略是 ClearToolUsesEdit,它会清除较旧的工具结果,同时保留较新的结果。
其工作原理如下:
- 监控对话中的令牌数量
- 当达到阈值时,清除较旧的工具输出
- 保留最近的 N 个工具结果
- 可选地保留工具调用参数以维持上下文
from langchain.agents import create_agent
from langchain.agents.middleware import ContextEditingMiddleware, ClearToolUsesEdit
agent = create_agent(
model="gpt-4.1",
tools=[search_tool, your_calculator_tool, database_tool],
middleware=[
ContextEditingMiddleware(
edits=[
ClearToolUsesEdit(
trigger=2000,
keep=3,
clear_tool_inputs=False,
exclude_tools=[],
placeholder="[cleared]",
),
],
),
],
)11.1.13 shell工具
向智能体开放一个持久化的 Shell 会话以用于命令执行。Shell 工具中间件在以下场景中非常有用:
- 需要执行系统命令的智能体
- 开发和部署自动化任务
- 测试和验证工作流
- 文件系统操作和脚本执行
安全注意事项: 请使用适当的执行策略(HostExecutionPolicy、DockerExecutionPolicy 或 CodexSandboxExecutionPolicy)以符合您部署环境的安全要求
限制: 持久化 Shell 会话目前不支持中断(人机回环)。我们预计未来会增加对此功能的支持。
from langchain.agents import create_agent
from langchain.agents.middleware import (
ShellToolMiddleware,
HostExecutionPolicy,
)
agent = create_agent(
model="gpt-4.1",
tools=[search_tool],
middleware=[
ShellToolMiddleware(
workspace_root="/workspace",
execution_policy=HostExecutionPolicy(),
),
],
)参数说明
| 参数名称 | 类型 | 说明 |
|---|---|---|
| workspace_root | str | Path | None |
工作区根目录。 指定 Shell 会话的基础目录。如果省略,系统会在代理启动时创建一个临时目录,并在结束时将其删除。 |
| startup_commands | tuple | list | str | None |
启动命令。 会话启动后按顺序执行的可选命令列表。 |
| shutdown_commands | tuple | list | str | None |
关闭命令。 会话关闭前执行的可选命令列表。 |
| execution_policy | BaseExecutionPolicy | None |
执行策略。 控制超时、输出限制和资源配置的策略。可选值: - HostExecutionPolicy:完全访问主机(默认);适用于代理已在容器或虚拟机内运行的受信任环境。- DockerExecutionPolicy:为每次代理运行启动独立的 Docker 容器,提供更强的隔离性。- CodexSandboxExecutionPolicy:复用 Codex CLI 沙箱,提供额外的系统调用和文件系统限制。 |
| redaction_rules | tuple | list | None |
脱敏规则。 用于在将命令输出返回给模型之前对其进行清理(脱敏)的规则。 注意:规则在执行后应用,使用 HostExecutionPolicy 时并不能完全防止敏感数据泄露。 |
| tool_description | str | None |
工具描述。 用于覆盖已注册 Shell 工具默认描述的可选字符串。 |
| shell_command | Sequence | str | None |
Shell 命令。 用于启动持久会话的 Shell 可执行文件(字符串)或参数序列。默认为 /bin/bash。 |
| env | Mapping | None |
环境变量。 提供给 Shell 会话的可选环境变量。在执行命令前,值会被强制转换为字符串。 |
中间件提供了一个单一的、持久的 Shell 会话,智能体可以利用它来按顺序执行命令
为了适应不同的安全需求,你可以选择以下三种策略之一:
- HostExecutionPolicy(默认策略)
- 原生执行:直接在宿主机上运行。
- 权限:拥有对主机的完全访问权限。这意味着智能体可以操作宿主机上的任何文件,适合完全受信任的环境。
- DockerExecutionPolicy
- 容器化执行:每次运行都在一个独立的 Docker 容器中启动。
- 权限:提供更强的隔离性。智能体的操作被限制在容器内部,不会直接影响宿主机系统。
- CodexSandboxExecutionPolicy
- 沙箱执行:通过 Codex CLI 进行沙箱化运行。
- 权限:提供额外的限制。除了容器隔离外,还会对系统调用和文件系统访问施加更严格的约束,安全性最高。
from langchain.agents import create_agent
from langchain.agents.middleware import (
ShellToolMiddleware,
HostExecutionPolicy,
DockerExecutionPolicy,
RedactionRule,
)
# Basic shell tool with host execution
agent = create_agent(
model="gpt-4.1",
tools=[search_tool],
middleware=[
ShellToolMiddleware(
workspace_root="/workspace",
execution_policy=HostExecutionPolicy(),
),
],
)
# Docker isolation with startup commands
agent_docker = create_agent(
model="gpt-4.1",
tools=[],
middleware=[
ShellToolMiddleware(
workspace_root="/workspace",
startup_commands=["pip install requests", "export PYTHONPATH=/workspace"],
execution_policy=DockerExecutionPolicy(
image="python:3.11-slim",
command_timeout=60.0,
),
),
],
)
# With output redaction (applied post execution)
agent_redacted = create_agent(
model="gpt-4.1",
tools=[],
middleware=[
ShellToolMiddleware(
workspace_root="/workspace",
redaction_rules=[
RedactionRule(pii_type="api_key", detector=r"sk-[a-zA-Z0-9]{32}"),
],
),
],
)11.1.14 文件搜索
为文件系统提供 Glob 和 Grep 搜索工具。文件搜索中间件在以下场景中非常有用:
- 代码探索和分析
- 按名称模式查找文件
- 使用正则表达式搜索代码内容
- 需要文件发现功能的大型代码库
from langchain.agents import create_agent
from langchain.agents.middleware import FilesystemFileSearchMiddleware
agent = create_agent(
model="gpt-4.1",
tools=[],
middleware=[
FilesystemFileSearchMiddleware(
root_path="/workspace",
use_ripgrep=True,
),
],
)参数说明
| 参数名称 | 类型与默认值 | 说明 |
|---|---|---|
| root_path | str(必填) |
搜索根目录。 指定搜索的基础目录,所有文件操作都将相对于此路径进行。 |
| use_ripgrep | bool(默认: "True") |
是否使用 ripgrep。 决定是否使用 ripgrep 工具进行搜索。如果系统中不可用,将自动回退到 Python 正则表达式。 |
| max_file_size_mb | int(默认: "10") |
最大文件大小。 限制搜索的文件大小上限(单位:MB)。超过此大小的文件将被自动跳过。 |
中间件为智能体添加了以下两个搜索工具:
Glob 工具 —— 快速的文件模式匹配
- 支持通配符模式:能够识别如
**/*.py或src/**/*.ts这样的复杂路径模式。 - 智能排序:返回匹配的文件路径,并按修改时间进行排序,方便快速找到最近变动的文件。
Grep 工具 —— 基于正则表达式的内容搜索
- 全功能正则支持:支持完整的正则表达式语法,能够进行极其精准的文本匹配。
- 文件过滤:可以通过
include参数指定文件模式(例如只在.js文件中搜索),缩小搜索范围。 - 三种输出模式:根据需要灵活返回结果:
files_with_matches:仅列出包含匹配项的文件列表。content:直接展示匹配到的具体文本内容。count:仅返回匹配到的数量统计
from langchain.agents import create_agent
from langchain.agents.middleware import FilesystemFileSearchMiddleware
from langchain.messages import HumanMessage
agent = create_agent(
model="gpt-4.1",
tools=[],
middleware=[
FilesystemFileSearchMiddleware(
root_path="/workspace",
use_ripgrep=True,
max_file_size_mb=10,
),
],
)
# Agent can now use glob_search and grep_search tools
result = agent.invoke({
"messages": [HumanMessage("Find all Python files containing 'async def'")]
})
# The agent will use:
# 1. glob_search(pattern="**/*.py") to find Python files
# 2. grep_search(pattern="async def", include="*.py") to find async functions11.1.15 文件系统中间件
在构建高效的智能体时,上下文工程是一个主要的挑战。这一点在使用那些返回结果长度不定的工具(例如网络搜索 web_search 和检索增强生成 RAG)时尤为困难,因为过长的工具返回结果会迅速占满你的上下文窗口(Context Window),导致信息丢失或成本增加。
解决方案:Deep Agents 的文件系统中间件
为了应对这一挑战,Deep Agents 的 FilesystemMiddleware 提供了四个工具,帮助智能体与短期及长期记忆(即文件系统)进行交互:
- ls:列出文件系统中的文件。
- read_file:读取整个文件,或仅读取文件的指定行数(有助于节省上下文)。
- write_file:向文件系统写入新文件。
- edit_file:编辑文件系统中现有的文件。
from langchain.agents import create_agent
from deepagents.middleware.filesystem import FilesystemMiddleware
# FilesystemMiddleware is included by default in create_deep_agent
# You can customize it if building a custom agent
agent = create_agent(
model="claude-sonnet-4-6",
middleware=[
FilesystemMiddleware(
backend=None, # Optional: custom backend (defaults to StateBackend)
system_prompt="Write to the filesystem when...", # Optional custom addition to the system prompt
custom_tool_descriptions={
"ls": "Use the ls tool when...",
"read_file": "Use the read_file tool to..."
} # Optional: Custom descriptions for filesystem tools
),
],
)短期与长期文件系统
-
默认行为(短期):
默认情况下,这些工具会将数据写入到你当前图状态中的一个本地“文件系统”里。这通常是临时的,随着会话结束可能会消失。 -
持久化存储(长期):
如果你希望数据能在线程之间持久保存(即长期记忆),你需要配置一个CompositeBackend。这个配置可以将特定的路径(例如/memories/)路由到StoreBackend,从而实现数据的持久化存储。
from langchain.agents import create_agent
from deepagents.middleware import FilesystemMiddleware
from deepagents.backends import CompositeBackend, StateBackend, StoreBackend
from langgraph.store.memory import InMemoryStore
store = InMemoryStore()
agent = create_agent(
model="claude-sonnet-4-6",
store=store,
middleware=[
FilesystemMiddleware(
backend=CompositeBackend(
default=StateBackend(),
routes={"/memories/": StoreBackend()}
),
custom_tool_descriptions={
"ls": "Use the ls tool when...",
"read_file": "Use the read_file tool to..."
} # Optional: Custom descriptions for filesystem tools
),
],
)当你配置了 CompositeBackend 并将 /memories/ 路径指向 StoreBackend 后,系统会根据文件路径的前缀来区分存储方式:
- 永久保存:任何以
/memories/开头的文件,都会被自动保存到持久化存储中。这意味着即使你开启了新的线程(比如新的对话或任务),这些文件依然存在,不会丢失。 - 临时存储:没有这个前缀的文件,则依然存放在临时的状态存储中,会话结束后它们就会消失
并发问题
如果多个 Agent 实例(或同一个 Agent 的多个并行线程)同时操作同一个文件,可能会遇到以下情况:
- 写入覆盖:Agent A 和 Agent B 同时读取文件,Agent A 先写入新内容,紧接着 Agent B 也写入它的内容(基于旧的读取状态),导致 Agent A 的修改被覆盖丢失。
- 数据损坏:如果两个 Agent 同时向文件追加内容,数据可能会交错混乱。
- 读取脏数据:Agent A 正在写入文件时,Agent B 读取了只写了一半的文件内容。
1. 利用底层存储的原子性
如果你使用的是云存储(如 S3)或数据库作为 StoreBackend,它们通常提供原子写入操作。这意味着写入要么完全成功,要么完全失败,不会留下“写了一半”的文件。但这不能完全解决“逻辑上的覆盖”问题(即上面的“写入覆盖”)。
2. 文件锁
这是最直接的解决方案。在读写文件之前,Agent 尝试获取一个“锁”。
- 写锁:如果 Agent A 拿到了写锁,Agent B 必须等待,直到 A 写完释放锁。
- 读锁:允许多个 Agent 同时读,但只要有 Agent 在读,就不允许写。
3. 乐观锁
在写入文件时,检查文件的版本号或修改时间。
- Agent 读取文件时记下版本号 v1。
- 修改完后准备写入时,检查当前文件版本号是否还是 v1。
- 如果是,写入成功并更新版本号为 v2。
- 如果不是(说明被别人改过了),则放弃写入或重新读取后再试。
4. 隔离工作区
为每个 Agent 或每个线程分配独立的临时工作目录,避免直接操作共享文件。只有在任务完成需要提交结果时,才将文件移动到共享区域。
11.1.16 子agent
将任务移交给子智能体可以隔离上下文。这样做的好处是,既能深入处理具体任务,又能保持主智能体(即主管)的上下文窗口整洁,不会被琐碎的细节填满。Deep Agents 的子智能体中间件允许你通过一个任务工具来配置并提供这些子智能体
from langchain.tools import tool
from langchain.agents import create_agent
from deepagents.middleware.subagents import SubAgentMiddleware
@tool
def get_weather(city: str) -> str:
"""Get the weather in a city."""
return f"The weather in {city} is sunny."
agent = create_agent(
model="claude-sonnet-4-6",
middleware=[
SubAgentMiddleware(
default_model="claude-sonnet-4-6",
default_tools=[],
subagents=[
{
"name": "weather",
"description": "This subagent can get weather in cities.",
"system_prompt": "Use the get_weather tool to get the weather in a city.",
"tools": [get_weather],
"model": "gpt-4.1",
"middleware": [],
}
],
)
],
)default_model="claude-sonnet-4-6" 被subagents取代,所以实际涉及两个智能体,不是三个。
定义一个子智能体时,你需要提供以下核心要素:名称描、述系统、提示词、工具集此外,你还可以为子智能体指定自定义模型,或者挂载额外的中间件。这点特别实用,比如当你希望子智能体能与主智能体共享某个特定的状态键时,就可以通过中间件来实现。
from langchain.agents import create_agent
from deepagents.middleware.subagents import SubAgentMiddleware
from deepagents import CompiledSubAgent
from langgraph.graph import StateGraph
# Create a custom LangGraph graph
def create_weather_graph():
workflow = StateGraph(...)
# Build your custom graph
return workflow.compile()
weather_graph = create_weather_graph()
# Wrap it in a CompiledSubAgent
weather_subagent = CompiledSubAgent(
name="weather",
description="This subagent can get weather in cities.",
runnable=weather_graph
)
agent = create_agent(
model="claude-sonnet-4-6",
middleware=[
SubAgentMiddleware(
default_model="claude-sonnet-4-6",
default_tools=[],
subagents=[weather_subagent],
)
],
)除了你自己定义的那些特定功能的子智能体,主智能体其实随时都能调用一个通用子智能体。
这个通用子智能体就像是主智能体的“克隆体”:
- 同样的指令:它知道主智能体知道的事。
- 同样的工具:主智能体能用的工具,它全都能用。
11.2 预构建供应商特定中间件
这些中间件是针对特定的 LLM 提供商进行了优化。有关完整的详细信息和示例,请参阅每个提供商的文档。
anthropic、aws、openA
11.3 自定义中间件
你可以通过实现钩子来构建自定义中间件,这些钩子会在智能体执行流程的特定节点自动运行。
11.3.1 钩子
中间件提供了两种风格的钩子(hooks)来拦截代理(agent)的执行:
- 节点风格钩子:在特定的执行点按顺序依次运行。
- 包装风格钩子:围绕每次模型或工具调用运行(即在执行前后进行拦截)
节点风格的钩子
这些钩子会按顺序在特定的执行点运行。你可以利用它们来做日志记录、数据验证或者更新状态。在构建中间件时,你需要根据需求选择钩子的风格:是选“节点风格”还是“包装风格
节点风格的钩子就像是在流水线上设置的检查站,专门在以下特定时刻触发:
| 钩子名称 | 触发时机 |
|---|---|
| before_agent | 智能体启动前(每次任务开始时只运行一次) |
| before_model | 每次调用模型前(比如发请求给 LLM 之前) |
| after_model | 每次模型响应后(拿到 LLM 的回复之后) |
| after_agent | 智能体结束后(任务彻底完成后只运行一次) |
包装钩子会包裹在每一次调用周围,让你能够精细地控制执行过程:
| 钩子名称 | 触发时机 |
|---|---|
| wrap_model_call | 包裹在每次模型调用周围(即在执行模型请求的前后运行) |
| wrap_tool_call | 包裹在每次工具调用周围(即在执行工具的前后运行) |
#装饰器风格
from langchain.agents.middleware import before_model, after_model, AgentState
from langchain.messages import AIMessage
from langgraph.runtime import Runtime
from typing import Any
@before_model(can_jump_to=["end"])
def check_message_limit(state: AgentState, runtime: Runtime) -> dict[str, Any] | None:
if len(state["messages"]) >= 50:
return {
"messages": [AIMessage("Conversation limit reached.")],
"jump_to": "end"
}
return None
@after_model
def log_response(state: AgentState, runtime: Runtime) -> dict[str, Any] | None:
print(f"Model returned: {state['messages'][-1].content}")
return None##继承AgentMiddleware
from langchain.agents.middleware import AgentMiddleware, AgentState, hook_config
from langchain.messages import AIMessage
from langgraph.runtime import Runtime
from typing import Any
class MessageLimitMiddleware(AgentMiddleware):
def __init__(self, max_messages: int = 50):
super().__init__()
self.max_messages = max_messages
@hook_config(can_jump_to=["end"])
def before_model(self, state: AgentState, runtime: Runtime) -> dict[str, Any] | None:
if len(state["messages"]) >= self.max_messages:
return {
"messages": [AIMessage("Conversation limit reached.")],
"jump_to": "end"
}
return None
def after_model(self, state: AgentState, runtime: Runtime) -> dict[str, Any] | None:
print(f"Model returned: {state['messages'][-1].content}")
return None包装风格钩子
这种钩子能拦截执行过程,并让你全权控制处理函数何时被调用。它特别适合用来实现重试机制、缓存以及数据转换。在这种模式下,你可以决定处理函数被调用的次数:
- 0 次:直接短路(跳过执行,比如直接从缓存拿数据)。
- 1 次:正常流程(按部就班地跑)。
- 多次:重试逻辑(报错了就自动重跑几次)
#装饰器
from langchain.agents.middleware import wrap_model_call, ModelRequest, ModelResponse
from typing import Callable
@wrap_model_call
def retry_model(
request: ModelRequest,
handler: Callable[[ModelRequest], ModelResponse],
) -> ModelResponse:
for attempt in range(3):
try:
return handler(request)
except Exception as e:
if attempt == 2:
raise
print(f"Retry {attempt + 1}/3 after error: {e}")#继承方式
from langchain.agents.middleware import AgentMiddleware, ModelRequest, ModelResponse
from typing import Callable
class RetryMiddleware(AgentMiddleware):
def __init__(self, max_retries: int = 3):
super().__init__()
self.max_retries = max_retries
def wrap_model_call(
self,
request: ModelRequest,
handler: Callable[[ModelRequest], ModelResponse],
) -> ModelResponse:
for attempt in range(self.max_retries):
try:
return handler(request)
except Exception as e:
if attempt == self.max_retries - 1:
raise
print(f"Retry {attempt + 1}/{self.max_retries} after error: {e}")11.3.2 状态更新
Node-style(节点式)和 Wrap-style(包装式)这两种 Hook 都能用来更新 Agent 的状态,但它们的运作机制有所不同:
Node-style hooks
(包括 before_agent、before_model、after_model、after_agent):
直接返回一个字典(dict)。这个字典会通过图(graph)的 reducers 应用到 Agent 的状态上。
Wrap-style hooks
(包括 wrap_model_call、wrap_tool_call):
- 针对模型调用:需要返回一个包含
Command的ExtendedModelResponse,以便在返回模型响应的同时注入状态更新。 - 针对工具调用:直接返回一个
Command。
节点钩子
从节点式 Hook 中返回一个字典,以便将更新合并到 Agent 状态中。该字典的键(keys)对应于状态字段
from langchain.agents.middleware import after_model, AgentState
from langgraph.runtime import Runtime
from typing import Any
from typing_extensions import NotRequired
class TrackingState(AgentState):
model_call_count: NotRequired[int]
@after_model(state_schema=TrackingState)
def increment_after_model(state: TrackingState, runtime: Runtime) -> dict[str, Any] | None:
return {"model_call_count": state.get("model_call_count", 0) + 1}包裹钩子
返回一个 ExtendedModelResponse,其中包含一个来自 wrap_model_call 的 Command,用于从模型调用层注入状态更新
#装饰器
from typing import Callable
from langchain.agents.middleware import (
wrap_model_call,
ModelRequest,
ModelResponse,
AgentState,
ExtendedModelResponse
)
from langgraph.types import Command
from typing_extensions import NotRequired
class UsageTrackingState(AgentState):
"""Agent state with token usage tracking."""
last_model_call_tokens: NotRequired[int]
@wrap_model_call(state_schema=UsageTrackingState)
def track_usage(
request: ModelRequest,
handler: Callable[[ModelRequest], ModelResponse],
) -> ExtendedModelResponse:
response = handler(request)
return ExtendedModelResponse(
model_response=response,
command=Command(update={"last_model_call_tokens": 150}),
)Command 会流经图的 reducer(状态归约器),因此更新能被正确应用,而且消息是追加进去的,而不是直接替换掉现有的状态
中间件组合
当有多个中间件层层叠加时,它们返回的指令会按照以下规则组合:
- 通过 Reducer 合并指令:
每一个指令都会变成一次独立的状态更新。对于消息列表来说,这意味着新消息会自动追加到旧消息后面,而不会覆盖。 - 外层优先原则:
对于那些非 Reducer 的普通状态字段,更新顺序是“先内层,后外层”。如果出现了键名冲突,最外层中间件的值拥有最终决定权(它会覆盖内层的值)。 - 重试安全机制:
如果外层中间件实现了重试逻辑(导致handler()被多次调用),那么之前失败尝试中产生的指令会被直接丢弃,只有最后一次成功调用的指令会生效。
from typing import Annotated, Callable
from langchain.agents.middleware import (
AgentMiddleware,
AgentState,
ExtendedModelResponse,
ModelRequest,
ModelResponse,
)
from langchain.messages import SystemMessage
from langgraph.types import Command
from typing_extensions import NotRequired
def _last_wins(_a: str, b: str) -> str:
"""Reducer: last writer wins (outer overwrites inner)."""
return b
class CustomMiddlewareState(AgentState):
"""Agent state: trace_layer uses last-wins (outer wins), messages use additive reducer."""
# Non-reducer field with last-wins: both middleware write; outermost value wins
trace_layer: NotRequired[Annotated[str, _last_wins]]
class OuterMiddleware(AgentMiddleware):
def wrap_model_call(
self,
request: ModelRequest,
handler: Callable[[ModelRequest], ModelResponse],
) -> ExtendedModelResponse:
response = handler(request)
return ExtendedModelResponse(
model_response=response,
command=Command(update={
"trace_layer": "outer",
"messages": [SystemMessage(content="[Outer ran]")],
}),
)
class InnerMiddleware(AgentMiddleware):
"""Adds trace_layer and message. Outer adds to same keys; trace_layer: outer wins, messages: additive."""
def wrap_model_call(
self,
request: ModelRequest,
handler: Callable[[ModelRequest], ModelResponse],
):
response = handler(request)
return ExtendedModelResponse(
model_response=response,
command=Command(update={
"trace_layer": "inner",
"messages": [SystemMessage(content="[Inner ran]")],
}),
)11.3.3 创建中间件
创建中间件有两种方式:
- 使用装饰器
- 继承AgentMiddleWare
基于装饰器的中间件
1. 节点风格
这类装饰器在 Agent 执行流程的特定节点触发:
@before_agent:在 Agent 启动之前运行(每次调用只运行一次)。@before_model:在每次调用模型之前运行。@after_model:在每次收到模型响应之后运行。@after_agent:在 Agent 完成工作之后运行(每次调用只运行一次)。
2. 包装风格
这类装饰器像“三明治”一样把调用过程包起来,可以处理调用前后的逻辑:
@wrap_model_call:用自定义逻辑包装每一次模型调用。@wrap_tool_call:用自定义逻辑包装每一次工具调用。
3. 便捷功能
@dynamic_prompt:用于生成动态的系统提示词。
基于装饰器的中间件
from langchain.agents.middleware import (
before_model,
wrap_model_call,
AgentState,
ModelRequest,
ModelResponse,
)
from langchain.agents import create_agent
from langgraph.runtime import Runtime
from typing import Any, Callable
@before_model
def log_before_model(state: AgentState, runtime: Runtime) -> dict[str, Any] | None:
print(f"About to call model with {len(state['messages'])} messages")
return None
@wrap_model_call
def retry_model(
request: ModelRequest,
handler: Callable[[ModelRequest], ModelResponse],
) -> ModelResponse:
for attempt in range(3):
try:
return handler(request)
except Exception as e:
if attempt == 2:
raise
print(f"Retry {attempt + 1}/3 after error: {e}")
agent = create_agent(
model="gpt-4.1",
middleware=[log_before_model, retry_model],
tools=[...],
)何时使用装饰器
- 只需要单一钩子时:如果你只需要在流程的某一个点(比如模型调用前)插入逻辑,不需要复杂的链路。
- 无需复杂配置时:你的逻辑很简单,不需要传递一堆参数或进行繁琐的初始化。
- 快速原型开发时:当你只是想快速验证想法、写个 Demo 或者赶进度的时候,用装饰器最快。
基于类的中间件
对于包含多个钩子或需要复杂配置的中间件,这种方式更加强大。当你需要为同一个钩子同时定义同步和异步实现,或者想要在一个中间件里组合多个钩子时,请使用类
from langchain.agents.middleware import (
AgentMiddleware,
AgentState,
ModelRequest,
ModelResponse,
)
from langgraph.runtime import Runtime
from typing import Any, Callable
class LoggingMiddleware(AgentMiddleware):
def before_model(self, state: AgentState, runtime: Runtime) -> dict[str, Any] | None:
print(f"About to call model with {len(state['messages'])} messages")
return None
def after_model(self, state: AgentState, runtime: Runtime) -> dict[str, Any] | None:
print(f"Model returned: {state['messages'][-1].content}")
return None
async def abefore_model(
self, state: AgentState, runtime: Runtime
) -> dict[str, Any] | None:
# Async version of before_model
return None
async def aafter_model(
self, state: AgentState, runtime: Runtime
) -> dict[str, Any] | None:
# Async version of after_model
print(f"Model returned: {state['messages'][-1].content}")
return None
agent = create_agent(
model="gpt-4.1",
middleware=[LoggingMiddleware()],
tools=[...],
)当你需要更复杂的结构时,类是更好的选择。具体包括以下几种情况:
- 同时定义同步和异步实现时
如果你需要在同一个钩子里既支持同步操作,又支持异步操作,用类来封装会更清晰。 - 单个中间件中需要包含多个钩子时
当一个中间件逻辑比较复杂,需要挂载好几个不同的钩子(hooks)时,用类可以把它们组织在一起。 - 需要复杂配置时
比如你需要设置可配置的阈值、传入自定义的模型等参数,用类的初始化方法(__init__)来接收这些配置会非常方便。 - 需要在项目间复用且依赖初始化配置时
如果你写了一个通用的中间件,想在不同的项目里用,而且每个项目初始化时的配置都不一样,用类实例化是最好的方式
11.3.4 自定义状态模式
如果你的中间件需要在不同的钩子之间追踪状态,可以通过添加自定义属性来扩展 Agent 的状态。这使得中间件能够:
- 跨执行过程追踪状态:维护计数器、标志位或其他数值,让它们在 Agent 的整个执行生命周期中持久存在。
- 在钩子之间共享数据:将信息从 before_model 传递给 after_model,或者在不同的中间件实例之间传递。
- 实现横切关注点:在不修改核心 Agent 逻辑的情况下,添加限流、用量统计、用户上下文或审计日志等功能。
- 做出条件判断:利用累积的状态数据来决定是否继续执行、跳转到不同的节点,或者动态地调整行为。
#装饰器模式
from langchain.agents import create_agent
from langchain.messages import HumanMessage
from langchain.agents.middleware import AgentState, before_model, after_model
from typing_extensions import NotRequired
from typing import Any
from langgraph.runtime import Runtime
class CustomState(AgentState):
model_call_count: NotRequired[int]
user_id: NotRequired[str]
@before_model(state_schema=CustomState, can_jump_to=["end"])
def check_call_limit(state: CustomState, runtime: Runtime) -> dict[str, Any] | None:
count = state.get("model_call_count", 0)
if count > 10:
return {"jump_to": "end"}
return None
@after_model(state_schema=CustomState)
def increment_counter(state: CustomState, runtime: Runtime) -> dict[str, Any] | None:
return {"model_call_count": state.get("model_call_count", 0) + 1}
agent = create_agent(
model="gpt-4.1",
middleware=[check_call_limit, increment_counter],
tools=[],
)
# Invoke with custom state
result = agent.invoke({
"messages": [HumanMessage("Hello")],
"model_call_count": 0,
"user_id": "user-123",
})#类模式
from langchain.agents import create_agent
from langchain.messages import HumanMessage
from langchain.agents.middleware import AgentState, AgentMiddleware
from typing_extensions import NotRequired
from typing import Any
class CustomState(AgentState):
model_call_count: NotRequired[int]
user_id: NotRequired[str]
class CallCounterMiddleware(AgentMiddleware[CustomState]):
state_schema = CustomState
def before_model(self, state: CustomState, runtime) -> dict[str, Any] | None:
count = state.get("model_call_count", 0)
if count > 10:
return {"jump_to": "end"}
return None
def after_model(self, state: CustomState, runtime) -> dict[str, Any] | None:
return {"model_call_count": state.get("model_call_count", 0) + 1}
agent = create_agent(
model="gpt-4.1",
middleware=[CallCounterMiddleware()],
tools=[],
)
# Invoke with custom state
result = agent.invoke({
"messages": [HumanMessage("Hello")],
"model_call_count": 0,
"user_id": "user-123",
})11.3.5 执行顺序
当使用多个中间件时需要知道他们之间的执行顺序
agent = create_agent(
model="gpt-4.1",
middleware=[middleware1, middleware2, middleware3],
tools=[...],
)Before hooks run in order:
middleware1.before_agent()
middleware2.before_agent()
middleware3.before_agent()
Agent loop starts
middleware1.before_model()
middleware2.before_model()
middleware3.before_model()
Wrap hooks nest like function calls:
middleware1.wrap_model_call() → middleware2.wrap_model_call() → middleware3.wrap_model_call() → model
After hooks run in reverse order:
middleware3.after_model()
middleware2.after_model()
middleware1.after_model()
Agent loop ends
middleware3.after_agent()
middleware2.after_agent()
middleware1.after_agent()核心规则:
before_*hooks: First to lastafter_*hooks: Last to first (reverse)wrap_*hooks: Nested (first middleware wraps all others)
11.3.6 智能体跳跃
若要在中间件中提前退出,请返回一个包含 jump_to 的字典
可用的跳转目标
'end':直接跳到 Agent 执行的终点(或者触发第一个after_agent钩子)。'tools':直接跳到工具节点(准备调用工具)。'model':直接跳到模型节点(或者触发第一个before_model钩子)。#装饰器 from langchain.agents.middleware import after_model, hook_config, AgentState from langchain.messages import AIMessage from langgraph.runtime import Runtime from typing import Any @after_model @hook_config(can_jump_to=["end"]) def check_for_blocked(state: AgentState, runtime: Runtime) -> dict[str, Any] | None: last_message = state["messages"][-1] if "BLOCKED" in last_message.content: return { "messages": [AIMessage("I cannot respond to that request.")], "jump_to": "end" } return None#使用类 from langchain.agents.middleware import AgentMiddleware, hook_config, AgentState from langchain.messages import AIMessage from langgraph.runtime import Runtime from typing import Any class BlockedContentMiddleware(AgentMiddleware): @hook_config(can_jump_to=["end"]) def after_model(self, state: AgentState, runtime: Runtime) -> dict[str, Any] | None: last_message = state["messages"][-1] if "BLOCKED" in last_message.content: return { "messages": [AIMessage("I cannot respond to that request.")], "jump_to": "end" } return None
11.3.7 最佳实践
- 保持专注:每个中间件应该只做好一件事(单一职责原则)。
- 优雅处理错误:千万别让中间件的报错导致整个 Agent 崩溃(要兜底)。
- 选用合适的钩子类型:
- 节点风格:适合处理顺序逻辑(比如日志记录、数据校验)。
- 包装风格:适合处理控制流(比如重试机制、降级方案、缓存)。
- 清晰文档化:如果你自定义了状态属性,一定要写清楚文档。
- 独立单元测试:在集成到主程序之前,先单独对中间件进行单元测试。
- 考虑执行顺序:把关键的中间件放在列表的最前面(优先执行)。
- 优先使用内置组件:能直接用系统自带的中间件,就别自己造轮
11.3.8 例子
11.3.8.1 动态提示词
在运行时动态修改系统提示词,以便在每次调用模型前注入上下文、针对用户的特定指令或其他信息。这是中间件最常见的应用场景之一。请使用 ModelRequest 上的 system_message 字段来读取和修改系统提示词。请注意,它包含的是一个 SystemMessage 对象(即使你在创建 Agent 时传入的 system_prompt 只是一个字符串)
#装饰器模式
from collections.abc import Callable
from langchain.agents.middleware import ModelRequest, ModelResponse, wrap_model_call
from langchain.messages import SystemMessage
@wrap_model_call
def add_context(
request: ModelRequest,
handler: Callable[[ModelRequest], ModelResponse],
) -> ModelResponse:
new_content = list(request.system_message.content_blocks) + [
{"type": "text", "text": "Additional context."}
]
new_system_message = SystemMessage(content=new_content)
return handler(request.override(system_message=new_system_message))#类模式
from collections.abc import Callable
from langchain.agents.middleware import AgentMiddleware, ModelRequest, ModelResponse
class ContextMiddleware(AgentMiddleware):
def wrap_model_call(
self,
request: ModelRequest,
handler: Callable[[ModelRequest], ModelResponse],
) -> ModelResponse:
new_content = list(request.system_message.content_blocks) + [
{"type": "text", "text": "Additional context."}
]
new_system_message = SystemMessage(content=new_content)
return handler(request.override(system_message=new_system_message))- 统一对象类型:ModelRequest.system_message 永远是一个 SystemMessage 对象,哪怕你当初创建 Agent 时传入的 system_prompt 只是个简单的字符串。
- 使用 content_blocks 访问内容:请使用 SystemMessage.content_blocks 来以“块列表”的形式访问内容。这样做的好处是,无论原始内容是字符串还是列表,你都能统一处理。
- 追加块以保留结构:在修改系统消息时,请操作 content_blocks 并追加新的块,这样可以保留原有的结构不被破坏。
- 高级用法:你可以直接将 SystemMessage 对象传递给 create_agent 的 system_prompt 参数,这适用于像缓存控制这样的高级场景。
11.3.8.2 动态模型
#装饰器
from collections.abc import Callable
from langchain.agents.middleware import ModelRequest, ModelResponse, wrap_model_call
from langchain.chat_models import init_chat_model
complex_model = init_chat_model("claude-sonnet-4-6")
simple_model = init_chat_model("claude-haiku-4-5-20251001")
@wrap_model_call
def dynamic_model(
request: ModelRequest,
handler: Callable[[ModelRequest], ModelResponse],
) -> ModelResponse:
if len(request.messages) > 10:
model = complex_model
else:
model = simple_model
return handler(request.override(model=model))#类
from collections.abc import Callable
from langchain.agents.middleware import AgentMiddleware, ModelRequest, ModelResponse
from langchain.chat_models import init_chat_model
complex_model = init_chat_model("claude-sonnet-4-6")
simple_model = init_chat_model("claude-haiku-4-5-20251001")
class DynamicModelMiddleware(AgentMiddleware):
def wrap_model_call(
self,
request: ModelRequest,
handler: Callable[[ModelRequest], ModelResponse],
) -> ModelResponse:
if len(request.messages) > 10:
model = complex_model
else:
model = simple_model
return handler(request.override(model=model))11.3.8.3 动态工具
在运行时筛选出相关的工具,以提升性能和准确率。本节主要介绍如何过滤预先注册的工具。(如果你想注册在运行时才发现的工具,比如来自 MCP 服务器的工具,请参见“运行时工具注册”章节。)
这样做的好处
- 提示词更精简:只暴露相关的工具,减少提示词的复杂度。
- 准确率更高:选项越少,模型越不容易挑花眼,选择正确的概率就越高。
- 权限控制:根据用户的访问权限,动态地过滤掉他们无权使用的工具
#装饰器
from langchain.agents import create_agent
from langchain.agents.middleware import wrap_model_call, ModelRequest, ModelResponse
from typing import Callable
@wrap_model_call
def select_tools(
request: ModelRequest,
handler: Callable[[ModelRequest], ModelResponse],
) -> ModelResponse:
"""Middleware to select relevant tools based on state/context."""
# Select a small, relevant subset of tools based on state/context
relevant_tools = select_relevant_tools(request.state, request.runtime)
return handler(request.override(tools=relevant_tools))
agent = create_agent(
model="gpt-4.1",
tools=all_tools, # All available tools need to be registered upfront
middleware=[select_tools],
)#类
from langchain.agents import create_agent
from langchain.agents.middleware import AgentMiddleware, ModelRequest, ModelResponse
from typing import Callable
class ToolSelectorMiddleware(AgentMiddleware):
def wrap_model_call(
self,
request: ModelRequest,
handler: Callable[[ModelRequest], ModelResponse],
) -> ModelResponse:
"""Middleware to select relevant tools based on state/context."""
# Select a small, relevant subset of tools based on state/context
relevant_tools = select_relevant_tools(request.state, request.runtime)
return handler(request.override(tools=relevant_tools))
agent = create_agent(
model="gpt-4.1",
tools=all_tools, # All available tools need to be registered upfront
middleware=[ToolSelectorMiddleware()],
)11.3.8.4 工具调用监控
#装饰器
from collections.abc import Callable
from langchain.agents.middleware import wrap_tool_call
from langchain.messages import ToolMessage
from langchain.tools.tool_node import ToolCallRequest
from langgraph.types import Command
@wrap_tool_call
def monitor_tool(
request: ToolCallRequest,
handler: Callable[[ToolCallRequest], ToolMessage | Command],
) -> ToolMessage | Command:
print(f"Executing tool: {request.tool_call['name']}")
print(f"Arguments: {request.tool_call['args']}")
try:
result = handler(request)
print("Tool completed successfully")
return result
except Exception as e:
print(f"Tool failed: {e}")
raise#类方式
from collections.abc import Callable
from langchain.agents.middleware import AgentMiddleware
from langchain.messages import ToolMessage
from langchain.tools.tool_node import ToolCallRequest
from langgraph.types import Command
class ToolMonitoringMiddleware(AgentMiddleware):
def wrap_tool_call(
self,
request: ToolCallRequest,
handler: Callable[[ToolCallRequest], ToolMessage | Command],
) -> ToolMessage | Command:
print(f"Executing tool: {request.tool_call['name']}")
print(f"Arguments: {request.tool_call['args']}")
try:
result = handler(request)
print("Tool completed successfully")
return result
except Exception as e:
print(f"Tool failed: {e}")
raise11.3.8.5 提示词缓存
当使用 Anthropic 模型时,请配合使用带有缓存控制指令的结构化内容块,以便缓存大型系统提示词
#装饰器模式
from langchain.agents.middleware import wrap_model_call, ModelRequest, ModelResponse
from langchain.messages import SystemMessage
from typing import Callable
@wrap_model_call
def add_cached_context(
request: ModelRequest,
handler: Callable[[ModelRequest], ModelResponse],
) -> ModelResponse:
# Always work with content blocks
new_content = list(request.system_message.content_blocks) + [
{
"type": "text",
"text": "Here is a large document to analyze:\n\n<document>...</document>",
# content up until this point is cached
"cache_control": {"type": "ephemeral"}
}
]
new_system_message = SystemMessage(content=new_content)
return handler(request.override(system_message=new_system_message))#类模式
from langchain.agents.middleware import AgentMiddleware, ModelRequest, ModelResponse
from langchain.messages import SystemMessage
from typing import Callable
class CachedContextMiddleware(AgentMiddleware):
def wrap_model_call(
self,
request: ModelRequest,
handler: Callable[[ModelRequest], ModelResponse],
) -> ModelResponse:
# Always work with content blocks
new_content = list(request.system_message.content_blocks) + [
{
"type": "text",
"text": "Here is a large document to analyze:\n\n<document>...</document>",
"cache_control": {"type": "ephemeral"} # This content will be cached
}
]
new_system_message = SystemMessage(content=new_content)
return handler(request.override(system_message=new_system_message))备注
-
统一对象类型
ModelRequest.system_message永远都是一个SystemMessage对象。哪怕你在创建 Agent 时只传了一个字符串(system_prompt="string"),框架也会在内部把它包装成这个对象。 -
统一访问方式
不管原始内容是字符串还是列表,你都可以通过SystemMessage.content_blocks来访问,它会统一以“内容块列表”的形式呈现。 -
修改时的最佳实践
当你需要修改系统消息时,建议操作content_blocks,通过追加新块的方式来保留原有的结构,而不是直接覆盖。 -
高级用法
在create_agent的system_prompt参数里,你可以直接传入SystemMessage对象。这通常用于一些高级场景,比如精细控制缓存(cache control)
总结
到此,langchain核心概念基本已经解读完毕,前端和agent交互请看下篇
下篇

AtomGit 是由开放原子开源基金会联合 CSDN 等生态伙伴共同推出的新一代开源与人工智能协作平台。平台坚持“开放、中立、公益”的理念,把代码托管、模型共享、数据集托管、智能体开发体验和算力服务整合在一起,为开发者提供从开发、训练到部署的一站式体验。
更多推荐

 9
9 0
0- 0


 已为社区贡献8条内容

所有评论(0)