从nanoagent理解Agent原理
前言
近 OpenClaw、Claude Code 这类 Coding Agent 火遍了整个开发者圈子——它们能自主读代码、改代码、跑测试,完成以前需要人类手动操作的整个开发流程。
但 Agent 到底和普通对话有什么区别?OpenClaw / Claude Code 这类工具的底层原理是什么?Agent 是怎么"使用工具"的?
本文通过逐行解读一个仅 115 行的极简 Agent 实现—— sanbuphy/nanoAgent,理解OpenClaw、Claude Code、Cursor Agent 等一切 Coding Agent 的共同底座。
在深入代码之前,先建立一个直觉:
| 维度 | 普通对话(Chat) | Agent |
|---|---|---|
| 交互模式 | 一问一答,用户驱动 | 自主循环,目标驱动 |
| 能力边界 | 只能生成文本 | 可以调用工具,作用于真实世界 |
| 执行流程 | 用户提问 → 模型回答 | 用户下达任务 → 思考 → 调用工具 → 观察 → 继续思考 → … → 返回答案 |
| 状态管理 | 每轮独立(或简单上下文拼接) | 维护完整的消息历史,包含工具调用与返回结果 |
| 自主性 | 无 | 模型自主决定"下一步做什么"、“用哪个工具”、“何时停止” |
一句话总结:Agent = LLM + 工具 + 循环。普通对话是"你问我答",Agent 是"你给我一个目标,我自己想办法完成"。
这三个要素缺一不可。没有 LLM,就没有"思考"能力;没有工具,就无法作用于真实世界;没有循环,就做不了多步任务。接下来我们看 nanoAgent 是怎么用 115 行代码实现这三要素的,整体结构可以拆成四个部分:
- LLM 客户端初始化
- 工具定义(Tool Schema)
- 工具实现(Tool Functions)
- Agent 循环(Core Loop)
下面逐层拆解。
一、工具 + 循环
1.1 LLM 客户端初始化
import os
import json
import subprocess
import sys
from openai import OpenAI
client = OpenAI(
    api_key=os.environ.get("OPENAI_API_KEY"),
    base_url=os.environ.get("OPENAI_BASE_URL")
)
这里用的是 OpenAI 的 Python SDK,但通过 base_url 环境变量,可以指向任何兼容 OpenAI API 格式的服务(比如 DeepSeek、Qwen、本地 Ollama 等)。这是一个非常实用的设计——Agent 框架不绑定具体模型。
1.2 工具定义:告诉 LLM “你有哪些能力”
tools = [
    {
        "type": "function",
        "function": {
            "name": "execute_bash",
            "description": "Execute a bash command on the system",
            "parameters": {
                "type": "object",
                "properties": {
                    "command": {"type": "string", "description": "The bash command to execute"}
                },
                "required": ["command"]
            }
        }
    },
    # ... read_file, write_file 类似
]
这是 OpenAI Function Calling 的标准格式。这段 JSON Schema 本质上是一份工具说明书。每次 API 调用时,所有工具的 JSON Schema(名称 + 描述 + 参数格式)都会一起发给 LLM。LLM 对比用户的任务和工具的 description,做语义匹配,LLM 通过这份说明书,就"知道"自己可以执行 bash 命令、读文件、写文件。
nanoAgent 定义了三个工具:
| 工具名 | 能力 | 危险等级 |
|---|---|---|
| execute_bash | 执行任意 shell 命令 | ⚠️ 极高——理论上可以做任何事 |
| read_file | 读取文件内容 | 中——可能读到敏感信息 |
| write_file | 写入文件 | 高——可以覆盖任何文件 |
LLM 本身不会执行任何代码。它只是根据工具说明书,输出一段结构化的 JSON,表达"我想调用 execute_bash,参数是 ls -la"。真正的执行发生在我们的 Python 代码里。这个"LLM 输出意图、代码执行动作"的分工,是理解所有 Agent 系统的关键。
1.3 工具实现:把 LLM 的"意图"变成"行动"
def execute_bash(command):
    try:
        result = subprocess.run(command, shell=True, capture_output=True, text=True, timeout=30)
        return result.stdout + result.stderr
    except Exception as e:
        return f"Error: {str(e)}"

def read_file(path):
    try:
        with open(path, 'r') as f:
            return f.read()
    except Exception as e:
        return f"Error: {str(e)}"

def write_file(path, content):
    try:
        with open(path, 'w') as f:
            f.write(content)
        return f"Successfully wrote to {path}"
    except Exception as e:
        return f"Error: {str(e)}"
这三个函数就是工具的"真身"。几个值得注意的细节:
- 错误处理:每个函数都用 try-except 包裹,确保即使执行出错也能把错误信息返回给 LLM,而不是让整个程序崩溃。这很重要——LLM 看到错误后可以自行修正策略。
- timeout=30:bash 命令有 30 秒超时限制,防止死循环或长时间阻塞。
- shell=True:意味着可以执行管道、重定向等复杂 shell 语法,能力很强,但安全风险也很大。
接下来是一个路由表,把工具名映射到实际函数:
available_functions = {
    "execute_bash": execute_bash,
    "read_file": read_file,
    "write_file": write_file
}
这个字典是工具调度的核心——当 LLM 说"我要调用 execute_bash"时,代码通过这个字典找到对应的 Python 函数并执行。
1.4 Agent 核心循环:最精华的 20 行代码
def run_agent(user_message, max_iterations=5):
    messages = [
        {"role": "system", "content": "You are a helpful assistant that can interact with the system. Be concise."},
        {"role": "user", "content": user_message}
    ]
    for _ in range(max_iterations):
        # Step 1: 把完整对话历史 + 工具列表发给 LLM
        response = client.chat.completions.create(
            model=os.environ.get("OPENAI_MODEL", "gpt-4o-mini"),
            messages=messages,
            tools=tools
        )
        message = response.choices[0].message
        messages.append(message)
        # Step 2: 如果 LLM 没有调用工具 → 任务完成,返回文本回答
        if not message.tool_calls:
            return message.content
        # Step 3: 如果 LLM 要调用工具 → 逐个执行,把结果追加到对话历史
        for tool_call in message.tool_calls:
            function_name = tool_call.function.name
            function_args = json.loads(tool_call.function.arguments)
            print(f"[Tool] {function_name}({function_args})")
            function_response = available_functions[function_name](**function_args)
            messages.append({
                "role": "tool",
                "tool_call_id": tool_call.id,
                "content": function_response
            })
    return "Max iterations reached"
- max_iterations是一个安全阀。如果 LLM 陷入死循环(比如反复执行同一个失败的命令),max_iterations 确保程序最终会停下来。在生产级 Agent 中,这个值通常更大(比如 Claude Code 可以连续执行数十步),同时会配合更复杂的终止策略。
- messages 是 Agent 的短期记忆。每一轮循环,它都会累积 LLM 的回复(包括它想调用什么工具)以及工具的执行结果。当这个列表在下一轮发送给 LLM 时,LLM 能看到完整的"行动-观察"历史,从而做出更合理的下一步决策。这就是 Agent 和简单对话的本质区别——Agent 维护了一条包含行动轨迹的上下文链。但请注意,这里的 messages 只在单次运行中存在。程序退出后,一切归零。Agent 下次运行时完全不记得上次做过什么。这个"失忆"问题,正是我们在第二篇连载中要解决的。
- tool_call_id 是 OpenAI API 的要求,用于将工具返回结果与对应的调用请求关联起来。当 LLM 在一次回复中同时调用多个工具时(并行调用),这个 ID 确保每个结果能正确匹配到对应的调用。
这 20 多行代码是整个 Agent 的灵魂。以一个具体例子来逐步拆解这个循环里发生了什么。假设用户运行:
python agent.py "统计当前目录下有多少个 Python 文件,并把结果写入 count.txt"
Agent 的执行过程如下:
第 1 轮循环
- 发送给 LLM 的 messages:
[system] You are a helpful assistant...
[user]   统计当前目录下有多少个 Python 文件,并把结果写入 count.txt
- LLM 返回:不是普通文本,而是一个 tool_call:
{
  "tool_calls": [{
    "function": {"name": "execute_bash", "arguments": "{\"command\": \"find . -name '*.py' | wc -l\"}"}
  }]
}
- 代码执行:调用
execute_bash("find . -name '*.py' | wc -l"),得到结果"42\n" - 追加到 messages:
[tool] 42
第 2 轮循环
- 发送给 LLM 的 messages:现在包含了完整历史(system + user + assistant的tool_call + tool结果)
- LLM 看到结果是 42,决定写入文件:
{
  "tool_calls": [{
    "function": {"name": "write_file", "arguments": "{\"path\": \"count.txt\", \"content\": \"Python files: 42\"}"}
  }]
}
- 代码执行:调用
write_file("count.txt", "Python files: 42")
第 3 轮循环
- LLM 看到文件写入成功,判断任务已完成,返回纯文本:
"已统计完成,当前目录下共有 42 个 Python 文件,结果已写入 count.txt。"
not message.tool_calls为 True → 退出循环,返回结果。
用一张图来表示:
用户任务
  │
  ▼
┌──────────────────────────────────────────────────┐
│                  Agent Loop                       │
│                                                   │
│  ┌─────────┐    ┌──────────┐    ┌──────────────┐ │
│  │ 发送给   │───▶│ LLM 决策  │───▶│ 有tool_call? │ │
│  │ LLM     │    │          │    └──────┬───────┘ │
│  └─────────┘    └──────────┘           │         │
│       ▲                          Yes   │   No    │
│       │                          ┌─────┴─────┐   │
│       │                          ▼           ▼   │
│  ┌────┴────────┐          ┌──────────┐  返回文本  │
│  │ 结果追加到   │◀─────────│ 执行工具  │  ──────▶  │
│  │ messages    │          └──────────┘   结束    │
│  └─────────────┘                                 │
└──────────────────────────────────────────────────┘
二、记忆与规划
2.1 记忆系统:最朴素但最本质的方案
上面通过 nanoAgent 的 115 行代码,我们可以提炼出 Agent 的三个本质要素:
- 感知(Perception)—— 通过工具获取外部信息(read_file、execute_bash 的输出)
- 决策(Reasoning)—— LLM 根据任务目标和已有观察,决定下一步行动
- 行动(Action)—— 通过工具作用于外部环境(write_file、execute_bash)
这三者在一个循环中不断迭代,直到 LLM 判断任务完成(不再调用工具)。这就是 Agent 最朴素、最本质的运行方式——**“思考 → 行动 → 观察”(ReAct)**范式。但如果你仔细想想,会发现它有几个根本性的缺陷:
- 没有记忆。 每次运行都是一张白纸。昨天让它创建的文件,今天问它"你昨天干了什么",它一脸茫然。
- 没有规划。 面对"重构整个项目"这样的复杂任务,它只能走一步看一步,容易迷失在细节中。
- 工具是硬编码的。 只有 3 个工具,想加新工具必须改代码。没有任何扩展机制。
- 没有行为约束。 它可以执行 rm -rf /,没有任何规则告诉它什么该做、什么不该做。
这些缺陷,恰好对应了 Agent 架构中更高层次的需求。nanoAgent 的作者也意识到了这一点,所以他写了两个进化版本来逐一解决。
| 能力 | agent.py (115 行) | agent-plus.py (182 行) |
|---|---|---|
| 工具调用 | ✅ 3 个工具 | ✅ 3 个工具(不变) |
| 单任务执行 | ✅ | ✅ |
| 跨会话记忆 | ❌ 每次运行都失忆 | ✅ agent_memory.md 文件持久化 |
| 任务规划 | ❌ 走一步看一步 | ✅ create_plan() 先拆解再执行 |
| 多步串联 | ❌ | ✅ 步骤间共享 messages 上下文 |
工具层完全没变——新增的 67 行全部用来构建更高层的能力。这恰好印证了第一篇的结论:工具 + 循环只是地基,记忆和规划才是让 Agent 真正可用的关键。
2.1.1 记忆的存储:一个 Markdown 文件
MEMORY_FILE = "agent_memory.md"
def save_memory(task, result):
    timestamp = datetime.now().strftime("%Y-%m-%d %H:%M:%S")
    entry = f"\n## {timestamp}\n**Task:** {task}\n**Result:** {result}\n"
    try:
        with open(MEMORY_FILE, 'a') as f:
            f.write(entry)
    except:
        pass
agent-plus.py 用了一种极其朴素的方案——把历史任务和结果追加写入一个 Markdown 文件。没有数据库,没有向量索引,就是纯文本。每次任务执行完毕,Agent 把"什么时间、做了什么、得到什么结果"追加到文件末尾:
## 2026-03-12 14:30:00
**Task:** 统计当前目录下的 Python 文件数量
**Result:** 当前目录下共有 42 个 Python 文件。

## 2026-03-12 15:00:00
**Task:** 创建一个 hello.py
**Result:** 已创建 hello.py,内容为打印 Hello World。
2.1.2 记忆的加载:滑动窗口
def load_memory():
    if not os.path.exists(MEMORY_FILE):
        return ""
    try:
        with open(MEMORY_FILE, 'r') as f:
            content = f.read()
        lines = content.split('\n')
        return '\n'.join(lines[-50:]) if len(lines) > 50 else content
    except:
        return ""
加载记忆时有一个关键细节:只取最后 50 行。这是一个简单的滑动窗口策略——记忆文件可能无限增长,但 LLM 的 context window 是有限的。必须截断。
2.1.3 记忆的注入:塞进 System Prompt
def run_agent_plus(task, use_plan=False):
    memory = load_memory()
    system_prompt = "You are a helpful assistant that can interact with the system. Be concise."
    if memory:
        system_prompt += f"\n\nPrevious context:\n{memory}"
    messages = [{"role": "system", "content": system_prompt}]
加载出来的记忆被拼接到 system prompt 末尾,以 “Previous context” 的形式注入。LLM 在处理新任务时能"看到"之前的历史。
2.1.4 记忆流程全景
第 1 次运行                          第 2 次运行
───────────                        ───────────
用户: "创建 hello.py"               用户: "读取 hello.py 并加上注释"
        │                                  │
        ▼                                  ▼
  system prompt:                    system prompt:
  "You are a helpful               "You are a helpful
   assistant..."                    assistant...

                                    Previous context:
                                    ## 2026-03-12 14:30
                                    Task: 创建 hello.py
                                    Result: 已创建..."
        │                                  │
        ▼                                  ▼
  Agent 执行任务                     Agent 执行任务
        │                           (知道之前创建过 hello.py)
        ▼                                  │
  save_memory() ──写入──▶ agent_memory.md ◀─── save_memory()
2.1.5 记忆的本质
这个方案虽然原始,但揭示了一个根本原理:LLM 本身没有持久记忆,所有"记忆"都是通过在 prompt 中注入历史信息来实现的。
无论是 Claude 的 Memory、ChatGPT 的记忆功能,还是更复杂的 RAG 系统,底层都遵循这个模式——只是在"存在哪、怎么找、搬多少"上做得更精细。我们会在文末讨论这些进化方向。
2.2 规划系统:让 Agent 学会"先想再做"
2.2.1 为什么需要规划?
回忆第一篇中 agent.py 的工作方式:把整个任务丢给 LLM,让它在循环中自行摸索。简单任务没问题,但面对复杂任务(比如"重构整个项目的目录结构"),LLM 容易迷失在细节中,忘记全局目标。
agent-plus.py 引入了一个可选的规划阶段:
def create_plan(task):
    print("[Planning] Breaking down task...")
    response = client.chat.completions.create(
        model=os.environ.get("OPENAI_MODEL", "gpt-4o-mini"),
        messages=[
            {"role": "system", "content": "Break down the task into 3-5 simple, actionable steps. Return as JSON array of strings."},
            {"role": "user", "content": f"Task: {task}"}
        ],
        response_format={"type": "json_object"}
    )
    try:
        plan_data = json.loads(response.choices[0].message.content)
        steps = plan_data.get("steps", [task])
        print(f"[Plan] {len(steps)} steps created")
        for i, step in enumerate(steps, 1):
            print(f"  {i}. {step}")
        return steps
    except:
        return [task]
规划的设计细节:
这段代码有几个值得细品的地方:
-
用 LLM 来做规划。规划本身也是一次 LLM 调用,但不带任何工具——纯粹的"思考"。system prompt 要求 LLM 把任务拆解为 3-5 个可执行的步骤,以 JSON 格式返回。
-
结构化输出。通过
response_format={"type": "json_object"}强制 LLM 返回 JSON,避免格式解析问题。 -
优雅降级。如果 JSON 解析失败,except 分支回退到
[task]——即不拆解,整个任务当作一步执行。这种防御性编程在 Agent 开发中非常重要。
两种执行范式的对比:
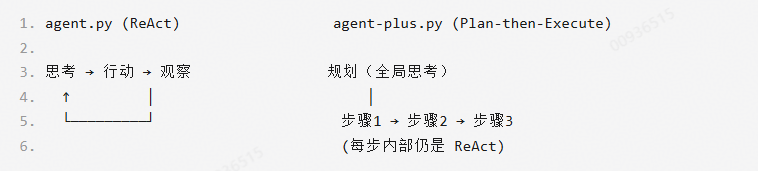
ReAct 灵活但容易迷失,Plan-then-Execute 有全局视角但规划可能不准确。agent-plus.py 通过 --plan 参数让用户自行选择——这种"默认简单,按需复杂"的设计在工程上很实用。
2.2.2 多步执行:步骤之间的上下文传递
从 run_agent 到 run_agent_step 的关键变化:
对比第一篇中 agent.py 的 run_agent 函数,agent-plus.py 的 run_agent_step 有两个关键变化:
def run_agent_step(task, messages, max_iterations=5):
    messages.append({"role": "user", "content": task})
    actions = []
    for _ in range(max_iterations):
        response = client.chat.completions.create(
            model=os.environ.get("OPENAI_MODEL", "gpt-4o-mini"),
            messages=messages,
            tools=tools
        )
        message = response.choices[0].message
        messages.append(message)
        if not message.tool_calls:
            return message.content, actions, messages
        for tool_call in message.tool_calls:
            function_name = tool_call.function.name
            function_args = json.loads(tool_call.function.arguments)
            print(f"[Tool] {function_name}({function_args})")
            function_response = available_functions[function_name](**function_args)
            actions.append({"tool": function_name, "args": function_args})
            messages.append({"role": "tool", "tool_call_id": tool_call.id, "content": function_response})
    return "Max iterations reached", actions, messages
-
变化一:messages 从内部创建变为外部传入。这意味着多个步骤可以共享同一个对话历史。步骤 1 执行 grep 搜索到的结果,在步骤 2 中仍然可见。
-
变化二:返回值包含 messages。函数把更新后的消息列表返回给调用方,供下一步继续使用。
编排层:把步骤串起来:
all_results = []
for i, step in enumerate(steps, 1):
    if len(steps) > 1:
        print(f"\n[Step {i}/{len(steps)}] {step}")
    result, actions, messages = run_agent_step(step, messages)
    all_results.append(result)
final_result = "\n".join(all_results)
save_memory(task, final_result)
messages 变量在整个步骤循环中是同一个列表对象。步骤 1 执行过程中产生的所有工具调用和结果,都会累积在这个列表中,步骤 2 的 LLM 调用能看到步骤 1 的完整执行轨迹。
这引出了一个重要的概念区分——短期记忆与长期记忆:
| 记忆类型 | 载体 | 生命周期 | 实现 |
|---|---|---|---|
| 短期记忆 | messages 列表 | 单次运行内 | 步骤间共享的对话历史 |
| 长期记忆 | agent_memory.md 文件 | 跨多次运行 | system prompt 中的 “Previous context” |

完整运行时序示例
以 python agent-plus.py --plan "找到所有 TODO 并整理到 todo.md" 为例:
[Planning] Breaking down task...
[Plan] 3 steps created
  1. 使用 grep 递归搜索所有 TODO 注释
  2. 整理搜索结果为 Markdown 清单格式
  3. 将清单写入 todo.md

[Step 1/3] 使用 grep 递归搜索所有 TODO 注释
[Tool] execute_bash({"command": "grep -rn 'TODO' --include='*.py' ."})
  → ./app.py:23: # TODO: add error handling
  → ./utils.py:7: # TODO: refactor this function
  → ./main.py:45: # TODO: add logging
找到 3 处 TODO 注释。

[Step 2/3] 整理搜索结果为 Markdown 清单格式
(LLM 看到步骤 1 的 grep 结果,直接整理,无需再次搜索)
已整理为以下清单:
- app.py:23 - add error handling
- utils.py:7 - refactor this function
- main.py:45 - add logging

[Step 3/3] 将清单写入 todo.md
[Tool] write_file({"path": "todo.md", "content": "# TODO List\n\n..."})
已将 TODO 清单写入 todo.md。
注意步骤 2 没有调用任何工具——LLM 直接从 messages 中读取了步骤 1 的 grep 输出并整理。这就是上下文传递的威力。
2.2.3、记忆方案的局限与进化方向
nanoAgent 的记忆方案堪称"最小可行记忆",但它清晰地暴露了四个需要进化的方向:
-
记忆无差别截断 → 向量数据库 + 语义检索
- 只保留最后 50 行会丢失重要的早期信息
- 更好的方案是把记忆存入向量数据库(如 Chroma、Pinecone),每次只检索与当前任务语义相关的记忆
- 这就是 RAG 的核心思路
-
无记忆压缩 → 记忆蒸馏
- 当记忆超过阈值时,用 LLM 自动压缩旧记忆——提取关键事实,丢弃细节
- 比如把"执行了 grep -rn TODO,找到 app.py:23、utils.py:7、main.py:45 三处"压缩为"项目中有 3 处 TODO 待处理"
-
全量注入 prompt → 记忆作为工具
- 不把记忆塞进 system prompt,而是提供一个 search_memory 工具让 Agent 按需查询
- Agent 自己决定什么时候需要回忆、回忆什么
-
单层记忆 → 分层记忆架构
- 参考人类记忆的工作方式:工作记忆(当前 messages)→ 短期记忆(最近几次对话摘要)→ 长期记忆(压缩后的关键事实)
- 每层的信息密度和保留时间不同
这些进化方向,正是业界 Agent 系统(如 Claude、AutoGPT 等)正在解决的核心问题。nanoAgent 用最少的代码,把它们清晰地摆在了我们面前。
三、Rules、Skills 与 MCP
现在我们的 Agent 有了记忆和规划能力,但还有三个问题没解决:
- 工具是硬编码的——想接入 Slack、GitHub、数据库等外部服务怎么办?
- 没有行为约束——不同项目、不同团队对 Agent 的要求完全不同,怎么定制?
- 规划是被动触发的——用户必须手动加 --plan 参数,Agent 自己不知道什么时候该规划。
今天我们继续进化—— agent-claudecode.py(265 行)。如果你用过 OpenClaw 或 Claude Code,你对 CLAUDE.md 规则文件、.agent/skills/ 技能目录、MCP 工具配置一定不陌生——这些概念正是本篇要拆解的核心。
agent-claudecode.py 在前两个版本的基础上,引入了四个新概念来回答那三个问题:
| 未解问题 | 解决方案 | 新概念 |
|---|---|---|
| 工具是硬编码的 | 外部配置文件动态加载工具 | MCP(Model Context Protocol) |
| 没有行为约束 | 声明式规则文件注入 prompt | Rules + Skills |
| 规划是被动的 | 把规划注册为 Agent 可自主调用的工具 | Plan-as-Tool |
先回顾整个进化路线:
| 能力 | agent.py (115行) | agent-plus.py (182行) | agent-claudecode.py (265行) |
|---|---|---|---|
| 基础工具 | bash / read / write | bash / read / write | read / write / edit / glob / grep / bash |
| 记忆 | ❌ | ✅ 文件持久化 | ✅ 文件持久化 |
| 规划 | ❌ | ✅ 外部函数,手动触发 | ✅ 规划本身是一个工具,Agent 自主触发 |
| Rules | ❌ | ❌ | ✅ .agent/rules/*.md |
| Skills | ❌ | ❌ | ✅ .agent/skills/*.json |
| MCP | ❌ | ❌ | ✅ .agent/mcp.json |
| 工具扩展性 | 硬编码 3 个 | 硬编码 3 个 | 基础 7 个 + MCP 动态加载 N 个 |
3.1 更精细的工具集:从"能用"到"好用"
agent-claudecode.py 首先在基础工具上做了大幅扩充,从 3 个增加到 7 个:
base_tools = [
    {"name": "read",  "description": "Read file with line numbers", ...},
    {"name": "write", "description": "Write content to file", ...},
    {"name": "edit",  "description": "Replace string in file", ...},   # 新增
    {"name": "glob",  "description": "Find files by pattern", ...},    # 新增
    {"name": "grep",  "description": "Search files for pattern", ...}, # 新增
    {"name": "bash",  "description": "Run shell command", ...},
    {"name": "plan",  "description": "Break down complex task", ...}   # 新增
]
新增的工具不是随意选择的——它们恰好对应了 Claude Code 的核心工具集。其中最值得深入分析的是 edit 和改进后的 read。
edit:用约束引导 LLM 行为
def edit(path, old_string, new_string):
    try:
        with open(path, 'r') as f:
            content = f.read()
        if content.count(old_string) != 1:
            return f"Error: old_string must appear exactly once"
        new_content = content.replace(old_string, new_string)
        with open(path, 'w') as f:
            f.write(new_content)
        return f"Successfully edited {path}"
    except Exception as e:
        return f"Error: {str(e)}"
这个工具有一个精妙的约束:old_string 必须在文件中恰好出现一次。出现零次说明目标不存在,出现多次则无法确定该替换哪一处。
这个"唯一性约束"迫使 LLM 在调用 edit 之前先用 read 或 grep 确认上下文,大大降低了误编辑的概率。对比第一篇中 agent.py 的 write_file(直接覆盖整个文件),edit 精确到了字符串级别——这正是 Claude Code 中 str_replace 工具的设计思路。
设计启示:用工具的约束来引导 LLM 的行为,比在 prompt 中告诫"小心编辑"可靠得多。约束是硬性的,prompt 是软性的。
read:行号 + 分页
def read(path, offset=None, limit=None):
    try:
        with open(path, 'r') as f:
            lines = f.readlines()
        start = offset if offset else 0
        end = start + limit if limit else len(lines)
        numbered = [f"{i+1:4d} {line}" for i, line in enumerate(lines[start:end], start)]
        return ''.join(numbered)
    except Exception as e:
        return f"Error: {str(e)}"
相比第一篇中简单的 read_file,这个版本支持 offset 和 limit 分页读取,还会给每行加上行号。行号看似微不足道,但对 LLM 配合 edit 使用时极其重要——LLM 可以精确定位"第 23 行附近的那段代码"。
3.2 Rules:教 Agent “做人的规矩”
加载与注入
RULES_DIR = ".agent/rules"
def load_rules():
    rules = []
    if not os.path.exists(RULES_DIR):
        return ""
    try:
        for rule_file in Path(RULES_DIR).glob("*.md"):
            with open(rule_file, 'r') as f:
                rules.append(f"# {rule_file.stem}\n{f.read()}")
        return "\n\n".join(rules) if rules else ""
    except:
        return ""
Rules 是存放在 .agent/rules/ 目录下的 Markdown 文件。Agent 启动时全部加载,注入到 system prompt 中:
if rules:
    context_parts.append(f"\n# Rules\n{rules}")
Rules 是什么、怎么用
你可以创建这样的规则文件:
<!-- .agent/rules/code-style.md -->
- 使用 Python 3.10+ 语法
- 所有函数必须有 docstring
- 变量命名使用 snake_case
- 不要使用 print 调试,使用 logging 模块

<!-- .agent/rules/safety.md -->
- 永远不要执行 rm -rf / 或类似的危险命令
- 修改文件前先备份
- 不要修改 .env 文件中的密钥
Rules 的本质
Rules 是项目级的 system prompt 扩展。它解决了一个关键问题:不同项目、不同团队、不同场景对 Agent 的要求不同。与其每次在对话中反复叮嘱"记得用 snake_case",不如写一次规则文件,永久生效。
如果你用过 OpenClaw 或 Claude Code,你一定对 CLAUDE.md 不陌生——它就是 Rules 的工程化实现。在 Claude Code 中对应 CLAUDE.md 文件和 .claude/rules/ 目录,在 OpenClaw 中也沿用了相同的约定。在 Cursor 中是 .cursorrules,在 GitHub Copilot 中是 .github/copilot-instructions.md。名字不同,本质一样——用声明式文件定制 Agent 的行为边界。
回顾第二篇中 agent-plus.py 的 system prompt 构建方式,当时只有"基础指令 + 记忆"两层。现在变成了四层拼接:
最终 system prompt = 基础指令 + Rules(项目规则) + Skills(技能描述) + Memory(历史记忆)
3.3 Skills:可插拔的技能注册
加载与注入
SKILLS_DIR = ".agent/skills"
def load_skills():
    skills = []
    if not os.path.exists(SKILLS_DIR):
        return []
    try:
        for skill_file in Path(SKILLS_DIR).glob("*.json"):
            with open(skill_file, 'r') as f:
                skills.append(json.load(f))
        return skills
    except:
        return []
Skills 是 .agent/skills/ 目录下的 JSON 文件,以列表摘要的形式注入 system prompt:
if skills:
    context_parts.append(
        f"\n# Skills\n" + "\n".join(
            [f"- {s['name']}: {s.get('description', '')}" for s in skills]
        )
    )
一个 Skill 文件可能长这样:
{
  "name": "docker-deploy",
  "description": "Deploy application using Docker Compose. Steps: 1) Check Dockerfile exists, 2) Run docker-compose build, 3) Run docker-compose up -d, 4) Verify containers are running.",
  "triggers": ["deploy", "docker", "container"]
}
关于 Skill 的文件格式:在 OpenClaw / Claude Code 的实际实现中,Skill 的标准格式是 Markdown(每个 Skill 目录下有一个 SKILL.md,里面详细描述执行步骤、最佳实践、示例代码等)。但 nanoAgent 原始仓库中采用的是 JSON 格式,所以代码里用 json.load() 来解析。这不影响理解核心思路——不管是 Markdown 还是 JSON,本质都是"把技能描述加载出来注入到 system prompt"。格式只是载体,思想是一样的。
Skills vs Rules
| 维度 | Rules | Skills |
|---|---|---|
| 文件格式 | Markdown | JSON |
| 作用 | 约束行为(“不要做什么”) | 提供能力(“可以怎么做”) |
| 类比 | 公司规章制度 | 员工培训手册 |
| 注入方式 | 全文注入 | 名称 + 描述摘要 |
Rules 管约束,Skills 管能力。一个告诉 Agent “做人的底线”,一个告诉 Agent “做事的方法”。
3.4 MCP:让 Agent 拥有无限工具的协议
什么是 MCP?
回忆第一篇中 agent.py 的工具定义方式——直接在代码里硬编码。想加一个新工具?改代码、重新部署。这在生产环境中完全不可接受。
MCP(Model Context Protocol)是 Anthropic 提出的一个开放标准,它定义了 LLM 与外部工具之间的通信协议。你可以把 MCP 理解为"AI 世界的 USB 接口"——任何遵循这个协议的工具服务都可以即插即用地接入 Agent。
如果你用过 OpenClaw 或 Claude Code,你一定在配置文件里见过 mcpServers 这个字段——配置一个 GitHub MCP Server,Agent 就能直接操作 PR 和 Issue;配置一个数据库 MCP Server,Agent 就能执行 SQL 查询。这就是 MCP 的威力。
agent-claudecode.py 中的 MCP 实现:
MCP_CONFIG = ".agent/mcp.json"
def load_mcp_tools():
    if not os.path.exists(MCP_CONFIG):
        return []
    try:
        with open(MCP_CONFIG, 'r') as f:
            config = json.load(f)
        mcp_tools = []
        for server_name, server_config in config.get("mcpServers", {}).items():
            if server_config.get("disabled", False):
                continue
            for tool in server_config.get("tools", []):
                mcp_tools.append({"type": "function", "function": tool})
        return mcp_tools
    except:
        return []
配置文件 .agent/mcp.json:
{
  "mcpServers": {
    "filesystem": {
      "disabled": false,
      "tools": [{
        "name": "list_directory",
        "description": "List contents of a directory with metadata",
        "parameters": {
          "type": "object",
          "properties": {"path": {"type": "string"}},
          "required": ["path"]
        }
      }]
    },
    "database": {
      "disabled": true,
      "tools": [...]
    }
  }
}
MCP 的精髓:一行代码
all_tools = base_tools + mcp_tools
这一行是整个 MCP 集成的精髓。MCP 加载的工具和基础工具使用完全相同的 JSON Schema 格式,直接拼接成一个列表传给 LLM。LLM 完全不需要知道某个工具是"内置的"还是"MCP 加载的"——对它来说,工具就是工具。
nanoAgent 简化了什么
需要说明的是,nanoAgent 的 MCP 实现是高度简化的——它只实现了"工具注册"(把 schema 加载给 LLM),没有实现"工具执行"(通过网络调用远程 MCP Server)。实际调用时会走到 else 分支返回 “Tool not implemented”:
| 特性 | 真实 MCP | nanoAgent 的实现 |
|---|---|---|
| 工具发现 | 运行时从 MCP Server 动态查询 | 从 JSON 文件静态读取 |
| 工具执行 | 通过 stdio/HTTP 调用远程 Server | ⚠️ 未实现 |
| 传输协议 | stdio / SSE / Streamable HTTP | 无 |
虽然不完整,但它展示了 MCP 集成的核心思路:工具定义与工具实现的分离。在完整实现中,那个 else 分支会变成一个 MCP 客户端调用。
MCP 解决的根本问题
没有 MCP 的世界:
Agent A         Agent B
├── Slack (自写) ├── Slack (自写)
├── GitHub(自写) ├── Jira (自写)
└── DB (自写)    └── DB (自写)

每个 Agent 各写各的,N × M 的工作量
有 MCP 的世界:
MCP Server: Slack  MCP Server: GitHub
└───── 标准协议────────┘
 ┌───────┼───────┐
Agent A  Agent B  Agent C
工具实现一次,全部共享
N + M 的工作量
3.5 Plan-as-Tool:规划从"被动触发"到"自主决策"
进化路径回顾: 三个版本中,规划经历了清晰的进化:
| 版本 | 规划方式 | 谁来决定是否规划 |
|---|---|---|
| agent.py | 无规划 | — |
| agent-plus.py | create_plan() 外部函数 | 用户(手动加 --plan) |
| agent-claudecode.py | plan 注册为工具 | LLM 自己 |
在 agent-claudecode.py 中,plan 出现在工具列表里:
{
  "name": "plan",
  "description": "Break down complex task into steps and execute sequentially",
  ...
}
这意味着 LLM 遇到复杂任务时可以主动调用 plan 工具进行拆解,无需用户干预。
递归执行与防无限循环
plan 工具的执行逻辑是整个文件最复杂的部分:
if function_name == "plan":
    plan_mode = True
    function_response = available_functions[function_name](**function_args)
    messages.append({"role": "tool", "tool_call_id": tool_call.id, "content": function_response})
    if current_plan:
        results = []
        for i, step in enumerate(current_plan, 1):
            messages.append({"role": "user", "content": step})
            result, messages = run_agent_step(
                messages,
                [t for t in tools if t["function"]["name"] != "plan"]  # 关键:排除 plan
            )
            results.append(result)
        plan_mode = False
        current_plan = []
        return "\n".join(results), messages
三个关键设计:
-
递归调用 run_agent_step。Plan 生成的每个步骤都通过 run_agent_step 执行,每步内部仍然可以使用 read、write、bash 等工具。这形成了一个两层循环——外层是规划步骤,内层是每步的 ReAct 循环。
-
排除 plan 工具本身。执行步骤时的工具列表中刻意去掉了 plan,配合
plan_mode全局变量双重保护,防止"在规划中再次规划"的无限递归。 -
上下文跨步共享。和第二篇中一样,
messages在所有步骤间共享。
用户: "重构项目的测试框架"
  │
  ▼
LLM 判断任务复杂 → 主动调用 plan 工具
  │
  ▼
plan() 返回 4 个步骤
  │
  ├── Step 1: 分析当前测试结构
  │     └── run_agent_step() → [glob, read, grep]
  │
  ├── Step 2: 创建新的测试目录
  │     └── run_agent_step() → [bash, write]
  │
  ├── Step 3: 迁移现有测试文件
  │     └── run_agent_step() → [read, edit, write]
  │
  └── Step 4: 验证所有测试通过
        └── run_agent_step() → [bash]
3.6 全部模块如何组装在一起
def run_agent_claudecode(task, use_plan=False):
    print("[Init] Loading ClaudeCode features...")
    # 1. 从文件系统加载所有外部配置
    memory = load_memory()        # 历史记忆
    rules = load_rules()          # 行为规则
    skills = load_skills()        # 技能注册
    mcp_tools = load_mcp_tools()  # MCP 外部工具
    # 2. 合并工具列表(基础工具 + MCP 工具)
    all_tools = base_tools + mcp_tools
    # 3. 构建 system prompt(基础指令 + Rules + Skills + Memory)
    context_parts = ["You are a helpful assistant..."]
    if rules:   context_parts.append(f"\n# Rules\n{rules}")
    if skills:  context_parts.append(f"\n# Skills\n...")
    if memory:  context_parts.append(f"\n# Previous Context\n{memory}")
    messages = [{"role": "system", "content": "\n".join(context_parts)}]
    # 4. 执行 ...
┌─────────────────────── 文件系统 ───────────────────────┐
│                                                         │
│  .agent/rules/*.md    → load_rules()    → system prompt │
│  .agent/skills/*.json → load_skills()   → system prompt │
│  .agent/mcp.json      → load_mcp_tools()→ tools 列表    │
│  agent_memory.md      → load_memory()   → system prompt │
│                                                         │
└─────────────────────────────────────────────────────────┘
                          │
                          ▼
              ┌──── Agent 运行时 ────┐
              │                      │
              │  system prompt =     │
              │    基础指令           │
              │    + Rules           │
              │    + Skills          │
              │    + Memory          │
              │                      │
              │  tools =             │
              │    base_tools (7个)   │
              │    + mcp_tools (N个)  │
              │                      │
              └──────────────────────┘
这个架构揭示了一个重要原则:Agent 的能力由两个正交维度定义——
- prompt 维度(知道什么):Rules、Skills、Memory 扩展的是 LLM 的认知
- tools 维度(能做什么):MCP 扩展的是 LLM 的行动能力
两者独立变化、自由组合,构成了 Agent 的完整能力空间。
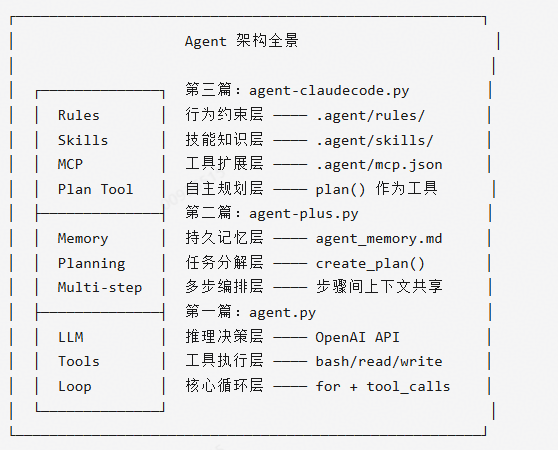
每一层都在回答一个关键问题:
- Loop :Agent 如何自主运行?
- Tools :Agent 如何作用于世界?
- Memory :Agent 如何记住过去?
- Planning: Agent 如何应对复杂任务?
- Rules :Agent 如何遵守约束?
- Skills :Agent 如何掌握做事方法?
- MCP :Agent 如何获得新工具?
这七层架构,就是当今所有主流 Agent 框架(OpenClaw、Claude Code、Cursor Agent、Devin、OpenHands 等)的共同骨架。nanoAgent 用不到 300 行 Python 代码,把这个骨架完整地呈现了出来。
四、SubAgent 子智能体
如果你跟着这三篇文章走了下来,你已经理解了 Agent 最核心的架构要素。但还有一个问题我们没有触及:当任务复杂到一个 Agent 忙不过来时怎么办?能不能让 Agent 自己找帮手?
这就是多智能体协作——SubAgent 的领域。在SubAgent 子智能体中,我们将用不到 30 行新增代码,让主 Agent 学会"分工派活"。
五、多智能体协作与编排—
六、上下文压缩
七、安全与权限控制
引用自:https://bbs.huaweicloud.com/forum/thread-0212720902922336605-1-1.html

AtomGit 是由开放原子开源基金会联合 CSDN 等生态伙伴共同推出的新一代开源与人工智能协作平台。平台坚持“开放、中立、公益”的理念,把代码托管、模型共享、数据集托管、智能体开发体验和算力服务整合在一起,为开发者提供从开发、训练到部署的一站式体验。
更多推荐

 8
8 0
0- 0


 已为社区贡献2条内容

所有评论(0)