centos7.9上部署openstack(train版)——6. Networking--neutron
理论
一、Neutron概述
Neutron是OpenStack项目中负责提供网络服务的组件,它基于软件定义网络的思想,实现了网络虚拟化下的资源管理。Neutron 的设计目标是实现网络即服务(Networking as a Service),在设计上遵循了基于 SDN 实现网络虚拟化的原则,在实现上充分利用了 Linux 系统上的各种网络相关的技术。
二、Neutron 功能
Neutron 为整个 OpenStack 环境提供网络支持,包括二层交换,三层路由,负载均衡,防火墙等。Neutron 提供了一个灵活的框架,通过配置,无论是开源还是商业软件都可以被用来实现这些功能。
1、二层交换Switch
L2其实是指七层网络协议中的第二层数据链路层,它的传输是以mac地址为基础。Nova 的 Instance 是通过虚拟交换机连接到虚拟二层网络的。Neutron 支持多种虚拟交换机,包括 Linux 原生的 Linux Bridge 和 第三方Open vSwitch。
Open vSwitch OVS)是一个开源的虚拟交换机,它支持标准的管理接口和协议。比Linuxbridge的功能更强大,是为了配合neutron而产生的。
利用 Linux Bridge 和 OVS,Neutron 除了可以创建传统的 VLAN 网络,还可以创建基于隧道技术的 Overlay 网络,比如 VxLAN 和 GRE(Linux Bridge 目前只支持 VxLAN,此外,由于GRE容易单点故障已经被弃用)。
2、三层路由 Routing
L3指网络层:是以ip地址为基础 。Instance 可以配置不同网段的 IP,Neutron 的 router(虚拟路由器)实现 instance 跨网段通信。Neutron从Juno版开始正式加入的DVR(Distributed Virtual Router)服务,它将原本集中在网络节点的部分服务分散到了计算节点上。可以通过namespace中使用ip route或者iptables实现路由或NAT,也可以通过openflow给OpenvSwitch下发流表来实现。
3、负载均衡
提供了将负载分发到多个 instance 的能力。LBaaS 支持多种负载均衡产品和方案,不同的实现以 Plugin 的形式集成到 Neutron,目前默认的 Plugin 是 HAProxy。所以不用搭建LVS,直接设置策略就可以。
4、 防火墙
Security Group 通过 iptables 限制进出 instance 的网络包。
FirewallasaService FWaaS,限制进出虚拟路由器的网络包,也是通过 iptables 实现。
防火墙的本质都是使用内核挂载的filter模块,只不过实现的方式有所区别,firewalld是利用分区实现,iptables是利用三表五链实现。Neutron有两种方式来保障instance和网络的安全性,分别是安全组以及防火墙功能,均可以通过iptables来实现,前者是限制进出instance的网络包,后者是进出虚拟路由器的网络包。
网络-network
- 模式
-
Local:本地的一个Linux Bridge,除了虚拟机的虚拟网卡不连接其他的网络设备,实际场景很少使用,可以忽略。网络中的 instance 只能与位于同一节点上同一网络的 instance 通信,local 网络主要用于单机测试。
-
Flat:不带vlan tag的网络,其实就是交换机形成的二层网络,和网桥一样,相当于Local网络的Linux Bridge连接到一个物理网卡,该网络中的instance能与同网络的instance通信,且可以跨多个节点,flat 网络中的 instance 能与位于同一网络的 instance通信,并且可以跨多个节点,实际场景也很少用到。
-
VLAN:可以跨节点,是具有 802.1q tagging 的网络,一共可以划分4095个子网。vlan 是一个二层的广播域,同一 vlan 中的instance 可以通信,不同 vlan 只能通过 router 通信。vlan 网络可以跨节点,是应用最广泛的网络类型。目前是私有云网络应用较多。
-
VXALN:是基于隧道技术的 overlay 网络,通过唯一的VNI区分于其他 vxlan 网络。vxlan中数据包通过VNI封装成UPD包进行传输,因为二层的包通过封装在三层传输,能够克服vlan和物理网络基础设施的限制。是VLAN的扩展,VxLAN有1600万个VNI编号,足够在云计算平台使用了。vxlan 网络通过唯一的 segmentation ID(也叫VNI)与其他 vxlan 网络区分。vxlan 中数据包会通过 VNI 封装成 UPD 包进行传输。因为二层的包通过封装在三层传输,能够克服 vlan 和物理网络基础设施的限制。Linuxbridge只支持VxLAN。
-
GRE:与vxlan类似的一种overlay网络,主要区别在于使用 IP 包而非 UDP 进行封装。不同 network 之间在二层上是隔离的。现在已经被弃用了。
-
-
network 必须属于某个 Project( Tenant 租户),Project 中可以创建多个 network。network 与 Project 之间是 多对1的关系。
-
注意:虚拟专用网络,还没有加到openstack的功能中。
-
子网-subnet
- subnet 是一个 IPv4 或者 IPv6 地址段。instance 的 IP 从 subnet 中分配。每个 subnet 需要定义 IP 地址的范围和掩码。 subnet 与 network 是 1对多 关系。一个 subnet 只能属于某个 network;一个 network 可以有多个 subnet,这些 subnet 可以是不同的 IP 段,但不能重叠。例如,以下这两种设置都是被允许的:


- subnet 是一个 IPv4 或者 IPv6 地址段。instance 的 IP 从 subnet 中分配。每个 subnet 需要定义 IP 地址的范围和掩码。 subnet 与 network 是 1对多 关系。一个 subnet 只能属于某个 network;一个 network 可以有多个 subnet,这些 subnet 可以是不同的 IP 段,但不能重叠。例如,以下这两种设置都是被允许的:
-
port-端口
- port 可以看做虚拟交换机上的一个端口。port 上直接定义了 MAC 地址和 IP 地址,当 instance的虚拟网卡 VIF(Virtual Interface) 绑定到 port 时,port 会将 MAC 和 IP 分配给 VIF。而原来我们做网桥时,是虚拟机的网卡eth0在物理机里对应的是vnet0,vnet0是加在br0上的。
- port 与 subnet 是 1对多 关系。一个 port 必须属于某个 subnet;一个 subnet 可以有多个port。有了port直接定义MAC与IP就不用使用ARP与RARP协议了。
- 综上所述,我们可以知道neutron定义的三大网络资源只是二层的网络资源,与三层的没有关系。
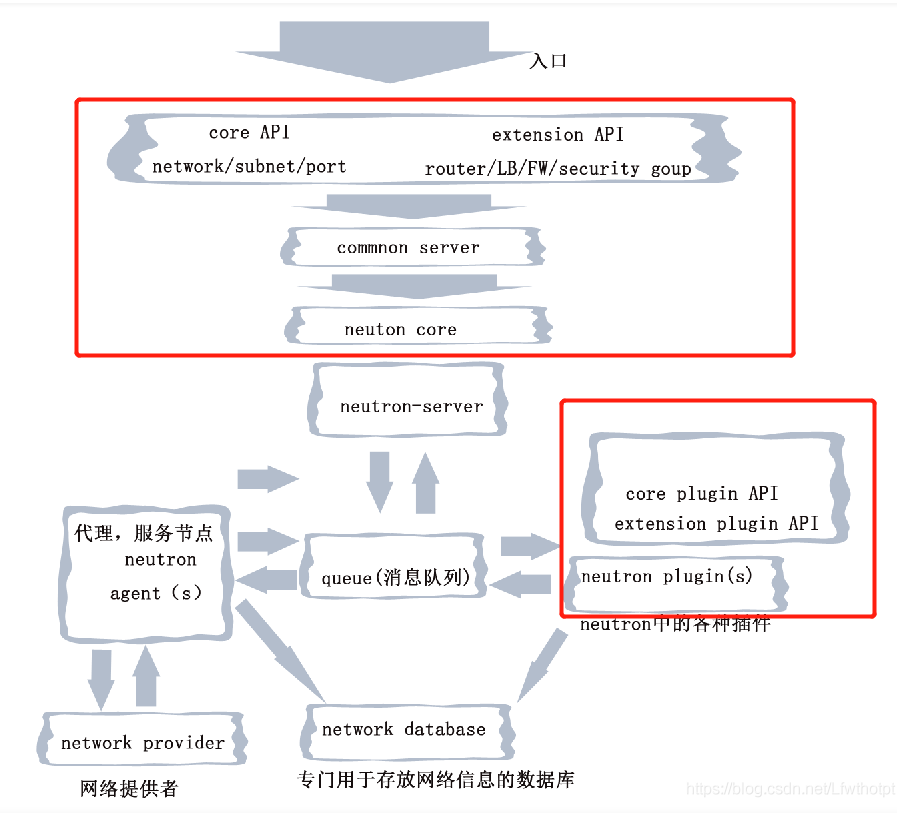
三、Neutron架构

-
core API ——对外提供管理 network, subnet 和 port 的 RESTful API。
-
extension API —— 对外提供管理 router, load balance, firewall 等资源 的 RESTful API。
-
common service ——认证和校验 API 请求。
-
neutron core Neutron server 的核心处理程序,通过调用相应的 Plugin 处理请求。
-
core plugin API 定义了 Core Plgin 的抽象功能集合,Neutron Core 通过该 API 调用相应的 Core Plgin。
-
extension plugin API 定义了 Service Plgin 的抽象功能集合,Neutron Core 通过该 API调用相应的 Service Plgin。
-
core plugin API 实现了 Core Plugin API,在数据库中维护 network, subnet 和 port 的状态,并负责调用相应的 agent 在 network provider 上执行相关操作,比如创建 network。
-
service plugin 实现了 Extension Plugin API,在数据库中维护 router, load balance,
-
security group 等资源的状态,并负责调用相应的 agent 在 network provider 上执行相关操作,比如创建 router
使用
安装与配置Controller
- 准备
- 创建数据库
- 使用数据库访问客户端连接到数据库 服务器作为用户:root
$ mysql -u root -p000000 - 创建数据库:neutron
MariaDB [(none)] CREATE DATABASE neutron; - 授予对数据库的适当访问权限,并替换为合适的密码:neutron
MariaDB [(none)]> GRANT ALL PRIVILEGES ON neutron.* TO 'neutron'@'localhost' IDENTIFIED BY '000000'; MariaDB [(none)]> GRANT ALL PRIVILEGES ON neutron.* TO 'neutron'@'%' IDENTIFIED BY '000000'; - 退出数据库访问客户端。
- 使用数据库访问客户端连接到数据库 服务器作为用户:root
- 获取凭据以获取对仅限管理员的 CLI 的访问权限 命令:admin
$ . ~/admin-openrc.sh - 要创建服务凭据:
- 创建用户:neutron
$ openstack user create --domain default --password-prompt neutron User Password:000000 Repeat User Password:000000 +---------------------+----------------------------------+ | Field | Value | +---------------------+----------------------------------+ | domain_id | default | | enabled | True | | id | ce73d190461f42249afc50aa1ef6f9d8 | | name | neutron | | options | {} | | password_expires_at | None | +---------------------+----------------------------------+ - 将 neutron 用户授予 admin 角色并添加到 service 项目
$ openstack role add --project service --user neutron admin - 创建服务实体:neutron
$ openstack service create --name neutron --description "OpenStack Networking" network
+-------------+----------------------------------+
| Field       | Value                            |
+-------------+----------------------------------+
| description | OpenStack Networking             |
| enabled     | True                             |
| id          | 1831bdeb02114fdf824196e8eff1427f |
| name        | neutron                          |
| type        | network                          |
+-------------+----------------------------------+
- 创建用户:neutron
- 创建网络服务 API 终结点:
$ openstack endpoint create --region RegionOne network public http://controller:9696

+--------------+----------------------------------+
| Field        | Value                            |
+--------------+----------------------------------+
| enabled      | True                             |
| id           | 0f3288eed7a649d7864b8db1c69a6eb2 |
| interface    | public                           |
| region       | RegionOne                        |
| region_id    | RegionOne                        |
| service_id   | 1831bdeb02114fdf824196e8eff1427f |
| service_name | neutron                          |
| service_type | network                          |
| url          | http://controller:9696           |
+--------------+----------------------------------+

$ openstack endpoint create --region RegionOne network internal http://controller:9696

+--------------+----------------------------------+
| Field        | Value                            |
+--------------+----------------------------------+
| enabled      | True                             |
| id           | 89ff2230b0224f1a84eddf68925750a0 |
| interface    | internal                         |
| region       | RegionOne                        |
| region_id    | RegionOne                        |
| service_id   | 1831bdeb02114fdf824196e8eff1427f |
| service_name | neutron                          |
| service_type | network                          |
| url          | http://controller:9696           |
+--------------+----------------------------------+

$ openstack endpoint create --region RegionOne network admin http://controller:9696

+--------------+----------------------------------+
| Field        | Value                            |
+--------------+----------------------------------+
| enabled      | True                             |
| id           | 323cb22c666740559d2b11d050100e57 |
| interface    | admin                            |
| region       | RegionOne                        |
| region_id    | RegionOne                        |
| service_id   | 1831bdeb02114fdf824196e8eff1427f |
| service_name | neutron                          |
| service_type | network                          |
| url          | http://controller:9696           |
+--------------+----------------------------------+
- 创建数据库
- 配置网络选项(两种网络选其一)
- 提供商网络(部署了最简单的体系结构,该体系结构仅支持 将实例附加到提供商(外部)网络。没有自助服务(私人) 网络、路由器或浮动 IP 地址。只有 或其他 特权用户可以管理提供商网络。admin)
- 安装服务
# yum install -y openstack-neutron openstack-neutron-ml2 openstack-neutron-linuxbridge ebtables - 配置服务器组件
网络服务器组件配置包括数据库, 认证机制, 消息队列, 拓扑变更通知等插件- 编辑文件并完成以下操作
/etc/neutron/neutron.conf[database] # ... connection = mysql+pymysql://neutron:000000@controller/neutron [DEFAULT] # ... core_plugin = ml2 service_plugins = transport_url = rabbit://openstack:000000@controller auth_strategy = keystone notify_nova_on_port_status_changes = true notify_nova_on_port_data_changes = true [keystone_authtoken] # ... www_authenticate_uri = http://controller:5000 auth_url = http://controller:5000 memcached_servers = controller:11211 auth_type = password project_domain_name = default user_domain_name = default project_name = service username = neutron password = 000000 [nova] # ... auth_url = http://controller:5000 auth_type = password project_domain_name = default user_domain_name = default region_name = RegionOne project_name = service username = nova password = 000000 [oslo_concurrency] # ... lock_path = /var/lib/neutron/tmp - 配置模块化第 2 层 (ML2) 插件
ML2 插件使用 Linux 桥接机制构建第 2 层(桥接 和交换)实例的虚拟网络基础结构。- 编辑文件添加
/etc/neutron/plugins/ml2/ml2_conf.ini[ml2] # ... type_drivers = flat,vlan tenant_network_types = mechanism_drivers = linuxbridge extension_drivers = port_security flat_networks = provider [securitygroup] # ... enable_ipset = true
- 编辑文件添加
- 配置 Linux 网桥代理
Linux 网桥代理构建第 2 层(桥接和交换)虚拟 实例的网络基础设施和处理安全组- 编辑文件
/etc/neutron/plugins/ml2/linuxbridge_agent.ini
若需要配置多个flat[linux_bridge] physical_interface_mappings = provider:ens33 [vxlan] enable_vxlan = false [securitygroup] # ... enable_security_group = true firewall_driver = neutron.agent.linux.iptables_firewall.IptablesFirewallDriver[ml2_type_flat] flat_networks = flat1,flat2 [linux_bridge] physical_interface_mappings = flat1:eth1,flat2:eth2 - 加载br_netfilter内核模块。要启用网络桥接器支持,通常br_netfilter内核模块需要加载
# echo net.bridge.bridge-nf-call-iptables = 1 >> /etc/sysctl.conf
# echo net.bridge.bridge-nf-call-ip6tables = 1 >> /etc/sysctl.conf

# cat /etc/sysctl.conf
# sysctl -p
# modprobe br_netfilter
# ls /proc/sys/net/bridge
# sysctl -p

# sysctl net.bridge.bridge-nf-call-iptables
# sysctl net.bridge.bridge-nf-call-ip6tables
- 编辑文件
- 配置 DHCP 代理
- 编辑文件
/etc/neutron/dhcp_agent.ini[DEFAULT] # ... interface_driver = linuxbridge dhcp_driver = neutron.agent.linux.dhcp.Dnsmasq enable_isolated_metadata = true
- 编辑文件
- 编辑文件并完成以下操作
- 安装服务
- 自助服务网络(使用支持连接的第 1 层服务扩充选项 3 实例到自助服务网络。或其他非特权 用户可以管理自助服务网络,包括提供 自助服务和提供商网络之间的连接。此外 浮动 IP 地址使用自助服务提供与实例的连接 来自外部网络(如互联网)的网络。demo)
- 安装组件
# yum install -y openstack-neutron openstack-neutron-ml2 openstack-neutron-linuxbridge ebtables - 配置服务器组件
- 编辑
/etc/neutron/neutron.conf[database] connection = mysql+pymysql://neutron:000000@controller/neutron [DEFAULT] core_plugin = ml2 service_plugins = router allow_overlapping_ips = true transport_url = rabbit://openstack:RABBIT_PASS@controller auth_strategy = keystone notify_nova_on_port_status_changes = true notify_nova_on_port_data_changes = true [keystone_authtoken] www_authenticate_uri = http://controller:5000 auth_url = http://controller:5000 memcached_servers = controller:11211 auth_type = password project_domain_name = default user_domain_name = default project_name = service username = neutron password = 000000 [nova] auth_url = http://controller:5000 auth_type = password project_domain_name = default user_domain_name = default region_name = RegionOne project_name = service username = nova password = 000000 [oslo_concurrency] lock_path = /var/lib/neutron/tmp [oslo_messaging_amqp] [oslo_messaging_kafka] [oslo_messaging_notifications] [oslo_messaging_rabbit] [oslo_middleware] [oslo_policy] [privsep] [ssl]
- 编辑
- 配置模块化第 2 层 (ML2) 插件
ML2 插件使用 Linux 桥接机制构建第 2 层(桥接 和交换)实例的虚拟网络基础结构- 编辑
/etc/neutron/plugins/ml2/ml2_conf.ini[ml2] type_drivers = flat,vlan,vxlan tenant_network_types = vxlan mechanism_drivers = linuxbridge,l2population extension_drivers = port_security [ml2_type_flat] flat_networks = provider [ml2_type_vxlan] vni_ranges = 1:1000 [securitygroup] enable_ipset = true
- 编辑
- 配置 Linux 网桥代理
Linux 网桥代理构建第 2 层(桥接和交换)虚拟 实例的网络基础设施和处理安全组- 编辑
/etc/neutron/plugins/ml2/linuxbridge_agent.ini[linux_bridge] physical_interface_mappings = provider:ens33 [vxlan] enable_vxlan = true local_ip = 192.168.200.150 l2_population = true [securitygroup] # ... enable_security_group = true firewall_driver = neutron.agent.linux.iptables_firewall.IptablesFirewallDriver - 加载br_netfilter内核模块。要启用网络桥接器支持,通常br_netfilter内核模块需要加载
# echo net.bridge.bridge-nf-call-iptables = 1 >> /etc/sysctl.conf
# echo net.bridge.bridge-nf-call-ip6tables = 1 >> /etc/sysctl.conf

# cat /etc/sysctl.conf
# sysctl -p
# modprobe br_netfilter
# ls /proc/sys/net/bridge
# sysctl -p

sysctl net.bridge.bridge-nf-call-iptables
sysctl net.bridge.bridge-nf-call-ip6tables
- 编辑
- 配置第 3 层代理
第 3 层 (L3) 代理为 自助式虚拟网络。- 编辑
/etc/neutron/l3_agent.ini[DEFAULT] # ... interface_driver = linuxbridge
- 编辑
- 配置 DHCP 代理
- 编辑
/etc/neutron/dhcp_agent.ini[DEFAULT] # ... interface_driver = linuxbridge dhcp_driver = neutron.agent.linux.dhcp.Dnsmasq enable_isolated_metadata = true
- 编辑
- 安装组件
- 提供商网络(部署了最简单的体系结构,该体系结构仅支持 将实例附加到提供商(外部)网络。没有自助服务(私人) 网络、路由器或浮动 IP 地址。只有 或其他 特权用户可以管理提供商网络。admin)
- 配置元数据代理
元数据代理提供配置信息 例如实例的凭证- 编辑文件
/etc/neutron/metadata_agent.ini[DEFAULT] # ... nova_metadata_host = controller metadata_proxy_shared_secret = 000000
- 编辑文件
- 将Nova服务配置为使用neutron服务
- 编辑文件
/etc/nova/nova.conf[neutron] # ... auth_url = http://controller:5000 auth_type = password project_domain_name = default user_domain_name = default region_name = RegionOne project_name = service username = neutron password = 000000 service_metadata_proxy = true metadata_proxy_shared_secret = 000000
- 编辑文件
- 完成安装
- 网络服务初始化脚本需要一个指向 ML2 插件配置的符号链接 文件。如果这个象征性 链接不存在,请使用以下命令创建它:
/etc/neutron/plugin.ini/etc/neutron/plugins/ml2/ml2_conf.ini# ln -s /etc/neutron/plugins/ml2/ml2_conf.ini /etc/neutron/plugin.ini - 填充数据库
# su -s /bin/sh -c "neutron-db-manage --config-file /etc/neutron/neutron.conf --config-file /etc/neutron/plugins/ml2/ml2_conf.ini upgrade head" neutron - 重新启动计算 API 服务:
# systemctl restart openstack-nova-api.service - 启动网络服务并将其配置为在系统启动时启动
- 使用网络1
# systemctl enable neutron-server.service neutron-linuxbridge-agent.service neutron-dhcp-agent.service neutron-metadata-agent.service # systemctl restart neutron-server.service neutron-linuxbridge-agent.service neutron-dhcp-agent.service neutron-metadata-agent.service - 使用网络2还需要启动第 3 层服务
# systemctl enable neutron-l3-agent.service
# systemctl restart neutron-l3-agent.service
- 使用网络1
- 网络服务初始化脚本需要一个指向 ML2 插件配置的符号链接 文件。如果这个象征性 链接不存在,请使用以下命令创建它:
安装与配置Compute
- 安装组件
# yum install -y openstack-neutron-linuxbridge ebtables ipset - 配置通用组件
网络常见组件配置包括 身份验证机制、消息队列和插件- 编辑文件
/etc/neutron/neutron.conf[DEFAULT] # ... transport_url = rabbit://openstack:000000@controller auth_strategy = keystone [keystone_authtoken] # ... www_authenticate_uri = http://controller:5000 auth_url = http://controller:5000 memcached_servers = controller:11211 auth_type = password project_domain_name = default user_domain_name = default project_name = service username = neutron password = 000000 [oslo_concurrency] # ... lock_path = /var/lib/neutron/tmp
- 编辑文件
- 配置网络选项
- 提供商网络
- 配置 Linux 网桥代理
Linux 网桥代理构建第 2 层(桥接和交换)虚拟 实例的网络基础设施和处理安全组。- 编辑
/etc/neutron/plugins/ml2/linuxbridge_agent.ini[linux_bridge] physical_interface_mappings = provider:ens33 [vxlan] enable_vxlan = false [securitygroup] # ... enable_security_group = true firewall_driver = neutron.agent.linux.iptables_firewall.IptablesFirewallDriver - 加载br_netfilter内核模块。要启用网络桥接器支持,通常br_netfilter内核模块需要加载
# echo net.bridge.bridge-nf-call-iptables = 1 >> /etc/sysctl.conf
# echo net.bridge.bridge-nf-call-ip6tables = 1 >> /etc/sysctl.conf

# cat /etc/sysctl.conf
# sysctl -p
# modprobe br_netfilter
# ls /proc/sys/net/bridge
# sysctl -p

# sysctl net.bridge.bridge-nf-call-iptables
# sysctl net.bridge.bridge-nf-call-ip6tables
- 编辑
- 配置 Linux 网桥代理
- 自助服务网络
- 配置 Linux 网桥代理
Linux 网桥代理构建第 2 层(桥接和交换)虚拟 实例的网络基础设施和处理安全组- 编辑
/etc/neutron/plugins/ml2/linuxbridge_agent.ini[linux_bridge] physical_interface_mappings = provider:ens33 [vxlan] enable_vxlan = true local_ip = 192.168.200.151 l2_population = true [securitygroup] # ... enable_security_group = true firewall_driver = neutron.agent.linux.iptables_firewall.IptablesFirewallDriver - 加载br_netfilter内核模块。要启用网络桥接器支持,通常br_netfilter内核模块需要加载
# echo net.bridge.bridge-nf-call-iptables = 1 >> /etc/sysctl.conf
# echo net.bridge.bridge-nf-call-ip6tables = 1 >> /etc/sysctl.conf

# cat /etc/sysctl.conf
# sysctl -p
# modprobe br_netfilter
# ls /proc/sys/net/bridge
# sysctl -p

# sysctl net.bridge.bridge-nf-call-iptables
# sysctl net.bridge.bridge-nf-call-ip6tables
- 编辑
- 配置 Linux 网桥代理
- 提供商网络
- 将计算服务配置为使用网络服务
- 编辑
/etc/nova/nova.conf[neutron] # ... auth_url = http://controller:5000 auth_type = password project_domain_name = default user_domain_name = default region_name = RegionOne project_name = service username = neutron password = 000000
- 编辑
- 完成安装
- 重新启动计算服务:
# systemctl restart openstack-nova-compute.service - 启动 Linux 网桥代理并将其配置为在 系统引导:
# systemctl enable neutron-linuxbridge-agent.service
# systemctl restart neutron-linuxbridge-agent.service
- 重新启动计算服务:
验证
注意:在控制器节点上执行这些命令。
- 获取凭据以获取对仅限管理员的 CLI 的访问权限 命令:admin
$ . ~/admin-openrc.sh - 列出加载的扩展以验证进程是否成功启动:neutron-server
$ openstack extension list --network - 列出用于验证neutron的代理
$ openstack network agent list

+--------------------------------------+--------------------+------------+-------------------+-------+-------+---------------------------+
| ID                                   | Agent Type         | Host       | Availability Zone | Alive | State | Binary                    |
+--------------------------------------+--------------------+------------+-------------------+-------+-------+---------------------------+
| 1056035f-9b52-4ba7-9f86-2429f4063eda | Linux bridge agent | controller | None              | :-)   | UP    | neutron-linuxbridge-agent |
| 86013848-6fbf-49f2-88b6-99514237cea2 | DHCP agent         | controller | nova              | :-)   | UP    | neutron-dhcp-agent        |
| 9aea177f-d303-4119-87b7-d7972024b7e7 | Metadata agent     | controller | None              | :-)   | UP    | neutron-metadata-agent    |
| a2f7261d-1a7f-4771-a502-477580953345 | Linux bridge agent | compute    | None              | :-)   | UP    | neutron-linuxbridge-agent |
| c6b33958-61fe-463c-b090-df400fa179b1 | L3 agent           | controller | nova              | :-)   | UP    | neutron-l3-agent          |
+--------------------------------------+--------------------+------------+-------------------+-------+-------+---------------------------+
网络选项 1:提供商网络 输出应指示控制器节点上的三个代理和一个Compute节点上的代理
网络选项 2:自助服务网络 输出应指示控制器节点上的四个代理和一个Compute上的代理

AtomGit 是由开放原子开源基金会联合 CSDN 等生态伙伴共同推出的新一代开源与人工智能协作平台。平台坚持“开放、中立、公益”的理念,把代码托管、模型共享、数据集托管、智能体开发体验和算力服务整合在一起,为开发者提供从开发、训练到部署的一站式体验。
更多推荐


 11
11 0
0- 0


 已为社区贡献7条内容

所有评论(0)