LLM基础·Huggingface使用教程
·
文章目录
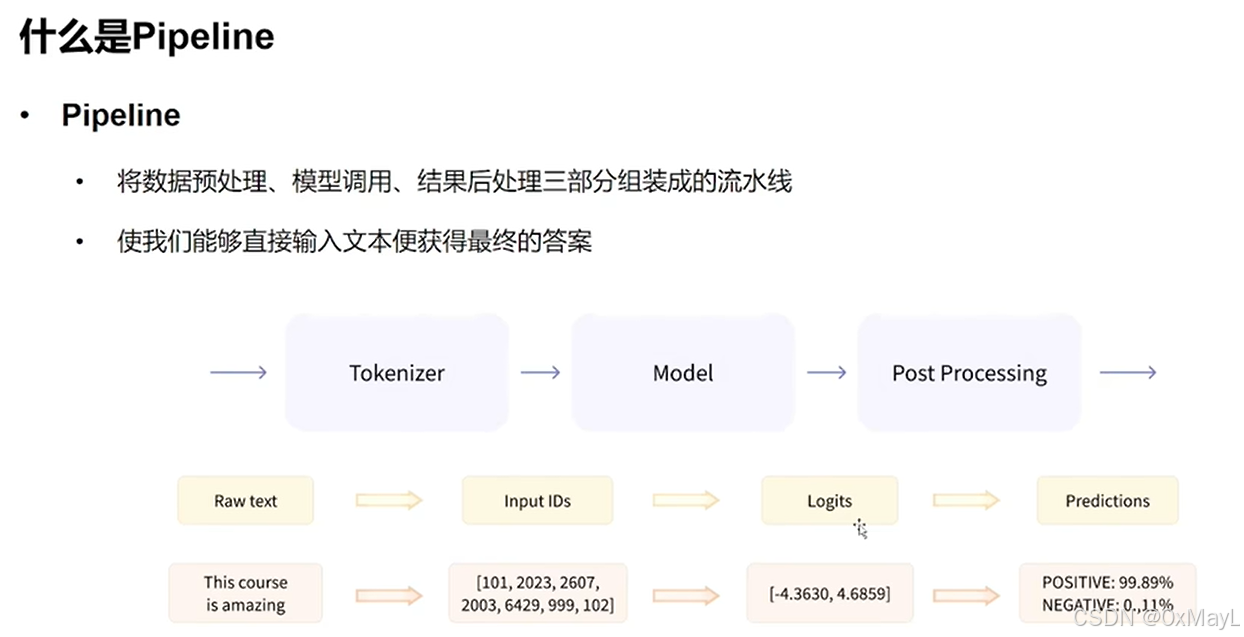
Pipeline
模型的加载
不需要记忆,只需要在官网找就行。
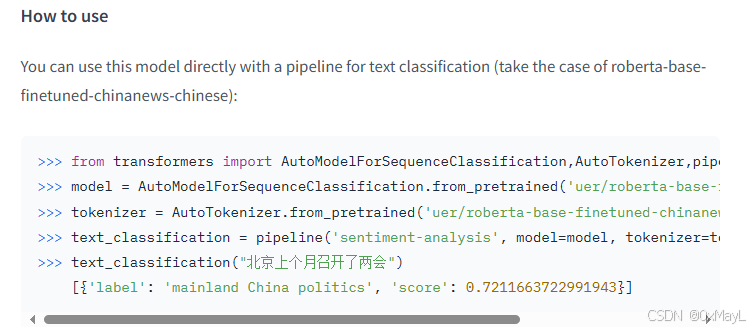
直接加载pipeline
- 注意
local_path指的是权重相关文件的目录路径. - 注意
device参数需配置,默认部署于CPU上.
local_path='model\models--uer--roberta-base-finetuned-dianping-chinese'
pipe = pipeline("text-classification", model=local_path,device=0)
组装为pipeline
- 分别加载模型和分词器,但是注意这个类不要用错了。
model=AutoModelForSequenceClassification.from_pretrained(local_path)
AutoTokenizer=AutoTokenizer.from_pretrained(local_path)
pipe=pipeline("text-classification", model=model, tokenizer=AutoTokenizer)
使用方法
- 接受输入,返回结构化输出
pipe("很好玩")
[{'label': 'positive (stars 4 and 5)', 'score': 0.9271045327186584}]
Tokenizer
分词+编码+中间过程(填充、阶段等)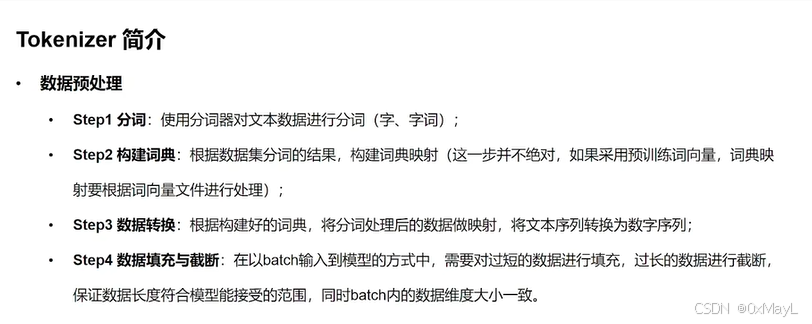
解码和编码函数
分词函数:encode(不带有掩码)
- 分词+编码
- 注意:add_special_tokens=True这一个参数,默认是添加的。
- 可以设置填充和截断
- 开启
max_length参数后,默认是截断,默认不开启填充。
# 截断
ids = tokenizer.encode(sen, max_length=20, truncation=True,padding="max_length")
ids
[101,2483,2207,4638,2769,738,3300,1920,3457,2682,106,102,0,0,0,0,0,0,0,0]
解码函数:decode
只针对编码后的结果进行解码,返回完整的句子,默认是保留特殊token的
str_sen = tokenizer.decode(ids, skip_special_tokens=False)
str_sen
'[CLS] 弱 小 的 我 也 有 大 梦 想! [SEP]'
编码函数:call和encode_plus(带有掩码)
- 在encode基础上增加了掩码(对应填充)和其他信息(例如区分Bert的SEQ的掩码)
inputs = tokenizer.encode_plus(sen, padding="max_length", max_length=20)
inputs
{'input_ids': [101, 2483, 2207, 4638, 2769, 738, 3300, 1920, 3457, 2682, 106, 102, 0, 0, 0, 0, 0, 0, 0, 0], 'token_type_ids': [0, 0, 0, 0, 0, 0, 0, 0, 0, 0, 0, 0, 0, 0, 0, 0, 0, 0, 0, 0], 'attention_mask': [1, 1, 1, 1, 1, 1, 1, 1, 1, 1, 1, 1, 0, 0, 0, 0, 0, 0, 0, 0]}
返回类型设置
- 注意
return_tensors='pt'参数,不然返回的是一个py类型的列表!
inputs = tokenizer(sen, padding="max_length", max_length=15,return_tensors='pt')
inputs
填充与截断
- 允许忽视特殊token:
skip_special_tokens=False - 允许填充和截断同时进行:
(sen, padding="max_length", max_length=20) - 优先填充至最大长度。
- 如果本来就超过最大长度,优先截断。
Model
- 有点类似骨干和输出头的关系,
AutoModel只是骨干 AutoConfig定义了骨干接受的一些参数AutoModelForSequenceClassification作为具体的模型,包括骨干+输出头,输出的是预期结果,而不是中间特征。
AutoConfig
- 配置了模型的基本权重
config = AutoConfig.from_pretrained(local_path)
config
BertConfig {
  "_name_or_path": "",
  "architectures": [
    "BertForMaskedLM"
  ],
  "attention_probs_dropout_prob": 0.1,
  "classifier_dropout": null,
...
}
AutoModel
- 不带model head,输出结果有多个,可以定制多个
model = AutoModel.from_pretrained(local_path)
output = model(**inputs)
output
output.last_hidden_state.size()
torch.Size([1, 12, 768])
AutoModelForSequenceClassification
- 具体的模型,可以看到已经是后处理的结果了(包括输出头)。
- 取出模型的输出概率:
output.logits
clz_model = AutoModelForSequenceClassification.from_pretrained(local_path, num_labels=10)
output=clz_model(**inputs)
SequenceClassifierOutput(loss=None, logits=tensor([[-0.1186, -0.0889,  0.5786,  0.5472, -0.1552, -0.0849,  0.2084,  0.1590,
         -0.1090,  0.3114]], grad_fn=<AddmmBackward0>), hidden_states=None, attentions=None)
Dataset
- 使用huggingface官方的datasets库中的
load_dataset函数来加载数据集 - 加载的类型为
DatasetDict,当成一个字典+列表来使用!
load_dataset
加载时划分数据集:split
- 支持数据集划分和切片,
split参数
dataset = load_dataset(local_path, split="train[20:100]")
dataset
DatasetDict
- 类似dict,用键值的方式得到对应列
- 支持切片:
datasets["train"][:2]
local_path='../dataset/datasets--madao33--new-title-chinese'
datasets = load_dataset(local_path)
datasets
DatasetDict({
    train: Dataset({
        features: ['title', 'content'],
        num_rows: 5850
    })
    validation: Dataset({
        features: ['title', 'content'],
        num_rows: 1679
    })
})
datasets["train"]["title"]
['望海楼美国打“台湾牌”是危险的赌博',
 '大力推进高校治理能力建设']
获得属性
- 按照属性的用法会得到数据类型说明
datasets["train"].features
{'title': Value(dtype='string', id=None),
 'content': Value(dtype='string', id=None)}
筛选特定数据
- 选择特定索引的数据
datasets["train"].select([0, 1,25])
过滤数据
- filter后面填写bool表达式,表示过滤的条件。
- 每一个example作为完整的元素,是一个字典类型。
# 过滤
filter_dataset = datasets["train"].filter(lambda example: "中国化" in example["title"])
数据映射:支持数据规整
- 数据映射:可以理解为
iter_row()的实现方式,遍历每一个数据,对数据的字段进行一定的修改
def add_prefix(example):
    example["title"] = 'Prefix: ' + example["title"]
    return example
 ['Prefix: 望海楼美国打“台湾牌”是危险的赌博',
 'Prefix: 大力推进高校治理能力建设',
 'Prefix: 坚持事业为上选贤任能',
 'Prefix: “大朋友”的话儿记心头',
 'Prefix: 用好可持续发展这把“金钥匙”',
 'Prefix: 跨越雄关,我们走在大路上',
 'Prefix: 脱贫奇迹彰显政治优势',
 'Prefix: 拱卫亿万人共同的绿色梦想',
 'Prefix: 为党育人、为国育才',
 'Prefix: 净化网络语言']
- 支持按照批次
bacthed=True的形式加快处理速度。 - 可以同时移除特定的列。
from transformers import AutoTokenizer
tokenizer = AutoTokenizer.from_pretrained("bert-base-chinese")
def preprocess_function(example, tokenizer=tokenizer):
    model_inputs = tokenizer(example["content"], max_length=512, truncation=True)
    labels = tokenizer(example["title"], max_length=32, truncation=True)
    # label就是title编码的结果
    model_inputs["labels"] = labels["input_ids"]
    return model_inputs
processed_datasets = datasets.map(preprocess_function, batched=True, remove_columns=datasets["train"].column_names)
processed_datasets

AtomGit 是由开放原子开源基金会联合 CSDN 等生态伙伴共同推出的新一代开源与人工智能协作平台。平台坚持“开放、中立、公益”的理念,把代码托管、模型共享、数据集托管、智能体开发体验和算力服务整合在一起,为开发者提供从开发、训练到部署的一站式体验。
更多推荐


 6
6 0
0- 0


 已为社区贡献2条内容

所有评论(0)