Android Safety 系列专题【篇四:Android SEPolicy】
SELinux原本是美国国安局联合一些公司设计的一个针对Linux的安全加强系统。
SELinux出现之前,Linux系统上的安全模型叫做DAC(自主访问控制),其原理是进程所拥有的权限与执行它的用户的权限相同(例如:以root用户启动Browser,那么Browser就有root用户的权限,在Linux系统上能干任何事情)。SELinux的出现结束了这种宽松的访问。
SELinux在DAC的基础之上,设计了新的安全模型叫做MAC(强制访问控制),其原理是任何进程想在SELinux系统中干任何事情,都必须先在安全策略配置文件中赋予权限,凡是没有在安全策略配置文件配置的权限,进程就没有该权限。Android4.4版本上正式推出的一套以SELinux为基础于核心的系统安全机制,且命名为SEAndroid,自此SELinux便被"移植"到了Android上了。
Android Selinux策略配置主要由SEPolicy实现,其源码在xxx/system/sepolicy/目录下:

一、基本概念
Selinux中涉及了很多基本概念,这些概念设计到selinux设计的底层逻辑,所以理解这些概念是必要的。
1、工作模式
SELinux通常有如下三种模式:disable、permissive、enforcing。通常发布版都将使用强制模式Enforcing。
可以通过getenforce来获取当前工作模式,还可以通过setenforce 0来设置当前模式为Permissive;也可以通过setenforce 1来设置当前模式为Enforcing。
fastboot模式设置selinux工作模式:
#设置参数bootargs
$setenv bootargs  androidboot.selinux = permissive/enforcing
#保存参数
$saveenv
#重启系统
$reset
Android模式设置selinux工作模式:
adb shell setenforce 0  #切换为宽容模式,注意重启后不生效
adb shell setenforce 1   #切换为强制模式,注意user版本不生效?
adb shell getenforce   #如果输出Permissive表示处于宽容模式下,如果输出Enforcing表示处于强制模式下
1)Disable禁用模式
如果SELinux 被关闭(开启Disable模式),就使用传统的Linux系统默认的自主访问控制(DAC)方式,不需要增强安全性的环境来说,该模式是很好用的(换句话禁止SELinux功能)。
编辑配置文件/etc/selinux/config,把SELINUX=disabled,然后重启系统,SELinux 就被禁用了。
还可以通过修改源代码的方式来关闭SELINUX,再Android S修改如下代码
pengcheng.ding@cdtinno-bianyi-105:~/works/n211/system/system/core/init$ git diff selinux.cpp
diff --git a/init/selinux.cpp b/init/selinux.cpp
index b7e8def89..066f9c2d4 100755
--- a/init/selinux.cpp
+++ b/init/selinux.cpp
@@ -123,10 +123,16 @@ EnforcingStatus StatusFromProperty() {
 }
 bool IsEnforcing() {
-    if (ALLOW_PERMISSIVE_SELINUX) {
+    LOG(INFO) << "-----SHEN: selinux isenforcing system";
+    StatusFromProperty();
+    return false;
+    /*if (ALLOW_PERMISSIVE_SELINUX) {
         return StatusFromProperty() == SELINUX_ENFORCING;
     }
-    return true;
+    return true;*/
 }
2)Permissive宽容模式
在 Permissive 模式中,安全策略规则并没有被强制执行。当安全策略规则应该拒绝访问时,访问仍然被允许。然而,此时会向日志文件发送一条消息,表示该访问应该被拒绝(换句话使能SELinux功能,但是SELinux不会拒绝方法但会打印日志)。
SELinux Permissive 模式主要用于以下几种情况:审核当前的 SELinux 策略规则;测试新应用程序,看看将 SELinux 策略规则应用到这些程序时会有什么效果;解决某一特定服务或应用程序在 SELinux 下不再正常工作的故障。
总结:仅记录但不强制执行 SELinux 安全政策。
3)Enforcing强制模式
Enforcing 模式, SELinux 被启动,并强制执行所有的安全策略规则(换句话使能SELinux,并强制按照SElinux的规则来进行权限访问)。
总结:强制执行并记录安全政策。如果失败,则显示为 EPERM 错误。当前user版本必须要开启强制模式。
2、进程和资源
有人比喻Linux中有两种东西:死的(Inactive)、活的(Active)。活的东西就是进程,而死的东西就是资源(普通文件、特殊文件、套接字、对象等)。
他们之间就是一种使用(操作)与被使用(被操纵)的关系:进程能发起动作(例如它能打开文件并操作它);而文件只能被进程操作。
SElinux Policy语言将死的和活的东西都给打上"标签",通过"标签"将系统内的资源(包括进程)分成不同的角色(比如:用户、客体),进而对整个系统资(包括进程)进行合理安全的管控。
1)安全上下文SContext
在SELinux世界里,每种东西都会被赋予一个安全属性(官方说法叫Security Context,后文简称SContext),也可以理解为第一小节提到的标签。
Linux中的所有东西,包括活的进程、死的资源都有自己对应的SContext安全属性,因此可以把SContext分为进程SContext和资源SContext,无论哪种安全属性,他们的本质都是一个字符串,其格式如下:
user:role:type[:range]
//user表示用户:SEAndroid中仅定义了一个SELinux用户,用u表示
//role表示角色:可以暂时理解为在SELinux用户可以有多个不同的role,不同role所具有的权限也不一样
//type表示类型:不同的type所具有的权限也不一样,但跟role有本质的不同
//range表示安全级别:通常为s0,不用怎么关注
2)Active的SContext
Active翻译过来就是活的,指动态的、能主动发起操作的系统资源,通常是进程或服务。通常包含如下:
- 进程:例如surfaceflinger进程、system_server进程、bootanim进程
- 应用:例如com.android.systemui应用,
- 服务:例如
audioserver服务、cameraserver服务,注意像PMS/WMS这些服务没有单独为进程出现,依赖于system_server进程
我们可以使用adb shell ps -A -Z来打印当前进程的SContext,如下:
OrderPAD_3:/ $ ps -Z -A
LABEL                          USER           PID  PPID        VSZ    RSS WCHAN            ADDR S NAME
//init进程的安全上下文,在A14上面存在两个init进程,一个是vendor kernel启动的,一个是通过命令启动system init
u:r:init:s0                    root             1     0   12547168  10724 0                   0 S init
u:r:vendor_init:s0             root           242     1   12439120   6628 0                   0 S init
u:r:ueventd:s0                 root           243     1   12442188   7620 0                   0 S ueventd
u:r:logd:s0                    logd           521     1   12577584   6824 0                   0 S logd
u:r:lmkd:s0                    lmkd           538     1   12606216   8808 0                   0 S lmkd
u:r:servicemanager:s0          system         544     1   12359884   5180 0                   0 S servicemanager
u:r:hwservicemanager:s0        system         551     1   12513004   6212 0                   0 S hwservicemanager
u:r:vndservicemanager:s0       system         554     1   12413232   4192 0                   0 S vndservicemanager
u:r:shell:s0                   shell          637     1   12362664   2716 n_tty_read          0 S sh
u:r:shell:s0                   shell         5523  3375   12418020   2996 __do_sys_+          0 S sh
u:r:dumpstate:s0               root          4516  1988   12429512   3364 0                   0 S logcat
u:r:keystore:s0                keystore       853     1   12609436  14044 0                   0 S keystore2
u:r:zygote:s0                  root          1081     1   16707764 184608 0                   0 S zygote64
u:r:zygote:s0                  root          1082     1    1742780 157160 0                   0 S zygote
u:r:surfaceflinger:s0          system        1342     1   13118436  47884 0                   0 S surfaceflinger
#system_server进程的安全上下文
u:r:system_server:s0           system        1806  1081   23305908 486132 0                   0 S system_server
//服务的安全上下文,注意大多数被system_server启动的服务没有独立为进程,所以没有他们的打印
u:r:audioserver:s0             audioserver   1303     1   13365972  38376 0                   0 S audioserver
u:r:vendor_rfs_access:s0       vendor_rfs    1357     1   12464008   3136 0                   0 S tftp_server
u:r:drmserver:s0               drm           1501     1      25492   5556 0                   0 S drmserver
u:r:cameraserver:s0            cameraserver  1575     1   12933632  32720 0                   0 S cameraserver
u:r:mediaserver:s0             media         1599     1      78476  25544 0                   0 S mediaserver
//HAL进程的安全上下文
u:r:hal_health_default:s0      system        1173     1   12457988   5852 0                   0 S android.hardware.health-service.qti
u:r:vendor_hal_identity_qti:s0 system        1175     1   12414892   6396 0                   0 S android.hardware.identity-service-qti
u:r:hal_nfc_default:s0         nfc           1181     1   12508268   6828 0                   0 S android.hardware.nfc_pn72xx@1.2-service
u:r:hal_power_default:s0       system        1183     1   12484040   6424 0                   0 S android.hardware.power-service
u:r:hal_sensors_default:s0     system        1189     1   12803584  10212 0                   0 S android.hardware.sensors@2.1-service.multihal
u:r:hal_thermal_default:s0     root          1191     1   12433980   4632 0                   0 S android.hardware.thermal@2.0-service.qti-v2
u:r:vendor_hal_usb_qti:s0      root          1194     1   12461460   4440 0                   0 S android.hardware.usb.gadget@1.1-service-qti
u:r:vendor_hal_usb_qti:s0      root          1197     1   12402524   4492 0                   0 S android.hardware.usb@1.2-service-qti
//应用的安全上下文
u:r:platform_app:s0:c512,c768  u0_a154       2598  1081   20358644 258496 0                   0 S com.android.systemui
u:r:priv_app:s0:c512,c768      u0_a155       2957  1081   18782288 216704 0                   0 S com.android.launcher3
u:r:system_app:s0              system        2935  1081   18635732 155008 0                   0 S com.android.settings
u:r:radio:s0                   radio         2887  1081   19065740 143584 0                   0 S com.android.phone
u:r:bluetooth:s0               bluetooth     3359  1081   18821812 128340 0                   0 S com.android.bluetooth
u:r:mediaprovider_app:s0:c183+ u0_a183       3689  1081   18802176 117328 0                   0 S com.google.android.providers.media.module
u:r:priv_app:s0:c512,c768      u0_a102       3713  1081   19732200 200084 0                   0 S com.google.android.googlequicksearchbox:interactor
u:r:untrusted_app:s0:c115,c25+ u0_a115       5225  1081   19641788 156404 0                   0 S com.google.android.apps.photos
u:r:untrusted_app:s0:c133,c25+ u0_a133       5260  1082    1482556 106644 0                   0 S com.android.chrome
u:r:untrusted_app:s0:c139,c25+ u0_a139       6379  1081   20815808 167432 0                   0 S com.google.android.youtube
u:r:system_app:s0              system        6406  1081   18285768  96800 0                   0 S com.journey.logger
u:r:radio:s0                   radio         6470  1081   18320752  97540 0                   0 S com.qualcomm.qti.modemtestmode
u:r:vendor_cs_app:s0:c81,c256+ u0_a81        6490  1081   18558964  92444 0                   0 S com.qualcomm.qti.qms.service.connectionsecurity
//kernel进程的安全上下文
u:r:kernel:s0                  root           507     2          0      0 0                   0 I [kworker/6:2H-kverityd]
u:r:kernel:s0                  root           508     2          0      0 0                   0 I [kworker/7:2H-kblockd]
u:r:kernel:s0                  root           514     2          0      0 0                   0 I [cwfg_gauge]
u:r:kernel:s0                  root           517     2          0      0 0                   0 S [tcpc_timer_type_c_port0]
u:r:kernel:s0                  root           221     2          0      0 0                   0 S [f2fs_gc-8:15]
u:r:kernel:s0                  root           222     2          0      0 0                   0 I [kdmflush]
3)Inactive的SContext
inactive翻译过来就是死的。指静态的、无法主动发起操作的系统资源,仅作为被访问或操作的对象。通常包含如下:
- 文件:普通文件、配置文件、脚本、应用资源文件等
- 目录:例如
/system、/data等目录 - 设备节点:例如
/dev/block/mmcblk0,其本质还是特殊的文件 - 套接字:例如UNIX Domain Socket,其本质还是特殊的文件
- 属性文件:例如sysprop这类系统属性存储在
/sys/class目录的虚拟文件,其本质还是特殊的文件 - 可执行文件:例如system/bin/里面的文件,其本质还是可执行的文件
- 服务对象:这个有点不好理解,通常用于binder通信里面的服务对象,servicemanager维护了一个服务列表,在注册服务的时候需要把服务对象实例添加到这个列表里面,其他进程使用这个服务的时候才能从servicemanager里面查找这个服务对象,所以这个列表本质只是一系列对象实例的集合,所以他们的本质并不是进程,可以理解为一种抽象的客体资源
3、类型type和属性Attribute
在 Android SELinux 中,Type和Attribute是策略规则的核心组成部分,两者既有明确差异又有紧密关联。这里我们把type用汉语"类型"来进行统称,把attribute用汉语"属性"来进行统称。那么它们到底有什么区别和关联呢?
- Type 是 SELinux 中最小的安全标签单元,用于标识主体(如进程)和客体(如文件、设备)的安全属性。例如system_server和surfaceflinger都属于进程的type;system_data_file和vendor_configs_file都属于资源的type。
- Attribute 是一组 Type 的抽象集合,用于简化策略规则的编写和管理。即表示一类type的共有特点,把这些特点抽象出来统一进行管理。例如
domain表示所有进程Type的集合;file_type表示所有文件Type的集合。
如上的理解,是否可以抽象的理解:type和attribute之间的关系,就是类名与属性之间的关系。
1)Type的定义
如何定义一个type?需要在xxx.te文件里面如下两种方式:
- 定义一个type,不继承任何属性
type  类型名
//当为进程定义type的时候,通常以进程名来进行命名。例如surfaceflinger.te文件第一行为type surfaceflinger
//当为资源定义type的时候,根据实际情况进行命名。例如file.te文件中定义了很多文件的type- 定义一个type,继承多个属性
type  类型名, 属性名1, 属性名2, 属性名3, 属性名N
//注意type后面的第一个名字才是类型名,后面的都是属性名,各个属性名之间没有什么继承关系,即type带有后面所有属性具有的权限规则,可以理解为多继承的关系
//例如surfaceflinger.te文件第一行为type surfaceflinger, domain表示surfaceflinger是一个domain进程的属性
//例如type uwb_service, app_api_service, system_server_service, service_manager_type表示uwb_service继承多个属性2)Attribute的定义
AOSP已经定义了很多属性,可以参考aosp/sepolicy目录下的attributes:
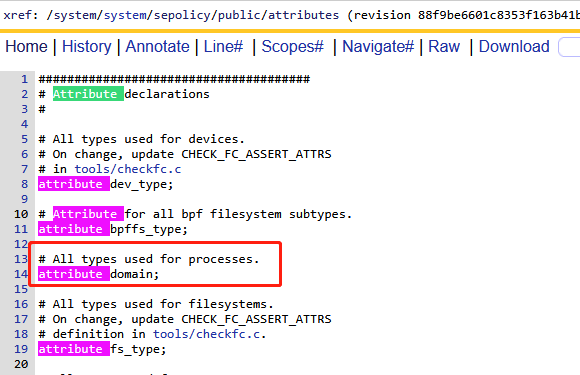
- 定义属性
attribute 属性名- type直接关联
type <type_name>,  <attribute_name_1> , <attribute_name_2>, <attribute_name_n>;
//定义type_name的同时,关联/继承后面的属性。通常用于新创建一个type同时进行关联- typeattribute关联已存在的type
typeattribute <type_name> <attribute_name>;
//type_name已存在,关联后面的属性。即针对一个已存在的type进行关联
4、TE安全策略
SEAndroid世界将所有事物都打上了标签(每个事物都有自己的SContext),那么SEAndroid就能根据这些SContext来进行统一管理。SEAndroid就是通过一系列的te文件来管理所有进程和资源的权限,每个te文件里面都有无数条te语句,每条te语句对应一条安全策略。
- 主体:主体和客体只是一个逻辑上的概念,就跟主谓宾语句:小红在吃米饭,其中主语是小红(活的),宾语是米饭(死的)。同理在Linux世界中,活的东西只有进程,死的东西是资源。即资源是被使用的东西,进程是使用者,这里的主体就是指使用者。SEAndroid中的主体就是指的进程,当然可能是单一的进程,也可以是一组具有相同权限的进程,但是它们都对应一个type。
- 客体:同上客体就是这个被使用者。SEAndroid中的客体就是指的资源(包括普通文件/特殊文件/套接字),当然可能是单一的资源,也可以是一组相同类型的资源,但是他们都对应一个type。
- 客体类别:客体与客体类别的概念就类似于Java语言中的object和class,其中class表示一个类,object表示一个实例对象。同样客体和客体类别也是这样的关系,例如小红在吃米饭,小红在吃鱼肉,米饭和鱼肉都是具体的事物(客体),但是他们却是不一样的类别(客体类别)。SEAndroid中已经为资源定义了一些客体类别,我们也可以自定义。例如/etc/password是一个普通文件,/atv/socket_0是一个套接字。
- 访问许可:这个比较好理解,代表对客体的访问权限,例如读写权限,查询发送等权限。这个也是可以自定义的。
- AV规则:既然已经有了主体和客体,那么就有对应访问规则,又叫AV规则。属于SElinux策略语言的控制部分,即te文件中每一条AV规则语句都需要能够描述清楚:主体 对 客体 是否具有 访问许可。其实就是te文件里面的allow、neverallow、dontaudit、auditallow等语句。
1)AVC日志
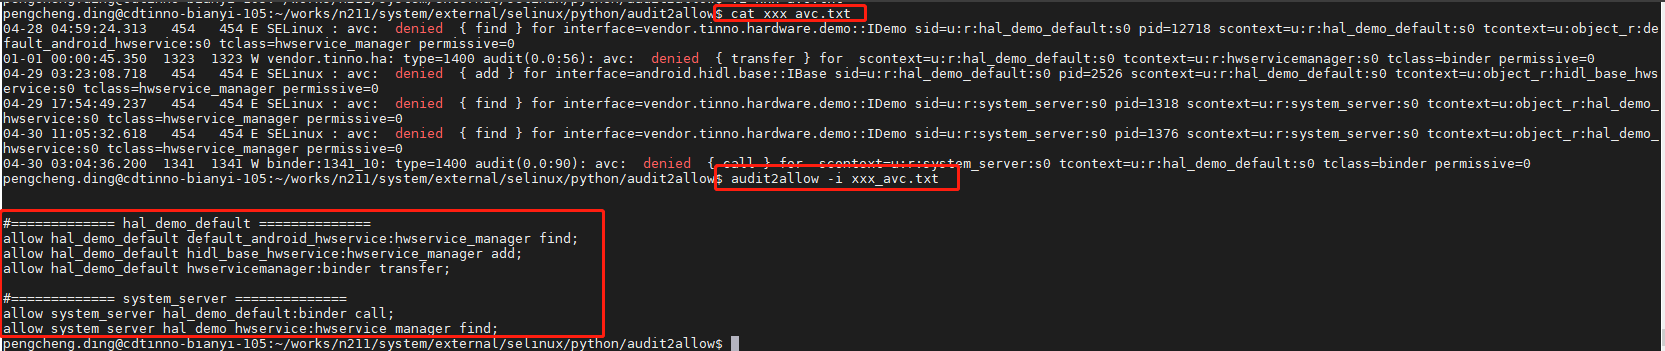
selinux的日志通常以avc开头,当然存在ap的avc日志和kernel的avc日志,因此我们针对这种两种抓取方式还不一样:
- AP的avc日志:直接adb shell logcat | grep avc即可,如下内容
04-30 11:05:32.618   454   454 E SELinux : avc:  denied  { find } for interface=vendor.tinno.hardware.demo::IDemo sid=u:r:system_server:s0 pid=1376 scontext=u:r:system_server:s0 tcontext=u:object_r:hal_demo_hwservice:s0 tclass=hwservice_manager permissive=0
04-30 03:04:36.200 1341 1341 W binder:1341_10: type=1400 audit(0.0:90): avc: denied { call } for scontext=u:r:system_server:s0 tcontext=u:r:hal_demo_default:s0 tclass=binder permissive=0- kernel的avc日志:需要使用adb shell dmesg | grep avc即可,如下内容
[ 281.740040] .(4)[457:servicemanager]SELinux: avc: denied { add } for pid=10936 uid=1000 name=tinno_can scontext=u:r:system_server:s0 tcontext=u:object_r:default_android_service:s0 tclass=service_manager permissive=0
2)allow规则
selinux这类日志都是以关键字avc开头,需要注意其中几个很重要的字段:
- denied { 权限 }:找到denied字段,后面通常跟随大括号,里面的内部就表示被拒绝的操作,即什么操作权限被拒绝,例如读写查等权限
- scontext=主体上下文:找到scontext字段,后面跟随的为主体安全上下文SContext,即代表主体进程
- tcontext=客体上下文:找到tcontext字段,后面跟随的为客体安全上下文SContext,即代表被访问单个资源或一系列资源的上下文
- tclass=客体类别:找到tclass字段,后面为客体类别
因此我们可以使用allow语句来进行配置,其格式如下:
allow  主体type  客体type  客体类别:  {权限}
//avc:denied { map } for path="/data/local/data/mute.png" dev="mmcblk0p37" ino=5338 scontext=u:r:bootvideo:s0 tcontext=u:object_r:system_data_file:s0 tclass=file permissive=0
//allow bootvideo system_data_file:file { map }我们除了手动转换avc日志之外,还可以使用audit2allow -i avc_log.txt工具来转换,如下:
3)neverallow规则
有时候我们配置的allow语句可能会触发一些neverallow规则,android编译系统在编译的时候会对neverallow进行校验,因此会导致neverallow引起的编译报错,如下案例:
FAILED: out/soong/.intermediates/system/sepolicy/sepolicy_neverallows_vendor/policy
out/host/linux-x86/bin/checkpolicy -M -c30-o out/soong/.intermediates/system/sepolicy/sepolicy_neverallows_vendor/policy out/soong/.intermediates/system/sepolicy/sepolicy_neverallows_vendor.checkpolicy.conf/android_common/sepolicy_neverallows_vendor.checkpolicy.conf # hash of input list: 15871fa7f1904c26cfc726ea362c19ede7f225bff09f1871b1f7d5657882753a
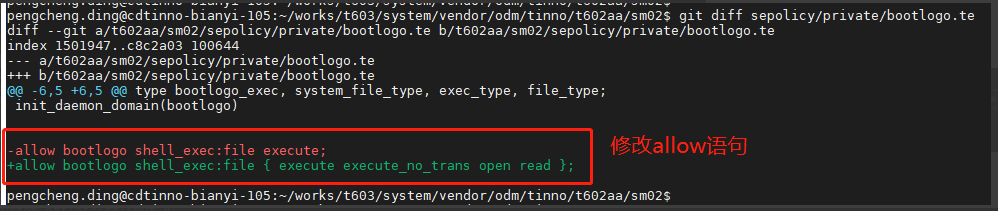
libsepol.report_failure: neverallow on line993of system/sepolicy/public/domain.te (or line13508of out/soong/.intermediates/system/sepolicy/sepolicy_neverallows_vendor.checkpolicy.conf/android_common/sepolicy_neverallows_vendor.checkpolicy.conf) violated by allow bootlogo toolbox_exec:file { read getattr map execute open execute_no_trans };
libsepol.report_failure: neverallow on line993of system/sepolicy/public/domain.te (or line13508of out/soong/.intermediates/system/sepolicy/sepolicy_neverallows_vendor.checkpolicy.conf/android_common/sepolicy_neverallows_vendor.checkpolicy.conf) violated by allow bootlogo shell_exec:file { read getattr map execute open execute_no_trans };
libsepol.report_failure: neverallow on line925of system/sepolicy/public/domain.te (or line13354of out/soong/.intermediates/system/sepolicy/sepolicy_neverallows_vendor.checkpolicy.conf/android_common/sepolicy_neverallows_vendor.checkpolicy.conf) violated by allow bootlogo toolbox_exec:file { execute execute_no_trans };
libsepol.report_failure: neverallow on line925of system/sepolicy/public/domain.te (or line13354of out/soong/.intermediates/system/sepolicy/sepolicy_neverallows_vendor.checkpolicy.conf/android_common/sepolicy_neverallows_vendor.checkpolicy.conf) violated by allow bootlogo shell_exec:file { execute execute_no_trans };
libsepol.check_assertions:4neverallow failures occurred
Errorwhileexpanding policy
如上的neverallow报错,触发原因就是违反了类似如下neverallow这样的语句配置,通常可以根据日志来找到这样的语句配置, 如上neverallow on line 925 of system/sepolicy/public/domain.te 的代码如下:
//vendor/system/sepolicy/public/domain.te
full_treble_only(`
# Do not allow vendor components to execute files from system
# except for the ones allowed here.
neverallow {
domain
-coredomain // 排除核心域(如 system_server)
-appdomain // 排除应用域
-vendor_executes_system_violators
-vendor_init // 排除vendor_init
} {
system_file_type
-system_lib_file
-system_linker_exec
-crash_dump_exec
-iorap_prefetcherd_exec
-iorap_inode2filename_exec
-netutils_wrapper_exec
userdebug_or_eng(`-tcpdump_exec')
}:file { entrypoint execute execute_no_trans };
') //禁止所有非核心域(vendor 域)执行 system 分区的可执行文件(除明确豁免的类型外)二、调试技巧
这里主要介绍一下selinux权限策略的代码目录在什么地方?然后如何单编sepolicy模块,然后如何推送到手机中进行验证。
1、selinux问题定义
1)如何初步定位selinux权限问题?
当遇到可能与selinux有关系的权限问题的时候,我们可以选择在debug版本上面设置selinux权限为宽容模式来看看是否还出现异常,如果设置selinux为宽容模式不出现异常,那么可以断定是selinux权限问题导致。
- 当遇到问题时,想判断是不是 selinux 权限导致时,在 userdebug 或 eng 版本,通过adb shell setenforce 0 命令,让 selinux 处于宽容模式,再看问题是否还存在。如果问题不存在,可以确认是 selinux 权限不足导致。(注意,特殊情况下可能还需要验证重启过程,上面命令重启失效,这个时候可以考虑修改init的代码来设置关闭模式)
- 抓取 log,过滤“avc“,可以看到缺少的权限信息,类似如下错误:avc:denied{permission}for pid=257 scontext=u:r:scontext:s0 tcontext=u:object_r:tcontext:s0 tclass=tclass=0
- 根据报错,可以得知 scontext 缺少对 tcontext 的 tclass 的 permission 权限,可以在对应的scontext.te 文件中补上对应allown语句:allow scontext tcontext:tclass {permission};
- 然后用 make selinux_policy 编译,然后 push 相关分区下的 etc/selinux。直到没有 avc 报错为止
如果确定是关闭selinux之后问题不出现,找出相关联的avc日志,准备开始进行权限策略配置,那么如何针对avc日志的信息进行配置呢?先介绍一个工具,自动帮我们生成
2)audit2allow工具生成allow语句
audit2allow工具是android源码中自带的一个工具,可以直接使用,其源码路径:
AOSP/external/selinux/python/audit2allow/
我们可以直接跳转到上面目录执行如下命令根据日志生成allow语句:
cd aosp/external/selinux/python/audit2allow/
audit2allow -i xxx_avc_log.txt
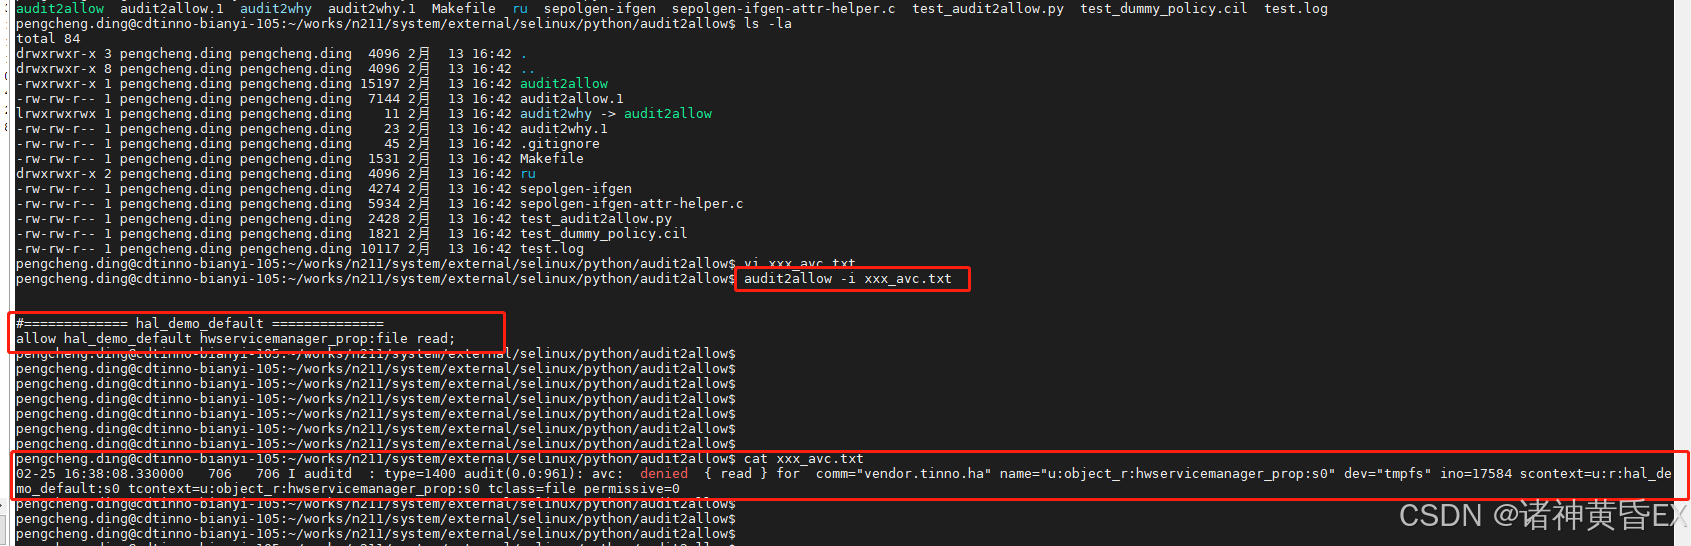
如上就表示这个avc报出来的权限问题,需要添加hal_demo_default.te中添加如上策略
2、sepolicy模块编译
selinux权限策略到底放到源代码中什么目录下呢?
1)sepolicy代码路径
在原生aosp中定义了sepolicy模块,该模块就是用来对selinux权限策略的配置
这里根据原生aosp和其他平台和厂商自定义进行区分如下几种:
A.原生平台
aosp原生基线的配置目录:aosp/system/sepolicy/
注意这里的aosp表示vendor和system的代码域,即vendor或system侧的根目录
无论其他平台如何扩展,最终aosp的这个目录都是selinux sepolicy模块编译的入口。
B.高通平台
我在高通基线发现如下两个目录
- vendor|system/device/qcom/sepolicy/sepolicy/
- vendor|system/device/qcom/sepolicy/sepolicy_vndr/
其中vendor和system分别表示代码域,然后高通的通用代码在device/qcom/sepolicy目录,该目录下又分为sepolicy和sepolicy_vndr目录。
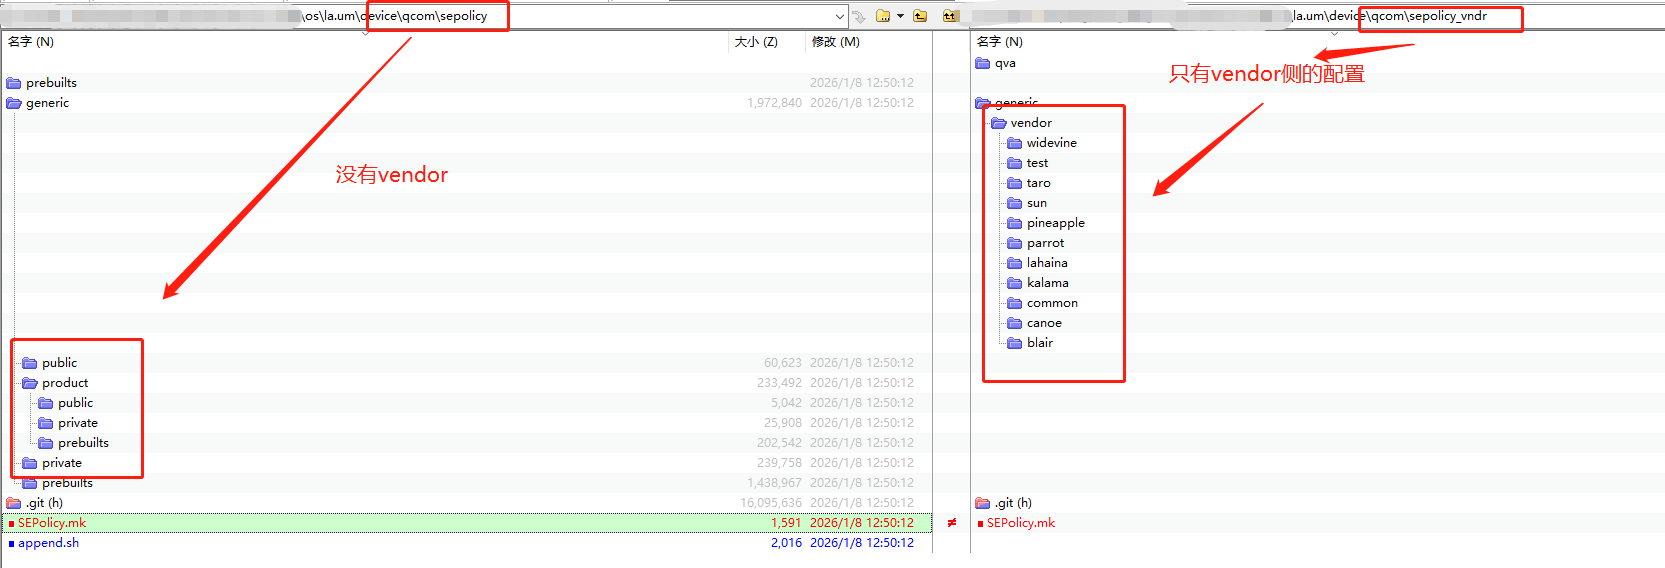
他们的SEPolicy.mk配置如下:

反正有点乱,只需要找到哪个路径生效就行了,最终还是通过几个宏控进行指定
C.自定义路径
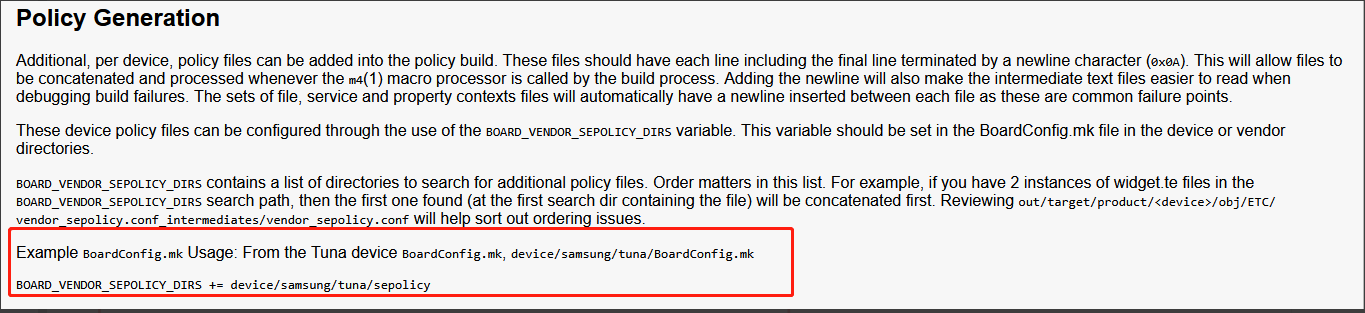
aosp在system/sepolicy/README.md中有重点介绍如何自定义sepolicy策略,如下:
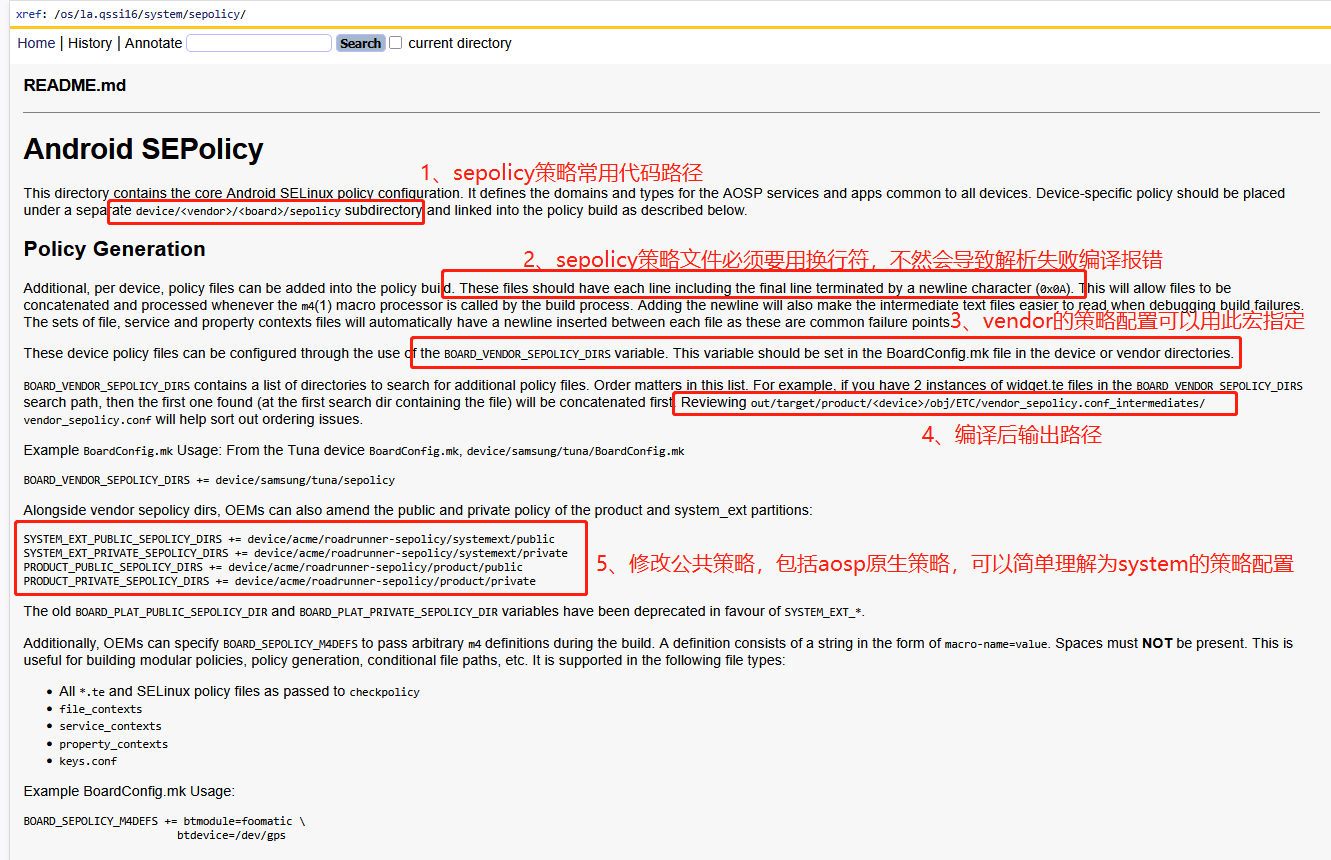
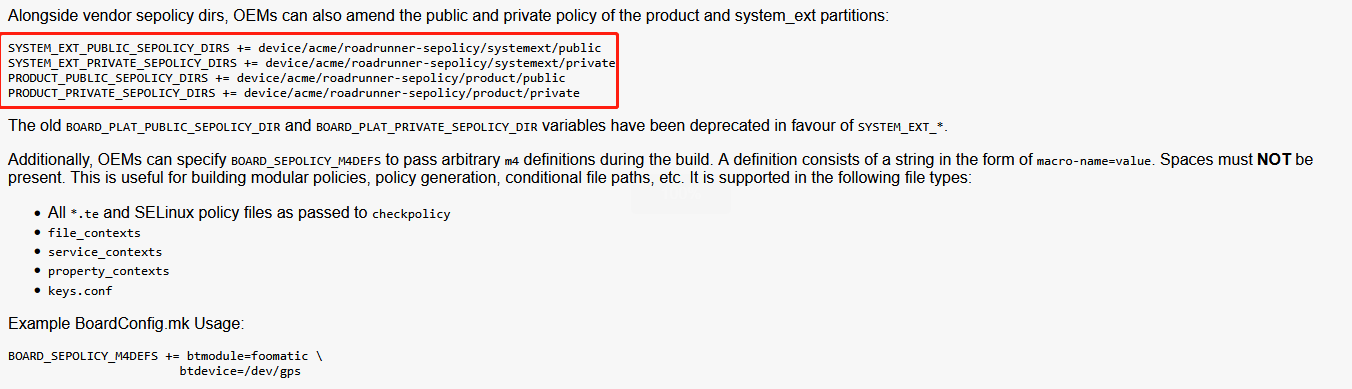
如上总结,可以得到有如下五个宏控可以来指定sepolicy策略
| 宏控 | 应用分区 | 分区特性 |
|---|---|---|
| BOARD_VENDOR_SEPOLICY_DIRS | vendor 分区 | 供应商自定义,可独立更新 |
| SYSTEM_EXT_PUBLIC_SEPOLICY_DIRS | system_ext 分区 | 系统扩展,公共策略 |
| SYSTEM_EXT_PRIVATE_SEPOLICY_DIRS | system_ext 分区 | 系统扩展,私有策略 |
| PRODUCT_PUBLIC_SEPOLICY_DIRS | product 分区 | 产品定制,公共策略 |
| PRODUCT_PRIVATE_SEPOLICY_DIRS | product 分区 | 产品定制,私有策略 |
PS:Android 16平台废弃了如下两个宏控
BOARD_PLAT_PUBLIC_SEPOLICY_DIR
BOARD_PLAT_PRIVATE_SEPOLICY_DIR
他们的代替宏控变成了如下两个
SYSTEM_EXT_PUBLIC_SEPOLICY_DIRS
SYSTEM_EXT_PRIVATE_SEPOLICY_DIRS
PS:公共策略和私有策略的区分
- PUBLIC:可被其他分区/模块引用,可定义供其他域使用的类型,其他分区可添加对这些类型的权限规则
- PRIVATE:仅本分区使用,不允许被其他分区引用,严格限制,提高隔离性
我司的配置通常如下:
BOARD_VENDOR_SEPOLICY_DIRS += \
vendor/xxx/product/xxx/sepolicy/non_plat
SYSTEM_EXT_PUBLIC_SEPOLICY_DIRS += \
vendor/xxx/product/xxx/sepolicy/plat_public
SYSTEM_EXT_PRIVATE_SEPOLICY_DIRS += \
vendor/xxx/product/xxx/sepolicy/plat_private
2)sepolicy模块编译
aosp sepolicy模块通用的单编步骤如下:
步骤一:单编selinux配置
//方式一:make selinux_policy
source build/envsetup.sh
lunch xxx
make selinux_policy
//方式二:mm
source build/envsetup.sh
lunch xxx
cd aosp/system/sepolicy/
mm
步骤二:selinux输出目录
//这里以A14项目system为例,注意A11的路径可能不一样
aosp\out\target\product\qssi\system\etc\selinux
aosp\out\target\product\qssi\system_ext\etc\selinux
//allow语句的新增可以参考该目录下的cil结尾的文件,例如system_ext_sepolicy.cil
//context语句的新增可以参考该目录下的contexts结尾的文件,例如system_ext_property_contexts、system_ext_file_contexts、system_ext_hwservice_contexts
举一个system_ext分区下的例子:

在举一个vendor分区下的例子:
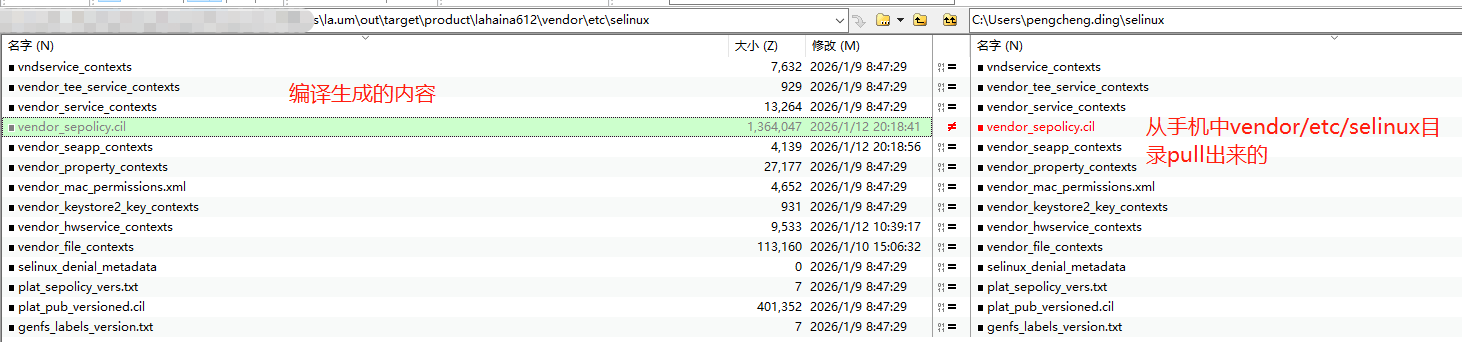
步骤三:推送xxx/etc/selinux目录到手机xxx/etc/selinux目录
注意这里的xxx通常有system和vendor,以及system_ext等目录

总结
- Selinux权限单编步骤:source build/envsetup.sh && lunch xxx && make selinux_policy
- Selinux编译输出路径:aosp/out|out_sys/target/product/xxx/system|system_ext|vendor/etc/selinux
注意:这里的aosp是指vendor或者system:
- 如果是system侧的进程,那么需要进入system/system/sepolicy目录下进行编译
- 如果是vendor侧的进程,那么需要进入vendor/system/sepolicy目录下进行编译
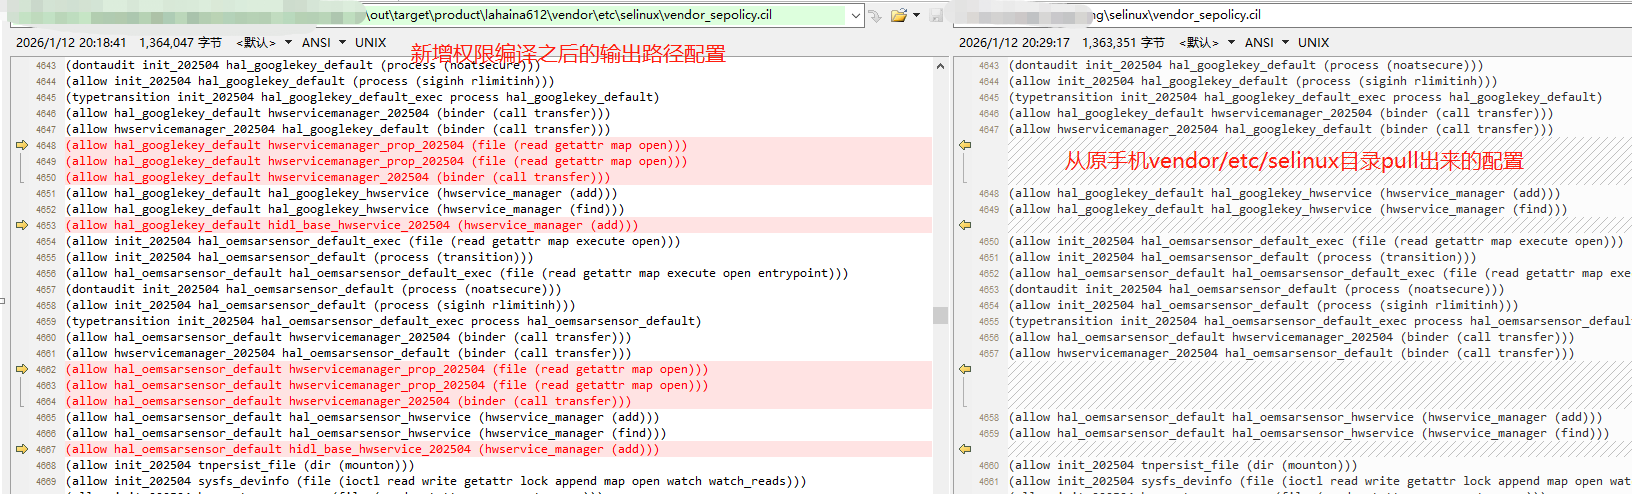
如上准备了selinux权限调试的常用路径,我们配置了allow语句之后,可能还没生效,这个时候就可能需要调试了,查看一下我们的allow语句是否被编译到镜像里面的cil文件中。
三、基本语法
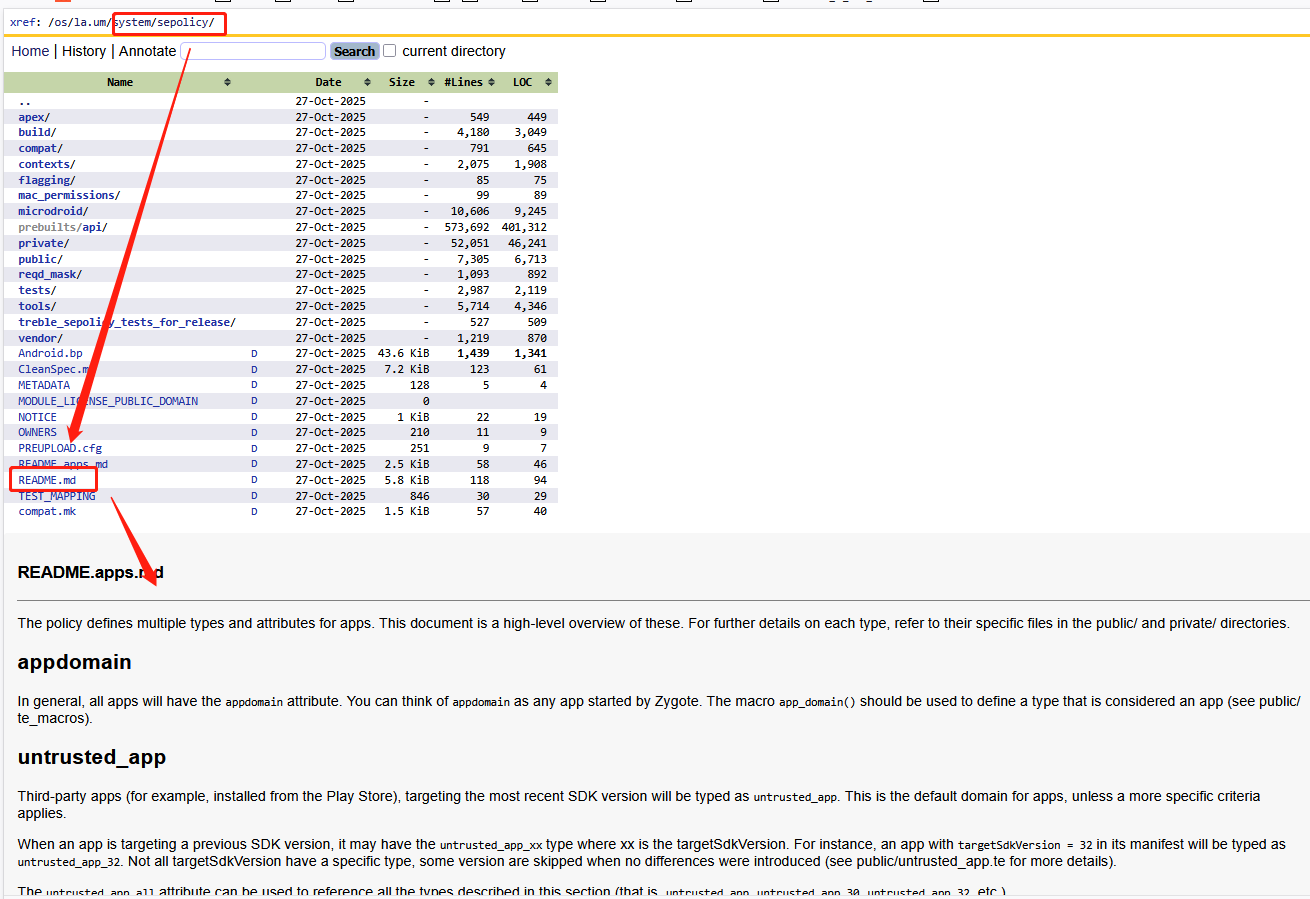
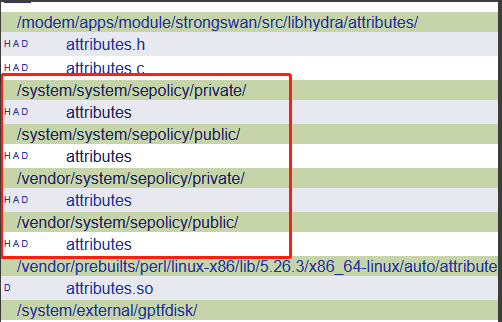
Selinux机制是属于linux的,Android基于这一套机制,配置了针对android系统的权限策略,这些策略和改模块的路径通常位于aosp/system/sepolicy/,如下目录:
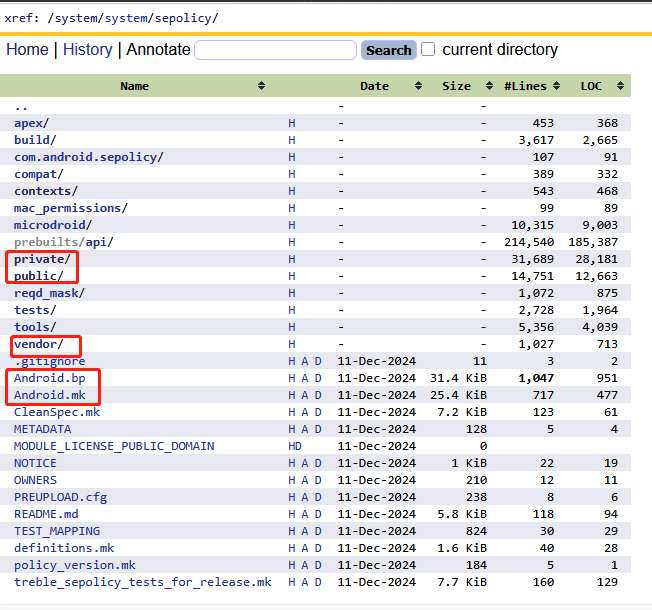
如上路径为aosp原生制定的一些列策略和模块,我们前文使用的单编命令make selinux_policy其实主要就是编译这个模块,这里我们只关注android的一些列策略目录,其中最重要的private和public和vendor,以及api不同版本的兼容性配置和odm厂商的定制
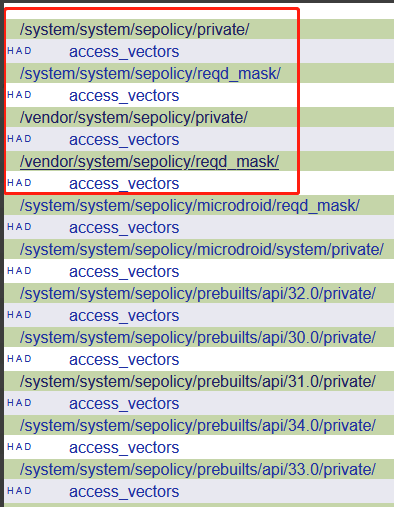
- private目录:存放AOSP 核心组件(如
system_server、surfaceflinger)的访问控制规则。厂商代码禁止直接引用private中的策略(如system_server的私有域)。Google 可在新版本中调整private策略(如收紧权限),无需考虑对厂商的影响 - public目录:存放公开策略接口,供厂商(Vendor)/供应商扩展使用。即厂商策略需通过
public接口实现扩展,避免直接依赖private。 - prebuilts/api/:存放了aosp不同版本的兼容性的配置,例如aosp/system/sepolicy/prebuilts/api/29/private和aosp/system/sepolicy/prebuilts/api/29/public,这些都基本上是针对android sdk为29的版本进行兼容的一些配置,通常我们不需要check
odm定制目录:厂商通常不应该直接修改aosp/system/sepolicy/private目录,但是readme里面已经提供了odm定制的配置应该如何集成
1、attributes:属性的定义
attributes文件中定义了aosp默认的一系列属性,并且在private和public都有配置,这里重点介绍一些常用的属性:
A. domain进程相关
- attribute domain:All types used for processes。根据注释来看,domain翻译过来为域,根据sepolicy的用法,可以暂时把它理解为普通进程,普通进程所具有的属性
- attribute coredomain:All core domains (as opposed to vendor/device-specific domains)。翻译为核心域,根据AI解释他为domain的子集,即用来标识核心进程,例如
system_server、surfaceflinger这类进程都继承了coredomain属性。 -
attribute appdomain:All domains used for apps。同样为domain的子集,用来标识APP进程
-
attribute halserverdomain:All HAL servers。同样为domain的子集,用来标识hal服务端进程,例如vendor.hardware.demo@1.0-service,通过该属性我们不需要为每一个hal服务端进程单独赋予一些binder相关的访问规则。
-
attribute halclientdomain:All HAL clients。同样为domain的子集,用来标识hal客户端进程,例如Android Framework的服务或者system_server,通过type system_server, domain, halclientdomain来设置framework的服务可以作为hal客户端进程访问hal。
-
expandattribute halclientdomain true:启用属性扩展机制,自动为所有关联到
halclientdomain的类型继承其权限规则,true表示开启此功能,即确保子属性或子类型自动继承权限。
B. hal_attribute宏
在attributes文件中使用了大量的hal_attribute宏控,如下代码:
# hal_attribute(hal_name)
# Add an attribute for hal implementations along with necessary
# restrictions.
define(`hal_attribute', `
attribute hal_$1;
expandattribute hal_$1 true;
attribute hal_$1_client;
expandattribute hal_$1_client true;
attribute hal_$1_server;
expandattribute hal_$1_server false;
neverallow { hal_$1_server -halserverdomain } domain:process fork;
# hal_*_client and halclientdomain attributes are always expanded for
# performance reasons. Neverallow rules targeting expanded attributes can not be
# verified by CTS since these attributes are already expanded by that time.
build_test_only(`
neverallow { hal_$1_server -hal_$1 } domain:process fork;
neverallow { hal_$1_client -halclientdomain } domain:process fork;
')
')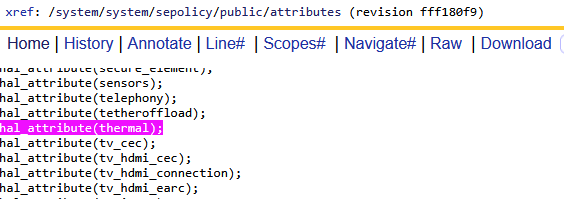
这里以hal_attribute(thermal)展开之后的配置如下:由此可见自定义hal建议在attribute中添加hal_attribute(xxx),以统一被管理。
attribute hal_thermal;                  //定义属性hal_thermal
expandattribute hal_thermal true;       //开启hal_thermal属性的扩展功能
attribute hal_thermal_client;           //定义属性hal_thermal_client,表示hal客户端进程
expandattribute hal_thermal_client true;//开启hal_thermal_client属性的扩展功能
attribute hal_thermal_server;           //定义属性hal_thermal_server,表示hal服务端进程
expandattribute hal_thermal_server false;//关闭hal_thermal_server属性的扩展功能
neverallow { hal_thermal_server -halserverdomain } domain:process fork;//强制所有 HAL 服务端必须属于 halserverdomain 属性,保证其权限统一受控
C. file文件相关
- attribute file_type:All types used for files that can exist on a labeled fs。根据注释来看,所有存在的文件的类型都应该叫做file_type,即用来标识文件,通常为客体资源。
- attribute data_file_type:All types used for /data files。是file_type的子集,用来标识所有存在在于/data目录的文件。
- attribute core_data_file_type:All types in /data, not in /data/vendor。是file_type的子集,用来标识存在/data目录但是不包含/data/vendor的所有文件。
- attribute app_data_file_type:All types used for app private data files in seapp_contexts。用来标识/data/private里面的私有应用文件。
- attribute system_file_type:All types in /system。是file_type的子集,用来标识所有存在/system目录的文件。
- attribute system_dlkm_file_type:All types in /system_dlkm。用来标识所有存在/system_dlkm目录的文件。
- attribute vendor_file_type:All types in /vendor。用来标识所有存在/vendor目录的文件。
- attribute proc_type:All types used for procfs files。用来标识存在/proc目录下的虚拟文件。
- attribute exec_type: All types used for domain entry points。用来标识能够被执行的文件,例如
/system/bin/init、/system/bin/app_process等,当进程通过 execve() 执行某个文件时,这个文件作为客体上下文必须得带有exec_type的属性。
D. property属性相关
- attribute property_type:All types used for property service. 所有与 Android 属性服务(property_service)关联的类型的基础标识符,用于统一归类属性操作相关的访问规则。
- attribute core_property_type:All properties defined in core SELinux policy. Should not be used by device specific properties. 核心策略层定义的全局属性(如 SELinux 自身运行时参数),禁止设备厂商策略直接使用
- attribute log_property_type:All properties used to configure log filtering.控制日志过滤规则的属性(如日志级别、分类过滤关键字)。用途:动态调整日志输出粒度(如 persist.log.tag 系列属性)。
- attribute system_property_type:All properties defined by /system. 由 /system 分区定义的属性(Android 系统原生属性),例如系统版本、全局调试开关等
- attribute system_internal_property_type:All /system-defined properties used only in /system. 仅在 /system 内部使用的私有属性,其他分区(如 /vendor)不可访问。场景:系统服务间通信的敏感参数(如 ActivityManager 内部状态)
- attribute system_restricted_property_type:All /system-defined properties which can't be written outside /system. 仅允许 /system 自身写入的属性,外部组件(包括特权进程)只能读取。
- attribute vendor_property_type:All properties defined by /vendor. 由 /vendor 分区定义的属性(设备厂商自定义属性),如硬件驱动参数、OEM 功能开关
- attribute vendor_internal_property_type:All /vendor-defined properties used only in /vendor.仅在 /vendor 内部使用的私有属性,其他分区(如 /system)不可访问。场景:硬件适配层(HAL)与厂商驱动间的专有通信参数。
- attribute vendor_restricted_property_type:All /vendor-defined properties which can't be written outside /vendor. 仅允许 /vendor 自身写入的属性,外部组件(包括系统服务)只能读取。
- attribute vendor_public_property_type:All /vendor-defined properties with no restrictions.厂商定义的公开属性,允许跨分区访问(如 /system 读取或设置)。
E. 其他常用属性
# All service_manager types created by system_server
attribute system_server_service;
# services which should be available to all but isolated apps
attribute app_api_service;
# services which should be available to all ephemeral apps
attribute ephemeral_app_api_service;
# services which export only system_api
attribute system_api_service;
# services which are explicitly disallowed for untrusted apps to access
attribute protected_service;
# All types used for services managed by servicemanager.
# On change, update CHECK_SC_ASSERT_ATTRS
# definition in tools/checkfc.c.
attribute service_manager_type;
# All types used for services managed by hwservicemanager
attribute hwservice_manager_type;
# All HwBinder services guaranteed to be passthrough. These services always run
# in the process of their clients, and thus operate with the same access as
# their clients.
attribute same_process_hwservice;
# All HwBinder services guaranteed to be offered only by core domain components
attribute coredomain_hwservice;
# All HwBinder services that untrusted apps can't directly access
attribute protected_hwservice;
# All types used for services managed by vndservicemanager
attribute vndservice_manager_type;
# All services declared as part of an HAL
attribute hal_service_type;
2、客体资源的SContext配置
1)file_contexts:文件的SContext
上一小节介绍了一些aosp默认定义的属性,前文也介绍了scontext的概念,以及主体和客体的安全类型格式,安全类型的定义和与属性的关系也都介绍了。
文件file_contexts是sepolicy用来统一针对文件的安全上下文的配置。因为针对的是文件,所以这里也是对客户资源的SContext描述。
A. 根目录和特殊文件的安全类型
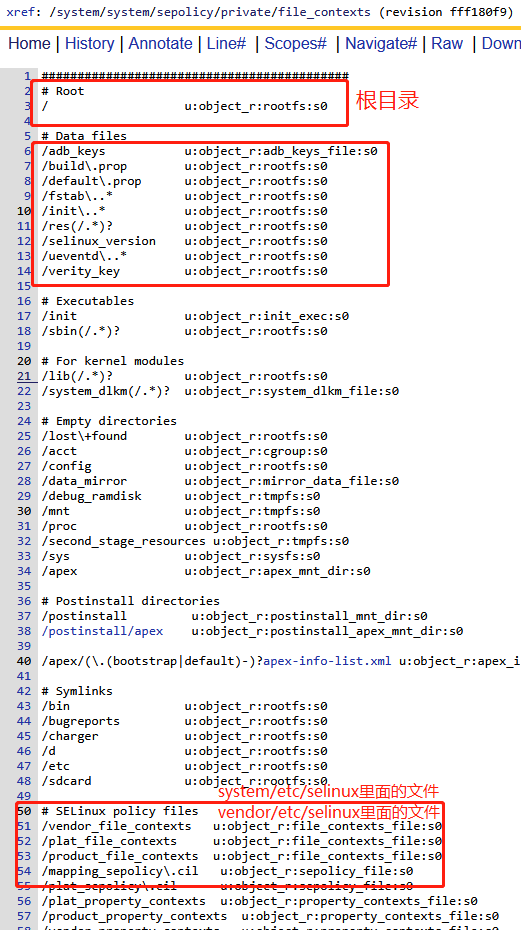
B. 设备节点的安全类型
dev目录下面的设备节点的安全类型
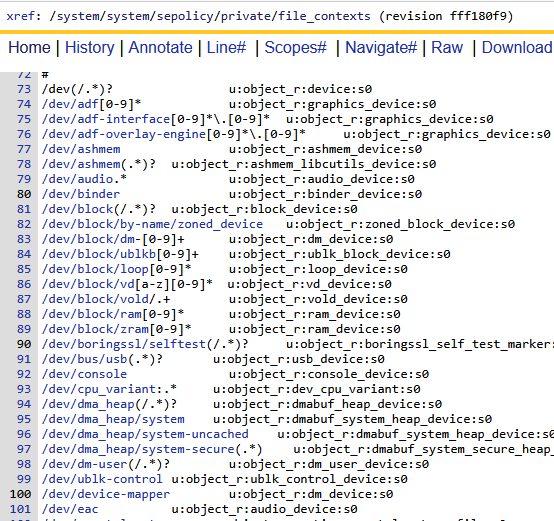
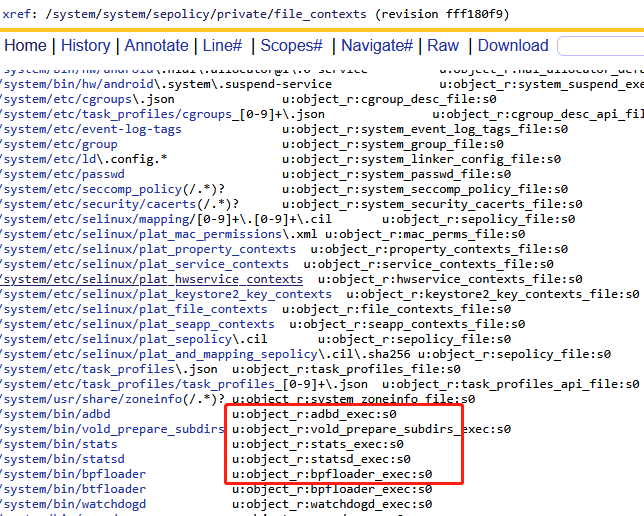
C. system/bin可执行文件的安全类型
system目录下我们最关注的主要是system/etc目录下面的一些配置文件,和system/bin下面的可执行文件,这些可执行文件的安全上下文都带有_exec这样的命名,因为她们继承了exec_type,表示属于可执行的文件。
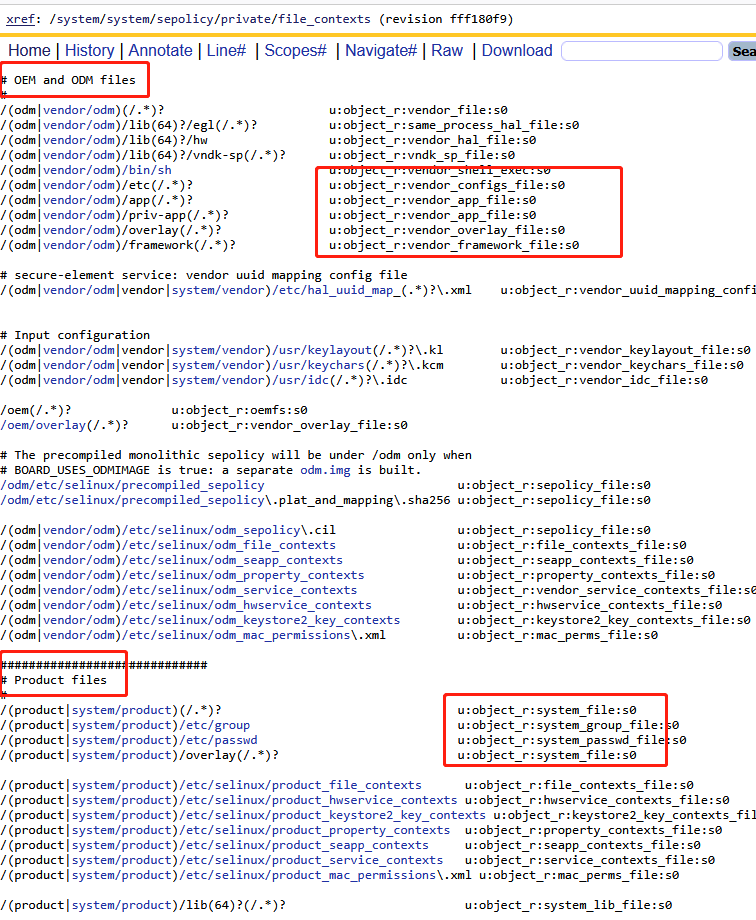
D. vendor和product目录的安全类型
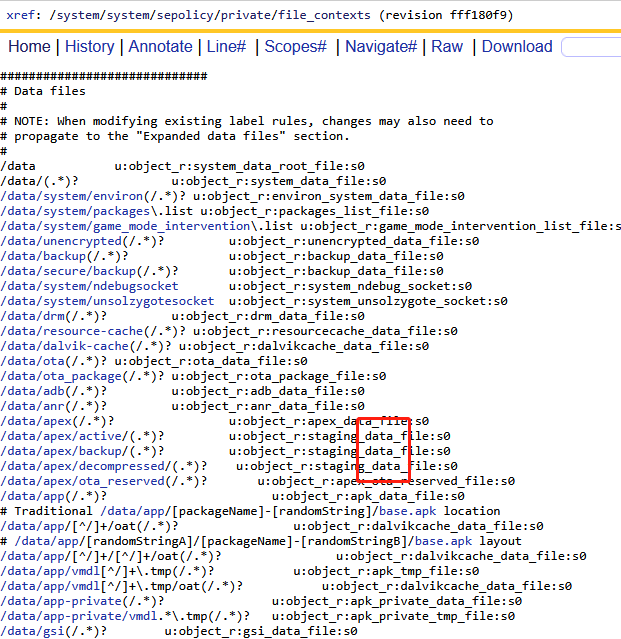
E. data目录的安全类型
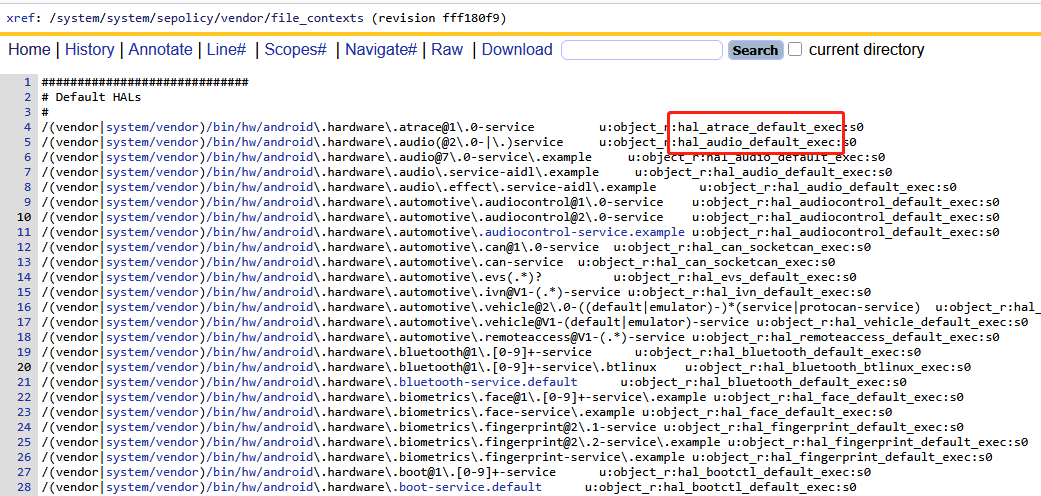
F. hal可执行文件的安全类型
在vendor/file_context里面还专门为hal服务进程可执行文件进行了SContext的指定,大体格式以hal_xxx_default_exec命名,他们的本质和system/bin一致,带有exec_type,表示属于可执行的文件。
G. 其他重要文件的配置
这里主要针对system/vendor/odm/product下面的bin/lib/app等这样的文件进行展示:
//AOSP/system/sepolicy/private/file_contexts
/system(/.*)?		u:object_r:system_file:s0                #system根目录
/system/lib(64)?(/.*)?		u:object_r:system_lib_file:s0    #system/lib动态库目录
/system/lib(64)?/bootstrap(/.*)? u:object_r:system_bootstrap_lib_file:s0
#下面分别指的是vendor/vendor或者system/vemdor目录下
/(vendor|system/vendor)(/.*)?                  u:object_r:vendor_file:s0
/(vendor|system/vendor)/bin/sh                 u:object_r:vendor_shell_exec:s0
/(vendor|system/vendor)/bin/toybox_vendor      u:object_r:vendor_toolbox_exec:s0
/(vendor|system/vendor)/bin/toolbox            u:object_r:vendor_toolbox_exec:s0
/(vendor|system/vendor)/etc(/.*)?              u:object_r:vendor_configs_file:s0
/(vendor|system/vendor)/etc/cgroups\.json      u:object_r:vendor_cgroup_desc_file:s0
/(vendor|system/vendor)/etc/task_profiles\.json    u:object_r:vendor_task_profiles_file:s0
/(vendor|system/vendor)/lib(64)?/egl(/.*)?     u:object_r:same_process_hal_file:s0
/(vendor|system/vendor)/lib(64)?/vndk-sp(/.*)? u:object_r:vndk_sp_file:s0
/(vendor|system/vendor)/manifest\.xml           u:object_r:vendor_configs_file:s0
/(vendor|system/vendor)/compatibility_matrix\.xml u:object_r:vendor_configs_file:s0
/(vendor|system/vendor)/etc/vintf(/.*)?        u:object_r:vendor_configs_file:s0
/(vendor|system/vendor)/app(/.*)?              u:object_r:vendor_app_file:s0
/(vendor|system/vendor)/priv-app(/.*)?         u:object_r:vendor_app_file:s0
/(vendor|system/vendor)/overlay(/.*)?          u:object_r:vendor_overlay_file:s0
/(vendor|system/vendor)/framework(/.*)?        u:object_r:vendor_framework_file:s0
#下面分别指的odm/odm或者vendor/odm目录下
/(odm|vendor/odm)(/.*)?                       u:object_r:vendor_file:s0
/(odm|vendor/odm)/lib(64)?/egl(/.*)?          u:object_r:same_process_hal_file:s0
/(odm|vendor/odm)/lib(64)?/hw                 u:object_r:vendor_hal_file:s0
/(odm|vendor/odm)/lib(64)?/vndk-sp(/.*)?      u:object_r:vndk_sp_file:s0
/(odm|vendor/odm)/bin/sh                      u:object_r:vendor_shell_exec:s0
/(odm|vendor/odm)/etc(/.*)?                   u:object_r:vendor_configs_file:s0
/(odm|vendor/odm)/app(/.*)?                   u:object_r:vendor_app_file:s0
/(odm|vendor/odm)/priv-app(/.*)?              u:object_r:vendor_app_file:s0
/(odm|vendor/odm)/overlay(/.*)?               u:object_r:vendor_overlay_file:s0
/(odm|vendor/odm)/framework(/.*)?             u:object_r:vendor_framework_file:s0
#下面分别指的product/product或者system/product目录下
/(product|system/product)(/.*)?                                 u:object_r:system_file:s0
/(product|system/product)/etc/group                             u:object_r:system_group_file:s0
/(product|system/product)/etc/passwd                            u:object_r:system_passwd_file:s0
/(product|system/product)/overlay(/.*)?                         u:object_r:system_file:s0
2)hwservice_contexts:HIDL接口的SContext
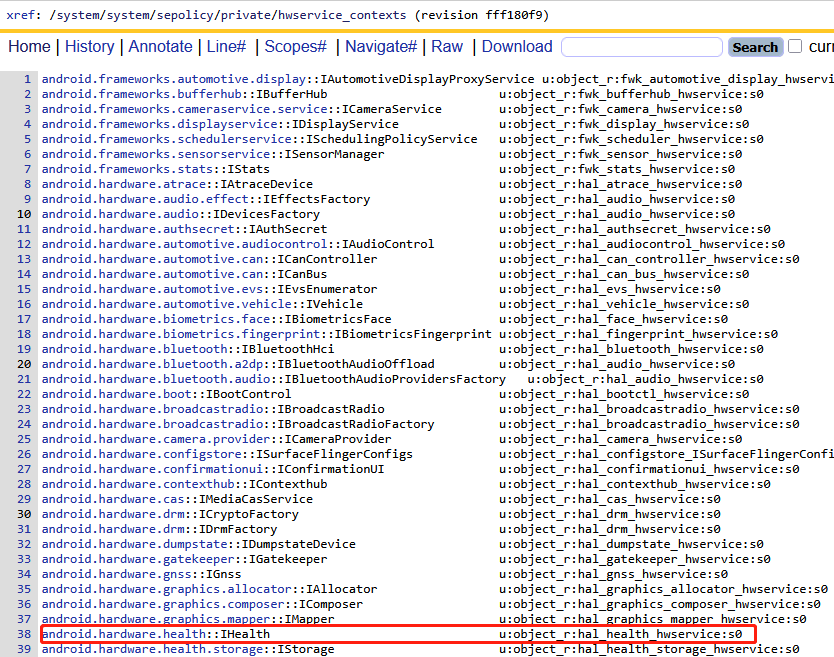
文件hwservice_contexts专门针对硬件抽象层里面的HAL接口对象进行安全上下文的配置。
注意是针对HAL接口对象的定义,即xxx.hal文件里面的接口,它是一个对象,不是进程,因此它还是一个客体资源。HIDL接口,包括实例对象,作为一种抽象的客体资源,安全上下文配置如下:通常以hal_xxx_hwservice的格式进行命名
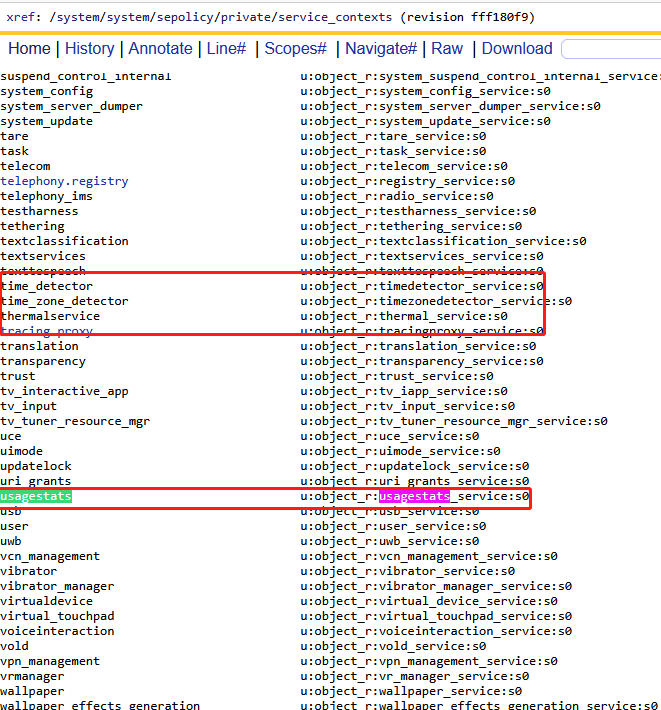
3)service_contexts:AIDL接口的SContext
文件service_contexts专门针对aidl接口进行描述,因此它也是一种抽象的客体资源。同上文的hwservice_contexts一致,service_contexts里面也定义差不多类似的结构的服务。
A. 通过AIDL实现HAL层服务
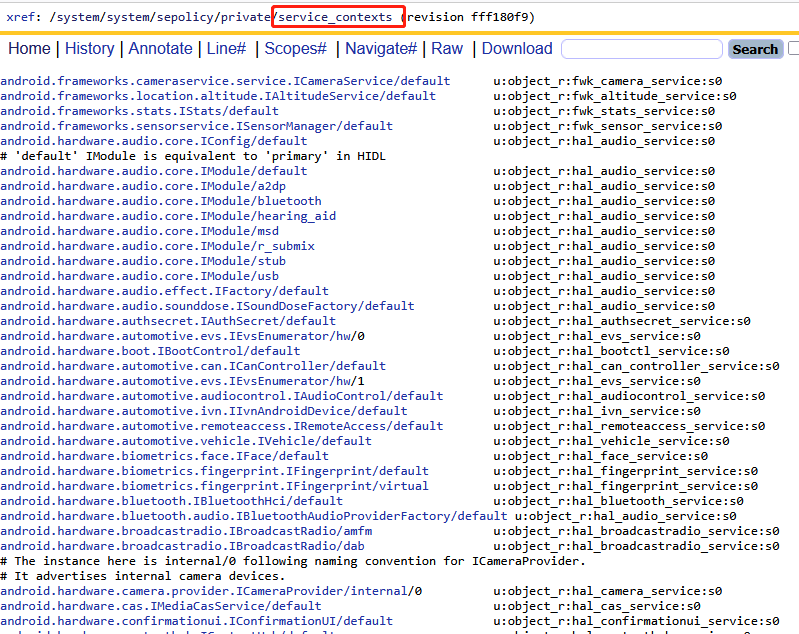
值得区分的是,它们不是HIDL接口,它们是针对HAL服务的最新AIDL方式实现。针对这块可以参考:https://source.android.com/docs/core/architecture/aidl/aidl-hals?hl=zh-cn

B. 通过AIDL实现FW或SystemServer层服务
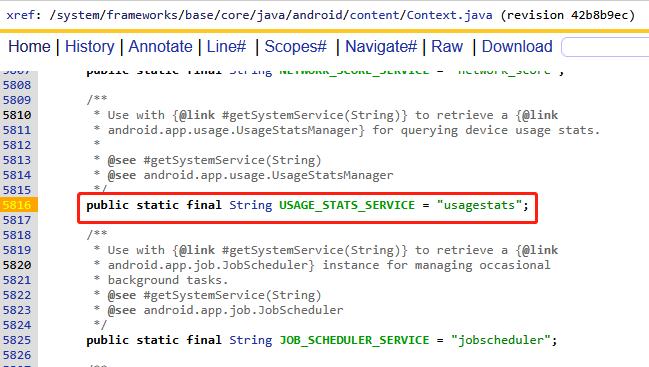
这些服务是systemserver里面定义的一些服务,如上usagestats在Context.java里面进行定义,作为系统级服务被systemserver启动。相关详情参考:Android Framework 之 SystemServer进程_bpkeyattestationapplicationidprovider-CSDN博客
4)property_contexts:属性的SContext
文件property_contexts针对属性相关的scontext配置,同意属性也是属于客体资源,这里针对一些常见的属性安全配置进行说明:
//aosp/system/sepolicy/private/property_contexts
init.svc.odm.           u:object_r:vendor_default_prop:s0
init.svc.vendor.        u:object_r:vendor_default_prop:s0
ro.hardware.            u:object_r:vendor_default_prop:s0
ro.odm.                 u:object_r:vendor_default_prop:s0
ro.vendor.              u:object_r:vendor_default_prop:s0
ro.vendor_dlkm.         u:object_r:vendor_default_prop:s0
ro.odm_dlkm.            u:object_r:vendor_default_prop:s0
odm.                    u:object_r:vendor_default_prop:s0
persist.odm.            u:object_r:vendor_default_prop:s0
persist.vendor.         u:object_r:vendor_default_prop:s0
vendor.                 u:object_r:vendor_default_prop:s0
net.                    u:object_r:system_prop:s0    #以net.开头的属性
dev.                    u:object_r:system_prop:s0    #以dev.开头的属性
ro.runtime.             u:object_r:system_prop:s0
hw.                     u:object_r:system_prop:s0    #以hw.开头的属性
ro.hw.                  u:object_r:system_prop:s0
sys.                    u:object_r:system_prop:s0    #以sys.开头的属性
sys.powerctl            u:object_r:powerctl_prop:s0  #以sys.powerctl开头的属性
service.                u:object_r:system_prop:s0    #以service.开头的属性,通常为服务
debug.                  u:object_r:debug_prop:s0
debug.db.               u:object_r:debuggerd_prop:s0
dumpstate.              u:object_r:dumpstate_prop:s0
log.                    u:object_r:log_prop:s0
log.tag                 u:object_r:log_tag_prop:s0
log.tag.WifiHAL         u:object_r:wifi_log_prop:s0
service.adb.root        u:object_r:shell_prop:s0
persist.adb.wifi.       u:object_r:adbd_prop:s0
persist.audio.          u:object_r:audio_prop:s0
persist.bluetooth.      u:object_r:bluetooth_prop:s0
persist.nfc.            u:object_r:nfc_prop:s0
persist.sys.            u:object_r:system_prop:s0
persist.sys.safemode    u:object_r:safemode_prop:s0
persist.sys.theme       u:object_r:theme_prop:s0
persist.service.        u:object_r:system_prop:s0
persist.security.       u:object_r:system_prop:s0
ro.boot.bootreason      u:object_r:bootloader_boot_reason_prop:s0
persist.sys.boot.reason u:object_r:last_boot_reason_prop:s0
sys.boot.reason         u:object_r:system_boot_reason_prop:s0
sys.boot.reason.last    u:object_r:last_boot_reason_prop:s0
pm.                     u:object_r:pm_prop:s0
sys.lmk.                u:object_r:system_lmk_prop:s0
sys.trace.              u:object_r:system_trace_prop:s0
vold.                   u:object_r:vold_prop:s0
# ctl properties
ctl.bootanim            u:object_r:ctl_bootanim_prop:s0
ctl.dumpstate           u:object_r:ctl_dumpstate_prop:s0
ctl.fuse_               u:object_r:ctl_fuse_prop:s0
ctl.mdnsd               u:object_r:ctl_mdnsd_prop:s0
ctl.ril-daemon          u:object_r:ctl_rildaemon_prop:s0
ctl.bugreport           u:object_r:ctl_bugreport_prop:s0
ctl.console             u:object_r:ctl_console_prop:s0
ctl.                    u:object_r:ctl_default_prop:s0
hwservicemanager.       u:object_r:hwservicemanager_prop:s0
3、主体进程SContexts的配置
前文介绍了客体资源的安全上下文,这里介绍一下主体进程的安全上下文,可以通过adb shell ps -A -Z命令获取,参考前文
1)native进程SContexts的配置
2)APP应用SContexts的配置
app应用进程的安全上下文配置和其他进程不一样,因为系统有一套机制,根据这套机制自动去给应用进程赋予安全上下文的标签,常见应用的安全上下文如下:
u:r:platform_app:s0:c512,c768  u0_a170       2748   989   18481688 177400 do_epoll_wait       0 S com.android.systemui        #系统默认
u:r:system_app:s0              system        9428   989   16935584 131484 do_epoll_wait       0 S com.android.settings
u:r:priv_app:s0:c512,c768      u0_a49        3597   989   16507812  30424 do_epoll_wait       0 S com.google.android.euicc    #普通google应用
u:r:untrusted_app:s0:c129,c256,c512,c768 u0_a129 21462 989 17029492 26020 do_epoll_wait       0 S com.google.android.apps.photos
u:r:gmscore_app:s0:c512,c768   u0_a116      22907   989   17090272 168424 do_epoll_wait       0 S com.google.android.gms	  #google.gms应用
u:r:gmscore_app:s0:c512,c768   u0_a116       3211   989   17369680 214892 do_epoll_wait       0 S com.google.android.gms.persistent
u:r:ascom_privileged_app:s0:c181,c256,c512,c768 u0_a181 3203 989 16691196 85704 do_epoll_wait 0 S com.ascom.myco.launcher2    #三方自定义应用,自己指定
u:r:ascom_privileged_app:s0:c158,c256,c512,c768 u0_a158 6075 989 16431456 51588 do_epoll_wait 0 S com.ascom.myco.oemconfig
u:r:platform_app:s0:c512,c768  u0_a164       6120   989   16400420  38728 do_epoll_wait       0 S com.ascom.myco.phonesip      #其他三方应用
A. seapp_contexts:基本语法
app应用的安全策略基本上都是seapp_contexts来进行指定,要读懂这个文件我们先来看看这个文件的语法和详细解释:
首先:说明了seapp_contexts中的每一行都是来定义app进程的安全上下文
接下来针对每一行的配置做了一个系统的解释,先介绍了输入项,然后介绍了输出项
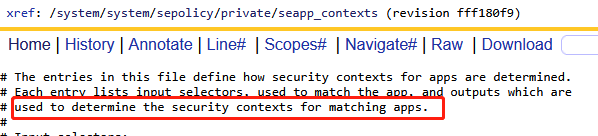
然后:对输出项的参数作了系统性的解释,即输出项的参数用来指定对应的安全上下文
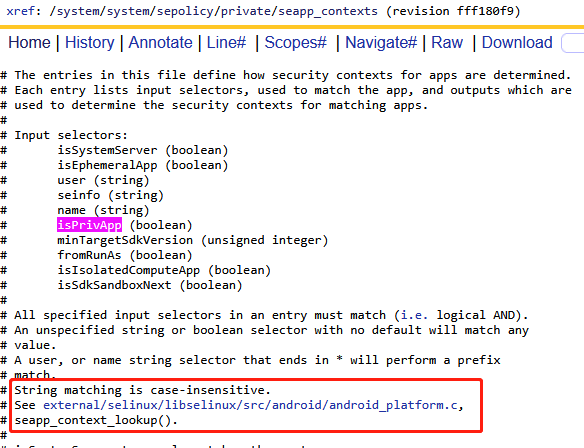
这些输入参数会在seapp_context_lookup方法中进行匹配,匹配成功的应用进程即会输出对应的安全上下文。
最后:对输出项的参数作了系统性的解释,即输出项的参数用来指定对应的安全上下文

这里我们重点针对domain和type来进行介绍,没错,他们就是进程主体的scontext和type
如何调试?
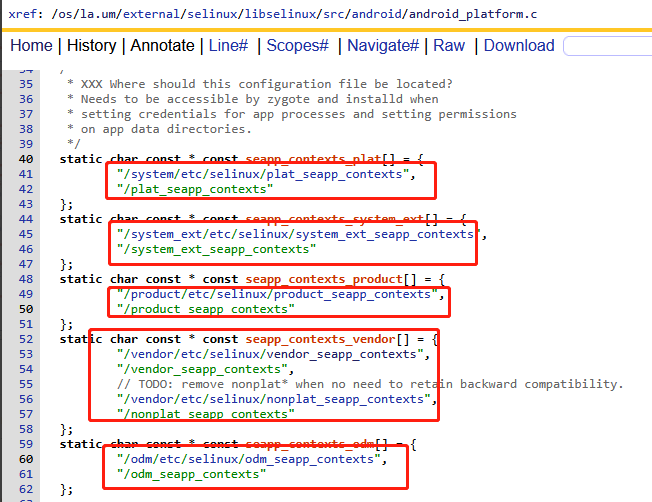
上面的注释已经介绍了seapp_contexts的输入和输出规则,最终由android_platform.c里面的代码中实现,阅读这个文件的代码可以发现关于seapp_contexts的解析和配置主要在android设备的/system|system_ext|product|vendor|odm/etc/selinu/xxx_seapp_contexts文件中:
下面依次对不同的输入参数作一些系统性的介绍:
B. seinfo:签名
//system/sepolicy/private/mac_permissions.xml
<?xml version="1.0" encoding="utf-8"?>
<policy>
<!--
    * A signature is a hex encoded X.509 certificate or a tag defined in
      keys.conf and is required for each signer tag. The signature can
      either appear as a set of attached cert child tags or as an attribute.
    * A signer tag must contain a seinfo tag XOR multiple package stanzas.
    * Each signer/package tag is allowed to contain one seinfo tag. This tag
      represents additional info that each app can use in setting a SELinux security
      context on the eventual process as well as the apps data directory.
    * seinfo assignments are made according to the following rules:
      - Stanzas with package name refinements will be checked first.
      - Stanzas w/o package name refinements will be checked second.
      - The "default" seinfo label is automatically applied.
    * valid stanzas can take one of the following forms:
     // multiple certs protecting explicitly named app (all certs must match)
     <signer>
       <cert signature="@PLATFORM1"/>
       <cert signature="@PLATFORM2"/>
       <package name="com.android.foo">
         <seinfo value="bar" />
       </package>
     </signer>
-->
    <!-- Platform dev key in AOSP -->
    <signer signature="@PLATFORM" >
      <seinfo value="platform" />
    </signer>
    <!-- Sdk Sandbox key -->
    <signer signature="@SDK_SANDBOX" >
      <seinfo value="sdk_sandbox" />
    </signer>
    <!-- Media key in AOSP -->
    <signer signature="@MEDIA" >
      <seinfo value="media" />
    </signer>
    <signer signature="@NETWORK_STACK" >
      <seinfo value="network_stack" />
    </signer>
</policy>
//system/sepolicy/private/seapp_contexts
# seinfo= matches aginst the seinfo tag for the app, determined from mac_permissions.xml files.
# The ':' character is reserved and may not be used in seinfo.
user=_app seinfo=app_zygote domain=app_zygote levelFrom=user
user=_app seinfo=media domain=mediaprovider type=app_data_file levelFrom=user
user=_app seinfo=platform domain=platform_app type=app_data_file levelFrom=user
user=system seinfo=platform domain=system_app type=system_app_data_file
user=bluetooth seinfo=platform domain=bluetooth type=bluetooth_data_file
关于seinfo的介绍如上,用于匹配签名标签,签名标签的定义是在mac_permissions.xml文件中,改文件中明确的就定义了如何针对单独的应用进行签名,然后默认提供了Platform、Sdk Sandbox 、Media 、Net等几种应用签名方式集成的时候的seinfo的定义。例如上面的三条策略翻译过来如下:
- user=_app的普通应用,seinfo=app_zygote使用app_zygote应用签名,能够匹配的应用指定SContext为app_zygote
- user=_app的普通应用,seinfo=media使用media应用签名,能够匹配的应用指定SContext为mediaprovider
- user=_app的普通应用,seinfo=platform使用platform应用签名,能够匹配的应用指定SContext为platform_app
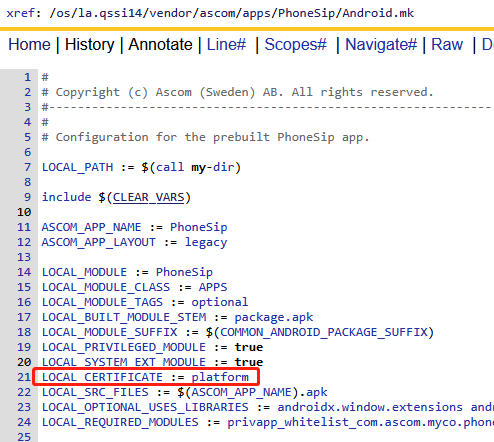
例如如下SContext为platform_app的三方应用和高通应用、systemui,是因为他们的集成签名配置LOCAL_CERTIFICATE := platform

C. user:sharedUserId
//system/sepolicy/private/seapp_contexts
# user=_app will match any regular app process.
# user=_isolated will match any isolated service process.
# user=_sdksandbox will match sdk sandbox process for an app.
# Other values of user are matched against the name associated with the process UID.
user=system seinfo=platform domain=system_app type=system_app_data_file
user=bluetooth seinfo=platform domain=bluetooth type=bluetooth_data_file
user=network_stack seinfo=network_stack domain=network_stack type=radio_data_file
user=nfc seinfo=platform domain=nfc type=nfc_data_file
user=secure_element seinfo=platform domain=secure_element levelFrom=all
user=radio seinfo=platform domain=radio type=radio_data_file
user=shared_relro domain=shared_relro levelFrom=all
user=shell seinfo=platform domain=shell name=com.android.shell type=shell_data_file
user=_sdksandbox domain=sdk_sandbox_34 type=sdk_sandbox_data_file levelFrom=all
user=_sdksandbox isSdkSandboxNext=true domain=sdk_sandbox_next type=sdk_sandbox_data_file levelFrom=all关于user的介绍如上,user=_app能够匹配所有的应用进程,user=system能够匹配应用xml中配置为android:sharedUserId="android.uid.system"的应用,同样user=bluetooth能够匹配应用xml中配置为android:sharedUserId="android.uid.bluetooth"的应用

如上为什么systemui和settings应用在集成系统的时候都使用了平台签名,为什么他们的SContext分别为platform_app和system_app呢?原来是因为他们的sharedUserId配置不一致,分别是android.uid.systemui和android.uid.system,因此user=system seinfo=platform domain=system_app type=system_app_data_file对settings应用匹配成功,蒋settings的SContext设置为system_app
//AOSP/frameworks/base/packages/SystemUI/Android.bp
android_app {
    name: "SystemUI",
    platform_apis: true,
    system_ext_specific: true,
    certificate: "platform",
    privileged: true,
}
//AOSP/frameworks/base/packages/SystemUI/AndroidManifest.xml
<manifest xmlns:android="http://schemas.android.com/apk/res/android"
        xmlns:androidprv="http://schemas.android.com/apk/prv/res/android"
        package="com.android.systemui"
        android:sharedUserId="android.uid.systemui"
        xmlns:tools="http://schemas.android.com/tools"
        coreApp="true">
//AOSP/packages/apps/Settings/Android.bp
android_app {
    name: "Settings",
    platform_apis: true,
    certificate: "platform",
    system_ext_specific: true,
    privileged: true,
}
//AOSP/packages/apps/Settings/AndroidManifest.xml
<manifest xmlns:android="http://schemas.android.com/apk/res/android"
          xmlns:tools="http://schemas.android.com/tools"
          package="com.android.settings"
          coreApp="true"
          android:sharedUserId="android.uid.system">
D. isSystemServer
//system/sepolicy/private/seapp_contexts
# isSystemServer=true only matches the system server.
# An unspecified isSystemServer defaults to false.
# only the system server can be in system_server domain
# only the system server can be assigned the system_server domains
neverallow isSystemServer=false domain=system_server
neverallow isSystemServer=false domain=system_server_startup
neverallow isSystemServer="" domain=system_server
neverallow isSystemServer="" domain=system_server_startup
isSystemServer=true domain=system_server_startup
关于isSystemServer的解释如上,它是一个bool型,根据策略得到如下两个信息:
- 只有system server进程才能使用这个域,isSystemServer为true的应用进程的SContext被配置为system_server_startup
- 其他应用进程isSystemServer这个参数都应该是false,且不允许isSystemServer=false和isSystemServer=""的应用进程的SContext为system_server
- 只有system_server进程的SContext是system_server,但是我并没有找到isSystemServer=true相关源码

E. name & isPrivApp & minTargetSdkVersion
# name= matches against the package name of the app.
# isPrivApp=true will only match for applications preinstalled in /system/priv-app.
# minTargetSdkVersion will match applications with a targetSdkVersion greater than or equal to the specified value. If unspecified, it has a default value of 0.
# any non priv-app with a non-known uid with a specified name should have a specified seinfo
neverallow user=_app isPrivApp=false name=.* seinfo=""
neverallow user=_app isPrivApp=false name=.* seinfo=default
user=_app isPrivApp=true name=com.google.android.gms domain=gmscore_app type=privapp_data_file levelFrom=user
user=_app isPrivApp=true name=com.google.android.gms.* domain=gmscore_app type=privapp_data_file levelFrom=user
user=_app isPrivApp=true name=com.google.android.gms:* domain=gmscore_app type=privapp_data_file levelFrom=user
user=_app minTargetSdkVersion=34 domain=untrusted_app type=app_data_file levelFrom=all
user=_app minTargetSdkVersion=32 domain=untrusted_app_32 type=app_data_file levelFrom=all   #兼容SDK为32的应用
如上注释,name用来匹配包名,可以用*作为通配符;isPrivApp=true用来匹配安装在/system/priv-app的应用,这个字段应该默认为false;minTargetSdkVersion用来匹配大于等于对应sdk的应用
4、access_vectors:访问权限
文件acces_vectors中定义了一系列操作,例如read和write等操作,通过这一些列操作,构建了整个selinux的行为,例如是否允许读取read某个文件等
A.file & socket权限
# Define a common prefix for file access vectors.
common file{
    ioctl               #控制设备的 I/O 操作(如调整终端参数),典型场景:终端管理工具(如 stty)
    read/write          #读取或修改文件内容,典型场景:文本编辑器读写文件
    create/unlink       #创建或删除文件,典型场景:日志轮转工具(如 logrotate)
    getattr/setattr     #查看或修改文件元数据(如权限、时间戳),典型场景:文件管理工具(如 chmod、touch)
    lock
    relabelfrom/relabelto   #修改文件安全上下文(SELinux 标签)的源和目标约束,典型场景:动态调整文件访问策略(如安全策略更新工具)
    append
    map
    link
    rename
    execute             #执行文件(二进制或脚本),典型场景:用户运行可执行程序
    quotaon
    mounton             #在文件系统对象上挂载新文件系统,典型场景:用户挂载 USB 存储设备
    audit_access
    open
    execmod             #允许修改已加载到内存的可执行文件(如运行时动态库注入),典型场景:调试工具修改进程内存
    watch/watch_mount/watch_sb/watch_with_perm/watch_reads  #监控文件系统事件(如文件修改、挂载点变动),典型场景:文件同步服务(如 inotify 监听)
}
# Define a common prefix for socket access vectors.
common socket{
    ioctl
    read
    write
    create
    getattr
    setattr
    lock
    relabelfrom
    relabelto
    append
    map
    bind/connect        #绑定本地端口或连接远程地址
    listen/accept       #监听端口请求或接受客户端连接
    getopt/setopt       #获取或设置套接字选项
    shutdown            #关闭套接字连接(如主动终止 TCP 会话)
    recvfrom/sendto     #发送或接收网络数据
    name_bind           #绑定特定端口(通常用于限制低端口号访问
}
B. Linux IPC进程间通信权限
# Define a common prefix for ipc access vectors.
common ipc{
    create          #创建新的 IPC 对象(如共享内存段、消息队列),进程初始化时分配 IPC 资源
    destroy         #删除 IPC 对象,释放系统资源,清理不再使用的共享内存或队列
    getattr         #查询 IPC 对象的元数据(如权限、所有者、大小),监控工具检查共享内存状态
    setattr         #修改 IPC 对象的属性(如调整消息队列容量或共享内存权限),动态优化 IPC 资源配置
    read/write      #从 IPC 对象读取或写入数据(如共享内存读写、消息收发),进程间传递实时数据(如音视频流)
    associate       #将进程与现有 IPC 对象绑定(如附加到已创建的共享内存段),多进程协作访问同一块共享内存
    unix_read/unix_write #针对 Unix 域套接字(本地进程间高速通信)的读写权限控制,本地服务间传输敏感数据(如数据库连接凭证)
}
C. Linux Capability核心权限
如下注释,这些cap权限都是linux相关的核心权限,被定义在include/linux/capability.h
common cap {
    # The capabilities are defined in include/linux/capability.h
    # Capabilities >= 32 are defined in the cap2 common. Care should be taken to ensure that these are consistent with. those definitions. (Order matters)
    chown               #基础权限控制类:CAP_CHOWN,允许修改文件的拥有者(UID)和所属组(GID)
    dac_override       #文件系统权限绕过类:CAP_DAC_OVERRIDE,完全绕过文件读写执行权限检查(即使文件权限为 600 也可强制访问)
    dac_read_search     #文件系统权限绕过类:CAP_DAC_READ_SEARCH,绕过目录读/搜索权限限制(如遍历 0700 权限目录)
    fowner              #基础权限控制类:CAP_FOWNER,绕过文件属主匹配检查(如 chmod、utime),允许非属主进程操作文件
    fsetid
    kill                #进程控制类:CAP_KILL,向任意进程发送信号(如 SIGKILL 强制终止进程)
    setgid           #基础权限控制类:CAP_SETGID,允许修改进程的组身份(GID)
    setuid           #基础权限控制类:CAP_SETUID,允许修改进程的用户身份(UID)
    setpcap          #基础权限控制类:CAP_SETPCAP,控制其他进程的能力集(如通过 prctl 修改子进程能力)
    linux_immutable     #文件系统权限绕过类:CAP_LINUX_IMMUTABLE,允许修改不可变文件(chattr +i 设置的文件)的属性
    net_bind_service
    net_broadcast
    net_admin           #网络控制类:CAP_NET_ADMIN,网络接口配置(IP 地址修改、路由表操作)、防火墙规则管理
    net_raw             #网络控制类:CAP_NET_RAW,创建原始套接字(用于实现 ping、tcpdump 等工具)
    ipc_lock
    ipc_owner
    sys_module          #系统管理与内核操作类:CAP_SYS_MODULE,加载或卸载内核模块(需谨慎授予,存在安全风险)
    sys_rawio           #系统管理与内核操作类:CAP_SYS_RAWIO,直接访问硬件端口(如 /dev/mem、/dev/port 操作)
    sys_chroot
    sys_ptrace          #进程控制类:CAP_SYS_PTRACE,调试其他进程(如 ptrace 系统调用)
    sys_pacct
    sys_admin           #系统管理与内核操作类:CAP_SYS_ADMIN,广义系统管理权限(挂载文件系统、修改主机名、控制交换空间等)
    sys_boot            #系统管理与内核操作类:CAP_SYS_BOOT,执行系统重启(reboot)或内核热加载(kexec_load)
    sys_nice            #进程控制类:CAP_SYS_NICE,调整进程优先级(nice 值)或调度策略
    sys_resource      #资源控制类:CAP_SYS_RESOURCE,突破资源限制(如 ulimit 设置的进程内存/文件句柄上限
    sys_time           #资源控制类:CAP_SYS_TIME,修改系统时间和硬件时钟
    sys_tty_config
    mknod              #文件系统权限绕过类:CAP_MKNOD,创建特殊设备文件(如 /dev 下的块/字符设备)
    lease
    audit_write         #安全控制类:CAP_AUDIT_WRITE,向内核审计日志写入记录(用于安全监控)
    audit_control       #安全控制类:CAP_AUDIT_CONTROL,配置审计规则(如启用/禁用审计子系统)
    setfcap             #安全控制类:CAP_SETFCAP,为文件设置能力属性(通过 setcap 命令)
}
common cap2{
    mac_override       #安全控制类:CAP_MAC_OVERRIDE,覆盖强制访问控制(MAC)策略(如 SELinux 标签限制),允许进程绕过安全标签检查访问资源
    mac_admin           #安全控制类:CAP_MAC_ADMIN,配置或修改 MAC 策略(如 SELinux 规则动态加载),需高度特权
    syslog              #内核硬件控制类:CAP_SYSLOG,读取内核日志(dmesg)或修改内核打印级别(需配合 /proc/sys/kernel/printk 接口)
    wake_alarm          #内核硬件控制类:CAP_WAKE_ALARM,设置定时器唤醒系统(如 RTC 时钟唤醒休眠状态的主机)
    block_suspend      #内核硬件控制类:CAP_BLOCK_SUSPEND,阻止系统休眠或挂起(如媒体播放器需保持屏幕常亮)
    audit_read          #安全控制类:CAP_AUDIT_READ,读取审计日志(auditd 记录的安全事件),用于安全监控工具
    perfmon             #安全控制类:CAP_PERFMON,访问性能监控接口(如 /sys/kernel/debug/tracing),支持 perf 等工具进行内核性能分析
}
D. Process进程控制权限
# Define the access vector interpretation for process-related objects
class process{
    fork
    transition
    sigchld # commonly granted from child to parent
    sigkill # cannot be caught or ignored
    sigstop # cannot be caught or ignored
    signull # for kill(pid, 0)
    signal  # all other signals
    ptrace
    getsched
    setsched
    getsession
    getpgid
    setpgid
    getcap
    setcap
    share
    getattr
    setexec
    setfscreate
    noatsecure
    siginh
    setrlimit
    rlimitinh
    dyntransition
    setcurrent
    execmem
    execstack
    execheap
    setkeycreate
    setsockcreate
    getrlimit
}
class process2{
    nnp_transition
    nosuid_transition
}
E. node & property & service_manager & binder
class node{
    recvfrom
    sendto
}
class property_service{
    set
}
class service_manager{
    add
    find
    list
}
class hwservice_manager{
    add
    find
    list
}
class binder{
    impersonate
    call
    set_context_mgr
    transfer
}
5、xxx.te文件策略规则配置
我们可以使用allow语句来对上文提到过的主体SContext进程赋予一系列权限操作,被赋予的就是客体SContext,这些权限操作其实就是access_vectors中定义的这些。
我们可以通过audit2allow工具根据日志来自动生成这些allow语句,通常一条allow语句对应一条权限策略。
这些allow语句通常被定义在xxx.te文件中,通常一个进程对应一个xxx.te(针对native层是如此,也存在一个te对应一类进程),一个xxx.te文件中可以配置若干条allow权限,当然也可以配置一些neverallow语句。
aosp对大部分的进程都定义了te策略,除此之外,还对常见的一些进程SContext主体,定义了一些默认策略,同时还是要nerverallow限制相关type或者属性的进程不具有一些策略。
接着介绍一下后续常用到的一些te文件
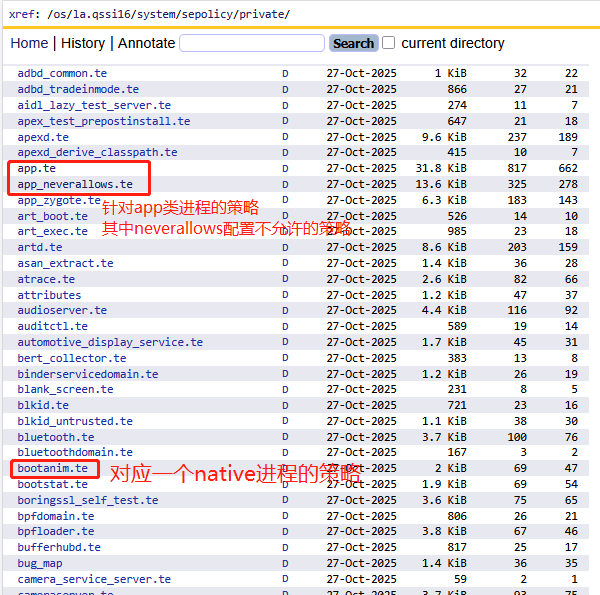
1)xxxdomain.te进程策略
在la.qssi16/system/sepolicy/private/目录下可以看到很多xxxdomain.te文件,其实他们对应不同domain属性的相应的配置策略,例如domain.te就是描述具有domain属性的进程的权限,bluetoothdomain.te就是描述具有bluetoothdomain属性的进程的权限。
当然domain是任何一个进程都必现拥有的一个父类属性。它与他的子类区分如下:
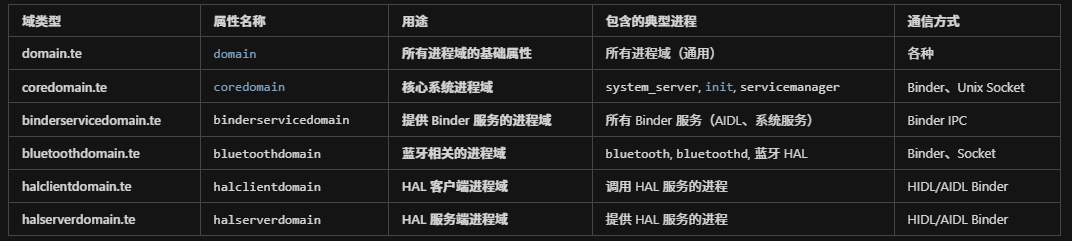
A.domain.te
- 作用:所有进程域的基础属性
- 用途:定义所有域的通用权限规则
- 示例:hal_googlekey_default, system_app, dumpstate 等
项目中的使用:
# every one can read sysfs_devinfo
r_dir_file( {domain -isolated_app_all }, sysfs_devinfo);
示例:hal_googlekey_default, system_app, dumpstate 等
B.coredomain.te
- 作用:核心系统进程域
- 用途:定义核心系统进程的通用权限规则
- 典型:system_server, init, servicemanager, surfaceflinger等进程都属于此类
- 特点:通常是系统级进程,需要较高权限
C.binderservicedomain.te
- 作用:提供 Binder 服务的进程域
- 用途:定义所有 Binder 服务的通用权限规则(通过 Binder IPC 提供服务的进程)
- 典型:系统服务(system_server, servicemanager)进程或者使用AIDL的应用进程
- 项目中的体现:
allow system_app hal_fingerprint_default:binder call;
该行允许 system_app 通过 Binder 调用 hal_fingerprint_default
D.bluetoothdomain.te
- 作用:蓝牙相关的进程域
- 用途:定义蓝牙相关进程的通用权限规则
- 典型:bluetooth, bluetoothd, hal_bluetooth等进程
- 特点:专门用于蓝牙功能的隔离和权限管理
E.halclientdomain.te
- 作用:HAL 客户端进程域(调用 HAL 服务的进程)
- 用途:定义 HAL 客户端的通用权限规则(允许这些进程调用 HAL 服务)
- 典型进程:system_server进程需要调用各种hal服务,因此fw层的system_server进程通常又可以看出bsp hal服务的客户端
- 项目中的实际使用:
hal_client_domain(dumpstate, vendor_hal_diaghal)
hal_client_domain(dumpstate, hal_allocator)
含义:dumpstate 是 HAL 客户端,可以调用 vendor_hal_diaghal 和 hal_allocator 这两个 HAL 服务
F.halserverdomain.te
- 作用:HAL 服务端进程域(提供 HAL 服务的进程)
- 用途:定义 HAL 服务端的通用权限规则(允许这些进程提供 HAL 服务)
- 典型:蓝牙hal服务进程,指纹hal服务进程
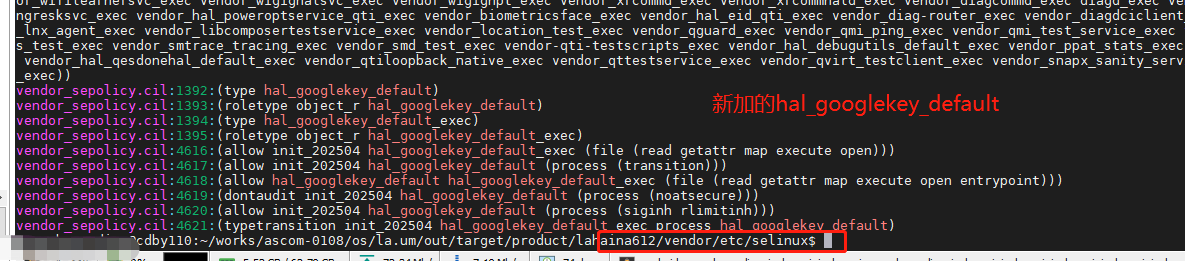
- 项目中的实际使用:如下为自定义的hal服务进程,在hal_googlekey_default.te如下配置
type hal_googlekey_default, domain;
type hal_googlekey_default_exec, exec_type, vendor_file_type, file_type;
init_daemon_domain(hal_googlekey_default)# Modified by pengcheng.ding at 20260110
# Add hwbinder support for HIDL service communication
hwbinder_use(hal_googlekey_default)# Modified by pengcheng.ding at 20260110
# Allow registering and finding hwservice for IGoogleKey interface
allow hal_googlekey_default hal_googlekey_hwservice:hwservice_manager { add };
allow hal_googlekey_default hal_googlekey_hwservice:hwservice_manager { find };
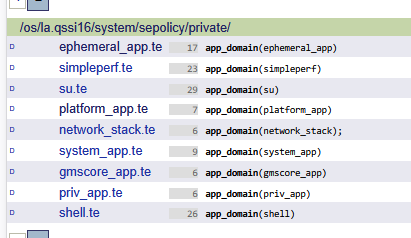
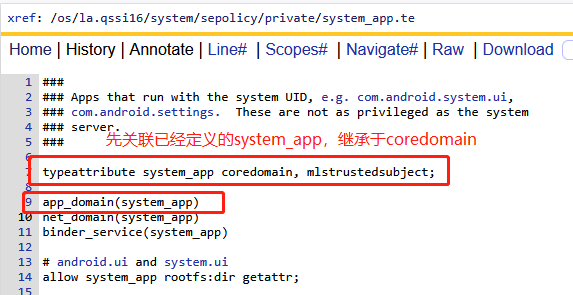
2)app.te应用进程策略
在la.qssi16/system/sepolicy/private/目录下很多te文件用来描述用户进程的策略。app.te和app_neverallows.te用来指定所有应用进程的规则,当然除了app.te之外还有其他xxx_app.te。
A.app与domain的关系
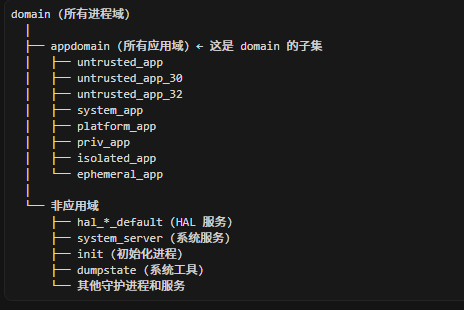
B.app_domain的分类
在理解这个之前,我们先看看sepolicy对应用进程如何进行分类:
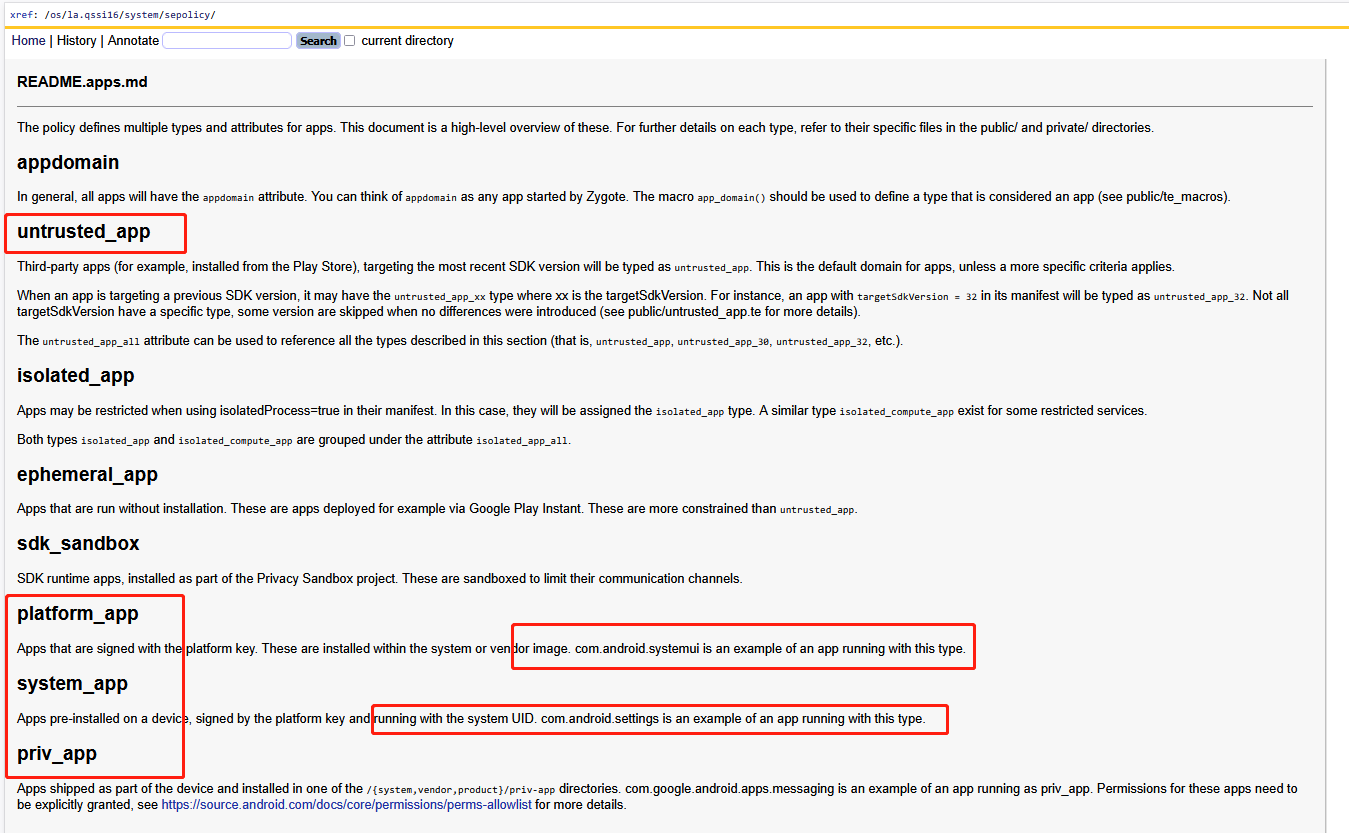
总结如下:
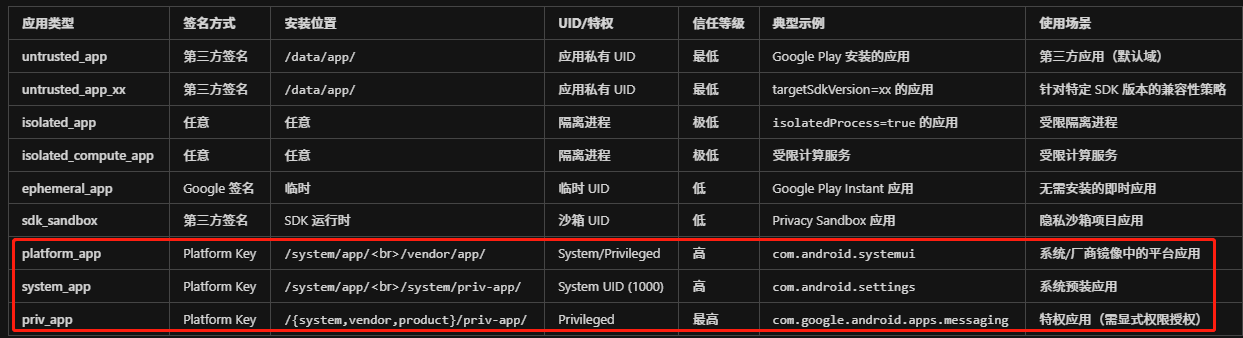
其中安全等级排序(从高到低)排名如下:
priv_app > system_app > platform_app > untrusted_app > sdk_sandbox ≈ ephemeral_app > isolated_app
因此他们对应如下te文件:
- app.te
- priv_app.te
- system_app.te
- platform_app.te
- untrusted_app.te
- sdk_sandbox_all.te
- ephemeral_app.te
- isolated_app.te
C.app_domain的作用
针对app.te比较关键的selinux语法函数是app_domain,他用来关联当前te文件定义的策略针对哪一类属性的进程,如下system_app.te最开始使用了app_domain(system_app)来关联这一类的进程域,因此后续的配置才针对具有system_app属性的应用进程生效。
3)IXXX接口对象注册策略
A.service.te
继续查看la.qssi16/system/sepolicy/目录下关于service.te配置

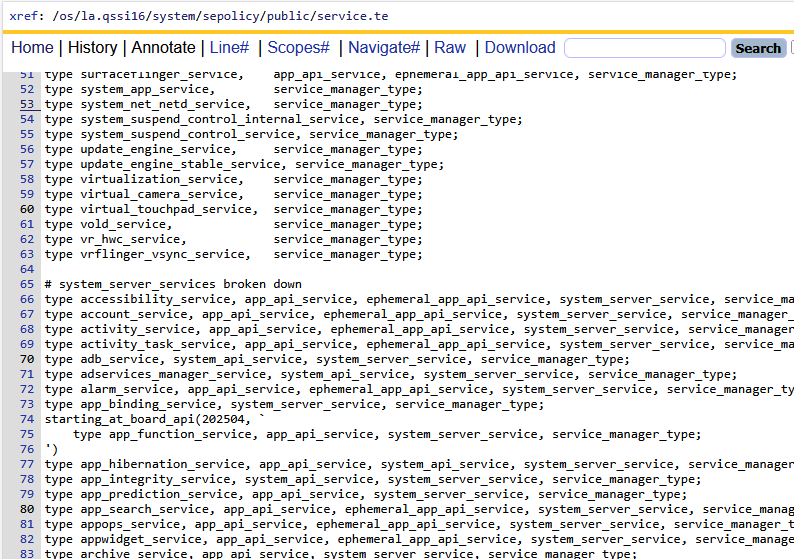
貌似都对servicemanager的属性继承,用白话文讲:只有继承了service_manager_type的服务接口对象,才能被servicemanager进程进行注册。
可以得出结论,service.te对FW中大多数SystemService服务对象,进行了客体SContext声明,这样才能通过publishBinderService方法向servicemanager进程发布系统服务。
中间有不理解的可以参考https://blog.csdn.net/qq_27672101/article/details/140658955
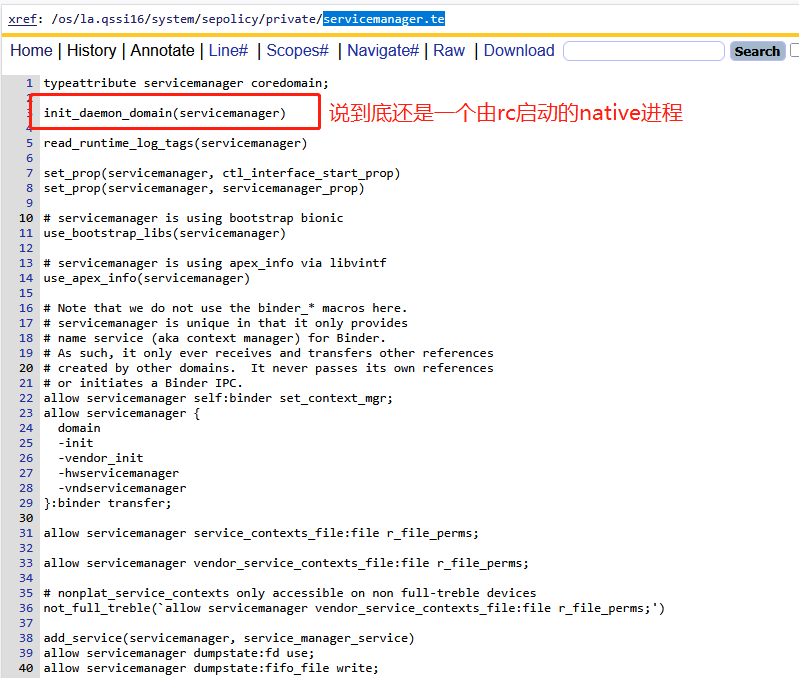
B.servicemanager.te

注意区分如上的service.te,该文件配置servicemanager进程的权限策略,servicemanager就是用来管理系统服务的一个超级进程,说到底还是init进程拉起来的一个进程,与service.te的作用相差太多。
C.hwservice.te
继续查看la.qssi16/system/sepolicy/private/目录下关于hwservice.te的配置
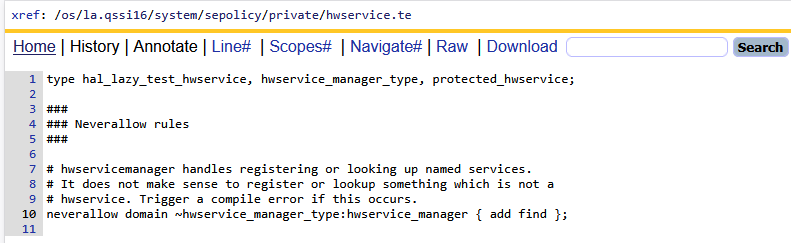
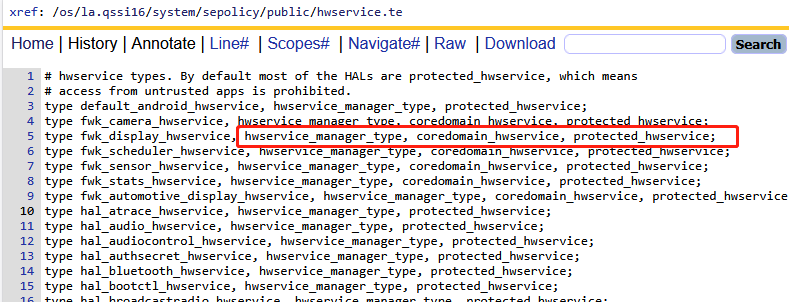
貌似都对hwservicemanager的属性继承,用白话文讲:只有继承了hwservice_manager_type的服务接口对象,才能被hwservicemanager进程进行注册。
可以得出结论,hwservice.te对大多数hal service进程中用到的IXXX接口对象,进行客体SContext声明,这样才能通过类似如下方式向hwservicemanager进程发布hal服务:
D.hwservicemanager.te
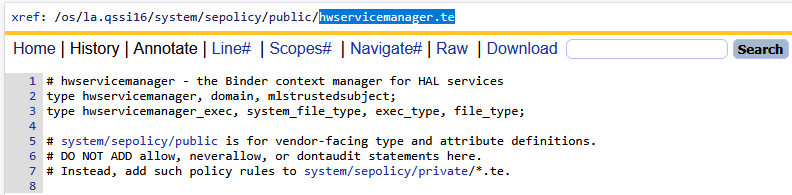
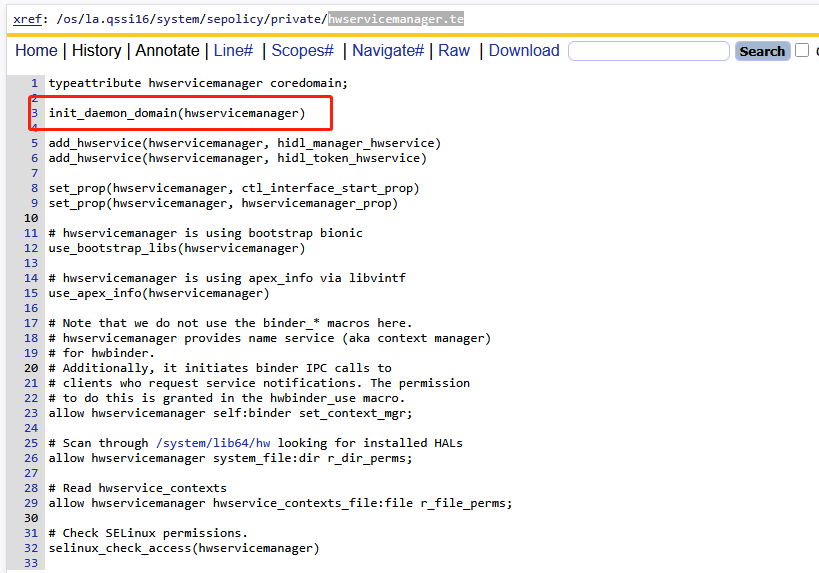
注意区分如上的hwservice.te,该文件配置hwservicemanager进程的权限策略,hwservicemanager就是用来管理hal服务的一个超级进程,说到底还是init进程拉起来的一个进程,与hwservice.te的作用相差太多。
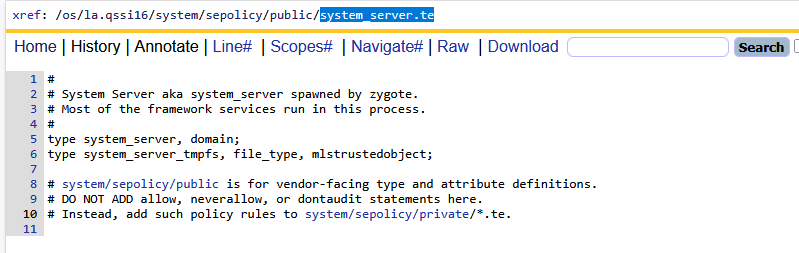
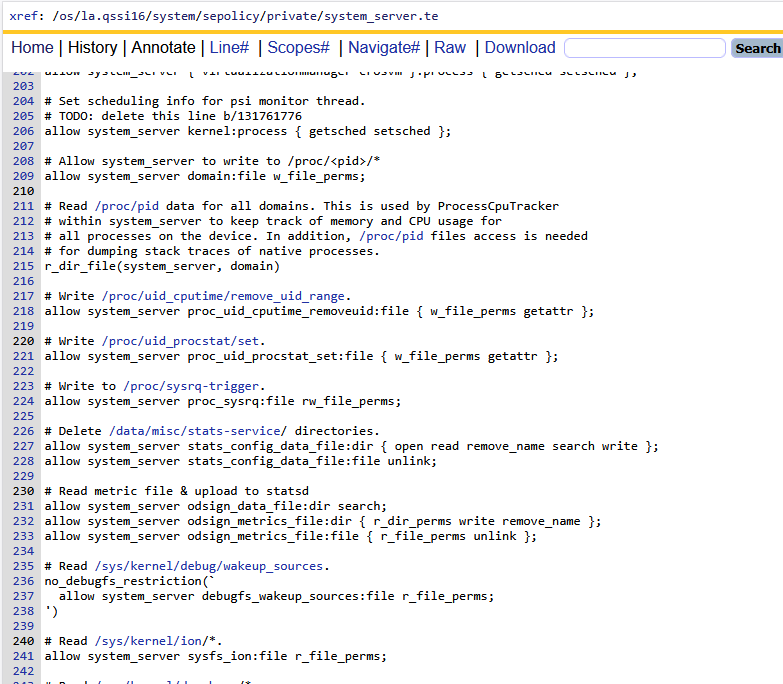
E.system_server.te
如上,该文件就是针对系统核心进程system_server的权限策略配置,这里不是指的一类进程,指的就是由zygote进程启动的system_server进程。
4)file.te & property.te
四、常用场景
通过第一章我们了解了selinux权限的基本概念
通过第二章我们掌握了如何调试selinux权限问题
通过第三章我们貌似掌握了一些基本语法,知道如何进行selinux权限配置,但还是没有一个标准的指南,这里我从几大场景下来梳理一下标准的selinux权限配置指南。主要场景场景涉及:新增一个native c++进程,新增hal service进程,新增fw系统级服务。
1、新增native c++进程selinux配置指南
我这里提到的native c++进程,统指由init进程启动的那些配置在rc里面的c/c++进程,例如bootanim或者surfaceflinger等这些进程。至于如何在系统中新增一个这样的进程,可以详细参考Android Init 系列专题【native进程自定义】。本节主要围绕selinux权限的配置进行说明。
01-02 00:46:48.482 1 1 E init : Could not start service 'bootlogo' as part of class 'hal': File /vendor/bin/bootlogo(labeled "u:object_r:vendor_file:s0") has incorrect label or no domain transition from u:r:init:s0 to another SELinux domain defined. Have you configured your service correctly?https://source.android.com/security/selinux/device-policy#label_new_services_and_address_denials. Note: this error shows up even in permissive mode in order to make auditing denials possible.
1)为什么报has incorrect label or no domain transition?
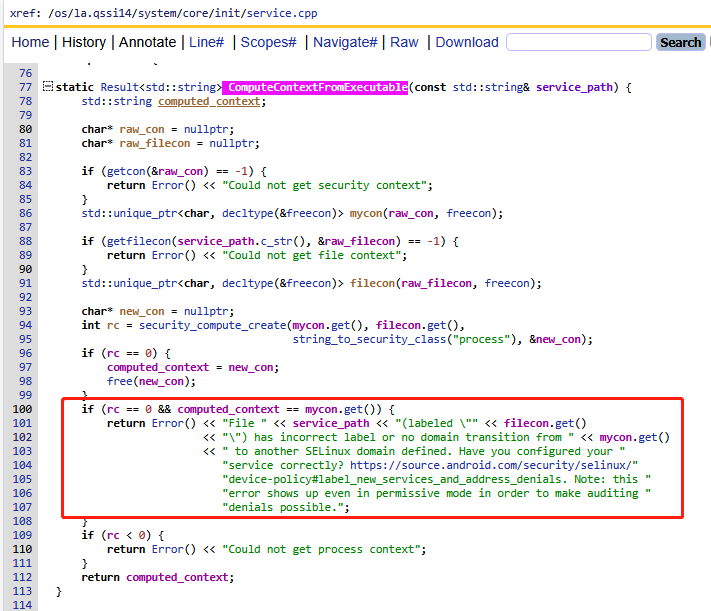
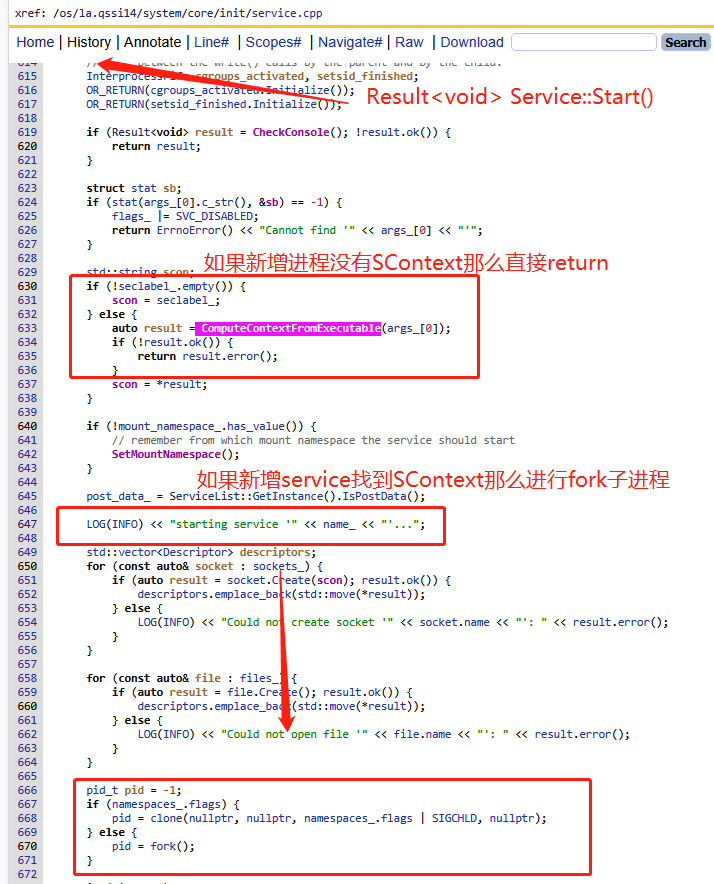
如上init进程里面的代码逻辑,init进程在启动一个Service的时候,其实就是去fork一个子进程,在fork之前做了一系列的检查,其中一个就是查找service对应的安全上下文,就是selinux的SContext,如果没有强制退出进程启动,并且starting service关键日志都不会打印!!!
那么需要如何对rc中配置的新增service,也就是这里说的新增native c++进程进行selinux权限配置呢?那么我们需要先理清楚主体和客体:
- 客体:这里的客体文件必须得是bin文件。即init进程创建新进程,然后exec加载可执行bin文件,这样init才完成了它启动native进程的目的。因此配置客体SContext,就是对可执行bin文件的SContext配置。
- 主体:这里的主体进程必须得是init进程和init创建的子进程。从上面的报错日志可以看出来,init在创建子进程之前为什么要检查rc对应的service进程的域,如果新创建的子进程没有这个域,那么后续子进程的SContext如何管理?因此这里后续会用到一个非常重要的selinux语法函数:init_daemon_domain
按照如上分析,我们可以依次按照如下流程进行配置。
步骤一:可执行文件客体SContext配置
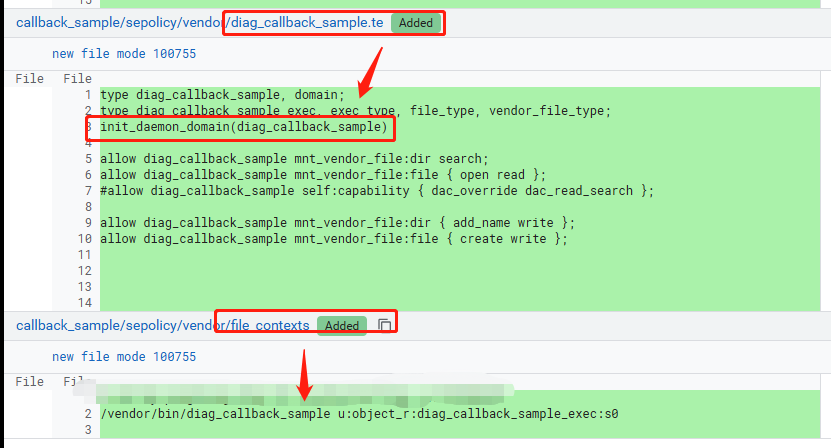
回顾第三章客体资源的SContext配置介绍的file_contexts文件中的内容,是不是恍然大悟, 原来这个file_contexts就是配置所有文件资源相关的客体上下文,这里的可执行bin文件也是一种文件,因此参考bootanimation的配置:
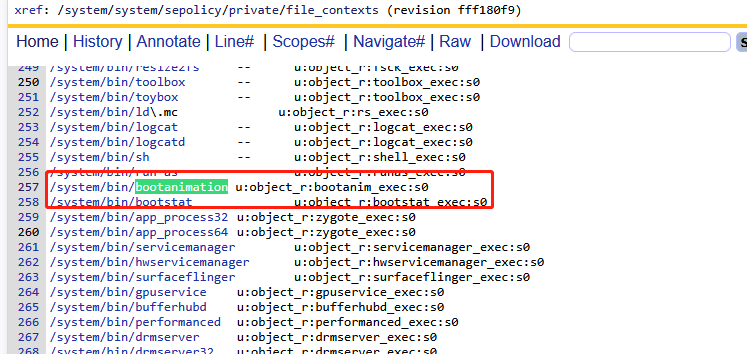
我们可以在此文件中新增如下代码:
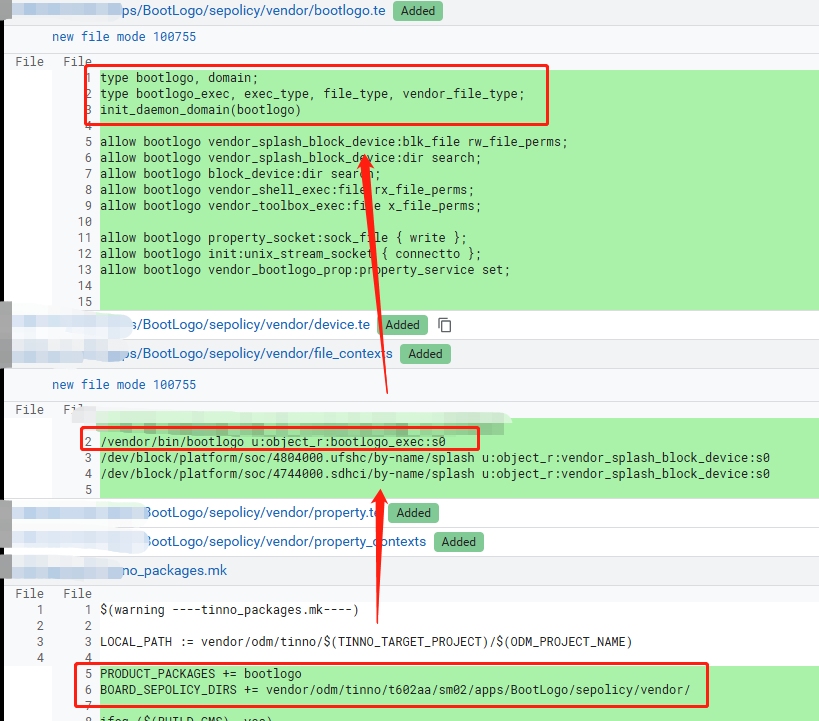
#system分区native进程对应的可执行bin文件配置客体SContext为bootlogo_exec
/system/bin/bootlogo u:object_r:bootlogo_exec:s0
#vendor分区hal service进程对应的可执行bin文件配置客体SContext为hal_googlekey_default_exec
/vendor/bin/hw/vendor\.tinno\.hardware\.googlekey@1\.0-service     u:object_r:hal_googlekey_default_exec:s0
#匹配vendor/bin/hw/xxx或者system/vendor/bin/hw/xxx可执行bin文件配置客体SContext为hal_oemsarsensor_default_exec
/(vendor|system/vendor)/bin/hw/vendor\.tinno\.hardware\.oemsarsensor@1\.0-service     u:object_r:hal_oemsarsensor_default_exec:s0
步骤二:可执行文件客体SContext定义
步骤一中已经定义声明了/system/bin/bootlogo文件的上下文是bootlogo_exec,那么这个属性在什么地方定义呢?可以参考搜索bootanim_exec,如下代码:
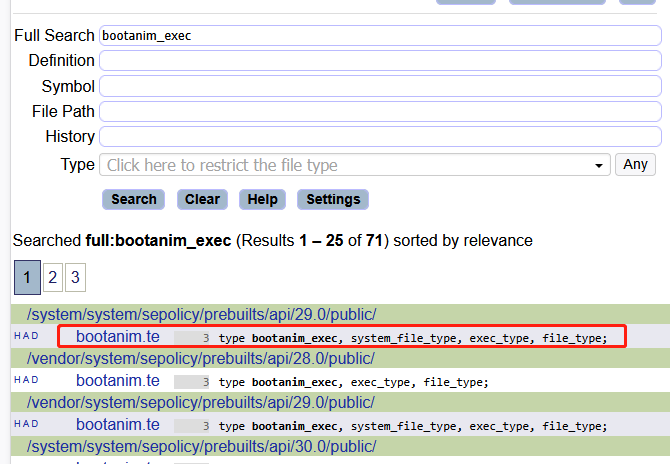
看起来新创建了bootanim.te文件,并在其中定义了这个属性,并且集成了已知的几个属性,例如file_type表示她还是一个文件,system_file_type表示她属于system分区的,exec_type表示这个文件可以被exec进行加载执行。
因此如上同级目录新建xxx.te文件,对步骤一中的客体SContext进行定义和继承:
# 新建bootlogo.te
# 声明bootlogo_exec继承system_file_type和exec_type
# 表示属于system分区可执行文件
type bootlogo_exec, system_file_type, exec_type, file_type;

# 新建hal_googlekey_default.te
# 声明hal_googlekey_default_exec继承vendor_file_type和exec_type
# 表示属于vendor分区可执行文件
type hal_googlekey_default_exec, exec_type, vendor_file_type, file_type;
步骤三:xxx进程主体SContext定义
步骤二已经定义了xxx.te,虽然目前他和我们将要启动的native进程还没有任何关系,但是selinux编译的逻辑,编译所有的te文件然后整合到一起,在需要进行校验selinux权限的时候,只需要获取对应进程,然后匹配配置文件中是否有相关策略。
因此这里很明确的告诉你xxx.te就是新进程的selinux策略文件,那么首先需要配置主体SContext。同样参考bootanim.te文件:
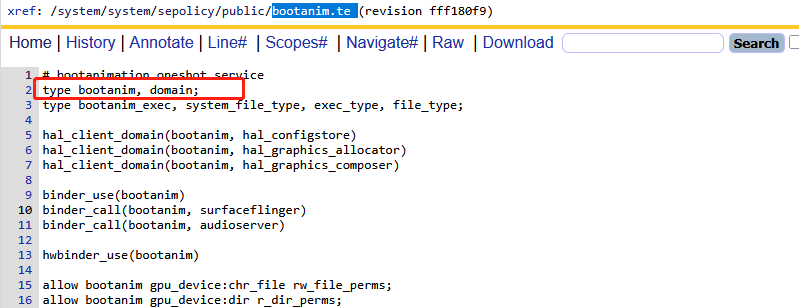
如上第三行就是对主体SContext的声明,定义属性bootanim,并继承domain,表示她是一个进程域。因此我这里需要进行如下配置:
# 新建bootlogo.te
# 声明bootlogo_exec继承system_file_type和exec_type
# 表示属于system分区可执行文件
type bootlogo_exec, system_file_type, exec_type, file_type;
# 声明属性bootlogo继承domain,表示 它是一个进程,这个属性名字最好和文件同名
type bootlogo, domain;

# 新建hal_googlekey_default.te
# 声明hal_googlekey_default_exec继承vendor_file_type和exec_type
# 表示属于vendor分区可执行文件
type hal_googlekey_default_exec, exec_type, vendor_file_type, file_type;
# 声明属性hal_googlekey_default继承domain,表示 它是一个进程,这个属性名字最好和文件同名
type hal_googlekey_default, domain;
步骤四:init_daemon_domain
步骤三提到了,如何讲客体与主体进行绑定,同时我们的xxx.te中已经定义好了客体SContext,也定义了主体SContext,参考google文档,我们可以使用init_daemon_domain函数语法。

因此xxx.te进行如下配置:
# 新建bootlogo.te
# 声明bootlogo_exec继承system_file_type和exec_type
# 表示属于system分区可执行文件
type bootlogo_exec, system_file_type, exec_type, file_type;
# 声明属性bootlogo继承domain,表示 它是一个进程,这个属性名字最好和文件同名
type bootlogo, domain;
# 进行域转换,子进程安全上下文从init转换成bootlogo
init_daemon_domain(bootlogo)

# 新建hal_googlekey_default.te
# 声明hal_googlekey_default_exec继承vendor_file_type和exec_type
# 表示属于vendor分区可执行文件
type hal_googlekey_default_exec, exec_type, vendor_file_type, file_type;
# 声明属性hal_googlekey_default继承domain,表示 它是一个进程,这个属性名字最好和文件同名
type hal_googlekey_default, domain;
# 进行域转换,子进程安全上下文从init转换成hal_googlekey_default
init_daemon_domain(hal_googlekey_default)
2)init_daemon_domain如何实现域转换?
先来看看init_daemon_domain函数是如何实现的,在aosp/system/sepolicy/public/te_macros代码如下:
#####################################
# init_daemon_domain(domain)
# Set up a transition from init to the daemon domain
# upon executing its binary.
define(`init_daemon_domain', `
domain_auto_trans(init, $1_exec, $1)
')
#####################################
# domain_auto_trans(olddomain, type, newdomain)
# Automatically transition from olddomain to newdomain
# upon executing a file labeled with type.
#
define(`domain_auto_trans', `
# Allow the necessary permissions.
domain_trans($1,$2,$3)
# Make the transition occur by default.
type_transition $1 $2:process $3;
')
#####################################
# domain_trans(olddomain, type, newdomain)
# Allow a transition from olddomain to newdomain
# upon executing a file labeled with type.
# This only allows the transition; it does not
# cause it to occur automatically - use domain_auto_trans
# if that is what you want.
#
define(`domain_trans', `
# Old domain may exec the file and transition to the new domain.
allow $1 $2:file { getattr open read execute map };
allow $1 $3:process transition;
# New domain is entered by executing the file.
allow $3 $2:file { entrypoint open read execute getattr map };
# New domain can send SIGCHLD to its caller.
ifelse($1, `init', `', `allow $3 $1:process sigchld;')
# Enable AT_SECURE, i.e. libc secure mode.
dontaudit $1 $3:process noatsecure;
# XXX dontaudit candidate but requires further study.
allow $1 $3:process { siginh rlimitinh };
')
例如init_daemon_domain(hal_googlekey_default):
- 进行第一层转换为:domain_auto_trans(init, hal_googlekey_default_exec, hal_googlekey_default)。这说明了可执行文件客体SContext和主体进程SContext前面的字符串必须一样,否则展开之后就变成了无法识别或者定义的值

- 进行第二层转换为多个allow,其实就是允许init进程能够操作新创建进程的客体和主体等策略
domain_auto_trans(init, hal_googlekey_default_exec, hal_googlekey_default)
allow init hal_googlekey_default_exec:file { getattr open read execute map };
allow init hal_googlekey_default:process transition;
allow hal_googlekey_default hal_googlekey_default_exec:file { entrypoint open read execute getattr map };
ifelse(init, `init', `', `allow hal_googlekey_default init:process sigchld;')
dontaudit init hal_googlekey_default:process noatsecure;
allow init hal_googlekey_default:process { siginh rlimitinh };
- 最后进行域转换的总结
init进程fork出新的子进程的时候,子进程的SContext和父进程init一模一样还是u:r:init:s0,当init进程通过exec加载可执行bin文件的时候,给他子进程的SContext设置为hal_googlekey_default,从而实现了域转换。
步骤 1: init 进程(SContext = u:r:init:s0)
   │
   │ 读取 rc 文件,准备启动服务
   │ service googlekey_hal_service /vendor/bin/hw/vendor.tinno.hardware.googlekey@1.0-service
   │
步骤 2: init 调用 execve() 执行可执行文件
   │
   │ 可执行文件的 SELinux 上下文(通过 file_contexts 定义):
   │ /vendor/bin/hw/vendor.tinno.hardware.googlekey@1.0-service
   │ → u:object_r:hal_googlekey_default_exec:s0
   │
步骤 3: SELinux 检查域转换规则(由 init_daemon_domain 宏生成)
   │
   │ 规则检查:
   │ - init 域是否可以执行 hal_googlekey_default_exec 类型的文件?
   │ - 执行后是否可以转换到 hal_googlekey_default 域?
   │
步骤 4: 域转换发生
   │
   └─→ 新进程的 SContext = u:r:hal_googlekey_default:s0
       (不再是 init 域)
示例一:自定义bootlogo进程
示例二:自定义diag_callback_sample进程
示例三:自定义hal service googlekey进程

3)hal_googlekey_default必现和hal_googlekey_default.te文件对应起来吗?
不必须。SELinux 编译时会把目录里所有参与合并的 .te 都读进来,规则是否生效只取决于类型名、宏、属性、file_contexts 等是否自洽,并不要求 type hal_googlekey_default 必须写在名为 hal_googlekey_default.te 的文件里。你完全可以把同样三行放进别的 .te 文件,只要没有重复定义、冲突即可。
但必须一致的是这些名字(和文件无关):
- 域类型:hal_googlekey_default
- 可执行文件类型:hal_googlekey_default_exec(init_daemon_domain(hal_googlekey_default) 会用到 …_exec)
- file_contexts 里 HIDL 那个二进制要标成 hal_googlekey_default_exec,和上面这条链对上
文件名和域同名只是工程上的习惯:别人看到 hal_googlekey_default.te 就知道里面大概是 HIDL googlekey default 的域策略,方便维护;属于约定,不是编译器强制。
2、新增SystemService服务selinux配置指南
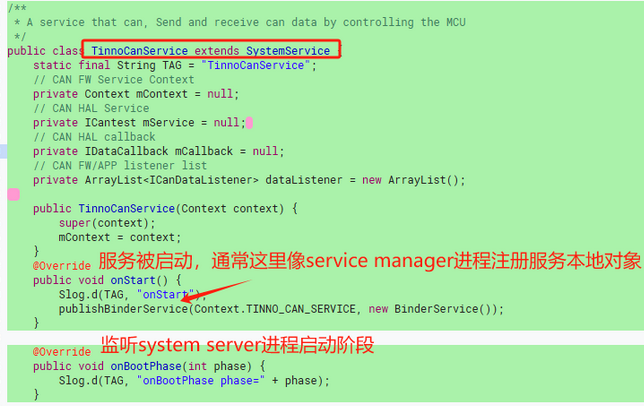
在FW SystemService进程中新增一个自定义系统级服务,详细可以参考Android SystemServer 系列专题【SystemServer新增服务】
在新增TinnoCanService的案例中,在向servicemanager进程注册系统服务的时候会出现如下异常:
01-03 06:02:58.330  9505  9505 I SystemServiceManager: Starting com.android.server.usage.UsageStatsService
01-03 06:02:58.337  9505  9505 V SystemServerTiming: StartUsageService took to complete: 7ms
01-03 06:02:58.337  9505  9505 D SystemServerTiming: StartTinnoCanService
01-03 06:02:58.337  9505  9505 E SystemServer: ----------------SHEN: startService TINNO_CAN_SERVICE start
01-03 06:02:58.338  9505  9505 I SystemServiceManager: Starting com.android.server.can.TinnoCanService
01-03 06:02:58.338  9505  9505 D TinnoCanService: onStart
01-03 06:02:58.340  9505  9505 E System  : ******************************************
01-03 06:02:58.340  9505  9505 E System  : ************ Failure starting system services
01-03 06:02:58.340  9505  9505 E System  : java.lang.RuntimeException: Failed to start service com.android.server.can.TinnoCanService: onStart threw an exception
01-03 06:02:58.340  9505  9505 E System  :      at com.android.server.SystemServiceManager.startService(SystemServiceManager.java:257)
01-03 06:02:58.340  9505  9505 E System  :      at com.android.server.SystemServiceManager.startService(SystemServiceManager.java:233)
01-03 06:02:58.340  9505  9505 E System  :      at com.android.server.SystemServer.startCoreServices(SystemServer.java:1370)
01-03 06:02:58.340  9505  9505 E System  :      at com.android.server.SystemServer.run(SystemServer.java:946)
01-03 06:02:58.340  9505  9505 E System  :      at com.android.server.SystemServer.main(SystemServer.java:669)
01-03 06:02:58.340  9505  9505 E System  :      at java.lang.reflect.Method.invoke(Native Method)
01-03 06:02:58.340  9505  9505 E System  :      at com.android.internal.os.RuntimeInit$MethodAndArgsCaller.run(RuntimeInit.java:552)
01-03 06:02:58.340  9505  9505 E System  :      at com.android.internal.os.ZygoteInit.main(ZygoteInit.java:955)
01-03 06:02:58.340  9505  9505 E System  : Caused by: java.lang.SecurityException: SELinux denied.
01-03 06:02:58.340  9505  9505 E System  :      at android.os.Parcel.createExceptionOrNull(Parcel.java:3057)
01-03 06:02:58.340  9505  9505 E System  :      at android.os.Parcel.createException(Parcel.java:3041)
01-03 06:02:58.340  9505  9505 E System  :      at android.os.Parcel.readException(Parcel.java:3024)
01-03 06:02:58.340  9505  9505 E System  :      at android.os.Parcel.readException(Parcel.java:2966)
01-03 06:02:58.340  9505  9505 E System  :      at android.os.IServiceManager$Stub$Proxy.addService(IServiceManager.java:468)
01-03 06:02:58.340  9505  9505 E System  :      at android.os.ServiceManagerProxy.addService(ServiceManagerNative.java:72)
01-03 06:02:58.340  9505  9505 E System  :      at android.os.ServiceManager.addService(ServiceManager.java:213)
01-03 06:02:58.340  9505  9505 E System  :      at com.android.server.SystemService.publishBinderService(SystemService.java:567)
01-03 06:02:58.340  9505  9505 E System  :      at com.android.server.SystemService.publishBinderService(SystemService.java:551)
01-03 06:02:58.340  9505  9505 E System  :      at com.android.server.SystemService.publishBinderService(SystemService.java:538)
01-03 06:02:58.340  9505  9505 E System  :      at com.android.server.can.TinnoCanService.onStart(TinnoCanService.java:61)
01-03 06:02:58.340  9505  9505 E System  :      at com.android.server.SystemServiceManager.startService(SystemServiceManager.java:255)
01-03 06:02:58.340  9505  9505 E System  :      ... 7 more
01-03 06:02:58.340  9505  9505 V SystemServerTiming: StartTinnoCanService took to complete: 3ms
01-03 06:02:58.341  9505  9505 E Zygote  : System zygote died with fatal exception
01-03 06:02:58.341  9505  9505 E Zygote  : java.lang.RuntimeException: Failed to start service com.android.server.can.TinnoCanService: onStart threw an exception
01-03 06:02:58.341  9505  9505 E Zygote  :      at com.android.server.SystemServiceManager.startService(SystemServiceManager.java:257)
01-03 06:02:58.341  9505  9505 E Zygote  :      at com.android.server.SystemServiceManager.startService(SystemServiceManager.java:233)
01-03 06:02:58.341  9505  9505 E Zygote  :      at com.android.server.SystemServer.startCoreServices(SystemServer.java:1370)
01-03 06:02:58.341  9505  9505 E Zygote  :      at com.android.server.SystemServer.run(SystemServer.java:946)
01-03 06:02:58.341  9505  9505 E Zygote  :      at com.android.server.SystemServer.main(SystemServer.java:669)
01-03 06:02:58.341  9505  9505 E Zygote  :      at java.lang.reflect.Method.invoke(Native Method)
01-03 06:02:58.341  9505  9505 E Zygote  :      at com.android.internal.os.RuntimeInit$MethodAndArgsCaller.run(RuntimeInit.java:552)
01-03 06:02:58.341  9505  9505 E Zygote  :      at com.android.internal.os.ZygoteInit.main(ZygoteInit.java:955)
01-03 06:02:58.341  9505  9505 E Zygote  : Caused by: java.lang.SecurityException: SELinux denied.
01-03 06:02:58.341  9505  9505 E Zygote  :      at android.os.Parcel.createExceptionOrNull(Parcel.java:3057)
01-03 06:02:58.341  9505  9505 E Zygote  :      at android.os.Parcel.createException(Parcel.java:3041)
01-03 06:02:58.341  9505  9505 E Zygote  :      at android.os.Parcel.readException(Parcel.java:3024)
01-03 06:02:58.341  9505  9505 E Zygote  :      at android.os.Parcel.readException(Parcel.java:2966)
01-03 06:02:58.341  9505  9505 E Zygote  :      at android.os.IServiceManager$Stub$Proxy.addService(IServiceManager.java:468)
01-03 06:02:58.341  9505  9505 E Zygote  :      at android.os.ServiceManagerProxy.addService(ServiceManagerNative.java:72)
01-03 06:02:58.341  9505  9505 E Zygote  :      at android.os.ServiceManager.addService(ServiceManager.java:213)
01-03 06:02:58.341  9505  9505 E Zygote  :      at com.android.server.SystemService.publishBinderService(SystemService.java:567)
01-03 06:02:58.341  9505  9505 E Zygote  :      at com.android.server.SystemService.publishBinderService(SystemService.java:551)
01-03 06:02:58.341  9505  9505 E Zygote  :      at com.android.server.SystemService.publishBinderService(SystemService.java:538)
01-03 06:02:58.341  9505  9505 E Zygote  :      at com.android.server.can.TinnoCanService.onStart(TinnoCanService.java:61)
01-03 06:02:58.341  9505  9505 E Zygote  :      at com.android.server.SystemServiceManager.startService(SystemServiceManager.java:255)
01-03 06:02:58.341  9505  9505 E Zygote  :      ... 7 more
01-03 06:02:58.341  9505  9505 D AndroidRuntime: Shutting down VM
01-03 06:02:58.341  9505  9505 E AndroidRuntime: *** FATAL EXCEPTION IN SYSTEM PROCESS: main
01-03 06:02:58.341  9505  9505 E AndroidRuntime: java.lang.RuntimeException: Failed to start service com.android.server.can.TinnoCanService: onStart threw an exception
01-03 06:02:58.341  9505  9505 E AndroidRuntime:        at com.android.server.SystemServiceManager.startService(SystemServiceManager.java:257)
01-03 06:02:58.341  9505  9505 E AndroidRuntime:        at com.android.server.SystemServiceManager.startService(SystemServiceManager.java:233)
01-03 06:02:58.341  9505  9505 E AndroidRuntime:        at com.android.server.SystemServer.startCoreServices(SystemServer.java:1370)
01-03 06:02:58.341  9505  9505 E AndroidRuntime:        at com.android.server.SystemServer.run(SystemServer.java:946)
01-03 06:02:58.341  9505  9505 E AndroidRuntime:        at com.android.server.SystemServer.main(SystemServer.java:669)
01-03 06:02:58.341  9505  9505 E AndroidRuntime:        at java.lang.reflect.Method.invoke(Native Method)
01-03 06:02:58.341  9505  9505 E AndroidRuntime:        at com.android.internal.os.RuntimeInit$MethodAndArgsCaller.run(RuntimeInit.java:552)
01-03 06:02:58.341  9505  9505 E AndroidRuntime:        at com.android.internal.os.ZygoteInit.main(ZygoteInit.java:955)
01-03 06:02:58.341  9505  9505 E AndroidRuntime: Caused by: java.lang.SecurityException: SELinux denied.
01-03 06:02:58.341  9505  9505 E AndroidRuntime:        at android.os.Parcel.createExceptionOrNull(Parcel.java:3057)
01-03 06:02:58.341  9505  9505 E AndroidRuntime:        at android.os.Parcel.createException(Parcel.java:3041)
01-03 06:02:58.341  9505  9505 E AndroidRuntime:        at android.os.Parcel.readException(Parcel.java:3024)
01-03 06:02:58.341  9505  9505 E AndroidRuntime:        at android.os.Parcel.readException(Parcel.java:2966)
01-03 06:02:58.341  9505  9505 E AndroidRuntime:        at android.os.IServiceManager$Stub$Proxy.addService(IServiceManager.java:468)
01-03 06:02:58.341  9505  9505 E AndroidRuntime:        at android.os.ServiceManagerProxy.addService(ServiceManagerNative.java:72)
01-03 06:02:58.341  9505  9505 E AndroidRuntime:        at android.os.ServiceManager.addService(ServiceManager.java:213)
01-03 06:02:58.341  9505  9505 E AndroidRuntime:        at com.android.server.SystemService.publishBinderService(SystemService.java:567)
01-03 06:02:58.341  9505  9505 E AndroidRuntime:        at com.android.server.SystemService.publishBinderService(SystemService.java:551)
01-03 06:02:58.341  9505  9505 E AndroidRuntime:        at com.android.server.SystemService.publishBinderService(SystemService.java:538)
01-03 06:02:58.341  9505  9505 E AndroidRuntime:        at com.android.server.can.TinnoCanService.onStart(TinnoCanService.java:61)
01-03 06:02:58.341  9505  9505 E AndroidRuntime:        at com.android.server.SystemServiceManager.startService(SystemServiceManager.java:255)
01-03 06:02:58.341  9505  9505 E AndroidRuntime:        ... 7 more
01-03 06:02:58.345  9505  9505 E SystemServiceRegistry: No service published for: dropbox
01-03 06:02:58.345  9505  9505 E SystemServiceRegistry: android.os.ServiceManager$ServiceNotFoundException: No service published for: dropbox
01-03 06:02:58.345  9505  9505 E SystemServiceRegistry:         at android.os.ServiceManager.getServiceOrThrow(ServiceManager.java:166)
01-03 06:02:58.345  9505  9505 E SystemServiceRegistry:         at android.app.SystemServiceRegistry$25.createService(SystemServiceRegistry.java:494)
01-03 06:02:58.345  9505  9505 E SystemServiceRegistry:         at android.app.SystemServiceRegistry$25.createService(SystemServiceRegistry.java:491)
01-03 06:02:58.345  9505  9505 E SystemServiceRegistry:         at android.app.SystemServiceRegistry$CachedServiceFetcher.getService(SystemServiceRegistry.java:2000)
01-03 06:02:58.345  9505  9505 E SystemServiceRegistry:         at android.app.SystemServiceRegistry.getSystemService(SystemServiceRegistry.java:1674)
01-03 06:02:58.345  9505  9505 E SystemServiceRegistry:         at android.app.ContextImpl.getSystemService(ContextImpl.java:2212)
01-03 06:02:58.345  9505  9505 E SystemServiceRegistry:         at android.content.Context.getSystemService(Context.java:4422)
01-03 06:02:58.345  9505  9505 E SystemServiceRegistry:         at com.android.server.am.ActivityManagerService.addErrorToDropBox(ActivityManagerService.java:9388)
01-03 06:02:58.345  9505  9505 E SystemServiceRegistry:         at com.android.server.am.ActivityManagerService.handleApplicationCrashInner(ActivityManagerService.java:8992)
01-03 06:02:58.345  9505  9505 E SystemServiceRegistry:         at com.android.server.am.ActivityManagerService.handleApplicationCrash(ActivityManagerService.java:8885)
01-03 06:02:58.345  9505  9505 E SystemServiceRegistry:         at com.android.internal.os.RuntimeInit$KillApplicationHandler.uncaughtException(RuntimeInit.java:160)
01-03 06:02:58.345  9505  9505 E SystemServiceRegistry:         at java.lang.ThreadGroup.uncaughtException(ThreadGroup.java:1071)
01-03 06:02:58.345  9505  9505 E SystemServiceRegistry:         at java.lang.ThreadGroup.uncaughtException(ThreadGroup.java:1066)
01-03 06:02:58.345  9505  9505 E SystemServiceRegistry:         at java.lang.Thread.dispatchUncaughtException(Thread.java:2306)
01-03 06:02:58.346  9505  9505 E SystemServiceRegistry: Manager wrapper not available: dropbox
publishBinderService(注册服务)-→ServiceManager.add(向service manager进程注册服务)。就是这个地方,关键日志如下:
01-03 06:02:58.340 9505 9505 E System : Caused by: java.lang.SecurityException: SELinux denied.
01-03 06:02:58.340 9505 9505 E System : at android.os.Parcel.createExceptionOrNull(Parcel.java:3057)
01-03 06:02:58.340 9505 9505 E System : at android.os.Parcel.createException(Parcel.java:3041)
01-03 06:02:58.340 9505 9505 E System : at android.os.Parcel.readException(Parcel.java:3024)
01-03 06:02:58.340 9505 9505 E System : at android.os.Parcel.readException(Parcel.java:2966)
01-03 06:02:58.340 9505 9505 E System : at android.os.IServiceManager$Stub$Proxy.addService(IServiceManager.java:468)
01-03 06:02:58.340 9505 9505 E System : at android.os.ServiceManagerProxy.addService(ServiceManagerNative.java:72)
01-03 06:02:58.340 9505 9505 E System : at android.os.ServiceManager.addService(ServiceManager.java:213)
01-03 06:02:58.340 9505 9505 E System : at com.android.server.SystemService.publishBinderService(SystemService.java:567)
01-03 06:02:58.340 9505 9505 E System : at com.android.server.SystemService.publishBinderService(SystemService.java:551)
01-03 06:02:58.340 9505 9505 E System : at com.android.server.SystemService.publishBinderService(SystemService.java:538)
01-03 06:02:58.340 9505 9505 E System : at com.android.server.can.TinnoCanService.onStart(TinnoCanService.java:61)
01-03 06:02:58.340 9505 9505 E System : at com.android.server.SystemServiceManager.startService(SystemServiceManager.java:255)
疑问一:为什么publishBinderService出现selinux异常?
publishBinderService的作用是向servicemanager进程注册当前服务,第一个参数就是当前服务的名称,被定义在Context里面。第二个参数就是当前的binder对象。
在向Service Manager注册或查询系统的时候,要求开发者必须为服务定义专属上下文(如system_xxx_service),而非复用默认的通用类型。
那么它到底是主体还是客体呢?
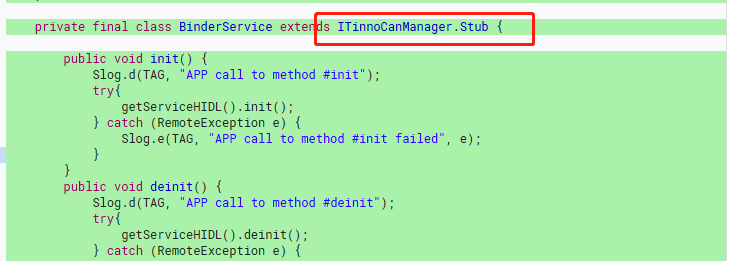
我们可以先看看BinderService是什么东西?原来是一个IXXX.Stub接口对象。因此在向servicemanager进程注册系统服务的时候,传递的是一个IXXX接口对象实例,那么它是主体吗?显然不是?在这个过程中进程是servicemanager,IXXX接口对象实例类被注册,你可以把它理解为一堆可被执行的代码段,其本质还是一个死的东西,即对应客体资源。
步骤一:服务接口对象客体SContext配置
因IXXX是一个服务对象实例,已经确定它是一个客体资源,因此我们需要对自定义服务配置客体上下文。
根据第三章的介绍,我们可以发现所有fw SystemService的子类对象实例,或者所有的IXXX接口对象实例均被配置在service_contexts文件内:
# 新建service_contexts文件/或者在原生service_contexts文件中添加如下配置
# tinno_can为Context中定义的服务名称,其上下文为tinno_can_service
tinno_can u:object_r:tinno_can_service:s0
步骤二:服务接口对象客体SContext定义
虽然步骤一配置服务接口对象实例的SContext,然后这个上下文其实没有被定义过,因此我们还需要对其使用type语法进行定义。
根据第三章的介绍,基本上fw层所有的系统服务的属性都统一被定义在service.te文件内:
# 新建service.te文件/或者在原生service.te文件中添加如下配置
# tinno_can_service继承app_api_service和system_server_service和service_manager_type属性
type tinno_can_service,app_api_service
, system_api_service, ephemeral_app_api_service, system_server_service, service_manager_type;
其中这几个属性解读如下:
-
app_api_service
允许普通应用程序通过 Binder 接口调用该服务。也就是说,普通应用可以通过 Binder 机制与该服务进行通信。 -
system_api_service
限制仅系统级应用或具有特定权限的应用可以访问该服务。这通常用于系统内部服务,防止普通应用随意调用。 -
ephemeral_app_api_service
限制临时应用(如一次性使用或短期权限的应用)访问该服务的接口。这类应用通常具有较短的生命周期,该属性确保其不能随意访问系统服务。 -
system_server_service
仅允许system_server进程绑定或管理该服务。这是系统核心服务的权限控制,确保只有系统关键进程可以操作该服务。 -
service_manager_type
表示该服务可以注册到servicemanager中,成为系统级服务的一部分。这意味着该服务可以通过servicemanager被其他进程查找和使用。
步骤三:system_server主体SContext配置
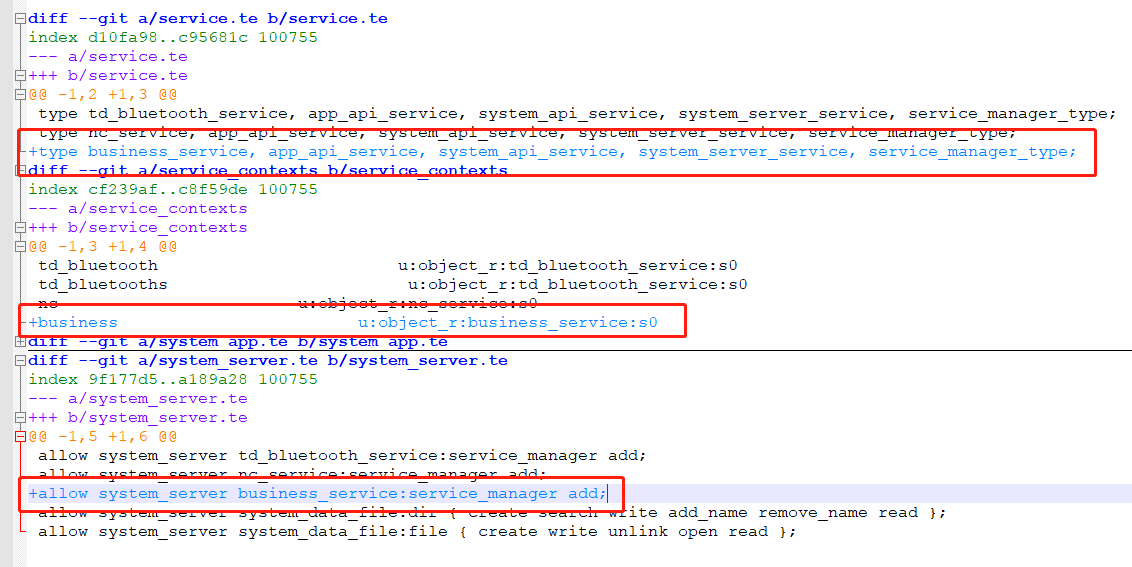
步骤一和步骤二对客体资源IXXX接口对象实例进行上下文的配置,那么主体进程是servicemanage吗?其实不是,主体进程是SystemServer进程,去调用publishBinderService方法,这个过程最后是通过binder通信到servicemanager进程那边,因此这里应该在system_server.te文件中配置如下策略:
# 新建system_server.te文件/或者在原生system_server.te文件中添加如下配置
# 允许system_server进程能操作客体tinno_can_service的service_manager类的add权限。
allow system_server tinno_can_service:service_manager add;
allow - 这是 SELinux 的允许规则关键字,表示授予某种权限-
system_server - 这是主体(subject),指执行操作的进程或用户。在这里,指的是 Android 系统服务器进程,它是系统的核心服务进程 -
tinno_can_service - 这是客体(object),指被访问或操作的对象类型。这里代表一个特定的服务类型 -
service_manager - 这是权限类别(permission class),表示服务管理器接口,用于管理系统中注册的服务 -
add - 这是具体的权限(permission),表示添加服务的操作
经过如上三步,SystemService进程就能启动我们自定义的系统服务。
示例一:自定义BusinessService
3、新增hal service进程selinux配置指南
因为hal service进程其实也属于一种native进程,如创建一个自定义hal service native进程,在经历google的几次策略变动之后,但是了HIDL接口的服务进程,和AIDL接口的服务进程:
- 自定义HIDL HAL服务进程:https://blog.csdn.net/qq_27672101/article/details/147340564
- 自定义AIDL HAL服务进程:https://blog.csdn.net/qq_27672101/article/details/159348384
Google在A16版本强制让AIDL去替代了HIDL,因此本篇作妖以AIDL的角度去进行配置,其本质上和HIDL基本一致。
AIDL HAL关于Selinux权限的配置,在Google官方文档中其实介绍的非常的详细,参考如下:
https://source.android.com/docs/core/architecture/aidl/aidl-hals?hl=zh-cn#sepolicy
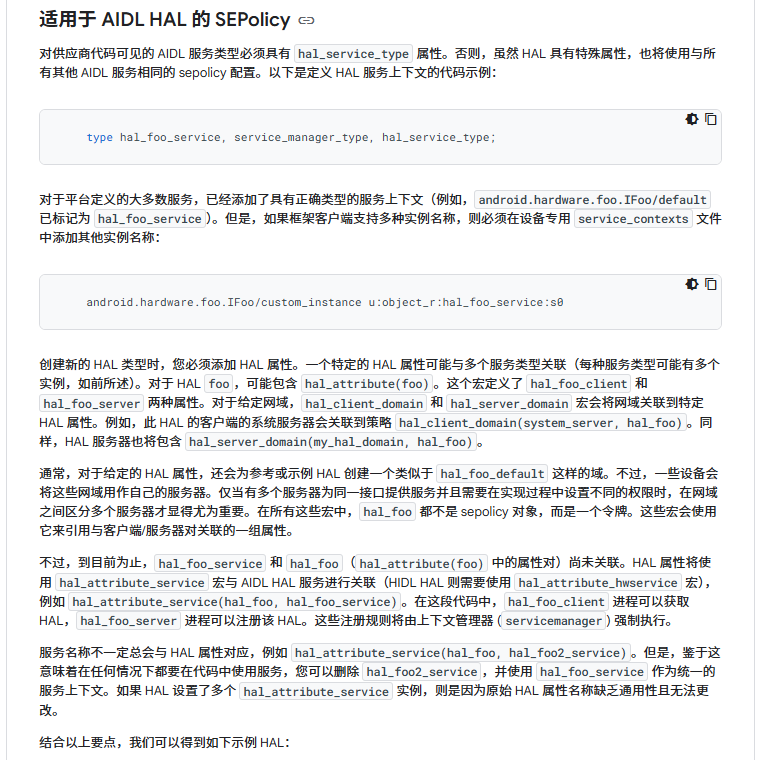
public/attributes:
// define hal_foo, hal_foo_client, hal_foo_server
hal_attribute(foo)
public/service.te
// define hal_foo_service
type hal_foo_service, hal_service_type, protected_service, service_manager_type
public/hal_foo.te:
// allow binder connection from client to server
binder_call(hal_foo_client, hal_foo_server)
// allow client to find the service, allow server to register the service
hal_attribute_service(hal_foo, hal_foo_service)
// allow binder communication from server to service_manager
binder_use(hal_foo_server)
private/service_contexts:
// bind an AIDL service name to the selinux type
android.hardware.foo.IFooXxxx/default u:object_r:hal_foo_service:s0
private/<some_domain>.te:
// let this domain use the hal service
binder_use(some_domain)
hal_client_domain(some_domain, hal_foo)
vendor/<some_hal_server_domain>.te
// let this domain serve the hal service
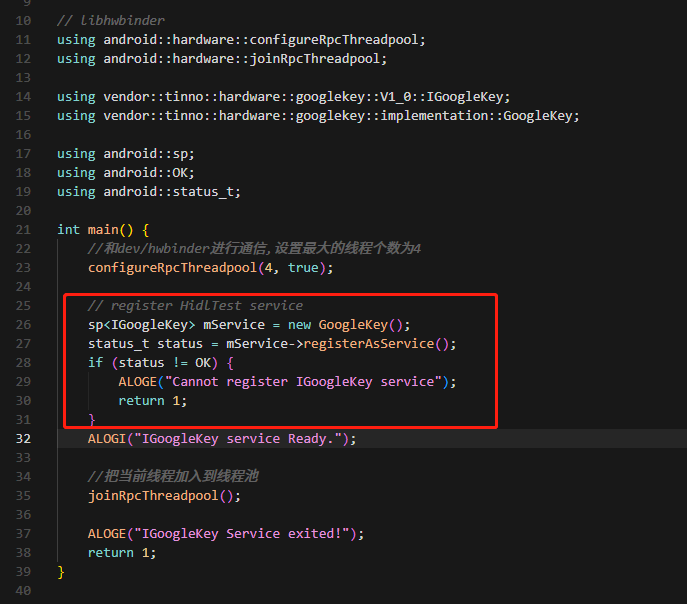
hal_server_domain(some_hal_server_domain, hal_foo)接下来以本案例中的oemsarsensor hal服务进程和fw systemserver作为客户端进程调用,详细解析selinux应该如何配置。
1)AIDL HAL服务进程配置
无论是AIDL HAL还是HIDL HAL他们其实都只是一种比较特殊的native进程,都是由init进程解析rc配置文件进行启动,因此都具有如下类似的selinux权限报错:
<14>[ 10.728014] .(5)[1:init]init 24: Parsing file /vendor/etc/init/vendor.tinno.hardware.oemsarsensor-service.rc...
<11>[ 17.617416] .(0)[1:init]init 34: [17448][0]Could not start service 'vendor.tinno.hardware.oemsarsensor-service' as part of class 'hal':
File /vendor/bin/hw/vendor.tinno.hardware.oemsarsensor-service(labeled "u:object_r:vendor_file:s0")
has incorrect label or no domain transition from u:r:init:s0 to another SELinux domain defined.
Have you configured your service correctly?
https://source.android.com/security/selinux/device-policy#label_new_services_and_address_denials.
Note: this error shows up even in permissive mode in order to make auditing denials possible.
前面已经讲了很多次了,即无法启动这个init rc 服务进程,原因是这个可执行bin文件的上下文标签没有进行定义。按照之前的流程,作如下配置:
步骤一:AIDL HAL服务进程可执行文件的客体配置
- file_contexts文件中对可执行文件的客体上下文配置
# AIDL HAL服务进程可执行文件的客体配置
/(vendor|system/vendor)/bin/hw/vendor\.tinno\.hardware\.oemsarsensor-service u:object_r:hal_oemsarsensor_aidl_exec:s0
- hal_oemsarsensor_aidl.te文件中定义客体上下文
# 定义客体上下文hal_oemsarsensor_aidl_exec继承vendor_file_type和exec_type,表示是一个文件即客体
type hal_oemsarsensor_aidl_exec, exec_type, vendor_file_type, file_type;
步骤二:AIDL HAL服务进程的主体配置
- hal_oemsarsensor_aidl.te文件中定义主体上下文
# 定义主体上下文hal_oemsarsensor_aidl继承domain,表示是一个进程域即主体
type hal_oemsarsensor_aidl, domain;
步骤三:AIDL HAL服务进程进行域转换
type hal_oemsarsensor_aidl, domain;
type hal_oemsarsensor_aidl_exec, exec_type, vendor_file_type, file_type;
init_daemon_domain(hal_oemsarsensor_aidl)
2)AIDL接口配置
经过第一节的配置,现在AIDL HAL服务进程终于可以起来,服务进程主函数在获取接口时候却崩溃了,发生了如下selinux权限问题:
01-01 00:14:22.663 901 901 I auditd : avc: denied { add } for pid=1591 uid=1000 name=vendor.tinno.hardware.oemsarsensor.IOemSarSensor/default scontext=u:r:hal_oemsarsensor_aidl:s0 tcontext=u:object_r:default_android_service:s0 tclass=service_manager permissive=1
如上avc日志表示aidl hal服务端进程(上下文hal_oemsarsensor_aidl)没有对客体资源vendor.tinno.hardware.oemsarsensor.IOemSarSensor/default 的service_manager添加权限,因为这个客体资源的上下文是一个默认的default_android_service。
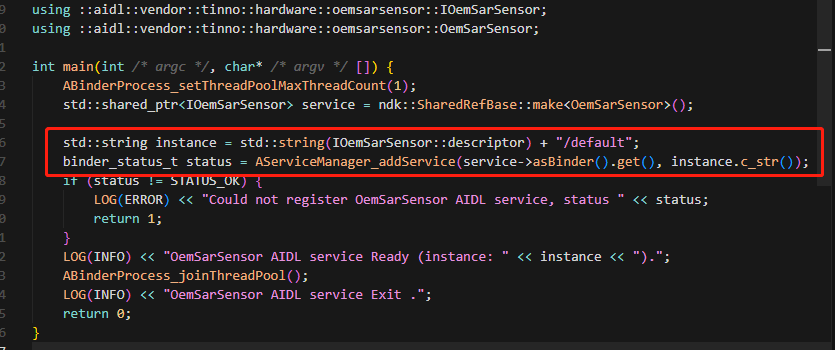
如上代码,aidl hal服务端进程启动之后,就去对IXXX接口进行操作,向service manager进程进行注册,同之前HIDL HAL和SystemService进程的服务接口注册原因一致,我们需要对AIDL接口赋予客体上下文。从前面的章节我们已经解释了AIDL这些接口为什么是客体资源,详细的可以查看本系列之前的内容。
因此本节主要是针对AIDL接口文件的selinux权限配置:
步骤一:AIDL接口属性簇配置
- hal_oemsarsensor_aidl.te文件中批量定义AIDL接口相关的属性
# 定义几个属性: hal_oemsarsensor, hal_oemsarsensor_client, hal_oemsarsensor_server
hal_attribute(oemsarsensor)
此宏就是用来定义AIDL接口相关的属性,包括AIDL接口的属性、AIDL服务端的属性、AIDL客户端的属性。在system/sepolicy/public/te_macros代码中对齐进行了定义:
#####################################
# hal_attribute(hal_name)
# Add an attribute for hal implementations along with necessary
# restrictions.
define(`hal_attribute', `
attribute hal_$1;
expandattribute hal_$1 true;
attribute hal_$1_client;
expandattribute hal_$1_client true;
attribute hal_$1_server;
expandattribute hal_$1_server false;
neverallow { hal_$1_server -halserverdomain } domain:process fork;
# hal_*_client and halclientdomain attributes are always expanded for
# performance reasons. Neverallow rules targeting expanded attributes can not be
# verified by CTS since these attributes are already expanded by that time.
build_test_only(`
neverallow { hal_$1_server -hal_$1 } domain:process fork;
neverallow { hal_$1_client -halclientdomain } domain:process fork;
')
')
因此hal_attribute(oemsarsensor)展开之后如下:
# 定义了hal_oemsarsensor属性,代表接口?
attribute hal_oemsarsensor; expandattribute hal_oemsarsensor true;
# 定义了hal_oemsarsensor_client属性,代表客户端进程上下文
attribute hal_oemsarsensor_client; expandattribute hal_oemsarsensor_client true;
#定义了hal_oemsarsensor_server属性,代表服务端进程上下文
attribute hal_oemsarsensor_server; expandattribute hal_oemsarsensor_server false;
步骤二:AIDL接口允许注册和查找
- hal_oemsarsensor_aidl.te文件中配置AIDL接口运行被注册和查找
# allow client to find the service, allow server to register the service
hal_attribute_service(hal_oemsarsensor, hal_oemsarsensor_service)
此宏就是用来配置AIDL接口允许被服务端进程注册,允许被客户端进程查找。在system/sepolicy/public/te_macros代码中对齐进行了定义:
###########################################
# hal_attribute_service(attribute, service)
# Ability for domain to get a service to service_manager
# and find it. It also creates a neverallow preventing
# others from adding it.
# Used to pair hal_foo_client with hal_foo_service
define(`hal_attribute_service', `
  allow $1_client $2:service_manager find;
  add_service($1_server, $2)
  build_test_only(`
    # if you are hitting this neverallow, try using:
    #     hal_client_domain(<your domain>, hal_<foo>)
    # instead
    neverallow {
        domain
        -$1_client
        -$1_server
        # some services are allowed to find all services
        -atrace
        # TODO(b/247267829) remove dumpstate
        -dumpstate
        -shell
        -system_app
        -traceur_app
    } $2:service_manager find;
  ')
')
###########################################
# add_service(domain, service)
# Ability for domain to add a service to service_manager
# and find it. It also creates a neverallow preventing
# others from adding it.
define(`add_service', `
  allow $1 $2:service_manager { add find };
  neverallow { domain -$1 } $2:service_manager add;
  # On debug builds with root, allow binder services to use binder over TCP.
  # Not using rw_socket_perms_no_ioctl to avoid granting too many permissions.
  userdebug_or_eng(`
    allow $1 su:tcp_socket { accept getopt read write };
  ')
')因此hal_attribute_service(hal_oemsarsensor, hal_oemsarsensor_service)展开之后如下内容:
#允许客户端进程对hal_oemsarsensor_service的查找
allow hal_oemsarsensor_client hal_oemsarsensor_service:service_manager find;
#允许服务端进程对hal_oemsarsensor_service的查找和添加
allow hal_oemsarsensor_server hal_oemsarsensor_service:service_manager { add find };
步骤三:AIDL接口客体资源配置
那么hal_oemsarsensor_service是什么?其实就是AIDL接口的客体资源上下文。所以我们还需要对hal_oemsarsensor_service关联我们的接口资源,我这里的这个名字取得不是很好,它的本质就是客体资源,如下配置:
- service.te文件中对AIDL接口定义上下文
type hal_oemsarsensor_service, hal_service_type, protected_service, service_manager_type;
- service_contexts文件中对AIDL接口关联描述符
vendor.tinno.hardware.oemsarsensor.IOemSarSensor/default u:object_r:hal_oemsarsensor_service:s0
这样是不是进行了完美的闭合?我这个案例中AIDL接口上下文的名字取得真陋!
然后根据这番操作,服务端进程可以通过service manager进程进行注册,客户端进程可以通过service manager进程查找这个服务。
疑问:AIDL接口注册在vndservice manager还是在service manager进程?
最初我把hal_oemsarsensor_service配置在vndservice.te和vndservice_contexts文件中的,然而配置了之后还是报不允许接口进行注册,后面结合AI如下内容:
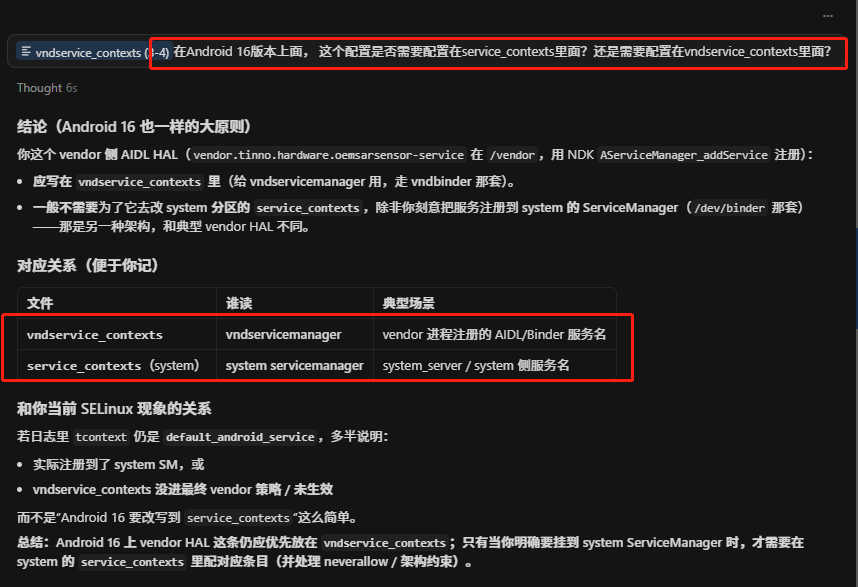
后查看了IThermal AIDL配置,得出如下结论:即通过AServiceManager_addService函数进行注册,是向service manager进程进行注册。
3)关联AIDL服务端进程
上节已经通过hal_attribute的方式定义了服务端进程的属性hal_xxx_server,那么这个属性最后被指定给到哪个进程呢?然后这个进程允许具有binder通信功能吗?这个进程允许被客户端进程调用吗?这些能力其实也被封装到宏里面去了,在hal_oemsarsensor_aidl.te中进行如下配置:
# let this domain serve the hal service
hal_server_domain(hal_oemsarsensor_aidl, hal_oemsarsensor)
# allow binder connection from client to server
binder_call(hal_oemsarsensor_client, hal_oemsarsensor_server)
# allow binder communication from server to service_manager
binder_use(hal_oemsarsensor_server)
步骤一:关联AIDL服务端进程
hal_server_domain就是用来完成这件事情的,其中第一个参数就是当前服务进程的上下文,第二个参数就是当前aidl接口簇的基本属性。在system/sepolicy/public/te_macros定义如下:
#####################################
# hal_server_domain(domain, hal_type)
# Allow a base set of permissions required for a domain to offer a
# HAL implementation of the specified type over HwBinder.
#
# For example, default implementation of Foo HAL:
#   type hal_foo_default, domain;
#   hal_server_domain(hal_foo_default, hal_foo)
#
define(`hal_server_domain', `
typeattribute $1 halserverdomain;
typeattribute $1 $2_server;
typeattribute $1 $2;
')
因此如上配置展开如下:
# hal_oemsarsensor_aidl 就是被指定的服务端进程上下文的属性
# hal_oemsarsensor_aidl 继承halserverdomain,表示是一个hal服务进程
typeattribute hal_oemsarsensor_aidl halserverdomain;
# hal_oemsarsensor_aidl 继承hal_oemsarsensor_server,对应当前AIDL服务端属性
typeattribute hal_oemsarsensor_aidl hal_oemsarsensor_server;#hal_oemsarsensor_aidl 继承hal_oemsarsensor,对应当前AIDL接口属性
typeattribute hal_oemsarsensor_aidl hal_oemsarsensor;
步骤二:允许和service manager进程进行通信
binder_use就是用来允许AIDL服务端进程能够和service manager进程通过binder的方式进行通信,因为服务注册和查询的底层原理还是通过binder的方式进行跨进程通信,不清楚的同学可以看看本系列的前面几篇内容。在system/sepolicy/public/te_macros定义如下:
#####################################
# binder_use(domain)
# Allow domain to use Binder IPC.
define(`binder_use', `
# Call the servicemanager and transfer references to it.
allow $1 servicemanager:binder { call transfer };
# Allow servicemanager to send out callbacks
allow servicemanager $1:binder { call transfer };
# rw access to /dev/binder and /dev/ashmem is presently granted to
# all domains in domain.te.
')
因此如上配置展开如下:
# 允许hal_oemsarsensor_server进程可以对servicemanager进程的binder端点执行call/transfer操作
allow hal_oemsarsensor_server servicemanager:binder { call transfer };
# 允许servicemanager进程可以对hal_oemsarsensor_server进程的binder端点执行call/transfer操作
allow servicemanager hal_oemsarsensor_server:binder { call transfer };
步骤三:允许和客户端进程进行通信
binder_call其实和binder_use类似,binder_use是去和service manager进程进行交互,而binder_call其实就是和指定进程进行交互,那么这里指定的进程通常就是客户端进程。在system/sepolicy/public/te_macros定义如下:
#####################################
# binder_call(clientdomain, serverdomain)
# Allow clientdomain to perform binder IPC to serverdomain.
define(`binder_call', `
# Call the server domain and optionally transfer references to it.
allow $1 $2:binder { call transfer };
# Allow the serverdomain to transfer references to the client on the reply.
allow $2 $1:binder transfer;
# Receive and use open files from the server.
allow $1 $2:fd use;
')
因此如上配置展开如下:
#允许客户端进程可以对服务端进程的binder端点执行call/transfer操作
allow hal_oemsarsensor_client hal_oemsarsensor_server:binder { call transfer };
#允许服务端进程可以对客户端进程的binder端点执行transfer操作
allow hal_oemsarsensor_server hal_oemsarsensor_client:binder transfer;
#允许客户端进程可以使用服务端进程的文件节点,这个目前还不知道有什么用?
allow hal_oemsarsensor_client hal_oemsarsensor_server:fd use;
4)关联AIDL客户端进程
最后我们来到客户端进程这边,这个案例是在systemserver进程中,监听usb插拔之后需要调用这个aidl hal服务,因此报了如下selinux权限问题:
03-22 08:02:16.376 901 901 I auditd : avc: denied { find } for pid=2322 uid=1000 name=vendor.tinno.hardware.oemsarsensor.IOemSarSensor/default scontext=u:r:system_server:s0 tcontext=u:object_r:default_android_service:s0 tclass=service_manager permissive=1
03-22 08:02:16.379 2322 2322 I auditd : type=1400 audit(0.0:5163): avc: denied { call } for comm="android.ui" scontext=u:r:system_server:s0 tcontext=u:r:hal_oemsarsensor_aidl:s0 tclass=binder permissive=1
如上第一行日志表示system_server进程没有对这个AIDL接口的查找权限,通过第二节的配置其实已经解决了这个问题,第二行日志表示system_server进程无法对这个AIDL接口执行call操作,其原因是system_server进程没有加入到AIDL客户端进程里面。同样在hal_oemsarsensor_aidl.te中进行如下配置:(PS 不一定非得在system_server.te中配置,因此编译后都要打包到一起,因此te里面的策略文件可以任意配置到不同文件中)
# let this domain use the hal service
hal_client_domain(system_server, hal_oemsarsensor)
binder_use(system_server)
步骤一:关联AIDL客户端进程
hal_client_domain就是用来完成这件事情的,其中第一个参数就是客户端进程的上下文,第二个参数就是当前aidl接口簇的基本属性。在system/sepolicy/public/te_macros定义如下:
#####################################
# hal_client_domain(domain, hal_type)
# Allow a base set of permissions required for a domain to be a
# client of a HAL of the specified type.
#
# For example, make some_domain a client of Foo HAL:
#   hal_client_domain(some_domain, hal_foo)
#
define(`hal_client_domain', `
typeattribute $1 halclientdomain;
typeattribute $1 $2_client;

# TODO(b/34170079): Make the inclusion of the rules below conditional also on
# non-Treble devices. For now, on non-Treble device, always grant clients of a
# HAL sufficient access to run the HAL in passthrough mode (i.e., in-process).
not_full_treble(`
typeattribute $1 $2;
# Find passthrough HAL implementations
allow $2 system_file:dir r_dir_perms;
allow $2 vendor_file:dir r_dir_perms;
allow $2 vendor_file:file { read open getattr execute map };
')
')
因此如上配置展开如下:
# 配置已有属性system_server继承halclientdomain
typeattribute system_server halclientdomain;
#配置已有属性system_server继承hal_oemsarsensor_client,即完全拥有此接口客户端进程所有能力
typeattribute system_server hal_oemsarsensor_client;
步骤二:运行和service manager进程进行通信
和前面的一样了,这里的参数是客户端进程system_server,即允许system_server进程和service manager进程之间通过binder的方式进行通信。
五、案例分析
1、案例之self:capability dac_override权限滥用
有自定义native进程去创建文件,但是总是创建不成功,最后查看avc报的日志是不具有dac相关权限:
07-26 07:02:14.578  3610  3610 W diag_callback_s: type=1400 audit(0.0:88): avc:  denied  { dac_read_search } for  capability=2  scontext=u:r:diag_callback_sample:s0 tcontext=u:r:diag_callback_sample:s0 tclass=capability permissive=0
07-26 07:02:14.578  3610  3610 W diag_callback_s: type=1400 audit(0.0:89): avc:  denied  { dac_override } for  capability=1  scontext=u:r:diag_callback_sample:s0 tcontext=u:r:diag_callback_sample:s0 tclass=capability permissive=0
通过audit2allow工具根据日志生成如下allow语句:
allow diag_callback_sample self:capability { dac_override dac_read_search };
但直接会触发neverallow的策略,这条语句的意思是允许自身进程使用dac_override权限,dac_override的意思是可以直接绕过linux的DAC策略,linux的DAC策略其实就是selinux之前的针对文件系统的用户组和读写权限的机制。类似如下:

为什么会报dac相关的访问权限呢?后经过研究,原来是当前进程在尝试访问的文件dac权限配置和自己进程所在的用户组匹配不上。就拿这个案例来进行说明:
当前进程用户组是system用户组,但是这个被访问的文件处于root用户组,且是0660权限,所以当前进程是根本无法成功访问到这个文件的,除非当前进程具有dac_override 的能力,绕过linux dac机制,所以按照如上配置可以使当前进程能够正常访问到这个文件。
然而编译的时候会直接触发neverallow规则:
neverallow check failed at out/soong/.intermediates/system/sepolicy/recovery_sepolicy.cil/android_common/recovery_sepolicy.cil:23470 from system/sepolicy/private/domain.te:405
  (neverallow base_typeattr_631 self (capability (dac_read_search)))
    <root>
    allow at out/soong/.intermediates/system/sepolicy/recovery_sepolicy.cil/android_common/recovery_sepolicy.cil:35458
      (allow diag_callback_sample self (capability (dac_override dac_read_search)))
为什么会触发neverallow?因为这个配置授予进程 dac_override 和 dac_read_search 能力,使其可绕过文件权限检查。因此这种题的正确处理思路是,去check linux dac机制,即需要使用chmod和chown命令去处理dac问题:
on boot
    mkdir /mnt/vendor/persist/diag 0777 system system
    chmod 0777 /mnt/vendor/persist/diag/xxx_text.xml
    chown system system /mnt/vendor/persist/diag/xxx_text.xml
2、案例之unknown type sysfs_devinfo
问题背景:需要去访问一些驱动节点,因此配置了如下权限,运行radio类进程去访问sysfs_devinfo修饰的客体资源
allow radio sysfs_devinfo:file { getattr open read };
allow radio sysfs_devinfo:dir r_dir_perms;
allow radio proc_version:file {read open getattr};
报错日志:然而编译的时候报了如下关键日志
[2026-03-25T17:50:46.129Z] FAILED: out_krn/soong/.intermediates/system/sepolicy/vendor_sepolicy.cil.raw/android_common/vendor_sepolicy.cil.raw
[2026-03-25T17:50:46.129Z] vendor/tinno/product/X620AA/tinno/sepolicy/non_plat/radio.te:4:ERROR 'unknown type sysfs_devinfo' at token ';' on line 44367:
[2026-03-25T17:50:46.129Z] allow radio sysfs_devinfo:file { getattr open read };
[2026-03-25T17:50:46.129Z] checkpolicy: error(s) encountered while parsing configuration
如上日志,其中的客体类型 sysfs_devinfo 在当前参与编译的策略里根本没有被声明(unknown type),所以整次 vendor_sepolicy.cil.raw 生成失败。为什么找不到声明呢?原来sysfs_devinfo是被声明在system侧,这个配置是加到vendor侧,因为他们之间存在隔离,所以存在找不到这个客体对象上下文的定义。
解决方案:对被修饰的客体资源文件重新定义type并进行继承,然后通过允许新被定义的type进行访问
# non_plat/file.te
type sysfs_ussd, fs_type, sysfs_type, mlstrustedobject;
# non_plat/genfs_contexts
genfscon sysfs /devices/virtual/touchscreen/ICNL9922C u:object_r:sysfs_ussd:s0
genfscon sysfs /devices/virtual/touchscreen/ICNL9922C/vendor u:object_r:sysfs_ussd:s0
genfscon sysfs /devices/virtual/touchscreen/ICNL9922C/ic_ver u:object_r:sysfs_ussd:s0
# non_plat/radio.te
allow radio sysfs_ussd:file { getattr open read };
allow radio sysfs_ussd:dir r_dir_perms;
allow radio proc_version:file {read open getattr};3、违反neverallow规则解决思路(摘抄)
遇到neverallow规则问题,千万别急着去注释/剔除里面原有的规则(原生的尽量别动它!)。增加allow规则是常见的解决办法,但是随着 android 版本的升级,系统对 selinux 的管控越来越严,增加了大量的 neverallow。一般情况下,向默认标签授予权限的做法是错误的。其中许多权限都是 neverallow 规则所不允许的。按照上面方法去添加 selinux 可能会违反了 neverallow规则,编译时候会报 neverallow 相关的错误。
1)访问 default property 超过权限
这是比较常见的 neverallow 错误,比如在 systemserver 进程中去对新加的属性设置属性,运行时就会报 default propert 的错误。
遇到这种类型的错误,首先需要给新增的属性添加标签。在 property.te 中定义 property
type demo_prop, property_type;
在 Android 12 中,由于新的 neverallow,如果对 file 进行操作将会编译不过
neverallow domain {
property_type
-system_property_type
-product_property_type
-vendor_property_type
}:file no_rw_file_perms;
新的 property type 需要指出具体是什么 property type,比如用于 vendor 就改成如下
type demo_prop, property_type, vendor_property_type;
但是如果这个属性还需要在 coredomain 中使用,比如 shell,那么上面写法还是会报一样的 neverallow,需要额外添加 vendor_restricted_property_type 或者是 vendor_restricted_prop(demo_prop)
在 proerty_contexts 中匹配所需要访问的 property
prop u:object_r:demo_prop:s0
然后再根据提示添加政策,比如例子是在systemserver中操作,所以在system_server.te中添加如下政策:
allow system_server demo_prop:property_service set;
2)为新服务添加标签并解决拒绝事件
比如新添加了一个 java 服务,那么需要在 service.te 中新增对应 type: type new_service, service_manager_type; 然后在 service_contexts 中匹配servicename u:object_r: new_service:s0
最后添加根据报错添加相关政策
native 的服务一般是通过 rc 文件定义的可执行程序拉起并注册进 ServiceManager 的,所以要对可执行程序做如下权限配置:
创建一个新域 newdomain.te
type newdomain, domain;
type newdomain _exec, exec_type, file_type;
init_daemon_domain(newdomain)
在 file_contexts 添加对应标签
Service 地址 u:object_r:newdomain _exec:s0
最后添加相关的政策
payjoy移植过程中遇到过这个问题,同时注意一定要在项目文件中进行配置(不要去配Google那边的了)。部分配置如下:
./service_context.te
# Start of PayJoy changes
payjoy_access_service u:object_r:payjoy_access_service:s0
# End of PayJoy changes
./service.te
# Start of PayJoy changes
type payjoy_access_service, system_server_service, service_manager_type;
# End of PayJoy changes
不要少了任何一步,否则都有可能不成功。
3)新设备节点增加访问权限
bsp 创建了一个新的设备节点,即使权限是 777,android 层也是没有访问权限的。
同样首先在 device.te 中添加定义
type new_device, dev_type;
然后在 file_context 中添加对应标签
device 路径 u:object_r:md_block_device:s0
最后添加相关的政策
总结:对于neverallow 需要缩小权限,明确具体需要对什么添加权限。然后根据需要的类型添加对应的 type 和 context 标签, 最后添加对应的政策。

AtomGit 是由开放原子开源基金会联合 CSDN 等生态伙伴共同推出的新一代开源与人工智能协作平台。平台坚持“开放、中立、公益”的理念,把代码托管、模型共享、数据集托管、智能体开发体验和算力服务整合在一起,为开发者提供从开发、训练到部署的一站式体验。
更多推荐


 21
21 0
0- 0


 已为社区贡献4条内容

所有评论(0)