项目1:学生课堂专注度分析系统-4人脸检测-insightface_package_SCRFD_10G
学生课堂专注度分析系统中人脸检测模块使用insightface的package测试人脸检测SCRFD_10G模型,代码免费下载链接如下:
https://download.csdn.net/download/hjm213/92716734
下载后务必将代码中的路径修改为自己的路径。
# 创建新的虚拟环境
conda create -n insightface_package python=3.10 -y
conda activate insightface_package
# 安装最新版 insightface 及其依赖
pip install -U insightface
可能提示安装Visual Studio Build Tools(推荐)
# 下载并安装Microsoft C++ Build Tools
# 访问:https://visualstudio.microsoft.com/visual-cpp-build-tools/
# 安装时选择:"使用C++的桌面开发" 工作负载
# 或者最小安装:勾选"MSVC v142 - VS 2019 C++ x64/x86 生成工具"和"Windows 10 SDK"
# 安装 onnxruntime(CPU 版本)
pip install onnxruntime
#安装 onnxruntime(GPU 版本)
#pip install onnxruntime-gpu
# 安装 cmake
pip install cmake
#添加excel打印
pip install pandas openpyxl
#查看是否有,有则卸载 headless 版本
pip uninstall opencv-python-headless -y
# 2. 安装完整版(带GUI)
pip install opencv-python==4.13.0.92
1 实现cpu、gpu环境,检测图像、视频及实时视频人脸,并保存标注信息;
2 使用insighace的package测试人脸检测SCRFD_10G模型;
3 输出设备、模型、推理时间信息,检测结果保存到excel;
以图像检测为例,核心代码:
# -------------------------- 核心配置项 --------------------------
# 检测模式:"camera"(摄像头) / "video"(视频) / "image"(图片)
DETECTION_MODE = "image"
# 各模式对应的文件路径
IMAGE_PATH = "test.jpg" # 图片检测路径(支持jpg/png/bmp等)
VIDEO_PATH = "test.mp4" # 视频检测路径
SAVE_RESULT = True # 是否保存检测结果(图片/视频)
CONF_THRESHOLD = 0.5 # 人脸置信度阈值(过滤低精度结果)
# InsightFace 模型配置
MODEL_PATH = r"E:/FD_SCRFD/models/SCRFD-10GF.onnx"
INPUT_SIZE = (640, 640) # 模型输入尺寸
# Excel 保存配置
SAVE_EXCEL = True # 是否保存人脸信息到Excel
EXCEL_DIR = "insightface_results" # Excel保存目录
# -------------------------- 全局变量仅占位 --------------------------
detector = None
device_name = None
ctx_id = None
excel_data = [] # 存储所有人脸信息
# -------------------------- 初始化环境 --------------------------
def init_environment():
"""
初始化环境(仅运行时执行,避开PyCharm静态解析)
包含:工作目录切换、设备判断、检测模型加载
"""
global detector, device_name, ctx_id
# 1. 切换工作目录
os.chdir(r"E:/CSDN/Classroom_Focus_System_insightface_package_FD_SCRFD")
# 2. 自动检测 GPU/CPU
print(f"\n2. 硬件检测:")
available_providers = ort.get_available_providers()
print(f" 可用的执行提供程序: {available_providers}")
if 'CUDAExecutionProvider' in available_providers:
ctx_id = 0 # GPU
device_name = "GPU (CUDA)"
print(f" ✓ 检测到 NVIDIA GPU,将使用 CUDA 加速")
else:
ctx_id = -1 # CPU
device_name = "CPU"
print(f" ℹ 未检测到 GPU,将使用 CPU 运行")
# 3. 创建Excel保存目录
if SAVE_EXCEL:
os.makedirs(EXCEL_DIR, exist_ok=True)
# 4. 加载检测模型(核心高负载逻辑,仅运行时加载)
if not os.path.exists(MODEL_PATH):
print(f"❌ 错误:模型文件不存在 {MODEL_PATH}")
return False
detector = get_model(MODEL_PATH)
detector.prepare(ctx_id=ctx_id, input_size=INPUT_SIZE)
# 5. 打印环境信息
print("=" * 60)
print(f"工作目录:{os.getcwd()}")
print(f"使用设备:{device_name}")
print(f"检测模式:{DETECTION_MODE.upper()}")
print(f"置信度阈值:{CONF_THRESHOLD}")
print(f"模型路径:{os.path.basename(MODEL_PATH)}")
print("=" * 60)
return True
def _extract_face_info(bbox, kps, frame_idx=0, timestamp=None, inference_time=None):
"""提取人脸信息并返回字典"""
info = {
'时间戳': timestamp or datetime.now().strftime("%Y-%m-%d %H:%M:%S"),
'帧序号': frame_idx,
'人脸ID': 0,
'位置_x1': int(bbox[0]),
'位置_y1': int(bbox[1]),
'位置_x2': int(bbox[2]),
'位置_y2': int(bbox[3]),
'置信度': round(float(bbox[4]), 4),
'推理时间_ms': round(inference_time * 1000, 2) if inference_time else None,
'关键点_左眼_x': int(kps[0][0]) if kps is not None else None,
'关键点_左眼_y': int(kps[0][1]) if kps is not None else None,
'关键点_右眼_x': int(kps[1][0]) if kps is not None else None,
'关键点_右眼_y': int(kps[1][1]) if kps is not None else None,
'关键点_鼻尖_x': int(kps[2][0]) if kps is not None else None,
'关键点_鼻尖_y': int(kps[2][1]) if kps is not None else None,
'关键点_左嘴角_x': int(kps[3][0]) if kps is not None else None,
'关键点_左嘴角_y': int(kps[3][1]) if kps is not None else None,
'关键点_右嘴角_x': int(kps[4][0]) if kps is not None else None,
'关键点_右嘴角_y': int(kps[4][1]) if kps is not None else None,
}
return info
def _draw_detection(img, bboxes, kpss, inference_time=None):
"""在图像上绘制检测框和关键点"""
annotated = img.copy()
if bboxes is None or len(bboxes) == 0:
return annotated
for idx, (bbox, kps) in enumerate(zip(bboxes, kpss)):
x1, y1, x2, y2 = bbox[:4].astype(int)
score = bbox[4]
# 绘制绿色检测框
cv2.rectangle(annotated, (x1, y1), (x2, y2), (0, 255, 0), 2)
# 绘制标签(置信度)
label = f"ID:{idx + 1} {score:.2f}"
cv2.putText(annotated, label, (x1, y1 - 10),
cv2.FONT_HERSHEY_SIMPLEX, 0.6, (0, 255, 0), 2)
# 绘制红色关键点(前5个核心点)
if kps is not None:
for (x, y) in kps[:5]:
cv2.circle(annotated, (int(x), int(y)), 3, (0, 0, 255), -1)
# 如果有推理时间,显示在左上角
if inference_time is not None:
time_text = f"Inference: {inference_time * 1000:.1f}ms"
cv2.putText(annotated, time_text, (10, 60),
cv2.FONT_HERSHEY_SIMPLEX, 0.6, (0, 255, 255), 2)
return annotated
def _save_excel(source_path=None):
"""保存所有人脸信息到 Excel"""
global excel_data
if not SAVE_EXCEL or not excel_data:
return
timestamp = datetime.now().strftime("%Y%m%d_%H%M%S")
source_name = os.path.splitext(os.path.basename(source_path or "camera"))[0]
if (ctx_id == -1): # CPU
excel_path = os.path.join(EXCEL_DIR, f"faces_{source_name}_{timestamp}_cpu.xlsx")
else:
excel_path = os.path.join(EXCEL_DIR, f"faces_{source_name}_{timestamp}_gpu.xlsx")
df = pd.DataFrame(excel_data)
df.to_excel(excel_path, index=False, engine='openpyxl')
print(f"📊 人脸信息已保存:{excel_path}(共 {len(excel_data)} 条记录)")
excel_data = [] # 清空数据
def _detect_and_annotate(img, frame_idx=0, source_info="", timing=True):
"""
核心检测函数:检测人脸、过滤、绘制标注、收集Excel数据
返回:标注后的图像、检测到的人脸数量、人脸框列表、推理时间(秒)
"""
global detector, excel_data
# 1. 人脸检测(计时)
start_time = time.time() if timing else 0
bboxes, kpss = detector.detect(img)
inference_time = time.time() - start_time if timing else None
# 2. 过滤低置信度结果
valid_faces = []
valid_kps = []
if bboxes is not None and len(bboxes) > 0:
for bbox, kps in zip(bboxes, kpss):
if bbox[4] >= CONF_THRESHOLD:
valid_faces.append(bbox)
valid_kps.append(kps)
bboxes = np.array(valid_faces) if valid_faces else None
kpss = np.array(valid_kps) if valid_kps else None
face_count = len(valid_faces) if valid_faces else 0
# 3. 绘制标注(显示推理时间)
annotated_img = _draw_detection(img, bboxes, kpss, inference_time)
# 4. 收集人脸信息到Excel
if bboxes is not None and len(bboxes) > 0:
for idx, (bbox, kps) in enumerate(zip(bboxes, kpss)):
face_info = _extract_face_info(bbox, kps, frame_idx=frame_idx, inference_time=inference_time)
face_info['人脸ID'] = idx + 1
face_info['来源'] = source_info
excel_data.append(face_info)
return annotated_img, face_count, bboxes, inference_time
# -------------------------- 检测函数 --------------------------
def detect_image(image_path):
"""本地图片人脸检测"""
global detector, device_name, excel_data
# 1. 检查图片文件
if not os.path.exists(image_path):
print(f"❌ 错误:图片文件 {image_path} 不存在!")
return
# 2. 读取图片
img = cv2.imread(image_path)
if img is None:
print(f"❌ 错误:无法读取图片 {image_path}(格式不支持/文件损坏)")
return
# 3. 人脸检测(计时)
print(f"\n🔍 正在检测图片:{image_path}")
print("-" * 60)
annotated_img, face_count, bboxes, inference_time = _detect_and_annotate(
img, frame_idx=0, source_info=image_path, timing=True
)
# 4. 添加检测信息文本
info_text = f"Faces: {face_count} | Time: {inference_time:.3f}s ({inference_time * 1000:.1f}ms) | {device_name}"
cv2.putText(annotated_img, info_text, (10, 30),
cv2.FONT_HERSHEY_SIMPLEX, 0.7, (0, 255, 255), 2)
# 5. 输出检测结果
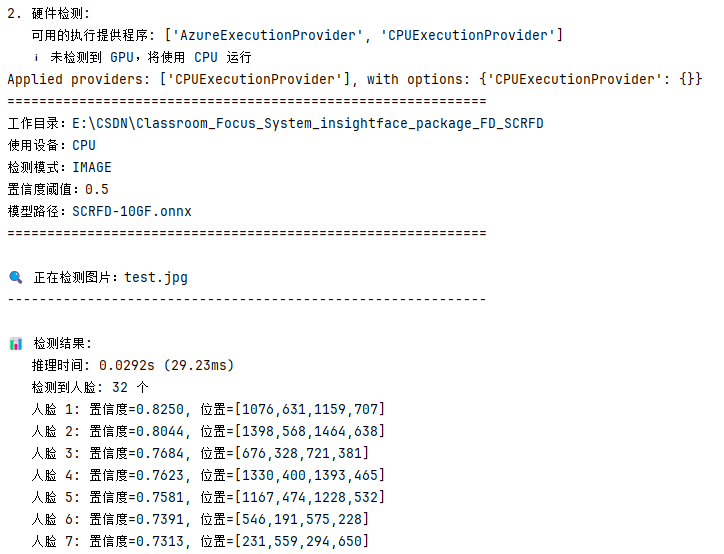
print(f"\n📊 检测结果:")
print(f" 推理时间: {inference_time:.4f}s ({inference_time * 1000:.2f}ms)")
print(f" 检测到人脸: {face_count} 个")
if face_count > 0:
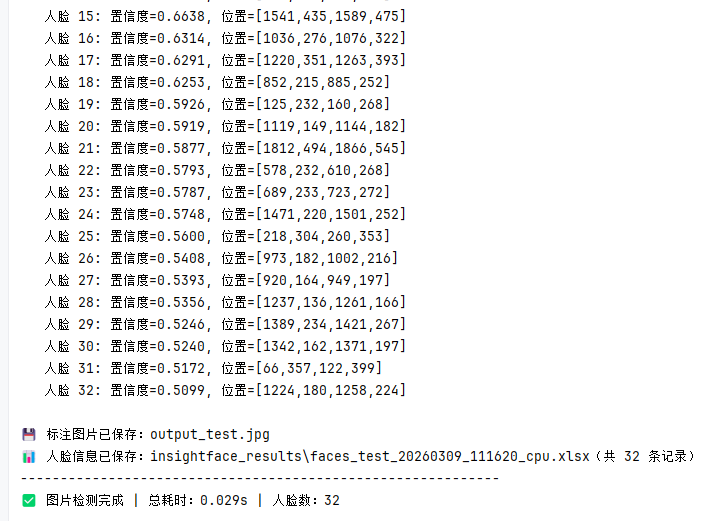
for idx, bbox in enumerate(bboxes):
print(f" 人脸 {idx + 1}: 置信度={bbox[4]:.4f}, "
f"位置=[{int(bbox[0])},{int(bbox[1])},{int(bbox[2])},{int(bbox[3])}]")
else:
print(" ❌ 未检测到任何人脸")
# 6. 保存检测结果
if SAVE_RESULT:
save_path = f"output_{os.path.basename(image_path)}"
cv2.imwrite(save_path, annotated_img)
print(f"\n💾 标注图片已保存:{save_path}")
# 7. 保存Excel
_save_excel(image_path)
# 8. 显示结果
print("-" * 60)
print(f"✅ 图片检测完成 | 总耗时:{inference_time:.3f}s | 人脸数:{face_count}")
cv2.imshow('InsightFace Detection (Image)', annotated_img)
print("\n💡 提示:按任意键关闭图片窗口...")
cv2.waitKey(0)
cv2.destroyAllWindows()
代码运行及excel保存截图:

篇幅受限代码未完全展示,学生课堂专注度分析系统中人脸检测模块使用insightface的package测试人脸检测SCRFD模型代码免费下载链接如下:
https://download.csdn.net/download/hjm213/92716734
下载后务必将代码中的路径修改为自己的路径。

AtomGit 是由开放原子开源基金会联合 CSDN 等生态伙伴共同推出的新一代开源与人工智能协作平台。平台坚持“开放、中立、公益”的理念,把代码托管、模型共享、数据集托管、智能体开发体验和算力服务整合在一起,为开发者提供从开发、训练到部署的一站式体验。
更多推荐

 18
18 0
0- 0


 已为社区贡献3条内容

所有评论(0)