多模态模型:【MiniCPM-o 4.5】
🚩 MiniCPM-o 4.5 笔记它来咯!
文章目录
1. 项目简介
1.1 仓库地址
- github:https://github.com/OpenBMB/MiniCPM-o/blob/main/README_zh.md
- huggingface:https://huggingface.co/openbmb/MiniCPM-o-4_5
1.2 介绍
- 总参数量 9B (内存:17.4 GB)
- 视觉、语音及全双工多模态实时流式交互
- 全双工:双向同时通信。AI和用户可以同时说话和接收信息,无需等待对方说完。
- 流式:边生成边输出。
- 能力接近 Gemini 2.5 Flash(截止2026.3.18,最新 Gemini 3.1)
- 中英双语实时交互,并支持声音克隆
2. 论文阅读
2.1 背景
最显著的挑战来自于运行具有大量参数和广泛计算的多模态大型语言模型的巨大成本。 因此,大多数多模态大型语言模型需要部署在高性能云服务器上,这极大地限制了它们的应用范围,例如移动、离线、能源敏感和隐私保护的场景。
2.2 创新点
- 领先的性能:MiniCPM-Llama3-V 2.5 在
OpenCompass 数据集上取得了优于 GPT-4V1106、Gemini Pro 和 Claude 3 的性能。OpenCompass 数据集是一个对 11 个常用基准的综合评估。 - 强大的OCR能力:在
OCRBench上的表现优于 GPT-4V、Gemini Pro 和 Qwen-VL-Max。它还支持高实用性功能,如表格到 Markdown 的转换和完整的 OCR 内容转录。这些主要归功于在任何宽高比下使用的 180 万像素高分辨率(例如,1344
×1344)图像感知技术。 - 可信赖的行为:基于
RLAIF-V和RLHF-V技术,这些技术通过 AI/人类反馈来调整 MLLM 的行为,MiniCPM-Llama3-V 2.5 表现出更可信赖的行为,在 Object HalBench 上实现了比 GPT-4V-1106 更低的幻觉率。 - 多语言支持:受到
VisCPM研究结果的启发,多语言LLM的集成显著减轻了低资源语言对多模态训练数据的严重依赖。在此基础上,高质量的多语言多模态指令调优有助于MiniCPM-Llama3-V 2.5将其多模态能力推广到30多种语言。 - 高效端侧部署:我们系统地整合了一套端侧优化技术,包括量化、内存优化、编译优化和NPU加速,从而能够在端侧设备上实现高效部署。
2.3 实验验证
-
预训练阶段(训练 visual encoder 和 compression layer ,其他层冻结)(包含三阶段训练)
- Stage-1:随机初始化压缩层并训练,即连接视觉编码器和LLM的跨膜态对齐层。冻结其他参数,视觉编码器分辨率为 224 * 224
- Stage-2:训练视觉编码器,其他参数冻结。扩展训练分辨率到 448 * 448
- Stage-3:训练视觉编码器和压缩层,其他参数冻结。使用自适应视觉编码策略,以适应任意宽高比的高分辨率输入
- 下面是用到的数据集:
Image Captioning Data(图像字幕数据,520M = 5.2亿条):COCO, VG, CC3M, CC12M, LAION-COCO, COYO, LAION-2B; AIC, LAION-2B-Chinese, WuKong, Zero-Chinese, etc.OCR+Knowledge(光学字符识别数据,50M = 5000万条):WIT, IDL, SynthText, SynthDoG-en, SynthDoG-zh, ArxivCap, etc; WIT, LAION-2B-OCR.
-
监督微调阶段(采用全参微调)
- 针对高质量VQA数据集进行训练
- 第一部分:增强模型的基本识别能力(短相应)
- 第二部分:提高其生成详细响应和遵循人类指令的能力(长相应)
-
RLAIF-V阶段(本质是强化学习 DPO)
- Step-1:响应生成。以较高温度,生成多个响应,抽取10个响应
- Step-2:反馈收集。开源MLLM对分治策略得到的子二元问题进行评分
- Step-3:直接偏好优化。根据上轮评分,进行DPO偏好学习(需自行构建偏好数据集,6K条)
-
端侧评估
- 小米 14 Pro (Snapdragon 8 Gen 3)
- vivo X100 Pro (Mediatek Dimensity 9300)
- Macbook Pro (M1)
- 采用的指标为:
Encoding Latency (编码延迟):以秒为单位 (s)。计算包括模型加载时间和编码时间。Decoding Throughput (解码吞吐量):以 tokens/s 为单位。
-
综合性测评指标:
OpenCompass评估平台 https://rank.opencompass.org.cn/home
3. 项目复现
3.1 模型下载至服务器
- 软件工具:
FinalShell,版本4.5.12,用于高效文件传输 - 从
huggingface链接进行下载,按照步骤使用anaconda配置环境,注意assets/token2wav模型也需要下载,方可使用 - 编程工具:
Cursor,进行linux服务器的远程ssh连接
环境简单配置
pip install "transformers==4.51.0" accelerate "torch>=2.3.0,<=2.8.0" "torchaudio<=2.8.0" "minicpmo-utils[all]>=1.0.5"
pip install minicpmo-utils[all]
3.2 模型架构
-
架构(具体架构可采用后文的代码查看)
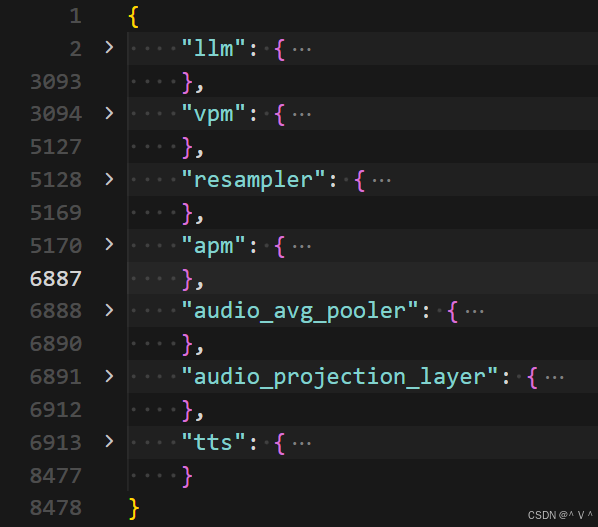
-
打印模型架构的 python 脚本
# 1. 修改引入,使用最通用的 AutoModel
from transformers import AutoModel

# 模型路径
model_id = "model/"

# 2. 加载模型
# 使用 AutoModel 可以自动处理 remote_code 定义的特殊结构
model = AutoModel.from_pretrained(model_id, trust_remote_code=True, device_map="cpu")

# 3. 打印结构
output_path = "structure/MiniCPM-model-structure.json"

import json
import torch.nn as nn

def get_weight_shape(module):
    """安全地获取权重张量的形状,处理 ParametrizationList 等特殊情况"""
    try:
        # 先检查是否有 weight 属性
        if not hasattr(module, 'weight'):
            return None

        weight = module.weight

        # 处理 ParametrizationList
        if hasattr(weight, 'parametrizations'):
            # 获取实际的参数化张量
            parametrizations = weight.parametrizations.weight
            if parametrizations and hasattr(parametrizations[0], 'original'):
                return list(parametrizations[0].original.shape)

        # 直接是 Tensor
        if hasattr(weight, 'shape'):
            return list(weight.shape)

    except Exception as e:
        # 如果出错,返回 None
        print(f"警告: 无法获取 {module.__class__.__name__} 的权重形状: {e}")

    return None

def build_clean_tree(model):
    """
    构建一个没有 'children' 字段的纯净树状结构。
    元数据使用下划线前缀(如 _type)以区分于子模块名称。
    """
    tree = {}

    for name, module in model.named_modules():
        # 跳过最外层的空名节点
        if name == "":
            continue

        parts = name.split('.')
        current_level = tree

        # 1. 逐层深入
        for part in parts:
            if part not in current_level:
                current_level[part] = {}
            current_level = current_level[part]

        # 2. 写入模块类型
        current_level["_type"] = module.__class__.__name__

        # 3. 获取权重形状(使用安全的函数)
        weight_shape = get_weight_shape(module)
        if weight_shape:
            current_level["_shape"] = weight_shape

        # 4. 添加其他有用信息
        if hasattr(module, 'bias') and module.bias is not None:
            current_level["_has_bias"] = True

    return tree

# --- 主程序 ---
print("正在生成精简版层级结构...")
clean_structure = build_clean_tree(model)

# 保存为 JSON
with open(output_path, "w", encoding="utf-8") as f:
    json.dump(clean_structure, f, indent=4, ensure_ascii=False)

print(f"已保存到 {output_path}")
print(f"结构树深度: {len(str(clean_structure).splitlines())} 行")

# 可选:打印树状结构的前几层看看
def print_tree(node, indent=0, max_depth=3, current_depth=0):
    if current_depth >= max_depth:
        print("  " * indent + "...")
        return

    for key, value in node.items():
        if key.startswith('_'):
            continue
        print("  " * indent + f"{key}: {value.get('_type', '')}")
        if isinstance(value, dict):
            print_tree(value, indent + 1, max_depth, current_depth + 1)

print("\n树状结构预览(前3层):")
print_tree(clean_structure, max_depth=3)
3.3 模型加载 & 推理
- 注意文件位置与相对路径名
/inference
	推理脚本.py
/model
	/assets
		/token2wav
			音视频模型权重.pt
		测试文件.mp4
	模型权重.safetensors
/structure
	模型结构查看脚本.py
- 节省显存的推理代码(仅视觉)
import torch
from transformers import AutoModel

# Load omni model (default: init_vision=True, init_audio=True, init_tts=True)
# For vision-only model: set init_audio=False and init_tts=False
# For audio-only model: set init_vision=False
model = AutoModel.from_pretrained(
    "model/",
    trust_remote_code=True,
    attn_implementation="sdpa", # sdpa or flash_attention_2
    torch_dtype=torch.bfloat16,
    init_vision=True,
    init_audio=False,
    init_tts=False,
    device_map="cuda:0",
    local_files_only=True
)

model.eval().cuda()

# 仅视觉,否则跑不起来
from PIL import Image

image = Image.open("model/assets/fossil.png").convert("RGB")
question = "What is in the image?"
msgs = [{"role": "user", "content": [image, question]}]

res = model.chat(msgs=msgs, use_tts_template=False)
print(res)
上述代码输入的图像: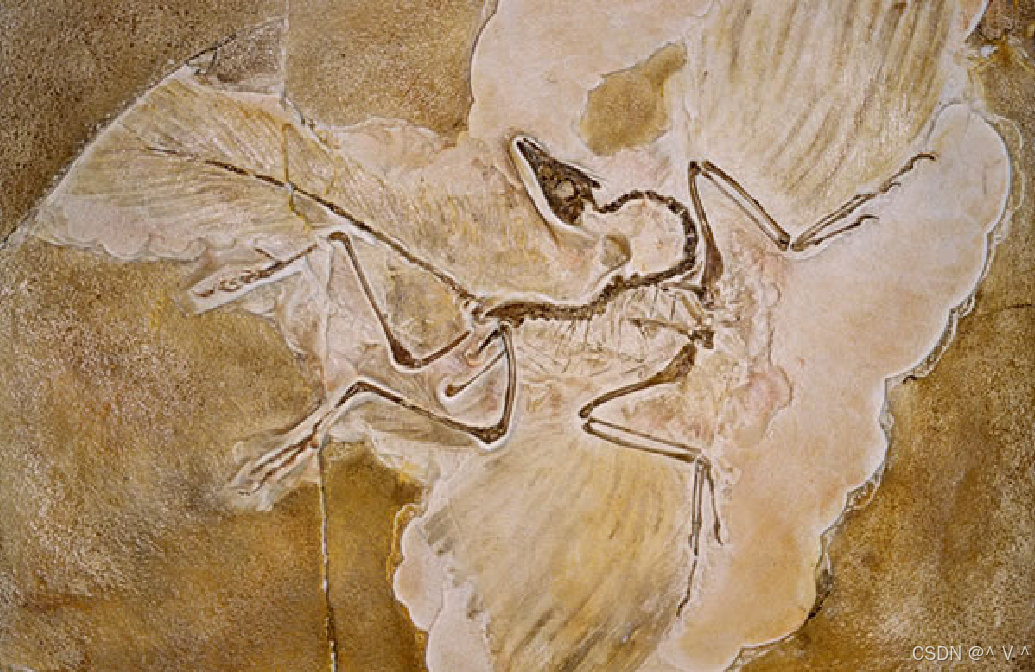
模型输出:
The image shows a fossilized bird, likely preserved in sedimentary rock. The fossil displays the skeletal structure of a small bird, including its wings, legs, skull, and ribcage, all imprinted in the rock matrix. The surrounding matrix is a light brown or beige color, with some areas appearing more eroded or weathered, which helps highlight the delicate bone impressions.
This type of fossil is often found in fine-grained sedimentary deposits (like shale or limestone) where rapid burial helped preserve soft tissues and fine details. The wings are spread out, suggesting the bird may have been captured mid-movement or in a resting position at the time of burial.
Such fossils are important for understanding the evolution of birds and their place in the avian lineage. They may belong to extinct species from the Mesozoic or Cenozoic eras, depending on the geological context.
In summary:
👉 A fossilized bird skeleton embedded in rock, showing detailed bone structure and likely representing an extinct species from deep geological time.
翻译:
图片显示了一只鸟类化石,可能保存在沉积岩中。该化石展示了一只小鸟的骨骼结构,包括翅膀、腿、头骨和胸腔,所有这些都印在岩石基质中。周围的基质是浅棕色或米色,有些区域似乎被侵蚀或风化得更严重,这有助于突出精致的骨痕。
这种化石通常存在于细粒沉积矿床(如页岩或石灰岩)中,快速埋藏有助于保护软组织和精细细节。翅膀展开,表明这只鸟可能是在运动中被捕获的,或者在埋葬时处于休息状态。
这些化石对于理解鸟类的进化及其在鸟类谱系中的地位非常重要。根据地质背景,它们可能属于中生代或新生代的已灭绝物种。
总之:
👉 嵌在岩石中的鸟类骨骼化石,显示了详细的骨骼结构,可能代表了深地质时代灭绝的物种。
- 采用官方推理代码(全双工,爆显存预警)
import torch
from transformers import AutoModel

# Load omni model (default: init_vision=True, init_audio=True, init_tts=True)
# For vision-only model: set init_audio=False and init_tts=False
# For audio-only model: set init_vision=False
model = AutoModel.from_pretrained(
    "model/",
    trust_remote_code=True,
    attn_implementation="sdpa", # sdpa or flash_attention_2
    torch_dtype=torch.bfloat16,
    init_vision=True,
    init_audio=True,
    init_tts=True,
    device_map="cuda:1",
    local_files_only=True
)

model.eval().cuda()

# Initialize TTS for audio output
model.init_tts()

# Convert half-duplex model to duplex mode
duplex_model = model.as_duplex()

# Convert duplex model back to half-duplex mode
model = duplex_model.as_simplex(reset_session=True)


# 聊天推理代码
from minicpmo.utils import get_video_frame_audio_segments

model.init_tts()

video_path = "model/assets/Skiing.mp4"

# Optional: Set reference audio for voice cloning
ref_audio_path = "model/assets/HT_ref_audio.wav"
sys_msg = model.get_sys_prompt(ref_audio=ref_audio_path, mode="omni", language="en")

# Use stack_frames=5 for high refresh rate mode
video_frames, audio_segments, stacked_frames = get_video_frame_audio_segments(video_path, stack_frames=1)
omni_contents = []
for i in range(len(video_frames)):
    omni_contents.append(video_frames[i])
    omni_contents.append(audio_segments[i])
    if stacked_frames is not None and stacked_frames[i] is not None:
        omni_contents.append(stacked_frames[i])

msg = {"role": "user", "content": omni_contents}
msgs = [sys_msg, msg]

# Set generate_audio=True and output_audio_path to save TTS output
generate_audio = True
output_audio_path = "output.wav"

res = model.chat(
    msgs=msgs,
    max_new_tokens=4096,
    do_sample=True,
    temperature=0.7,
    use_tts_template=True,
    enable_thinking=False,
    omni_mode=True,  # Required for omni inference
    generate_audio=generate_audio,
    output_audio_path=output_audio_path,
    max_slice_nums=1,  # Increase for HD mode
)
print(res)

# Example output: "The person in the picture is skiing down a snowy mountain slope."
# import IPython
# IPython.display.Audio("output.wav")
- 体验感受
-
全双工显存占用高,不可以放心食用 (V100显卡,32GB显存爆掉了)

-
尝试三卡并行,暂时未成功
-
改用纯视觉对话,成功,显存占用越18GB(单张图像),显存占用取决于你输入的图像数量
-

AtomGit 是由开放原子开源基金会联合 CSDN 等生态伙伴共同推出的新一代开源与人工智能协作平台。平台坚持“开放、中立、公益”的理念,把代码托管、模型共享、数据集托管、智能体开发体验和算力服务整合在一起,为开发者提供从开发、训练到部署的一站式体验。
更多推荐

 10
10 0
0- 0


 已为社区贡献3条内容

所有评论(0)