LangGraph完整教程(2026版)构建智能Agent工作流,掌握2025-2026年大模型开发新特性
文章是一份全面的LangGraph框架教程,从基础概念到2025-2026年新特性。详细介绍了StateGraph、State、Nodes和Edges等核心组件,提供了对话机器人、工具调用Agent等实战示例。重点讲解了Command API、interrupt()函数等最新功能,以及状态设计、节点设计等最佳实践。适合开发者学习构建有状态、多步骤的LLM应用和智能Agent系统。
版本说明
本教程基于 LangGraph 1.0.8(2026年2月最新版),涵盖所有核心概念和2025-2026年发布的新特性。
目录
- 基础概念
- 环境安装
- 核心概念详解
- 实战示例
- 高级特性
- 2025-2026新特性
- 最佳实践
- 常见模式
- 练习题
第一部分:基础概念
1.1 什么是 LangGraph?
LangGraph 是一个用于构建有状态、多步骤 LLM 应用的框架,特别适合构建:
- 代理(Agent)工作流
- 多代理系统
- 复杂的对话系统
- 需要人工审核的工作流
核心理念: 将应用建模为有向图,其中节点执行计算,边定义流程。
1.2 核心组件
StateGraph (状态图)
├── State (状态)
├── Nodes (节点)
├── Edges (边)
│   ├── Normal Edges (普通边)
│   └── Conditional Edges (条件边)
└── Checkpointer (检查点)
第二部分:环境安装
# 安装基础包
pip install langgraph langchain langchain-openai

# 如果使用 Anthropic
pip install langchain-anthropic

# 新增:Supervisor 库(可选)
pip install langgraph-supervisor

# 其他可选依赖
pip install langchain-community
版本检查:
python -c "import langgraph; print(langgraph.__version__)"
# 应该显示 1.0.8 或更高
第三部分:核心概念详解
3.1 State (状态)
状态是在节点之间传递的数据结构。
from typing import TypedDict, Annotated
from langgraph.graph.message import add_messages

# 方式1: 使用 TypedDict
classAgentState(TypedDict):
    messages: Annotated[list, add_messages]  # 自动合并消息
    user_info: str
    current_step: int

# 方式2: 使用简单字典
state = {
"messages": [],
"counter": 0
}
重要: Annotated[list, add_messages] 会自动合并新旧消息,而不是覆盖。
3.2 Nodes (节点)
节点是执行实际工作的函数。
defmy_node(state: AgentState) -> dict:
"""
    节点函数必须:
    1. 接收 state 作为参数
    2. 返回字典,用于更新 state
    """
    messages = state["messages"]

# 执行某些操作
    result = do_something(messages)

# 返回状态更新
return {
"messages": [result],
"current_step": state["current_step"] + 1
    }
3.3 Edges (边)
边定义节点之间的连接关系。
from langgraph.graph import StateGraph, END

# 创建图
workflow = StateGraph(AgentState)

# 添加节点
workflow.add_node("node1", node1_function)
workflow.add_node("node2", node2_function)

# 普通边: 总是从 node1 到 node2
workflow.add_edge("node1", "node2")

# 条件边: 根据条件决定下一步
defrouter(state: AgentState) -> str:
if state["current_step"] > 5:
return"end"
else:
return"continue"

workflow.add_conditional_edges(
"node2",
    router,  # 路由函数
    {
"continue": "node1",
"end": END
    }
)

# 设置入口点
workflow.set_entry_point("node1")
第四部分:实战示例
示例1: 简单的对话机器人
from langchain_anthropic import ChatAnthropic
from langgraph.graph import StateGraph, END
from langgraph.graph.message import add_messages
from typing import Annotated, TypedDict

# 1. 定义状态
classChatState(TypedDict):
    messages: Annotated[list, add_messages]

# 2. 创建 LLM
llm = ChatAnthropic(model="claude-3-5-sonnet-20241022")

# 3. 定义节点
defchatbot(state: ChatState):
return {"messages": [llm.invoke(state["messages"])]}

# 4. 构建图
graph = StateGraph(ChatState)
graph.add_node("chatbot", chatbot)
graph.set_entry_point("chatbot")
graph.add_edge("chatbot", END)

# 5. 编译
app = graph.compile()

# 6. 使用
from langchain_core.messages import HumanMessage

response = app.invoke({
"messages": [HumanMessage(content="你好!")]
})

print(response["messages"][-1].content)
示例2: 带工具调用的 Agent
from langchain_core.tools import tool
from langchain_core.messages import ToolMessage
import json

# 1. 定义工具
@tool
defget_weather(location: str) -> str:
"""获取指定地点的天气"""
# 模拟天气数据
returnf"{location}的天气是晴天,温度25度"

@tool
defsearch_web(query: str) -> str:
"""搜索网络"""
returnf"搜索结果: {query}"

tools = [get_weather, search_web]

# 2. 绑定工具到 LLM
llm_with_tools = llm.bind_tools(tools)

# 3. 定义状态
classAgentState(TypedDict):
    messages: Annotated[list, add_messages]

# 4. 定义节点
defagent(state: AgentState):
"""调用 LLM"""
return {"messages": [llm_with_tools.invoke(state["messages"])]}

deftool_node(state: AgentState):
"""执行工具"""
    messages = state["messages"]
    last_message = messages[-1]

    tool_calls = last_message.tool_calls
    results = []

for tool_call in tool_calls:
# 找到对应的工具
        tool_name = tool_call["name"]
        tool_to_call = {t.name: t for t in tools}[tool_name]

# 调用工具
        result = tool_to_call.invoke(tool_call["args"])

# 创建工具消息
        results.append(
            ToolMessage(
                content=str(result),
                tool_call_id=tool_call["id"]
            )
        )

return {"messages": results}

# 5. 路由函数
defshould_continue(state: AgentState) -> str:
"""判断是否需要继续调用工具"""
    last_message = state["messages"][-1]

if hasattr(last_message, 'tool_calls') and last_message.tool_calls:
return"tools"
return"end"

# 6. 构建图
workflow = StateGraph(AgentState)

workflow.add_node("agent", agent)
workflow.add_node("tools", tool_node)

workflow.set_entry_point("agent")

workflow.add_conditional_edges(
"agent",
    should_continue,
    {
"tools": "tools",
"end": END
    }
)

workflow.add_edge("tools", "agent")

app = workflow.compile()

# 7. 测试
from langchain_core.messages import HumanMessage

result = app.invoke({
"messages": [HumanMessage(content="北京的天气怎么样?")]
})

for msg in result["messages"]:
    print(f"{msg.__class__.__name__}: {msg.content}")
示例3: 多代理协作
classMultiAgentState(TypedDict):
    messages: Annotated[list, add_messages]
    current_agent: str
    task_result: dict

# 研究员代理
defresearcher(state: MultiAgentState):
    llm = ChatAnthropic(model="claude-3-5-sonnet-20241022")

    prompt = f"""你是一个研究员。请针对以下问题进行研究:
{state['messages'][-1].content}

    提供详细的研究结果。"""

    response = llm.invoke([HumanMessage(content=prompt)])

return {
"messages": [response],
"current_agent": "writer",
"task_result": {"research": response.content}
    }

# 写作代理
defwriter(state: MultiAgentState):
    llm = ChatAnthropic(model="claude-3-5-sonnet-20241022")

    research_data = state["task_result"].get("research", "")

    prompt = f"""你是一个专业写作者。基于以下研究结果,写一篇文章:

    研究结果:
{research_data}

    请写一篇简洁专业的文章。"""

    response = llm.invoke([HumanMessage(content=prompt)])

return {
"messages": [response],
"current_agent": "reviewer"
    }

# 审核代理
defreviewer(state: MultiAgentState):
    llm = ChatAnthropic(model="claude-3-5-sonnet-20241022")

    article = state["messages"][-1].content

    prompt = f"""你是一个审核者。请审核以下文章,提出改进建议:

{article}

    如果文章质量很好,回复"APPROVED"。否则提出具体改进建议。"""

    response = llm.invoke([HumanMessage(content=prompt)])

return {"messages": [response]}

# 路由逻辑
defroute_agent(state: MultiAgentState) -> str:
    current = state.get("current_agent", "researcher")

if current == "researcher":
return"writer"
elif current == "writer":
return"reviewer"
else:
# 检查是否通过审核
        last_msg = state["messages"][-1].content
if"APPROVED"in last_msg:
return END
else:
return"writer"# 返回写作环节修改

# 构建图
workflow = StateGraph(MultiAgentState)

workflow.add_node("researcher", researcher)
workflow.add_node("writer", writer)
workflow.add_node("reviewer", reviewer)

workflow.set_entry_point("researcher")

workflow.add_edge("researcher", "writer")
workflow.add_edge("writer", "reviewer")

workflow.add_conditional_edges(
"reviewer",
lambda state: "end"if"APPROVED"in state["messages"][-1].content else"writer",
    {
"writer": "writer",
"end": END
    }
)

app = workflow.compile()
第五部分:高级特性
5.1 持久化 (Checkpointing)
持久化允许你保存和恢复图的执行状态。
from langgraph.checkpoint.memory import MemorySaver

# 创建检查点
checkpointer = MemorySaver()

# 编译时添加检查点
app = graph.compile(checkpointer=checkpointer)

# 使用线程ID来跟踪会话
config = {"configurable": {"thread_id": "user_123"}}

# 第一轮对话
response1 = app.invoke(
    {"messages": [HumanMessage(content="我叫小明")]},
    config=config
)

# 第二轮对话 - 会记住上下文
response2 = app.invoke(
    {"messages": [HumanMessage(content="我叫什么名字?")]},
    config=config
)
生产环境持久化:
from langgraph.checkpoint.postgres import PostgresSaver

# 使用 PostgreSQL 持久化
checkpointer = PostgresSaver.from_conn_string(
"postgresql://user:pass@localhost/dbname"
)

app = graph.compile(checkpointer=checkpointer)
5.2 流式输出
# 流式获取每个节点的输出
for chunk in app.stream({"messages": [HumanMessage(content="你好")]}):
    print(chunk)
    print("---")

# 流式获取tokens
asyncfor event in app.astream_events(
    {"messages": [HumanMessage(content="你好")]},
    version="v1"
):
if event["event"] == "on_chat_model_stream":
        print(event["data"]["chunk"].content, end="")
第六部分:2025-2026新特性
6.1 Command API ⭐ (最重要的新特性)
什么是 Command?
Command 允许节点同时完成状态更新和路由决策,大幅简化代码。
对比:旧方法 vs 新方法
# ❌ 旧方法:需要分开处理
defmy_node(state):
return {"counter": state["counter"] + 1}

defrouter(state):
if state["counter"] > 5:
return"end"
return"continue"

workflow.add_conditional_edges("my_node", router, {...})

# ✅ 新方法:一步完成
from langgraph.types import Command

defmy_node(state):
if state["counter"] > 5:
return Command(
            update={"counter": state["counter"] + 1},
            goto=END
        )
else:
return Command(
            update={"counter": state["counter"] + 1},
            goto="my_node"
        )
实战示例:智能审批流程
from langgraph.graph import StateGraph, END, START
from langgraph.types import Command
from typing import TypedDict

classApprovalState(TypedDict):
    request: str
    approved: bool
    retry_count: int
    reason: str

defanalyze_request(state: ApprovalState):
"""分析请求并决定是否需要审批"""

    risk_level = assess_risk(state["request"])

if risk_level == "low":
# 低风险:自动批准
return Command(
            update={
"approved": True,
"reason": "自动批准 - 低风险操作"
            },
            goto="execute"
        )
elif risk_level == "high":
# 高风险:需要人工审批
return Command(
            update={"approved": False},
            goto="human_approval"
        )
else:
# 中等风险:AI 辅助决策
return Command(goto="ai_review")

defhuman_approval(state: ApprovalState):
"""人工审批"""
# ... 等待人工输入

if state["approved"]:
return Command(goto="execute")
else:
if state["retry_count"] < 3:
return Command(
                update={"retry_count": state["retry_count"] + 1},
                goto="analyze_request"# 重新分析
            )
else:
return Command(goto=END)

defexecute(state: ApprovalState):
"""执行操作"""
if state["approved"]:
# 执行逻辑
        print(f"执行: {state['request']}")
return {}

# 构建图 - 不需要 conditional_edges!
workflow = StateGraph(ApprovalState)
workflow.add_node("analyze_request", analyze_request)
workflow.add_node("human_approval", human_approval)
workflow.add_node("ai_review", ai_review_node)
workflow.add_node("execute", execute)

workflow.set_entry_point("analyze_request")
# 节点自己通过 Command 决定路由!

app = workflow.compile()
Command 的优势:
- ✅ 代码更简洁:状态和路由逻辑在一起
- ✅ 更灵活:每个节点可以动态决定下一步
- ✅ 减少错误:不需要同步多个地方的逻辑
- ✅ 适合复杂流程:轻松实现复杂的决策树
6.2 interrupt() 函数 ⭐ (超级实用)
什么是 interrupt()?
一个革命性的函数,让人工介入(Human-in-the-Loop)变得极其简单。
对比:旧方法 vs 新方法
# ❌ 旧方法:需要在编译时指定
app = workflow.compile(
    checkpointer=checkpointer,
    interrupt_before=["approval_node"]  # 硬编码,不够灵活
)

# ✅ 新方法:在节点内部动态中断
from langgraph.types import interrupt, Command

defapproval_node(state):
# 暂停并请求审批
    user_decision = interrupt({
"question": "是否批准此操作?",
"details": state["details"],
"options": ["approve", "reject", "modify"]
    })

# 根据用户决策继续
if user_decision == "approve":
return Command(goto="execute")
elif user_decision == "reject":
return Command(goto=END)
else:
        modifications = interrupt("请输入修改内容:")
return Command(
            update={"details": modifications},
            goto="reprocess"
        )
完整示例:邮件审核系统
from langgraph.types import interrupt, Command
from langgraph.graph import StateGraph, END
from langgraph.checkpoint.memory import MemorySaver
from typing import TypedDict

classEmailState(TypedDict):
    to: str
    subject: str
    body: str
    approved: bool

defdraft_email(state: EmailState):
"""AI 起草邮件"""
    draft = generate_email_with_ai(state["to"])
return {
"subject": draft["subject"],
"body": draft["body"]
    }

defreview_email(state: EmailState):
"""人工审核邮件"""

# 第一次中断:展示邮件给用户
    approval = interrupt({
"message": "请审核以下邮件",
"to": state["to"],
"subject": state["subject"],
"body": state["body"],
"actions": ["send", "edit", "cancel"]
    })

if approval["action"] == "send":
return Command(
            update={"approved": True},
            goto="send_email"
        )

elif approval["action"] == "edit":
# 第二次中断:获取编辑内容
        edits = interrupt({
"message": "请修改邮件内容",
"current_subject": state["subject"],
"current_body": state["body"]
        })

return Command(
            update={
"subject": edits.get("subject", state["subject"]),
"body": edits.get("body", state["body"])
            },
            goto="review_email"# 重新审核
        )

else:  # cancel
return Command(goto=END)

defsend_email(state: EmailState):
"""发送邮件"""
if state["approved"]:
        send_email_api(state["to"], state["subject"], state["body"])
        print(f"✓ 邮件已发送到 {state['to']}")
return {}

# 构建图
workflow = StateGraph(EmailState)
workflow.add_node("draft_email", draft_email)
workflow.add_node("review_email", review_email)
workflow.add_node("send_email", send_email)

workflow.set_entry_point("draft_email")
workflow.add_edge("draft_email", "review_email")

# 必须使用 checkpointer
app = workflow.compile(checkpointer=MemorySaver())

# 使用
config = {"configurable": {"thread_id": "email-123"}}

# 第一次运行 - 会在审核处暂停
result = app.invoke({
"to": "boss@company.com",
"subject": "",
"body": "",
"approved": False
}, config)

# 查看中断信息
print(result.get("__interrupt__"))

# 用户做出决策后继续
result = app.invoke(
    Command(resume={"action": "send"}),
    config
)
高级用法:工具调用审批
defreview_tool_calls(state):
"""逐个审核 AI 要调用的工具"""

    tool_calls = state["messages"][-1].tool_calls
    approved_calls = []

for tool_call in tool_calls:
# 展示工具调用详情
        approval = interrupt({
"tool": tool_call["name"],
"args": tool_call["args"],
"question": f"允许调用 {tool_call['name']} 工�吗?",
"risk_level": assess_tool_risk(tool_call)
        })

if approval["decision"] == "approve":
# 用户可能修改了参数
if"modified_args"in approval:
                tool_call["args"] = approval["modified_args"]
            approved_calls.append(tool_call)

elif approval["decision"] == "skip":
continue# 跳过这个工具

else:  # reject
return Command(goto=END)

return Command(
        update={"approved_tool_calls": approved_calls},
        goto="execute_tools"
    )
6.3 工具直接更新状态
新特性:工具现在可以返回 Command,直接更新图的状态和控制流程。
from langchain_core.tools import tool
from langgraph.types import Command

@tool
defsmart_search(query: str, state) -> Command:
"""智能搜索 - 可以更新状态和决定路由"""

    results = search_api(query)

# 根据结果质量决定下一步
if len(results) == 0:
return Command(
            update={
"search_results": [],
"needs_refinement": True
            },
            goto="refine_query"# 需要优化查询
        )
elif len(results) > 100:
return Command(
            update={
"search_results": results[:10],
"too_broad": True
            },
            goto="narrow_search"
        )
else:
return Command(
            update={
"search_results": results,
"search_count": state.get("search_count", 0) + 1
            },
            goto="process_results"
        )

@tool
defvalidate_and_route(data: str) -> Command:
"""验证数据并决定路由"""

    validation_result = validate(data)

if validation_result["valid"]:
return Command(
            update={"validated_data": data},
            goto="process"
        )
elif validation_result["can_fix"]:
return Command(
            update={"errors": validation_result["errors"]},
            goto="auto_fix"
        )
else:
return Command(
            update={"errors": validation_result["errors"]},
            goto="human_review"
        )
6.4 Node Caching (性能优化)
缓存节点结果,避免重复计算
from langgraph.graph import StateGraph

defexpensive_analysis(state):
"""耗时的分析任务"""
# 假设这需要30秒
    result = run_heavy_computation(state["data"])
return {"analysis": result}

workflow = StateGraph(State)

# 启用缓存
workflow.add_node(
"analyze",
    expensive_analysis,
    cache=True# 缓存结果
)

# 编译时配置
app = workflow.compile(
    cache_config={
"ttl": 3600,  # 缓存1小时
"max_size": 100# 最多100个结果
    }
)

# 第一次运行:30秒
result1 = app.invoke({"data": "same_data"})

# 第二次运行相同数据:<1秒(从缓存读取)
result2 = app.invoke({"data": "same_data"})
高级缓存策略:
# 自定义缓存键
workflow.add_node(
"process",
    process_function,
    cache=True,
    cache_key=lambda state: f"{state['user_id']}:{state['query']}"
)

# 条件缓存
workflow.add_node(
"compute",
    expensive_computation,
    cache=lambda state: state.get("mode") == "production"
)
6.5 Deferred Nodes (并行任务同步)
等待所有并行分支完成后再执行
from langgraph.graph import StateGraph, START, END

deffetch_user_data(state):
"""并行任务1:获取用户数据"""
return {"user_data": fetch_from_db(state["user_id"])}

deffetch_product_data(state):
"""并行任务2:获取产品数据"""
return {"product_data": fetch_from_api(state["product_id"])}

deffetch_analytics(state):
"""并行任务3:获取分析数据"""
return {"analytics": run_analytics(state["query"])}

defcombine_all_data(state):
"""汇总所有数据 - 需要等待所有并行任务"""
    combined = {
"user": state["user_data"],
"product": state["product_data"],
"analytics": state["analytics"]
    }
return {"result": generate_report(combined)}

workflow = StateGraph(State)

# 添加并行任务
workflow.add_node("fetch_user", fetch_user_data)
workflow.add_node("fetch_product", fetch_product_data)
workflow.add_node("fetch_analytics", fetch_analytics)

# 添加聚合节点 - 标记为 deferred
workflow.add_node(
"combine",
    combine_all_data,
    deferred=True# 等待所有上游完成
)

# 三个任务并行启动
workflow.add_edge(START, "fetch_user")
workflow.add_edge(START, "fetch_product")
workflow.add_edge(START, "fetch_analytics")

# 都连接到 combine,但 combine 会等待全部完成
workflow.add_edge("fetch_user", "combine")
workflow.add_edge("fetch_product", "combine")
workflow.add_edge("fetch_analytics", "combine")
workflow.add_edge("combine", END)

app = workflow.compile()
6.6 LangGraph Supervisor (多代理协调)
简化层级多代理系统
pip install langgraph-supervisor
from langgraph_supervisor import create_supervisor
from langchain_anthropic import ChatAnthropic

llm = ChatAnthropic(model="claude-3-5-sonnet-20241022")

# 定义专家 Agent
researcher = create_agent(
"researcher",
    llm,
    tools=[web_search, academic_search],
    system_prompt="你是研究专家"
)

coder = create_agent(
"coder",
    llm,
    tools=[python_repl, code_review],
    system_prompt="你是编程专家"
)

writer = create_agent(
"writer",
    llm,
    tools=[grammar_check],
    system_prompt="你是写作专家"
)

# 创建 Supervisor 协调所有 Agent
supervisor = create_supervisor(
    agents={
"researcher": researcher,
"coder": coder,
"writer": writer
    },
    workflow_type="dynamic",  # 动态决定调用顺序
    llm=llm  # Supervisor 使用 LLM 做决策
)

# Supervisor 会自动协调
result = supervisor.invoke({
"task": "研究最新的 AI 框架,写代码示例,然后写一篇教程"
})
不同的 Supervisor 模式:
# 1. 顺序模式
supervisor = create_supervisor(
    agents={...},
    workflow_type="sequential",
    sequence=["researcher", "coder", "writer"]
)

# 2. 并行模式
supervisor = create_supervisor(
    agents={...},
    workflow_type="parallel",
    parallel_tasks=["research", "data_collection", "analysis"]
)

# 3. 层级模式
supervisor = create_supervisor(
    agents={
"manager": manager_agent,
"workers": [worker1, worker2, worker3]
    },
    workflow_type="hierarchical"
)
第七部分:最佳实践
7.1 状态设计
✅ 推荐:
classGoodState(TypedDict):
    messages: Annotated[list, add_messages]  # 使用消息列表
    metadata: dict  # 元数据
    step_count: int  # 计数器
❌ 不推荐:
# 状态过于复杂
classBadState(TypedDict):
    msg1: str
    msg2: str
    msg3: str
# ... 太多字段
7.2 节点设计
✅ 推荐: 单一职责
deffetch_data(state):
"""只负责获取数据"""
    data = api_call()
return {"data": data}

defprocess_data(state):
"""只负责处理数据"""
    processed = process(state["data"])
return {"result": processed}
❌ 不推荐: 节点做太多事情
defdo_everything(state):
# 获取数据、处理、保存、通知...
pass
7.3 何时使用 Command vs Conditional Edges
使用 Command:
- ✅ 节点内部逻辑决定路由
- ✅ 需要同时更新状态和路由
- ✅ 动态、复杂的决策树
使用 Conditional Edges:
- ✅ 简单的二选一路由
- ✅ 路由逻辑独立于节点
- ✅ 多个节点共用同一路由逻辑
# 适合用 Command
defcomplex_node(state):
    result = process(state)

if result.needs_review:
return Command(update={...}, goto="review")
elif result.needs_retry:
return Command(update={...}, goto="retry")
else:
return Command(update={...}, goto="finalize")

# 适合用 Conditional Edges
defsimple_router(state):
return"option_a"if state["flag"] else"option_b"

workflow.add_conditional_edges("node", simple_router, {...})
7.4 错误处理
defrobust_node(state: AgentState):
try:
        result = risky_operation(state)
return {"messages": [result], "error": None}
except Exception as e:
return {
"messages": [HumanMessage(content=f"错误: {str(e)}")],
"error": str(e)
        }

# 使用 Command 处理错误路由
defrobust_node_with_command(state):
try:
        result = risky_operation(state)
return Command(
            update={"result": result},
            goto="success"
        )
except Exception as e:
return Command(
            update={"error": str(e)},
            goto="error_handler"
        )
7.5 调试技巧
# 1. 可视化图结构
from IPython.display import Image, display

display(Image(app.get_graph().draw_mermaid_png()))

# 2. 打印中间状态
defdebug_node(state):
    print(f"当前状态: {state}")
return state

workflow.add_node("debug", debug_node)

# 3. 使用 LangSmith 追踪
import os
os.environ["LANGCHAIN_TRACING_V2"] = "true"
os.environ["LANGCHAIN_API_KEY"] = "your-api-key"

# 4. 查看执行历史
config = {"configurable": {"thread_id": "1"}}
app.invoke(input, config)

# 获取状态历史
history = app.get_state_history(config)
for state in history:
    print(state)
第八部分:常见模式
模式1: ReAct Agent (推理-行动循环)
defreact_pattern():
"""思考 -> 行动 -> 观察 -> 思考..."""

defagent_think(state):
# LLM 决定下一步行动
        response = llm.invoke(state["messages"])
return {"messages": [response]}

defagent_act(state):
# 执行工具
        last_message = state["messages"][-1]
if hasattr(last_message, 'tool_calls'):
# 执行工具...
return {"messages": [tool_result]}
return state

    workflow = StateGraph(AgentState)
    workflow.add_node("think", agent_think)
    workflow.add_node("act", agent_act)

    workflow.add_conditional_edges(
"think",
lambda s: "act"if has_tool_calls(s) else END,
        {"act": "act", END: END}
    )
    workflow.add_edge("act", "think")
模式2: Map-Reduce
defmap_reduce_pattern():
"""并行处理多个任务,然后汇总结果"""

classMapReduceState(TypedDict):
        inputs: list
        mapped_results: list
        final_result: str

defmap_node(state):
# 并行处理每个输入
        results = [process(item) for item in state["inputs"]]
return {"mapped_results": results}

defreduce_node(state):
# 汇总结果
        final = combine(state["mapped_results"])
return {"final_result": final}

    workflow = StateGraph(MapReduceState)
    workflow.add_node("map", map_node)
    workflow.add_node("reduce", reduce_node)
    workflow.add_edge("map", "reduce")
模式3: 审批流(使用 Command + interrupt)
defmodern_approval_workflow():
"""现代化审批流 - 使用新特性"""

defsubmit(state):
"""提交请求"""
return Command(
            update={"status": "pending"},
            goto="auto_review"
        )

defauto_review(state):
"""自动审核"""
        risk = assess_risk(state["request"])

if risk == "low":
return Command(
                update={"status": "auto_approved"},
                goto="approved"
            )
else:
return Command(goto="human_review")

defhuman_review(state):
"""人工审核"""
        decision = interrupt({
"request": state["request"],
"risk": "high",
"question": "是否批准?"
        })

if decision == "approve":
return Command(
                update={"status": "approved"},
                goto="approved"
            )
else:
return Command(
                update={"status": "rejected"},
                goto="rejected"
            )

defapproved(state):
        execute_action(state["request"])
return {}

defrejected(state):
        notify_rejection(state["request"])
return {}

    workflow = StateGraph(State)
    workflow.add_node("submit", submit)
    workflow.add_node("auto_review", auto_review)
    workflow.add_node("human_review", human_review)
    workflow.add_node("approved", approved)
    workflow.add_node("rejected", rejected)

    workflow.set_entry_point("submit")

    app = workflow.compile(checkpointer=MemorySaver())
第九部分:练习题
练习1: 基础 - 数学教师
创建一个数学教师 Agent:
- 接收数学问题
- 解答问题
- 提供详细步骤
提示: 使用基本的 StateGraph + Tool
练习2: 中级 - 内容审核(使用 Command)
创建一个内容审核系统:
- 接收用户输入
- 检查敏感内容
- 安全则处理,不安全则拒绝
- 使用 Command 处理路由
练习3: 高级 - 代码审查流程(使用 Command + interrupt)
创建一个自动化代码审查系统:
- 代码生成 Agent
- 自动代码审查
- 如果发现问题,使用 interrupt() 请求人工确认
- 使用 Command 控制流程
- 只有通过所有检查才输出
第十部分:版本迁移指南
从 0.x 升级到 1.0
# 升级
pip install --upgrade langgraph

# 检查版本
python -c "import langgraph; print(langgraph.__version__)"
主要变化
- langgraph.prebuilt 已弃用
# ❌ 旧代码
from langgraph.prebuilt import create_react_agent

# ✅ 新代码
from langchain.agents import create_react_agent
- 推荐使用新特性
- 优先使用 Command 而不是复杂的 conditional_edges
- 优先使用 interrupt() 而不是 interrupt_before
- 考虑使用 Node Caching 优化性能
- 其他都向后兼容
- 所有核心 API 保持不变
- 旧代码依然可以运行
快速参考
最小化模板(经典版)
from langgraph.graph import StateGraph, END
from typing import TypedDict, Annotated
from langgraph.graph.message import add_messages

classState(TypedDict):
    messages: Annotated[list, add_messages]

defmy_node(state: State):
# 你的逻辑
return {"messages": [...]}

workflow = StateGraph(State)
workflow.add_node("node1", my_node)
workflow.set_entry_point("node1")
workflow.add_edge("node1", END)
app = workflow.compile()

result = app.invoke({"messages": [...]})
最小化模板(使用新特性)
from langgraph.graph import StateGraph, END
from langgraph.types import Command, interrupt
from typing import TypedDict

classState(TypedDict):
    data: str
    approved: bool

defprocess_node(state: State):
# 使用 interrupt 获取审批
    decision = interrupt(f"处理 {state['data']}?")

# 使用 Command 控制流程
if decision == "yes":
return Command(
            update={"approved": True},
            goto="execute"
        )
else:
return Command(goto=END)

workflow = StateGraph(State)
workflow.add_node("process", process_node)
workflow.add_node("execute", execute_node)
workflow.set_entry_point("process")

from langgraph.checkpoint.memory import MemorySaver
app = workflow.compile(checkpointer=MemorySaver())
学习路径建议
第1周:基础
- Day 1-2: 理解核心概念(State, Nodes, Edges)
- Day 3-4: 实践示例1和示例2
- Day 5-7: 完成示例3,理解多代理
第2周:新特性
- Day 1-2: 学习 Command API,重构之前的代码
- Day 3-4: 学习 interrupt(),实现 HITL
- Day 5-7: 探索其他新特性(缓存、Supervisor等)
第3周:实战
- 开始实际项目
- 应用最佳实践
- 完成练习题
资源链接
- 官方文档: https://langchain-ai.github.io/langgraph/
- GitHub: https://github.com/langchain-ai/langgraph
- Changelog: https://changelog.langchain.com/
- LangSmith (调试工具): https://smith.langchain.com/
- 社区论坛: https://forum.langchain.com/
oint(“node1”)
workflow.add_edge(“node1”, END)
app = workflow.compile()
result = app.invoke({“messages”: […]})
### 最小化模板(使用新特性)

```plaintext
from langgraph.graph import StateGraph, END
from langgraph.types import Command, interrupt
from typing import TypedDict

classState(TypedDict):
    data: str
    approved: bool

defprocess_node(state: State):
# 使用 interrupt 获取审批
    decision = interrupt(f"处理 {state['data']}?")

# 使用 Command 控制流程
if decision == "yes":
return Command(
            update={"approved": True},
            goto="execute"
        )
else:
return Command(goto=END)

workflow = StateGraph(State)
workflow.add_node("process", process_node)
workflow.add_node("execute", execute_node)
workflow.set_entry_point("process")

from langgraph.checkpoint.memory import MemorySaver
app = workflow.compile(checkpointer=MemorySaver())
学习路径建议
第1周:基础
- Day 1-2: 理解核心概念(State, Nodes, Edges)
- Day 3-4: 实践示例1和示例2
- Day 5-7: 完成示例3,理解多代理
第2周:新特性
- Day 1-2: 学习 Command API,重构之前的代码
- Day 3-4: 学习 interrupt(),实现 HITL
- Day 5-7: 探索其他新特性(缓存、Supervisor等)
第3周:实战
- 开始实际项目
- 应用最佳实践
- 完成练习题
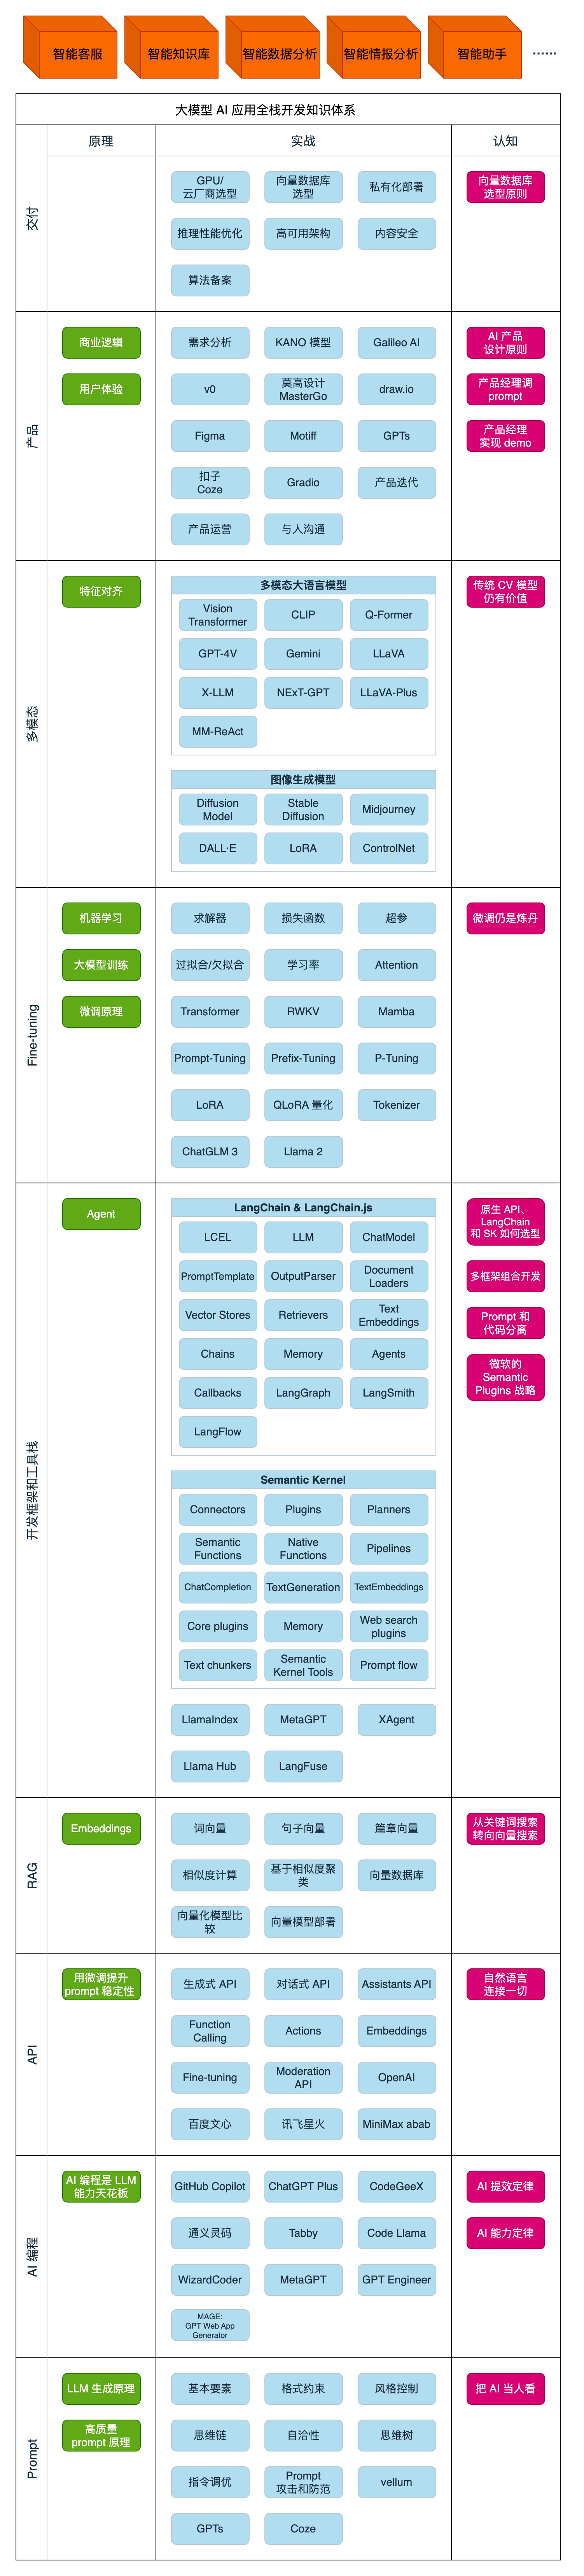
如何学习大模型 AI ?
由于新岗位的生产效率,要优于被取代岗位的生产效率,所以实际上整个社会的生产效率是提升的。
但是具体到个人,只能说是:
“最先掌握AI的人,将会比较晚掌握AI的人有竞争优势”。
这句话,放在计算机、互联网、移动互联网的开局时期,都是一样的道理。
我在一线互联网企业工作十余年里,指导过不少同行后辈。帮助很多人得到了学习和成长。
我意识到有很多经验和知识值得分享给大家,也可以通过我们的能力和经验解答大家在人工智能学习中的很多困惑,所以在工作繁忙的情况下还是坚持各种整理和分享。但苦于知识传播途径有限,很多互联网行业朋友无法获得正确的资料得到学习提升,故此将并将重要的AI大模型资料包括AI大模型入门学习思维导图、精品AI大模型学习书籍手册、视频教程、实战学习等录播视频免费分享出来。
第一阶段(10天):初阶应用
该阶段让大家对大模型 AI有一个最前沿的认识,对大模型 AI 的理解超过 95% 的人,可以在相关讨论时发表高级、不跟风、又接地气的见解,别人只会和 AI 聊天,而你能调教 AI,并能用代码将大模型和业务衔接。
- 大模型 AI 能干什么?
- 大模型是怎样获得「智能」的?
- 用好 AI 的核心心法
- 大模型应用业务架构
- 大模型应用技术架构
- 代码示例:向 GPT-3.5 灌入新知识
- 提示工程的意义和核心思想
- Prompt 典型构成
- 指令调优方法论
- 思维链和思维树
- Prompt 攻击和防范
- …
第二阶段(30天):高阶应用
该阶段我们正式进入大模型 AI 进阶实战学习,学会构造私有知识库,扩展 AI 的能力。快速开发一个完整的基于 agent 对话机器人。掌握功能最强的大模型开发框架,抓住最新的技术进展,适合 Python 和 JavaScript 程序员。
- 为什么要做 RAG
- 搭建一个简单的 ChatPDF
- 检索的基础概念
- 什么是向量表示(Embeddings)
- 向量数据库与向量检索
- 基于向量检索的 RAG
- 搭建 RAG 系统的扩展知识
- 混合检索与 RAG-Fusion 简介
- 向量模型本地部署
- …
第三阶段(30天):模型训练
恭喜你,如果学到这里,你基本可以找到一份大模型 AI相关的工作,自己也能训练 GPT 了!通过微调,训练自己的垂直大模型,能独立训练开源多模态大模型,掌握更多技术方案。
到此为止,大概2个月的时间。你已经成为了一名“AI小子”。那么你还想往下探索吗?
- 为什么要做 RAG
- 什么是模型
- 什么是模型训练
- 求解器 & 损失函数简介
- 小实验2:手写一个简单的神经网络并训练它
- 什么是训练/预训练/微调/轻量化微调
- Transformer结构简介
- 轻量化微调
- 实验数据集的构建
- …
第四阶段(20天):商业闭环
对全球大模型从性能、吞吐量、成本等方面有一定的认知,可以在云端和本地等多种环境下部署大模型,找到适合自己的项目/创业方向,做一名被 AI 武装的产品经理。
- 硬件选型
- 带你了解全球大模型
- 使用国产大模型服务
- 搭建 OpenAI 代理
- 热身:基于阿里云 PAI 部署 Stable Diffusion
- 在本地计算机运行大模型
- 大模型的私有化部署
- 基于 vLLM 部署大模型
- 案例:如何优雅地在阿里云私有部署开源大模型
- 部署一套开源 LLM 项目
- 内容安全
- 互联网信息服务算法备案
- …
学习是一个过程,只要学习就会有挑战。天道酬勤,你越努力,就会成为越优秀的自己。
如果你能在15天内完成所有的任务,那你堪称天才。然而,如果你能完成 60-70% 的内容,你就已经开始具备成为一名大模型 AI 的正确特征了。
这份完整版的大模型 AI 学习资料已经上传CSDN,朋友们如果需要可以微信扫描下方CSDN官方认证二维码免费领取【保证100%免费】


AtomGit 是由开放原子开源基金会联合 CSDN 等生态伙伴共同推出的新一代开源与人工智能协作平台。平台坚持“开放、中立、公益”的理念,把代码托管、模型共享、数据集托管、智能体开发体验和算力服务整合在一起,为开发者提供从开发、训练到部署的一站式体验。
更多推荐

 8
8 1
1- 0


 已为社区贡献66条内容

所有评论(0)