AI测试:自动化测试框架、智能缺陷检测、A/B测试优化
1. 自动化测试框架
1.1 概述
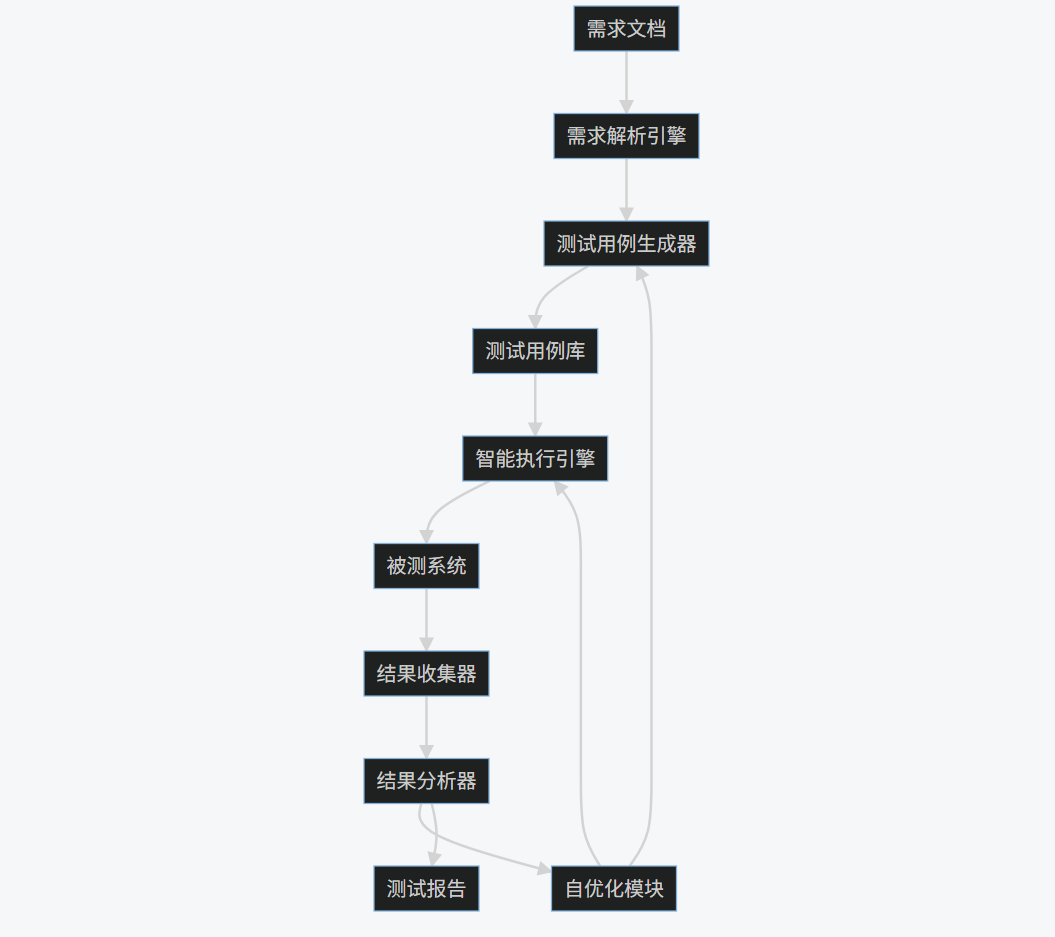
基于AI的自动化测试框架通过机器学习和自然语言处理技术,实现了测试用例的自动生成、执行和优化,显著提升了测试效率和覆盖率。这类框架能够理解需求文档、识别UI元素、预测测试路径,并持续优化测试策略。
1.2 核心组件
- 需求解析引擎:使用NLP技术分析需求文档
- 测试用例生成器:基于需求自动生成测试用例
- 智能执行引擎:动态调整测试执行顺序
- 结果分析器:使用ML模型分析测试结果
- 自优化模块:根据历史数据持续改进测试策略
1.3 代码实现
-
import numpy as np -
import pandas as pd -
from sklearn.feature_extraction.text import TfidfVectorizer -
from sklearn.model_selection import train_test_split -
from sklearn.ensemble import RandomForestClassifier -
from selenium import webdriver -
from selenium.webdriver.common.by import By -
from selenium.webdriver.support.ui import WebDriverWait -
from selenium.webdriver.support import expected_conditions as EC -
import cv2 -
import pytesseract -
from PIL import Image -
import matplotlib.pyplot as plt -
import seaborn as sns -
class AITestFramework: -
def __init__(self): -
self.driver = webdriver.Chrome() -
self.test_cases = [] -
self.results = [] -
self.model = self._train_requirement_model() -
def _train_requirement_model(self): -
"""训练需求分析模型""" -
# 示例数据:需求描述和对应的测试类型 -
data = { -
'requirement': [ -
"用户登录功能需要验证用户名和密码", -
"购物车应能添加和删除商品", -
"支付页面需要支持多种支付方式", -
"用户个人资料可以更新头像和昵称" -
], -
'test_type': [ -
"authentication", "cart", "payment", "profile" -
] -
} -
df = pd.DataFrame(data) -
vectorizer = TfidfVectorizer() -
X = vectorizer.fit_transform(df['requirement']) -
y = df['test_type'] -
X_train, X_test, y_train, y_test = train_test_split(X, y, test_size=0.2) -
model = RandomForestClassifier() -
model.fit(X_train, y_train) -
return model, vectorizer -
def generate_test_cases(self, requirements): -
"""从需求生成测试用例""" -
model, vectorizer = self.model -
test_cases = [] -
for req in requirements: -
# 预测测试类型 -
req_vec = vectorizer.transform([req]) -
test_type = model.predict(req_vec)[0] -
# 根据类型生成测试用例 -
if test_type == "authentication": -
test_cases.append({ -
'description': f"验证登录功能: {req}", -
'steps': [ -
"导航到登录页面", -
"输入有效用户名和密码", -
"点击登录按钮", -
"验证登录成功" -
], -
'type': 'functional' -
}) -
elif test_type == "cart": -
test_cases.append({ -
'description': f"验证购物车功能: {req}", -
'steps': [ -
"添加商品到购物车", -
"验证商品出现在购物车中", -
"从购物车移除商品", -
"验证商品已移除" -
], -
'type': 'functional' -
}) -
# 其他类型类似处理... -
self.test_cases = test_cases -
return test_cases -
def execute_test_cases(self): -
"""执行测试用例""" -
results = [] -
for test in self.test_cases: -
try: -
# 模拟测试执行 -
self.driver.get("https://example.com") -
# 使用图像识别定位元素 -
screenshot = self.driver.get_screenshot_as_png() -
img = Image.open(io.BytesIO(screenshot)) -
# 使用OCR识别文本 -
text = pytesseract.image_to_string(img) -
# 模拟测试步骤执行 -
for step in test['steps']: -
print(f"执行步骤: {step}") -
# 实际实现中会包含具体的UI操作 -
results.append({ -
'test_case': test['description'], -
'status': 'passed', -
'details': '所有步骤执行成功' -
}) -
except Exception as e: -
results.append({ -
'test_case': test['description'], -
'status': 'failed', -
'details': str(e) -
}) -
self.results = results -
return results -
def analyze_results(self): -
"""分析测试结果""" -
df = pd.DataFrame(self.results) -
# 统计通过率 -
pass_rate = (df['status'] == 'passed').mean() -
# 可视化结果 -
plt.figure(figsize=(10, 6)) -
sns.countplot(x='status', data=df) -
plt.title('测试结果分布') -
plt.savefig('test_results.png') -
return { -
'total_tests': len(df), -
'passed': (df['status'] == 'passed').sum(), -
'failed': (df['status'] == 'failed').sum(), -
'pass_rate': pass_rate -
} -
def optimize_test_strategy(self): -
"""优化测试策略""" -
# 分析失败模式 -
failed_tests = [r for r in self.results if r['status'] == 'failed'] -
# 使用聚类分析识别常见失败模式 -
if failed_tests: -
# 这里简化处理,实际会使用更复杂的分析 -
common_failures = "UI元素定位失败" -
print(f"检测到常见失败模式: {common_failures}") -
print("建议: 增加UI元素稳定性检查") -
return "测试策略已优化" -
# 使用示例 -
framework = AITestFramework() -
requirements = [ -
"用户登录功能需要验证用户名和密码", -
"购物车应能添加和删除商品" -
] -
test_cases = framework.generate_test_cases(requirements) -
print("生成的测试用例:", test_cases) -
results = framework.execute_test_cases() -
print("测试结果:", results) -
analysis = framework.analyze_results() -
print("测试分析:", analysis) -
optimization = framework.optimize_test_strategy() -
print(optimization)
一键获取完整项目代码

1.4 Mermaid流程图
graph TD
A[需求文档] --> B[需求解析引擎]
B --> C[测试用例生成器]
C --> D[测试用例库]
D --> E[智能执行引擎]
E --> F[被测系统]
F --> G[结果收集器]
G --> H[结果分析器]
H --> I[自优化模块]
I --> C
I --> E
H --> J[测试报告]
1.5 Prompt示例
测试用例生成Prompt:
-
作为AI测试专家,请根据以下需求生成全面的测试用例: -
需求描述:用户登录功能需要验证用户名和密码,包括记住密码选项和忘记密码链接。 -
要求: -
1. 生成至少5个测试用例,覆盖正常场景和异常场景 -
2. 每个测试用例包含:测试ID、描述、前置条件、测试步骤、预期结果 -
3. 考虑边界条件和错误处理 -
4. 包含UI元素验证
一键获取完整项目代码
测试优化Prompt:
-
分析以下测试执行结果,并提供优化建议: -
测试结果摘要: -
- 总测试用例数: 150 -
- 通过: 120 -
- 失败: 30 -
- 失败类型分布: -
* UI元素定位失败: 15 -
* 数据验证失败: 8 -
* 性能超时: 5 -
* 其他: 2 -
请提供: -
1. 失败模式分析 -
2. 测试策略优化建议 -
3. 自动化框架改进方向
一键获取完整项目代码

1.6 图表展示
测试结果分布图:
-
import matplotlib.pyplot as plt -
import seaborn as sns -
# 测试结果数据 -
results = { -
'status': ['passed', 'failed', 'passed', 'passed', 'failed', 'passed', 'failed', 'passed'], -
'test_type': ['functional', 'functional', 'performance', 'security', 'functional', 'performance', 'functional', 'security'] -
} -
df = pd.DataFrame(results) -
plt.figure(figsize=(10, 6)) -
sns.countplot(x='test_type', hue='status', data=df) -
plt.title('不同类型测试的结果分布') -
plt.xlabel('测试类型') -
plt.ylabel('数量') -
plt.savefig('test_distribution.png') -
plt.show()
一键获取完整项目代码

测试用例生成效率对比:
-
# 数据 -
methods = ['手动编写', '传统自动化', 'AI驱动'] -
time_per_case = [45, 15, 5] # 分钟 -
coverage = [60, 75, 95] # 百分比 -
fig, (ax1, ax2) = plt.subplots(1, 2, figsize=(12, 5)) -
# 时间对比 -
ax1.bar(methods, time_per_case, color=['skyblue', 'lightgreen', 'salmon']) -
ax1.set_title('每个测试用例平均生成时间(分钟)') -
ax1.set_ylabel('分钟') -
# 覆盖率对比 -
ax2.bar(methods, coverage, color=['skyblue', 'lightgreen', 'salmon']) -
ax2.set_title('测试覆盖率(%)') -
ax2.set_ylabel('覆盖率(%)') -
plt.tight_layout() -
plt.savefig('ai_testing_efficiency.png') -
plt.show()
一键获取完整项目代码

1.7 实际应用图片
AI测试框架架构图:
测试执行仪表盘:
2. 智能缺陷检测
2.1 概述
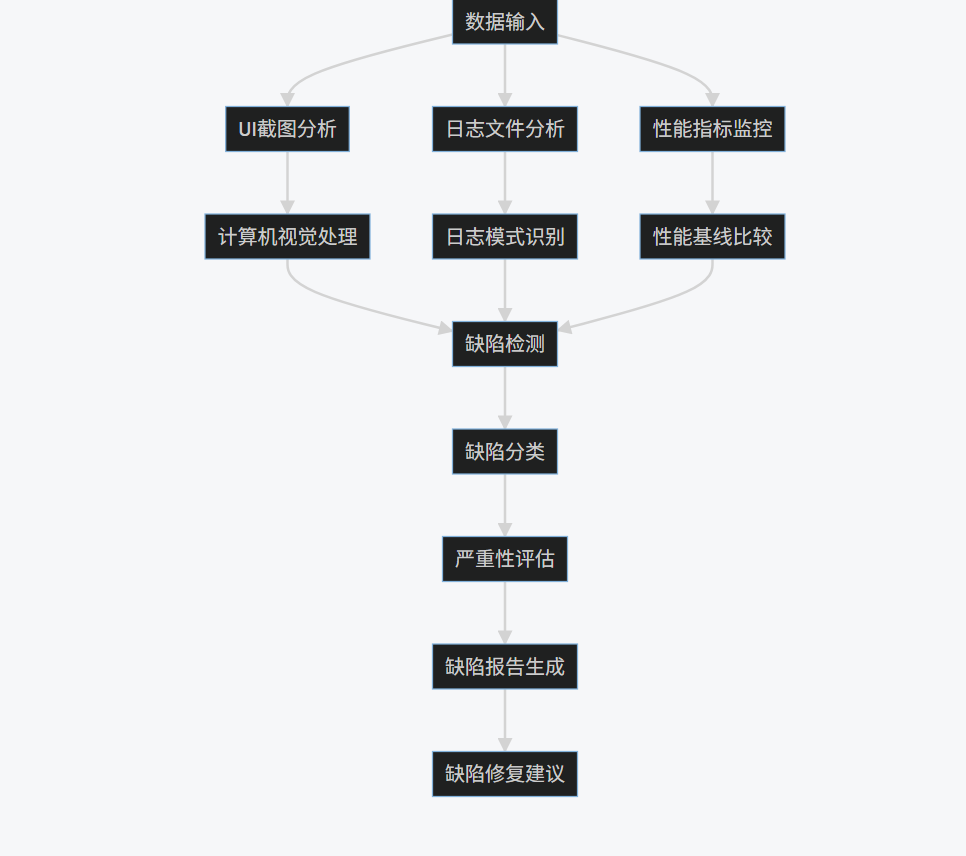
智能缺陷检测利用机器学习和计算机视觉技术,自动识别软件中的潜在缺陷,包括UI异常、性能问题、安全漏洞等。这种方法能够显著提高缺陷检测的准确性和效率,减少人工审查的工作量。
2.2 核心技术
- 计算机视觉:检测UI布局异常、渲染问题
- 日志分析:识别异常日志模式和错误趋势
- 性能监控:检测性能指标异常
- 静态代码分析:识别代码中的潜在缺陷模式
- 动态行为分析:监控运行时行为异常
2.3 代码实现
-
import cv2 -
import numpy as np -
import pandas as pd -
from sklearn.ensemble import IsolationForest -
from sklearn.preprocessing import StandardScaler -
from tensorflow.keras.applications import VGG16 -
from tensorflow.keras.models import Model -
from tensorflow.keras.layers import Dense, GlobalAveragePooling2D -
from tensorflow.keras.optimizers import Adam -
import matplotlib.pyplot as plt -
import seaborn as sns -
from datetime import datetime, timedelta -
import logging -
class IntelligentDefectDetector: -
def __init__(self): -
self.ui_model = self._build_ui_model() -
self.log_model = IsolationForest(contamination=0.05) -
self.scaler = StandardScaler() -
self.performance_baseline = None -
def _build_ui_model(self): -
"""构建UI缺陷检测模型""" -
base_model = VGG16(weights='imagenet', include_top=False) -
x = base_model.output -
x = GlobalAveragePooling2D()(x) -
x = Dense(1024, activation='relu')(x) -
predictions = Dense(1, activation='sigmoid')(x) -
model = Model(inputs=base_model.input, outputs=predictions) -
model.compile(optimizer=Adam(lr=0.0001), loss='binary_crossentropy', metrics=['accuracy']) -
return model -
def detect_ui_defects(self, screenshot_path, reference_path): -
"""检测UI缺陷""" -
# 加载图像 -
screenshot = cv2.imread(screenshot_path) -
reference = cv2.imread(reference_path) -
# 预处理 -
screenshot = cv2.resize(screenshot, (224, 224)) -
reference = cv2.resize(reference, (224, 224)) -
# 计算差异 -
diff = cv2.absdiff(screenshot, reference) -
gray_diff = cv2.cvtColor(diff, cv2.COLOR_BGR2GRAY) -
# 阈值处理 -
_, thresh = cv2.threshold(gray_diff, 30, 255, cv2.THRESH_BINARY) -
# 查找轮廓 -
contours, _ = cv2.findContours(thresh, cv2.RETR_EXTERNAL, cv2.CHAIN_APPROX_SIMPLE) -
defects = [] -
for cnt in contours: -
if cv2.contourArea(cnt) > 100: # 过滤小区域 -
x, y, w, h = cv2.boundingRect(cnt) -
defects.append({ -
'type': 'layout_difference', -
'location': (x, y, w, h), -
'severity': 'medium' if w*h > 1000 else 'low' -
}) -
# 使用深度学习模型检测 -
img_array = np.expand_dims(screenshot, axis=0) / 255.0 -
prediction = self.ui_model.predict(img_array)[0][0] -
if prediction > 0.7: -
defects.append({ -
'type': 'visual_anomaly', -
'confidence': float(prediction), -
'severity': 'high' -
}) -
return defects -
def analyze_logs(self, log_file): -
"""分析日志文件检测异常""" -
# 解析日志 -
logs = [] -
with open(log_file, 'r') as f: -
for line in f: -
parts = line.strip().split(' - ') -
if len(parts) >= 3: -
timestamp_str, level, message = parts[0], parts[1], ' - '.join(parts[2:]) -
try: -
timestamp = datetime.strptime(timestamp_str, '%Y-%m-%d %H:%M:%S') -
except: -
timestamp = datetime.now() -
logs.append({ -
'timestamp': timestamp, -
'level': level, -
'message': message -
}) -
# 转换为DataFrame -
df = pd.DataFrame(logs) -
# 特征工程 -
df['hour'] = df['timestamp'].dt.hour -
df['day_of_week'] = df['timestamp'].dt.dayofweek -
df['message_length'] = df['message'].str.len() -
# 编码日志级别 -
level_map = {'DEBUG': 0, 'INFO': 1, 'WARNING': 2, 'ERROR': 3, 'CRITICAL': 4} -
df['level_code'] = df['level'].map(level_map).fillna(0) -
# 准备特征 -
features = df[['hour', 'day_of_week', 'message_length', 'level_code']] -
# 标准化 -
features_scaled = self.scaler.fit_transform(features) -
# 异常检测 -
df['anomaly'] = self.log_model.fit_predict(features_scaled) -
# 提取异常 -
anomalies = df[df['anomaly'] == -1] -
# 分析异常模式 -
error_patterns = anomalies[anomalies['level'].isin(['ERROR', 'CRITICAL'])] -
defects = [] -
for _, row in error_patterns.iterrows(): -
defects.append({ -
'type': 'log_error', -
'timestamp': row['timestamp'], -
'level': row['level'], -
'message': row['message'], -
'severity': 'high' if row['level'] == 'CRITICAL' else 'medium' -
}) -
return defects -
def monitor_performance(self, metrics_data): -
"""监控性能指标检测异常""" -
df = pd.DataFrame(metrics_data) -
# 计算统计特征 -
stats = df.agg(['mean', 'std', 'min', 'max']).T -
# 建立基线(第一次运行时) -
if self.performance_baseline is None: -
self.performance_baseline = stats -
return [] -
# 比较当前与基线 -
defects = [] -
for metric in stats.index: -
current_mean = stats.loc[metric, 'mean'] -
baseline_mean = self.performance_baseline.loc[metric, 'mean'] -
baseline_std = self.performance_baseline.loc[metric, 'std'] -
# 检测显著偏差 -
if abs(current_mean - baseline_mean) > 2 * baseline_std: -
defects.append({ -
'type': 'performance_degradation', -
'metric': metric, -
'current_value': current_mean, -
'baseline_value': baseline_mean, -
'deviation': abs(current_mean - baseline_mean), -
'severity': 'high' if abs(current_mean - baseline_mean) > 3 * baseline_std else 'medium' -
}) -
return defects -
def generate_defect_report(self, defects): -
"""生成缺陷报告""" -
report = { -
'timestamp': datetime.now().isoformat(), -
'total_defects': len(defects), -
'defects_by_type': {}, -
'defects_by_severity': {'high': 0, 'medium': 0, 'low': 0}, -
'details': defects -
} -
# 统计缺陷类型和严重程度 -
for defect in defects: -
defect_type = defect['type'] -
severity = defect['severity'] -
if defect_type not in report['defects_by_type']: -
report['defects_by_type'][defect_type] = 0 -
report['defects_by_type'][defect_type] += 1 -
report['defects_by_severity'][severity] += 1 -
return report -
# 使用示例 -
detector = IntelligentDefectDetector() -
# 检测UI缺陷 -
ui_defects = detector.detect_ui_defects('current_screenshot.png', 'reference_screenshot.png') -
print("UI缺陷:", ui_defects) -
# 分析日志 -
log_defects = detector.analyze_logs('application.log') -
print("日志缺陷:", log_defects) -
# 监控性能 -
metrics_data = [ -
{'timestamp': datetime.now(), 'cpu_usage': 45.2, 'memory_usage': 60.5, 'response_time': 200}, -
{'timestamp': datetime.now() - timedelta(minutes=1), 'cpu_usage': 50.1, 'memory_usage': 65.3, 'response_time': 220}, -
# 更多数据... -
] -
perf_defects = detector.monitor_performance(metrics_data) -
print("性能缺陷:", perf_defects) -
# 生成报告 -
all_defects = ui_defects + log_defects + perf_defects -
report = detector.generate_defect_report(all_defects) -
print("缺陷报告:", report)
一键获取完整项目代码

2.4 Mermaid流程图
graph TD
A[数据输入] --> B[UI截图分析]
A --> C[日志文件分析]
A --> D[性能指标监控]
B --> E[计算机视觉处理]
C --> F[日志模式识别]
D --> G[性能基线比较]
E --> H[缺陷检测]
F --> H
G --> H
H --> I[缺陷分类]
I --> J[严重性评估]
J --> K[缺陷报告生成]
K --> L[缺陷修复建议]
2.5 Prompt示例
UI缺陷检测Prompt:
-
作为AI视觉测试专家,请分析以下UI截图并识别潜在缺陷: -
截图描述: -
- 登录页面截图 -
- 参考设计图已提供 -
请检测: -
1. 布局差异(元素位置、大小、对齐) -
2. 颜色对比度问题 -
3. 文本可读性问题 -
4. 图标或图像渲染问题 -
5. 响应式设计问题 -
对于每个发现的缺陷,请提供: -
- 缺陷类型 -
- 位置坐标 -
- 严重程度(低/中/高) -
- 修复建议
一键获取完整项目代码

日志分析Prompt:
-
分析以下应用程序日志片段,识别异常模式和潜在问题: -
日志片段: -
[2023-05-15 10:23:45] INFO: User login successful for user123 -
[2023-05-15 10:24:02] WARNING: High memory usage detected: 85% -
[2023-05-15 10:24:15] ERROR: Database connection timeout -
[2023-05-15 10:24:30] INFO: Retrying database connection -
[2023-05-15 10:24:45] ERROR: Database connection failed again -
[2023-05-15 10:25:00] CRITICAL: System shutting down due to database failure -
请提供: -
1. 异常模式识别 -
2. 潜在根本原因分析 -
3. 问题严重性评估 -
4. 建议的修复措施
一键获取完整项目代码

2.6 图表展示
缺陷类型分布:
-
# 缺陷数据 -
defect_types = ['UI布局', '性能问题', '日志错误', '安全漏洞', '兼容性问题'] -
counts = [45, 30, 25, 15, 10] -
plt.figure(figsize=(10, 6)) -
plt.pie(counts, labels=defect_types, autopct='%1.1f%%', startangle=140) -
plt.title('检测到的缺陷类型分布') -
plt.axis('equal') -
plt.savefig('defect_types_distribution.png') -
plt.show()
一键获取完整项目代码

性能指标监控:
-
# 性能数据 -
time_points = pd.date_range(start='2023-05-01', periods=30, freq='D') -
cpu_usage = np.random.normal(50, 10, 30) -
memory_usage = np.random.normal(60, 8, 30) -
response_time = np.random.normal(200, 30, 30) -
plt.figure(figsize=(12, 8)) -
plt.subplot(3, 1, 1) -
plt.plot(time_points, cpu_usage, label='CPU Usage (%)') -
plt.axhline(y=70, color='r', linestyle='--', label='Threshold') -
plt.legend() -
plt.subplot(3, 1, 2) -
plt.plot(time_points, memory_usage, label='Memory Usage (%)') -
plt.axhline(y=80, color='r', linestyle='--', label='Threshold') -
plt.legend() -
plt.subplot(3, 1, 3) -
plt.plot(time_points, response_time, label='Response Time (ms)') -
plt.axhline(y=300, color='r', linestyle='--', label='Threshold') -
plt.legend() -
plt.tight_layout() -
plt.savefig('performance_monitoring.png') -
plt.show()
一键获取完整项目代码

2.7 实际应用图片
UI缺陷检测可视化:
日志异常模式分析:
3. A/B测试优化
3.1 概述
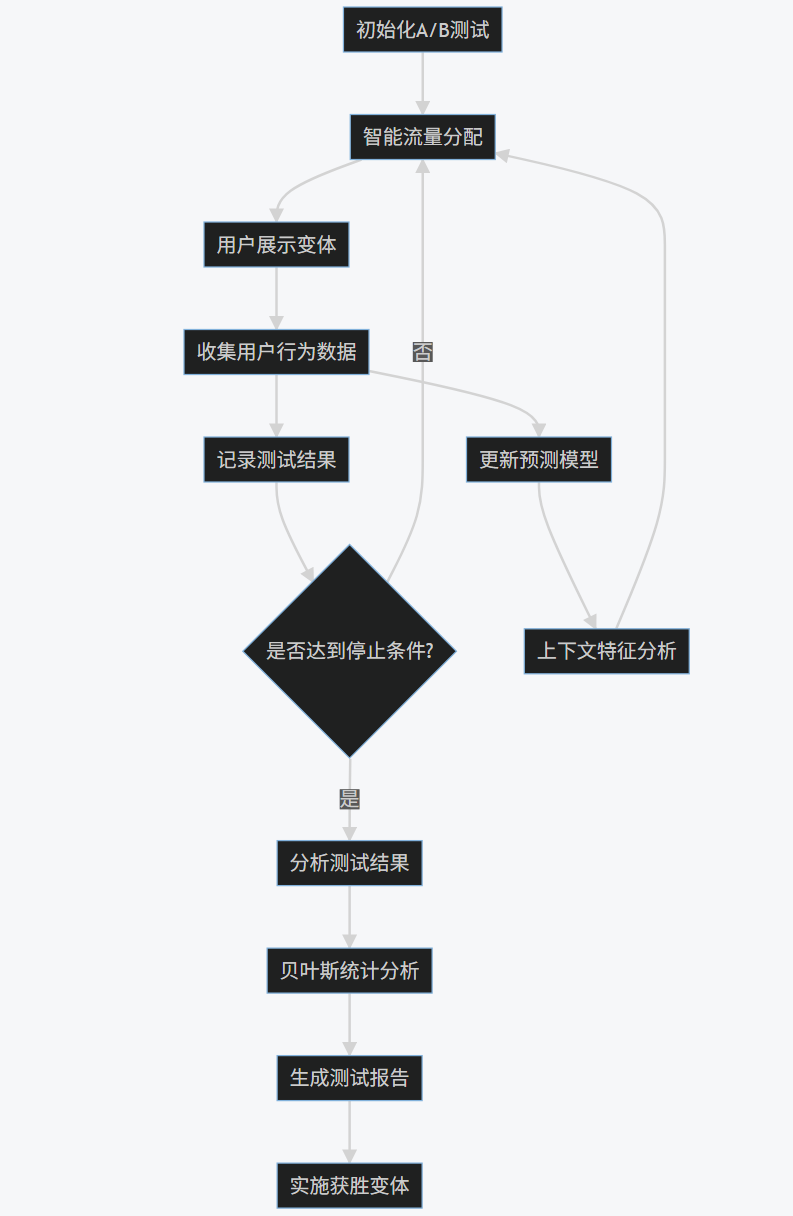
AI驱动的A/B测试优化利用机器学习算法智能分配流量、分析结果并提前终止无效测试,从而显著提高测试效率和准确性。这种方法能够动态调整测试策略,最大化测试价值并最小化资源浪费。
3.2 核心技术
- 多臂老虎机算法:智能流量分配
- 贝叶斯统计:结果概率分析
- 早期停止机制:提前终止无效测试
- 因果推断:准确评估测试效果
- 自适应实验设计:动态调整测试参数
3.3 代码实现
-
import numpy as np -
import pandas as pd -
import matplotlib.pyplot as plt -
import seaborn as sns -
from scipy import stats -
from sklearn.preprocessing import StandardScaler -
from sklearn.ensemble import RandomForestRegressor -
from sklearn.model_selection import train_test_split -
import pymc3 as pm -
import theano.tensor as tt -
class ABOptimizer: -
def __init__(self, variants): -
""" -
初始化A/B测试优化器 -
:param variants: 变体列表,例如 ['A', 'B', 'C'] -
""" -
self.variants = variants -
self.n_variants = len(variants) -
self.variant_data = {v: {'impressions': 0, 'conversions': 0} for v in variants} -
self.historical_data = [] -
self.scaler = StandardScaler() -
self.model = None -
def allocate_traffic(self, method='thompson'): -
""" -
智能流量分配 -
:param method: 分配方法 ('thompson', 'ucb', 'epsilon_greedy') -
:return: 选择的变体 -
""" -
if method == 'thompson': -
return self._thompson_sampling() -
elif method == 'ucb': -
return self._ucb1() -
elif method == 'epsilon_greedy': -
return self._epsilon_greedy() -
else: -
raise ValueError("Unknown allocation method") -
def _thompson_sampling(self): -
"""Thompson采样算法""" -
samples = {} -
for v in self.variants: -
data = self.variant_data[v] -
if data['impressions'] == 0: -
# 没有数据时均匀分配 -
samples[v] = np.random.beta(1, 1) -
else: -
# Beta分布采样 -
samples[v] = np.random.beta( -
data['conversions'] + 1, -
data['impressions'] - data['conversions'] + 1 -
) -
return max(samples, key=samples.get) -
def _ucb1(self): -
"""UCB1算法""" -
total_impressions = sum(data['impressions'] for data in self.variant_data.values()) -
if total_impressions == 0: -
return np.random.choice(self.variants) -
ucb_values = {} -
for v in self.variants: -
data = self.variant_data[v] -
if data['impressions'] == 0: -
ucb_values[v] = float('inf') -
else: -
conversion_rate = data['conversions'] / data['impressions'] -
exploration = np.sqrt(2 * np.log(total_impressions) / data['impressions']) -
ucb_values[v] = conversion_rate + exploration -
return max(ucb_values, key=ucb_values.get) -
def _epsilon_greedy(self, epsilon=0.1): -
"""ε-贪婪算法""" -
if np.random.random() < epsilon: -
# 探索:随机选择 -
return np.random.choice(self.variants) -
else: -
# 利用:选择当前最优 -
best_variant = None -
best_rate = -1 -
for v in self.variants: -
data = self.variant_data[v] -
if data['impressions'] > 0: -
rate = data['conversions'] / data['impressions'] -
if rate > best_rate: -
best_rate = rate -
best_variant = v -
return best_variant if best_variant else np.random.choice(self.variants) -
def record_result(self, variant, converted): -
""" -
记录测试结果 -
:param variant: 变体 -
:param converted: 是否转化 (True/False) -
""" -
self.variant_data[variant]['impressions'] += 1 -
if converted: -
self.variant_data[variant]['conversions'] += 1 -
def should_stop_early(self, min_impressions=1000, confidence=0.95): -
""" -
检查是否应该提前停止测试 -
:param min_impressions: 最小展示次数 -
:param confidence: 置信水平 -
:return: 是否停止, 获胜变体 -
""" -
# 检查是否有足够的展示次数 -
total_impressions = sum(data['impressions'] for data in self.variant_data.values()) -
if total_impressions < min_impressions: -
return False, None -
# 找到当前表现最好的变体 -
best_variant = None -
best_rate = -1 -
for v in self.variants: -
data = self.variant_data[v] -
if data['impressions'] > 0: -
rate = data['conversions'] / data['impressions'] -
if rate > best_rate: -
best_rate = rate -
best_variant = v -
if best_variant is None: -
return False, None -
# 检查最佳变体是否显著优于其他变体 -
for v in self.variants: -
if v == best_variant: -
continue -
data_v = self.variant_data[v] -
data_best = self.variant_data[best_variant] -
if data_v['impressions'] == 0: -
continue -
# 进行双比例z检验 -
count = np.array([data_best['conversions'], data_v['conversions']]) -
nobs = np.array([data_best['impressions'], data_v['impressions']]) -
z_stat, p_value = stats.proportions_ztest(count, nobs, alternative='larger') -
if p_value > (1 - confidence): -
# 不显著,继续测试 -
return False, None -
# 所有比较都显著,可以停止 -
return True, best_variant -
def bayesian_analysis(self): -
"""贝叶斯分析测试结果""" -
results = {} -
for v in self.variants: -
data = self.variant_data[v] -
if data['impressions'] == 0: -
continue -
with pm.Model() as model: -
# 先验分布 -
prior = pm.Beta('prior', alpha=1, beta=1) -
# 似然函数 -
likelihood = pm.Binomial( -
'likelihood', -
n=data['impressions'], -
p=prior, -
observed=data['conversions'] -
) -
# 采样 -
trace = pm.sample(1000, tune=1000) -
# 计算后验均值 -
posterior_mean = trace['prior'].mean() -
results[v] = { -
'conversion_rate': posterior_mean, -
'credible_interval': pm.stats.hpd(trace['prior'], credible_interval=0.95) -
} -
return results -
def predict_outcome(self, context_features): -
""" -
预测不同变体在给定上下文下的表现 -
:param context_features: 上下文特征字典 -
:return: 预测结果 -
""" -
if self.model is None: -
# 如果没有训练好的模型,返回历史平均转化率 -
predictions = {} -
for v in self.variants: -
data = self.variant_data[v] -
if data['impressions'] > 0: -
predictions[v] = data['conversions'] / data['impressions'] -
else: -
predictions[v] = 0.1 # 默认值 -
return predictions -
# 准备特征 -
features = [] -
for v in self.variants: -
feature_vector = list(context_features.values()) -
# 添加变体编码 -
variant_encoding = [1 if v == variant else 0 for variant in self.variants] -
feature_vector.extend(variant_encoding) -
features.append(feature_vector) -
# 预测 -
features_scaled = self.scaler.transform(features) -
predictions = self.model.predict(features_scaled) -
return {v: pred for v, pred in zip(self.variants, predictions)} -
def train_predictive_model(self, historical_data): -
""" -
训练预测模型 -
:param historical_data: 历史数据列表,每个元素是字典包含: -
- variant: 变体 -
- context: 上下文特征字典 -
- outcome: 结果 (0或1) -
""" -
# 准备训练数据 -
X = [] -
y = [] -
for record in historical_data: -
context = record['context'] -
variant = record['variant'] -
outcome = record['outcome'] -
# 特征向量 -
feature_vector = list(context.values()) -
# 添加变体编码 -
variant_encoding = [1 if variant == v else 0 for v in self.variants] -
feature_vector.extend(variant_encoding) -
X.append(feature_vector) -
y.append(outcome) -
X = np.array(X) -
y = np.array(y) -
# 标准化 -
X_scaled = self.scaler.fit_transform(X) -
# 训练模型 -
self.model = RandomForestRegressor(n_estimators=100) -
self.model.fit(X_scaled, y) -
self.historical_data = historical_data -
def generate_report(self): -
"""生成测试报告""" -
report = { -
'variants': {}, -
'total_impressions': 0, -
'total_conversions': 0, -
'overall_conversion_rate': 0 -
} -
total_impressions = 0 -
total_conversions = 0 -
for v in self.variants: -
data = self.variant_data[v] -
impressions = data['impressions'] -
conversions = data['conversions'] -
conversion_rate = conversions / impressions if impressions > 0 else 0 -
report['variants'][v] = { -
'impressions': impressions, -
'conversions': conversions, -
'conversion_rate': conversion_rate -
} -
total_impressions += impressions -
total_conversions += conversions -
report['total_impressions'] = total_impressions -
report['total_conversions'] = total_conversions -
report['overall_conversion_rate'] = total_conversions / total_impressions if total_impressions > 0 else 0 -
# 添加贝叶斯分析结果 -
bayesian_results = self.bayesian_analysis() -
for v in bayesian_results: -
report['variants'][v]['bayesian_analysis'] = bayesian_results[v] -
return report -
# 使用示例 -
optimizer = ABOptimizer(variants=['A', 'B', 'C']) -
# 模拟测试过程 -
for _ in range(10000): -
# 智能分配流量 -
variant = optimizer.allocate_traffic(method='thompson') -
# 模拟用户转化 (这里简化处理,实际应基于真实数据) -
true_rates = {'A': 0.10, 'B': 0.12, 'C': 0.08} -
converted = np.random.random() < true_rates[variant] -
# 记录结果 -
optimizer.record_result(variant, converted) -
# 检查是否提前停止 -
should_stop, winner = optimizer.should_stop_early(min_impressions=1000) -
if should_stop: -
print(f"提前停止测试,获胜变体: {winner}") -
break -
# 生成报告 -
report = optimizer.generate_report() -
print("A/B测试报告:", report) -
# 训练预测模型 (假设有历史数据) -
historical_data = [ -
{'variant': 'A', 'context': {'device': 'mobile', 'time': 'morning'}, 'outcome': 1}, -
{'variant': 'B', 'context': {'device': 'desktop', 'time': 'afternoon'}, 'outcome': 0}, -
# 更多数据... -
] -
optimizer.train_predictive_model(historical_data) -
# 预测新上下文下的表现 -
context = {'device': 'mobile', 'time': 'evening'} -
predictions = optimizer.predict_outcome(context) -
print("预测结果:", predictions)
一键获取完整项目代码

3.4 Mermaid流程图
graph TD
A[初始化A/B测试] --> B[智能流量分配]
B --> C[用户展示变体]
C --> D[收集用户行为数据]
D --> E[记录测试结果]
E --> F{是否达到停止条件?}
F -- 否 --> B
F -- 是 --> G[分析测试结果]
G --> H[贝叶斯统计分析]
H --> I[生成测试报告]
I --> J[实施获胜变体]
D --> K[更新预测模型]
K --> L[上下文特征分析]
L --> B
3.5 Prompt示例
A/B测试设计Prompt:
-
作为A/B测试专家,请为以下场景设计优化的A/B测试方案: -
业务场景:电子商务网站的产品详情页 -
目标:提高"添加到购物车"按钮的点击率 -
变体: -
- 变体A:当前设计(蓝色按钮,右侧位置) -
- 变体B:新设计(绿色按钮,中心位置) -
- 变体C:新设计(橙色按钮,左侧位置) -
请提供: -
1. 测试假设 -
2. 样本量计算(假设基线转化率为5%,期望提升20%) -
3. 流量分配策略 -
4. 测试持续时间建议 -
5. 早期停止条件 -
6. 结果分析方法
一键获取完整项目代码

A/B测试结果分析Prompt:
-
分析以下A/B测试结果并提供决策建议: -
测试数据: -
- 变体A:展示次数5000,转化次数250,转化率5.0% -
- 变体B:展示次数5000,转化次数300,转化率6.0% -
- 变体C:展示次数5000,转化次数275,转化率5.5% -
用户细分数据: -
- 移动设备用户: -
* 变体A:转化率4.8% -
* 变体B:转化率6.5% -
* 变体C:转化率5.2% -
- 桌面设备用户: -
* 变体A:转化率5.5% -
* 变体B:转化率5.2% -
* 变体C:转化率6.0% -
请提供: -
1. 统计显著性分析 -
2. 各变体效果评估 -
3. 用户细分分析 -
4. 最终决策建议 -
5. 后续测试建议
一键获取完整项目代码

3.6 图表展示
A/B测试转化率比较:
-
# 测试数据 -
variants = ['A (Control)', 'B (New Design)', 'C (Alternative)'] -
conversion_rates = [5.0, 6.0, 5.5] -
errors = [0.3, 0.35, 0.32] # 标准误差 -
plt.figure(figsize=(10, 6)) -
plt.bar(variants, conversion_rates, yerr=errors, capsize=5, color=['skyblue', 'lightgreen', 'salmon']) -
plt.ylabel('Conversion Rate (%)') -
plt.title('A/B Test Conversion Rates with Confidence Intervals') -
plt.ylim(0, 8) -
plt.savefig('ab_test_conversion_rates.png') -
plt.show()
一键获取完整项目代码

流量分配演化:
-
# 模拟流量分配演化数据 -
days = np.arange(1, 31) -
traffic_A = np.linspace(33, 15, 30) + np.random.normal(0, 1, 30) -
traffic_B = np.linspace(33, 70, 30) + np.random.normal(0, 1, 30) -
traffic_C = np.linspace(34, 15, 30) + np.random.normal(0, 1, 30) -
plt.figure(figsize=(12, 6)) -
plt.stackplot(days, traffic_A, traffic_B, traffic_C, labels=['Variant A', 'Variant B', 'Variant C']) -
plt.legend(loc='upper right') -
plt.xlabel('Day of Test') -
plt.ylabel('Traffic Allocation (%)') -
plt.title('Evolution of Traffic Allocation During A/B Test') -
plt.savefig('traffic_allocation_evolution.png') -
plt.show()
一键获取完整项目代码

3.7 实际应用图片
A/B测试仪表盘:
贝叶斯分析结果:
4. 综合应用与未来展望
4.1 集成方案
将AI测试的三个核心领域(自动化测试框架、智能缺陷检测、A/B测试优化)集成到一个统一的平台,可以形成完整的AI驱动测试解决方案:
-
class IntegratedAITestingPlatform: -
def __init__(self): -
self.test_framework = AITestFramework() -
self.defect_detector = IntelligentDefectDetector() -
self.ab_optimizer = ABOptimizer(variants=['A', 'B']) -
def run_full_testing_cycle(self, requirements, application_url): -
"""运行完整的测试周期""" -
# 1. 从需求生成测试用例 -
test_cases = self.test_framework.generate_test_cases(requirements) -
# 2. 执行测试用例 -
results = self.test_framework.execute_test_cases() -
# 3. 智能缺陷检测 -
defects = [] -
# UI缺陷检测 -
ui_defects = self.defect_detector.detect_ui_defects( -
'current_screenshot.png', -
'reference_screenshot.png' -
) -
defects.extend(ui_defects) -
# 日志分析 -
log_defects = self.defect_detector.analyze_logs('application.log') -
defects.extend(log_defects) -
# 4. 设计A/B测试验证修复效果 -
if defects: -
# 为关键缺陷设计A/B测试 -
critical_defects = [d for d in defects if d['severity'] == 'high'] -
if critical_defects: -
print("为关键缺陷设计A/B测试...") -
# 这里简化处理,实际会根据缺陷类型设计测试 -
ab_test_results = self.run_ab_test_for_fix(application_url) -
print("A/B测试结果:", ab_test_results) -
# 5. 生成综合报告 -
report = { -
'test_results': results, -
'defects': defects, -
'recommendations': self.generate_recommendations(results, defects) -
} -
return report -
def run_ab_test_for_fix(self, application_url): -
"""为修复方案运行A/B测试""" -
# 模拟A/B测试 -
for _ in range(1000): -
variant = self.ab_optimizer.allocate_traffic() -
# 模拟用户行为 -
converted = np.random.random() < 0.15 if variant == 'B' else np.random.random() < 0.10 -
self.ab_optimizer.record_result(variant, converted) -
# 检查是否可以停止 -
should_stop, winner = self.ab_optimizer.should_stop_early() -
if should_stop: -
return f"获胜变体: {winner}" -
else: -
return "测试继续进行" -
def generate_recommendations(self, test_results, defects): -
"""生成改进建议""" -
recommendations = [] -
# 基于测试结果的建议 -
passed_tests = [r for r in test_results if r['status'] == 'passed'] -
failed_tests = [r for r in test_results if r['status'] == 'failed'] -
if len(failed_tests) / len(test_results) > 0.2: -
recommendations.append("测试失败率较高,建议检查测试环境和测试数据") -
# 基于缺陷的建议 -
high_severity_defects = [d for d in defects if d['severity'] == 'high'] -
if high_severity_defects: -
recommendations.append(f"发现{len(high_severity_defects)}个高严重性缺陷,建议立即修复") -
# 基于缺陷类型的建议 -
defect_types = [d['type'] for d in defects] -
if 'performance_degradation' in defect_types: -
recommendations.append("检测到性能问题,建议进行性能优化") -
if 'log_error' in defect_types: -
recommendations.append("检测到日志错误,建议检查错误处理逻辑") -
return recommendations -
# 使用示例 -
platform = IntegratedAITestingPlatform() -
requirements = [ -
"用户登录功能需要验证用户名和密码", -
"购物车应能添加和删除商品" -
] -
report = platform.run_full_testing_cycle(requirements, "https://example.com") -
print("综合测试报告:", report)
一键获取完整项目代码

4.2 未来发展趋势
-
更智能的测试生成:
- 利用大型语言模型(LLM)理解复杂需求
- 基于用户行为自动生成真实场景测试
- 自适应测试用例优先级排序
-
预测性缺陷分析:
- 基于代码变更预测潜在缺陷位置
- 利用图神经网络分析代码依赖关系
- 结合历史数据预测缺陷修复时间
-
增强的A/B测试:
- 多变量测试(MVT)的智能优化
- 个性化A/B测试(针对不同用户群体)
- 因果推断模型提高结果准确性
-
全流程自动化:
- 从需求到部署的全流程自动化测试
- 持续测试与持续部署的深度集成
- 自修复测试脚本
-
跨平台测试整合:
- 统一的Web、移动、API测试框架
- IoT设备测试自动化
- 云原生环境测试优化
4.3 实施建议
-
分阶段实施:
- 第一阶段:实施自动化测试框架
- 第二阶段:引入智能缺陷检测
- 第三阶段:集成A/B测试优化
-
团队培训:
- AI/ML基础知识培训
- 测试自动化工具培训
- 数据分析技能提升
-
工具选择:
- 开源工具与商业工具结合
- 考虑与现有CI/CD工具的集成
- 评估云测试平台服务
-
数据管理:
- 建立测试数据管理策略
- 确保数据安全和隐私
- 实现测试数据的自动生成
-
度量与改进:
- 建立AI测试效果度量指标
- 定期回顾和优化测试策略
- 持续收集反馈并改进
5. 结论
AI驱动的测试技术正在彻底改变软件测试领域。通过自动化测试框架、智能缺陷检测和A/B测试优化三大核心技术的结合,我们能够实现更高效、更准确、更智能的软件测试。
自动化测试框架利用AI技术自动生成测试用例、智能执行测试并分析结果,显著提高了测试效率和覆盖率。智能缺陷检测通过机器学习和计算机视觉技术,能够自动识别UI异常、性能问题和日志错误,减少了人工审查的工作量。A/B测试优化则利用多臂老虎机算法和贝叶斯统计,智能分配流量并提前终止无效测试,最大化测试价值。
随着AI技术的不断发展,未来的软件测试将更加智能化、自动化和预测性。组织应该积极拥抱这些技术,分阶段实施AI测试解决方案,培养相关技能,并建立有效的度量体系,从而在激烈的市场竞争中获得优势。
感谢每一个认真阅读我文章的人!!!
作为一位过来人也是希望大家少走一些弯路,如果你不想再体验一次学习时找不到资料,没人解答问题,坚持几天便放弃的感受的话,在这里我给大家分享一些自动化测试的学习资源,希望能给你前进的路上带来帮助。

软件测试面试文档
我们学习必然是为了找到高薪的工作,下面这些面试题是来自阿里、腾讯、字节等一线互联网大厂最新的面试资料,并且有字节大佬给出了权威的解答,刷完这一套面试资料相信大家都能找到满意的工作。
视频文档获取方式:
这份文档和视频资料,对于想从事【软件测试】的朋友来说应该是最全面最完整的备战仓库,这个仓库也陪伴我走过了最艰难的路程,希望也能帮助到你!以上均可以分享,点下方小卡片即可自行领取。

AtomGit 是由开放原子开源基金会联合 CSDN 等生态伙伴共同推出的新一代开源与人工智能协作平台。平台坚持“开放、中立、公益”的理念,把代码托管、模型共享、数据集托管、智能体开发体验和算力服务整合在一起,为开发者提供从开发、训练到部署的一站式体验。
更多推荐


 10
10 0
0- 0


 已为社区贡献3条内容

所有评论(0)