【Harmony Next 应用开发入门】第八期:Image组件实战指南:从基础到进阶的图片加载艺术
在鸿蒙应用开发中,图片展示是最常见的需求之一。今天,小鱼将通过一个完整的示例代码,带小伙伴们深入了解鸿蒙Next系统中Image组件的各项强大功能
一、多种图片格式支持
鸿蒙的Image组件原生支持PNG、GIF、SVG、JPG等主流图片格式,使用方式统一简洁:
// 加载png格式图片
Image($r('app.media.ic_chat'))
  .width(110).height(110)

// 加载gif动图
Image($r('app.media.ic_hi_cat'))
  .width(110).height(110)

// 加载svg矢量图
Image($r('app.media.ic_finished'))
  .width(110).height(110)

// 加载jpg图片
Image($r('app.media.ic_jpg'))
  .width(110).height(110)
通过$r('app.media.xxx')的方式引用资源文件,简洁明了。
二、图片缩放模式详解
在实际开发中,我们经常需要将图片适配到固定尺寸的容器中。Image组件提供了丰富的缩放模式:
2.1 ImageFit.Contain
保持宽高比缩放,使图片完全显示在容器内,可能会有留白。
Image($r('app.media.picture'))
          .width(200)
          .height(150)
          .border({ width: 1 })
          .objectFit(ImageFit.Contain)
          .margin({ bottom: 25, left: 2 })
          .overlay('Contain', { align: Alignment.Bottom, offset: { x: 0, y: 20 } })
2.2 ImageFit.Cover
保持宽高比缩放,填满整个容器,可能会裁剪图片。
 Image($r('app.media.picture'))
          .width(200)
          .height(150)
          .border({ width: 1 })
          .objectFit(ImageFit.Cover)
          .margin({ bottom: 25, left: 2 })
          .overlay('Cover', { align: Alignment.Bottom, offset: { x: 0, y: 20 } })
2.3 ImageFit.Fill
不保持宽高比,拉伸图片填满容器。
        Image($r('app.media.picture'))
          .width(200)
          .height(150)
          .border({ width: 1 })
          .objectFit(ImageFit.Fill)
          .margin({ bottom: 25, left: 2 })
          .overlay('Fill', { align: Alignment.Bottom, offset: { x: 0, y: 20 } })
2.4 ImageFit.ScaleDown
保持宽高比缩小(不会放大),图片完整显示。
        Image($r('app.media.picture'))
          .width(200)
          .height(150)
          .border({ width: 1 })
          // 通过设置objectFit属性,可以使图片在高度和宽度确定的框内进行缩放
          // 保持宽高比显示,图片缩小或者保持不变
          .objectFit(ImageFit.ScaleDown)
          .margin({ bottom: 25, left: 2 })
          .overlay('ScaleDown', { align: Alignment.Bottom, offset: { x: 0, y: 20 } })
2.6 ImageFit.Auto
图片或视频会根据其自身尺寸和组件的尺寸进行适当缩放,以在保持比例的同时填充视图,对齐方式为水平居中
        Image($r('app.media.picture'))
          .width(200)
          .height(150)
          .border({ width: 1 })
          .objectFit(ImageFit.Auto)
          .margin({ bottom: 25, left: 2 })
          .overlay('Auto:自适应显示', { align: Alignment.Bottom, offset: { x: 0, y: 20 } })
2.5 ImageFit.None
保持原始尺寸显示。
 Image($r('app.media.picture'))
          .width(200)
          .height(150)
          .border({ width: 1 })
          .objectFit(ImageFit.None)
          .margin({ bottom: 25, left: 2 })
          .overlay('None:保持原有尺寸显示', { align: Alignment.Bottom, offset: { x: 0, y: 20 } })
2.6 ImageFit.TOP_START
图片显示在容器左上角,保持原始尺寸。
 Image($r('app.media.picture'))
          .width(200)
          .height(150)
          .border({ width: 1 })
          .objectFit(ImageFit.TOP_START)
          .margin({ bottom: 25, left: 2 })
          .overlay('TOP_START', { align: Alignment.Bottom, offset: { x: 0, y: 40 } })
上效果图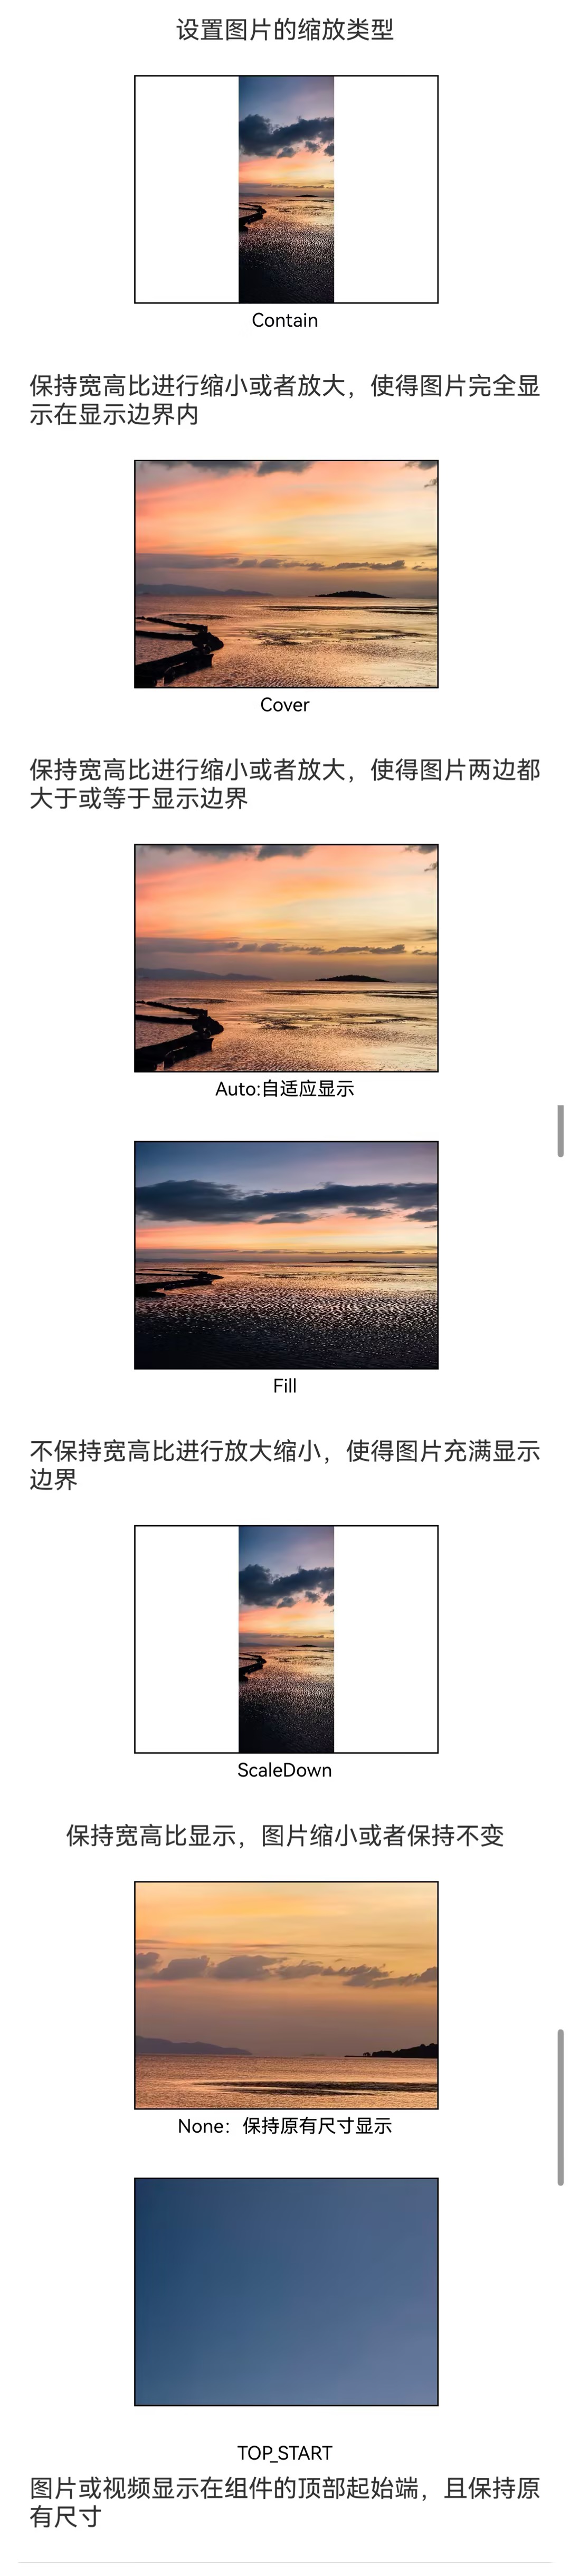
三、图片插值:让模糊图片变清晰
当低分辨率图片放大显示时,会出现明显的锯齿和模糊。Image组件提供了插值功能来改善显示效果:
Image($r('app.media.grass')).width('40%') .borderWidth(1)

// 无插值(效果最差)
.interpolation(ImageInterpolation.None)

// 低质量插值(双线性插值)
.interpolation(ImageInterpolation.Low)

// 中质量插值(MipMap插值)
.interpolation(ImageInterpolation.Medium)

// 高质量插值(Cubic插值,效果最好,可能影响性能)
.interpolation(ImageInterpolation.High)
选择合适的插值方式,可以在显示效果和性能之间取得平衡。
上效果图: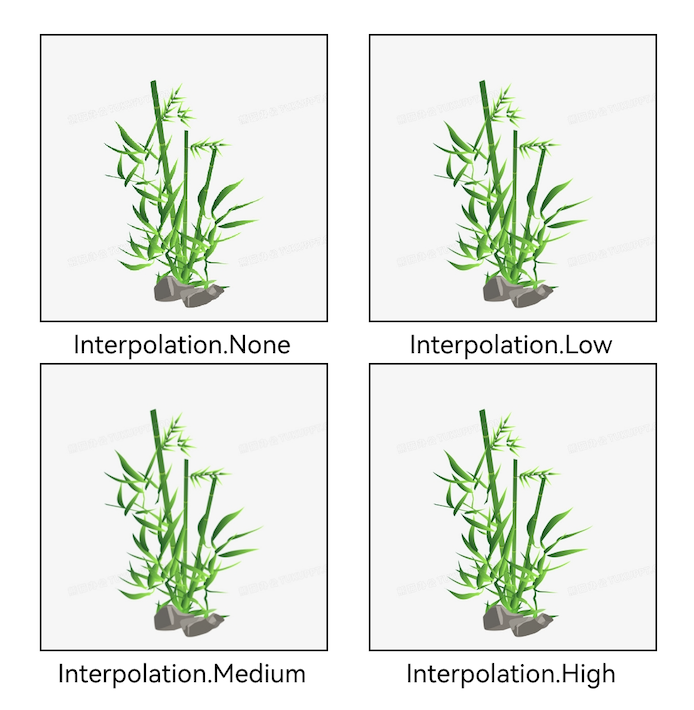
四、图片重复样式
类似CSS的background-repeat,Image组件支持设置重复样式:
Image($r('app.media.ic_wink')).width(160).height(160)
          .border({ width: 1 })
          .objectFit(ImageFit.ScaleDown)

// 水平和垂直方向都重复
.objectRepeat(ImageRepeat.XY)

// 只垂直方向重复
.objectRepeat(ImageRepeat.Y)

// 只水平方向重复
.objectRepeat(ImageRepeat.X)
上效果图: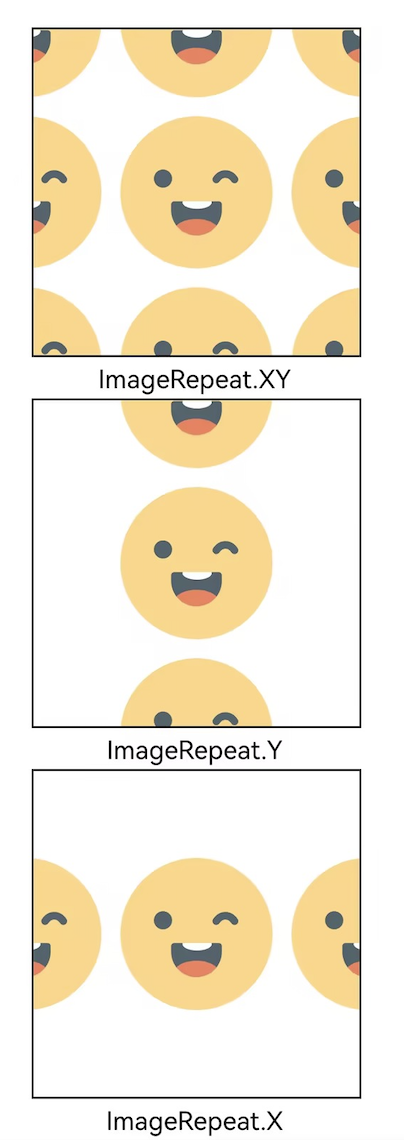
五、图片渲染模式
Image($r('app.media.ic_wink'))】
.width(100)
.height(100)
.border({ width: 1 })

// 保持原色渲染
.renderMode(ImageRenderMode.Original)

// 模板模式(将图片转换为单色,适合作为图标)
.renderMode(ImageRenderMode.Template)
上效果图: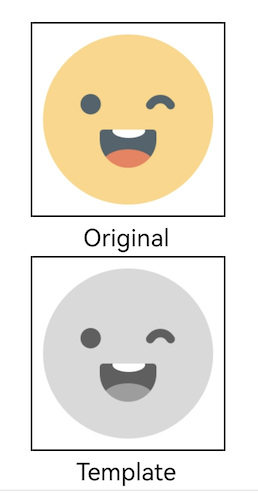
六、解码尺寸优化
通过sourceSize可以在解码阶段就调整图片尺寸,有效减少内存占用:
Image($r('app.media.girl'))
  .sourceSize({
    width: 40,
    height: 40  // 解码时就将图片缩小到40x40
  })
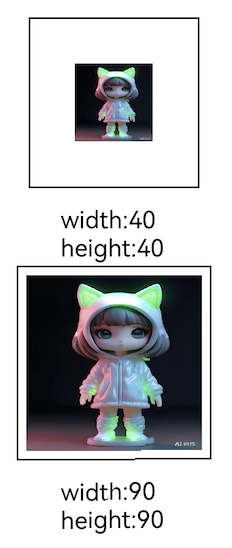
这对于加载大图特别有用,可以显著降低内存使用。
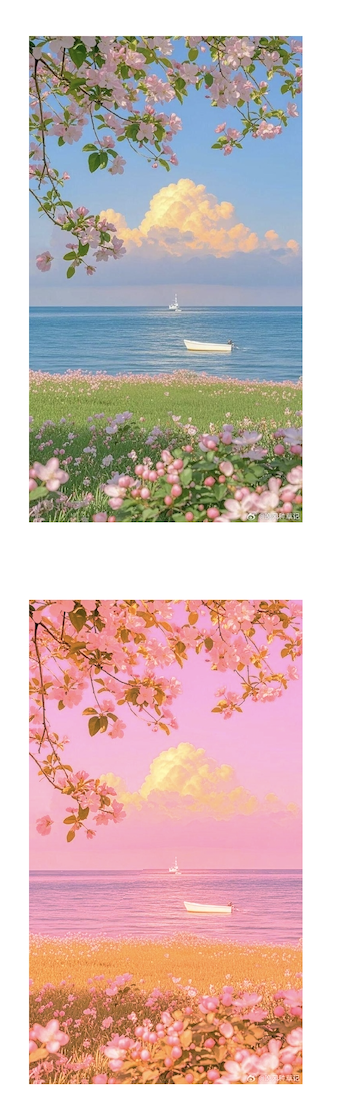
七、滤镜效果
通过colorFilter矩阵调整图片的像素颜色,实现各种滤镜效果:
Image($r('app.media.flower'))
          .width('40%')
          .margin(10)
Image($r('app.media.flower')).width('40%')
// 通过colorFilter调整图片的像素颜色,为图片添加滤镜
.colorFilter(
  [1, 1, 0, 0, 0,   // R通道
   0, 1, 0, 0, 0,   // G通道
   0, 0, 1, 0, 0,   // B通道
   0, 0, 0, 1, 0])  // Alpha通道
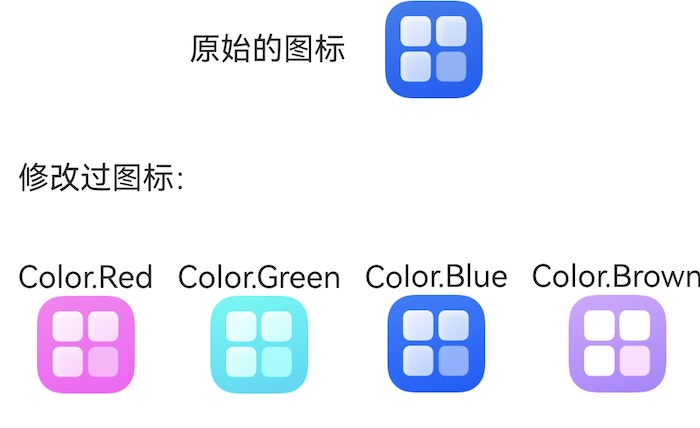
八、图片着色
8.1 PNG图标着色
Image($r('app.media.startIcon'))
              .colorBlend(Color.Red)
              .height(50)
              .width(50);
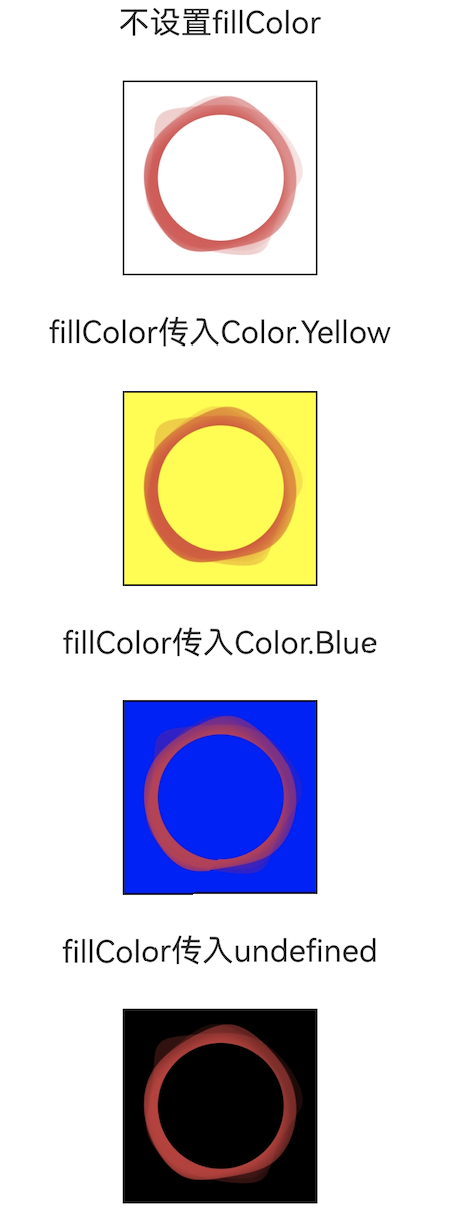
8.2 SVG填充颜色
// 设置SVG图片的填充色
Image($r('app.media.circle'))
          .height(100)
          .width(100)
          .objectFit(ImageFit.Contain)
          .borderWidth(1)
          .fillColor(Color.Yellow)
九、同步加载与事件监听
9.1 同步加载
// 一般情况下,图片加载流程会异步进行,以避免阻塞主线程,影响UI交互。
// 但是特定情况下,图片刷新时会出现闪烁,这时可以使用syncLoad属性,
//使图片同步加载,从而避免出现闪烁。
//不建议图片加载较长时间时使用,会导致页面无法响应。
Image($r('app.media.picture'))
.syncLoad(true)
9.2 加载事件
Image($r('app.media.picture'))
          .width(200)
          .height(150)
          .margin(15)
          // 图片加载成功后,通过onComplete获取图片必要信息
          .onComplete(msg => {
            console.info(`load image success: width = ${msg?.width},height = ${msg?.height},componentWidth = ${msg?.componentWidth},componentHeight = ${msg?.componentHeight}`);
          })
          // 如果加载失败,使用onError触发回调函数获取结果
          .onError(() => {
            console.info('load image fail');
          })
Tips:SVG 图片的加载事件是:onFinish
十、最佳实践建议
-
合理选择缩放模式:根据UI设计需求选择最合适的
objectFit值。 -
优化内存使用:
- 对大图使用
sourceSize预先缩放到合适的尺寸 - 不需要全彩时使用
renderMode设为模板模式
- 对大图使用
-
性能考量:
ImageInterpolation.High虽然效果最好,但会影响渲染性能,请按需使用- 除非必要,避免使用
syncLoad(true),防止阻塞UI
-
SVG图片处理:
- 使用
fillColor可以动态改变单色SVG的颜色 - 这对于主题切换、状态变化非常有用
- 使用
总结
鸿蒙Next的Image组件功能强大而灵活,从基础的图片加载到高级的滤镜效果,都能很好地满足开发需求。通过合理使用这些特性,我们既能实现丰富的视觉效果,又能保持良好的性能表现。

AtomGit 是由开放原子开源基金会联合 CSDN 等生态伙伴共同推出的新一代开源与人工智能协作平台。平台坚持“开放、中立、公益”的理念,把代码托管、模型共享、数据集托管、智能体开发体验和算力服务整合在一起,为开发者提供从开发、训练到部署的一站式体验。
更多推荐


 5
5 0
0- 0


 已为社区贡献1条内容

所有评论(0)