Rust WebAssembly 开发实战:从 Web 应用到边缘计算
·
目录
📝 摘要
WebAssembly (Wasm) 作为新一代 Web 标准,让 Rust 能够在浏览器中运行,并扩展到服务器端、边缘计算等场景。本文将深入讲解 Rust 编译到 Wasm 的原理、wasm-bindgen 工具链、与 JavaScript 的互操作、性能优化技巧,以及如何构建高性能的 Web 应用。通过实战案例(图像处理、游戏引擎、在线编辑器),帮助读者掌握 Rust + Wasm 的全栈开发能力。
一、背景介绍
1.1 为什么选择 Rust + Wasm?
WebAssembly 的优势:
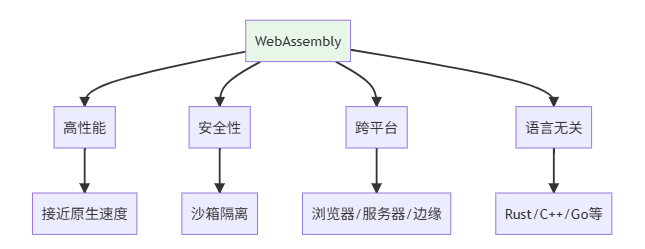
性能对比:
| 语言/技术 | 执行速度 | 二进制大小 | 启动时间 |
|---|---|---|---|
| JavaScript | 1x | - | 即时 |
| TypeScript | 1x | - | 即时 |
| Rust (Wasm) | 5-20x | 小 | <50ms |
| C++ (Wasm) | 5-20x | 中 | <50ms |
1.2 Rust Wasm 生态
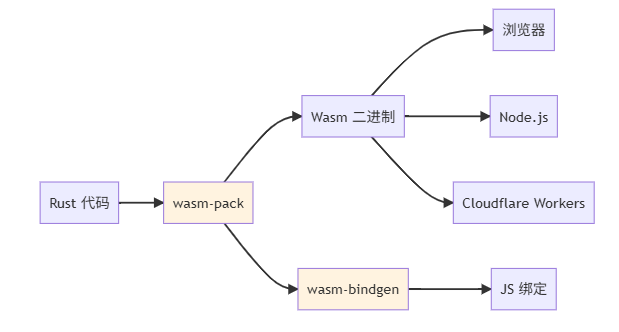
二、快速开始
2.1 环境搭建
# 安装 Rust
curl --proto '=https' --tlsv1.2 -sSf https://sh.rustup.rs | sh

# 添加 Wasm 目标
rustup target add wasm32-unknown-unknown

# 安装 wasm-pack
cargo install wasm-pack

# 安装 cargo-generate(可选)
cargo install cargo-generate
2.2 创建第一个 Wasm 项目
# 使用模板创建项目
cargo generate --git https://github.com/rustwasm/wasm-pack-template

# 或手动创建
cargo new --lib hello-wasm
cd hello-wasm
Cargo.toml 配置:
[package]
name = "hello-wasm"
version = "0.1.0"
edition = "2021"

[lib]
crate-type = ["cdylib"]  # 动态库

[dependencies]
wasm-bindgen = "0.2"

[profile.release]
opt-level = "z"          # 优化大小
lto = true               # 链接时优化
codegen-units = 1        # 单编译单元
panic = 'abort'          # panic时直接终止
src/lib.rs:
use wasm_bindgen::prelude::*;

// 导出函数给 JavaScript
#[wasm_bindgen]
pub fn greet(name: &str) -> String {
    format!("Hello, {}!", name)
}

#[wasm_bindgen]
pub fn add(a: i32, b: i32) -> i32 {
    a + b
}

// Wasm 模块初始化
#[wasm_bindgen(start)]
pub fn main() {
    // 设置 panic hook,在浏览器控制台显示错误
    #[cfg(feature = "console_error_panic_hook")]
    console_error_panic_hook::set_once();
}
2.3 编译与测试
# 构建 Wasm 包
wasm-pack build --target web

# 输出目录结构:
# pkg/
#   ├── hello_wasm.js
#   ├── hello_wasm_bg.wasm
#   ├── hello_wasm.d.ts
#   └── package.json
在 HTML 中使用:
<!DOCTYPE html>
<html>
<head>
    <meta charset="utf-8">
    <title>Rust Wasm Demo</title>
</head>
<body>
    <h1>Rust + WebAssembly</h1>
    <button id="greetBtn">问候</button>
    <div id="output"></div>

    <script type="module">
        import init, { greet, add } from './pkg/hello_wasm.js';

        async function run() {
            // 初始化 Wasm 模块
            await init();

            // 调用 Rust 函数
            const result = greet('World');
            console.log(result);  // "Hello, World!"

            const sum = add(5, 7);
            console.log(sum);  // 12

            document.getElementById('greetBtn').addEventListener('click', () => {
                const name = prompt('请输入名字:');
                document.getElementById('output').textContent = greet(name);
            });
        }

        run();
    </script>
</body>
</html>
三、wasm-bindgen 深度解析
3.1 类型映射
Rust ⇔ JavaScript 类型转换:
| Rust 类型 | JS 类型 | 说明 |
|---|---|---|
i32, u32 |
number |
32位整数 |
f64 |
number |
64位浮点 |
bool |
boolean |
布尔值 |
String, &str |
string |
字符串 |
Vec<T> |
Array |
数组 |
Option<T> |
T | undefined |
可选值 |
Result<T, E> |
Promise<T> |
异步结果 |
3.2 复杂数据传递
use wasm_bindgen::prelude::*;
use serde::{Deserialize, Serialize};

// 使用 serde 序列化
#[derive(Serialize, Deserialize)]
pub struct User {
    pub name: String,
    pub age: u32,
    pub email: String,
}

#[wasm_bindgen]
pub fn process_user(user_json: &str) -> String {
    let user: User = serde_json::from_str(user_json).unwrap();

    format!("{} ({}岁) - {}", user.name, user.age, user.email)
}

// 返回 JsValue
#[wasm_bindgen]
pub fn create_user(name: String, age: u32) -> JsValue {
    let user = User {
        name,
        age,
        email: "user@example.com".to_string(),
    };

    serde_wasm_bindgen::to_value(&user).unwrap()
}
JavaScript 调用:
import init, { process_user, create_user } from './pkg/hello_wasm.js';

await init();

// 传递 JSON
const userJson = JSON.stringify({
    name: 'Alice',
    age: 30,
    email: 'alice@example.com'
});
const result = process_user(userJson);
console.log(result);

// 接收对象
const user = create_user('Bob', 25);
console.log(user.name);  // "Bob"
3.3 访问 DOM
use wasm_bindgen::prelude::*;
use web_sys::{Document, Element, HtmlElement, Window};

#[wasm_bindgen]
pub fn manipulate_dom() {
    let window = web_sys::window().expect("no global window");
    let document = window.document().expect("no document");

    // 创建元素
    let div = document.create_element("div").unwrap();
    div.set_text_content(Some("Hello from Rust!"));
    div.set_class_name("rust-content");

    // 添加到 body
    let body = document.body().expect("no body");
    body.append_child(&div).unwrap();

    // 修改样式
    if let Some(html_div) = div.dyn_ref::<HtmlElement>() {
        let style = html_div.style();
        style.set_property("color", "blue").unwrap();
        style.set_property("font-size", "20px").unwrap();
    }
}

#[wasm_bindgen]
pub fn add_click_listener() {
    let window = web_sys::window().unwrap();
    let document = window.document().unwrap();

    let button = document
        .get_element_by_id("myButton")
        .expect("找不到按钮");

    let closure = Closure::wrap(Box::new(move || {
        web_sys::console::log_1(&"按钮被点击!".into());
    }) as Box<dyn FnMut()>);

    button
        .add_event_listener_with_callback("click", closure.as_ref().unchecked_ref())
        .unwrap();

    closure.forget();  // 防止闭包被释放
}
四、实战案例
4.1 图像处理器
use wasm_bindgen::prelude::*;
use image::{ImageBuffer, Rgba};

#[wasm_bindgen]
pub struct ImageProcessor {
    width: u32,
    height: u32,
    data: Vec<u8>,
}

#[wasm_bindgen]
impl ImageProcessor {
    #[wasm_bindgen(constructor)]
    pub fn new(width: u32, height: u32, data: Vec<u8>) -> Self {
        ImageProcessor { width, height, data }
    }

    // 灰度化
    pub fn grayscale(&mut self) {
        for chunk in self.data.chunks_mut(4) {
            let r = chunk[0] as f32;
            let g = chunk[1] as f32;
            let b = chunk[2] as f32;

            let gray = (0.299 * r + 0.587 * g + 0.114 * b) as u8;

            chunk[0] = gray;
            chunk[1] = gray;
            chunk[2] = gray;
        }
    }

    // 模糊处理
    pub fn blur(&mut self, radius: u32) {
        let img = ImageBuffer::<Rgba<u8>, _>::from_raw(
            self.width,
            self.height,
            self.data.clone(),
        ).unwrap();

        let blurred = image::imageops::blur(&img, radius as f32);
        self.data = blurred.into_raw();
    }

    // 获取处理后的数据
    pub fn get_data(&self) -> Vec<u8> {
        self.data.clone()
    }
}
JavaScript 使用:
import init, { ImageProcessor } from './pkg/image_wasm.js';

await init();

// 从 Canvas 获取图像数据
const canvas = document.getElementById('myCanvas');
const ctx = canvas.getContext('2d');
const imageData = ctx.getImageData(0, 0, canvas.width, canvas.height);

// 创建处理器
const processor = new ImageProcessor(
    canvas.width,
    canvas.height,
    new Uint8Array(imageData.data)
);

// 应用效果
processor.grayscale();
processor.blur(5);

// 获取结果
const processed = processor.get_data();
const newImageData = new ImageData(
    new Uint8ClampedArray(processed),
    canvas.width,
    canvas.height
);
ctx.putImageData(newImageData, 0, 0);
4.2 性能测试:Rust vs JavaScript
use wasm_bindgen::prelude::*;

#[wasm_bindgen]
pub fn fibonacci_rust(n: u32) -> u64 {
    if n <= 1 {
        return n as u64;
    }
    fibonacci_rust(n - 1) + fibonacci_rust(n - 2)
}

#[wasm_bindgen]
pub fn sum_array_rust(arr: &[f64]) -> f64 {
    arr.iter().sum()
}

#[wasm_bindgen]
pub fn matrix_multiply_rust(
    a: &[f64],
    b: &[f64],
    n: usize,
) -> Vec<f64> {
    let mut result = vec![0.0; n * n];

    for i in 0..n {
        for j in 0..n {
            for k in 0..n {
                result[i * n + j] += a[i * n + k] * b[k * n + j];
            }
        }
    }

    result
}
性能对比(JavaScript):
// JavaScript 版本
function fibonacciJS(n) {
    if (n <= 1) return n;
    return fibonacciJS(n - 1) + fibonacciJS(n - 2);
}

// 基准测试
console.time('JS Fibonacci');
const resultJS = fibonacciJS(40);
console.timeEnd('JS Fibonacci');
// JS Fibonacci: ~1500ms

console.time('Rust Fibonacci');
const resultRust = fibonacci_rust(40);
console.timeEnd('Rust Fibonacci');
// Rust Fibonacci: ~80ms

// 性能提升:18.75倍!
4.3 实时游戏引擎
use wasm_bindgen::prelude::*;
use web_sys::{CanvasRenderingContext2d, HtmlCanvasElement};

#[wasm_bindgen]
pub struct GameEngine {
    ctx: CanvasRenderingContext2d,
    width: f64,
    height: f64,
    player_x: f64,
    player_y: f64,
}

#[wasm_bindgen]
impl GameEngine {
    #[wasm_bindgen(constructor)]
    pub fn new(canvas: HtmlCanvasElement) -> Result<GameEngine, JsValue> {
        let ctx = canvas
            .get_context("2d")?
            .unwrap()
            .dyn_into::<CanvasRenderingContext2d>()?;

        let width = canvas.width() as f64;
        let height = canvas.height() as f64;

        Ok(GameEngine {
            ctx,
            width,
            height,
            player_x: width / 2.0,
            player_y: height / 2.0,
        })
    }

    pub fn update(&mut self, delta_time: f64) {
        // 更新游戏逻辑
    }

    pub fn render(&self) {
        // 清屏
        self.ctx.clear_rect(0.0, 0.0, self.width, self.height);

        // 绘制玩家
        self.ctx.set_fill_style(&JsValue::from_str("blue"));
        self.ctx.fill_rect(self.player_x - 25.0, self.player_y - 25.0, 50.0, 50.0);
    }

    pub fn move_player(&mut self, dx: f64, dy: f64) {
        self.player_x += dx;
        self.player_y += dy;

        // 边界检测
        self.player_x = self.player_x.max(0.0).min(self.width);
        self.player_y = self.player_y.max(0.0).min(self.height);
    }
}
五、优化技巧
5.1 减小二进制大小
# 1. 使用 wee_alloc(更小的分配器)
cargo add wee_alloc

# 2. 启用 LTO 和优化
# Cargo.toml
[profile.release]
opt-level = "z"
lto = true
codegen-units = 1
panic = 'abort'
strip = true

# 3. 使用 wasm-opt
wasm-opt -Oz -o output.wasm input.wasm

# 4. 启用 Brotli 压缩
大小对比:
| 优化阶段 | 大小 | 压缩后 |
|---|---|---|
| 初始 | 200KB | 60KB |
| opt-level=“z” | 150KB | 45KB |
| + LTO | 100KB | 30KB |
| + wasm-opt | 80KB | 25KB |
| + Brotli | - | 18KB |
5.2 避免不必要的克隆
// ❌ 低效:不必要的克隆
#[wasm_bindgen]
pub fn process_data(data: Vec<u8>) -> Vec<u8> {
    let mut result = data.clone();
    // ...
    result
}

// ✓ 高效:直接修改
#[wasm_bindgen]
pub fn process_data_inplace(mut data: Vec<u8>) -> Vec<u8> {
    // 直接修改 data
    for byte in &mut data {
        *byte = byte.wrapping_mul(2);
    }
    data
}
5.3 使用 TypedArray 传递大数据
use wasm_bindgen::prelude::*;
use js_sys::Uint8Array;

#[wasm_bindgen]
pub fn process_typed_array(input: Uint8Array) -> Uint8Array {
    let mut data = input.to_vec();

    // 处理数据
    for byte in &mut data {
        *byte = byte.wrapping_add(1);
    }

    Uint8Array::from(&data[..])
}
六、部署场景
6.1 浏览器 Web 应用
// 动态加载 Wasm
async function loadWasm() {
    const { greet } = await import('./pkg/hello_wasm.js');
    return { greet };
}

// 使用 Web Worker
const worker = new Worker('wasm-worker.js');
worker.postMessage({ cmd: 'init' });
6.2 Node.js 服务
// server.js
const { add, process_data } = require('./pkg/hello_wasm_node');

const express = require('express');
const app = express();

app.get('/add/:a/:b', (req, res) => {
    const result = add(
        parseInt(req.params.a),
        parseInt(req.params.b)
    );
    res.json({ result });
});

app.listen(3000);
6.3 Cloudflare Workers
use worker::*;

#[event(fetch)]
pub async fn main(req: Request, env: Env, _ctx: worker::Context) -> Result<Response> {
    let url = req.url()?;

    if url.path() == "/hello" {
        Response::ok("Hello from Rust Wasm!")
    } else {
        Response::error("Not Found", 404)
    }
}
七、调试与测试
7.1 Source Maps
# 生成 Source Maps
wasm-pack build --dev --target web

# Chrome DevTools 会自动加载,可以调试 Rust 源代码
7.2 单元测试
#[cfg(test)]
mod tests {
    use super::*;
    use wasm_bindgen_test::*;

    #[wasm_bindgen_test]
    fn test_add() {
        assert_eq!(add(2, 3), 5);
    }

    #[wasm_bindgen_test]
    async fn test_async_function() {
        let result = fetch_data().await;
        assert!(result.is_ok());
    }
}
# 运行测试
wasm-pack test --headless --chrome
八、总结与讨论
核心要点:
✅ 高性能 - Rust Wasm 比 JS 快 5-20 倍
✅ 小体积 - 优化后可达 20KB 以下
✅ 跨平台 - 浏览器/服务器/边缘计算
✅ 类型安全 - wasm-bindgen 自动生成类型
✅ 零成本互操作 - 与 JS 无缝集成
适用场景:
| 场景 | 适合度 | 说明 |
|---|---|---|
| 图像/视频处理 | ⭐⭐⭐⭐⭐ | 计算密集 |
| 游戏引擎 | ⭐⭐⭐⭐⭐ | 实时渲染 |
| 加密算法 | ⭐⭐⭐⭐⭐ | 安全性能 |
| DOM 操作 | ⭐⭐ | JS 更方便 |
| 简单 CRUD | ⭐ | 无需 Wasm |
讨论问题:
- Rust Wasm 相比 C++ Wasm,开发体验和性能有何差异?
- 何时应该使用 Wasm,何时应该坚持用 JavaScript?
- Wasm 的 GC 提案会如何改变 Rust Wasm 的开发方式?
- 如何在大型项目中组织 Rust 和 JS 代码?
- Wasm 在移动端浏览器的性能表现如何?
欢迎分享你的 Wasm 实践经验!🌐
参考链接
- Rust Wasm Book:https://rustwasm.github.io/docs/book/
- wasm-bindgen 文档:https://rustwasm.github.io/wasm-bindgen/
- wasm-pack:https://rustwasm.github.io/wasm-pack/
- WebAssembly 官网:https://webassembly.org/
- Awesome Wasm:https://github.com/mbasso/awesome-wasm

AtomGit 是由开放原子开源基金会联合 CSDN 等生态伙伴共同推出的新一代开源与人工智能协作平台。平台坚持“开放、中立、公益”的理念,把代码托管、模型共享、数据集托管、智能体开发体验和算力服务整合在一起,为开发者提供从开发、训练到部署的一站式体验。
更多推荐


 27
27 0
0- 0


 已为社区贡献9条内容

所有评论(0)