linux 安装 ffmpeg 包括静态包和编译安装
linux 安装 ffmpeg
windows上安装,直接下载压缩包解压。linux安装,找了半天各种技术文章,说最好编译安装,按照步骤安装编译环境编译成功了,但是使用的时候总要安装各种外部库,转码转不了等等问题......
最后无奈,卸载掉ffmpeg,去官网下载编译好的程序,尝试了一下。效果满意。所以建议0基础底子薄的,和我一样不要编译安装了。
切记,去官网下载最新版本ffmpeg。避免踩坑!
ffmpeg的卸载
如果知道编译安装的位置,直接删除文件夹即可;
不知道位置,采用以下方式重新编译安装:https://www.linuxidc.com/Linux/2019-03/157703.htm
最后,删除/usr/local/bin/ffmpeg执行程序,你的可能不在这个地方,可以自己查看具体位置,whereis ffmpeg
首先说一下静态安装包 安装方法 此方法适合小白
1. 下载
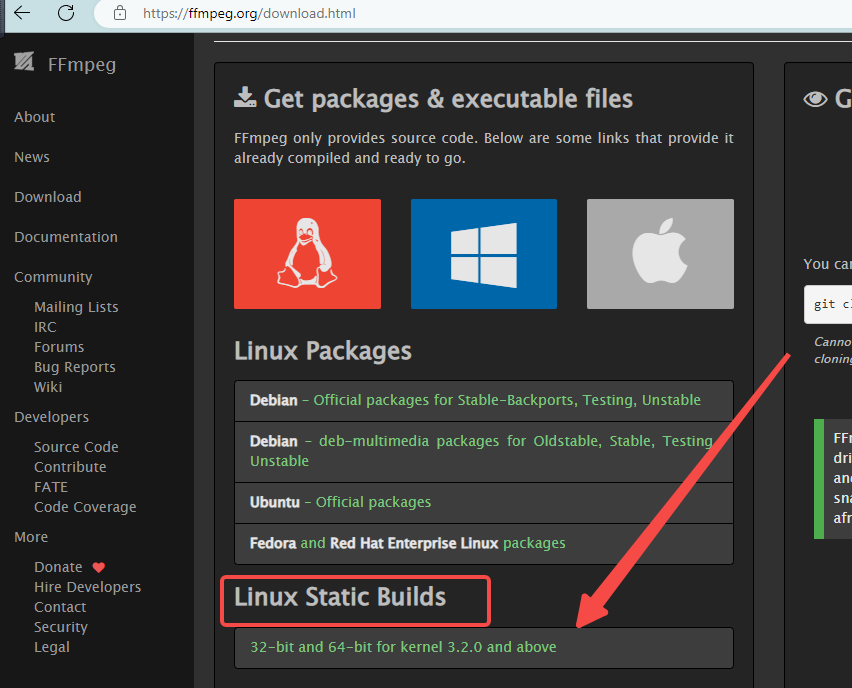
打开官网地址,进入下载页:Download FFmpeg

选择Linux Static Builds下的构建选项,进入详情页

在列表中选择适合自己的版本,鼠标右键,复制链接地址。这里我选择了release5.1.1最新版本 ffmpeg-release-amd64-static.tar.xz。
打开Linux中要安装ffmpeg的目录,使用wget命令下载文件:
wget https://johnvansickle.com/ffmpeg/builds/ffmpeg-release-amd64-static.tar.xz2. 解压
下载完成后,如图:
可以看到下载完成的文件后缀名为 .tar.xz ,执行对应解压命令解压文件:
xz -d ffmpeg-release-amd64-static.tar.xz经过一次解压,.xz 后缀名已经被去掉。接下来执行:
tar -xvf ffmpeg-release-amd64-static.tar解压完成后进入解压出来的这个目录 ffmpeg-5.1.1-amd64-static
ffmpeg 和 ffprobe 都在这里。
3. 运行
接下来执行下命令试试:
./ffmpeg安装成功,接下来可以随意做媒体处理啦,是不是 so easy!
备注
当然,如果想要ffmpeg命令全局可用,可以在bin目录加个链接。比如,分别执行如下命令,即可在/usr/bin目录下创建ffmpeg和ffprobe软链接。
cd /usr/bin
ln -s /data/software/ffmpeg-5.1.1-amd64-static/ffmpeg ffmpeg
ln -s /data/software/ffmpeg-5.1.1-amd64-static/ffprobe ffprobe
这样在其他目录也都可以直接使用 ffmpeg 和 ffprobe 而不用加目录前缀了。
在命令行输入ffmpeg 如下 就说明正常了

下面来介绍一下 编译的安装方法
(如果不想看罗里吧嗦一大顿有用的话,可以跳到文章末尾直接拿写好的脚本用。。)
源码安装与二进制安装最大的不同是,你可以得到ffmpeg的libav*的一系列库。如何你需要基于这些库做开发,那么基本上你只能源码安装。另外,假如你需要对ffmpeg的源码或者它依赖的第三方库的源码做定制化修改,那也需要源码安装。
我的环境是一台阿里云的云主机,系统是CentOS 6.5,linux内核版本是2.6.32,gcc版本是4.4.7 20120313 (Red Hat 4.4.7-23)
上 Download FFmpeg 这个网页找到最新稳定版本的ffmpeg源码下载:
$wget https://ffmpeg.org/releases/ffmpeg-4.2.2.tar.bz2
$tar xvf ffmpeg-4.2.2.tar.bz2
$cd ffmpeg-4.2.2
$./configure
报错:
nasm/yasm not found or too old. Use --disable-x86asm for a crippled build.
...
yasm可以理解为是一个针对汇编做优化的库,所以我们选择先安装yasm而不是简单粗暴的使用--disable-x86asm禁用它。
上 Index of /projects/yasm/releases/ 这个网页找yasm的源码下载:
$wget http://www.tortall.net/projects/yasm/releases/yasm-1.3.0.tar.gz
$tar xvf yasm-1.3.0.tar.gz
$cd yasm-1.3.0/
$./configure
$make
$make install
成功之后,再回到ffmpeg的源码目录:
$cd ffmpeg-4.2.2
$./configure
$make
编译完后试试运行ffmpeg:
$./ffmpeg

ffmpeg version 4.2.2 Copyright (c) 2000-2019 the FFmpeg developers
  built with gcc 4.4.7 (GCC) 20120313 (Red Hat 4.4.7-23)
  configuration:
  libavutil      56. 31.100 / 56. 31.100
  libavcodec     58. 54.100 / 58. 54.100
  libavformat    58. 29.100 / 58. 29.100
  libavdevice    58.  8.100 / 58.  8.100
  libavfilter     7. 57.100 /  7. 57.100
  libswscale      5.  5.100 /  5.  5.100
  libswresample   3.  5.100 /  3.  5.100
Hyper fast Audio and Video encoder
usage: ffmpeg [options] [[infile options] -i infile]... {[outfile options] outfile}...
但是需要注意的是,我们这样编译出来的ffmpeg,缺少很多编解码器,比如说h264。
这意味着,你用ffmpeg把一个h264编码的mp4文件转换成flv文件,不改动里面的编码数据,这是ok的,因为只是外层封装格式的转换,但是如果涉及到h264的编码和解码,可能就瞎了。这里例子就不上了。
那怎么添加需要的库呢,其实也很简单,基本就是两步,先源码安装好需要的编解码库,然后再在编译ffmpeg执行./configure那一步时将库加上。
configure所有的参数说明可以通过./configure -h查看。
我们回头看本文方式一中,直接运行下载得到的二进制ffmpeg,其中有一行信息:
configuration: --enable-gpl --enable-version3 --enable-static --disable-debug --disable-ffplay --disable-indev=sndio --disable-outdev=sndio --cc=gcc-6 --enable-fontconfig --enable-frei0r --enable-gnutls --enable-gray --enable-libfribidi --enable-libass --enable-libfreetype --enable-libmp3lame --enable-libopencore-amrnb --enable-libopencore-amrwb --enable-libopenjpeg --enable-librubberband --enable-librtmp --enable-libsoxr --enable-libspeex --enable-libvorbis --enable-libopus --enable-libtheora --enable-libvidstab --enable-libvo-amrwbenc --enable-libvpx --enable-libwebp --enable-libx264 --enable-libx265 --enable-libxvid --enable-libzimg
这个就是这个ffmpeg当时./configure的参数。可以看到里面包含了x264的库--enable-libx264。
下面我们演示如何编译包含x264的ffmpeg。
首先,编译x264:
$wget https://code.videolan.org/videolan/x264/-/archive/master/x264-master.tar.bz2
$tar xvf x264-master.tar.bz2
$cd x264-master/
$./configure
报错:
Found no assembler
Minimum version is nasm-2.13
If you really want to compile without asm, configure with --disable-asm.
安装nasm:
$wget https://www.nasm.us/pub/nasm/releasebuilds/2.14.02/nasm-2.14.02.tar.gz
$tar xvf nasm-2.14.02.tar.gz
$cd nasm-2.14.02/
$./configure
$make
$make install
成功后,返回x264目录,继续编译:
$cd x264-master/
$./configure
$make
# 这里需要注意,默认的make install只会安装x264可执行文件,并不会安装静态库,
# 所以我们使用install-lib-static
$make install-lib-static
回到ffmpeg源码目录,重新编译一个ffmpeg,这次我们把debug禁用掉,把x264包含上,显式指定编译静态库(不写的话默认也是静态库)
$./configure --disable-debug --enable-static --enable-libx264
报错:
libx264 is gpl and --enable-gpl is not specified.
继续:
$./configure --disable-debug --enable-static --enable-libx264 --enable-gpl
报错:
ERROR: libx264 not found
打开ffbuild/config.log文件查看错误信息:
/usr/local/lib/libx264.a(opencl-8.o): In function `x264_8_opencl_close_library':
opencl.c:(.text+0x5dd): undefined reference to `dlclose'
/usr/local/lib/libx264.a(opencl-8.o): In function `x264_8_opencl_load_library':
opencl.c:(.text+0x62f): undefined reference to `dlopen'
opencl.c:(.text+0x648): undefined reference to `dlsym'
opencl.c:(.text+0x662): undefined reference to `dlsym'
opencl.c:(.text+0x67c): undefined reference to `dlsym'
opencl.c:(.text+0x696): undefined reference to `dlsym'
opencl.c:(.text+0x6b0): undefined reference to `dlsym'
/usr/local/lib/libx264.a(opencl-8.o):opencl.c:(.text+0x6ca): more undefined references to `dlsym' follow
/usr/local/lib/libx264.a(opencl-8.o): In function `x264_8_opencl_load_library':
opencl.c:(.text+0x934): undefined reference to `dlclose'
/usr/local/lib/libx264.a(opencl-8.o): In function `x264_8_opencl_lookahead_init':
opencl.c:(.text+0x170c): undefined reference to `dlopen'
opencl.c:(.text+0x1727): undefined reference to `dlsym'
opencl.c:(.text+0x173b): undefined reference to `dlsym'
opencl.c:(.text+0x1752): undefined reference to `dlsym'
opencl.c:(.text+0x1766): undefined reference to `dlsym'
opencl.c:(.text+0x179c): undefined reference to `dlclose'
collect2: ld returned 1 exit status
把dl库加上:
$./configure --disable-debug --enable-static --enable-libx264 --enable-gpl --extra-libs=-ldl
$make
$./ffmpeg

ffmpeg version 4.2.2 Copyright (c) 2000-2019 the FFmpeg developers
  built with gcc 4.4.7 (GCC) 20120313 (Red Hat 4.4.7-23)
  configuration: --disable-debug --enable-libx264 --enable-gpl --extra-libs=-ldl
  libavutil      56. 31.100 / 56. 31.100
  libavcodec     58. 54.100 / 58. 54.100
  libavformat    58. 29.100 / 58. 29.100
  libavdevice    58.  8.100 / 58.  8.100
  libavfilter     7. 57.100 /  7. 57.100
  libswscale      5.  5.100 /  5.  5.100
  libswresample   3.  5.100 /  3.  5.100
  libpostproc    55.  5.100 / 55.  5.100
Hyper fast Audio and Video encoder
usage: ffmpeg [options] [[infile options] -i infile]... {[outfile options] outfile}...

Use -h to get full help or, even better, run 'man ffmpeg'
说明安装成功了。
最后,提供一个我日后持续在本文维护的安装脚本。
#!/usr/bin/env bash
# 源码编译ffmpeg静态库以及可执行文件
# 需要root权限
# 本脚本的最新版本请访问  https://pengrl.com/p/20029/

set -x

# 编译yasm,ffmpeg依赖的汇编优化的库
wget http://www.tortall.net/projects/yasm/releases/yasm-1.3.0.tar.gz
tar xvf yasm-1.3.0.tar.gz
cd yasm-1.3.0/
./configure
make
make install
cd -

# 编译nasm,x264依赖的汇编优化的库
wget https://www.nasm.us/pub/nasm/releasebuilds/2.14.02/nasm-2.14.02.tar.gz
tar xvf nasm-2.14.02.tar.gz
cd nasm-2.14.02/
./configure
make
make install
cd -

# 编译x264
wget https://code.videolan.org/videolan/x264/-/archive/master/x264-master.tar.bz2
tar xvf x264-master.tar.bz2
cd x264-master/
./configure
make
make install-lib-static
cd -

# 编译ffmpeg
wget https://ffmpeg.org/releases/ffmpeg-4.2.2.tar.bz2
tar xvf ffmpeg-4.2.2.tar.bz2
cd ffmpeg-4.2.2
./configure --disable-debug --enable-static --enable-libx264 --enable-gpl --extra-libs=-ldl
make
make install
./ffmpeg
更多推荐
 已为社区贡献2条内容


所有评论(0)