systemc-2-3.0的安装、配置和测试。(linux环境)附加window下的连接
linux-dash
A beautiful web dashboard for Linux
项目地址:https://gitcode.com/gh_mirrors/li/linux-dash
·
SystemC Linux開發環境配置
SystemC的開發工具有很多種,不過原則上SystemC只是在C++裏增加一個Class,因此基本上任何一個符合ANSI標準的C++編譯工具都可以對systemC程式進行編譯連結來產生可執行檔。
在此我們將介紹如何在Linux環境裏,使用g++來編譯SystemC的程式。
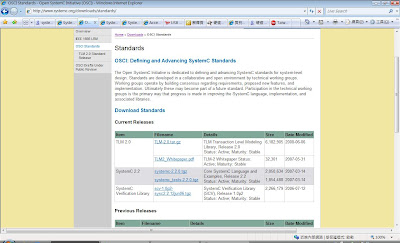
首先請到OSCI網站下載systemc-2.3.0.tgz
http://www.systemc.org/downloads/standards

下載時需要帳號才行下載,所以就申請一個,啟動帳後再回來下載
下載回來後,找個地方把你的systemc-2.3.0.tgz解開
接下來寫個範例程式來測看看
hello.h
Makefile
參數說明:
g++ -o hello hello.cpp -L/usr/systemc/lib-linux -I/usr/systemc/include -lsystemc
hello.cpp:16: error: new types may not be defined in a return type
hello.cpp:16: note: (perhaps a semicolon is missing after the definition of 'hello')
hello.cpp:16: error: two or more data types in declaration of 'sc_main'
hello.cpp: In function 'hello sc_main(int, char**)':
hello.cpp:16: error: new declaration 'hello sc_main(int, char**)'
/usr/systemc/include/sysc/kernel/sc_externs.h:49: error: ambiguates old declaration 'int sc_main(int, char**)'
hello.cpp: In function 'hello sc_main(int, char**)':
hello.cpp:18: error: conversion from 'int' to non-scalar type 'hello' requested
make: *** [all] Error 1
千萬不要以為是sc_main參數有問題,或是回傳值有問題,其實真正的問題點很有可能是沒有加";"喔!
比如:
執行結果如下:
- 在systemc-2.3.0里面建立一个objdir : $mkdir objdir
- 进入objdir里面运行 $export CXX=g++
- 在objdir里面运行 $../configure —prefix=安装目录
- 在objdir里面运行 $gmake
- 在objdir里面运行 $gmake install
如果一切顺利到这时systemc2.2已经安装完成,然后我们要验证一下systemc的安装是否正确。
验证
验证很简单,在objdir里面直接运行gmake check。他会把所有的exemple都验证了一次,所以我们也知道了结果。
SystemC的開發工具有很多種,不過原則上SystemC只是在C++裏增加一個Class,因此基本上任何一個符合ANSI標準的C++編譯工具都可以對systemC程式進行編譯連結來產生可執行檔。
在此我們將介紹如何在Linux環境裏,使用g++來編譯SystemC的程式。
首先請到OSCI網站下載systemc-2.3.0.tgz
http://www.systemc.org/downloads/standards

下載時需要帳號才行下載,所以就申請一個,啟動帳後再回來下載
下載回來後,找個地方把你的systemc-2.3.0.tgz解開
tar xvf systemc-2.3.0.tgz然後
cd systemc-2.3.0然後
mkdir /usr/systemc然後
./configure --prefix=/usr/systemc最後
make
make install
做到這裏,我們已經把SystemC的開發環境做好了,我最後在make install時有發生錯誤,但由於是example的部份,所以我就不管它了
接下來寫個範例程式來測看看
hello.h
#ifndef _HELLO_H
#define _HELLO_H
#include "systemc.h"

SC_MODULE(hello){
        SC_CTOR(hello){
                cout<<"Hello,SystemC!"<<endl;
        }
};
#endif
hello.cpp
#if 1

#include "hello.h"

#else
#include "systemc.h"

class hello : public sc_module{
public:
        hello(sc_module_name name) : sc_module(name){
                cout<<"Hello,SystemC!"<<endl;
        }
};
#endif

int sc_main(int argc,char** argv){
        hello h("hello");
        return 0;
}
上面的hello有2種寫法,但意思是一樣的啦!
Makefile
LIB_DIR=-L/usr/systemc/lib-linux
INC_DIR=-I/usr/systemc/include
LIB=-lsystemc

APP=hello

all:
         g++ -o $(APP) $(APP).cpp $(LIB_DIR) $(INC_DIR) $(LIB)

clean:
        rm -rf $(APP)
你也可以使用g++ hello.cpp -I/usr/systemc/include -L/usr/systemc/lib-linux -o hello -lsystemc直接下命令編譯
參數說明:
-
-I/usr/systemc/include 告訴g++去/usr/systemc/include底下尋找include檔案,也就是我們寫的systemc.h路徑
-L/usr/systemc/lib-linux 告訴ld去/usr/systemc/lib-linux底下尋找library檔案
-o hello 最後輸出一個執行檔,檔名為hello
-lsystemc 靠訴ld要引用libsystemc.a這個函式庫
g++ -o hello hello.cpp -L/usr/systemc/lib-linux -I/usr/systemc/include -lsystemc
hello.cpp:16: error: new types may not be defined in a return type
hello.cpp:16: note: (perhaps a semicolon is missing after the definition of 'hello')
hello.cpp:16: error: two or more data types in declaration of 'sc_main'
hello.cpp: In function 'hello sc_main(int, char**)':
hello.cpp:16: error: new declaration 'hello sc_main(int, char**)'
/usr/systemc/include/sysc/kernel/sc_externs.h:49: error: ambiguates old declaration 'int sc_main(int, char**)'
hello.cpp: In function 'hello sc_main(int, char**)':
hello.cpp:18: error: conversion from 'int' to non-scalar type 'hello' requested
make: *** [all] Error 1
千萬不要以為是sc_main參數有問題,或是回傳值有問題,其實真正的問題點很有可能是沒有加";"喔!
比如:
SC_MODULE(hello){
        SC_CTOR(hello){
                cout<<"Hello,SystemC!"<<endl;
        }
}
就是在最後的"}"後面,還必需接一個";",才不會有錯誤。
執行結果如下:
[root@svn hello]# ./hello

             SystemC 2.3.0 --- Jun  7 2013 11:10:01
        Copyright (c) 1996-2006 by all Contributors
                    ALL RIGHTS RESERVED
Hello,SystemC!
如果是用Windows的可以參考底下這篇文章或 Installing SystemC
/************************************************************************************************************************************************************************************/
/************************************************************************************************************************************************************************************/
/********************************************************************接下来给出一个很好的测试流程******************************************************************************/
/************************************************************************************************************************************************************************************/
/************************************************************************************************************************************************************************************/
/************************************************************************************************************************************************************************************/
- 在systemc-2.3.0里面建立一个objdir : $mkdir objdir
- 进入objdir里面运行 $export CXX=g++
- 在objdir里面运行 $../configure —prefix=安装目录
- 在objdir里面运行 $gmake
- 在objdir里面运行 $gmake install
如果一切顺利到这时systemc2.2已经安装完成,然后我们要验证一下systemc的安装是否正确。
验证
验证很简单,在objdir里面直接运行gmake check。他会把所有的exemple都验证了一次,所以我们也知道了结果。
A beautiful web dashboard for Linux
最近提交(Master分支:5 个月前 )
186a802e
added ecosystem file for PM2 4 年前
5def40a3
Add host customization support for the NodeJS version 4 年前
更多推荐
 已为社区贡献1条内容


所有评论(0)