
[Linux]在Linux上部署Java开发环境笔记(一):虚拟机安装Linux,配置Linux和主机XP能互Ping成功
在Linux上部署Java开发环境笔记(一)
虚拟机安装Linux,配置Linux和主机XP能互Ping成功
2010/06/14
本文使用的虚拟机软件为:
VirtualBox-3.2.4-62467-Win.exe
下载地址:
http://dlc.sun.com.edgesuite.net/virtualbox/3.2.4/VirtualBox-3.2.4-62467-Win.exe
安装的Linux版本为:
红旗Linux桌面版6.0系统光盘.iso
下载地址:
http://www.xdowns.com/soft/softdown.asp?softid=38411
1.查看XP的IP地址
在XP命令行窗口中,输入“ipconfig”,结果如下:
C:/Documents and Settings/Administrator>ipconfig
Ethernet adapter 无线网络连接:
Connection-specific DNS Suffix . :
IP Address. . . . . . . . . . . . : 192.168.0.101
Subnet Mask . . . . . . . . . . . : 255.255.255.0
IP Address. . . . . . . . . . . . : fe80::21f:3cff:fee3:6390%9
Default Gateway . . . . . . . . . : 192.168.0.1
2.查看虚拟机Linux的IP地址
在Linux命令行窗口,输入“ifconfig”,结果如下:
[root@localhost ~]# ifconfig
eth0 Link encap:Ethernet HWaddr 08:00:27:48:30:9B
inet addr:10.0.2.15 Bcast:10.0.2.255 Mask:255.255.255.0
inet6 addr: fe80::a00:27ff:fe48:309b/64 Scope:Link
UP BROADCAST RUNNING MULTICAST MTU:1500 Metric:1
RX packets:23 errors:0 dropped:0 overruns:0 frame:0
TX packets:55 errors:0 dropped:0 overruns:0 carrier:0
collisions:0 txqueuelen:1000
RX bytes:5821 (5.6 KiB) TX bytes:9823 (9.5 KiB)
Base address:0xd010 Memory:f0000000-f0020000
lo Link encap:Local Loopback
inet addr:127.0.0.1 Mask:255.0.0.0
inet6 addr: ::1/128 Scope:Host
UP LOOPBACK RUNNING MTU:16436 Metric:1
RX packets:0 errors:0 dropped:0 overruns:0 frame:0
TX packets:0 errors:0 dropped:0 overruns:0 carrier:0
collisions:0 txqueuelen:0
RX bytes:0 (0.0 b) TX bytes:0 (0.0 b)
由此可见Linux的IP和XP的IP不在一个网段,
3.虚拟机Linux上ping主机XP的IP
在Linux命令行窗口,输入“ping 192.168.0.101”,结果如下:
[root@localhost ~]# ping 192.168.0.101
PING 192.168.0.101 (192.168.0.101) 56(84) bytes of data.
64 bytes from 192.168.0.101: icmp_seq=1 ttl=64 time=0.343 ms
64 bytes from 192.168.0.101: icmp_seq=2 ttl=64 time=1.99 ms
64 bytes from 192.168.0.101: icmp_seq=3 ttl=64 time=4.95 ms
64 bytes from 192.168.0.101: icmp_seq=4 ttl=64 time=0.766 ms
64 bytes from 192.168.0.101: icmp_seq=5 ttl=64 time=0.709 ms
64 bytes from 192.168.0.101: icmp_seq=6 ttl=64 time=4.73 ms
此时Linux是能正常上网的,可以使用浏览器访问网页
4.主机XP上ping虚拟机Linux的IP
在XP命令行窗口中,输入“ping 10.0.2.15”,结果如下:
C:/Documents and Settings/Administrator>ping 10.0.2.15
Pinging 10.0.2.15 with 32 bytes of data:
Request timed out.
说明此时2个系统是不能互ping成功的
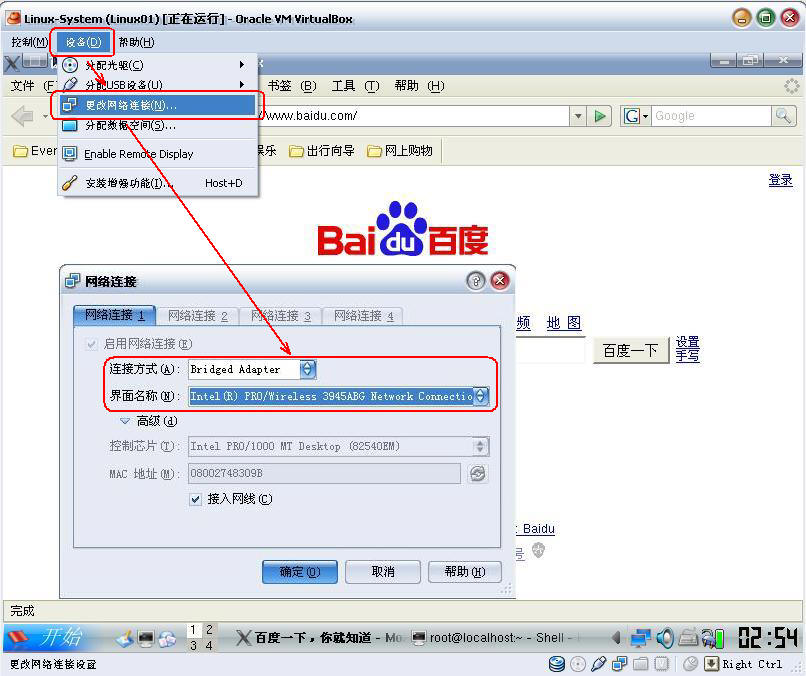
5.更改虚拟机Linux网络连接方式
虚拟机窗口-->设备(D)-->更改网络连接(N)
在弹出的“网络连接”窗口中,将
连接方式(A)改为:Bridged Adapter
界面名称中选择你主机XP使用的网卡,如下图:
修改后,你会发现此时Linux无法访问网页
6.设置下虚拟机Linux的IP地址
虚拟机Linux系统中,右下角有网络连接图标,右键点击,在弹出右键菜单中选择“属性”
设置IP地址如下:

修改完后,然后重复3-4步,检查2个系统是否能互ping成功
7.虚拟机Linux启动SSH服务
默认情况下,Linux开机是不启动SSH服务的,要想XP系统通过SSH来和Linux交互必须将它开启
在Linux命令行窗口,输入“service sshd status”,结果如下:
[root@localhost ~]# service sshd status
sshd 已停
表明SSH服务未开启
在Linux命令行窗口,输入“service sshd status”,结果如下:
[root@localhost ~]# service sshd start
生成 SSH1 RSA 主机键: [确定]
生成 SSH2 RSA 主机键: [确定]
正在生成 SSH2 DSA 主机键: [确定]
启动 sshd: [确定]
表明SSH服务已启动
8.在XP中通过“SecureCRT”或者类似软件,使用SSH协议登陆到虚拟机Linux中
Last login: Mon Jun 14 03:09:40 2010 from 192.168.0.101
[root@localhost ~]#
[root@localhost ~]#
[root@localhost ~]# ll
总计 45
-rwx------ 1 root root 771 06-12 10:15 anaconda-ks.cfg
drwx------ 3 root root 1024 06-14 02:46 Desktop
-rwx------ 1 root root 38147 06-12 10:15 install.log
-rwx------ 1 root root 3732 06-12 10:15 install.log.syslog
[root@localhost ~]#
表明登陆成功
至此,虚拟机Linux的网络已经配置完毕

旨在为数千万中国开发者提供一个无缝且高效的云端环境,以支持学习、使用和贡献开源项目。
更多推荐
 0
0 0
0- 0


 已为社区贡献2条内容

所有评论(0)