【深度学习】基于tensorflow的服装图像分类训练(数据集:Fashion-MNIST)
活动地址:CSDN21天学习挑战赛
目录
前言
关于环境这里不再赘述,与【深度学习】从LeNet-5识别手写数字入门深度学习一文的环境一致。
了解Fashion-MNIST数据集
Fashion-MNIST数据集与MNIST手写数字数据集不一样。但他们都有共同点就是都是灰度图片。
Fashion-MNIST数据集是各类的服装图片总共10类。下面列出了中英文对应表,方便接下来的学习。
| 中文 | 英文 |
|---|---|
| t-shirt | T恤 |
| trouser | 牛仔裤 |
| pullover | 套衫 |
| dress | 裙子 |
| coat | 外套 |
| sandal | 凉鞋 |
| shirt | 衬衫 |
| sneaker | 运动鞋 |
| bag | 包 |
| ankle boot | 短靴 |
下载数据集
使用tensorflow下载(推荐)
默认下载在C:\Users\用户\.keras\datasets路径下。
from tensorflow.keras import datasets

# 下载数据集
(train_images, train_labels), (test_images, test_labels) = datasets.cifar10.load_data()
数据集分类
这里对从网上下载的数据集进行一个说明。
| 文件名 | 数据说明 |
|---|---|
| train-images-idx3-ubyte | 训练数据图片集 |
| train-labels-idx1-ubyte | 训练数据标签集 |
| t10k-images-idx3-ubyte | 测试数据图片集 |
| t10k-labels-idx1-ubyte | 测试数据标签集 |
数据集格式
训练数据集共60k张图片,各个服装类型的数据量一致也就是说每种6k。
测试数据集共10k张图片,各个服装类型的数据量一致也就是说每种100。
数据集均采用28281的灰度照片。
采用CPU训练还是GPU训练
一般来说有好的显卡(GPU)就使用GPU训练因为快,那么对应的你就要下载tensorflow-gpu包。如果你的显卡较差或者没有足够资金入手一款好的显卡就可以使用CUP训练。
区别
(1)CPU主要用于串行运算;而GPU则是大规模并行运算。由于深度学习中样本量巨大,参数量也很大,所以GPU的作用就是加速网络运算。
(2)CPU计算神经网络也是可以的,算出来的神经网络放到实际应用中效果也很好,只不过速度会很慢罢了。而目前GPU运算主要集中在矩阵乘法和卷积上,其他的逻辑运算速度并没有CPU快。
使用CPU训练
# 使用cpu训练
import os

os.environ["CUDA_VISIBLE_DEVICES"] = "-1"
使用CPU训练时不会显示CPU型号。

使用GPU训练
gpus = tf.config.list_physical_devices("GPU")

if gpus:
    gpu0 = gpus[0]  # 如果有多个GPU,仅使用第0个GPU
    tf.config.experimental.set_memory_growth(gpu0, True)  # 设置GPU显存用量按需使用
    tf.config.set_visible_devices([gpu0], "GPU")
使用GPU训练时会显示对应的GPU型号。

预处理
最值归一化(normalization)
关于归一化相关的介绍在前文中有相关介绍。 最值归一化与均值方差归一化
# 将像素的值标准化至0到1的区间内。
    train_images, test_images = train_images / 255.0, test_images / 255.0
    return train_images, test_images
升级图片维度
因为数据集是灰度照片,所以我们需要将[28,28]的数据格式转换为[28,28,1]
# 调整数据到我们需要的格式
    train_images = train_images.reshape((60000, 28, 28, 1))
    test_images = test_images.reshape((10000, 28, 28, 1))

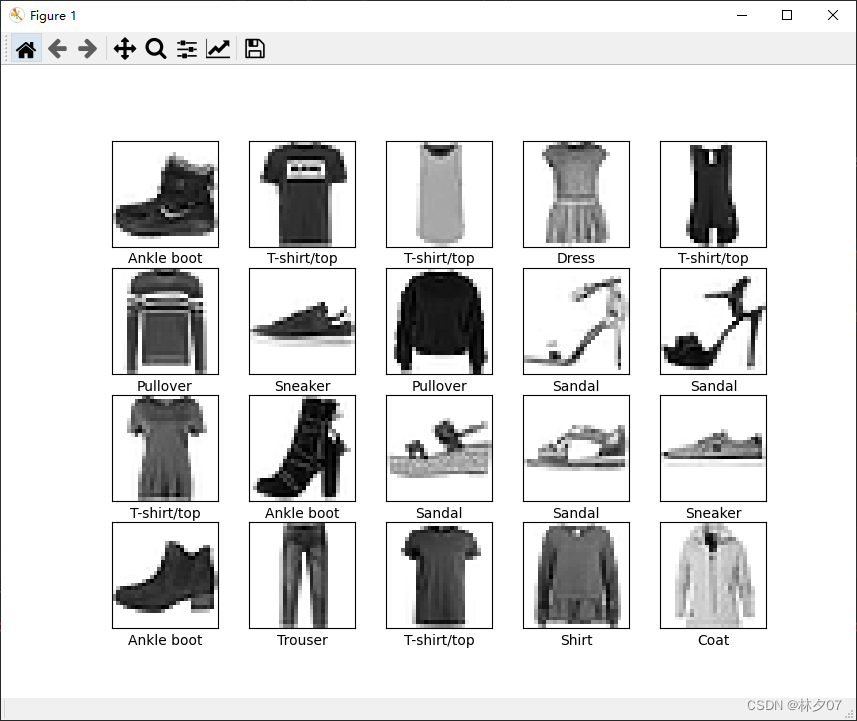
显示部分图片
首先需要建立一个标签数组,然后绘制前20张,每行5个共四行
注意:如果你执行下面这段代码报这个错误:TypeError: Invalid shape (28, 28, 1) for image data。那么你就使用我下面注释掉的那句话。
from matplotlib import pyplot as plt

class_names = ['T-shirt/top', 'Trouser', 'Pullover', 'Dress', 'Coat',
                   'Sandal', 'Shirt', 'Sneaker', 'Bag', 'Ankle boot']

plt.figure(figsize=(20, 10))
for i in range(20):
    plt.subplot(4, 5, i + 1)
    plt.xticks([])
    plt.yticks([])
    plt.grid(False)
    plt.imshow(train_images[i], cmap=plt.cm.binary)
    #plt.imshow(train_images[i].squeeze(), cmap=plt.cm.binary)
    plt.xlabel(class_names[train_labels[i]])
plt.show()
绘制结果:

建立CNN模型
from tensorflow_core.python.keras import Input, Sequential
from tensorflow_core.python.keras.layers import Conv2D, Activation, MaxPooling2D, Flatten, Dense


def simple_CNN(input_shape=(32, 32, 3), num_classes=10):
    # 构建一个空的网络模型,它是一个线性堆叠模型,各神经网络层会被顺序添加,专业名称为序贯模型或线性堆叠模型
    model = Sequential()

    # 卷积层1
    model.add(Conv2D(filters=32, kernel_size=(3, 3), activation='relu', input_shape=input_shape))

    # 最大池化层1
    model.add(MaxPooling2D((2, 2), strides=(2, 2), padding='same'))

    # 卷积层2
    model.add(Conv2D(filters=64, kernel_size=(3, 3), padding='same', activation='relu'))

    # 最大池化层2
    model.add(MaxPooling2D((2, 2), strides=(2, 2), padding='same'))

    # 卷积层3
    model.add(Conv2D(filters=64, kernel_size=(3, 3), padding='same', activation='relu'))

    # flatten层常用来将输入“压平”,即把多维的输入一维化,常用在从卷积层到全连接层的过渡。
    model.add(Flatten())

    # 全连接层 对特征进行提取
    model.add(Dense(units=64, activation='relu'))

    # 输出层
    model.add(Dense(10))
    return model
网络结构
包含输入层的话总共9层。其中有三个卷积层,俩个最大池化层,一个flatten层,俩个全连接层。

参数量
总共参数为319k,训练时间比LeNet-5较长。建议采用GPU训练。
Total params: 257,162
Trainable params: 257,162
Non-trainable params: 0
训练模型
训练模型,进行10轮,将模型保存到1.h5文件中。后期可以直接加载模型继续训练。
from tensorflow_core.python.keras.models import load_model
from Cnn import simple_CNN
import tensorflow as tf


model = simple_CNN(train_images, train_labels)
model.summary()  # 打印网络结构

model.compile(optimizer='adam',
                  loss=tf.keras.losses.SparseCategoricalCrossentropy(from_logits=True),
                  metrics=['accuracy'])
model.save("1.h5")
history = model.fit(train_images, train_labels, epochs=10, validation_data=(test_images, test_labels))
训练结果:测试集acc为91.64%。从效果来说该模型还是不错的。

模型评估
对训练完模型的数据制作成曲线表,方便之后对模型的优化,看是过拟合还是欠拟合还是需要扩充数据等等。
acc = history.history['accuracy']
    val_acc = history.history['val_accuracy']

    loss = history.history['loss']
    val_loss = history.history['val_loss']

    epochs_range = range(10)

    plt.figure(figsize=(12, 4))
    plt.subplot(1, 2, 1)
    plt.plot(epochs_range, acc, label='Training Accuracy')
    plt.plot(epochs_range, val_acc, label='Validation Accuracy')
    plt.legend(loc='lower right')
    plt.title('Training and Validation Accuracy')

    plt.subplot(1, 2, 2)
    plt.plot(epochs_range, loss, label='Training Loss')
    plt.plot(epochs_range, val_loss, label='Validation Loss')
    plt.legend(loc='upper right')
    plt.title('Training and Validation Loss')
    plt.show()
运行结果:

更多推荐
 已为社区贡献9条内容


所有评论(0)