在eclipse中使用Maven创建spring+springMVC工程
前言
花了两周时间去学习研究的,虽然网上有各种教程可以照着做,但是在实践过程中总会出现一些教程上没有出现的错误。然后又花时间去了解错误,寻找解决方法,以至于时间很久。本文除了讲述怎么搭建项目,还讲述我在搭建项目过程中遇到的问题,发生该问题的原因,以及我怎么解决的问题。
准备工作:
1.安装好Maven
2.在eclipse中配置好Maven
关于安装和配置,请网上查找教程自行安装配置。
一.新建Maven web工程
打开eclipse(这里我使用的是eclipse mars),点击File-new-Maven project
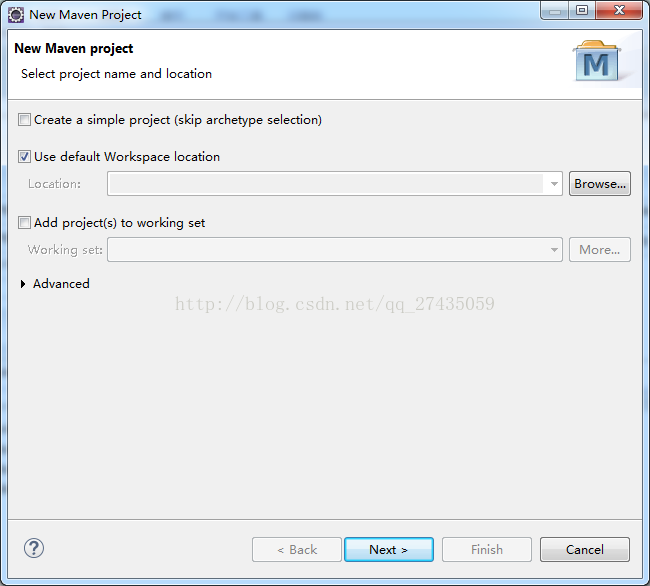
弹出如下窗口,填写Maven工程放置的位置,图中圈出的地方。选好放置的地方,点击next.
然后出现该方框,选择Maven工程的类型,我们要建的是一web工程,所以,选择圈出工程类型。

弹出如下窗口,红色打叉提示我们要填写工程的Group Id和Artifact Id。在这里插几句,Group Id和Artifact Id是干吗用的。这里Group Id和Artifact Id叫做坐标,是工程的坐标,Maven就像一个坐标空间,通过坐标去查找相应的文件。简单说就是给文件一个标志。

填写好坐标以后,点击finish。
新建好工程之后,发现工程报了一个错

打开报错的文件,查看报错原因。
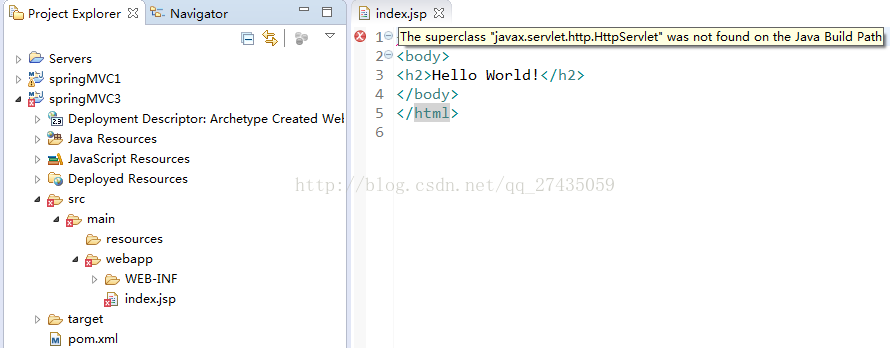
打开,报错文件提示缺少这个类javax.servlet.http.HttpServlet,我们可以在pom.xml文件里引入这个包。
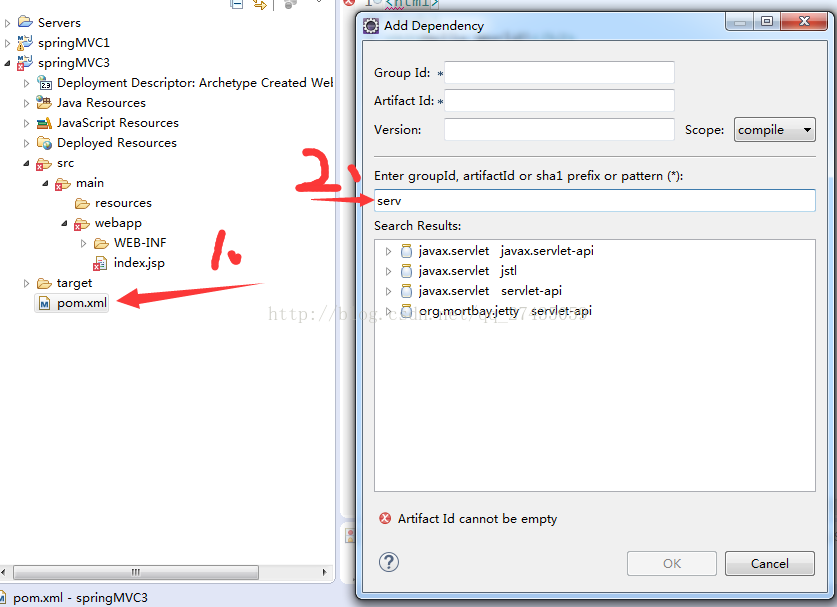
选中pom文件,点右键-Maven-add dependency
弹出下边的窗口,在第一个红色方框中输入,ser ,下边的红色方框会进行模糊查询,显示查询结果,然后选择第一个,finish。然后错误就会消失。
二.配置文件
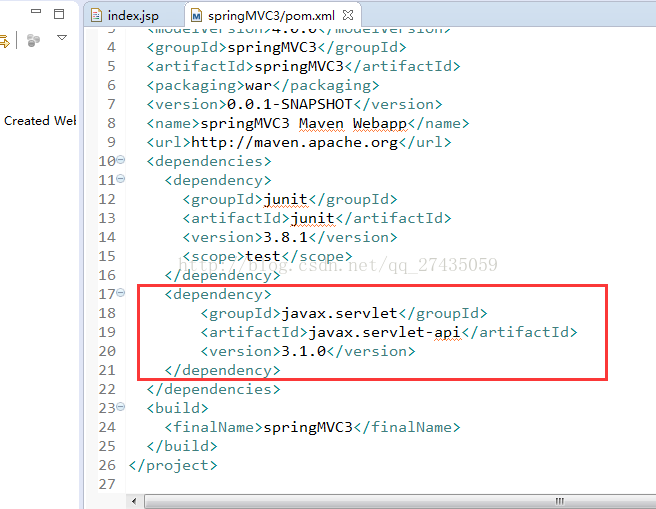
1.pom.xml(最终版,pom里引入依赖的方式就像上边引入servlet一样,这里不再赘述,只把最终结果贴出来)
<project xmlns="http://maven.apache.org/POM/4.0.0" xmlns:xsi="http://www.w3.org/2001/XMLSchema-instance"
  xsi:schemaLocation="http://maven.apache.org/POM/4.0.0 http://maven.apache.org/maven-v4_0_0.xsd">
  <modelVersion>4.0.0</modelVersion>
  <groupId>springMVC3</groupId>
  <artifactId>springMVC3</artifactId>
  <packaging>war</packaging>
  <version>0.0.1-SNAPSHOT</version>
  <name>springMVC3 Maven Webapp</name>
  <url>http://maven.apache.org</url>
  <dependencies>
    <dependency>
      <groupId>junit</groupId>
      <artifactId>junit</artifactId>
      <version>3.8.1</version>
      <scope>test</scope>
    </dependency>
    <dependency>
    	<groupId>javax.servlet</groupId>
    	<artifactId>servlet-api</artifactId>
    	<version>2.5</version>
    </dependency>

     <dependency>
    	<groupId>org.springframework</groupId>
    	<artifactId>spring-core</artifactId>
    	<version>4.1.4.RELEASE</version>
    </dependency>
    <dependency>
    	<groupId>org.springframework</groupId>
    	<artifactId>spring-context</artifactId>
    	<version>4.1.4.RELEASE</version>
    </dependency>
    <dependency>
    	<groupId>org.springframework</groupId>
    	<artifactId>spring-webmvc</artifactId>
    	<version>4.1.3.RELEASE</version>
    </dependency>

  </dependencies>
  <build>
    <finalName>springMVC3</finalName>
    <plugins>
    	<plugin>
    		<groupId>org.apache.maven.plugins</groupId>
    		<artifactId>maven-assembly-plugin</artifactId>
    		<version>2.2-beta-5</version>
    	</plugin>
    </plugins>
  </build>
</project>
spring-core.jar
这个jar 文件包含Spring框架基本的核心工具类。Spring其它组件要都要使用到这个包里的类,是其它组件的基本核心,当然你也可以在自己的应用系统中使用这些工具类。
外部依赖Commons Logging,(Log4J)。
spring-context:这个jar 文件为Spring 核心提供了大量扩展。可以找到使用Spring ApplicationContext特性时所需的全部类,JDNI所需的全部类,instrumentation组件以及校验Validation方面的相关类。
外部依赖spring-beans, (spring-aop)。
spring-webmvc.jar
这个jar 文件包含Spring MVC框架相关的所有类。包括框架的Servlets,Web MVC框架,控制器和视图支持。当然,如果你的应用使用了独立的MVC框架,则无需这个JAR文件里的任何类。
外部依赖spring-web, (spring-support,Tiles,iText,POI)。
spring-web.jar
这个jar 文件包含Web应用开发时,用到Spring框架时所需的核心类,包括自动载入Web Application Context特性的类、Struts与JSF集成类、文件上传的支持类、Filter类和大量工具辅助类。
外部依赖spring-context, Servlet API, (JSP API, JSTL, Commons FileUpload, COS)。
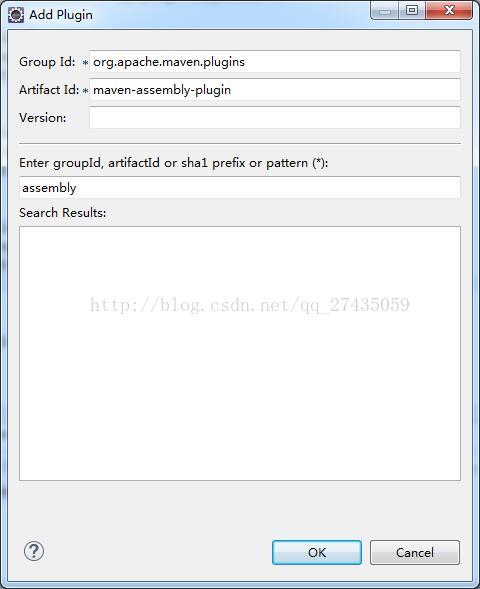
maven-assembly-plugin
这是一个插件,Maven在将工程打包的时候,所打包的东西是不包括依赖包的,要想将依赖包也包含进去,必须引入这个插件。如果既不引入这个插件,也没有另外在WEB-INF文件夹下新建lib文件夹引入依赖的jar包,再在自动部署中进行设置(如下图),工程就会一直报错,提示找不到包,找不到类,找不到xml文件什么的。我当时就在这里卡了好久,请教了别人,查阅了一些资料。


2.mvc-dispatcher-servlet.xml
在WEB-INF文件夹下建立文件夹configs,spring,和文件mvc-dispatcher-servlet.xml

<?xml version="1.0" encoding="UTF-8"?>
<beans xmlns="http://www.springframework.org/schema/beans"
	xmlns:xsi="http://www.w3.org/2001/XMLSchema-instance" xmlns:context="http://www.springframework.org/schema/context"
	xmlns:mvc="http://www.springframework.org/schema/mvc"
	xsi:schemaLocation="
        http://www.springframework.org/schema/beans
        http://www.springframework.org/schema/beans/spring-beans.xsd
        http://www.springframework.org/schema/context
        http://www.springframework.org/schema/context/spring-context.xsd
        http://www.springframework.org/schema/mvc
        http://www.springframework.org/schema/mvc/spring-mvc.xsd">


	<!-- 本配置文件是工名为mvc-dispatcher的DispatcherServlet使用, 提供其相关的Spring MVC配置 -->


	<!-- 启用Spring基于annotation的DI, 使用户可以在Spring MVC中使用Spring的强大功能。 激活 @Required
		@Autowired,JSR 250's @PostConstruct, @PreDestroy and @Resource 等标注 -->
	<context:annotation-config/>


	<!-- DispatcherServlet上下文, 只管理@Controller类型的bean, 忽略其他型的bean, 如@Service -->
	<context:component-scan base-package="com">
		<context:include-filter type="annotation"
			expression="org.springframework.stereotype.Controller" />
	</context:component-scan>


	<!-- HandlerMapping, 无需配置, Spring MVC可以默认启动。 DefaultAnnotationHandlerMapping
		annotation-driven HandlerMapping -->


	<!-- 扩充了注解驱动,可以将请求参数绑定到控制器参数 -->
	<mvc:annotation-driven/>


	<!-- 静态资源处理, css, js, imgs -->
	<mvc:resources mapping="/css/**" location="/WEB-INF/css/"/>
	<mvc:resources mapping="/js/**" location="/WEB-INF/js/" />


	<bean
		class="org.springframework.web.servlet.view.InternalResourceViewResolver">
		<property name="prefix" value="/WEB-INF/jsps/" />
		<property name="suffix" value=".jsp" />
	</bean>
</beans>
3.web.xml
<web-app xmlns="http://xmlns.jcp.org/xml/ns/javaee"
          xmlns:xsi="http://www.w3.org/2001/XMLSchema-instance"
          xsi:schemaLocation="http://xmlns.jcp.org/xml/ns/javaee
          http://xmlns.jcp.org/xml/ns/javaee/web-app_2_4.xsd"
          version="2.4">
  <display-name>Archetype Created Web Application</display-name>

   <!-- DispatcherServlet, Spring MVC的核心 -->
  <servlet>
		<servlet-name>mvc-dispatcher</servlet-name>
		<servlet-class> org.springframework.web.servlet.DispatcherServlet</servlet-class>
		<!-- DispatcherServlet对应的上下文配置, 默认为/WEB-INF/$servlet-name$-servlet.xml
		 -->
		<init-param>
          <param-name>contextConfigLocation</param-name>
          <param-value>/WEB-INF/configs/spring/mvc-dispatcher-servlet.xml</param-value>
        </init-param>
		<load-on-startup>1</load-on-startup>
	</servlet>

	<servlet-mapping>
		<servlet-name>mvc-dispatcher</servlet-name>
	    <!-- mvc-dispatcher拦截所有的请求-->
		<url-pattern>/</url-pattern>
	</servlet-mapping>

</web-app>
这里文件已经有解释了,不过多说明,只是注意引入的上边的
mvc-dispatcher-servlet.xml文件的引入路径要对。
其次
xmlns="http://xmlns.jcp.org/xml/ns/javaee"
          xmlns:xsi="http://www.w3.org/2001/XMLSchema-instance"
          xsi:schemaLocation="http://xmlns.jcp.org/xml/ns/javaee
          http://xmlns.jcp.org/xml/ns/javaee/web-app_2_4.xsd"
          version="2.4"
web-app标签里的这串东西在新建工程的时候,web.xml里是没有的,是自己加进去的,它的作用是拿来规范xml文件引入的标签,对xml文件进行规定,哪些标签可以引入。
三.java类
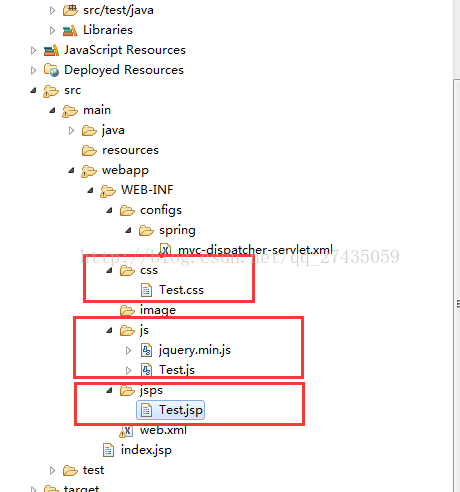
在下图位置新建包和java类

TestController.java
package com;


import org.springframework.stereotype.Controller;
import org.springframework.web.bind.annotation.RequestMapping;


@Controller
@RequestMapping("/Test")
public class TestController {


	@RequestMapping("/mvc")
	public String helloMvc() {
		return "Test";
	}
}	@RequestMapping("/mvc")
	public String helloMvc() {
		return "Test";
	}
}
四.jsp页面,css文件,js文件
新建css文件夹和Test.css文件,新建js文件夹和Test.js文件,新建jsps文件夹和Test.jsp,位置如下。
Test.css
body{
	background:red;
}
Test.js
$(function() {
alert("123!");
})
这里注意,想以美元符号去获取html元素,对其进行操作。也就是想使用jquery就要在jsp页面引入jquery.min.js,并且在jsp页面中要放在所有js文件之前。否则或报错说$未定义undefined。
Test.jsp
<%@ page language="java" contentType="text/html; charset=utf-8"
    pageEncoding="utf-8"%>
<!DOCTYPE html PUBLIC "-//W3C//DTD HTML 4.01 Transitional//EN" "http://www.w3.org/TR/html4/loose.dtd">
<html>
<head>
<meta http-equiv="Content-Type" content="text/html; charset=utf-8">
<title>Insert title here</title>
<link rel="stylesheet" type="text/css" href="../css/Test.css">
<script src="../js/jquery.min.js"></script>
<script src="../js/Test.js"></script>


</head>
<body>
hello ,this is a test.
</body>
</html>
这样子,就可以把工程部署到tomcat里,然后启动tomcat,打开浏览器输入http://localhost:8080/工程名/Test/mvc
就可以访问了。
此过程中遇到的问题
1.在使用eclipse引入依赖的时候,eclipse出现了问题
我引入依赖时,都是选中工程的pom.xml点右键-Maven-add Maven
弹出下边的窗口进行引入的
但是,有几次我在下图中的方框1输入搜索的artifactId字符时,方框2并没有得出模糊查询的结果

我网上搜索的解决办法是,打开Maven repositories如下图,选中圈出红线部分,点右键,选择rebuild index。然后去重新引入依赖就可以了。

2.关于访问Test.jsp路径的问题
我是按照慕课的spring mvc教程来学习的,慕课上访问jsp页面的路径直接是不加工程名的,形如:http://localhost:8080/Test/mvc。而我在实践过程中,怎么也访问不到我的页面。后来请教了别人才知道,这是根项目和非根项目的区别。tomcat根项目的页面访问时,访问路径中不用加项目名称,,而非根项目的页面访问路径中一定要有项目名称。
3.其他问题
如依赖包未被Maven打包,还有jquery文件引入位置不当的问题在上边已经说明了,这里不再说明。
好了,花了两周的时间去搭了这个项目,再花一早上的时间写这篇博文,因为网络的原因,写几个字就停一下,卡住了。希望对你有帮助.

AtomGit 是由开放原子开源基金会联合 CSDN 等生态伙伴共同推出的新一代开源与人工智能协作平台。平台坚持“开放、中立、公益”的理念,把代码托管、模型共享、数据集托管、智能体开发体验和算力服务整合在一起,为开发者提供从开发、训练到部署的一站式体验。
更多推荐

 9
9 0
0- 0


 已为社区贡献5条内容

所有评论(0)