TensorFlow与OpenCV,读取图片,进行简单操作并显示
本文是OpenCV 2 Computer Vision Application Programming Cookbook读书笔记的第一篇。在笔记中将以Python语言改写每章的代码。
PythonOpenCV的配置这里就不介绍了。
注意,现在opencv for python就是通过NumPy进行绑定的。所以在使用时必须掌握一些NumPy的相关知识!
图像就是一个矩阵,在OpenCV for Python中,图像就是NumPy中的数组!
如果读取图像首先要导入OpenCV包,方法为:
读取并显示图像
在Python中不需要声明变量,所以也就不需要C++中的cv::Mat xxxxx了。只需这样:
OpenCV目前支持读取bmp、jpg、png、tiff等常用格式。更详细的请参考OpenCV的参考文档。
接着创建一个窗口
然后在窗口中显示图像
最后还要添上一句:
如果不添最后一句,在IDLE中执行窗口直接无响应。在命令行中执行的话,则是一闪而过。
完整的程序为:
最后释放窗口是个好习惯!创建/复制图像
新的OpenCV的接口中没有CreateImage接口。即没有cv2.CreateImage这样的函数。如果要创建图像,需要使用numpy的函数(现在使用OpenCV-Python绑定,numpy是必装的)。如下:
也可以复制原有的图像来获得一副新图像。
如果不怕麻烦,还可以用cvtColor获得原图像的副本。 后面的emptyImage3[...]=0是将其转成空白的黑色图像。保存图像
保存图像很简单,直接用cv2.imwrite即可。
cv2.imwrite("D:\\cat2.jpg", img)
第一个参数是保存的路径及文件名,第二个是图像矩阵。其中,imwrite()有个可选的第三个参数,如下:
cv2.imwrite("D:\\cat2.jpg", img,[int(cv2.IMWRITE_JPEG_QUALITY), 5])
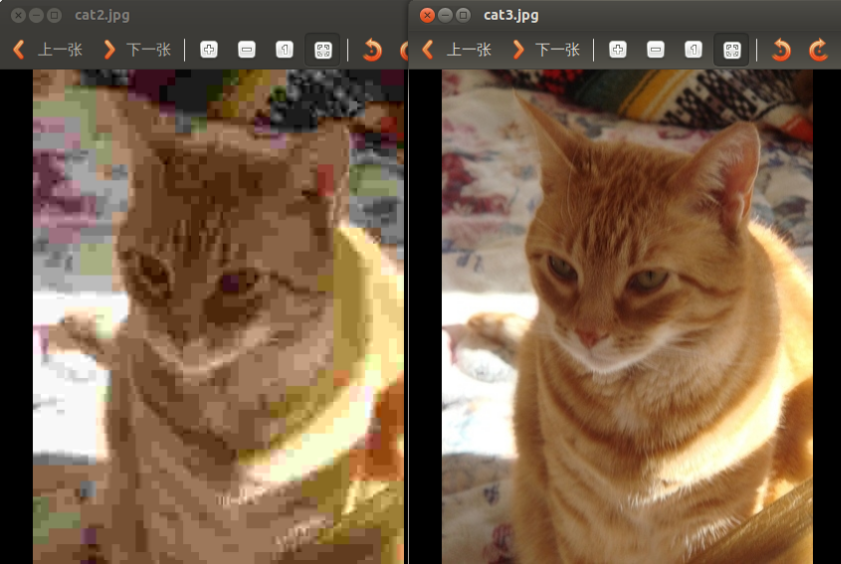
第三个参数针对特定的格式: 对于JPEG,其表示的是图像的质量,用0-100的整数表示,默认为95。 注意,cv2.IMWRITE_JPEG_QUALITY类型为Long,必须转换成int。下面是以不同质量存储的两幅图:
对于PNG,第三个参数表示的是压缩级别。cv2.IMWRITE_PNG_COMPRESSION,从0到9,压缩级别越高,图像尺寸越小。默认级别为3:
保存的图像尺寸如下:
还有一种支持的图像,一般不常用。
完整的代码为:
参考资料:
《OpenCV References Manuel》
图像是人们喜闻乐见的一种信息形式,“百闻不如一见”,有时一张图能胜千言万语。图像处理是利用计算机将数值化的图像进行一定(线性或非线性)变换获得更好效果的方法。Photoshop,美颜相机就是利用图像处理技术的应用程序。深度学习最重要的应用领域就是计算机视觉(CV, Computer Vision),历史上,MNIST 手写体数字识别和 ImageNet 大规模图像识别均得益于深度学习模型,取得了相比传统方法更高的准确率。从 2012 年的 AlexNet 模型开始,随后的 VGG, GoogLeNet, ResNet 等模型不断刷新 ImageNet 图像识别准确率纪录,甚至超过了人类水平。为了获得良好的识别效果,除了使用更好的模型,数据集的预处理也是十分重要的一项内容,最常用的方法有尺度缩放、随机切片、随机翻转、颜色变换等。
本文介绍如何使用 TensorFlow 完成图像数据的预处理,以及如何使用 tensorboard 工具将图像数据进行可视化。在使用 TensorFlow 实现图像识别、目标检测时会经常用到本文介绍的内容。
首先看下输入图像,是一只猫:
TensorFlow 读取图片数据代码:
reader = tf.WholeFileReader()
key, value = reader.read(tf.train.string_input_producer(['cat.jpg']))
image0 = tf.image.decode_jpeg(value)
用过 Caffe 的读者可能会非常熟悉上面的图片(位于 caffe/examples/images/cat.jpg)。原图尺寸为 360 x 480。
图像缩放
代码:
resized_image = tf.image.resize_images(image0, [256, 256], \
method=tf.image.ResizeMethod.AREA)
其中 method 有四种选择:
ResizeMethod.BILINEAR :双线性插值
ResizeMethod.NEAREST_NEIGHBOR : 最近邻插值
ResizeMethod.BICUBIC : 双三次插值
ResizeMethod.AREA :面积插值
读者可以分别试试,看看缩放效果。
图像裁剪
代码:
cropped_image = tf.image.crop_to_bounding_box(image0, 20, 20, 256, 256)
图像水平翻转
代码:
flipped_image = tf.image.flip_left_right(image0)
除此之外还可以上下翻转:
flipped_image = tf.image.flip_up_down(image0)
图像旋转
代码:
rotated_image = tf.image.rot90(image0, k=1)
其中 k 值表示旋转 90 度的次数,读者可以尝试对原图旋转 180 度、270 度。
图像灰度变换
代码:
grayed_image = tf.image.rgb_to_grayscale(image0)
从上面看到,用 TensorFlow 实现上述图像预处理是非常简单的。TensorFlow 也提供了针对目标检测中用到的 bounding box 处理的 api,有兴趣的读者可以翻阅 api 文档(https://www.tensorflow.org/versions/r1.0/api_docs/Python/image/working_with_bounding_boxes)学习。
为了方便查看图像预处理的效果,可以利用 TensorFlow 提供的 tensorboard 工具进行可视化。
使用方法也比较简单,直接用 tf.summary.image 将图像写入 summary,对应代码如下:
img_resize_summary = tf.summary.image('image resized', tf.expand_dims(resized_image, 0))
cropped_image_summary = tf.summary.image('image cropped', tf.expand_dims(cropped_image, 0))
flipped_image_summary = tf.summary.image('image flipped', tf.expand_dims(flipped_image, 0))
rotated_image_summary = tf.summary.image('image rotated', tf.expand_dims(rotated_image, 0))
grayed_image_summary = tf.summary.image('image grayed', tf.expand_dims(grayed_image, 0))
merged = tf.summary.merge_all()
with tf.Session() as sess:
summary_writer = tf.summary.FileWriter('/tmp/tensorboard', sess.graph)
summary_all = sess.run(merged)
summary_writer.add_summary(summary_all, 0)
summary_writer.close()
运行该程序,会在 /tmp/tensorboard 目录下生成 summary,接着在命令行启动 tensorboard 服务:
打开浏览器,输入 127.0.0.1:6006 就可以查看 tensorboard 页面了(Ubuntu 自带的 firefox 打开 tensorboard 时不显示图像,可以更换为 Chrome 浏览器)。
TensorBoard 图像可视化效果
TensorFlow与OpenCV,读取图片,进行简单操作并显示
1 opencv读入图片,使用tf.Variable初始化为tensor,加载到tensorflow对图片进行转置操作,然后opencv显示转置后的结果
2 OpenCV读入图片,使用tf.placeholder符号变量加载到tensorflow里,然后tensorflow对图片进行剪切操作,最后opencv显示转置后的结果
参考资料:
更多推荐
 已为社区贡献11条内容


所有评论(0)