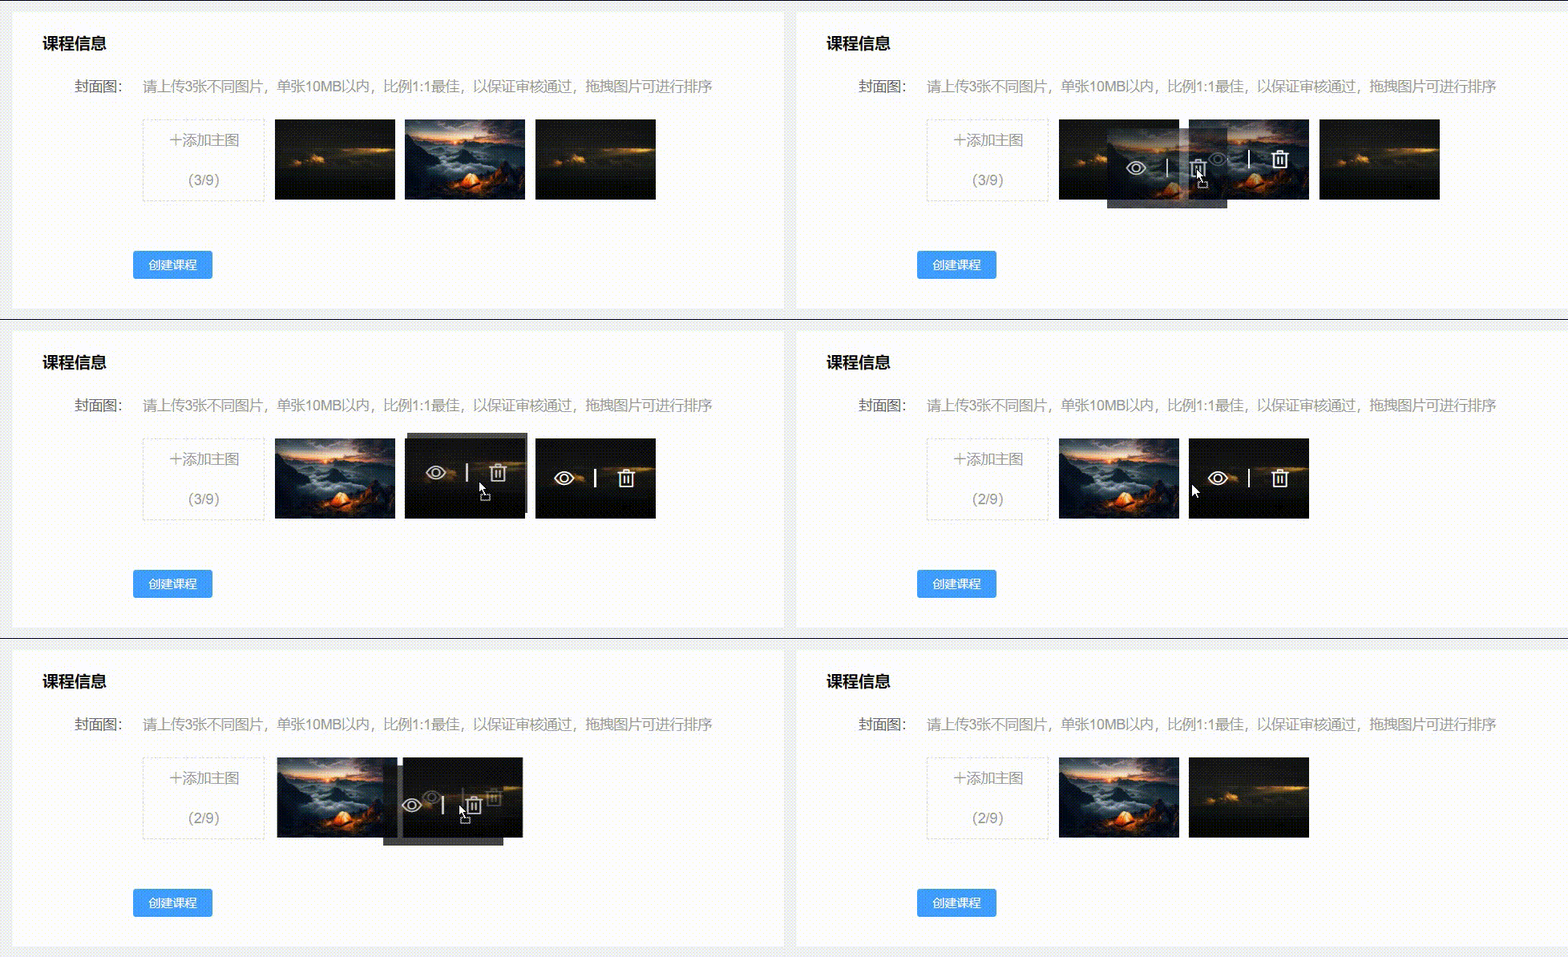
vue后台Element-ui实现图片上传后拖拽排序
element
A Vue.js 2.0 UI Toolkit for Web
项目地址:https://gitcode.com/gh_mirrors/eleme/element
·
其实element的uoload已经有好多功能了,但是多图上传的时候排序不能修改,此次根据项目需求对组件上传一系列进行了组件封装.

项目基于vue2,element2,vuedraggable2,话不多说直接开整。
npm i -S vuedraggable 插件下载
1。创建组件。直接在项目components下面创建组件名为uploadImg。
在组件下面先局部引入拖拽组件vuedraggable,import draggable from 'vuedraggable';

2.使用element的upload组件,创建mystyle对样式穿透动态修改。


3.定义组件接收参数,上传图最大值,宽,高,圆角,回显数组,然后监听当前数组值变化再传递给父组件。
<template>
    <div :style="myStyle">
        <div class=" isblock">
            <div class="isleft" v-show="zlist.length != numshow">
                <el-upload class="avatar-uploader"
                    :style="{ width: upWith + 'px', height: upHeight + 'px', borderRadius: upBradius + 'px', lineHeight: upHeight + 'px' }"
                    :action="updatehttp" :headers="headers" :data="updataimg"
                    accept=".jpg, .jpeg, .png, .gif, .bmp, .JPG, .JPEG, .PBG, .GIF, .BMP" :show-file-list="false"
                    :on-success="handleAvatarSuccess" :before-upload="beforeAvatarUpload" :on-progress="topprogressicon">
                    <div v-show="isopens">
                        <i class="el-icon-loading"></i>
                        上传中...
                    </div>
                    <div v-show="!isopens">
                        <i class="el-icon-plus avatar-uploader-icon-sf">{{ uptext }}</i>
                        <div class="avatar-uploader-icon-sf">({{ zlist.length }}/{{ numshow }})</div>
                    </div>
                </el-upload>
            </div>
            <!-- 拖拽组件 -->
            <draggable v-model="zlist" :animation="100" class="dira">
                <div class=" isblocks" v-for="(item, index) in zlist" :key="index">
                    <div class="ress">
                        <el-image ref="preview"
                            :style="{ width: upWith + 'px', height: upHeight + 'px', borderRadius: upBradius + 'px' }"
                            :preview-src-list="zlist" :src="item"></el-image>
                        <div class="imgs_prews">
                            <div class="imgs_prew"
                                :style="{ width: upWith + 'px', height: upHeight + 'px', borderRadius: upBradius + 'px' }">
                                <i @click="ylimg(index)" class="el-icon-view"></i>
                                <span></span>
                                <i @click="deleteimg(index)" class="el-icon-delete"></i>
                            </div>
                        </div>
                    </div>
                </div>
            </draggable>
        </div>
    </div>
</template>

<script>
import { uploadimg } from '../api/zhaoMG';
import draggable from 'vuedraggable';
export default {
    components: {
        draggable
    },
    props: {
        //上传最大值
        numshow: {
            type: String,
            default: '3'
        },
        //改变文字
        uptext: {
            type: String,
            default: '上传图片'
        },
        //宽度
        upWith: {
            type: Number,
            default: 100
        },
        //高度
        upHeight: {
            type: Number,
            default: 100
        },
         //圆角
        upBradius: {
            type: Number,
            default: 0
        },
        //可忽略
        utypeTexe: {
            type: String,
            default: 'WxCourse'
        },
        //1图片 2视频
        utype: {
            type: Number,
            default: 1
        },
        //回显数组
        imglist: {
            type: Array,
            default: []
        },
        //可忽略
        isflag: {
            type: Boolean,
            default: false
        }
    },
    //修改宽高圆角
    computed: {
        myStyle() {
            return {
                "--upWith": this.upWith + 'px',
                "--upHeight": this.upHeight + 'px',
                "--upBradius": this.upBradius + 'px'
            }
        }
    },
    data() {
        return {
            updatehttp: 'https://', //上传的接口
            headers: {
                token: localStorage.getItem('logintoken')
            },
            updataimg: {
                fileKey: 'WxCourse' //上传时携带参数
            },
            isopens: false,//上传加载显示
            isok: false, //上传成功失败,
            payVoucherDialog: false,
            ishow: true,
            zlist:[] //组件数组
        }
    },
    watch: {
        //动态监听组件变化,把新数组传给父组件
        zlist(newvalue) {
            this.$emit('changeName', this.zlist)
        }
    },
    created(){
        //回显数组
       this.zlist = this.imglist
    },
    methods: {
        //上传成功
        handleAvatarSuccess(res, file) {
            if (this.isok) {
                uploadimg({
                    resp_type: 1,
                    img_url: res.path
                }).then(resimg => {
                    //发请求拿数据把后端返回的图片路径push到数组
                    if(res.code == 200){
                        this.zlist.push(resimg.pic_file.img_url)
                        this.isopens = false
                    }
                })
            }
        },
        //文件上传时
        topprogressicon(event, file, fileList) {
            if (this.isok) {
               //上传时显示 加载提示
                this.isopens = true
            }
        },
        //上传之前的操作
        beforeAvatarUpload(file) {
            //对上传图片做验证
            if (file.type.includes('image')) {
                const isLt2M = file.size / 1024 / 1024 < 10;
                if (!isLt2M) {
                    this.$message.error('上传图片大小不能超过 10MB!');
                    this.isok = false
                } else {
                    this.isok = true
                    this.updataimg.fileKey = this.utypeTexe
                }
            }
        },
        //删除
        deleteimg(index) {
            this.$delete(this.zlist, index)
        },
        //预览
        ylimg(index) {
            this.$refs.preview[index].showViewer = true
        },
    },
}
</script>

<style  scoped>
/* 修改upload的原有样式 */
.avatar-uploader /deep/ .el-upload {
    width: var(--upWith);
    height: var(--upHeight);
    border-radius: var(--upBradius);
    line-height: 40px;
}
.avatar-uploader-icon-sf {
    color: #999999;
}
.ress {
    position: relative;
}
.avatar-uploader {
    border: 1px dashed #d9d9d9;
    width: 100%;
    text-align: center;
}
.isblock {
    display: inline-block;
    width: 700px;
}
.isleft {
    float: left;
    margin-right: 10px;
}
.isblocks {
    margin-right: 10px;
    display: inline-block;
}
.isblock .isblocks:hover .imgs_prews {
    display: block;
}
.imgs_prews {
    display: none;
}
.imgs_prew {
    position: absolute;
    top: 0;
    width: 100%;
    display: flex;
    justify-content: center;
    align-items: center;
    background: rgba(0, 0, 0, 0.3);
    color: #fff;
}
/* 左右图标 */
.imgs_prew i {
    display: inline-block;
    font-size: 20px;
    cursor: pointer;
}
.imgs_prew span {
    width: 2px;
    height: 18px;
    margin: 0px 20px;
    background-color: #fff;
}
</style>
4.在父组件使用,按钮提交作校验成功拿到数组数据。
<template>
    <div class="header_flex">
        <div class="flex_l">
            <el-form label-width="120px" :rules="rules" class="user-search" label-position="right" :size="size" ref="form"
                :model="form" :inline="true">
                <div class="title">课程信息</div>
                <el-row>
                    <el-col :span="24">
                        <el-form-item label="封面图:" prop="main_image" :rules="rules.main_image">
                            <div class="text9">请上传3张不同图片,单张10MB以内,比例1:1最佳,以保证审核通过,拖拽图片可进行排序</div>
                        </el-form-item>
                    </el-col>
                    <el-col :span="24">
                        <el-form-item>
                            <uploadImg numshow="9" uptext="添加主图" style="margin-left: 120px;" @changeName="setimgs"
                                :up-height="80" :upWith="120" :imglist="form.main_image"></uploadImg>
                        </el-form-item>
                    </el-col>
                </el-row>
            </el-form>
            <div class="dialog-footer">
                <el-button :size="size" :loading="loading" type="primary" @click="submit('form')">
                    <span v-if="!loading">创建课程</span>
                    <span v-else>提 交 中...</span>
                </el-button>
            </div>

        </div>
    </div>
</template>

<script>
import uploadImg from '../../components/upload_imglist.vue';
export default {
    components: {
        uploadImg
    },
    data() {
        var main_imagelength = (rule, value, callback) => {
            if (this.form.main_image.length < 3) {
                callback(new Error('最少三张图'))
            } else {
                callback()
            }
        }
        return {
            size: "mini ",
            form: {
                main_image:[]
            },
            params: {
                title: '',
                page: 1
            },
            rules: {
                main_image: [
                    { validator: main_imagelength, trigger: 'blur' }
                ]
            },
            loading: false,
        }
    },
    methods: {
        //单机提交做验证
        submit(form) {
            this.$refs[form].validate(valid => {
                if (valid) {
                    console.log(this.form);
                }
            })
        },
        //拿到字组件数组
        setimgs(e) {
            this.form.main_image = e
        },
    },
}
</script>

<style scoped>
.text9 {
    color: #999;
    font-size: 14px;
}

.textareainput /deep/ .el-textarea__inner {
    height: 100px;
}

.flex_r::-webkit-scrollbar {
    display: none;
    width: 0;
    height: 0;
    color: transparent;
}

.header_flex {
    display: flex;
    background: #fff;
}

</style>
这样就完事了,非常的银杏好用。
A Vue.js 2.0 UI Toolkit for Web
最近提交(Master分支:3 个月前 )
c345bb45
7 个月前
a07f3a59
* Update transition.md
* Update table.md
* Update transition.md
* Update table.md
* Update transition.md
* Update table.md
* Update table.md
* Update transition.md
* Update popover.md 7 个月前
更多推荐
 已为社区贡献6条内容


所有评论(0)