快速入门OpenCV(C/C++)(持续更新)
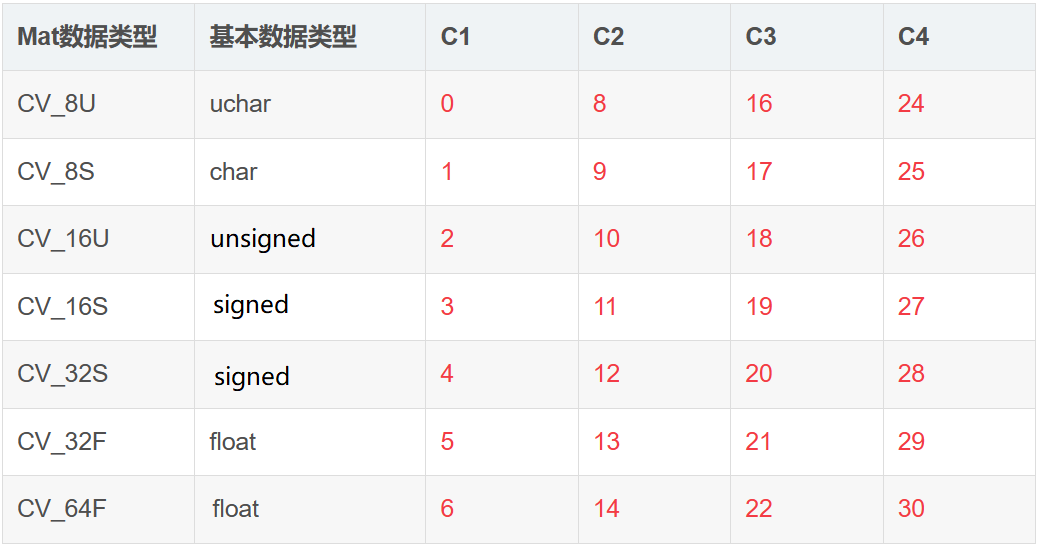
数据类型(版本4.6.0)
CV_8U:占8位的unsigned
CV_8UC(n):占8位的unsigned char
CV_8UC1:占8位的unsigned char 一通道
CV_8UC2:占8位的unsigned char 二通道
CV_8UC3:占8位的unsigned char 三通道
CV_8UC4:占8位的unsigned char 四通道
CV_8S:占8位的signed
CV_8SC(n):占8位的signed char
CV_8SC1:占8位的signed char 一通道
CV_8SC2:占8位的signed char 二通道
CV_8SC3:占8位的signed char 三通道
CV_8SC4:占8位的signed char 四通道
CV_16U:占16位的unsigned
CV_16UC(n):占16位的unsigned char
CV_16UC1:占16位的unsigned char 一通道
CV_16U2:占16位的unsigned char 二通道
CV_16U3:占16位的unsigned char 三通道
CV_16U4:占16位的unsigned char 四通道
CV_16S:占16位的signed
CV_16SC(n):占16位的signed char
CV_16SC1:占16位的signed char 一通道
CV_16SC2:占16位的signed char 二通道
CV_16SC3:占16位的signed char 三通道
CV_16SC4:占16位的signed char 四通道
CV_16F:占16位的float
CV_16FC(n):占16位的float char
CV_16FC1:占16位的float char 一通道
CV_16FC2:占16位的float char 二通道
CV_16FC3:占16位的float char 三通道
CV_16FC4:占16位的float char 四通道
CV_32S:占32位的signed
CV_32SC(n):占32位的signed char
CV_32SC1:占32位的signed char 一通道
CV_32SC2:占32位的signed char 二通道
CV_32SC3:占32位的signed char 三通道
CV_32SC4:占32位的signed char 四通道
CV_32F:占32位的float
CV_32FC(n):占32位的float char
CV_32FC1:占32位的float char 一通道
CV_32FC2:占32位的float char 二通道
CV_32FC3:占32位的float char 三通道
CV_32FC4:占23位的float char 四通道
CV_64F:占64位的float
CV_64FC(n):占64位的float char
CV_64FC1:占64位的float char 一通道
CV_64FC2:占64位的float char 二通道
CV_64FC3:占64位的float char 三通道
CV_64FC4:占64位的float char 四通道
矩阵基本操作
全零矩阵
CV_NODISCARD_STD static MatExpr Mat::zeros(int rows, int cols, int type);
CV_NODISCARD_STD static MatExpr Mat::zeros(Size size, int type);

CV_NODISCARD_STD static MatExpr Mat::zeros(int ndims, const int* sz, int type);
//not recommended
rows:行数
cols:列数
type:数据类型(CV_16F)
size:Size(宽(列数),高(行数))
-
Size与Mat中的成员函数.size()的返回值,有相同的数据类型,是[宽*高]。
-
Mat中的成员变量.size,与以上二者不同,是 rows*cols
全一矩阵
CV_NODISCARD_STD static MatExpr Mat::ones(int rows, int cols, int type);
CV_NODISCARD_STD static MatExpr Mat::ones(Size size, int type);

CV_NODISCARD_STD static MatExpr Mat::ones(int ndims, const int* sz, int type);
//not recommended
rows:行数
cols:列数
type:数据类型(CV_16F)
size:Size(宽(列数),高(行数))
单位矩阵
CV_NODISCARD_STD static MatExpr Mat::eye(int rows, int cols, int type);
CV_NODISCARD_STD static MatExpr Mat::eye(Size size, int type);
rows:行数
cols:列数
type:数据类型(CV_16F)
size:Size(宽(列数),高(行数))
矩阵转置
MatExpr Mat::t() const;求逆矩阵
MatExpr Mat::inv(int method=DECOMP_LU) const;逗号式分隔创建矩阵,常用于自定义卷积核
template<typename _Tp> inline
Mat_<_Tp>::Mat_(int _rows, int _cols)
    : Mat(_rows, _cols, traits::Type<_Tp>::value)
{
}

template<typename _Tp> inline
Mat_<_Tp>::Mat_(int _rows, int _cols, const _Tp& value)
    : Mat(_rows, _cols, traits::Type<_Tp>::value)
{
    *this = value;
}

template<typename _Tp> inline
Mat_<_Tp>::Mat_(Size _sz)
    : Mat(_sz.height, _sz.width, traits::Type<_Tp>::value)
{}

template<typename _Tp> inline
Mat_<_Tp>::Mat_(Size _sz, const _Tp& value)
    : Mat(_sz.height, _sz.width, traits::Type<_Tp>::value)
{
    *this = value;
}
以下为使用实例
Mat a=Mat_<int>(2,2)<<(1,2,3,4);
Mat b=Mat_<double>(Size(2,2))<<(1,2,3,4);注意:给出的数据类型必须是基本数据类型,如int,double。不能是CV_16F等。
矩阵定义(只列出常用的)
Mat::Mat() CV_NOEXCEPT;
Mat::Mat(int rows, int cols, int type);
Mat::Mat(Size size, int type);
Mat::Mat(int rows, int cols, int type, const Scalar& s);
Mat::Mat(Size size, int type, const Scalar& s);
Mat::Mat(const std::vector<int>& sizes, int type);
Mat::Mat(const std::vector<int>& sizes, int type, const Scalar& s);
Mat::Mat(const Mat& m);

void Mat::create(int rows, int cols, int type);
void Mat::create(Size size, int type);
void Mat::create(const std::vector<int>& sizes, int type);
rows:行数
cols:列数
type:数据类型(CV_16F)
size:Size(宽(列数),高(行数))
数据类型Scalar
-
Scalar(gray)
-
Scalar(blue,green,red)
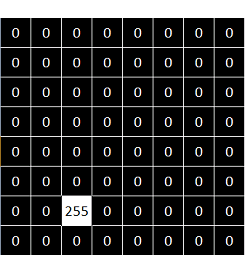
通过ptr与at函数遍历矩阵
Vec类型
typedef Vec<uchar, 2> Vec2b;
typedef Vec<uchar, 3> Vec3b;
typedef Vec<uchar, 4> Vec4b;

typedef Vec<short, 2> Vec2s;
typedef Vec<short, 3> Vec3s;
typedef Vec<short, 4> Vec4s;

typedef Vec<ushort, 2> Vec2w;
typedef Vec<ushort, 3> Vec3w;
typedef Vec<ushort, 4> Vec4w;

typedef Vec<int, 2> Vec2i;
typedef Vec<int, 3> Vec3i;
typedef Vec<int, 4> Vec4i;
typedef Vec<int, 6> Vec6i;
typedef Vec<int, 8> Vec8i;

typedef Vec<float, 2> Vec2f;
typedef Vec<float, 3> Vec3f;
typedef Vec<float, 4> Vec4f;
typedef Vec<float, 6> Vec6f;

typedef Vec<double, 2> Vec2d;
typedef Vec<double, 3> Vec3d;
typedef Vec<double, 4> Vec4d;
typedef Vec<double, 6> Vec6d;
以下为实例
Mat a(Size(2560,1440),CV_8UC3);
for(int i=0;i<a.rows;i++){
      for(int j=0;j<a.cols;j++){
          a.ptr(i,j)[0]=0;
          a.ptr(i,j)[1]=0;
          a.ptr(i,j)[2]=255;
      }
}
for(int i=0;i<a.rows;i++){
      for(int j=0;j<a.cols;j++){
          a.ptr<Vec3b>(i,j)[0]=0;
          a.ptr<Vec3b>(i,j)[1]=0;
          a.ptr<Vec3b>(i,j)[2]=255;
      }
}
for(int i=0;i<a.rows;i++){
      for(int j=0;j<a.cols;j++){
          a.at<Vec3b>(i,j)[0]=0;
          a.at<Vec3b>(i,j)[1]=0;
          a.at<Vec3b>(i,j)[2]=255;
      }
}-
用ptr访问可以不加Vec类型
-
用at访问必须加Vec类型
通过迭代器遍历矩阵(recommended)
Mat a(Size(2560,1440),CV_8UC3);
for(auto iter=a.begin<Vec3b>();iter!=a.end<Vec3b>();iter++){
      iter[0]=255;
      iter[1]=0;
      iter[2]=0;
}
图像基本操作
图片读取
CV_EXPORTS_W Mat imread( const String& filename, int flags = IMREAD_COLOR );
enum ImreadModes {

       IMREAD_UNCHANGED            = -1,
//!< If set, return the loaded image as is (with alpha channel, otherwise it gets cropped). Ignore EXIF orientation.

       IMREAD_GRAYSCALE            = 0,
//!< If set, always convert image to the single channel grayscale image (codec internal conversion).

       IMREAD_COLOR                = 1,
//!< If set, always convert image to the 3 channel BGR color image.

       IMREAD_ANYDEPTH             = 2,
//!< If set, return 16-bit/32-bit image when the input has the corresponding depth, otherwise convert it to 8-bit.

       IMREAD_ANYCOLOR             = 4,
//!< If set, the image is read in any possible color format.

       IMREAD_LOAD_GDAL            = 8,
//!< If set, use the gdal driver for loading the image.

       IMREAD_REDUCED_GRAYSCALE_2  = 16,
//!< If set, always convert image to the single channel grayscale image and the image size reduced 1/2.

       IMREAD_REDUCED_COLOR_2      = 17,
//!< If set, always convert image to the 3 channel BGR color image and the image size reduced 1/2.

       IMREAD_REDUCED_GRAYSCALE_4  = 32,
//!< If set, always convert image to the single channel grayscale image and the image size reduced 1/4.

       IMREAD_REDUCED_COLOR_4      = 33,
//!< If set, always convert image to the 3 channel BGR color image and the image size reduced 1/4.

       IMREAD_REDUCED_GRAYSCALE_8  = 64,
//!< If set, always convert image to the single channel grayscale image and the image size reduced 1/8.

       IMREAD_REDUCED_COLOR_8      = 65,
//!< If set, always convert image to the 3 channel BGR color image and the image size reduced 1/8.

       IMREAD_IGNORE_ORIENTATION   = 128
//!< If set, do not rotate the image according to EXIF's orientation flag.
     };
创建窗口
CV_EXPORTS_W void namedWindow(const String& winname, int flags = WINDOW_AUTOSIZE);
winname(window name):窗体名
图片显示
CV_EXPORTS_W void imshow(const String& winname, InputArray mat);winname(window name):窗体名
若窗体未创建,会自动进行创建
CV_EXPORTS_W int waitKey(int delay = 0);控制图片的展示时间,如设置delay=0,则表示一直展示,按SPACE停止展示
如设置delay不为0,则表示停留delay毫秒
图片保存
CV_EXPORTS_W bool imwrite( const String& filename, InputArray img,
              const std::vector<int>& params = std::vector<int>());
filename:保存的文件名
视频输出
CV_WRAP explicit VideoCapture(const String& filename, int apiPreference = CAP_ANY);

CV_WRAP explicit VideoCapture(const String& filename, int apiPreference, const std::vector<int>& params);

CV_WRAP explicit VideoCapture(int index, int apiPreference = CAP_ANY);

CV_WRAP explicit VideoCapture(int index, int apiPreference, const std::vector<int>& params);
filename
影片档案名称(例如video.avi)
图片序列(例如img_%02d.jpg,将读取像这样的样本img_00.jpg, img_01.jpg, img_02.jpg, …)
视频流的网址(例如protocol://host:port/script_name?script_params|auth)。请注意,每个视频流或IP摄像机源均具有其自己的URL方案。请参考源流的文档以了解正确的URL。
index
要打开的视频捕获设备的ID。要使用默认后端打开默认摄像头,只需传递0。
当apiPreference为CAP_ANY时,使用camera_id + domain_offset(CAP_ *)向后兼容有效。
apiPreference(not important)
首选使用的Capture API后端。如果有多个可用的读取器实现,则可以用于实施特定的读取器实现。
设置读取的摄像头编号,默认CAP_ANY=0,自动检测摄像头。多个摄像头时,使用索引0,1,2,…进行编号调用摄像头。 apiPreference = -1时单独出现窗口,选取相应编号摄像头。
演示
    VideoCapture video(<filename>);
    while (1){
        Mat fps;
        video>>fps;
        imshow("video",fps);
        waitKey(10);//控制帧率
    }
通道分离与合并
分离
API(一)
CV_EXPORTS void split(const Mat& src, Mat* mvbegin);src(source):输入图像。
mvbegin(mat vector begin):分离后的Mat数组。
API(二)
CV_EXPORTS_W void split(InputArray m, OutputArrayOfArrays mv);m(mat):输入图像。
mv(mat vector):分离后的的Mat数组,可以使用STL容器vector。
合并
API(一)
CV_EXPORTS void merge(const Mat* mv, size_t count, OutputArray dst);mv(mat vector):欲合并的图像数组。
count:欲合并的图像的个数
dst(destination):输出图片。
API(二)
CV_EXPORTS_W void merge(InputArrayOfArrays mv, OutputArray dst);mv(mat vector):欲合并的图像数组,可以使用STL容器vector。
dst(destination):输出图片。
图片色彩模式转换
CV_EXPORTS_W void cvtColor( InputArray src, OutputArray dst, int code, int dstCn = 0 );code:转换码
转换类型和转换码
-
RGB和BGR(opencv默认的彩色图像的颜色空间是BGR)颜色空间的转换
cv::COLOR_BGR2RGB
cv::COLOR_RGB2BGR
cv::COLOR_RGBA2BGRA
cv::COLOR_BGRA2RGBA
-
向RGB和BGR图像中增添alpha通道
cv::COLOR_RGB2RGBA
cv::COLOR_BGR2BGRA
-
从RGB和BGR图像中去除alpha通道
cv::COLOR_RGBA2RGB
cv::COLOR_BGRA2BGR
-
从RBG和BGR颜色空间转换到灰度空间
cv::COLOR_RGB2GRAY
cv::COLOR_BGR2GRAY
cv::COLOR_RGBA2GRAY
cv::COLOR_BGRA2GRAY
-
从灰度空间转换到RGB和BGR颜色空间
cv::COLOR_GRAY2RGB
cv::COLOR_GRAY2BGR
cv::COLOR_GRAY2RGBA
cv::COLOR_GRAY2BGRA
-
RGB和BGR颜色空间与BGR565颜色空间之间的转换
cv::COLOR_RGB2BGR565
cv::COLOR_BGR2BGR565
cv::COLOR_BGR5652RGB
cv::COLOR_BGR5652BGR
cv::COLOR_RGBA2BGR565
cv::COLOR_BGRA2BGR565
cv::COLOR_BGR5652RGBA
cv::COLOR_BGR5652BGRA
-
灰度空间与BGR565之间的转换
cv::COLOR_GRAY2BGR555
cv::COLOR_BGR5552GRAY
-
RGB和BGR颜色空间与CIE XYZ之间的转换
cv::COLOR_RGB2XYZ
cv::COLOR_BGR2XYZ
cv::COLOR_XYZ2RGB
cv::COLOR_XYZ2BGR
-
RGB和BGR颜色空间与uma色度(YCrCb空间)之间的转换
cv::COLOR_RGB2YCrCb
cv::COLOR_BGR2YCrCb
cv::COLOR_YCrCb2RGB
cv::COLOR_YCrCb2BGR
-
RGB和BGR颜色空间与HSV颜色空间之间的相互转换
cv::COLOR_RGB2HSV
cv::COLOR_BGR2HSV
cv::COLOR_HSV2RGB
cv::COLOR_HSV2BGR
-
RGB和BGR颜色空间与HLS颜色空间之间的相互转换
cv::COLOR_RGB2HLS
cv::COLOR_BGR2HLS
cv::COLOR_HLS2RGB
cv::COLOR_HLS2BGR
-
RGB和BGR颜色空间与CIE Lab颜色空间之间的相互转换
cv::COLOR_RGB2Lab
cv::COLOR_BGR2Lab
cv::COLOR_Lab2RGB
cv::COLOR_Lab2BGR
-
RGB和BGR颜色空间与CIE Luv颜色空间之间的相互转换
cv::COLOR_RGB2Luv
cv::COLOR_BGR2Luv
cv::COLOR_Luv2RGB
cv::COLOR_Luv2BGR
-
Bayer格式(raw data)向RGB或BGR颜色空间的转换
cv::COLOR_BayerBG2RGB
cv::COLOR_BayerGB2RGB
cv::COLOR_BayerRG2RGB
cv::COLOR_BayerGR2RGB
cv::COLOR_BayerBG2BGR
cv::COLOR_BayerGB2BGR
cv::COLOR_BayerRG2BGR
cv::COLOR_BayerGR2BGR
改变图片的对比度和亮度
概述
Mat.ptr(i,j)=Mat.ptr(i,j)*a+ba:控制对比度增益
b:控制亮度增益
手动(使用saturate_cast函数确保输出值不溢出范围)
Mat xuenai = imread("xuenai.jpg");
resize(xuenai,xuenai,Size(1000,1000));
imshow("xuenai", xuenai);
for(int i=0;i<xuenai.rows;i++){
        for(int j=0;j<xuenai.cols;j++){
            for(int k=0;k<xuenai.channels();k++) {
                xuenai.at<Vec3b>(i, j)[k] = saturate_cast<uchar>(xuenai.at<Vec3b>(i, j)[k] *                 1.2 + 30);
            }
        }
    }
imshow("xuenai_convertTo",xuenai);
waitKey();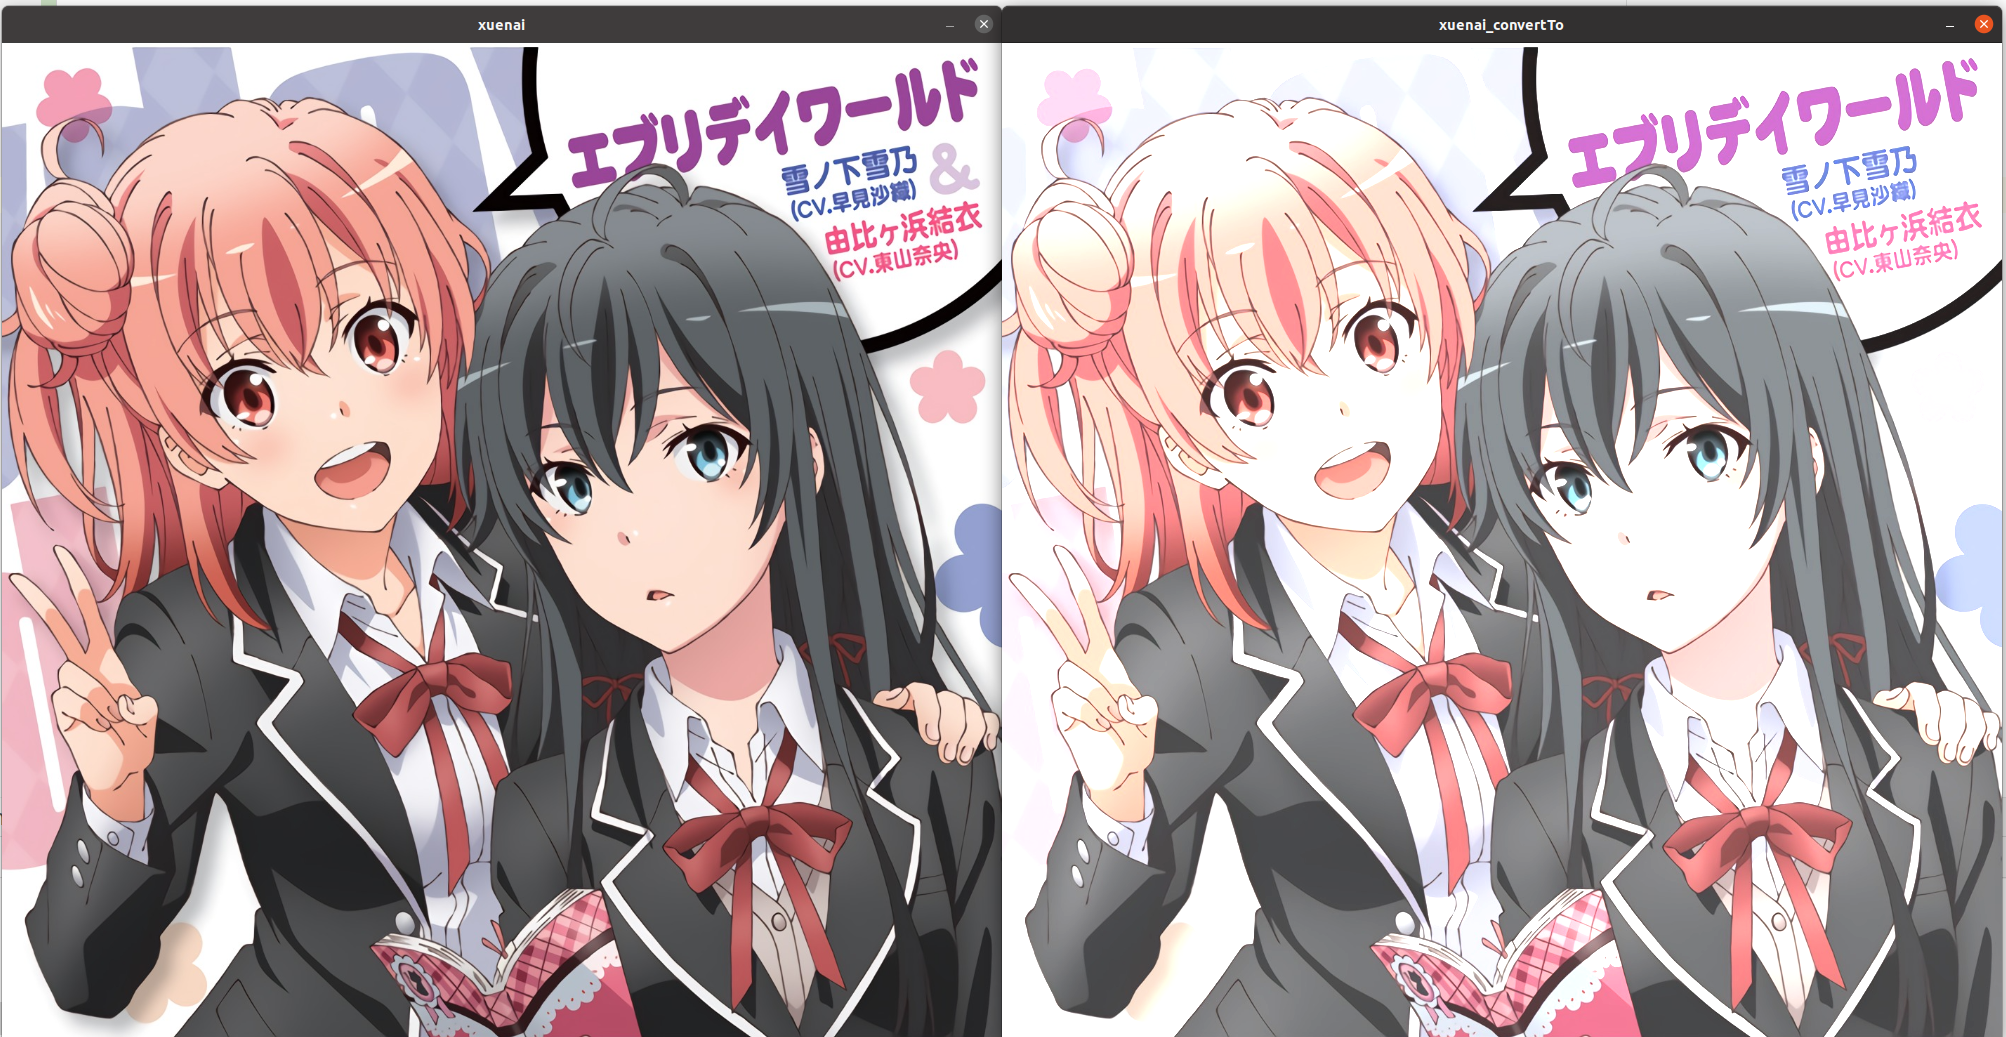
调用API:Mat::convertTo
void Mat::convertTo( OutputArray m, int rtype, double alpha=1, double beta=0 ) const;Mat xuenai = imread("xuenai.jpg");
resize(xuenai,xuenai,Size(1000,1000));
imshow("xuenai", xuenai);
xuenai.convertTo(xuenai,-1,1.2,30);
imshow("xuenai_convertTo",xuenai);
waitKey();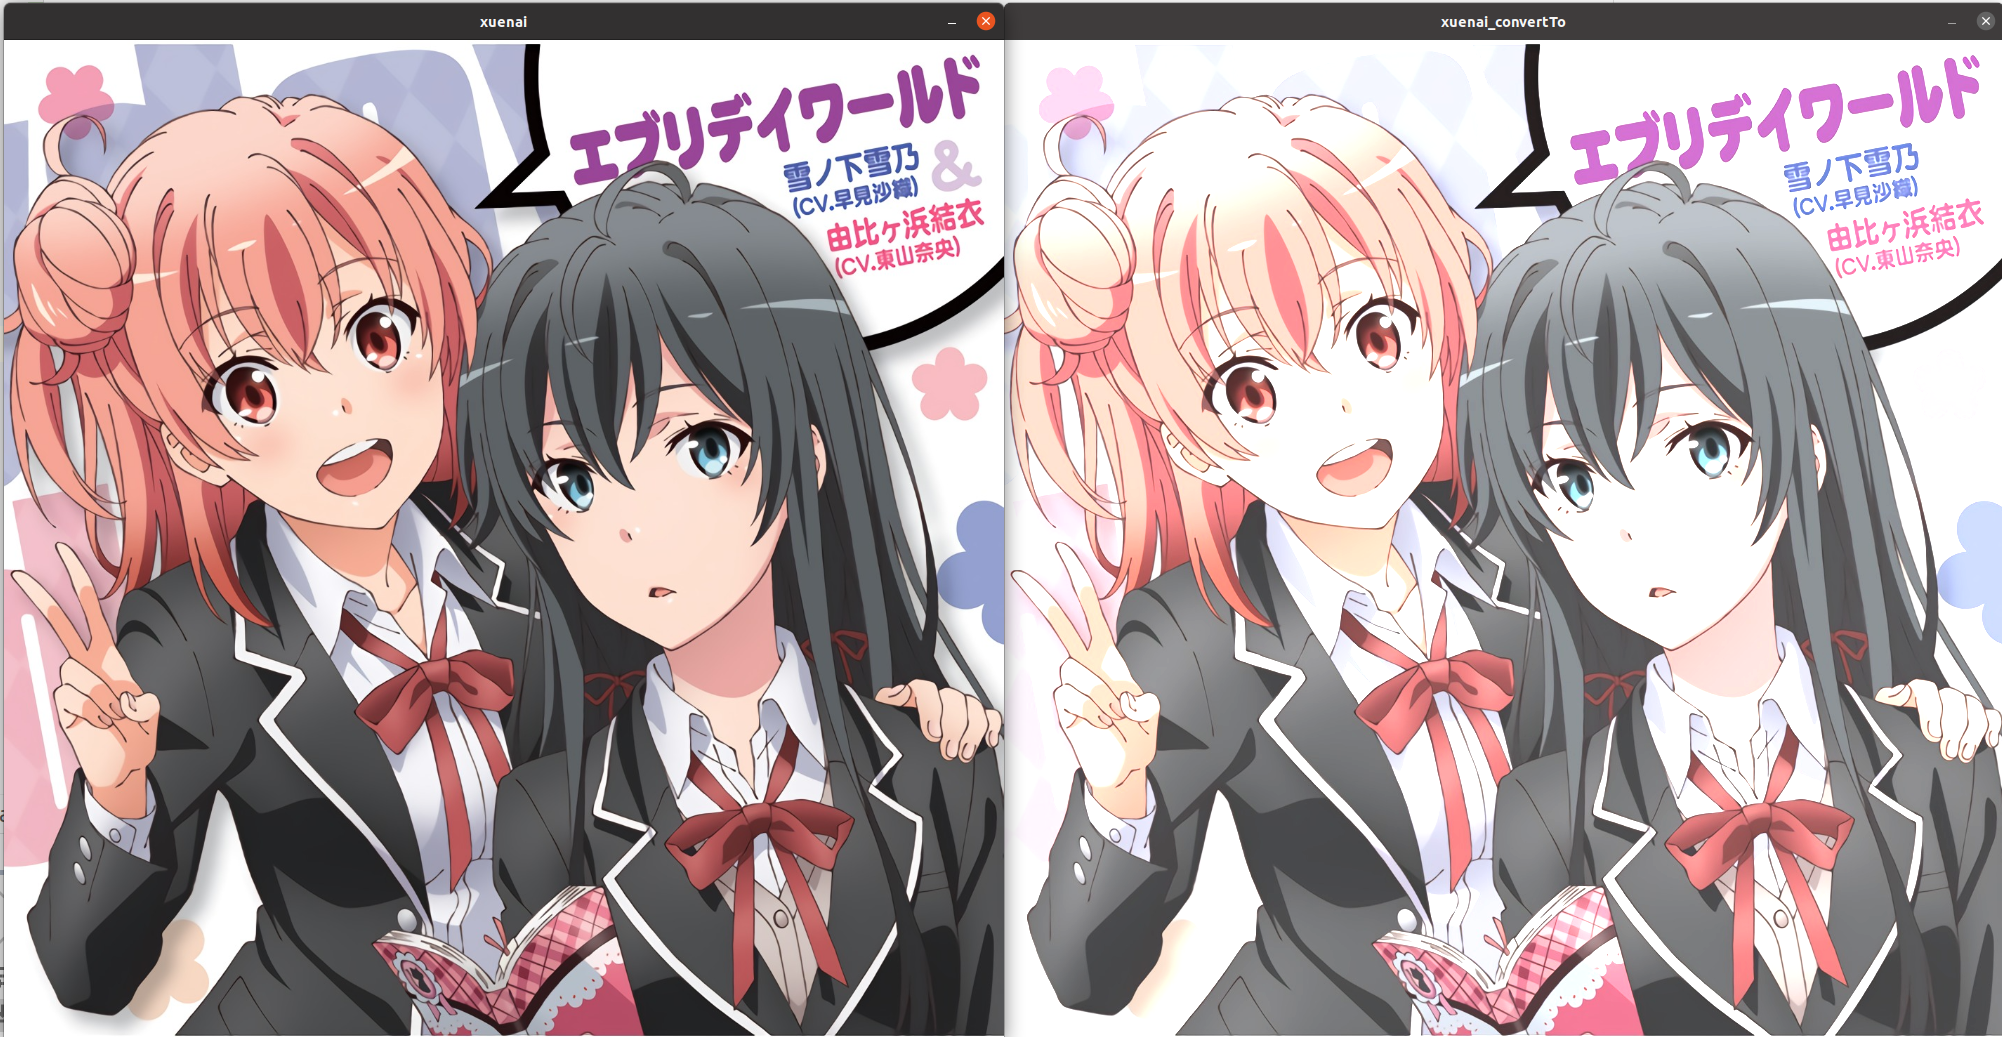
可以看到效果是一样的
图片混合
CV_EXPORTS_W void addWeighted(InputArray src1, double alpha, InputArray src2,
                              double beta, double gamma, OutputArray dst, int dtype = -1);
src(source1):输入图片1
alpha:src1的权重
src2(source2):输入图片2
beta:src2的权重
gamma:额外的增量
dst(destination):输出图片
dtype(destination type):输出图片的数据类型,-1表示与输入图片一致
图片尺寸调整
CV_EXPORTS_W void resize( InputArray src, OutputArray dst,
                          Size dsize, double fx = 0, double fy = 0,
                          int interpolation = INTER_LINEAR );
src(source):输入图片
dst(destination):输出图片
dsize(destination size):输出图片的尺寸
fx:x方向(width方向)的缩放比例,如果它是0,那么它就会按照(double)dsize.width/src.cols来计算;
fy:y方向(height方向)的缩放比例,如果它是0,那么它就会按照(double)dsize.height/src.rows来计算;
interpolation:插值算法的选择
插值算法(not important)
enum InterpolationFlags{
    /** nearest neighbor interpolation */
    INTER_NEAREST        = 0,
    /** bilinear interpolation */
    INTER_LINEAR         = 1,
    /** bicubic interpolation */
    INTER_CUBIC          = 2,
    /** resampling using pixel area relation. It may be a preferred method for image decimation, as
    it gives moire'-free results. But when the image is zoomed, it is similar to the INTER_NEAREST
    method. */
    INTER_AREA           = 3,
    /** Lanczos interpolation over 8x8 neighborhood */
    INTER_LANCZOS4       = 4,
    /** Bit exact bilinear interpolation */
    INTER_LINEAR_EXACT = 5,
    /** Bit exact nearest neighbor interpolation. This will produce same results as
    the nearest neighbor method in PIL, scikit-image or Matlab. */
    INTER_NEAREST_EXACT  = 6,
    /** mask for interpolation codes */
    INTER_MAX            = 7,
    /** flag, fills all of the destination image pixels. If some of them correspond to outliers in the
    source image, they are set to zero */
    WARP_FILL_OUTLIERS   = 8,
    /** flag, inverse transformation

    For example, #linearPolar or #logPolar transforms:
    - flag is __not__ set: \f$dst( \rho , \phi ) = src(x,y)\f$
    - flag is set: \f$dst(x,y) = src( \rho , \phi )\f$
    */
    WARP_INVERSE_MAP     = 16
};
注意事项
使用注意事项:
-
dsize和fx/fy不能同时为0
-
指定dsize的值,让fx和fy空置直接使用默认值。
-
让dsize为0,指定好fx和fy的值,比如fx=fy=0.5,那么就相当于把原图两个方向缩小一倍。
图像金字塔(常用于神经网络的池化层,对图像进行成倍的放大或缩小)
CV_EXPORTS_W void pyrDown( InputArray src, OutputArray dst,
                           const Size& dstsize = Size(), int borderType = BORDER_DEFAULT );
//缩小一倍
src(source):输入图片
dst(destination):输出图片
dstsize(destination size):输出图片的尺寸,默认自动调整
borderType:边界填充方式,默认为黑边。如果没有设置dstsize,则不会出现黑边,因为已经进行了自动调整
CV_EXPORTS_W void pyrUp( InputArray src, OutputArray dst,
                         const Size& dstsize = Size(), int borderType = BORDER_DEFAULT );
//放大一倍
src(source):输入图片
dst(destination):输出图片
dstsize(destination size):输出图片的尺寸,默认自动调整
borderType:边界填充方式,默认为黑边。如果没有设置dstsize,则不会出现黑边,因为已经进行了自动调整
二值化(一般只对灰度图使用)
CV_EXPORTS_W double threshold( InputArray src, OutputArray dst,
                               double thresh, double maxval, int type );
src(source):输入图片
dst(destination):输出图片
thresh(threshold):阈值
maxval(max value):最大值
type:阈值类型
阈值类型
enum ThresholdTypes {
    THRESH_BINARY     = 0, //!< \f[\texttt{dst} (x,y) =  \fork{\texttt{maxval}}{if \(\texttt{src}(x,y) > \texttt{thresh}\)}{0}{otherwise}\f]
    THRESH_BINARY_INV = 1, //!< \f[\texttt{dst} (x,y) =  \fork{0}{if \(\texttt{src}(x,y) > \texttt{thresh}\)}{\texttt{maxval}}{otherwise}\f]
    THRESH_TRUNC      = 2, //!< \f[\texttt{dst} (x,y) =  \fork{\texttt{threshold}}{if \(\texttt{src}(x,y) > \texttt{thresh}\)}{\texttt{src}(x,y)}{otherwise}\f]
    THRESH_TOZERO     = 3, //!< \f[\texttt{dst} (x,y) =  \fork{\texttt{src}(x,y)}{if \(\texttt{src}(x,y) > \texttt{thresh}\)}{0}{otherwise}\f]
    THRESH_TOZERO_INV = 4, //!< \f[\texttt{dst} (x,y) =  \fork{0}{if \(\texttt{src}(x,y) > \texttt{thresh}\)}{\texttt{src}(x,y)}{otherwise}\f]
    THRESH_MASK       = 7,
    THRESH_OTSU       = 8, //!< flag, use Otsu algorithm to choose the optimal threshold value
    THRESH_TRIANGLE   = 16 //!< flag, use Triangle algorithm to choose the optimal threshold value
};
1. 阈值二值化(Threshold Binary)
首先指定像素的灰度值的阈值,遍历图像中像素值,如果像素的灰度值大于这个阈值,则将这个像素设置为最大像素值(8位灰度值最大为255);若像素的灰度值小于阈值,则将该像素点像素值赋值为0。公式以及示意图如下:

2. 阈值反二值化(Threshold Binary Inverted)
首先也要指定一个阈值,不同的是在对图像进行阈值化操作时与阈值二值化相反,当像素的灰度值超过这个阈值的时候为该像素点赋值为0;当该像素的灰度值低于该阈值时赋值为最大值。公式及示意图如下:

3. 截断(Truncate)
给定像素值阈值,在图像中像素的灰度值大于该阈值的像素点被设置为该阈值,而小于该阈值的像素值保持不变。公式以及示意图如下:

4. 阈值取零(Threshold To Zero)
与截断阈值化相反,像素点的灰度值如果大于该阈值则像素值不变,如果像素点的灰度值小于该阈值,则该像素值设置为0.公式以及示意图如下:

5. 阈值反取零(Threshold To Zero Inverted)
像素值大于阈值的像素赋值为0,而小于该阈值的像素值则保持不变,公式以及示意图如下:

图片裁剪
方式一
inline
Mat Mat::operator()( const Rect& roi ) const
{
    return Mat(*this, roi);
}
以下为实例
Mat xuenai = imread("xuenai.jpg");
resize(xuenai,xuenai,Size(1000,1000));
imshow("xuenai", xuenai);
Mat tuanzi(xuenai,(Rect(0,0,500,1000)));
imshow("tuanzi",tuanzi);
waitKey();
方式二
Mat::Mat(const Mat& m, const Rect& roi);以下为实例
Mat xuenai = imread("xuenai.jpg");
resize(xuenai,xuenai,Size(1000,1000));
imshow("xuenai", xuenai);
Mat tuanzi(xuenai(Rect(0,0,500,1000)));
imshow("tuanzi",tuanzi);
waitKey();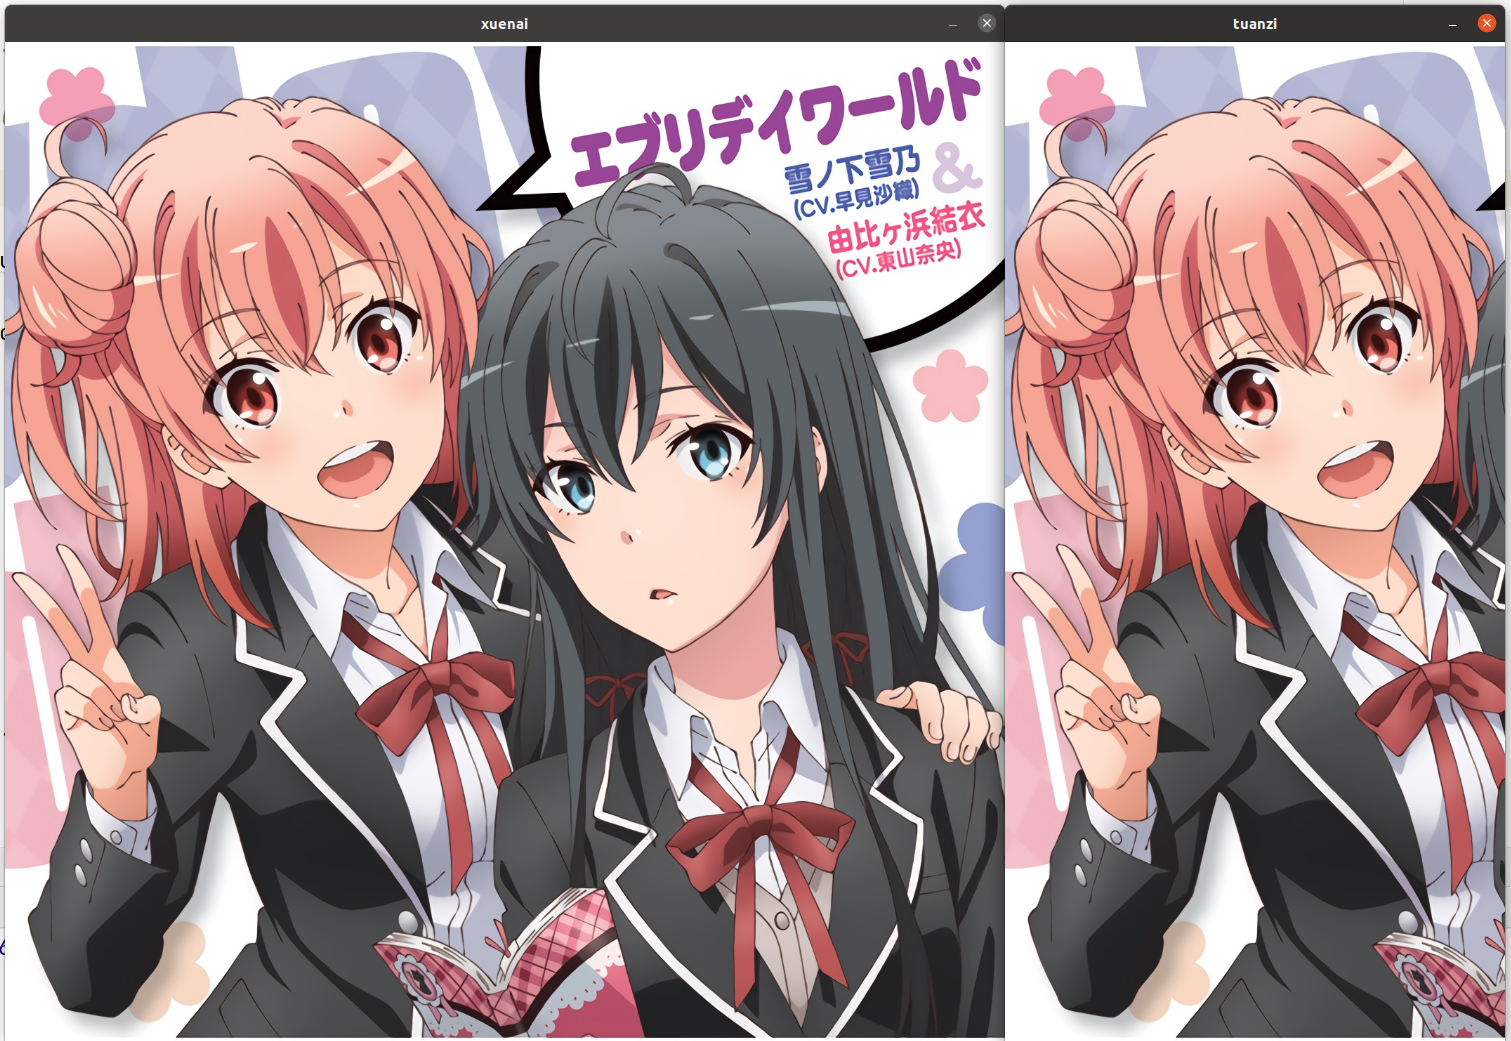
Rect类构造
template<typename _Tp> inline
Rect_<_Tp>::Rect_(_Tp _x, _Tp _y, _Tp _width, _Tp _height)
    : x(_x), y(_y), width(_width), height(_height) {}

template<typename _Tp> inline
Rect_<_Tp>::Rect_(const Point_<_Tp>& org, const Size_<_Tp>& sz)
    : x(org.x), y(org.y), width(sz.width), height(sz.height) {}

template<typename _Tp> inline
Rect_<_Tp>::Rect_(const Point_<_Tp>& pt1, const Point_<_Tp>& pt2)
{
    x = std::min(pt1.x, pt2.x);
    y = std::min(pt1.y, pt2.y);
    width = std::max(pt1.x, pt2.x) - x;
    height = std::max(pt1.y, pt2.y) - y;
}
基本变换
翻转
CV_EXPORTS_W void flip(InputArray src, OutputArray dst, int flipCode);src(source):输入图片
dst(destination):输出图片
flipCode:翻转类型
flipcode==0;//上下翻转
flipcod>0;//左右翻转
flipcode<0;//上下加左右翻转,等价于旋转180°
效果
Mat xuenai = imread("xuenai.jpg");
resize(xuenai,xuenai,Size(1000,1000));
imshow("xuenai", xuenai);
Mat xuenai_flip(xuenai.size(), xuenai.type());
flip(xuenai, xuenai_flip, 0);
imshow("xuenai_flip", xuenai_flip);
waitKet();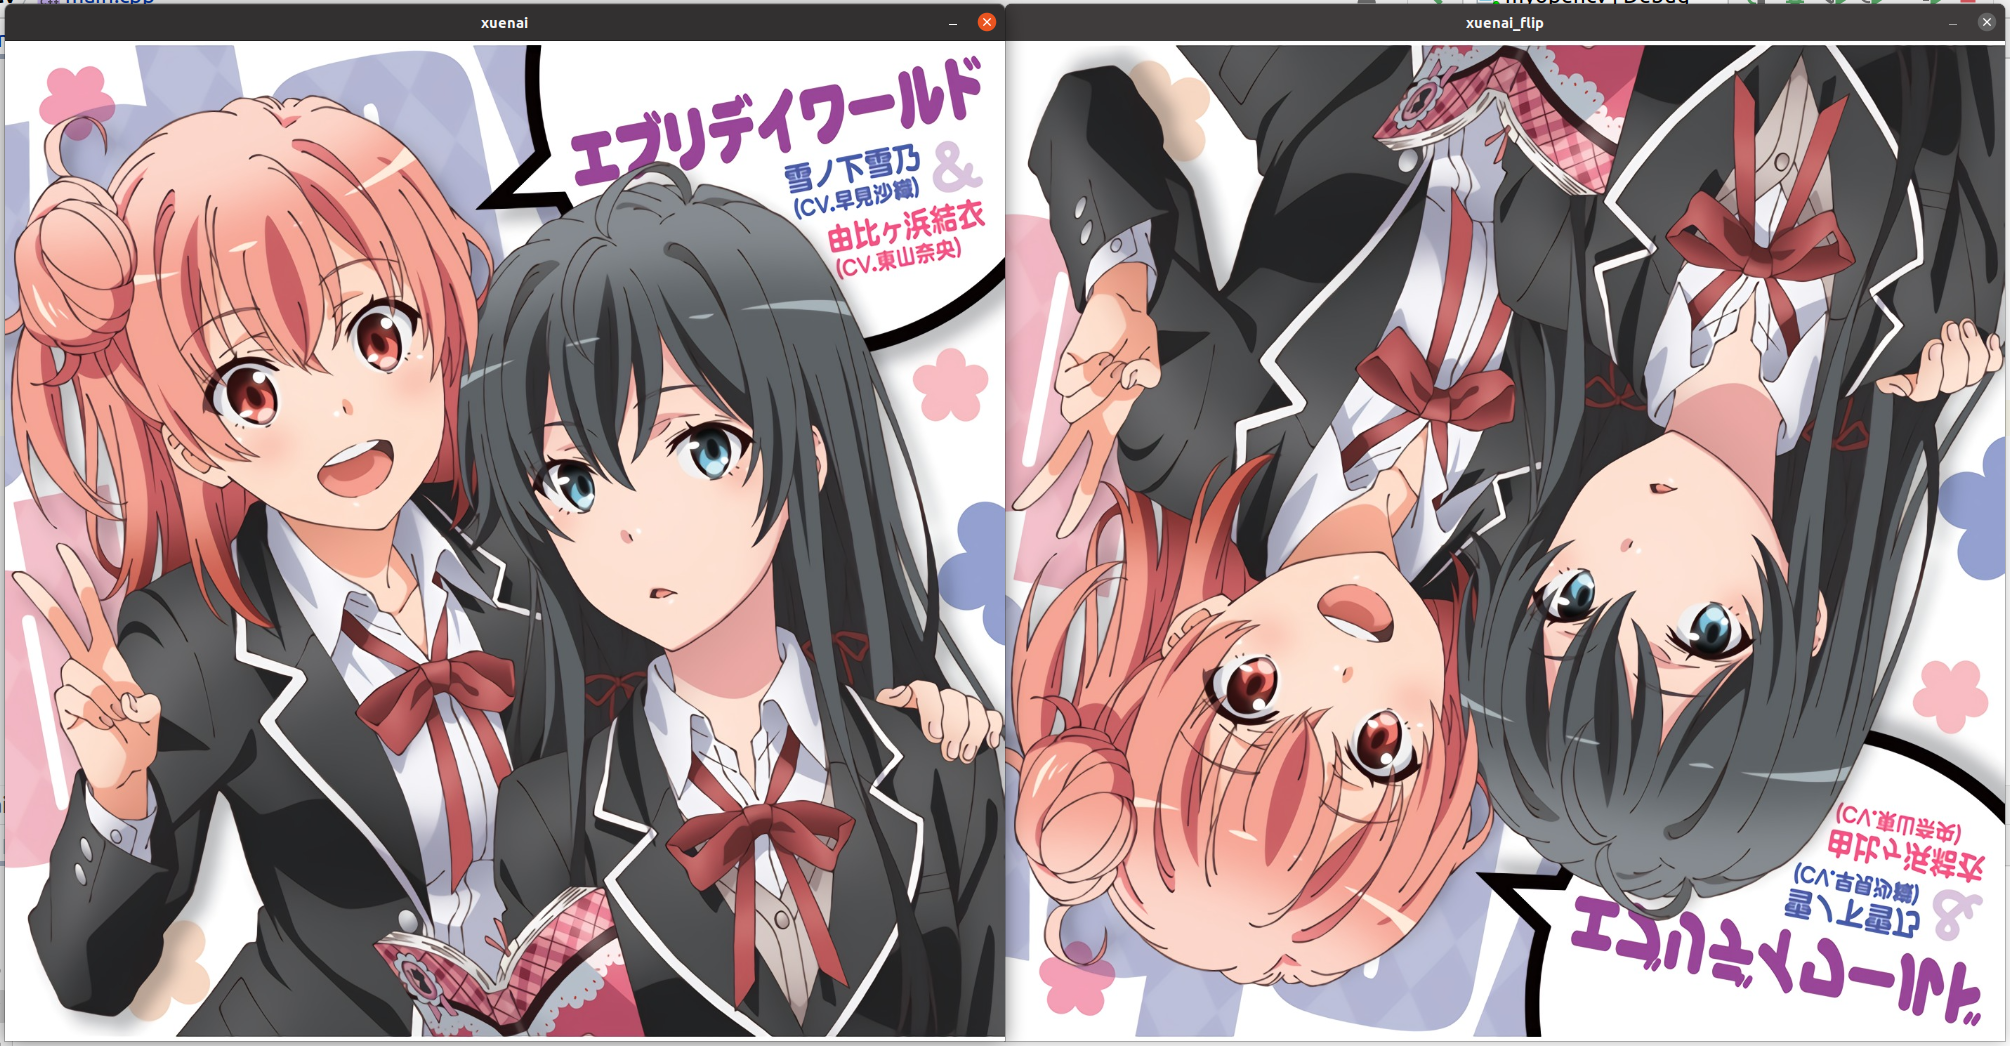
90°旋转
CV_EXPORTS_W void rotate(InputArray src, OutputArray dst, int rotateCode);
enum RotateFlags {
    ROTATE_90_CLOCKWISE = 0, //!<Rotate 90 degrees clockwise
    ROTATE_180 = 1, //!<Rotate 180 degrees clockwise
    ROTATE_90_COUNTERCLOCKWISE = 2, //!<Rotate 270 degrees clockwise
};
src(source):输入图片
dst(destination):输出图片
rotateCode:旋转类型
效果
Mat xuenai = imread("xuenai.jpg");
resize(xuenai,xuenai,Size(1000,1000));
imshow("xuenai", xuenai);
Mat xuenai_rotate(xuenai.size(), xuenai.type());
rotate(xuenai, xuenai_rotate, ROTATE_180);
imshow("xuenai_rotate", xuenai_rotate);
waitKet();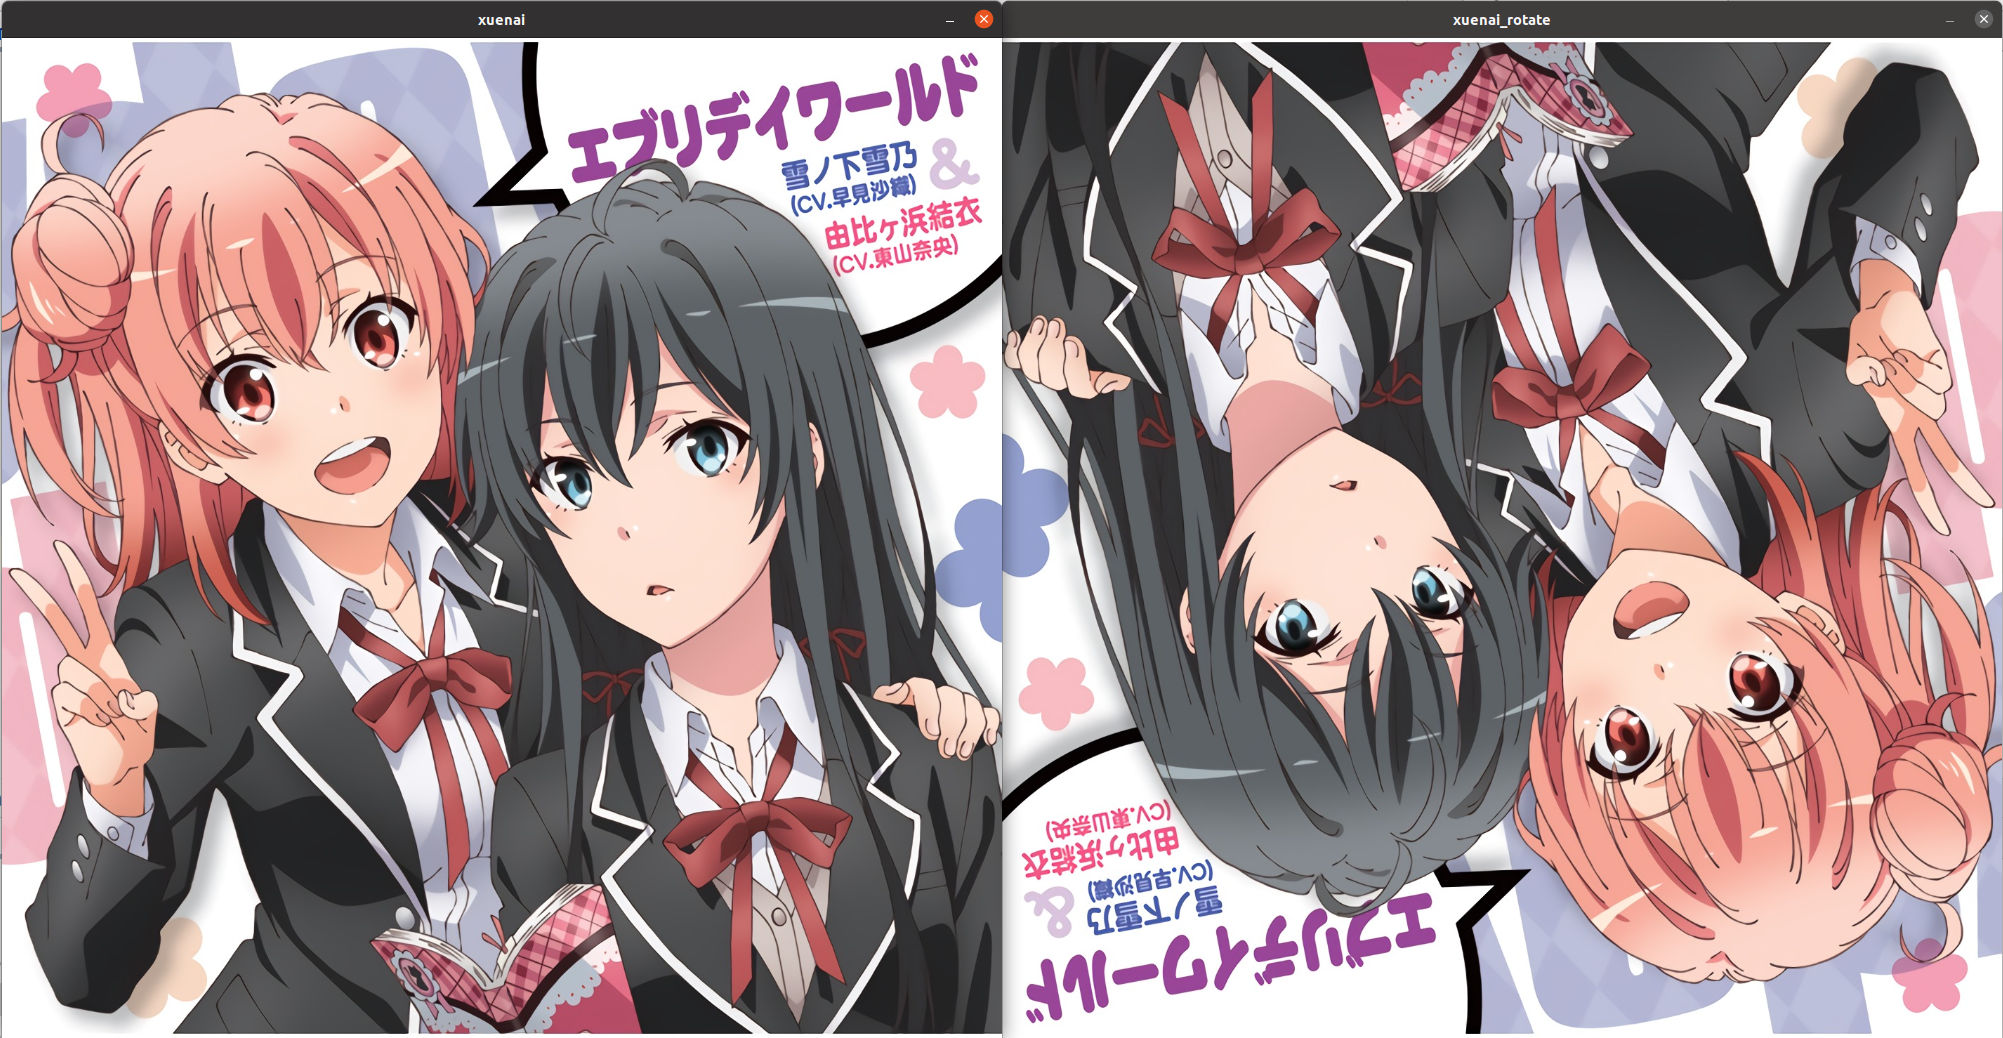
仿射变换与透射变换
CV_EXPORTS_W void warpAffine( InputArray src, OutputArray dst,
                              InputArray M, Size dsize,
                              int flags = INTER_LINEAR,
                              int borderMode = BORDER_CONSTANT,
                              const Scalar& borderValue = Scalar());
src(source):输入图片
dst(destination):输出图片
M:变换矩阵
dsize(destination size):输出图片的尺寸,若不对输出图片的尺寸进行调整,那么很可能会出现黑边
flags:插值算法
borderMode:边界外推法
borderValue:填充边界的值
平移
只需将变换矩阵M设置成如下形式:
float delta_x=200,delta_y=200;
float  M_values[]={1,0,delta_x,
                   0,1,delta_y};
Mat M(Size(3,2),CV_32F,M_values);
delta_x:x方向上的偏移量
delta_y:y方向上的偏移量
M_values:必须是浮点类型的数组对象
M:必须是CV_32F,不能用逗号式分隔创建
效果
Mat xuenai = imread("xuenai.jpg");
resize(xuenai,xuenai,Size(1000,1000));
imshow("xuenai",xuenai);
double  M_values[]={1,0,200,
                    0,1,200};
Mat M(Size(3,2), CV_64F,M_values);
Mat xuenai_shift(xuenai.size(),xuenai.type());
warpAffine(xuenai,xuenai_shift,M,xuenai.size());
imshow("xuenai_shift",xuenai_shift);
waitKet();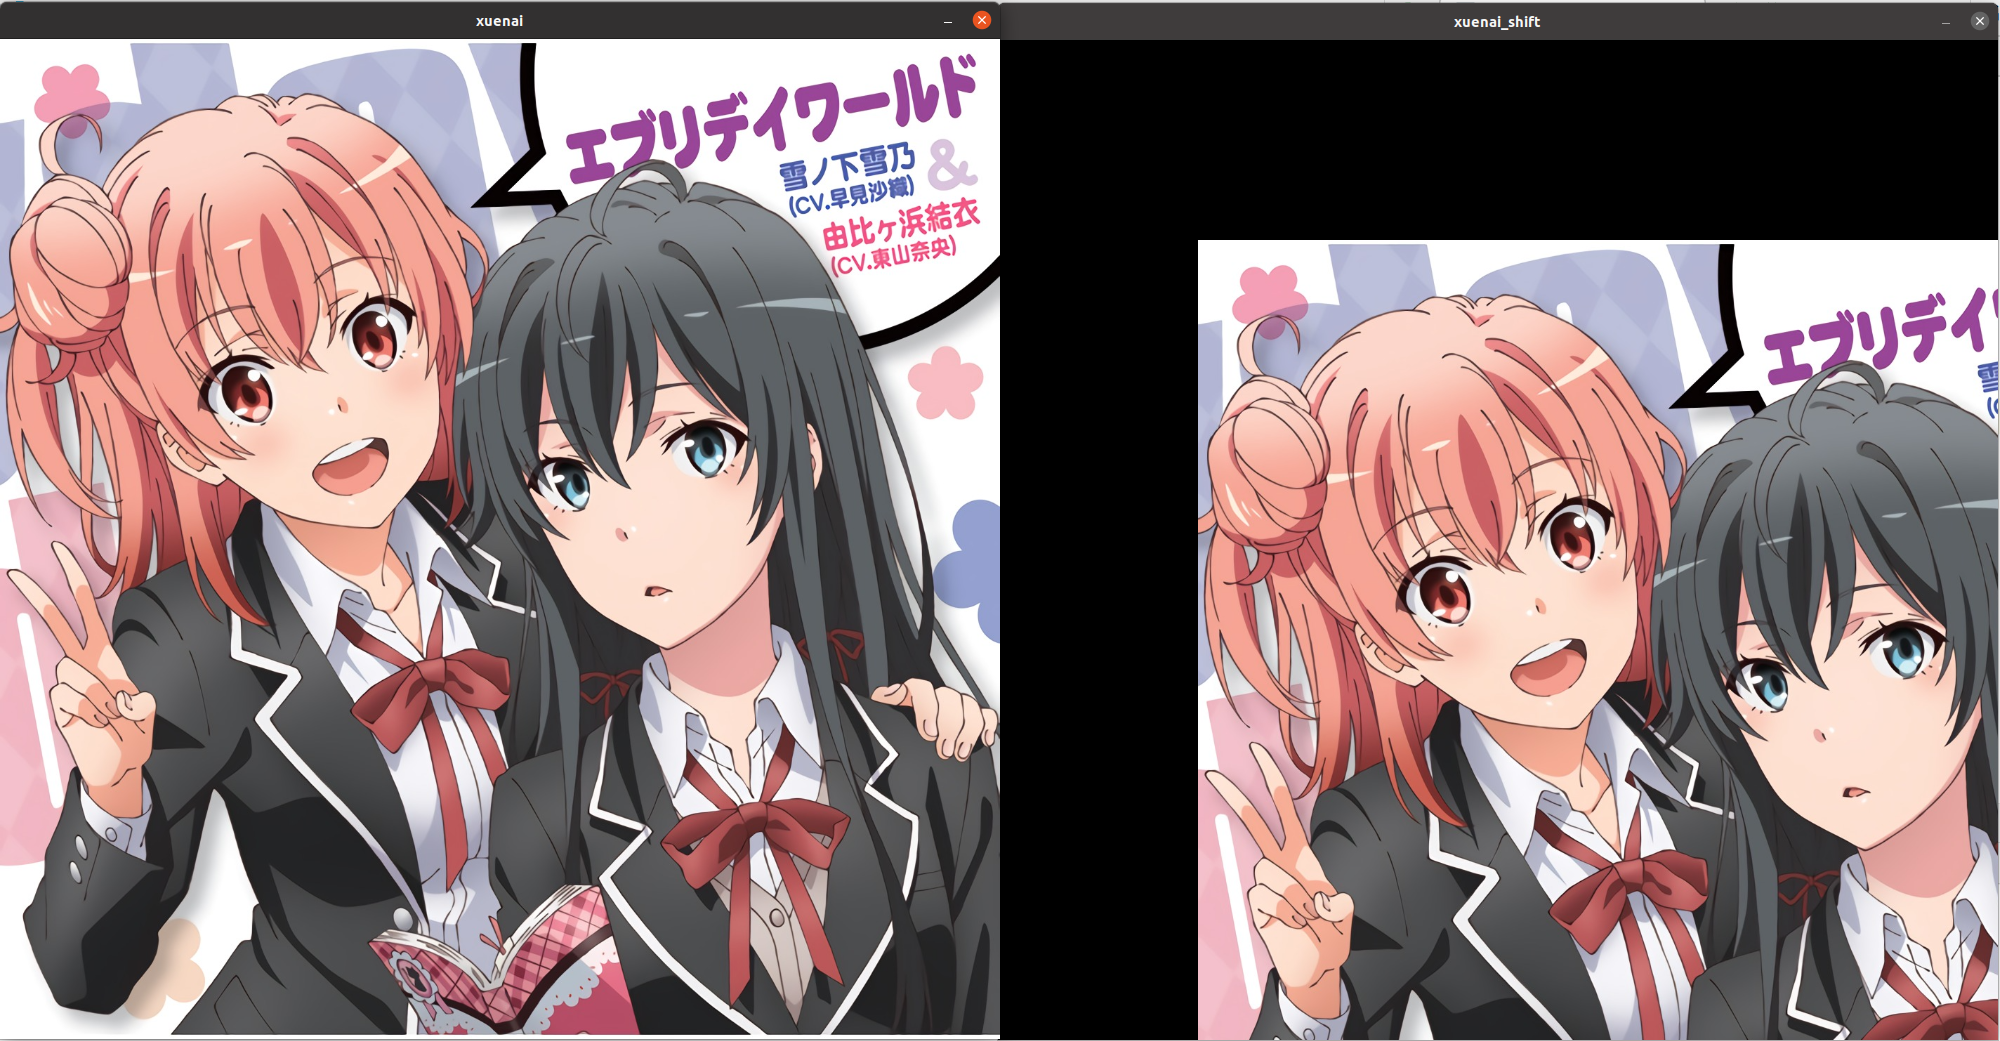
任意角度旋转
获得变换矩阵M
inline
Mat getRotationMatrix2D(Point2f center, double angle, double scale)
{
    return Mat(getRotationMatrix2D_(center, angle, scale), true);
}
center:旋转中心点的坐标
angle:逆时针偏角
scale:生成图与原图之比
效果
Mat xuenai = imread("xuenai.jpg");
resize(xuenai,xuenai,Size(1000,1000));
imshow("xuenai", xuenai);
Mat M= getRotationMatrix2D(Point2f(xuenai.cols/2,xuenai.rows/2),45,1);
Mat xuenai_rotate(xuenai.size(),xuenai.type());
warpAffine(xuenai,xuenai_rotate,M,xuenai.size());
imshow("xuenai_flip",xuenai_rotate);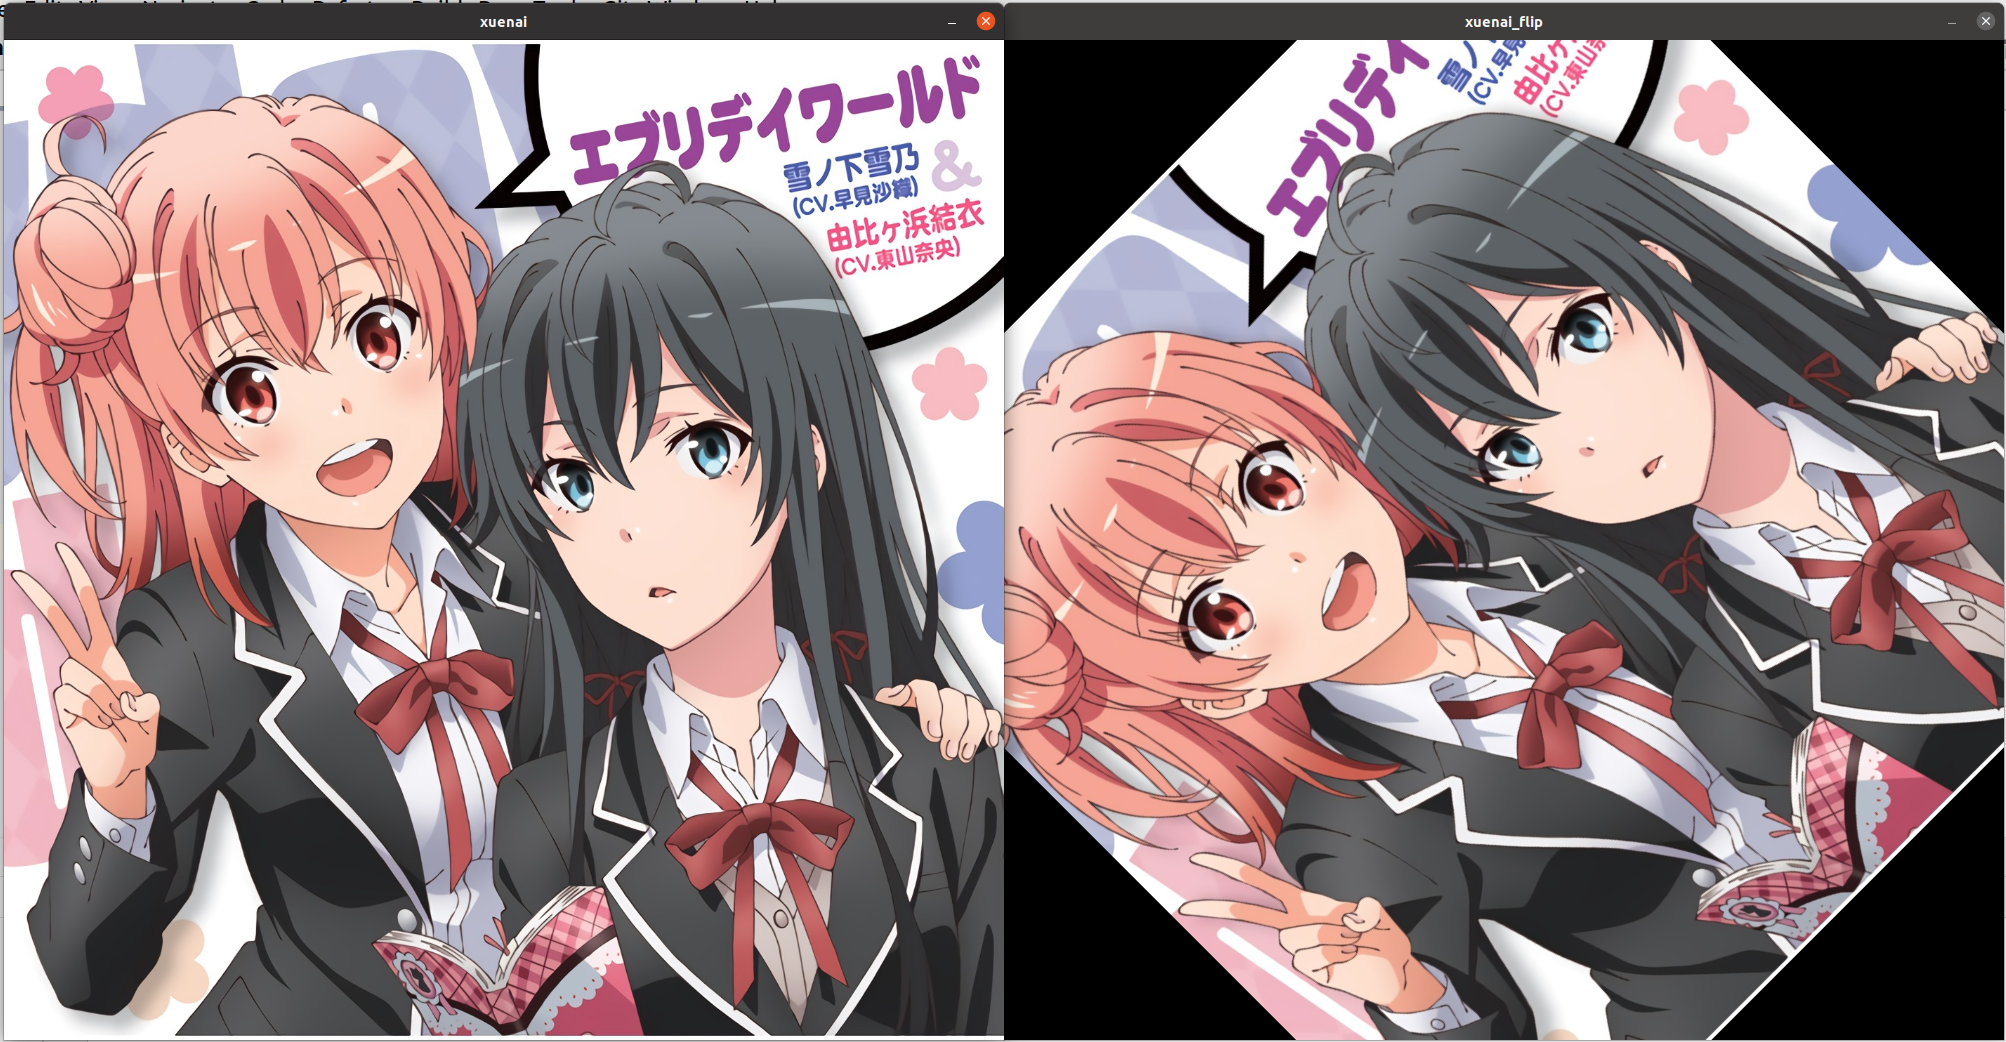
仿射(不破坏几何关系)
获得变换矩阵M
CV_EXPORTS Mat getAffineTransform( const Point2f src[], const Point2f dst[] );src[](source[]):输入图片的坐标点集,含三个坐标点
dst[](destination[]):三个坐标点变换的目标位置
透射(破坏几何关系)
已知变换后图片,逆推变换矩阵M
CV_EXPORTS_W Mat getPerspectiveTransform(InputArray src, InputArray dst, int solveMethod = DECOMP_LU);src(source):输入图片
dst(destination):输出图片
获得变换矩阵M
CV_EXPORTS Mat getPerspectiveTransform(const Point2f src[], const Point2f dst[], int solveMethod = DECOMP_LU);src[](source[]):输入图片的坐标点集,含四个坐标点
dst[](destination[]):四个坐标点变换的目标位置
滤波及边缘检测
均值滤波
卷积核形状
Mat kernal=Mat::ones(Size(ksize,ksize),CV_64F)/(ksize*ksize);API
CV_EXPORTS_W void blur( InputArray src, OutputArray dst,
                        Size ksize, Point anchor = Point(-1,-1),
                        int borderType = BORDER_DEFAULT );
src(source):输入图片
dst(destination):输出图片
ksize(kernal size):卷积核大小,必须是正奇数
anchor:滤波器中心像素位置,取(-1,-1)表示几何中心
borderType:边界填充方式,默认为黑边
效果
Mat xuenai = imread("xuenai.jpg");
resize(xuenai,xuenai,Size(1000,1000));
imshow("xuenai",xuenai);
Mat xuenai_blur(xuenai.size(),xuenai.type());
blur(xuenai,xuenai_blur,Size(3,5));
imshow("xuenai_blur",xuenai_blur);
waitKet();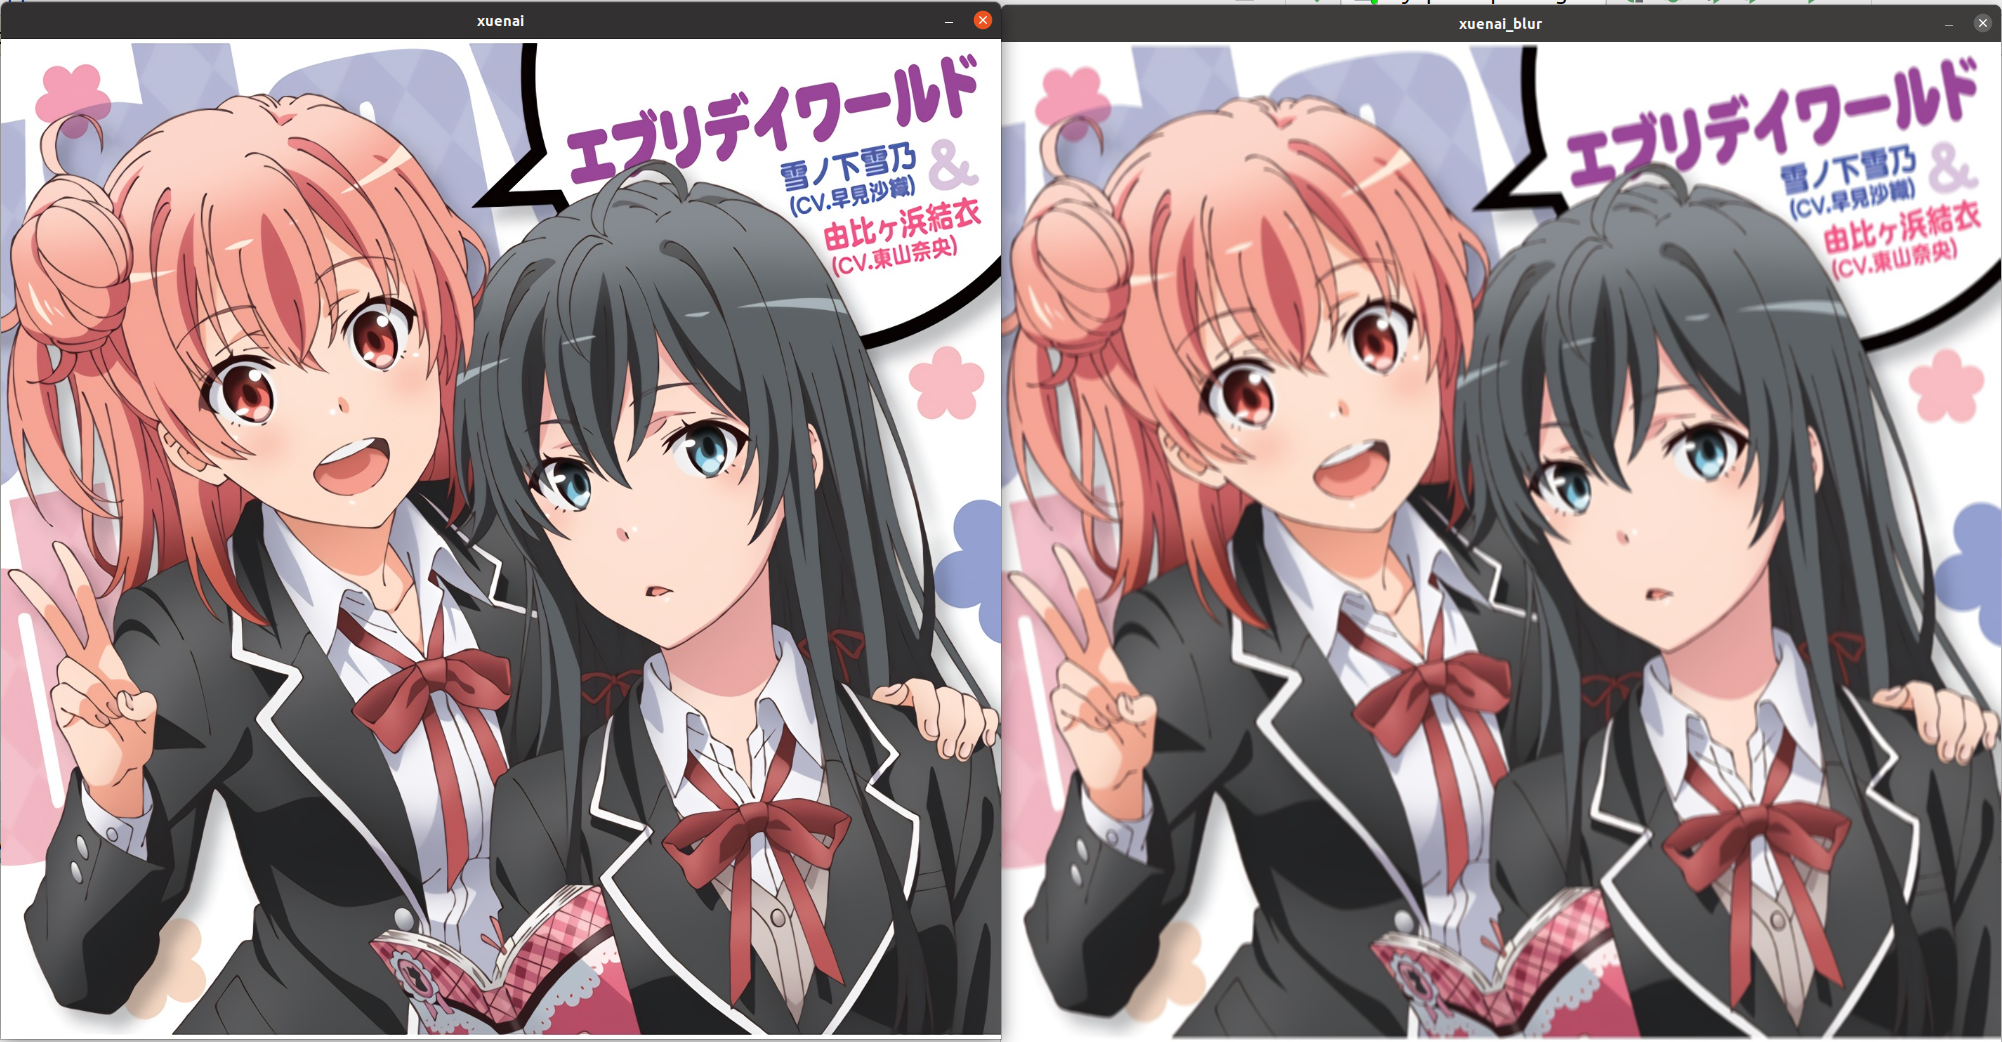
高斯滤波
卷积核形状
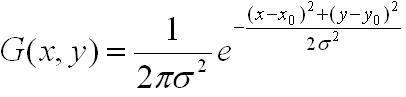
二维高斯函数表述为:
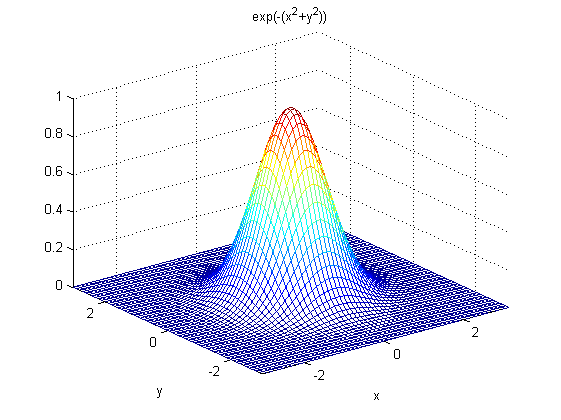
对应图形:
代码实现(不区分sigmaX与sigmaY)
void GetGaussianKernel(Mat kernal, const int ksize,const double sigma)
{
    const double PI=4.0*atan(1.0); //圆周率π赋值
    int center= ksize/2;
    double sum=0;
    for(int i=0;i<ksize;i++)
    {
        for(int j=0;j<ksize;j++)
        {
            kernal.ptr(i,j)=(1/(2*PI*sigma*sigma))*exp(-((i-center)*(i-center)+(j-center)*(j-center))/(2*sigma*sigma));
            sum+=kernal.ptr(i,j);
        }
    }

    for(int i=0;i<ksize;i++)
    {
        for(int j=0;j<ksize;j++)
        {
            kernal.ptr(i,j)/=sum;
        }
    }
    return ;
}
API
CV_EXPORTS_W void GaussianBlur( InputArray src, OutputArray dst, Size ksize,
                                double sigmaX, double sigmaY = 0,
                                int borderType = BORDER_DEFAULT );
src(source):输入图片
dst(destination):输出图片
ksize(kernal size):卷积核大小。如果这个值我们设其为非正数,那么OpenCV会从第五个参数sigmaSpace来计算出它来。
sigmaX:x方向上的标准差
sigmaY:y方向上的标准差。默认输入量为0,则将其设置为等于sigmaX,如果两个轴的标准差均为0,则根据输入的高斯滤波器尺寸计算标准偏差。
borderType:边界填充方式,默认为黑边
效果
    Mat xuenai = imread("xuenai.jpg");
    resize(xuenai,xuenai,Size(1000,1000));
    imshow("xuenai",xuenai);
    Mat xuenai_Gauss(xuenai.size(),xuenai.type());
    GaussianBlur(xuenai,xuenai_Gauss,Size(-1,-1),10);
    imshow("xuenai_Gauss",xuenai_Gauss);
    waitKet();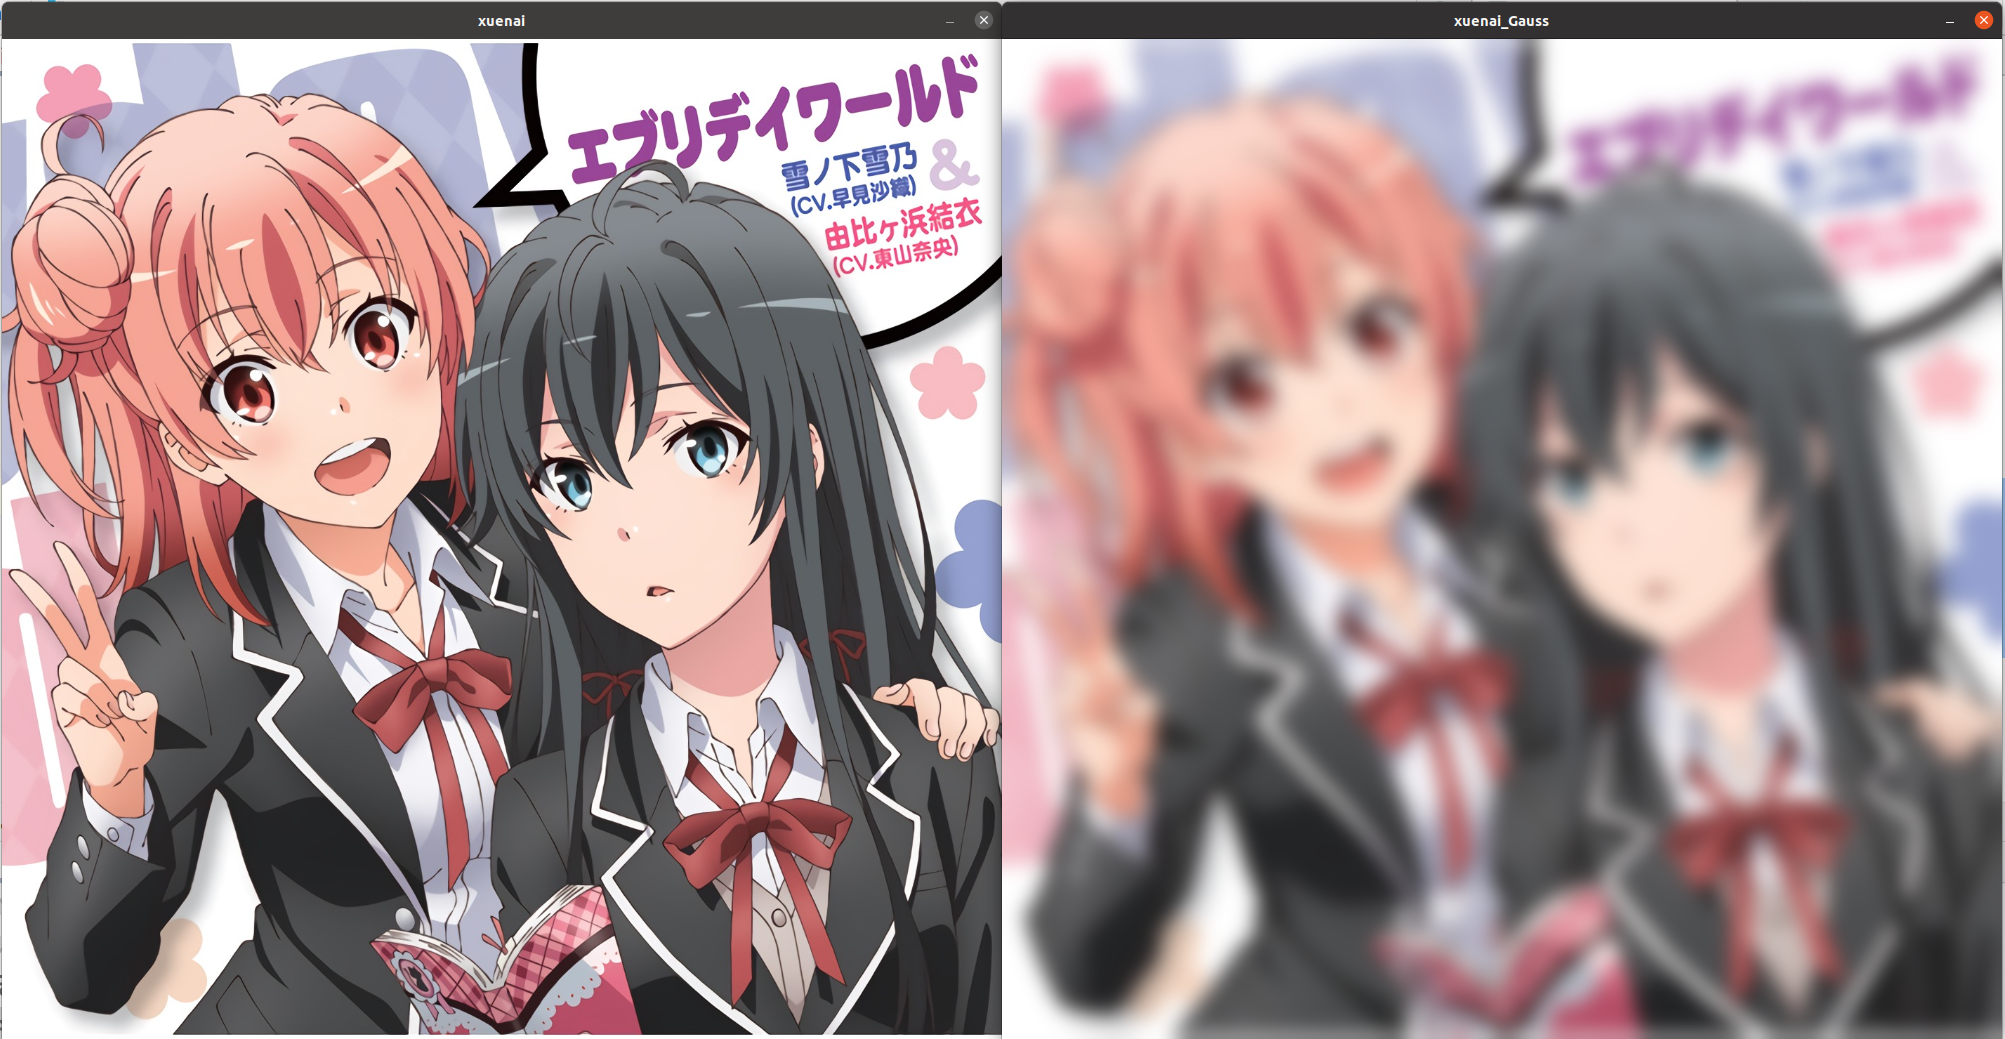
中值滤波
原理
取滤波器内的中值作为输出,可以很好的抑制椒盐噪声
API
CV_EXPORTS_W void medianBlur( InputArray src, OutputArray dst, int ksize );src(source):输入图片
dst(destination):输出图片
ksize(kernal size):卷积核边长,必须是正奇数
效果
    Mat xuenai = imread("xuenai.jpg");
    resize(xuenai,xuenai,Size(1000,1000));
    imshow("xuenai",xuenai);
    Mat xuenai_median(xuenai.size(),xuenai.type());
    medianBlur(xuenai,xuenai_median,5);
    imshow("xuenai_median",xuenai_median);
    waitKet();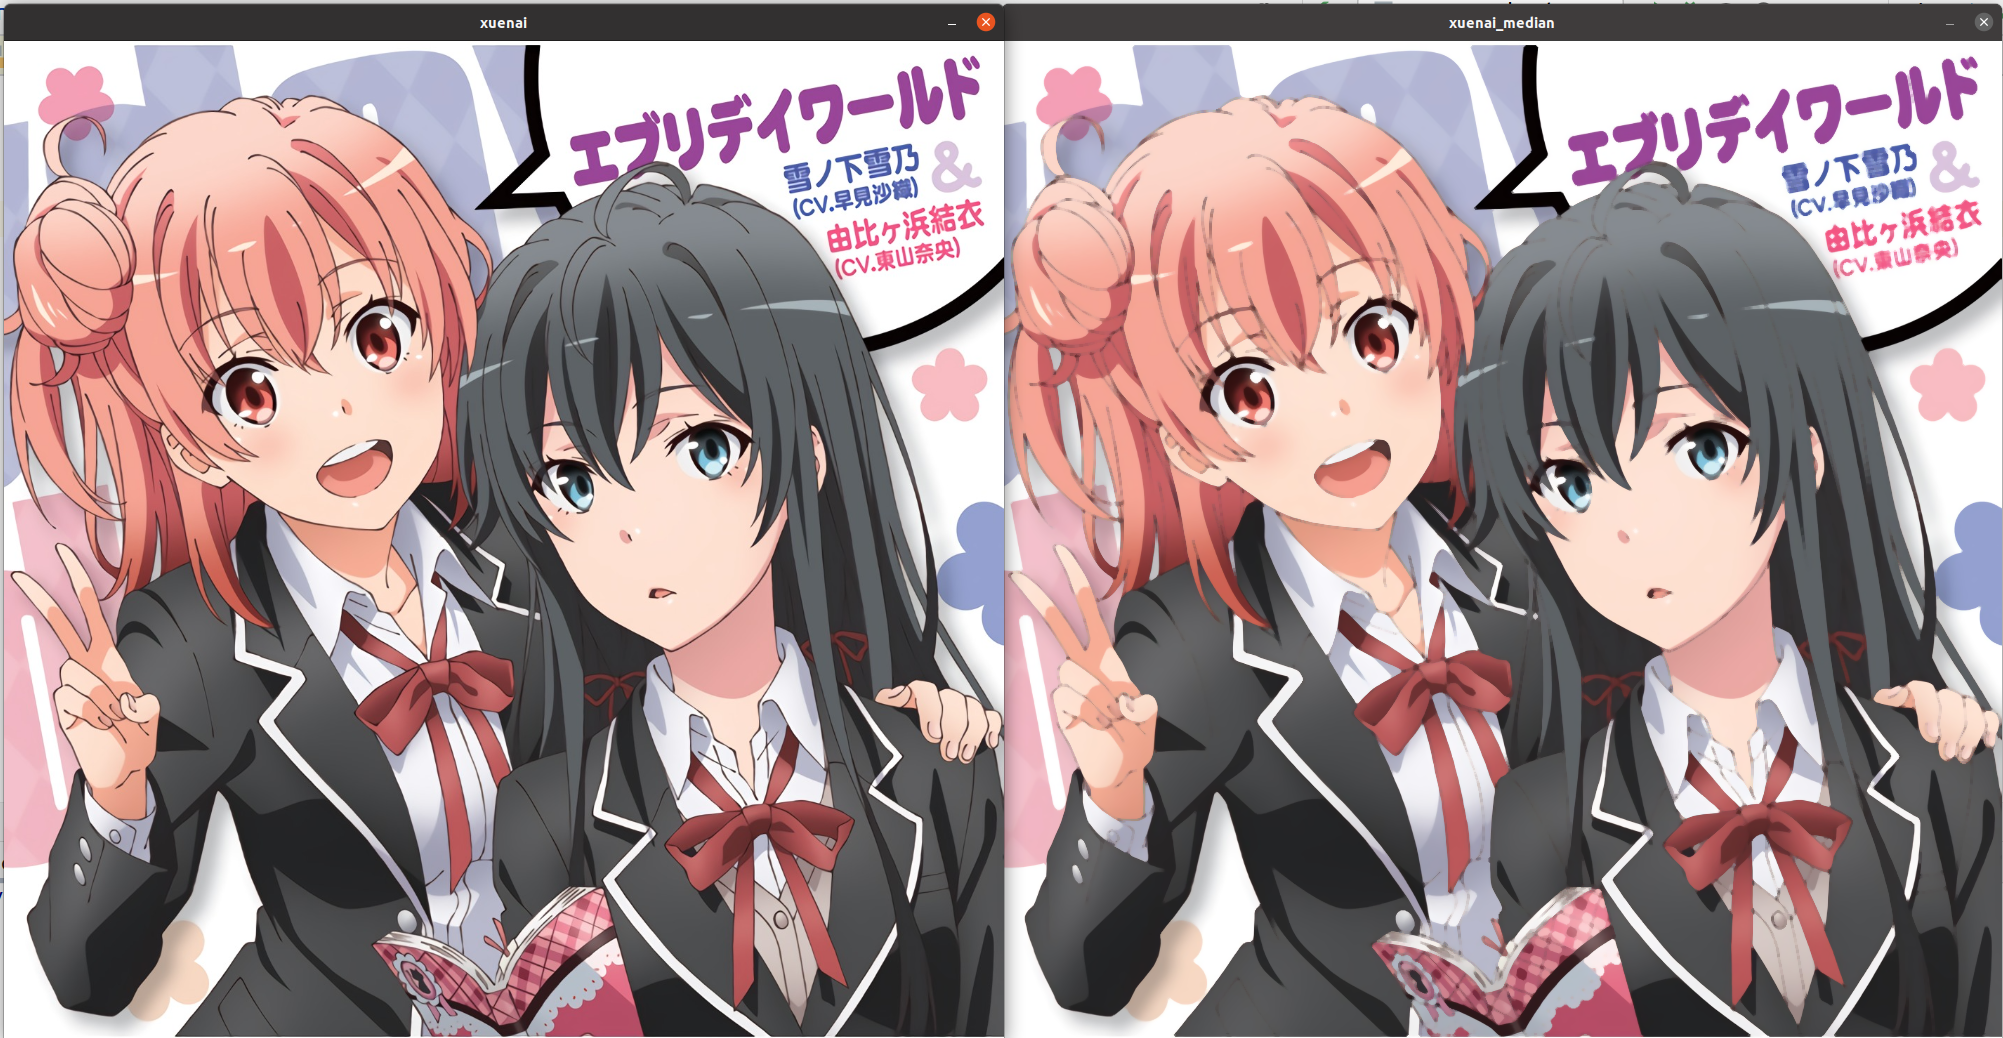
高斯双边滤波
原理
双边滤波器的好处是可以做边缘保存(edge preserving),一般用高斯滤波去降噪,会较明显地模糊边缘,对于高频细节的保护效果并不明显。双边滤波器顾名思义比高斯滤波多了一个高斯方差sigma-d,它是基于空间分布的高斯滤波函数,所以在边缘附近,离的较远的像素不会太多影响到边缘上的像素值,这样就保证了边缘附近像素值的保存。但是由于保存了过多的高频信息,对于彩色图像里的高频噪声,双边滤波器不能够干净的滤掉,只能够对于低频信息进行较好的滤波。
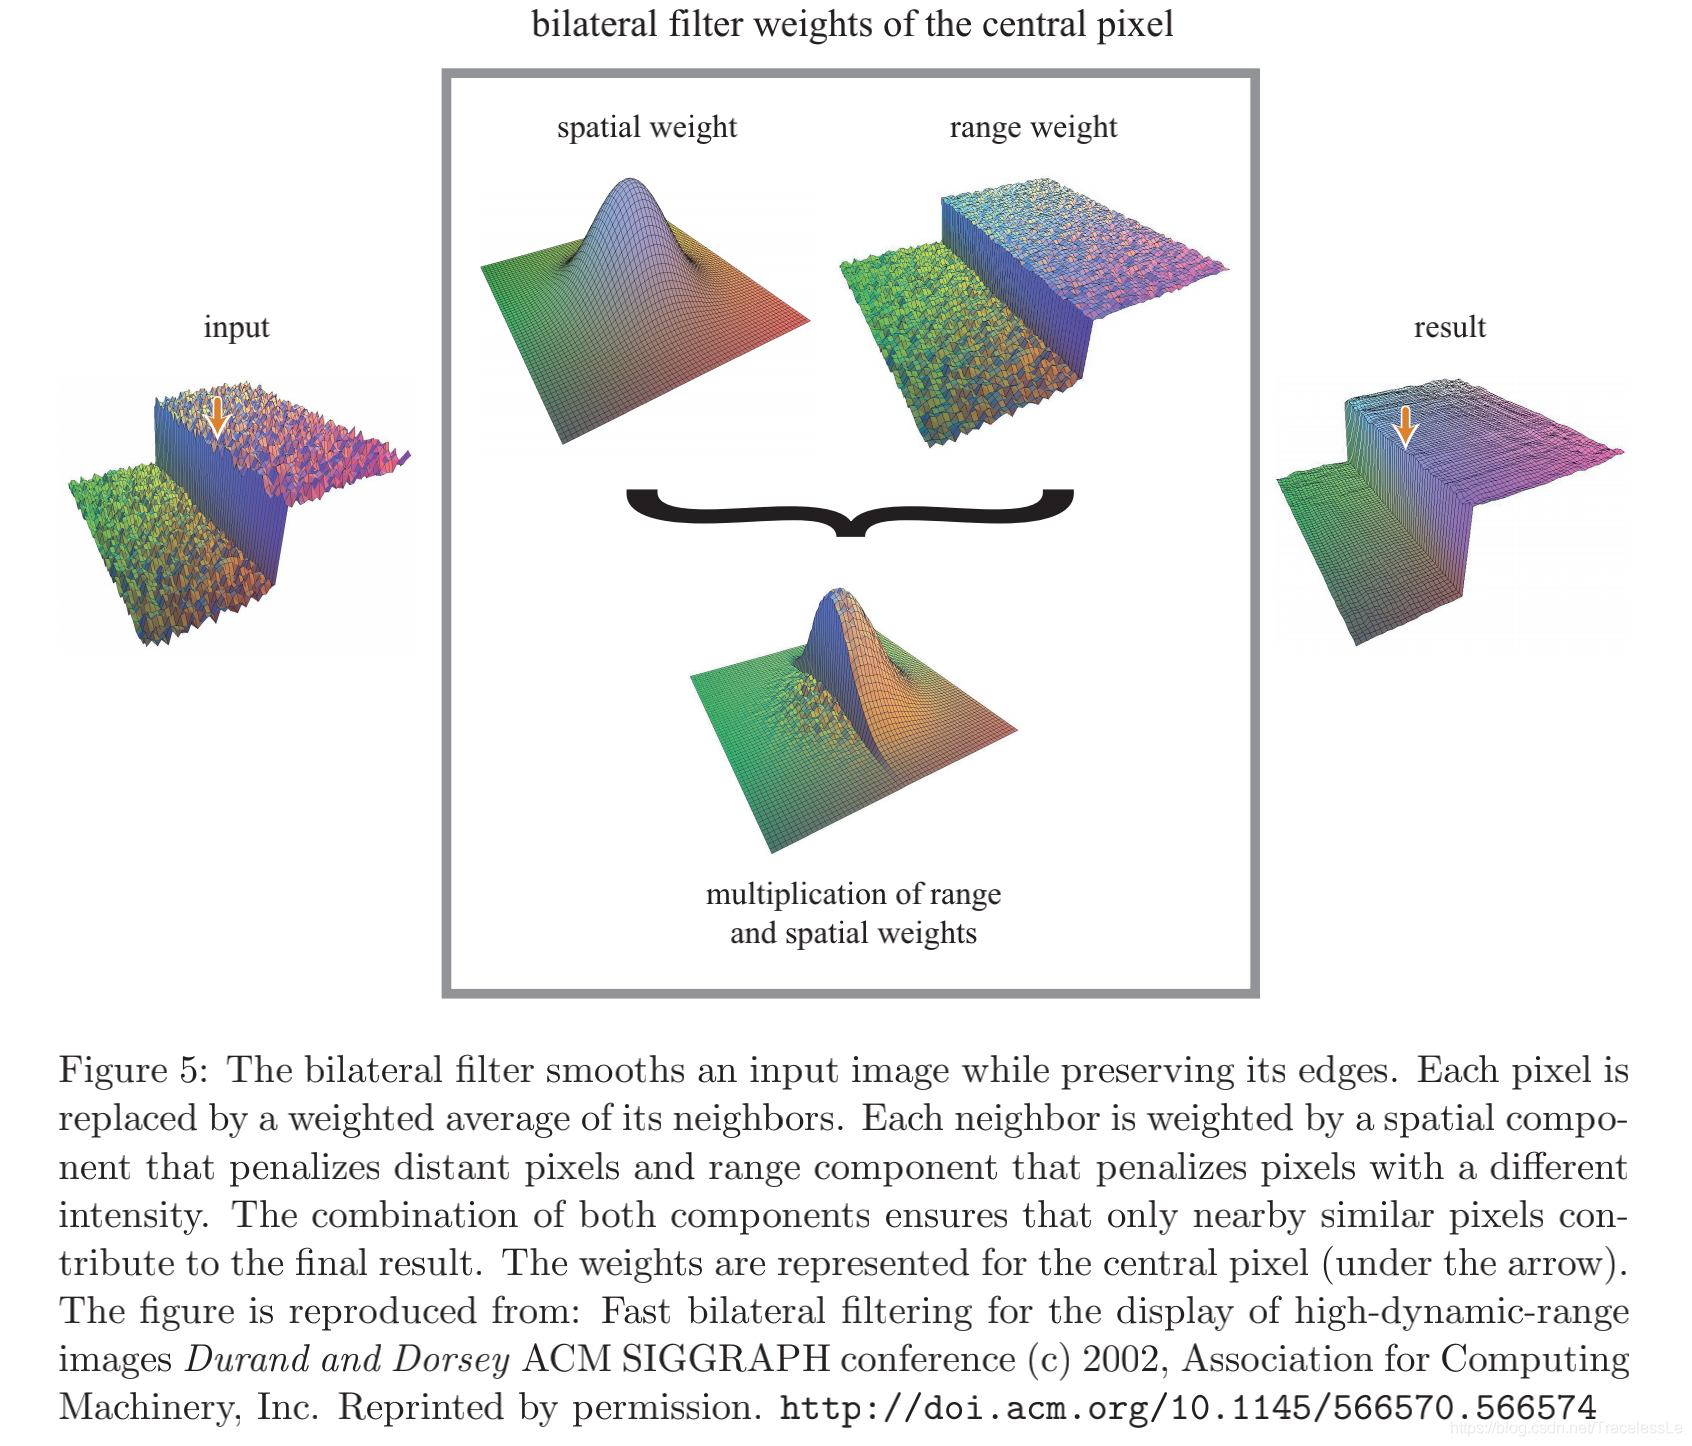
API
CV_EXPORTS_W void bilateralFilter( InputArray src, OutputArray dst, int d,
                                   double sigmaColor, double sigmaSpace,
                                   int borderType = BORDER_DEFAULT );
src(source):输入图片
dst(destination):输出图片
d:卷积核边长。如果这个值我们设其为非正数,那么OpenCV会从第五个参数sigmaSpace来计算出它来。
sigmaColor:颜色空间滤波器的sigma值。这个参数的值越大,就表明该像素邻域内有更宽广的颜色会被混合到一起,产生较大的半相等颜色区域。
sigmaSpace:坐标空间中滤波器的sigma值,坐标空间的标注方差。他的数值越大,意味着越远的像素会相互影响,从而使更大的区域足够相似的颜色获取相同的颜色。当d>0,卷积核大小已被指定且与sigmaSpace无关。否则,d正比于sigmaSpace。
borderType:边界填充方式,默认为黑边
效果
    Mat xuenai = imread("xuenai.jpg");
    resize(xuenai,xuenai,Size(1000,1000));
    imshow("xuenai",xuenai);
    Mat xuenai_bilateral(xuenai.size(),xuenai.type());
    bilateralFilter(xuenai,xuenai_bilateral,-1,100,10);
    imshow("xuenai_bilateral",xuenai_bilateral);
    waitKet();
获取用来形态学操作的滤波器
CV_EXPORTS_W Mat getStructuringElement(int shape, Size ksize, Point anchor = Point(-1,-1));
enum MorphShapes {
    MORPH_RECT    = 0, //!< a rectangular structuring element:  \f[E_{ij}=1\f]
    MORPH_CROSS   = 1, //!< a cross-shaped structuring element:
                       //!< \f[E_{ij} = \begin{cases} 1 & \texttt{if } {i=\texttt{anchor.y } {or } {j=\texttt{anchor.x}}} \\0 & \texttt{otherwise} \end{cases}\f]
    MORPH_ELLIPSE = 2 //!< an elliptic structuring element, that is, a filled ellipse inscribed
                      //!< into the rectangle Rect(0, 0, esize.width, 0.esize.height)
};
shape:滤波器形状
ksize(kernal size):滤波器大小
anchor:滤波器中心像素位置,取(-1,-1)表示几何中心
腐蚀和膨胀(一般对二值图)
原理
腐蚀:取滤波器内的最小值作为输出
膨胀:取滤波器内的最大值作为输出
腐蚀API
CV_EXPORTS_W void erode( InputArray src, OutputArray dst, InputArray kernel,
                         Point anchor = Point(-1,-1), int iterations = 1,
                         int borderType = BORDER_CONSTANT,
                         const Scalar& borderValue = morphologyDefaultBorderValue() );
src(source):输入图片
dst(destination):输出图片
kernal:滤波器矩阵
anchor:滤波器中心像素位置,取(-1,-1)表示几何中心
iterations:执行erode函数的次数,默认执行一次
borderType:边界填充方式
borderValue:填充边界的值
效果
    Mat xuenai = imread("xuenai.jpg");
    resize(xuenai,xuenai,Size(1000,1000));

    Mat xuenai_gray(xuenai.size(),xuenai.type());
    cvtColor(xuenai,xuenai_gray,COLOR_BGR2GRAY);
    Mat xuenai_threshold(xuenai.size(),xuenai.type());
    threshold(xuenai_gray,xuenai_threshold,100,255,THRESH_BINARY);
    imshow("xuenai_threshold",xuenai_threshold);

    Mat kernal=getStructuringElement(MORPH_RECT,Size(3,3));

    Mat xuenai_erode(xuenai.size(),xuenai.type());
    erode(xuenai_threshold,xuenai_erode,kernal);
    imshow("xuenai_erode",xuenai_erode);
    waitKet();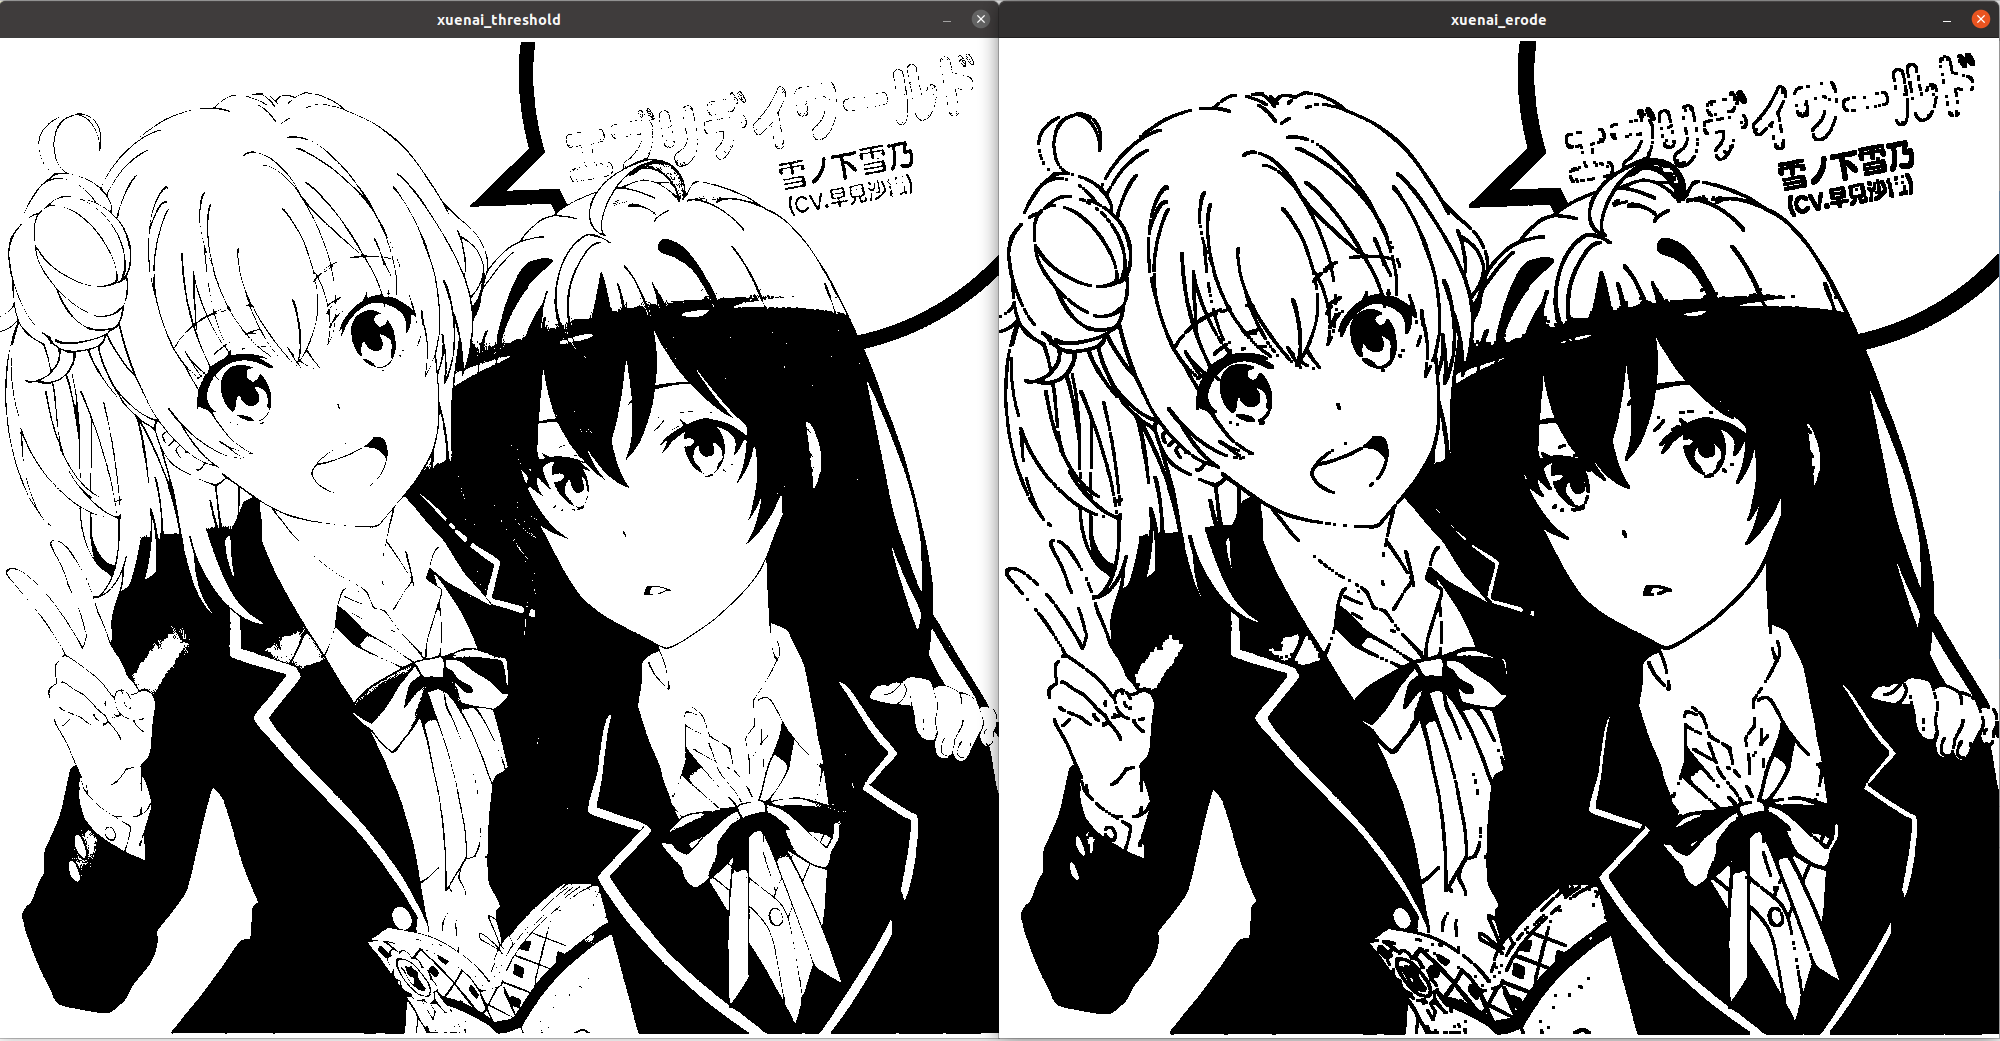
膨胀API
CV_EXPORTS_W void dilate( InputArray src, OutputArray dst, InputArray kernel,
                          Point anchor = Point(-1,-1), int iterations = 1,
                          int borderType = BORDER_CONSTANT,
                          const Scalar& borderValue = morphologyDefaultBorderValue() );
src(source):输入图片
dst(destination):输出图片
kernal:滤波器矩阵
anchor:滤波器中心像素位置,取(-1,-1)表示几何中心
iterations:执行erode函数的次数
borderType:边界填充方式
borderValue:填充边界的值
效果
    Mat xuenai = imread("xuenai.jpg");
    resize(xuenai,xuenai,Size(1000,1000));

    Mat xuenai_gray(xuenai.size(),xuenai.type());
    cvtColor(xuenai,xuenai_gray,COLOR_BGR2GRAY);
    Mat xuenai_threshold(xuenai.size(),xuenai.type());
    threshold(xuenai_gray,xuenai_threshold,100,255,THRESH_BINARY);
    imshow("xuenai_threshold",xuenai_threshold);

    Mat kernal=getStructuringElement(MORPH_RECT,Size(3,3));

    Mat xuenai_dilate(xuenai.size(),xuenai.type());
    dilate(xuenai_threshold,xuenai_dilate,kernal);
    imshow("xuenai_dilate",xuenai_dilate);
    waitKet();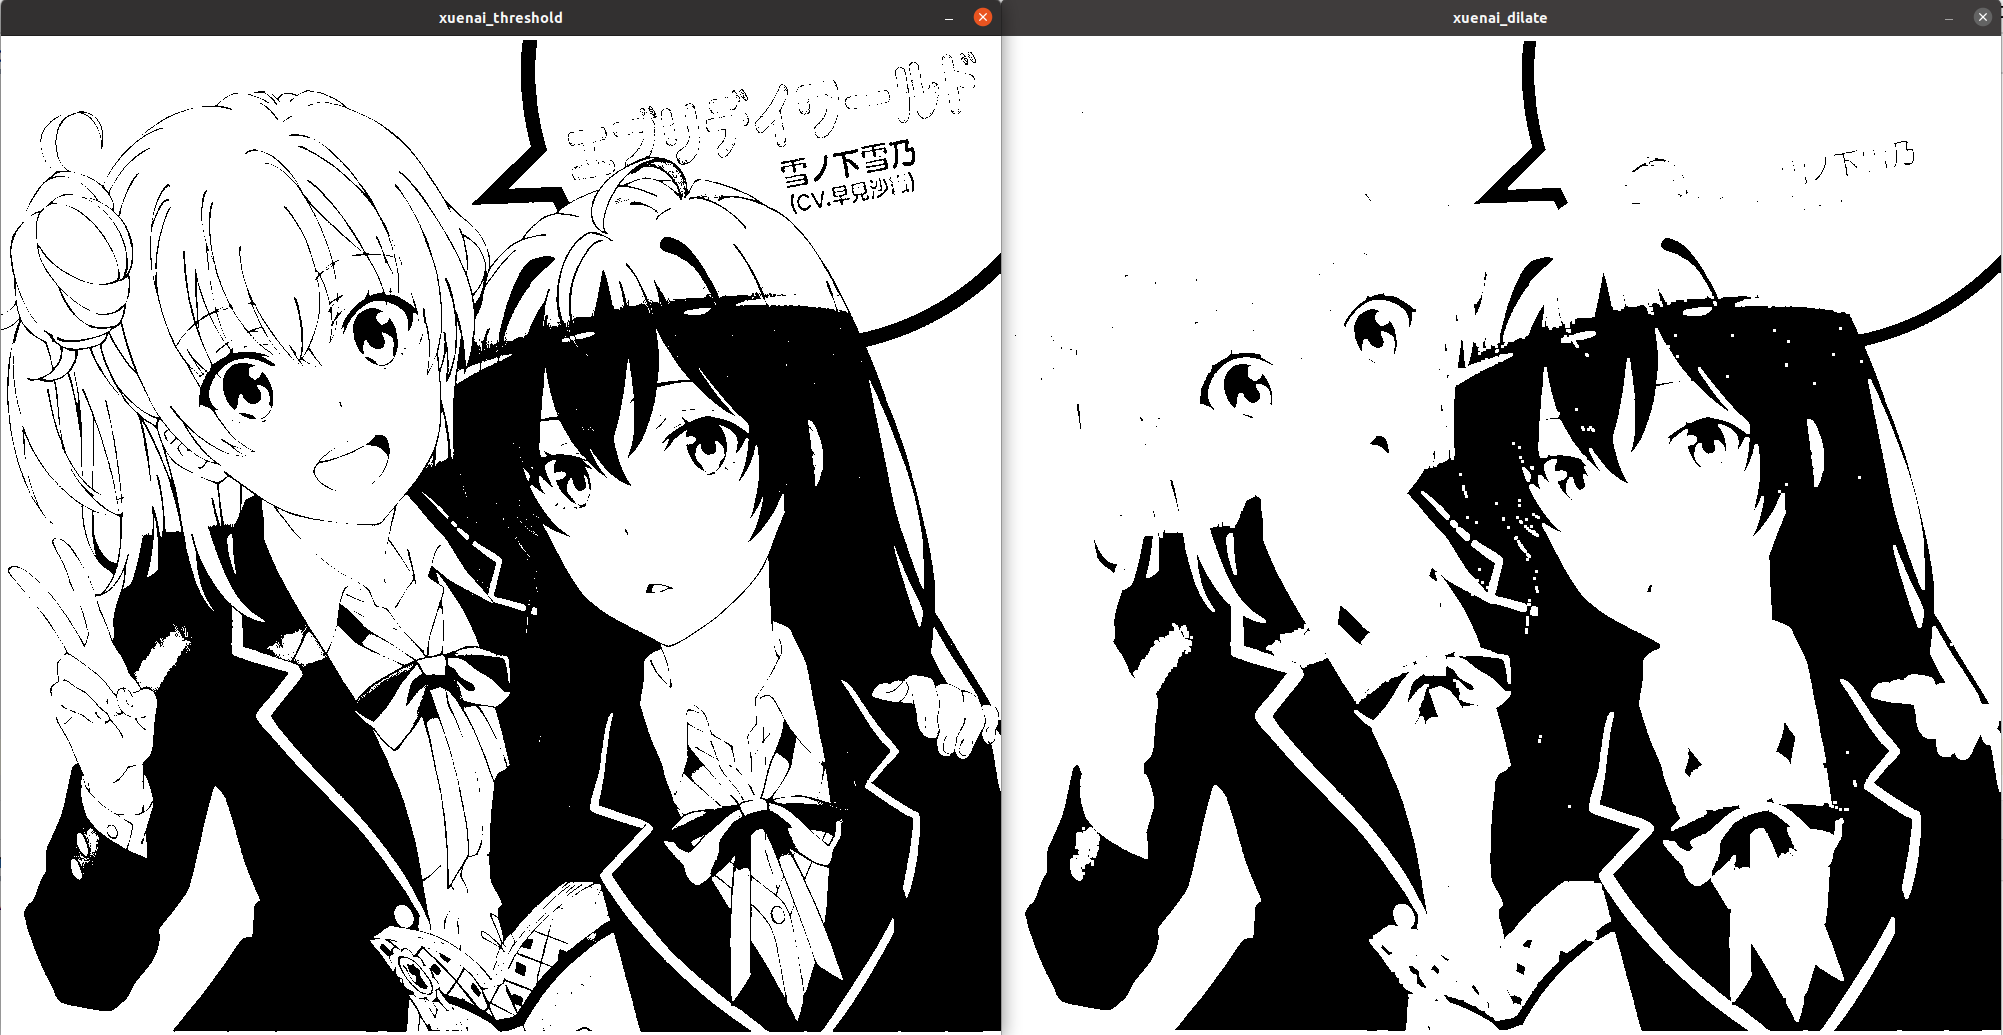
形态学操作(一般对二值图)
API
CV_EXPORTS_W void morphologyEx( InputArray src, OutputArray dst,
                                int op, InputArray kernel,
                                Point anchor = Point(-1,-1), int iterations = 1,
                                int borderType = BORDER_CONSTANT,
                                const Scalar& borderValue = morphologyDefaultBorderValue() );
src(source):输入图片
dst(destination):输出图片
op:变换类型
kernal:滤波器矩阵
anchor:滤波器中心像素位置,取(-1,-1)表示几何中心
iterations:执行erode函数的次数
borderType:边界填充方式
borderValue:填充边界的值
变换类型
enum MorphTypes{
    MORPH_ERODE    = 0, //腐蚀

    MORPH_DILATE   = 1, //膨胀

    MORPH_OPEN     = 2, //开

    MORPH_CLOSE    = 3, //闭

    MORPH_GRADIENT = 4, //形态学梯度

    MORPH_TOPHAT   = 5, //顶帽

    MORPH_BLACKHAT = 6, //黑帽

    MORPH_HITMISS  = 7  //击中击不中变换

};
开
原理
对输入图片先进行腐蚀,然后进行膨胀。可以用来屏蔽与滤波器大小相当的亮部。
效果
    Mat xuenai = imread("xuenai.jpg");
    resize(xuenai,xuenai,Size(1000,1000));

    Mat xuenai_gray(xuenai.size(),xuenai.type());
    cvtColor(xuenai,xuenai_gray,COLOR_BGR2GRAY);
    Mat xuenai_threshold(xuenai.size(),xuenai.type());
    threshold(xuenai_gray,xuenai_threshold,100,255,THRESH_BINARY);
    imshow("xuenai_threshold",xuenai_threshold);

    Mat kernal=getStructuringElement(MORPH_RECT,Size(3,3));

    Mat xuenai_morphology(xuenai.size(),xuenai.type());
    morphologyEx(xuenai_threshold,xuenai_morphology,MORPH_OPEN,kernal);
    imshow("xuenai_morphology",xuenai_morphology);
    waitKet();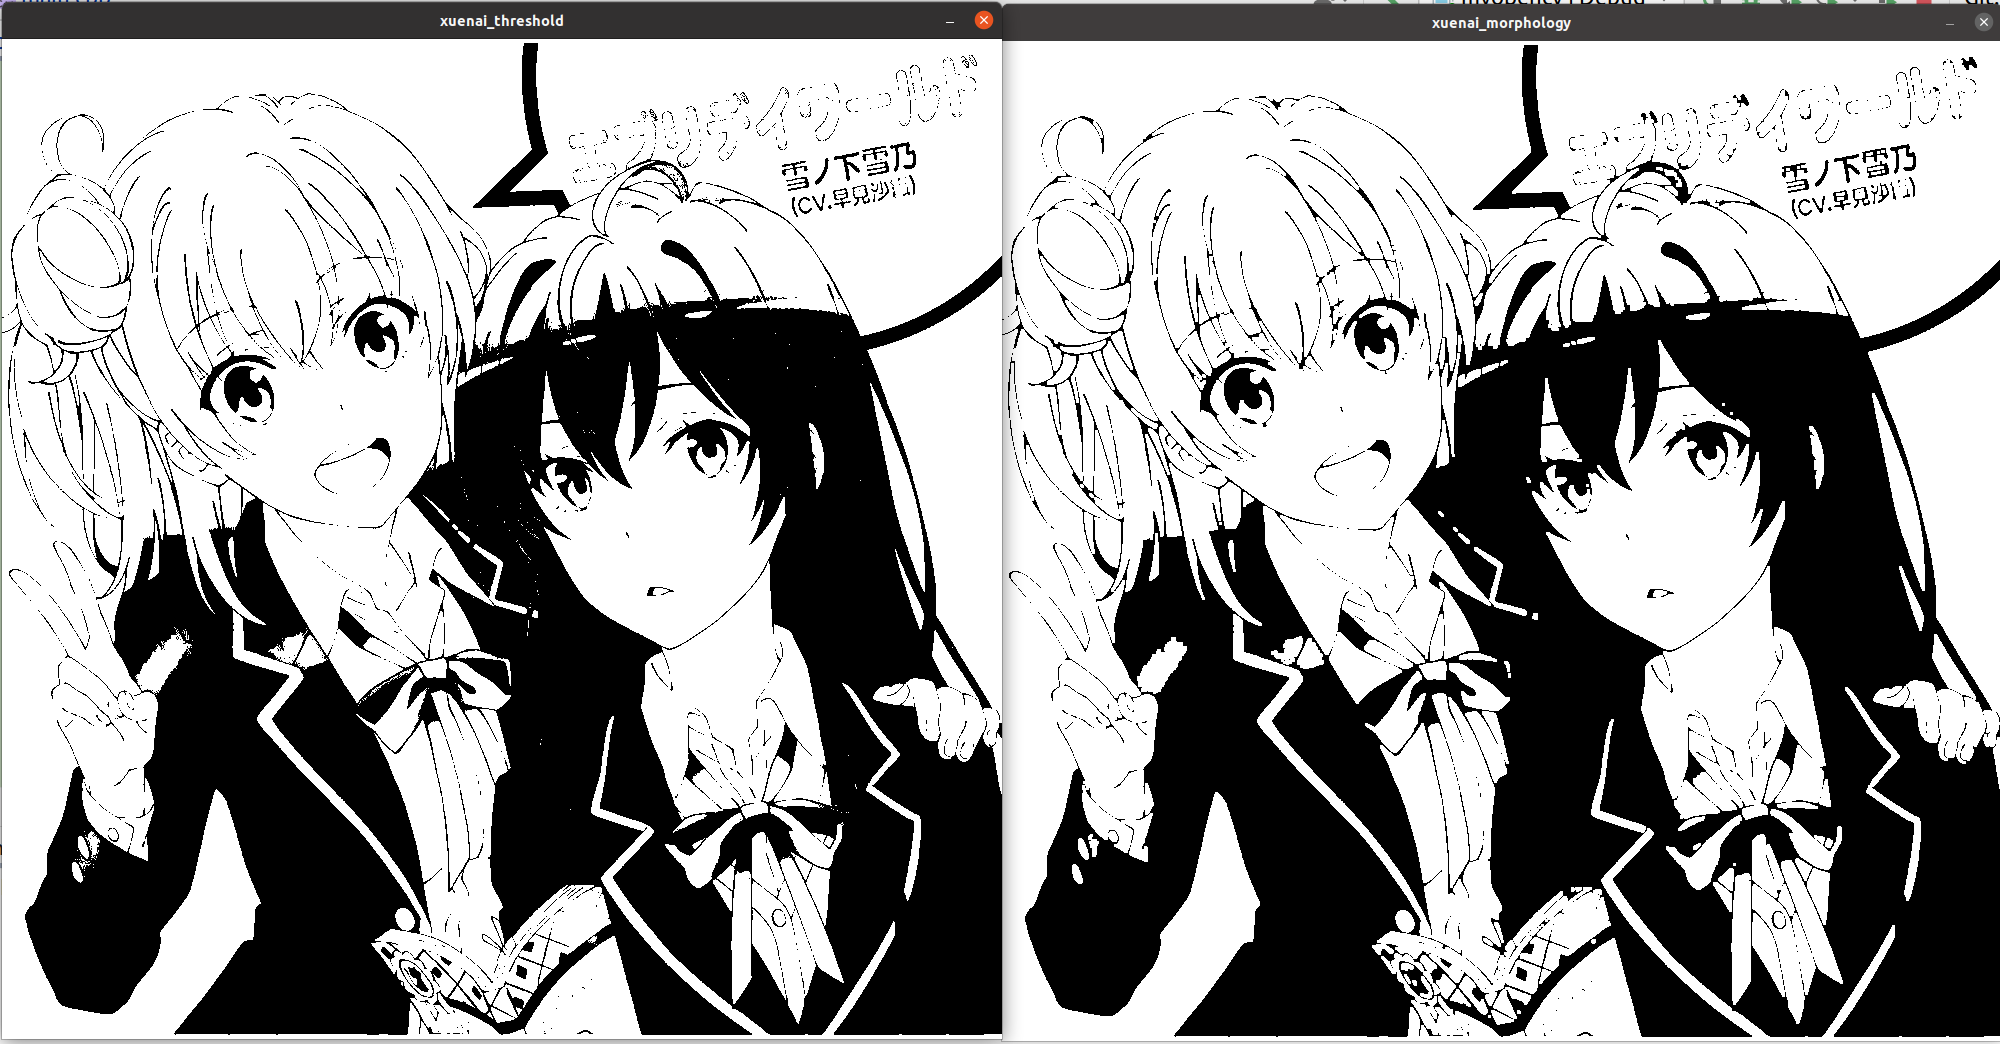
闭
原理
对输入图片先进行膨胀,然后进行腐蚀。可以用来屏蔽与滤波器大小相当的暗部。
效果
    Mat xuenai = imread("xuenai.jpg");
    resize(xuenai,xuenai,Size(1000,1000));

    Mat xuenai_gray(xuenai.size(),xuenai.type());
    cvtColor(xuenai,xuenai_gray,COLOR_BGR2GRAY);
    Mat xuenai_threshold(xuenai.size(),xuenai.type());
    threshold(xuenai_gray,xuenai_threshold,100,255,THRESH_BINARY);
    imshow("xuenai_threshold",xuenai_threshold);

    Mat kernal=getStructuringElement(MORPH_RECT,Size(3,3));

    Mat xuenai_morphology(xuenai.size(),xuenai.type());
    morphologyEx(xuenai_threshold,xuenai_morphology,MORPH_CLOSE,kernal);
    imshow("xuenai_morphology",xuenai_morphology);
    waitKet();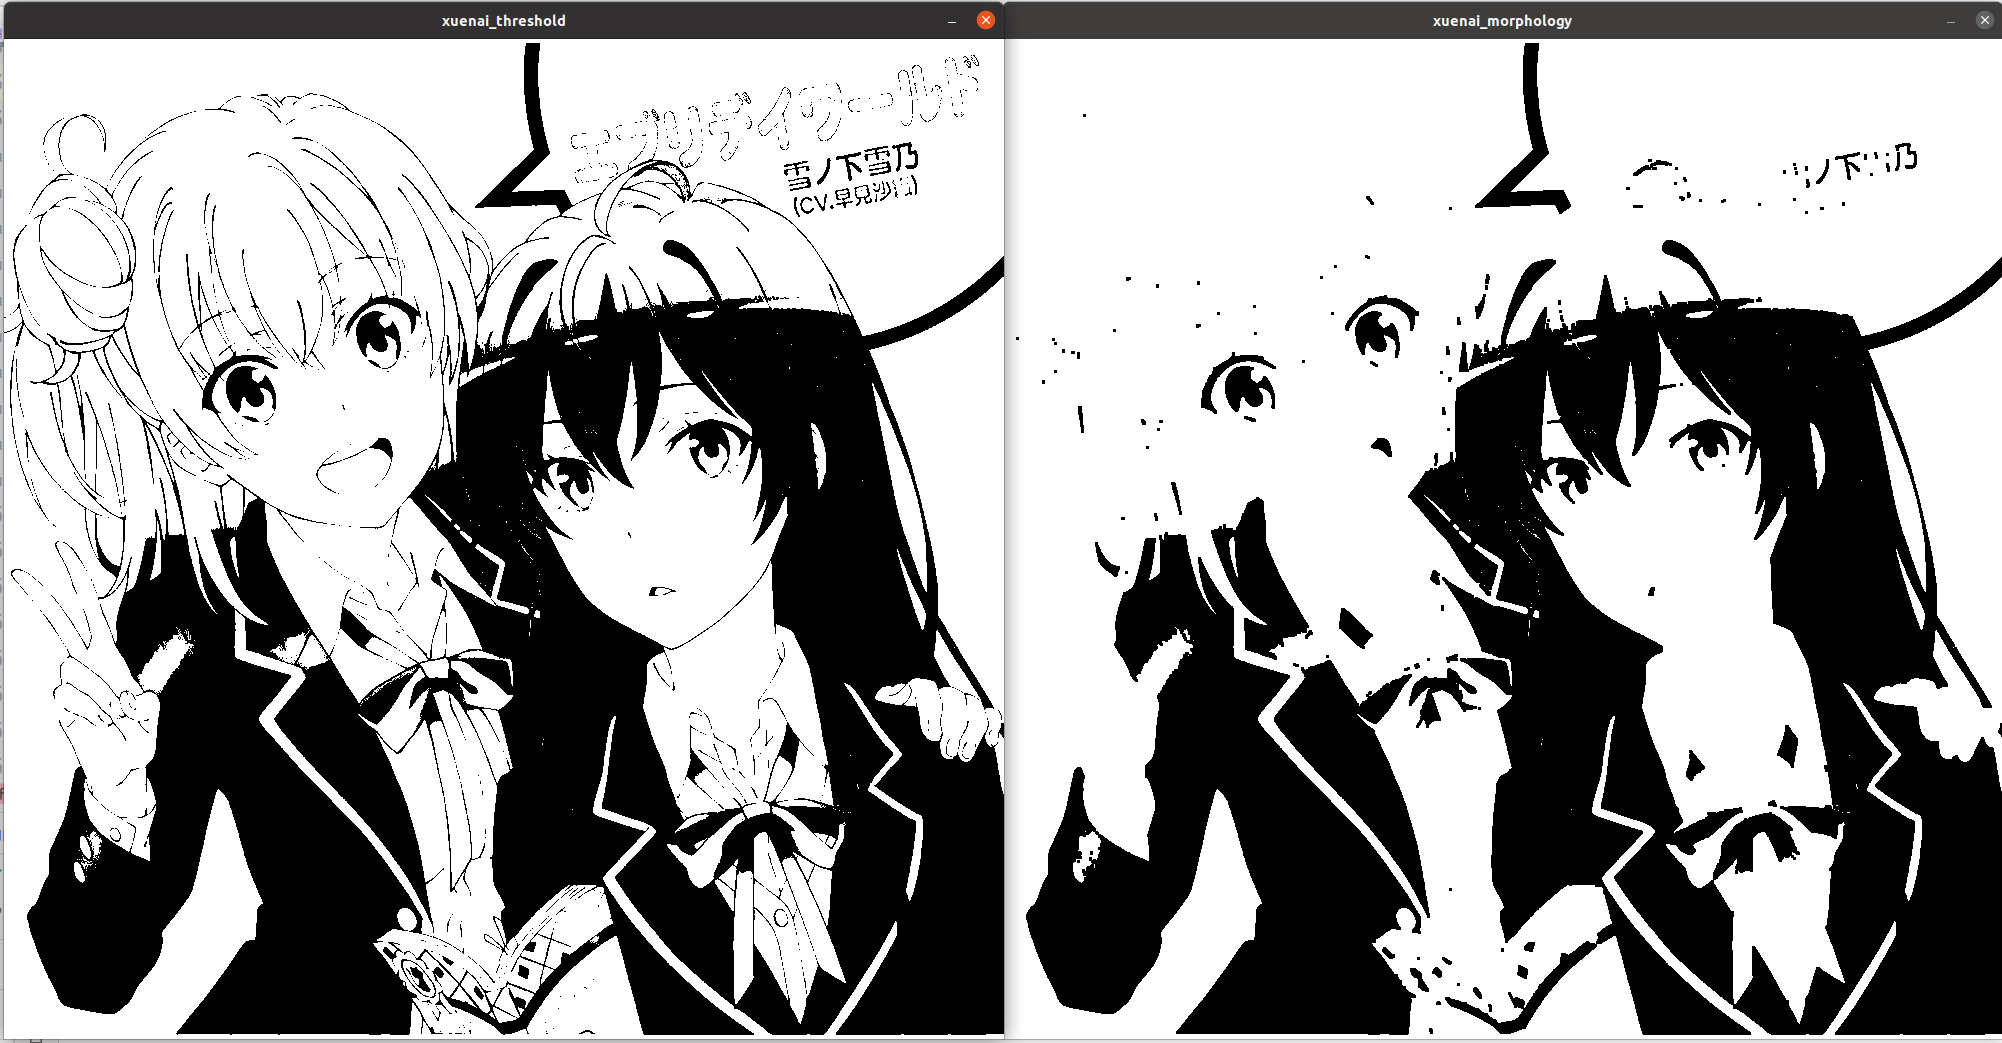
顶帽
原理
对输入图片先进行开操作,然后原图-开操作图。可以用来提取与滤波器大小相当的亮部。
效果
    Mat xuenai = imread("xuenai.jpg");
    resize(xuenai,xuenai,Size(1000,1000));

    Mat xuenai_gray(xuenai.size(),xuenai.type());
    cvtColor(xuenai,xuenai_gray,COLOR_BGR2GRAY);
    Mat xuenai_threshold(xuenai.size(),xuenai.type());
    threshold(xuenai_gray,xuenai_threshold,100,255,THRESH_BINARY);
    imshow("xuenai_threshold",xuenai_threshold);

    Mat kernal=getStructuringElement(MORPH_RECT,Size(3,3));

    Mat xuenai_morphology(xuenai.size(),xuenai.type());
    morphologyEx(xuenai_threshold,xuenai_morphology,MORPH_TOPHAT,kernal);
    imshow("xuenai_morphology",xuenai_morphology);
    waitKet();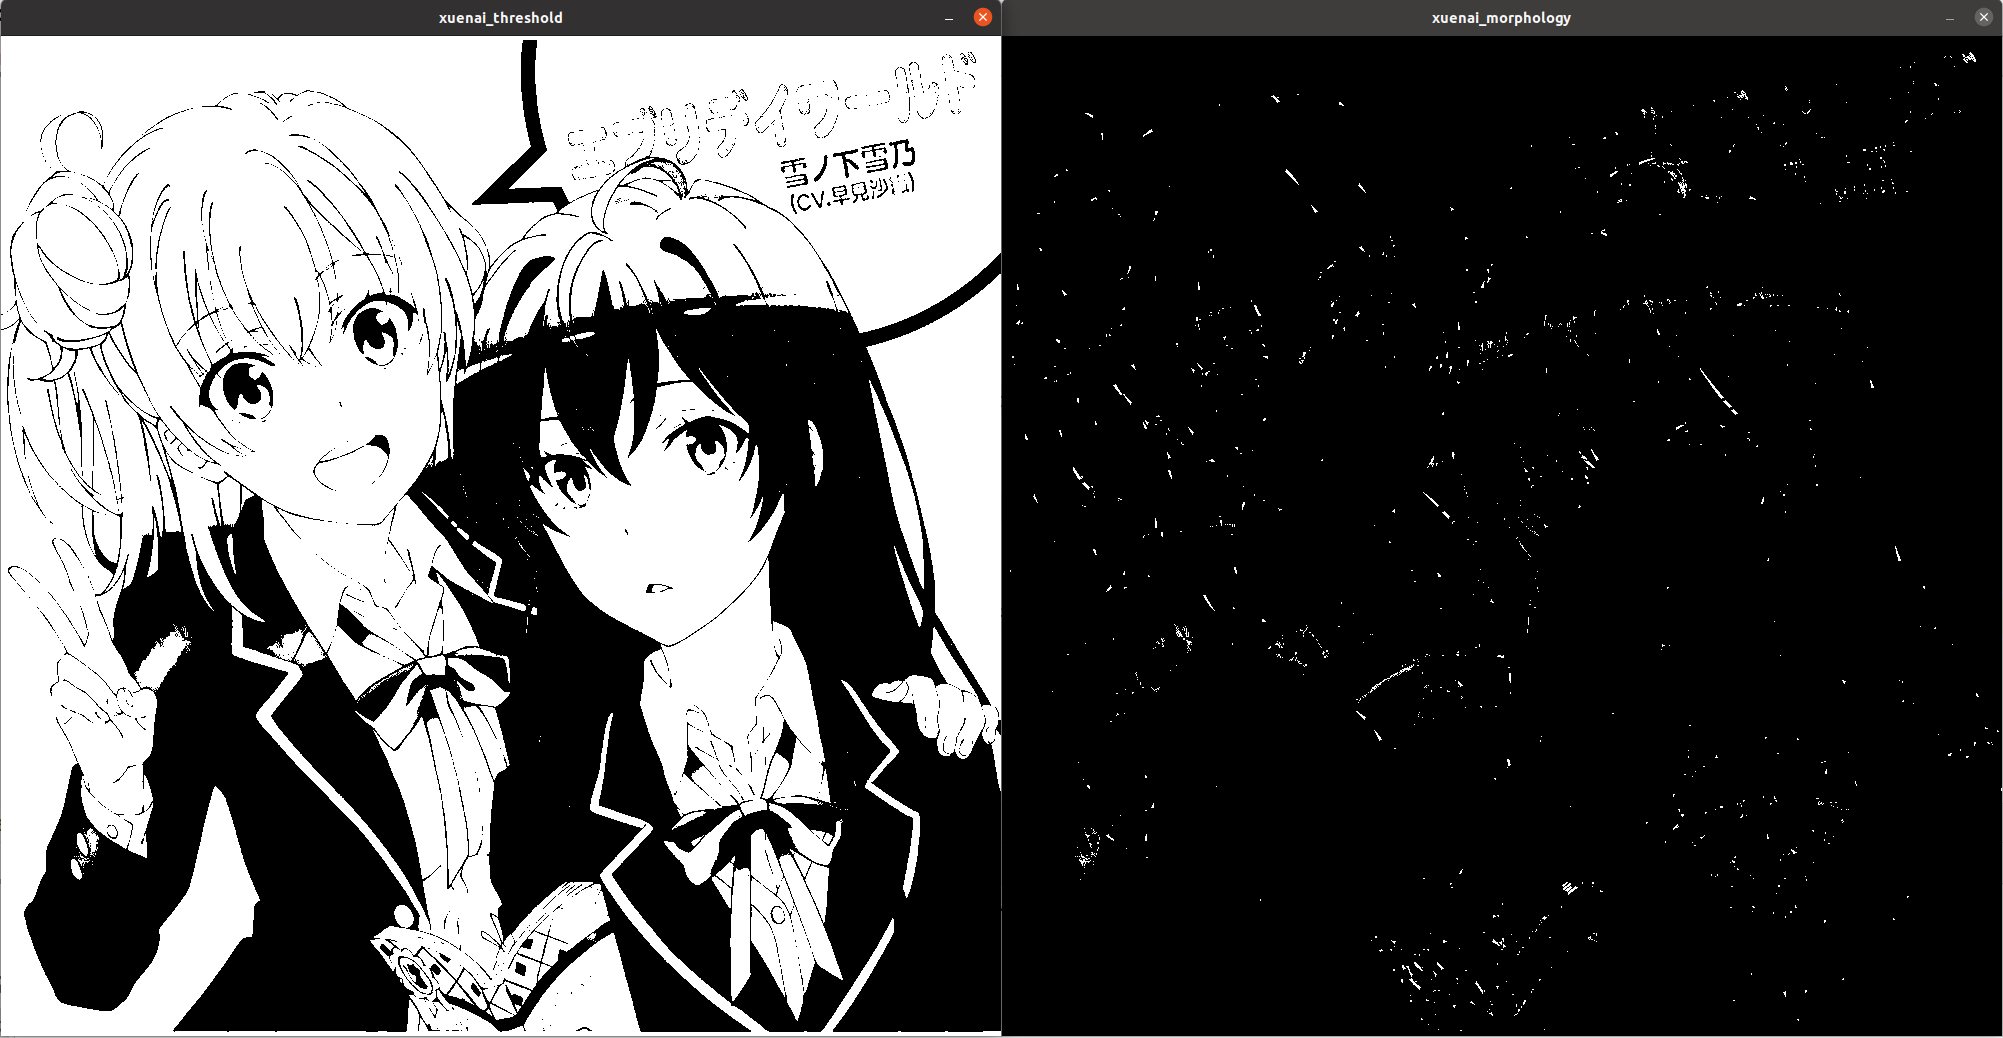
黑帽
原理
对输入图片先进行闭操作,然后闭操作图-原图。可以用来提取与滤波器大小相当的暗部。
效果
    Mat xuenai = imread("xuenai.jpg");
    resize(xuenai,xuenai,Size(1000,1000));

    Mat xuenai_gray(xuenai.size(),xuenai.type());
    cvtColor(xuenai,xuenai_gray,COLOR_BGR2GRAY);
    Mat xuenai_threshold(xuenai.size(),xuenai.type());
    threshold(xuenai_gray,xuenai_threshold,100,255,THRESH_BINARY);
    imshow("xuenai_threshold",xuenai_threshold);

    Mat kernal=getStructuringElement(MORPH_RECT,Size(3,3));

    Mat xuenai_morphology(xuenai.size(),xuenai.type());
    morphologyEx(xuenai_threshold,xuenai_morphology,MORPH_BLACKHAT,kernal);
    imshow("xuenai_morphology",xuenai_morphology);
    waitKet();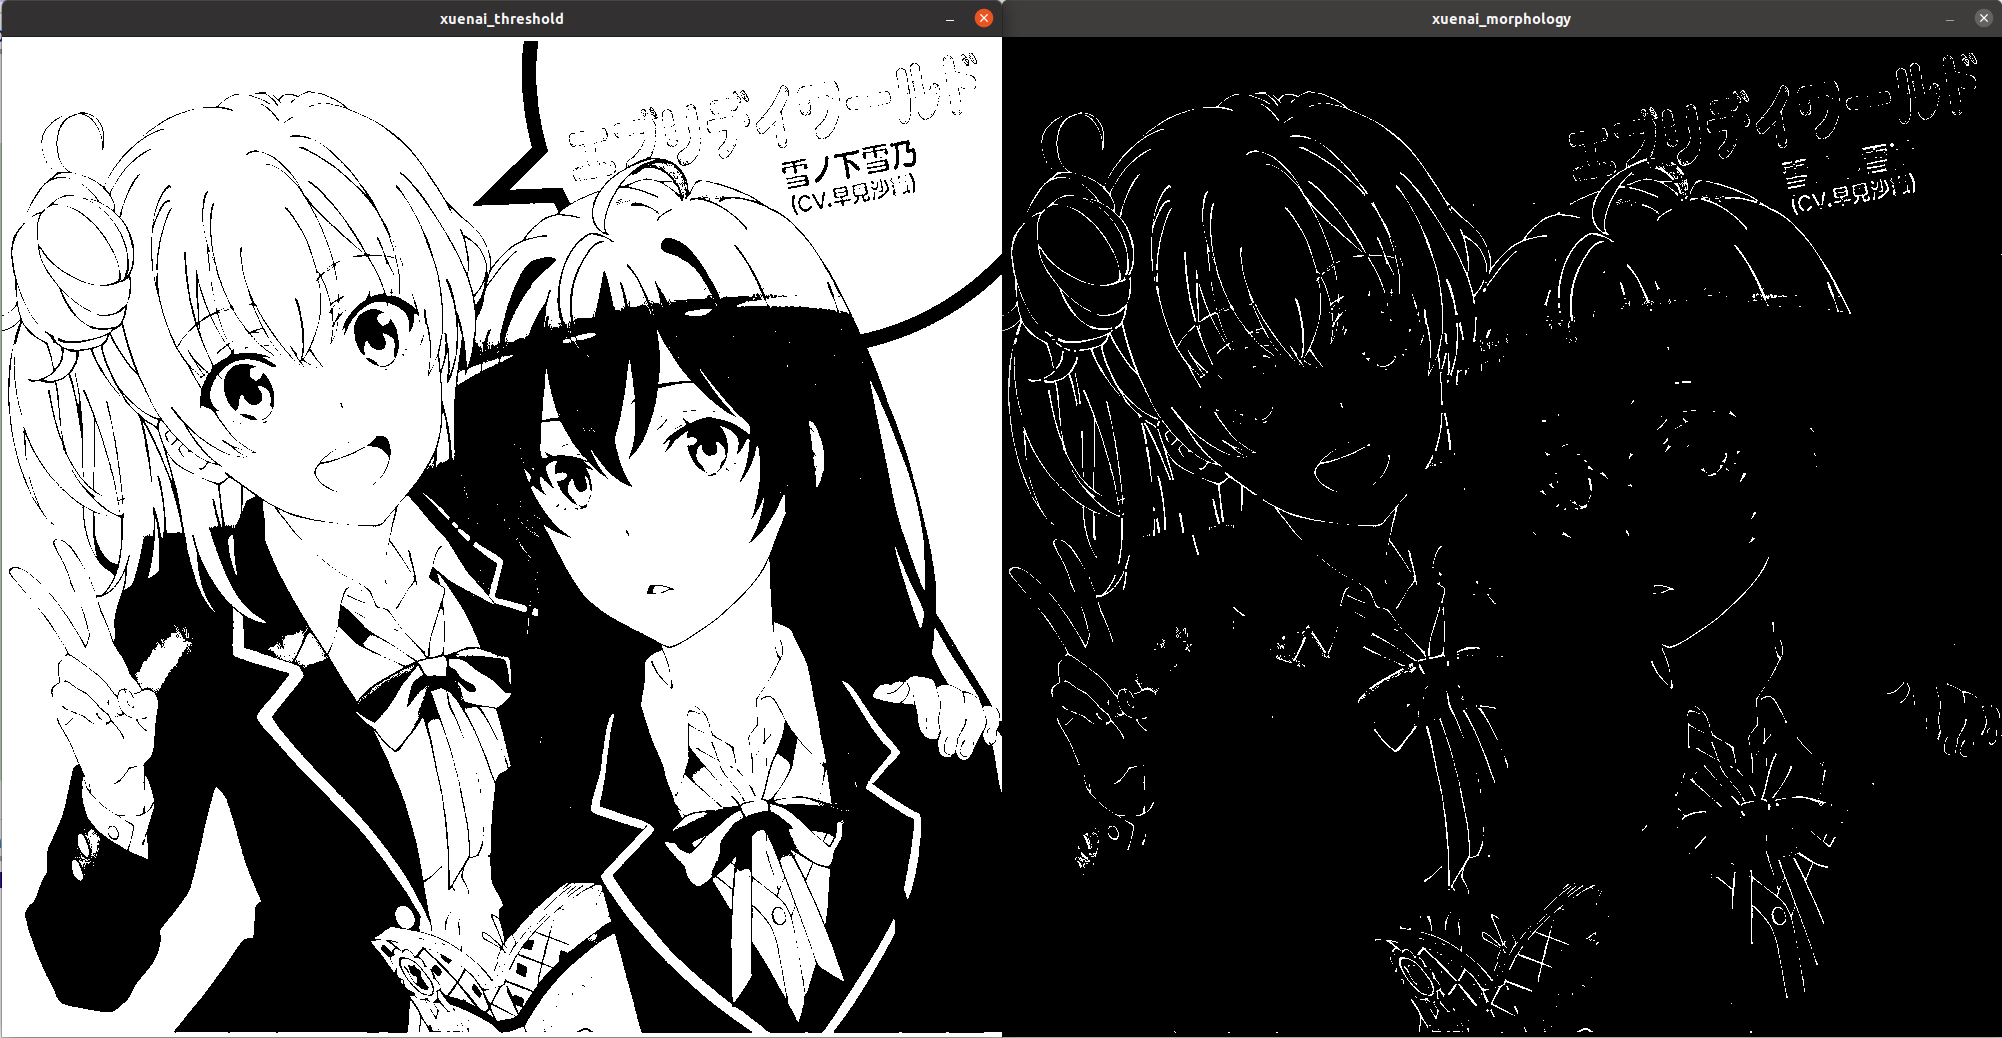
形态学梯度
原理
膨胀图与腐蚀图之差。可以用来提取边界轮廓,但提取效果比不上专业的边缘检测算法。
效果
    Mat xuenai = imread("xuenai.jpg");
    resize(xuenai,xuenai,Size(1000,1000));

    Mat xuenai_gray(xuenai.size(),xuenai.type());
    cvtColor(xuenai,xuenai_gray,COLOR_BGR2GRAY);
    Mat xuenai_threshold(xuenai.size(),xuenai.type());
    threshold(xuenai_gray,xuenai_threshold,100,255,THRESH_BINARY);
    imshow("xuenai_threshold",xuenai_threshold);

    Mat kernal=getStructuringElement(MORPH_RECT,Size(3,3));

    Mat xuenai_morphology(xuenai.size(),xuenai.type());
    morphologyEx(xuenai_threshold,xuenai_morphology,MORPH_GRADIENT,kernal);
    imshow("xuenai_morphology",xuenai_morphology);
    waitKet();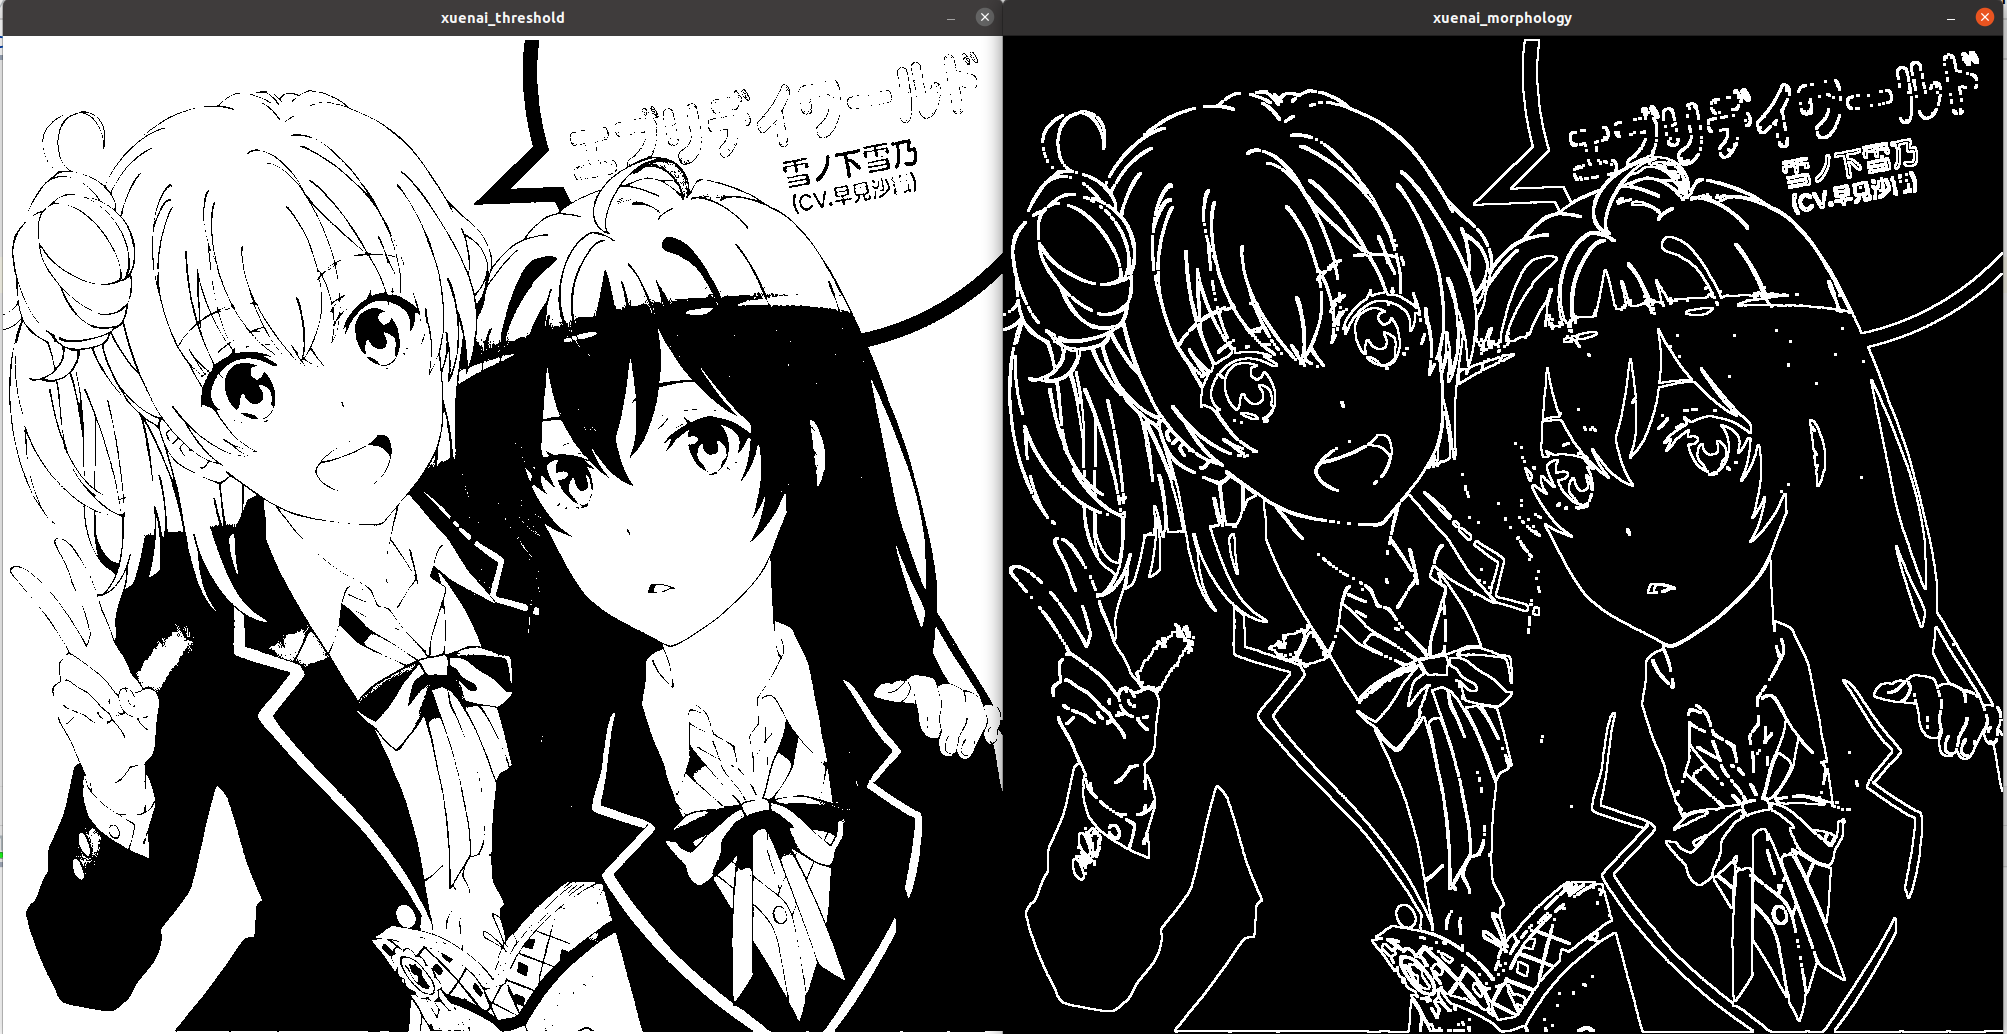
击中击不中变换
原理
击中击不中变换由下面三步构成:
用结构元素B1来腐蚀输入图像
用结构元素B2来腐蚀输入图像的补集
前两步结果的与运算
结构元素B1和B2可以结合为一个元素B。例如:
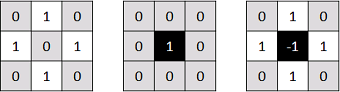
结构元素:左B1(击中元素),中B2(击不中元素),右B(两者结合)
本例中,我们寻找这样一种结构模式,中间像素属于背景,其上下左右属于前景,其余领域像素忽略不计(背景为黑色,前景为白色)。然后用上面的核在输入图像中找这种结构。从下面的输出图像中可以看到,输入图像中只有一个位置满足要求。
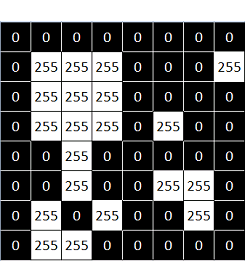
输入二值图像
输出二值图像
选择合适的边缘检测输出图像的深度
参照以下表格
|
int sdepth |
int ddepth |
|
CV_8U |
CV_16S/CV_32F/CV_64F |
|
CV_16U/CV_16S |
CV_32F/CV_64F |
|
CV_32F |
CV_32F/CV_64F |
|
CV_64F |
CV_64F |
convertScaleAbs恢复深度为CV_8U
CV_EXPORTS_W void convertScaleAbs(InputArray src, OutputArray dst,
                                  double alpha = 1, double beta = 0);
src(source):输入图片
dst(destination):输出图片
sobel
卷积核形状(ksize=3)
Mat kernalX=Mat_<int>(Size(3,3))<<(-1,0,1
                                    -2,0,2
                                    -1,0,1);
Mat kernalY=Mat_<int>(Size(3,3))<<(-1,-2,1
                                     0,0,0
                                     1,2,1);
API
CV_EXPORTS_W void Sobel( InputArray src, OutputArray dst, int ddepth,
                         int dx, int dy, int ksize = 3,
                         double scale = 1, double delta = 0,
                         int borderType = BORDER_DEFAULT );
src(source):输入图片
dst(destination):输出图片
ddepth(destination depth):输出图片的深度(CV_16F)
dx:x方向导数的阶数,一般取1
dy:y方向导数的阶数,一般取1
ksize:卷积核边长,默认为3
scale:生成图与原图的缩放比例,默认为1
delta:额外的增量,默认为0
borderType:边界填充方式,默认为黑边
流程
-
用cvtColor函数转灰度图
-
在x,y方向上分别各调用一次Sobel
-
用convertScaleAbs函数转换到原格式,否则无法显示
-
用addWeighted函数把两张输出图片加在一起
同时在x,y方向上调用Sobel和分开调用的效果对比
Mat xuenai = imread("xuenai.jpg");
resize(xuenai,xuenai,Size(1000,1000));
imshow("xuenai", xuenai);

//转灰度图
Mat xuenai_gray(xuenai.size(),xuenai.type());
cvtColor(xuenai,xuenai_gray,COLOR_BGR2GRAY);

//同时在x,y方向上调用Sobel
Mat xuenai_sobel1(xuenai.size(),xuenai.type());
Sobel(xuenai_gray,xuenai_sobel1,CV_16S,1,1,3);
convertScaleAbs(xuenai_sobel1,xuenai_sobel1);
imshow("xuenai_sobel1",xuenai_sobel1);

//在x,y方向上分别各调用一次Sobel
Mat xuenai_xsobel(xuenai.size(),xuenai.type());Mat xuenai_ysobel(xuenai.size(),xuenai.type());Mat xuenai_sobel2(xuenai.size(),xuenai.type());
Sobel(xuenai_gray,xuenai_xsobel,CV_16S,1,0,3);
convertScaleAbs(xuenai_xsobel,xuenai_xsobel);
Sobel(xuenai_gray,xuenai_ysobel,CV_16S,0,1,3);
convertScaleAbs(xuenai_ysobel,xuenai_ysobel);
addWeighted(xuenai_xsobel,0.5,xuenai_ysobel,0.5,0,xuenai_sobel2);
convertScaleAbs(xuenai_sobel2,xuenai_sobel2);
imshow("xuenai_sobel2",xuenai_sobel2);
waitKey();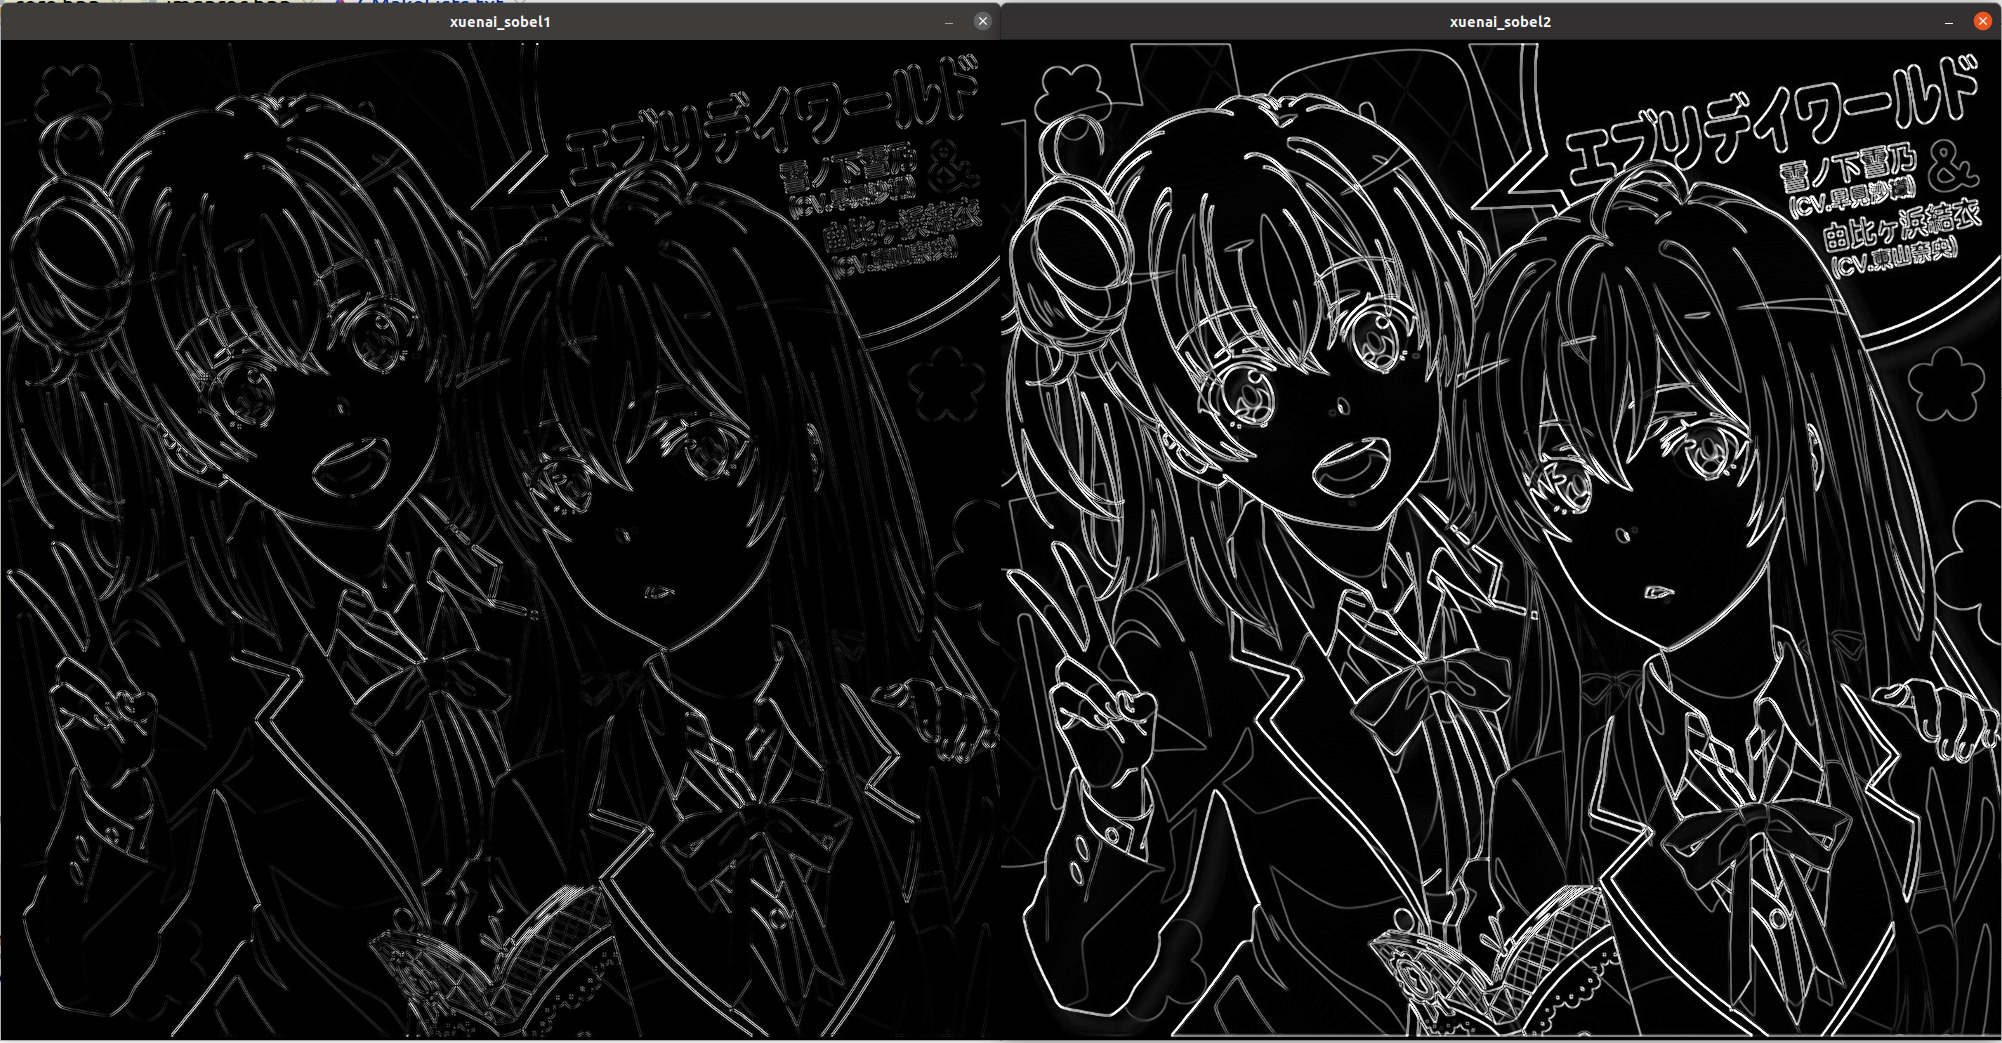
可以看到效果差了很多
scharr
卷积核形状(ksize恒定为3)
虽然Sobel算子可以有效的提取图像边缘,但是对图像中较弱的边缘提取效果较差。因此为了能够有效的提取出较弱的边缘,需要将像素值间的差距增大,因此引入Scharr算子。Scharr算子是对Sobel算子差异性的增强,因此两者之间的在检测图像边缘的原理和使用方式上相同。
Mat kernalX=Mat_<int>(Size(3,3))<<(-3,0,3
                                    -10,0,10
                                    -3,0,3);
Mat kernalY=Mat_<int>(Size(3,3))<<(-3,-10,3
                                     0,0,0
                                     3,10,3);
API
CV_EXPORTS_W void Scharr( InputArray src, OutputArray dst, int ddepth,
                          int dx, int dy, double scale = 1, double delta = 0,
                          int borderType = BORDER_DEFAULT );
src(source):输入图片
dst(destination):输出图片
ddepth(destination depth):输出图片的深度(CV_16F)
dx:x方向导数的阶数,一般取1
dy:y方向导数的阶数,一般取1
scale:生成图与原图的缩放比例,默认为1
delta:额外的增量,默认为0
borderType:边界填充方式,默认为黑边
流程
-
用cvtColor函数转灰度图
-
在x,y方向上分别各调用一次Scharr
-
用convertScaleAbs函数转换到原格式,否则无法显示
-
用addWeighted函数把两张输出图片加在一起
Laplacian
卷积核形状(ksize=3)
Mat kernal=Mat_<int>(Size(3,3))<<(0,-1,0
                                   -1,4,-1
0,-1,0);Laplacian算子的卷积核形状决定了它对噪声非常敏感,因此,通常需要通过滤波平滑处理。
API
CV_EXPORTS_W void Laplacian( InputArray src, OutputArray dst, int ddepth,
                             int ksize = 1, double scale = 1, double delta = 0,
                             int borderType = BORDER_DEFAULT );
src(source):输入图片
dst(destination):输出图片
ddepth(destination depth):输出图片的深度(CV_16F)
scale:生成图与原图的缩放比例,默认为1
delta:额外的增量,默认为0
borderType:边界填充方式,默认为黑边
流程
-
用中值滤波等操作平滑处理
-
用cvtColor函数转灰度图
-
用Laplacian函数处理
-
用convertScaleAbs函数转换到原格式,否则无法显示
Canny(recommended)
API
CV_EXPORTS_W void Canny( InputArray image, OutputArray edges,
                         double threshold1, double threshold2,
                         int apertureSize = 3, bool L2gradient = false );
image:输入图片
edges:输出图片
threshold1:最小阈值
threshold2:最大阈值
高于threshold2被认为是真边界,低于threshold1被抛弃,介于二者之间,则取决于是否与真边界相连。
apertureSize:Sobel卷积核的大小,默认为3。核越大,对噪声越不敏感,但是边缘检测的错误也会随之增加。
L2gradient:计算图像梯度幅度的标识,默认为false,表示L1范数(直接将两个方向的导数的绝对值相加)。如果使用true,表示L2范数(两个方向的导数的平方和再开方)
流程
-
用中值滤波等操作平滑处理
-
用Canny函数处理
效果
    Mat xuenai = imread("xuenai.jpg");
    resize(xuenai,xuenai,Size(1000,1000));
    imshow("xuenai",xuenai);

    Mat xuenai_canny(xuenai.size(),xuenai.type());
    Canny(xuenai,xuenai_canny,60,150);
    imshow("xuenai_canny",xuenai_canny);
    waitKet();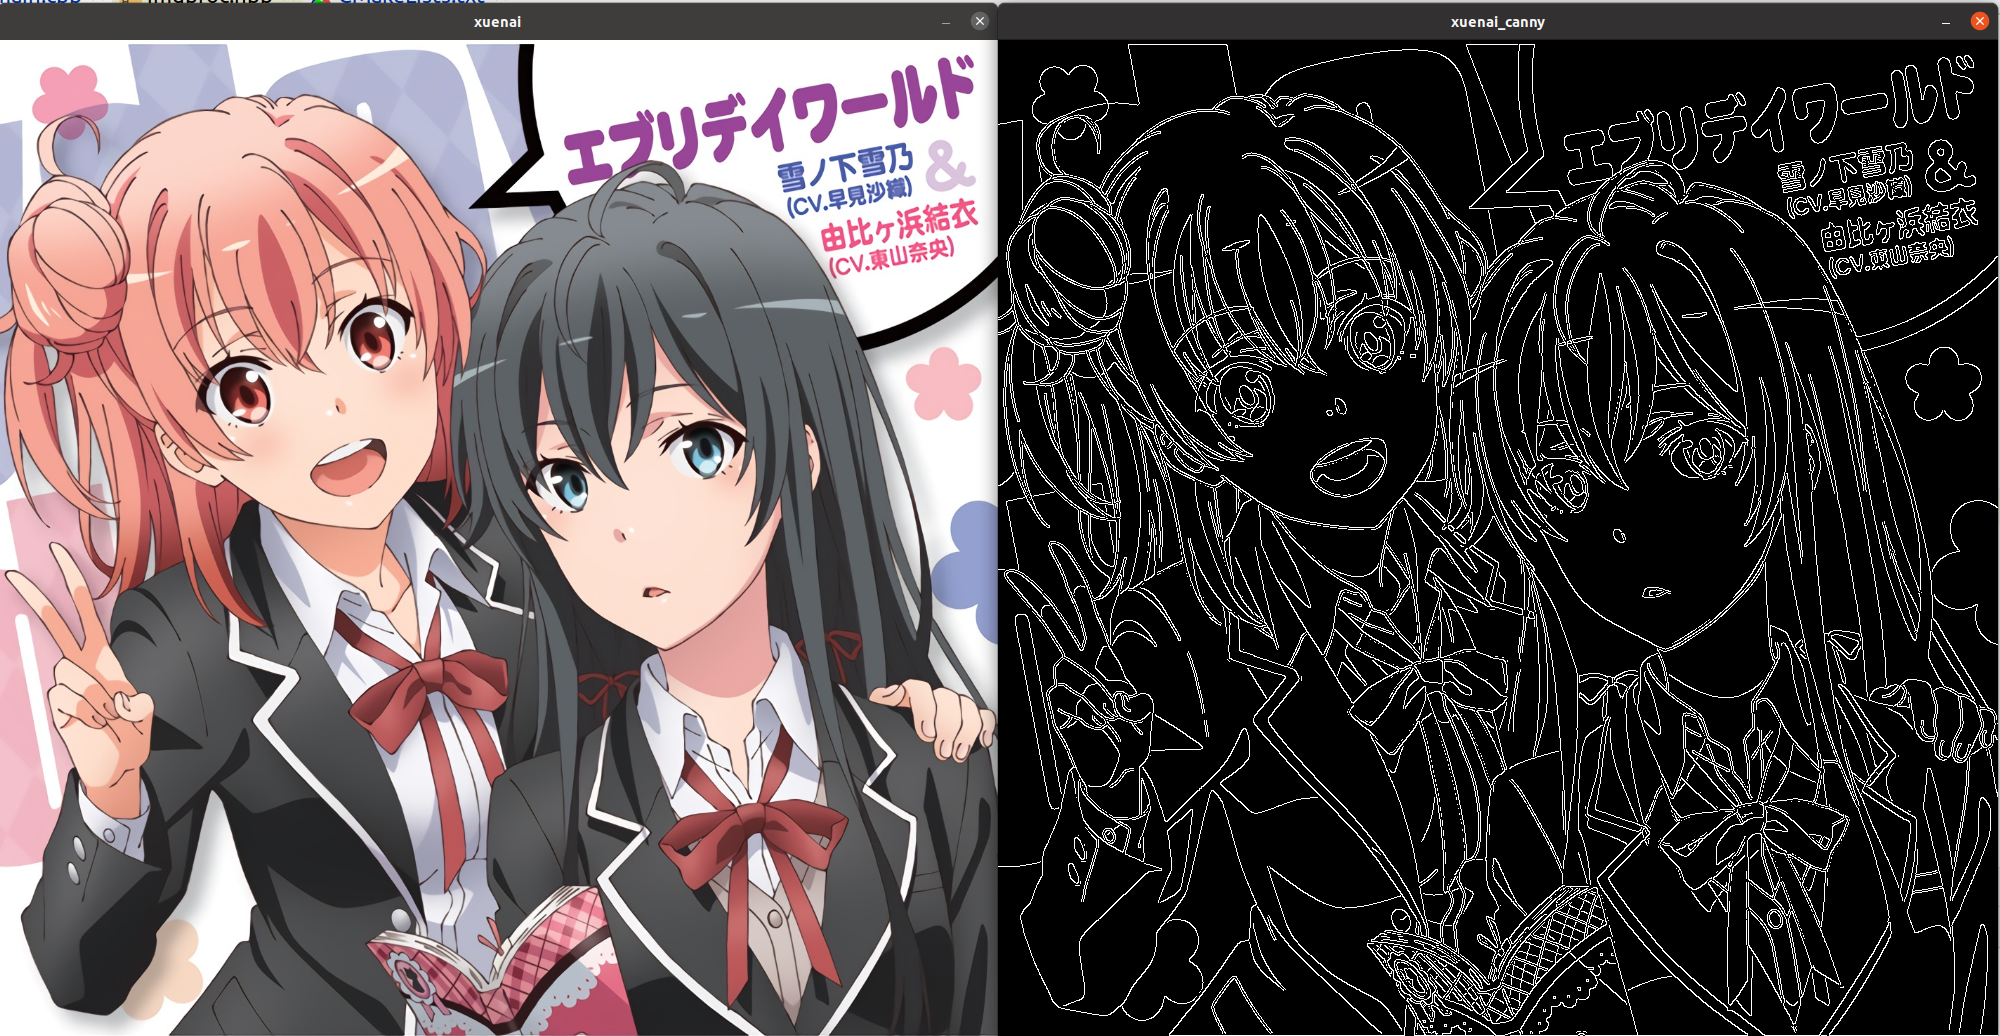
画几何图形
直线
API
CV_EXPORTS_W void line(InputOutputArray img, Point pt1, Point pt2, const Scalar& color,int thickness = 1, int lineType = LINE_8, int shift = 0);img(image):输入图片
pt1(point1):端点1
pt2(point2):端点2
color:颜色
thickness:粗细
lineType:连通类型
shift:坐标点小数点位数(not important)
连通类型
enum LineTypes {
    FILLED  = -1,
    LINE_4  = 4, //!< 4-connected line
    LINE_8  = 8, //!< 8-connected line
    LINE_AA = 16 //!< antialiased line
};-
LINE_4与LINE_8差别不大,而LINE_AA的抗锯齿效果显著
正矩形
API
CV_EXPORTS_W void rectangle(InputOutputArray img, Point pt1, Point pt2,
                          const Scalar& color, int thickness = 1,
                          int lineType = LINE_8, int shift = 0);
img(image):输入图片
pt1(point1):左上角端点
pt2(point2):右下角端点
color:颜色
thickness:粗细
lineType:连通类型
shift:坐标点小数点位数(not important)
CV_EXPORTS_W void rectangle(InputOutputArray img, Rect rec,
                          const Scalar& color, int thickness = 1,
                          int lineType = LINE_8, int shift = 0);
img(image):输入图片
rec(rect):一个矩形
color:颜色
thickness:粗细
lineType:连通类型
shift:坐标点小数点位数(not important)
圆形
API
CV_EXPORTS_W void circle(InputOutputArray img, Point center, int radius,
                       const Scalar& color, int thickness = 1,
                       int lineType = LINE_8, int shift = 0);
img(image):输入图片
center:圆心坐标
radius:半径
color:颜色
thickness:粗细。若取负值,则表示进行填充
lineType:连通类型
shift:坐标点小数点位数(not important)
椭圆
API
CV_EXPORTS_W void ellipse(InputOutputArray img, Point center, Size axes,
                        double angle, double startAngle, double endAngle,
                        const Scalar& color, int thickness = 1,
                        int lineType = LINE_8, int shift = 0);
img(image):输入图片
center:圆心坐标
axes:(x方向上半轴长,y方向上半轴长)
angle:顺时针偏角
startAngle:以x方向上的半轴为起点,偏移一定角度后的起点,从此起点开始画椭圆
endAngle:以x方向上的半轴为起点,偏移一定角度后的终点,到此为止结束画椭圆
确定起点和终点后,顺时针方向画
color:颜色
thickness:粗细。若取负值,则表示进行填充
lineType:连通类型
shift:坐标点小数点位数(not important)
效果
Mat canvas(Size(1000,1000),CV_8U,Scalar(255));
ellipse(canvas,Point2f(500,500),Size(50,100),0,0,90,Scalar(0,0,0),5);
imshow("canvas",canvas);
waitKey();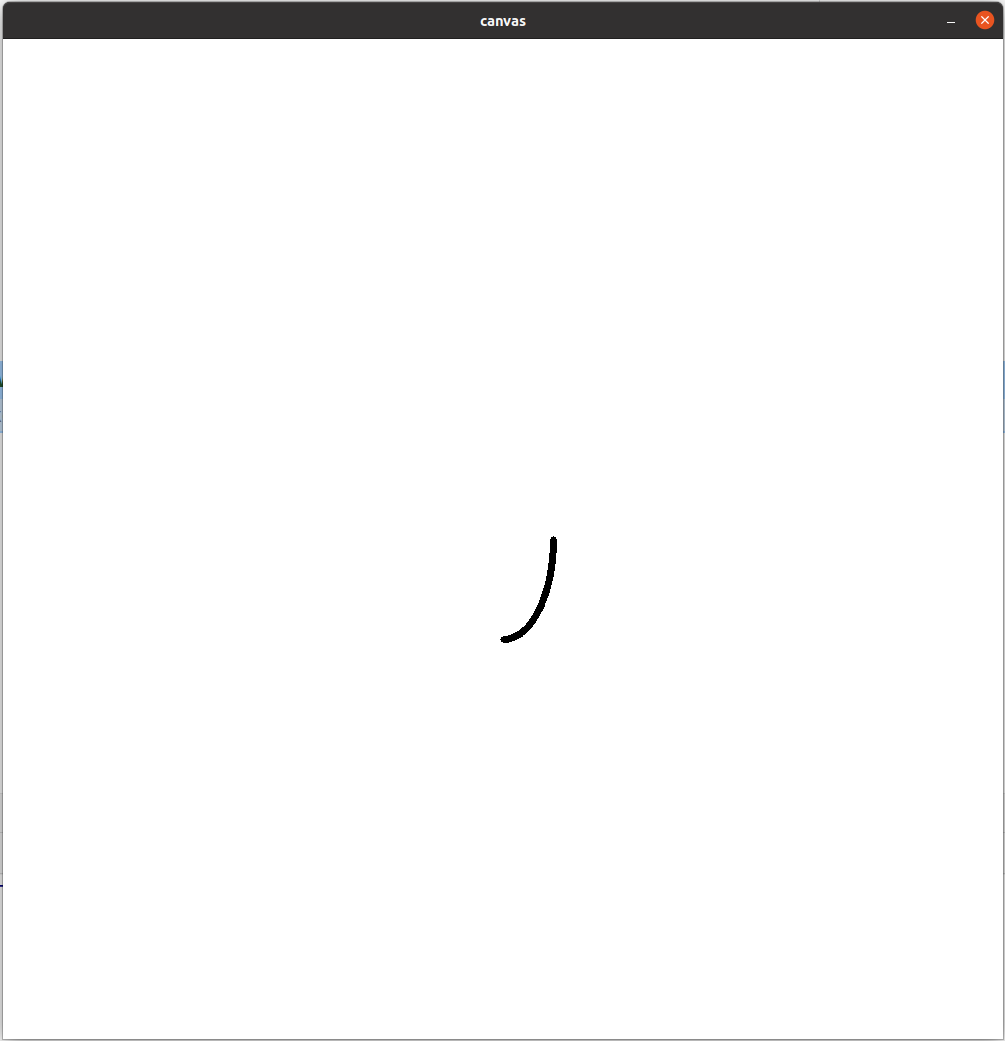
Mat canvas(Size(1000,1000),CV_8U,Scalar(255));
ellipse(canvas,Point2f(500,500),Size(50,100),20,0,360,Scalar(0,0,0),5);
imshow("canvas",canvas);
waitKey();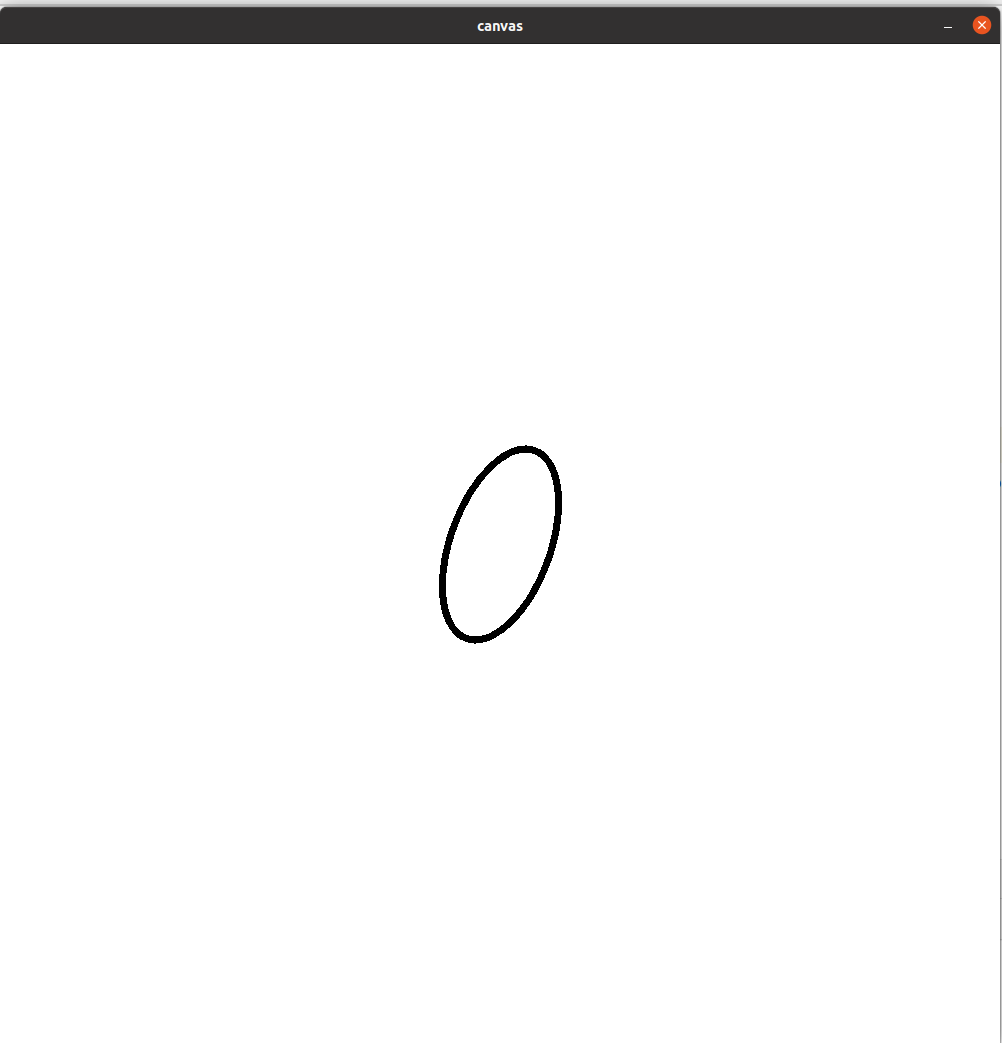
Mat canvas(Size(1000,1000),CV_8U,Scalar(255));
ellipse(canvas,Point2f(500,500),Size(50,100),20,0,180,Scalar(0,0,0),5);
imshow("canvas",canvas);
waitKey();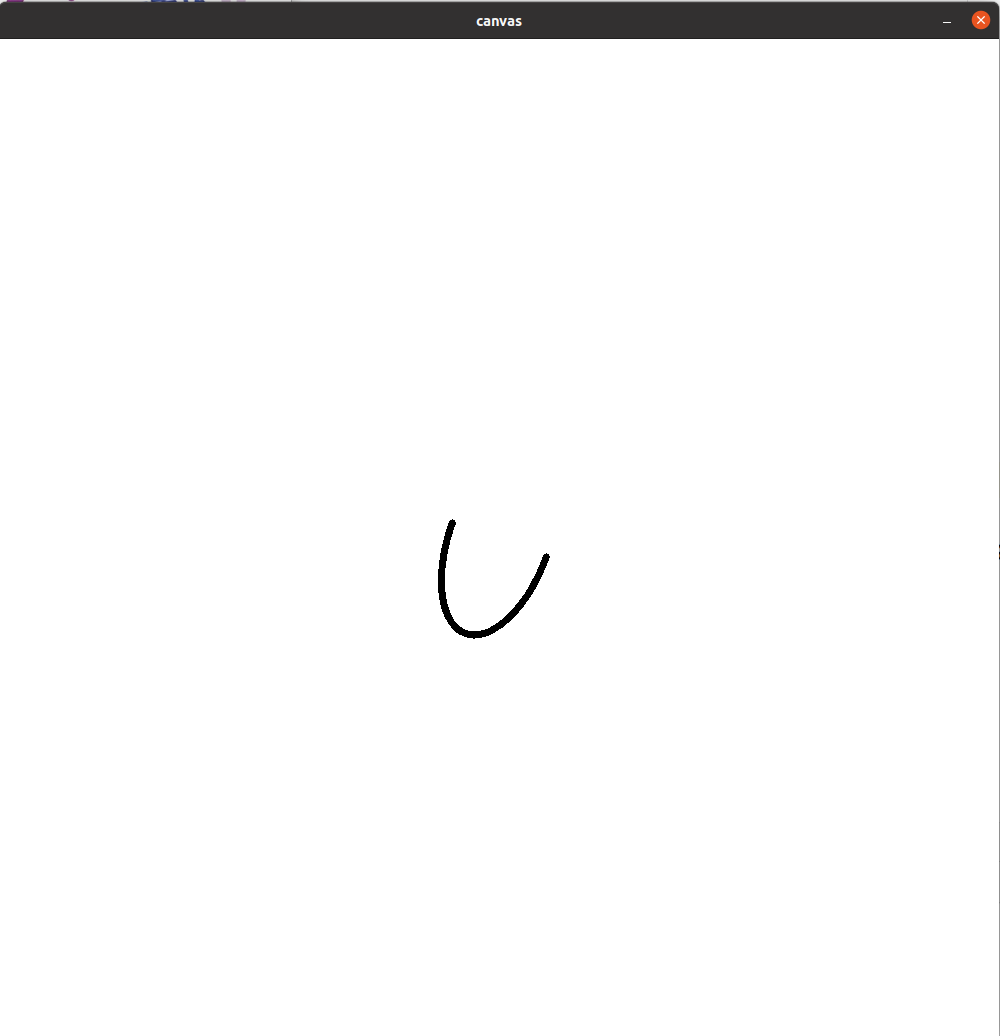
斜矩形
API(通过RotatedRect类和line函数实现)
class CV_EXPORTS RotatedRect
{
public:
    //! default constructor
    RotatedRect();

    /*center:质心坐标
      size:(x方向上全边长,y方向上全边长)
      angle:顺时针偏角
    */
    RotatedRect(const Point2f& center, const Size2f& size, float angle);

    /**
    三点确定一矩形,记得要互相垂直
     */
    RotatedRect(const Point2f& point1, const Point2f& point2, const Point2f& point3);

    /** 返回四个角点坐标,要用Point2f类型的数组对象作为参数传入,不能是仅仅是Point类型的数组对象*/
    void points(Point2f pts[]) const;

    //! returns the minimal up-right integer rectangle containing the rotated rectangle
    Rect boundingRect() const;

    //! returns the minimal (exact) floating point rectangle containing the rotated rectangle, not intended for use with images
    Rect_<float> boundingRect2f() const;

    //! returns the rectangle mass center
    Point2f center;

    //! returns width and height of the rectangle
    Size2f size;

    //! returns the rotation angle. When the angle is 0, 90, 180, 270 etc., the rectangle becomes an up-right rectangle.
    float angle;
};
下面是自定义的一个快捷画斜矩形的函数
void drawRotatedRect(InputOutputArray img, RotatedRect rRect,const Scalar& color, int thickness = 1,int lineType = LINE_8, int shift = 0){
    Point2f vertices[4];
    rRect.points(vertices);
    for(int i=0;i<4;i++){
        line(img,vertices[i],vertices[(i+1)%4],color,lineType,shift);
    }
}
Trackbar控件
createTrackbar创建滚动条
API
CV_EXPORTS int createTrackbar(const String& trackbarname, const String& winname,
                              int* value, int count,
                              TrackbarCallback onChange = 0,
                              void* userdata = 0);
trackbarname:滚动条名字
winname(window name):窗体名字。要先用nameWindow创建好同名窗体,滚动条才会出现
value:欲控制的变量的地址
count:欲控制的变量的最大值(最小为0)
onChange:回调函数,默认为空。如果想要传入,那么其参数是固定的。
void onChange(int,void*);userdata:万能指针,默认为空。如果想要传入,通常用一个类的对象的地址。
getTrackbarPos获得滚动条当前的值
CV_EXPORTS_W int getTrackbarPos(const String& trackbarname, const String& winname);
trackbarname:滚动条名字
winname(window name):窗体名字
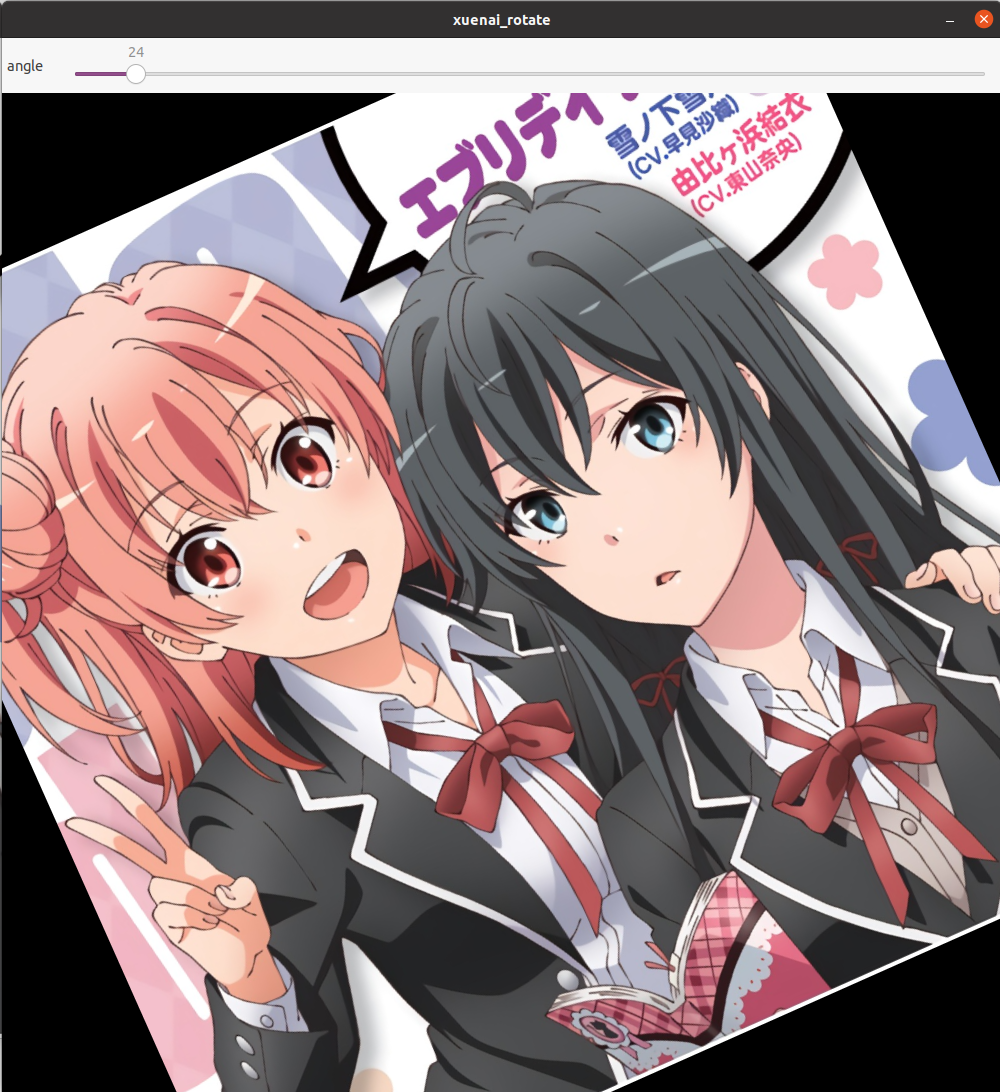
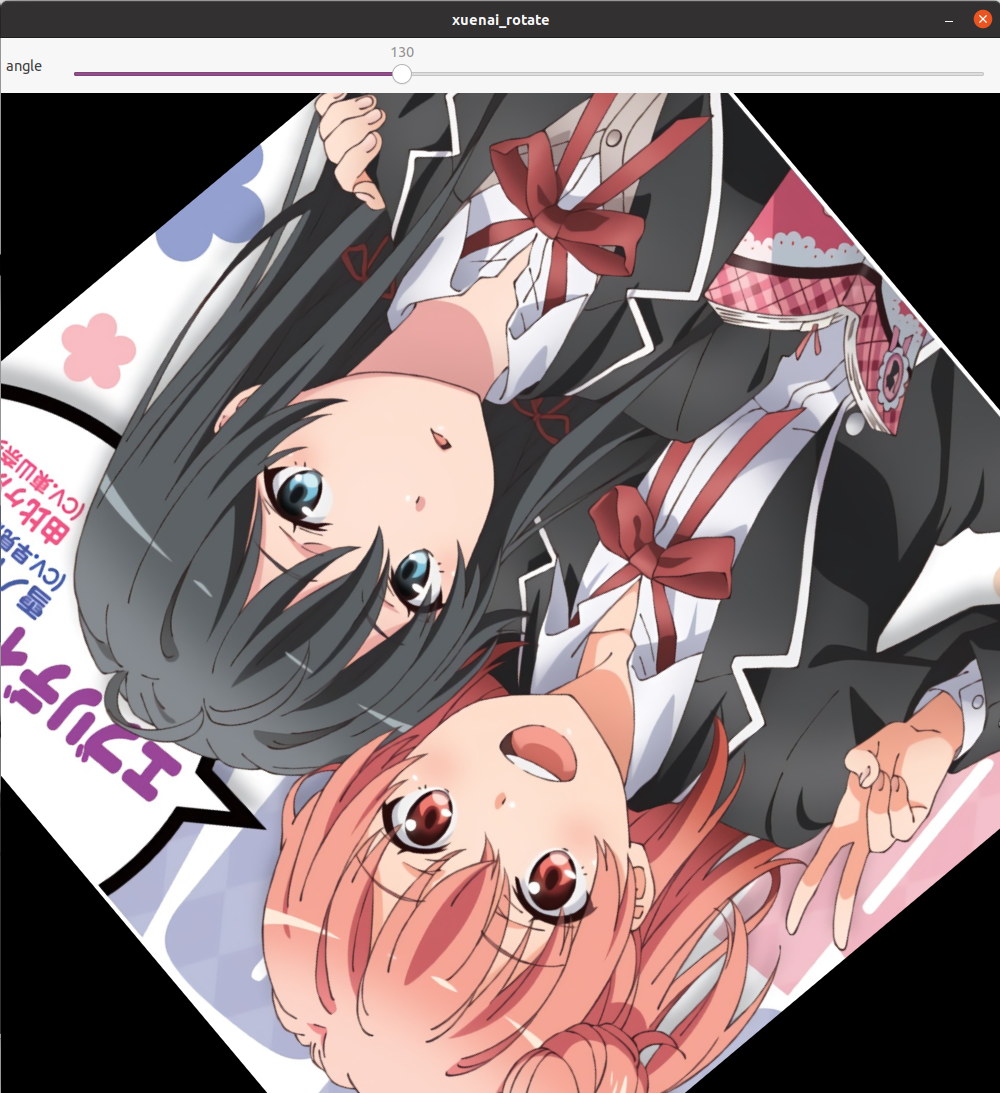
使用方式一(recommended)
原理
不使用createTrackbar函数的参数value、onChange、userdata参数。通过while(1)的无限循环,在循环中不断地用getTrackbarPos函数动态地获取滚动条的值,然后在循环内部用这些值进行操作。
效果
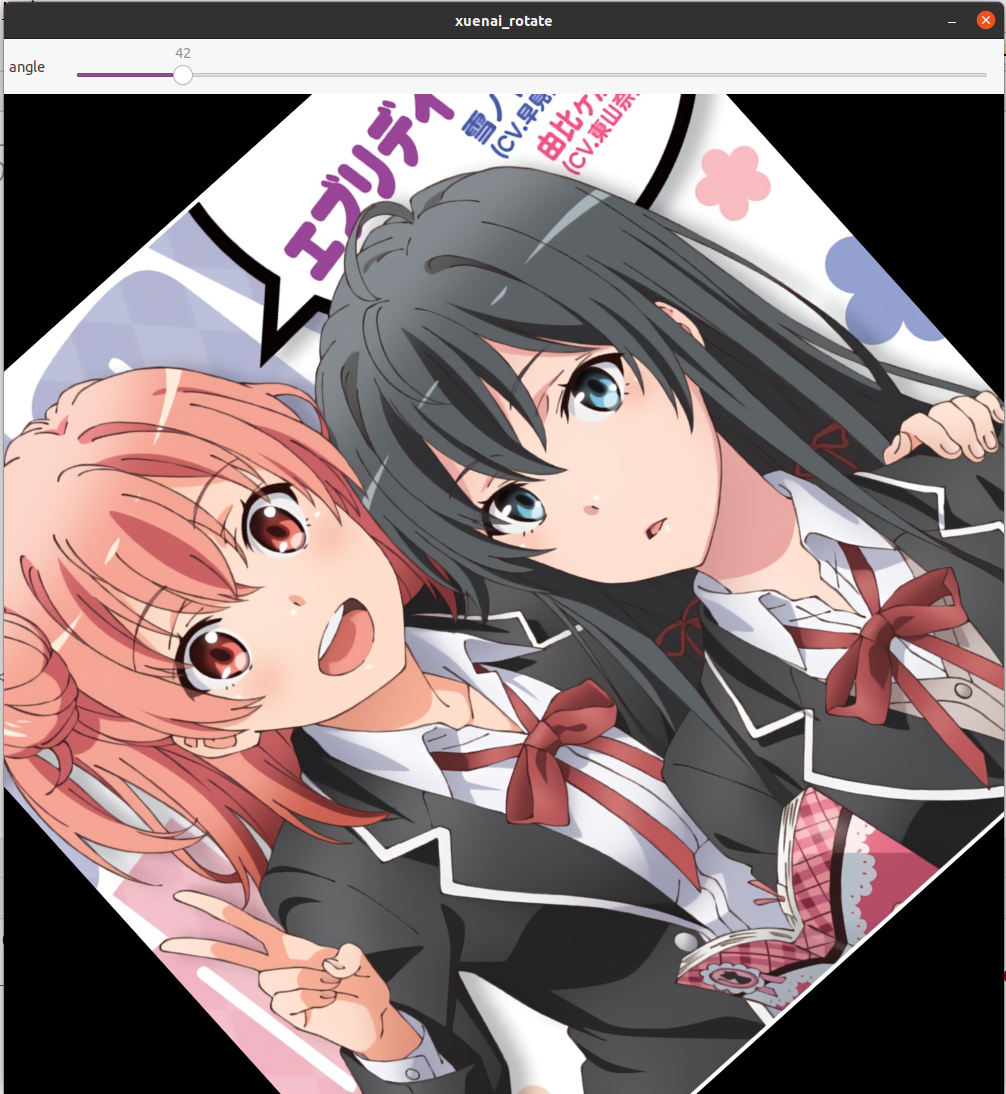
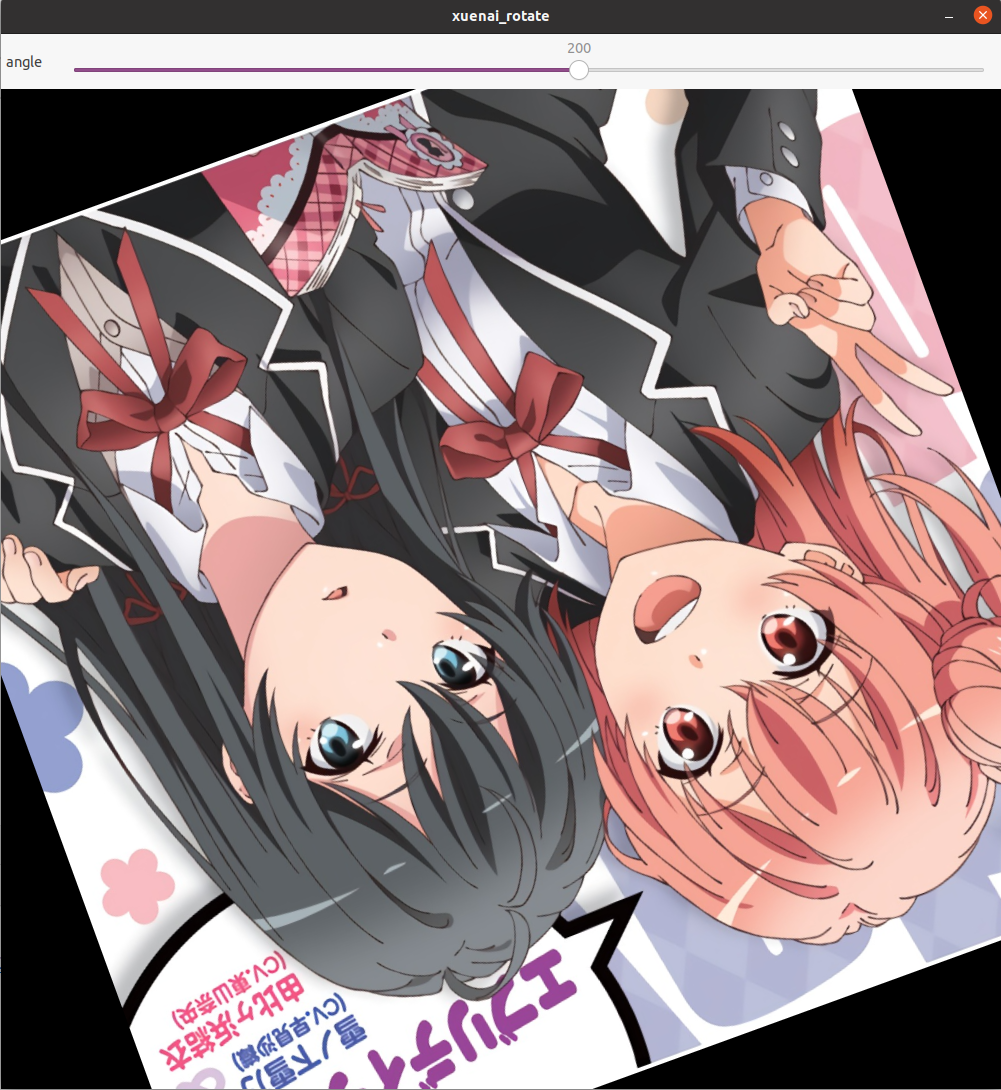
    Mat xuenai = imread("xuenai.jpg");
    resize(xuenai,xuenai,Size(1000,1000));
    imshow("xuenai",xuenai);

    namedWindow("xuenai_rotate");
    Mat xuenai_rotate(xuenai.size(), xuenai.type());
    createTrackbar("angle","xuenai_rotate", nullptr,360);
    while (1) {
        int angle= getTrackbarPos("angle","xuenai_rotate");
        Mat M = getRotationMatrix2D(Point2f(xuenai.cols / 2, xuenai.rows / 2), angle, 1);
        warpAffine(xuenai, xuenai_rotate, M, xuenai.size());
        imshow("xuenai_rotate",xuenai_rotate);
        waitKey(20);
    }
使用方式二
原理
不使用getTrackbarPos函数,使用createTrackbar的全部参数,在onChange回调函数中完成所有操作,由于回调函数的参数表是固定的,因此需要userdata传入所需数据。在每次移动滚动条时,相当于调用了一次回调函数,就完成了操作。结尾没有waitKey(0)就显示不了多久。
效果
class TrackbarUserdata{
public:
    Mat input;
    Mat output;
    int angle=0;
    string winname;
};

void RotateonChange(int,void *userdata) {

    TrackbarUserdata *data = (TrackbarUserdata *) userdata;
    int rows = data->input.rows;
    int cols = data->output.cols;
    Mat M = getRotationMatrix2D(Point2f(rows / 2, cols / 2), data->angle, 1);
    warpAffine(data->input,data->output,M,data->input.size());
    imshow(data->winname,data->output);
    waitKey(10);

}
int main(){
    Mat xuenai = imread("xuenai.jpg");
    resize(xuenai,xuenai,Size(1000,1000));
    imshow("xuenai",xuenai);

    Mat xuenai_rotate(xuenai.size(), xuenai.type());

    TrackbarUserdata userdata;
    userdata.input=xuenai;
    userdata.output=xuenai_rotate;
    userdata.winname="xuenai_rotate";
    namedWindow(userdata.winname);
    createTrackbar("angle",userdata.winname, &userdata.angle,360, RotateonChange,&userdata);
    waitKey();

    return 0;
}
轮廓检测(一般对二值图)
查找轮廓
API
CV_EXPORTS_W void findContours( InputArray image, OutputArrayOfArrays contours,
                              OutputArray hierarchy, int mode,
                              int method, Point offset = Point());

/** @overload */
CV_EXPORTS void findContours( InputArray image, OutputArrayOfArrays contours,
                              int mode, int method, Point offset = Point());
image:输入图片
contours:保存输出轮廓的点坐标。通常用vector<vector<Point>>数据类型担任,通过Point可以看出存储的是坐标。
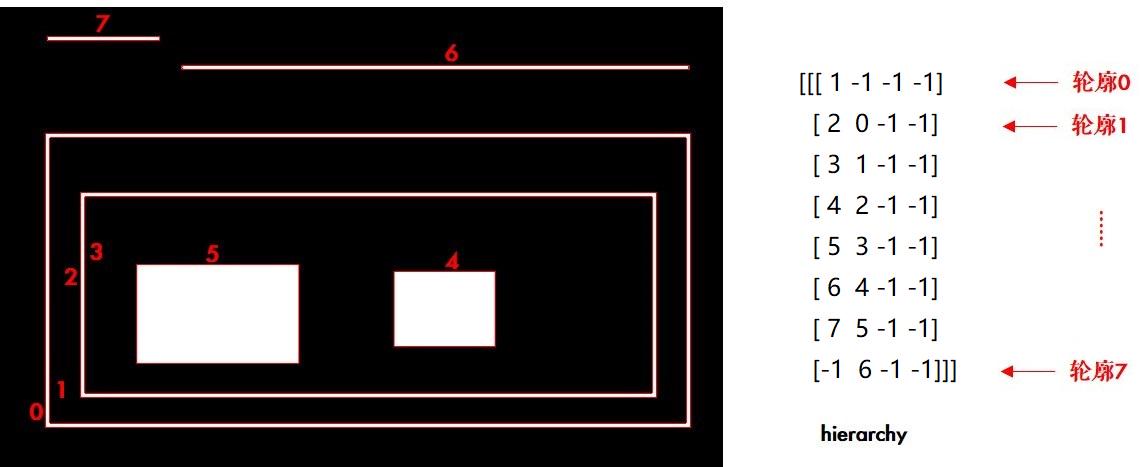
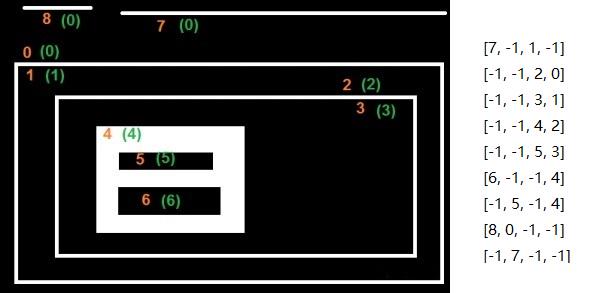
hierarchy:可选参数,保存输出轮廓的层级关系。通常用vector<Vec4i>数据类型担任。
hierarchy[i][0]:第i个轮廓的同一层级后一个轮廓的索引编号。
hierarchy[i][1]:第i个轮廓的同一层级前一个轮廓的索引编号。
hierarchy[i][2]:第i个轮廓的子轮廓的索引编号。
hierarchy[i][3]:第i个轮廓的父轮廓的索引编号。
如果当前轮廓没有对应的后一个轮廓、前一个轮廓、父轮廓或内嵌轮廓的话,则hierarchy[i][0] ~hierarchy[i][3]的相应位被设置为默认值-1。
mode:轮廓层级的检测模式。
method:轮廓坐标点的储存方式
offset:额外偏移量,在每一个检测出的轮廓点上加上该偏移量,可以是负值。当所分析图像是另外一个图像的ROI的时候,通过加减这个偏移量,可以把ROI图像的检测结果投影到原始图像对应位置上。
轮廓层级检测模式:索引号(层级)
enum RetrievalModes {
    /** retrieves only the extreme outer contours. It sets `hierarchy[i][2]=hierarchy[i][3]=-1` for
    all the contours. */
    RETR_EXTERNAL  = 0,
    /** retrieves all of the contours without establishing any hierarchical relationships. */
    RETR_LIST      = 1,
    /** retrieves all of the contours and organizes them into a two-level hierarchy. At the top
    level, there are external boundaries of the components. At the second level, there are
    boundaries of the holes. If there is another contour inside a hole of a connected component, it
    is still put at the top level. */
    RETR_CCOMP     = 2,
    /** retrieves all of the contours and reconstructs a full hierarchy of nested contours.*/
    RETR_TREE      = 3,
};
RETR_EXTERNAL(索引顺序:从右下到左上)
只检测最外围轮廓,包含在外围轮廓内的内围轮廓被忽略
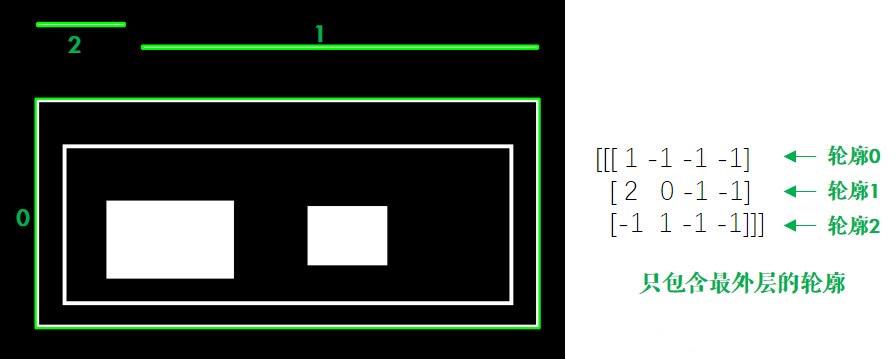
RETR_LIST(recommended)(索引顺序:从右下到左上,由外到内)
检测所有的轮廓,包括内围、外围轮廓,但是检测到的轮廓不建立层级关系,这就意味着这个检索模式下不存在父轮廓或内嵌轮廓,所以hierarch[i]向量内所有元素的第3、第4个分量都会被置为-1。
RETR_CCOMP(not recommended)(索引顺序:由内到外,从右下到左上)
检测所有的轮廓,但所有轮廓只建立两个等级关系,外围为顶层,若外围内的内围轮廓还包含了其他的轮廓信息,则内围内的所有轮廓均归属于顶层
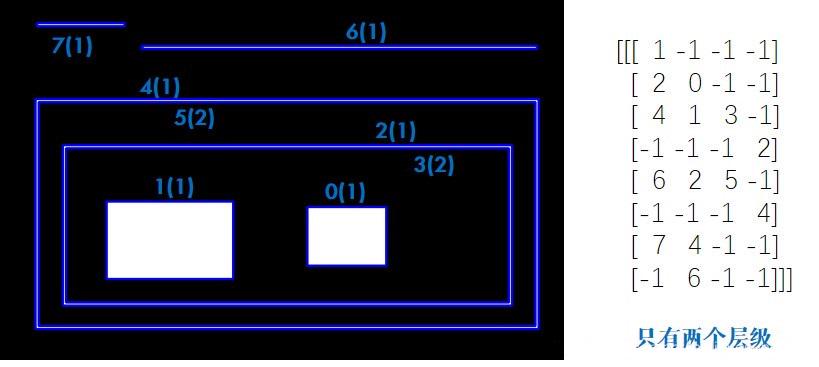
RETR_TREE(recommended)
检测所有轮廓,所有轮廓建立一个等级树结构。外层轮廓包含内层轮廓,内层轮廓还可以继续包含内嵌轮廓。
轮廓坐标点储存方式
enum ContourApproximationModes {
    /** stores absolutely all the contour points. That is, any 2 subsequent points (x1,y1) and
    (x2,y2) of the contour will be either horizontal, vertical or diagonal neighbors, that is,
    max(abs(x1-x2),abs(y2-y1))==1. */
    CHAIN_APPROX_NONE      = 1,
    /** compresses horizontal, vertical, and diagonal segments and leaves only their end points.
    For example, an up-right rectangular contour is encoded with 4 points. */
    CHAIN_APPROX_SIMPLE    = 2,
    /** applies one of the flavors of the Teh-Chin chain approximation algorithm @cite TehChin89 */
    CHAIN_APPROX_TC89_L1   = 3,
    /** applies one of the flavors of the Teh-Chin chain approximation algorithm @cite TehChin89 */
    CHAIN_APPROX_TC89_KCOS = 4
};
CHAIN_APPROX_NONE:保存物体边界上所有连续的轮廓点到contours向量内
CHAIN_APPROX_SIMPLE(recommended):仅保存轮廓的拐点信息,把所有轮廓拐点处的点保存入contours向量内,拐点与拐点之间直线段上的信息点不予保留,效率比较高。
CHAIN_APPROX_TC89_L1,CV_CHAIN_APPROX_TC89_KCOS:使用tehChinl chain 近似算法(not important)
绘制轮廓
API
CV_EXPORTS_W void drawContours( InputOutputArray image, InputArrayOfArrays contours,
                              int contourIdx, const Scalar& color,
                              int thickness = 1, int lineType = LINE_8,
                              InputArray hierarchy = noArray(),
                              int maxLevel = INT_MAX, Point offset = Point() );
image:输入图片
contours:输入轮廓数组
contourIdx(contour index):欲绘制的轮廓的索引值,输入-1可以绘制所有轮廓
color:绘制颜色
thickness:线条粗细,默认为1。输入-1则表示填充。
lineType:连通类型。
hierarchy:可选的层次结构信息。它仅在当你需要绘制一些轮廓线时被使用。(详见参数maxLevel)默认为noArray(),返回一个空数组。
maxLevel:绘制轮廓线的最高级别。此参数仅在参数hierarchy有效时被考虑。
-
如果为0,只有被指定的轮廓被绘制。
-
如果为1,绘制被指定的轮廓和其下一级轮廓。
-
如果为2,绘制被指定的轮廓和其所有子轮廓。
offset:额外偏移量。
轮廓面积和周长
面积(非原地算法)
CV_EXPORTS_W double contourArea( InputArray contour, bool oriented = false );contour:某一个轮廓,数据类型vector<Point>
oriented: 有方向的区域标志。(not important)
-
true: 此函数依赖轮廓的方向(顺时针或逆时针)返回一个已标记区域的值。
-
false: 默认值。意味着返回不带方向的绝对值。
此函数利用格林公式计算轮廓的面积。对于具有自交点的轮廓,该函数几乎肯定会给出错误的结果。
周长(非原地算法)
CV_EXPORTS_W double arcLength( InputArray curve, bool closed );curve:某一个轮廓,数据类型vector<Point>
closed:轮廓是否是闭合的。
多边形逼近
CV_EXPORTS_W void approxPolyDP( InputArray curve,
                                OutputArray approxCurve,
double epsilon, bool closed );curve:某一个轮廓,数据类型vector<Point>
approxCurve:输出多边形的点集,数据类型vector<Point>
epsilon:设置精度,越小则精度越高,多边形越趋近于曲线,拟合效果更好但效率低。
closed:轮廓是否是闭合的。
凸包
CV_EXPORTS_W void convexHull( InputArray points, OutputArray hull,
                              bool clockwise = false, bool returnPoints = true );
points:输入点集
hull:输出凸包。数据类型取决于returnPoints,vector<Point>或vector<int>
clockwise:拟合凸包的直线的转动方向,TRUE为顺时针,否则为逆时针。
returnPoints:若为true,则在hull中存储点的坐标。若为false,则在hull中存储点的索引,索引值根据参数points得到。默认为true
外接矩形
最小外接矩形(返回RotatedRect)
CV_EXPORTS_W RotatedRect minAreaRect( InputArray points );points:输入点集
最大外界矩形(返回Rect)
CV_EXPORTS_W Rect boundingRect( InputArray array );points:输入点集
由于换了markdown编辑器,后续内容请点击链接
后续不在此处更新了

AtomGit 是由开放原子开源基金会联合 CSDN 等生态伙伴共同推出的新一代开源与人工智能协作平台。平台坚持“开放、中立、公益”的理念,把代码托管、模型共享、数据集托管、智能体开发体验和算力服务整合在一起,为开发者提供从开发、训练到部署的一站式体验。
更多推荐


 30
30 0
0- 0


 已为社区贡献1条内容

所有评论(0)