Unity OpenCVForUnity 安装和第二个案例详解 <二>
目录
一、前言
第二个案例(如图1所示),讲的内容是使用相机和把相机的图片转换成Mat再去使用。

二、场景介绍
这个案例,如果你点击运行了,就是把相机的内容显示在界面里,同时你可以控制相机的切换,是否启动。
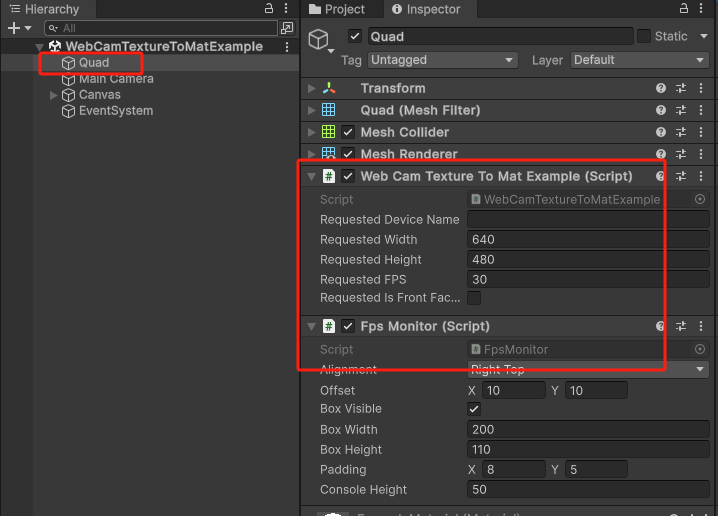
整个场景中,重要的脚本有两个。(如图2所示)

1.WebCamTextureToMatExample脚本
这个脚本主要是控制相机的启停,输出图片,把图片显示在界面上。
2.FpsMonitor脚本
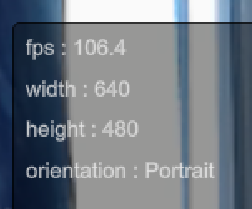
这个脚本是帧率监视器,把图片的长宽,和输出图片的帧率显示在界面上。(如图3所示)
这些数字和方框都是在脚本里画的,所以在界面里看不见这个游戏物体。

本篇文章不讲脚本2,因为不是主要脚本,只讲脚本1.
三、 结构体Scaler
图片计算一般是四个数据。比如,Color是(255,255,255,255)。
但是我们每次设置就要new Color(255,255,255,255),再进行修改或者计算是比较麻烦的。
为了不那么麻烦,OpenCV中设置了一个结构体Scaler,专门用来存放四个数,可以复制,可以相乘等,写了一些帮助计算的代码。本质就是存放四个数的结构体。
大家后面看见了不要太陌生。
四、找到相机并使用
我把WebCamTextureToMatExample脚本中最核心的部分拿了出来,单独写了一个脚本。
1.相机的启用
//相机驱动
WebCamDevice webCamDevice;
//相机拍摄的图片
WebCamTexture webCamTexture;

//你希望输出的分辨率宽
public int requestedWidth = 1920;
//你希望输出的分辨率高
public int requestedHight = 1080;
//相机按什么帧率输出图片
public int requestFPS = 30;


void Start()
{
    //初始化
   Initialize();
}

//相机的初始化用携程比较好,就再创建个携程调用
private void Initialize()
{
 StartCoroutine(_Initialize());
}

//携程
IEnumerator _Initialize()
{
    //获取所有可以传输图片的相机
     WebCamDevice[] webCamDevices = WebCamTexture.devices;
    //如果这个数量是大于1的
     if (webCamDevices.Length >= 0)
      {
            //默认取第一个相机,这里你也可以选别的,不要紧
            webCamDevice = webCamDevices[0];

            //初始化一下图片,提供驱动名称,图片的宽高,输出图片的帧率
            webCamTexture = new WebCamTexture(
            webCamDevice.name,
            requestedWidth,
            requestedHight,
            requestFPS);
       }

        //如果没初始化,说明没找到相机
        if (webCamTexture == null)
        {
            Debug.Log("没有找到相机");
            //跳出方法
            yield break;
        }
        //如果找到了,就开始接收图片
        webCamTexture.Play();

        //相机照到以后
        OnInited();
    }
这部分代码就可以把相机打开,并且把图片拿到WebCamTexture中了。
2.格式转换
还是老规矩,万物都要转换成OpenCV的通用格式Mat,所以分两步:
a.把webCamTexture转换成Mat
b.把mat转换成Texture2D。
a.把webCamTexture转换成Mat
需要的参数有三个:
public static void webCamTextureToMat(
WebCamTexture webCamTexture,
Mat mat,
Color32[] pixels32Buffer,
bool flipAfter = true,
int flipCode = 0)
webCamTexture有了
新建Mat:
Mat rgbaMat;

rgbaMat = new Mat(
webCamTexture.height,
webCamTexture.width,
CvType.CV_8UC4,
new Scalar(0, 0, 0, 255));    //初始化一个黑色
新建Color32[]:
它的大小必须装得下你想要的相机图片大小。
Color32[] colors;

colors = new Color32[webCamTexture.width * webCamTexture.height];
webCamTexture转换成Mat:
上一集说过,转换的方法都放在Utils类里面,所以,转换方法为:
Utils.webCamTextureToMat(webCamTexture, rgbaMat, colors);b.把Mat转换成Texture2D
上节课的内容,这里略过。
五、脚本组合
WebCamDevice webCamDevice;
    WebCamTexture webCamTexture;

    public int requestedWidth = 1920;
    public int requestedHight = 1080;
    public int requestFPS = 30;

    Mat rgbaMat;
    Color32[] colors;
    Texture2D texture;


    void Start()
    {
        Initialize();
    }

    private void Initialize()
    {
    StartCoroutine(_Initialize());
    }

    IEnumerator _Initialize()
    {
        WebCamDevice[] webCamDevices = WebCamTexture.devices;
        if (webCamDevices.Length >= 0)
        {
            webCamDevice = webCamDevices[0];
            webCamTexture = new WebCamTexture(webCamDevice.name,requestedWidth,requestedHight,requestFPS);
        }

        if (webCamTexture == null)
        {
            Debug.Log("没有找到相机");
            yield break;
        }

        webCamTexture.Play();

        OnInited();

    }

    private void OnInited()
    {
        //初始化Colors
        colors = new Color32[webCamTexture.width * webCamTexture.height];
        //初始化texture
        texture = new Texture2D(webCamTexture.width, webCamTexture.height, TextureFormat.RGBA32, false);
        //初始化mat并赋值黑色
        rgbaMat = new Mat(webCamTexture.height, webCamTexture.width, CvType.CV_8UC4, new Scalar(0, 0, 0, 255));
        //转换
        Utils.matToTexture2D(rgbaMat, texture, colors);

        //我是把脚本挂在RawImage上的,所以可以直接赋值
        gameObject.GetComponent<RawImage>().texture = texture;
    }

    void Update()
    {
        if (webCamTexture.isPlaying && webCamTexture.didUpdateThisFrame)
        {
            Utils.webCamTextureToMat(webCamTexture, rgbaMat, colors);
            Utils.matToTexture2D(rgbaMat, texture, colors);

            //我是把脚本挂在RawImage上的,所以可以直接赋值
            gameObject.GetComponent<RawImage>().texture = webCamTexture;
        }
    }
六、作者的碎碎念
发现数据还挺好,所以....继续更了。
更多推荐
 已为社区贡献2条内容


所有评论(0)