【图像处理】opencv | 图像的二值化操作| cv2.threshold() | cv2.adaptiveThreshold()
提示:文章写完后,目录可以自动生成,如何生成可参考右边的帮助文档
文章目录
前言
参考视频:opencv教学
参考教材:《数字图像处理基础》
我的代码基本是跟着B站的视频里面敲了一遍,然后结合教材对指定区域做了一些加强学习
一、cv2.threshold()阈值操作函数
1.1、初见
首先学习一个英文单词:binary。它就是二值化的意思。
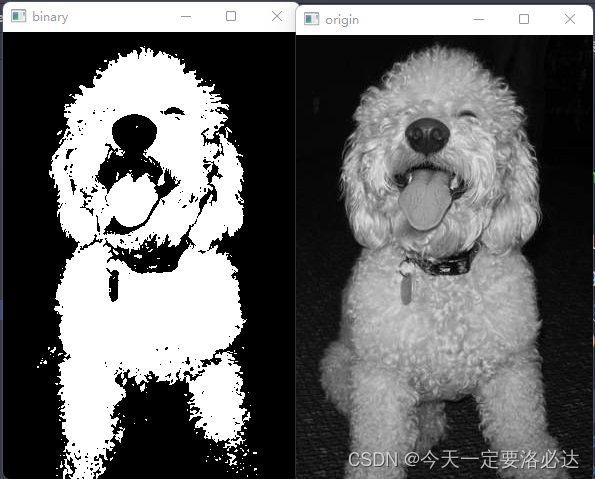
我们直接先来一个cv2.threshold()的例子,首先读入一张灰度图:
import cv2

X1=cv2.imread('dog.jpg',0)
thresh,img = cv2.threshold(X1, thresh=128, maxval=255, type=cv2.THRESH_BINARY)
cv2.imshow('origin', X1)
cv2.imshow('binary',img)
cv2.waitKey(0) #0为任意键位终止
cv2.destroyAllWindows()

里面起到主要作用的就是这句话:
thresh,img = cv2.threshold(X1, thresh=128, maxval=255, type=cv2.THRESH_BINARY)
稍微解释一下:
1)第一个参数 :输入的需要 转换的图像
2)第二个参数:设定的阈值
3)第三个参数:输入图像的像素最大值(这里是灰度图,所以为255)
4)第四个参数:二值化的类型。除了我们这里用的cv2.THRESH_BINARY(大于阈值的像素点设置为255,小于阈值的点设为0),还有很多种:比如cv2.THRESH_BINARY_INV(大于阈值的像素点设置为0,小于阈值的点设为255)
5)返回两个参数:阈值和二值化图像。调用的时候,两个参数都必须写出来,不然会报错
如下图所示即为第四个参数选择为cv2.THRESH_BINARY_INV(和前面那副图反着来了)

1.2、阈值不同时的效果
我们分别把阈值设置为32,64,128,196看看他们的效果
import cv2

X1=cv2.imread('dog.jpg',0)
thresh1,img1 = cv2.threshold(X1, thresh=32, maxval=255, type=cv2.THRESH_BINARY)
thresh2,img2 = cv2.threshold(X1, thresh=64, maxval=255, type=cv2.THRESH_BINARY)
thresh3,img3 = cv2.threshold(X1, thresh=128, maxval=255, type=cv2.THRESH_BINARY)
thresh4,img4 = cv2.threshold(X1, thresh=196, maxval=255, type=cv2.THRESH_BINARY)
cv2.imshow('origin', X1)
cv2.imshow('thresh=32',img1)
cv2.imshow('thresh=64',img2)
cv2.imshow('thresh=128',img3)
cv2.imshow('thresh=196',img4)
cv2.waitKey(0) #0为任意键位终止
cv2.destroyAllWindows()

二、cv2.adaptiveThreshold()自适应阈值操作函数
自适应阈值操作 说白了就是在一个图像中进行多个区域的阈值操作
2.1、初见
还是直接看一个例子
import cv2
X1=cv2.imread('dog.jpg',0)
img = cv2.adaptiveThreshold(X1, 127, cv2.ADAPTIVE_THRESH_GAUSSIAN_C, cv2.THRESH_BINARY, 11, 1)
cv2.imshow('img', X1)
cv2.imshow('adaptiveThreshold', img)
cv2.waitKey(0) #0为任意键位终止
cv2.destroyAllWindows()

起作用的是这个函数:cv2.adaptiveThreshold(X1, 127, cv2.ADAPTIVE_THRESH_GAUSSIAN_C, cv2.THRESH_BINARY, 11, 1)
1)第一个参数是输入的图像:X1
2)第二个参数是设定的阈值
3)第三个参数:自适应的类型,除这个之外还有ADAPTIVE_THRESH_MEAN_C
4)第四个参数: 二值化的类型
5)第五个参数:分割区域的数量
6)第六个参数: 用以计算的常数
2.2、固定blocksize,改变C值大小的实验结果
import cv2

X1=cv2.imread('dog.jpg',0)
img1 = cv2.adaptiveThreshold(X1, 127, cv2.ADAPTIVE_THRESH_GAUSSIAN_C, cv2.THRESH_BINARY, 11, 1)
img2 = cv2.adaptiveThreshold(X1, 127, cv2.ADAPTIVE_THRESH_GAUSSIAN_C, cv2.THRESH_BINARY, 11, 10)
img3 = cv2.adaptiveThreshold(X1, 127, cv2.ADAPTIVE_THRESH_GAUSSIAN_C, cv2.THRESH_BINARY, 11, 100)
img4 = cv2.adaptiveThreshold(X1, 127, cv2.ADAPTIVE_THRESH_GAUSSIAN_C, cv2.THRESH_BINARY, 11, -10)
img5 = cv2.adaptiveThreshold(X1, 127, cv2.ADAPTIVE_THRESH_GAUSSIAN_C, cv2.THRESH_BINARY, 11, -100)
cv2.imshow('img', X1)
cv2.imshow('C=1', img1)
cv2.imshow('C=10', img2)
cv2.imshow('C=100', img3)
cv2.imshow('C=-10', img4)
cv2.imshow('C=-100', img5)
cv2.waitKey(0) #0为任意键位终止
# cv2.waitKey(1000) #等待1秒
cv2.destroyAllWindows()

2.3、固定C值,改变blocksize大小的实验结果
import cv2

X1=cv2.imread('dog.jpg',0)
img1 = cv2.adaptiveThreshold(X1, 127, cv2.ADAPTIVE_THRESH_GAUSSIAN_C, cv2.THRESH_BINARY, 5, 1)
img2 = cv2.adaptiveThreshold(X1, 127, cv2.ADAPTIVE_THRESH_GAUSSIAN_C, cv2.THRESH_BINARY, 7, 1)
img3 = cv2.adaptiveThreshold(X1, 127, cv2.ADAPTIVE_THRESH_GAUSSIAN_C, cv2.THRESH_BINARY, 9, 1)
img4 = cv2.adaptiveThreshold(X1, 127, cv2.ADAPTIVE_THRESH_GAUSSIAN_C, cv2.THRESH_BINARY, 11, 1)
img5 = cv2.adaptiveThreshold(X1, 127, cv2.ADAPTIVE_THRESH_GAUSSIAN_C, cv2.THRESH_BINARY, 13, 1)
cv2.imshow('img', X1)
cv2.imshow('blocksize=5', img1)
cv2.imshow('blocksize=7', img2)
cv2.imshow('blocksize=9', img3)
cv2.imshow('blocksize=11', img4)
cv2.imshow('blocksize=13', img5)
cv2.waitKey(0) #0为任意键位终止
# cv2.waitKey(1000) #等待1秒
cv2.destroyAllWindows()

更多推荐
 已为社区贡献7条内容


所有评论(0)