
OpenCV机器视觉-HSV颜色模型
HSV颜色模型
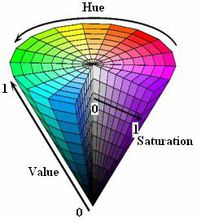
HSV(Hue, Saturation, Value)是根据颜色的直观特性由A. R. Smith在1978年创建的一种颜色空间, 也称六角锥体模型(Hexcone Model)。
这个模型中颜色的参数分别是:色调(H),饱和度(S),明度(V)
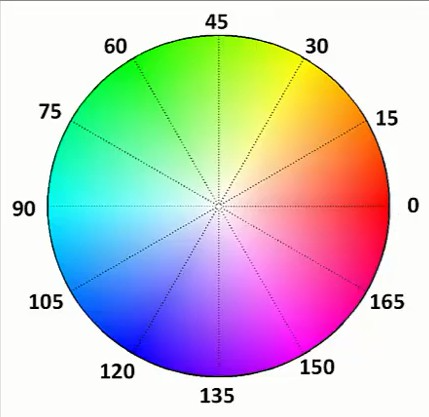
色调H
用角度度量,取值范围为0°~360°,从红色开始按逆时针方向计算,红色为0°,绿色为120°,蓝色为240°。它们的补色是:黄色为60°,青色为180°,品红为300°;
饱和度S
饱和度S表示颜色接近光谱色的程度。一种颜色,可以看成是某种光谱色与白色混合的结果。其中光谱色所占的比例愈大,颜色接近光谱色的程度就愈高,颜色的饱和度也就愈高。饱和度高,颜色则深而艳。光谱色的白光成分为0,饱和度达到最高。通常取值范围为0%~100%,值越大,颜色越饱和。
明度V
明度表示颜色明亮的程度,对于光源色,明度值与发光体的光亮度有关;对于物体色,此值和物体的透射比或反射比有关。通常取值范围为0%(黑)到100%(白)。
- 当S=1 V=1时,H所代表的任何颜色被称为纯色;
- 当S=0时,即饱和度为0,颜色最浅,最浅被描述为灰色(灰色也有亮度,黑色和白色也属于灰色),灰色的亮度由V决定,此时H无意义;
- 当V=0时,颜色最暗,最暗被描述为黑色,因此此时H(无论什么颜色最暗都为黑色)和S(无论什么深浅的颜色最暗都为黑色)均无意义。
注意: 在opencv中,H、S、V值范围分别是[0,180],[0,255],[0,255],而非[0,360],[0,1],[0,1];
这里我们列出部分hsv空间的颜色值, 表中将部分紫色归为红色

判断当前是白天还是晚上
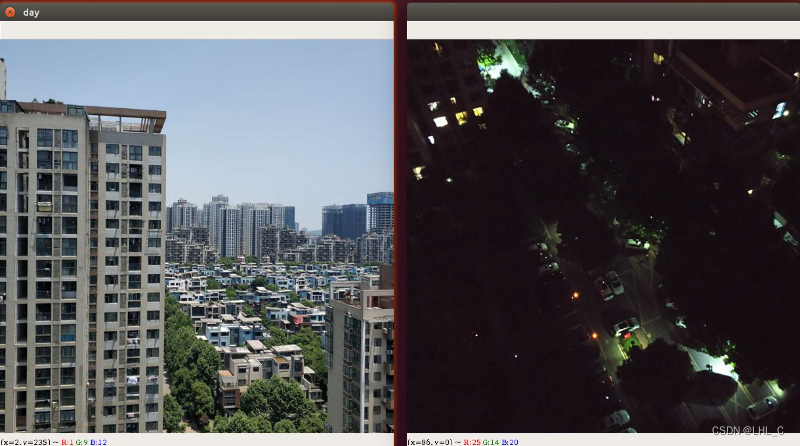
实现步骤
- 将图片从BGR颜色空间,转变成HSV颜色空间
- 获取图片的宽高信息
- 统计每个颜色点的亮度
- 计算整张图片的亮度平均值
注意,这仅仅只能做一个比较粗糙的判定,按照我们人的正常思维,在傍晚临界点我们也无法判定当前是属于晚上还是白天!
import cv2 as cv
import numpy as np


def average_brightness(img):
    """封装一个计算图片平均亮度的函数"""
    imgInfo = img.shape
    height = imgInfo[0]
    width = imgInfo[1]

    hsv_img = cv.cvtColor(img, cv.COLOR_BGR2HSV)
    # 提取出v通道信息
    v_day = cv.split(hsv_img)[2]
    # 计算亮度之和
    result = np.sum(v_day)
    # 返回亮度的平均值
    return result / (height * width)


# 计算白天的亮度平均值
day_img = cv.imread("img/bt.png", cv.IMREAD_COLOR)
brightness1 = average_brightness(day_img)
print("day brightness1:", brightness1)

# 计算晚上的亮度平均值
night_img = cv.imread("img/ws.png", cv.IMREAD_COLOR)
brightness2 = average_brightness(night_img)
print("night brightness2:", brightness2)

cv.waitKey(0)
cv.destroyAllWindows()
运行结果

颜色过滤
在一张图片中,如果某个物体的颜色为纯色,那么我们就可以使用颜色过滤inRange的方式很方便的来提取这个物体.
下面我们有一张网球的图片,并且网球的颜色为一定范围内的绿色,在这张图片中我们找不到其它颜色也为绿色的图片,所以我们可以考虑使用绿色来提取它!
图片的颜色空间默认为BGR颜色空间,如果我们想找到提取纯绿色的话,我们可能需要写(0,255,0)这样的内容,假设我们想表示一定范围的绿色就会很麻烦!
所以我们考虑将它转成HSV颜色空间,绿色的色调H的范围我们很容易知道,剩下的就是框定颜色的饱和度H和亮度V就可以啦!
实现步骤:
- 读取一张彩色图片
- 将RGB转成HSV图片
- 定义颜色的范围,下限位(30,120,130),上限为(60,255,255)
- 根据颜色的范围创建一个mask
示例代码
import cv2 as cv
# 读取图片
rgb_img = cv.imread("assets/tenis1.jpg", cv.IMREAD_COLOR)
cv.imshow("rgb_img",rgb_img)
# 将BGR颜色空间转成HSV空间
hsv_img = cv.cvtColor(rgb_img, cv.COLOR_BGR2HSV)

# 定义范围 网球颜色范围
lower_color = (30,120,130)
upper_color = (60,255,255)

# 查找颜色
mask_img = cv.inRange(hsv_img, lower_color, upper_color)
# 在颜色范围内的内容是白色, 其它为黑色
cv.imshow("mask_img",mask_img)

cv.waitKey(0)
cv.destroyAllWindows()

替换背景案例
实现步骤
- 从绿幕图片中过滤出绿幕
- 将图片里的内容从绿幕中抠出来
- 在itheima图片上抠出狮子的位置
- 将狮子和黑马图片进行相加得到最终的图片
示例代码
import cv2 as cv
# 1.读取绿幕图片
green_img = cv.imread("assets/lion.jpg", cv.IMREAD_COLOR)

hsv_img = cv.cvtColor(green_img,cv.COLOR_BGR2HSV)
# 2. 定义绿幕的颜色范围
lower_green = (35,43,60)
upper_green = (77,255,255)
# 3. 使用inrange找出所有的背景区域
mask_green = cv.inRange(hsv_img, lower_green, upper_green)

# 复制狮子绿幕图片
mask_img = green_img.copy()
# 将绿幕图片,对应蒙板图片中所有不为0的地方全部改成0
mask_img[mask_green!=0]=(0,0,0)
cv.imshow("dst",mask_img)

# itheima图片 对应蒙板图片为0的地方全都改成0,抠出狮子要存放的位置
itheima_img = cv.imread("assets/itheima.jpg", cv.IMREAD_COLOR)
itheima_img[mask_green==0]=(0,0,0)
cv.imshow("itheima",itheima_img)

# 将抠出来的狮子与处理过的itheima图片加载一起
result = itheima_img+mask_img
cv.imshow("result",result)

cv.waitKey(0)
cv.destroyAllWindows()


旨在为数千万中国开发者提供一个无缝且高效的云端环境,以支持学习、使用和贡献开源项目。
更多推荐
 4
4 0
0- 0


 已为社区贡献1条内容

所有评论(0)