Android Jetpack Compose之列表的使用
概述
在Android的传统View中,当我们需要展示大量的数据时,一般都会使用ListView或者是更高级的RecyclerView。在Compose中我们可以通过Column来实现这一需求,并且还可以让列表实现滚动,懒加载,快速定位到具体位置等功能。非常灵活,下文就是使用Column来实现列表的内容
实例解析
1.实现简单的列表
实现简单的列表时,我们仅需要通过Column组件枚举列出要展示的项即可,比如可以做一个菜单之类的控件。

代码如下:
@Composable
fun SimpleColumn() {
    Surface(border = BorderStroke(2.dp,Color.Gray),
        modifier = Modifier
            .padding(5.dp)
            .height(80.dp)
            .width(70.dp)
    ) {
        Column {
            Text(text = "添加好友", style = MaterialTheme.typography.subtitle1)
            Text(text = "更换背景", style = MaterialTheme.typography.subtitle1)
            Text(text = "隐私协议", style = MaterialTheme.typography.subtitle1)
        }
    }
}
这只是个简单的demo,目的就是想告诉读者可以使用column来做菜单,然后可以搭配DropdownMenu来做下拉菜单。菜单的特点就是可以枚举完所有的项。而且这些项在手机屏幕的展示范围之类,假设需要展示的项过多,则需要菜单支持滑动的方式。
2.实现可滑动的菜单列表
在很多时候,列表中的项会非常多,例如通讯录,短信,音乐列表等,我们需要滑动列表来查看所有内容,我们可以通过给Column的Modifier添加verticalScroll()方法来让列表实现滑动。
这里需要注意的是,当展示的内容变多时,我们不能再用Column组件了,因为Column组件会将所有的数据全部加载,这非常的耗内存和性能,这里采用的是LazyColumn组件,这个组件加载数据时是懒加载。即使用到时才加载数据。

效果如上图所示。代码也很简单,如下:
@Composable
fun SimpleColumn() {
    Surface(border = BorderStroke(2.dp,Color.Gray),
        modifier = Modifier
            .padding(5.dp)
            .height(80.dp)
            .width(70.dp)
    ) {
        val scrollState = rememberScrollState()
        Column(modifier = Modifier.verticalScroll(scrollState)) {
            Text(text = "添加好友", style = MaterialTheme.typography.subtitle1)
            Text(text = "更换背景", style = MaterialTheme.typography.subtitle1)
            Text(text = "隐私协议", style = MaterialTheme.typography.subtitle1)
            Text(text = "添加好友", style = MaterialTheme.typography.subtitle1)
            Text(text = "更换背景", style = MaterialTheme.typography.subtitle1)
            Text(text = "隐私协议", style = MaterialTheme.typography.subtitle1)
            Text(text = "添加好友", style = MaterialTheme.typography.subtitle1)
            Text(text = "更换背景", style = MaterialTheme.typography.subtitle1)
            Text(text = "隐私协议", style = MaterialTheme.typography.subtitle1)
            Text(text = "添加好友", style = MaterialTheme.typography.subtitle1)
            Text(text = "更换背景", style = MaterialTheme.typography.subtitle1)
            Text(text = "隐私协议", style = MaterialTheme.typography.subtitle1)
        }
    }
}
3.实现一个可滑动并且能快速滑动到指定位置的列表
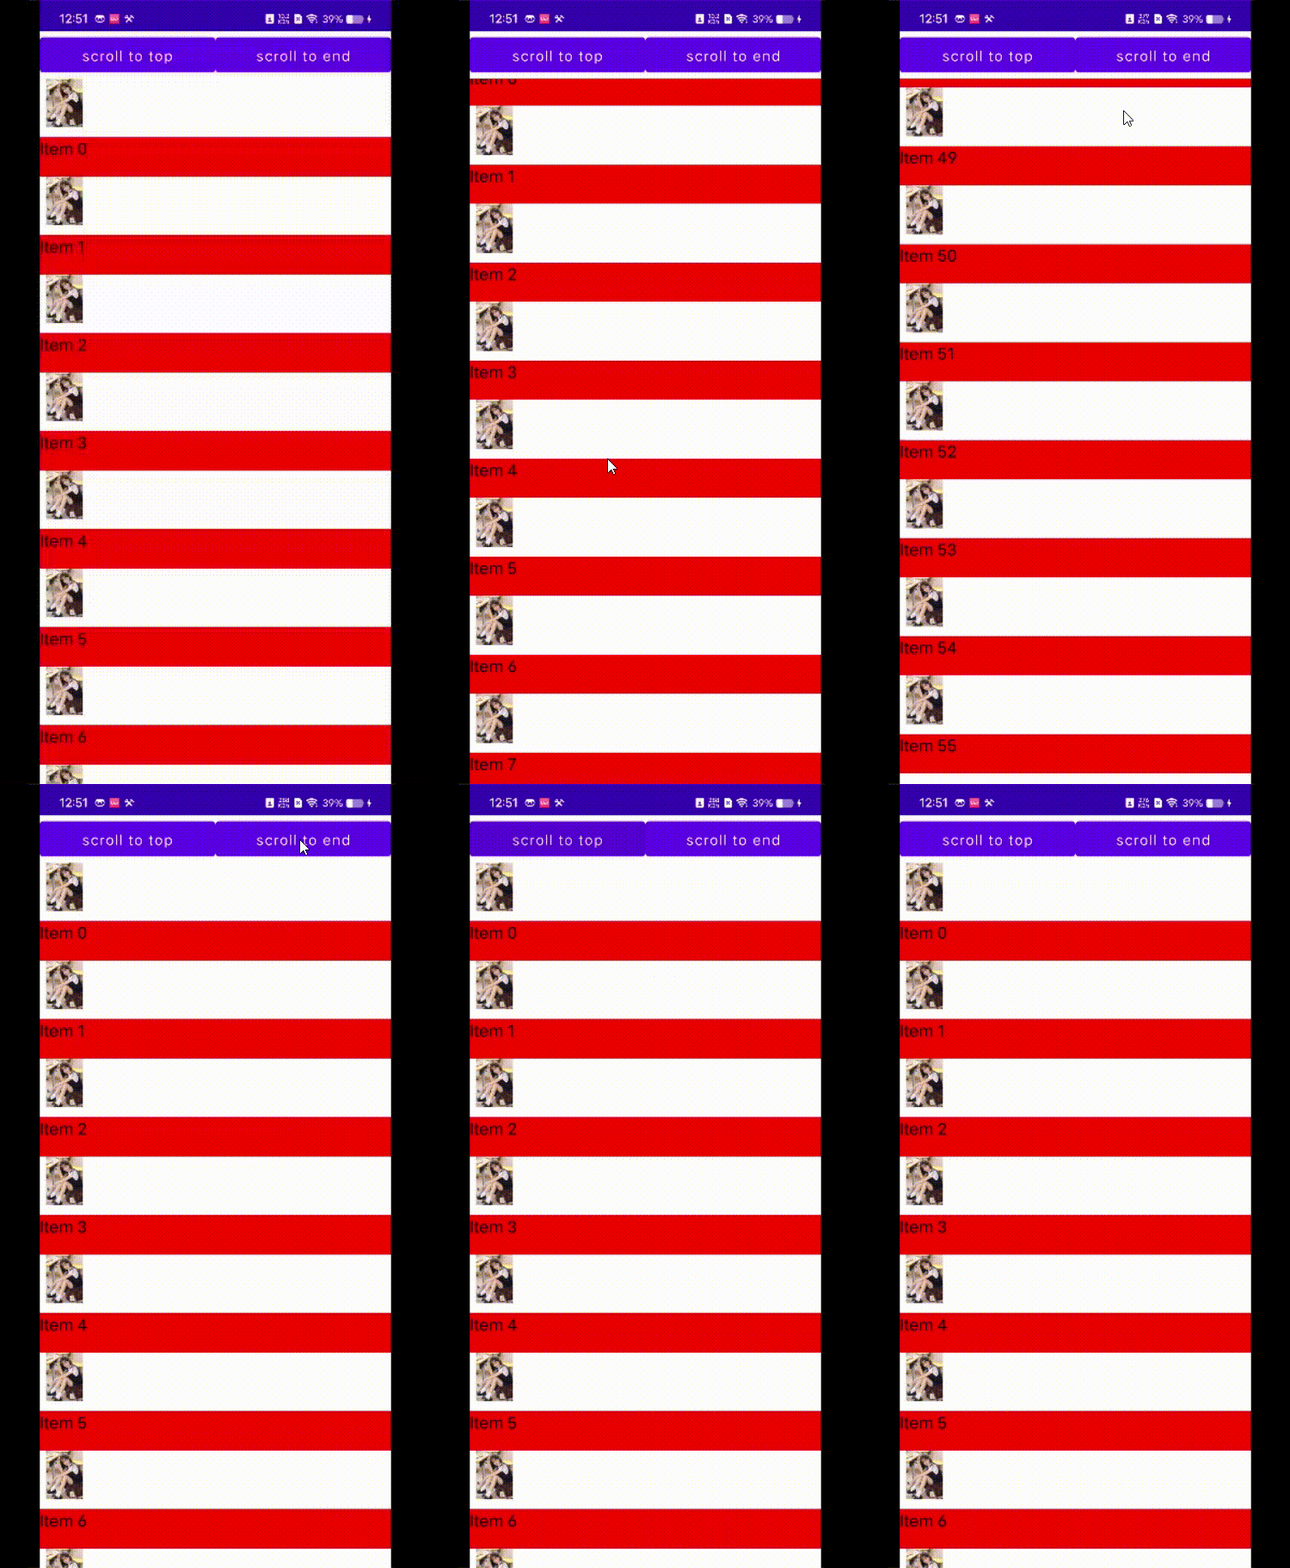
当我们的列表的项特别多时,我们引入了可滑动的列表,让用户可以通过滑动来查看更多的信息,但是有时候用户滑到最底下时,想要快速回到第一项,或者用户想要快速看最后一项的内容,这时候就需要我们实现能快速滑动到列表的最后一项或者时从最后一项快速滑动到第一项的功能。效果如下所示:
 即用户既可以滑动查看内容,也可以通过点击对应的按钮快速滑动到指定的Item,代码如下所示:
@Composable
fun ScrollingList() {
    val scrollState = rememberLazyListState()
    val listSize = 100;
    val coroutineScope = rememberCoroutineScope()
    Column {
        Row {
            Button(
                onClick = {
                    coroutineScope.launch {
                        scrollState.animateScrollToItem(0)
                    }
                },
                modifier = Modifier.weight(1f)
            ) {
                Text(text = "scroll to top")
            }

            Button(
                onClick = {
                    coroutineScope.launch {
                        scrollState.animateScrollToItem(listSize - 1)
                    }
                },
                modifier = Modifier.weight(1f)
            ) {
                Text(text = "scroll to end")
            }
        }

        LazyColumn(state = scrollState) {
            items(listSize) {
                ImageListItem(index = it)
            }
        }
    }
}
ImageListItem代码如下:
@Composable
fun ImageListItem(index: Int) {
    Row(verticalAlignment = Alignment.CenterVertically) {
        Image(
            painter = rememberImagePainter(data = "图片链接"),
            contentDescription = "",
            modifier = Modifier.size(50.dp)
        )
    }

    Spacer(modifier = Modifier.size(10.dp))
    Box(modifier = Modifier
        .fillMaxWidth()
        .height(40.dp)
        .background(color = Color.Red)){
        Text(text = "Item $index", style = MaterialTheme.typography.subtitle1)
    }
}
注意:展示图片这里需要引入一个库:implementation('io.coil-kt:coil-compose:1.3.0')
如上面的代码所示,这里完成快速滑动到列表指定的项的功能主要是通过scrollState.animateScrollToItem(0) api完成的。代码量也少,相比于传统的ListView和RecycleView,Compose ui的代码量更少,更容易读。而且不用再写Adapter适配器和xml的布局了。感觉真的超级好。
注意:使用scrollState.animateScrollToItem(0) API时需要搭配协程使用
总结
本文主要是介绍了如何使用Compose UI去展示一些列表数据,主要分为不可滚动的列表,可以用于做菜单;可滚动的列表 ,可以用于展示大量的数据;还有能快速定位到指定项的列表,用于方便用户快速滚动到需要查看的项。实现列表有两种方式,一种是Column,适合用于数据量比较少的场景,还有另外一种是懒加载的方式LazyColumn,适合数据量大的场景。列表在UI展示是比较重要的,希望读者能够牢牢掌握。
更多推荐
 已为社区贡献7条内容


所有评论(0)