Spring boot 整合Dubbo实践(nacos作为注册中心)
该demo主要基于springboot整合dubo,注册中心采用nacos,主要是对dubbo的@Service 和@Reference的应用,还有基本的配置
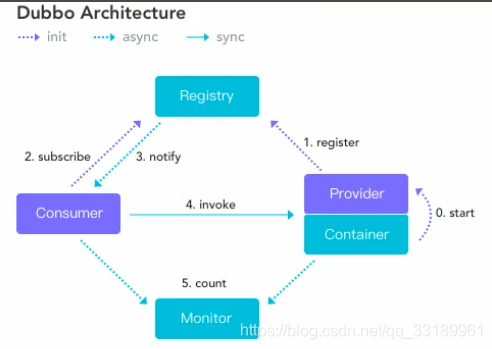
Dubbo的组成部分

其中Registry采用nacos,之所以不使用zookeeper作为注册中心,是因为我不会 :),Monitor是dubbo自己的监控管理系统。
依次配置各个部分。
一、配置注册中心
nacos作为注册中心的安装配置可以看这篇,在这就不赘述了

启动后访问红框的地址进入管理控制台

二、创建服务提供者和消费者
1、初始化项目
工程结构如下:
其中service1是服务提供者(provider),service2是消费者(consumer),service1和service2都引入了api工程的接口,实现则由service1和service2自己完成

父工程依赖:
<?xml version="1.0" encoding="UTF-8"?>
<project xmlns="http://maven.apache.org/POM/4.0.0"
         xmlns:xsi="http://www.w3.org/2001/XMLSchema-instance"
         xsi:schemaLocation="http://maven.apache.org/POM/4.0.0 http://maven.apache.org/xsd/maven-4.0.0.xsd">
    <modelVersion>4.0.0</modelVersion>

    <groupId>com.xx</groupId>
    <artifactId>dubbo</artifactId>
    <version>1.0-SNAPSHOT</version>
    <modules>
        <module>service1</module>
        <module>service2</module>
    </modules>

    <packaging>pom</packaging>

    <dependencyManagement>
        <dependencies>
            <dependency>
                <groupId>com.alibaba.cloud</groupId>
                <artifactId>spring-cloud-alibaba-dependencies</artifactId>
                <version>2.1.0.RELEASE</version>
                <type>pom</type>
                <scope>import</scope>
            </dependency>
            <dependency>
                <groupId>org.springframework.cloud</groupId>
                <artifactId>spring-cloud-dependencies</artifactId>
                <version>Greenwich.RELEASE</version>
                <type>pom</type>
                <scope>import</scope>
            </dependency>
            <dependency>
                <groupId>org.springframework.boot</groupId>
                <artifactId>spring-boot-dependencies</artifactId>
                <version>2.1.3.RELEASE</version>
                <type>pom</type>
                <scope>import</scope>
            </dependency>
        </dependencies>
    </dependencyManagement>
</project>在正式的开发中,通常将各个服务的接口单独写成一个api项目,其他服务需要调用该服务时时只需要引入这个该服务的api依赖,比如这个demo
其中service1及其实现:
返回提供者给的内容
public class Service1Impl implements Service1 {
    public String provider(String content) {
        return "服务提供者-" + content;
    }
}
service2及其实现:
打印service1的返回内容
public class Service2Impl implements Service2 {

    Service1 service1;

    public void consumer() {
        System.out.println(service1.provider("调用者:service2"));
    }
}
现在运行comsumer方法肯定是会报错的,因为service2仅仅引入了service1的接口,实现还在另一个项目(service1)中。
2、改造项目实现RPC调用
主要分为以下几步:
1、暴露服务(将服务提供者注册到注册中心)
(1)导入dubbo依赖
(2)配置服务提供者
2、让服务消费者去注册中心订阅服务提供者的服务地址
2.1、暴露服务service1
(1)导入相关依赖
    <dependencies>
        <dependency>
            <!--nacos注册中心-->
            <groupId>com.alibaba.cloud</groupId>
            <artifactId>spring-cloud-starter-alibaba-nacos-discovery</artifactId>
            <version>2.1.0.RELEASE</version>
        </dependency>
        <!--dubbo-->
        <dependency>
            <groupId>com.alibaba.cloud</groupId>
            <artifactId>spring-cloud-starter-dubbo</artifactId>
            <version>2.1.0.RELEASE</version>
        </dependency>
        <dependency>
            <groupId>org.springframework.boot</groupId>
            <artifactId>spring-boot-starter-web</artifactId>
            <version>2.1.3.RELEASE</version>
        </dependency>
    </dependencies>
(2)配置服务提供者
包括了注册中心和dubbo的配置
server:
  port: 56050
spring:
  application:
    name: provider
  main:
    allow-bean-definition-overriding: true #Spring Boot 2.1 需要设定,允许覆盖bean
  cloud:
    nacos:
      discovery:
        server-addr: 127.0.0.1:8848
        namespace: 9cd826a1-2bb5-4eeb-a2fb-20cb95ea65f2 #开发环境空间

dubbo:
  scan:
    # dubbo 服务扫描基准包
    base-packages: com.dubbo.service
  protocol:
    # dubbo 协议
    name: dubbo
    # dubbo 协议端口
    port: 20884
  registry:
    address: spring-cloud://localhost #注册中心地址,相当于nacos的服务地址127.0.0.1:8848
  application:
    qos-enable: false #dubbo运维服务是否开启
  consumer:
    check: false #启动时是否检查依赖的服务
添加@org.apache.dubbo.config.annotation.Service注解,使得该服务可被dubbo发现和调用(暴露服务)
@org.apache.dubbo.config.annotation.Service
public class Service1Impl implements Service1 {
    public String provider(String content) {
        return "服务提供者-" + content;
    }
}
启动service1的启动类:
@SpringBootApplication
@EnableDiscoveryClient
@EnableDubbo
public class Service1Application {
    public static void main(String[] args) {
        SpringApplication.run(Service1Application.class, args);
    }
}
@EnableDubbo:开启基于注解的dubbo服务
打开nacos的控制台可以看到provider已经注册到注册中心了:

2.2、让服务消费者去注册中心订阅服务提供者的服务地址
service2的pom:
<?xml version="1.0" encoding="UTF-8"?>
<project xmlns="http://maven.apache.org/POM/4.0.0"
         xmlns:xsi="http://www.w3.org/2001/XMLSchema-instance"
         xsi:schemaLocation="http://maven.apache.org/POM/4.0.0 http://maven.apache.org/xsd/maven-4.0.0.xsd">
    <parent>
        <artifactId>dubbo</artifactId>
        <groupId>com.xx</groupId>
        <version>1.0-SNAPSHOT</version>
    </parent>
    <modelVersion>4.0.0</modelVersion>

    <artifactId>service2</artifactId>

    <dependencies>
        <!--api模块-->
        <dependency>
            <groupId>com.xx</groupId>
            <artifactId>api</artifactId>
            <version>1.0-SNAPSHOT</version>
        </dependency>
        <dependency>
            <!--nacos注册中心-->
            <groupId>com.alibaba.cloud</groupId>
            <artifactId>spring-cloud-starter-alibaba-nacos-discovery</artifactId>
            <version>2.1.0.RELEASE</version>
        </dependency>
        <!--dubbo-->
        <dependency>
            <groupId>com.alibaba.cloud</groupId>
            <artifactId>spring-cloud-starter-dubbo</artifactId>
            <version>2.1.0.RELEASE</version>
        </dependency>
        <dependency>
            <groupId>org.springframework.boot</groupId>
            <artifactId>spring-boot-starter-web</artifactId>
            <version>2.1.3.RELEASE</version>
        </dependency>
    </dependencies>

</project>
添加nacos和duubo的配置:
server:
  port: 56051
spring:
  application:
    name: consumer
  main:
    allow-bean-definition-overriding: true #Spring Boot 2.1 需要设定,允许覆盖bean
  cloud:
    nacos:
      discovery:
        server-addr: 127.0.0.1:8848
        namespace: 9cd826a1-2bb5-4eeb-a2fb-20cb95ea65f2 #开发环境空间

dubbo:
  scan:
    # dubbo 服务扫描基准包
    base-packages: com.dubbo.service
  protocol:
    # dubbo 协议
    name: dubbo
    # dubbo 协议端口
    port: 20883
  registry:
    address: spring-cloud://localhost #注册中心地址,相当于nacos的服务地址127.0.0.1:8848
  application:
    qos-enable: false #dubbo运维服务是否开启
  consumer:
    check: false #启动时是否检查依赖的服务
同样地,也为消费者Service2Impl添加@org.springframework.stereotype.Service注解,同时为其中的服务提供者Service1添加@org.apache.dubbo.config.annotation.Reference注解,告诉调用者Service1的实现在远端,从注册中心找,要通过dubbo调用:
@org.springframework.stereotype.Service
public class Service2Impl implements Service2 {

    @org.apache.dubbo.config.annotation.Reference
    Service1 service1;

    public String consumer() {
        return service1.provider("调用者:service2");
    }
}
在dubbo 2.7.8之后的版本中注解
@Service被@DubboService 取代。
@Reference被@DubboReference取代。
到此为止,service2已经可以通过dubbo远程调用service1的方法了,接下来启动service2:
@SpringBootApplication
@EnableDiscoveryClient
@EnableDubbo
public class Service2Application {
    public static void main(String[] args) {
        SpringApplication.run(Service2Application.class, args);
    }
}
通过controller测试一下:
@RequestMapping("/c1")
@RestController
public class ConsumerController {

    @Autowired
    Service2Impl service2;

    @GetMapping("consumer")
    public String consumer(){
        return service2.consumer();
    }
}
在浏览器访问http://localhost:56051/c1/consumer:

至此成功实现调用
更多推荐
 已为社区贡献7条内容


所有评论(0)