C++在win10中搭建onnxruntime(cpu+gpu),TensorRT过程及报错解决
TensorRT
此配置方法为下载zip文件,使用CMake方法可参考:
https://download.csdn.net/blog/column/12528315/135650724?ydreferer=aHR0cHM6Ly93d3cuYmFpZHUuY29tL2xpbms%2FdXJsPVVld201LWxLcnlpeFJkUXV6RnZYM1ZiYVdRUEFCa1NtbFNTTjhra3g5cUxURVN3SXdsTFd6blVWeU5YaXE4UXlTS2NqM245VXhpbV90d2hva0E0WEd1a2c5dzV2bFVsMHQxTlNxUl9QNUptJndkPSZlcWlkPTk1OTllMDBhMDA2MTBkMGQwMDAwMDAwNjY2YmM0M2Fh https://download.csdn.net/blog/column/12528315/135650724?ydreferer=aHR0cHM6Ly93d3cuYmFpZHUuY29tL2xpbms%2FdXJsPVVld201LWxLcnlpeFJkUXV6RnZYM1ZiYVdRUEFCa1NtbFNTTjhra3g5cUxURVN3SXdsTFd6blVWeU5YaXE4UXlTS2NqM245VXhpbV90d2hva0E0WEd1a2c5dzV2bFVsMHQxTlNxUl9QNUptJndkPSZlcWlkPTk1OTllMDBhMDA2MTBkMGQwMDAwMDAwNjY2YmM0M2Fh
环境:
win10,cuda11.8,TensorRT-8.5.2.2,vs2022(最好vs2019),opencv4.10.0
TensorRT配置详情参考(图文版):
https://blog.csdn.net/m0_72734364/article/details/128865904?spm=1001.2014.3001.5501(win10下 yolov8 tensorrt模型部署)
TensorRT配置详情参考(视频版):
报错1:
#error: -- unsupported Microsoft Visual Studio version! Only the versions between 2017 and 2022 (inclusive) are supported! The nvcc flag '-allow-unsupported-compiler' can be used to override this version check; however, using an unsupported host compiler may cause compilation failure or incorrect run time execution. Use at your own risk. rt C:\Program Files\NVIDIA GPU Computing Toolkit\CUDA\v11.8\include\crt\host_config.h 153
错误表明 NVIDIA CUDA Toolkit 不正式支持您使用的 Microsoft Visual Studio 版本。当使用的 Visual Studio 版本超出 CUDA 指定的支持范围,我的配置cuda11.8支持vs2022
解决办法:配置属性> CUDA C/C++ >Command Line>加入命令:-allow-unsupported-compiler,告诉 NVCC 绕过对不受支持的 Visual Studio 版本的检查。
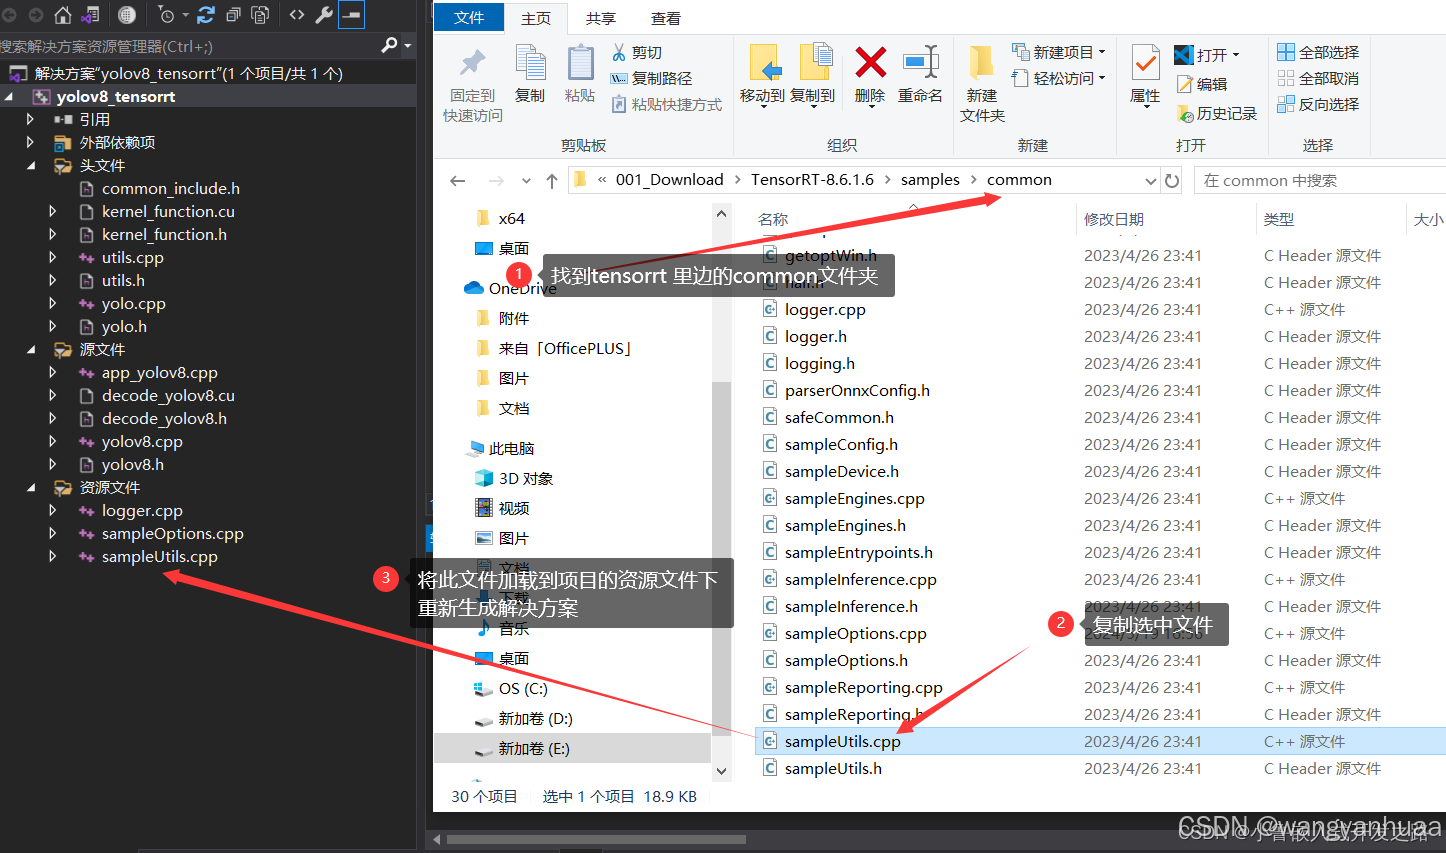
报错2:
sampleOptions.obj : error LNK2001: 无法解析的外部符号
error LNK2001: 无法解析的外部符号 "class std::vector<class std::basic_string<char,struct std::char_traits<char>,class std::allocator<char> >,class std::allocator<class std::basic_string<char,struct std::char_traits<char>,class std::allocator<char> > > > __cdecl sample::splitToStringVec(class std::basic_string<char,struct std::char_traits<char>,class std::allocator<char> > const &,char)" (?splitToStringVec@sample@@YA?AV?$vector@V?$basic_string@DU?$char_traits@D@std@@V?$allocator@D@2@@std@@V?$allocator@V?$basic_string@DU?$char_traits@D@std@@V?$allocator@D@2@@std@@@2@@std@@AEBV?$basic_string@DU?$char_traits@D@std@@V?$allocator@D@2@@3@D@Z)
1>E:\003_Project\CUDA\yolov8_tensorrt\yolov8_tensorrt\x64\Release\yolov8_tensorrt.exe : fatal error LNK1120: 1 个无法解析的外部命令
报错原因是:sampleOptions.cpp没有加载没有找到引用的类成员函数
解决办法:
报错3:
当tensorrt加速项目遇到找不到‘nvinfer.dll‘ ,可能会找不到5个.dll文件
解决办法:
nvinfer.dll在lib文件夹,将所有的.dll文件都复制到CUDA的lib文件夹中,参考:
Yolov8将.pt文件转换为tensorRt的.trt文件(模型部署)_yolov8转tensorrt-CSDN博客
.trt文件转换
方法一:
现将.pt文件转换成.onnx文件,之后cmd到TensorRT的bin目录下使用trtexec.exe进行转换:
"E:\TensorRT-8.5.2.2\bin\trtexec.exe" --onnx="E:\wangyanhua\yolov8-train27-3.onnx" --saveEngine="E:\wangyanhua\yolov8-train27-3.trt" --fp16
方法二:
YOLOv8 Tensorrt Python/C++部署详解-CSDN博客
图片推理
配置属性-->调试-->命令参数:
--model=E:/wangyanhua/yolov8-train27-3.trt --size=640 --batch_size=1 --img=E:/wangyanhua/ultralytics-main/dataset/yolo_clip3/images/test/00002.jpg --show --savePath=E:/wangyanhua/ultralytics-main/test
训练自己的数据集,改动:(app_yolov8.cpp)
void setParameters(utils::InitParameter& initParameters)
{
	initParameters.class_names = {
	   "centre",
	   "end"

	   // Add all class names here
	};
	//initParameters.class_names = utils::dataSets::coco80;
	//initParameters.class_names = utils::dataSets::voc20;
	initParameters.num_class = 2; // for coco
	//initParameters.num_class = 20; // for voc2012
	initParameters.batch_size = 8;
	initParameters.dst_h = 640;
	initParameters.dst_w = 640;
	initParameters.input_output_names = { "images",  "output0" };
	initParameters.conf_thresh = 0.25f;
	initParameters.iou_thresh = 0.45f;
	initParameters.save_path = "";
}
onnxruntime(CPU)
使用nupkg包解析的方法:
使用onnxruntime推理yolov5(C++)_怎么在外部推理yolov5-CSDN博客
onnxruntime(GPU)
环境:win10,cuda11.8,TensorRT-8.5.2.2,vs2022(最好vs2019),opencv4.10.0
详细参考:
VS2019 快速配置Onnxruntime环境_onnxruntime.dll-CSDN博客
CPU+GPU版,CPU使用zip文件配置:
深度学习模型部署——基于Onnx Runtime的深度学习模型CPU与GPU部署(C++实现)_onnxruntime-gpu-CSDN博客
代码可使用:
https://zhuanlan.zhihu.com/p/662592782
我使用的推理代码:
【yolov8部署实战】VS2019环境下使用Onnxruntime环境部署yolov8目标检测|含源码_c++ onnxruntime 部署yolov8-CSDN博客

AtomGit 是由开放原子开源基金会联合 CSDN 等生态伙伴共同推出的新一代开源与人工智能协作平台。平台坚持“开放、中立、公益”的理念,把代码托管、模型共享、数据集托管、智能体开发体验和算力服务整合在一起,为开发者提供从开发、训练到部署的一站式体验。
更多推荐


 19
19 0
0- 0


 已为社区贡献1条内容

所有评论(0)