【三】安装k8s+kuboard, 拉取harbor镜像并执行yml文件
自己的配置
我在尊云上两百多买了三台2c4g的服务器,其实买两台就够了。
-
修改服务网卡掩码 确保几台服务器内网之间可以ping通
以尊云为例,vi /etc/sysconfig/network-scripts/ifcfg-eth1 修NETMASK值为255.0.0.0,重启服务器,尝试ping,确认内网已互通。 -
安装kuboard教程安装k8s和kuboard
安装k8s:https://kuboard.cn/install/history-k8s/install-k8s-1.19.x.html,其中初始化master和worker时都填写购买的域名,没有就不改就行,ip改为master的内网ip
安装kuboard:https://kuboard.cn/install/v3/install-in-k8s.html#方法一-使用-hostpath-提供持续化 -
在kuboard的配置中心配置harbor密文
进入对应的命名空间内,点击配置中心,点击密文,点击创建secret,在弹出的表单中
按要求输入,名字任取,docker serve以我的例子填写的是http://103.39.222.98:80/ 一定要带端口,username和password填自己登录harbor的。会出现一个复制指令,可以复制后去master中验证一下是否输出login success。 -
所有的节点,都要修改daemon.json并重启docker,否则拉取harbor镜像时会报一个https的错误
vi /etc/docker/daemon.json
添加 “insecure-registries”: [“103.39.222.98:80”], ip是私有镜像地址,端口80看harbor端口 -
让Jenkins可以通过ssh无密码登录master
    # 在安装Jenkins的服务器上,看是否.ssh目录,如果没有则创建,
    docker exec -it jenkins bash
    cd ~
    ls -a
	# 创建命令如下
	mkdir .ssh
	cd .ssh
	ssh-keygen   # 然后连续回车三次,就会得到id_rsa和id_rsa.pub
	cat id_rsa.pub
	# 复制这个秘钥,然后切换到k8s的master服务器上, 看是否有.ssh/authorized_keys文件,没有就创建
	mkdir .ssh
	cd .ssh
	touch authorized_keys
	vi authorized_keys
黏贴密钥后保存,不要黏贴多余的空格,在Jenkins的bash命令中输入 ssh root@ip fsddsffdsgs, 若提示无该命令则表示无密码登录成功。
配置jenkins+k8s
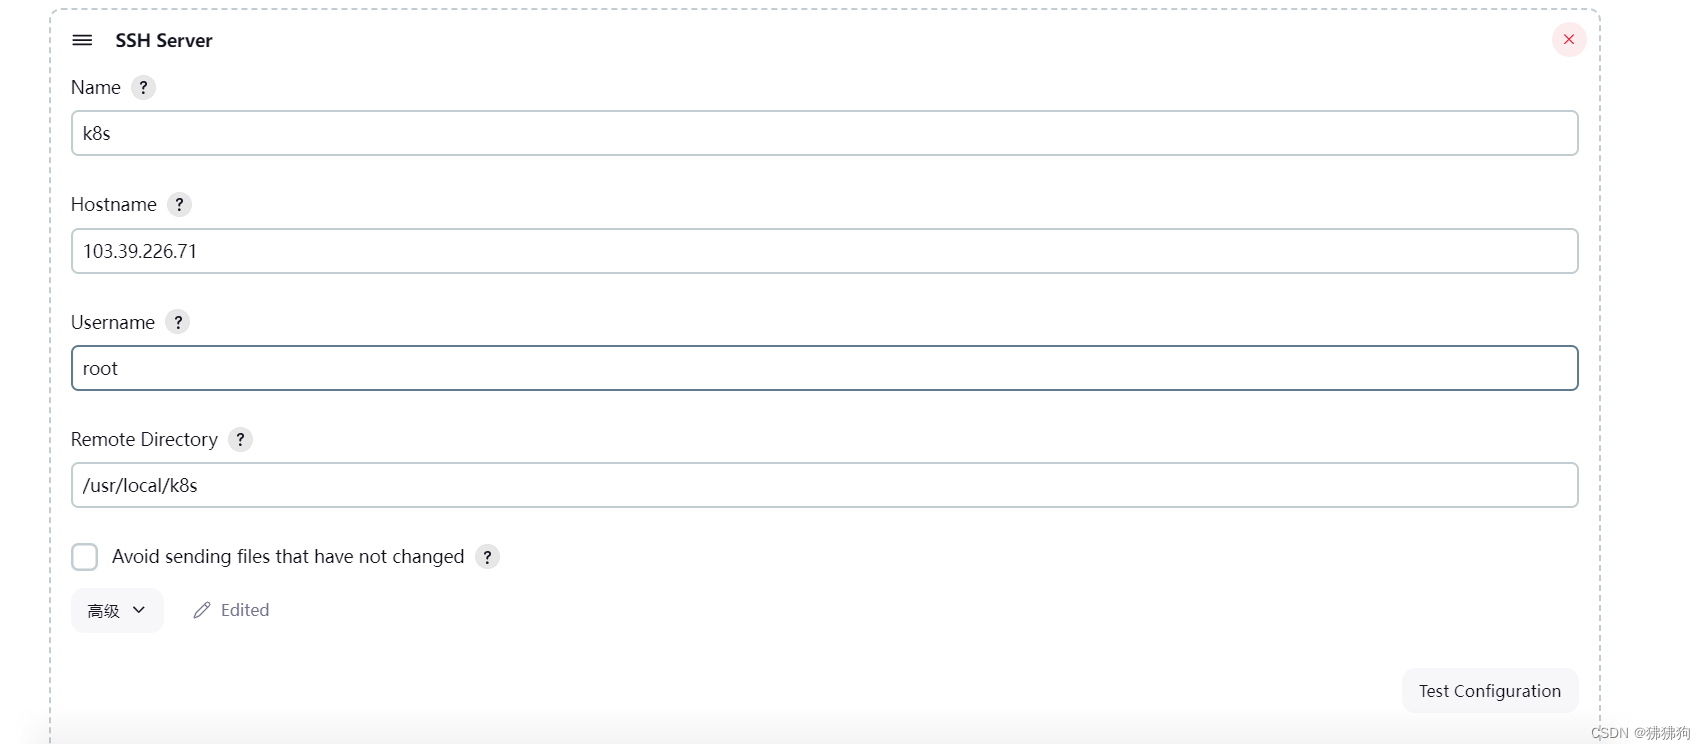
进入jenkins的系统管理的系统配置中,找到Publish over SSH
点击新增,填写如下内容

点击test会提示k8s文件夹不存在,去master节点中创建该目录。再测试就成功了。
创建k8s生成的pod、server的yml文件
我命名为pipeline.yml
apiVersion: apps/v1
kind: Deployment
metadata:
  namespace: test
  name: helloworld-deployment
  labels:
    app: helloworld-deployment
spec:
  replicas: 3
  selector:
    matchLabels:
      app: helloworld
  template:
    metadata:
      labels:
        app: helloworld
    spec:
      containers:
      - name: helloworld
        image: 103.39.222.98:80/repo/hello:v4.0.0
        imagePullPolicy: Always
        ports:
        - containerPort: 8000
      imagePullSecrets:
        - name: harbor-token
---
apiVersion: v1
kind: Service
metadata:
  namespace: test
  name: helloworld-deployment
  labels:
    app: helloworld-deployment
spec:
  selector:
    app: helloworld
  ports:
  - port: 8000
    targetPort: 8000   # 这些端口要与dockerfile中配置的端口一致
  type: NodePort
进入jenkins流水线语法中选择

其他都空着就行,点击生成流水线脚本复制到jenkinfile中,到现在的文件内容为:
// 所有的脚本命令都放在当前的pipline中
pipeline{
	// 制定任务在哪个集群节点中执行
	agent any

	// 声明全局变量,方便后面使用
	environment {
		key = 'value'
	}

	stages {
        	stage('拉取git仓库代码') {
            		steps {
        checkout scmGit(branches: [[name: '${tag}']], extensions: [], userRemoteConfigs: [[credentialsId: 'ee882b26-32f7-487f-af8b-8ce97ae6d923', url: 'https://gitee.com/feiminjie/helloworld.git']])
            		}
        	}
        	stage('生成docker镜像') {
            		steps {
            		    sh 'docker build -t hello:$tag .'
            		}
        	}
            stage('推送harbor') {
            		steps {
            		    sh '''docker login -u admin -p Harbor12345 103.39.222.98:80
docker tag hello:$tag 103.39.222.98:80/repo/hello:$tag
docker push 103.39.222.98:80/repo/hello:$tag'''
            		}
        	}
            stage('推送yml到master') {
            		steps {
            		    sshPublisher(publishers: [sshPublisherDesc(configName: 'k8s', transfers: [sshTransfer(cleanRemote: false, excludes: '', execCommand: '', execTimeout: 120000, flatten: false, makeEmptyDirs: false, noDefaultExcludes: false, patternSeparator: '[, ]+', remoteDirectory: '', remoteDirectorySDF: false, removePrefix: '', sourceFiles: 'pipeline.yml')], usePromotionTimestamp: false, useWorkspaceInPromotion: false, verbose: false)])
            		}
        	}
     }
}
执行一下任务,进入master的/usr/local/k8s下查看文件是否推送过来。
执行yml文件
上面已经设置了无密码登录,所以直接进jenkins的流水线语法中,选择

复制黏贴到jenkinsfile中,最后的文件内容为:
// 所有的脚本命令都放在当前的pipline中
pipeline{
	// 制定任务在哪个集群节点中执行
	agent any

	// 声明全局变量,方便后面使用
	environment {
		key = 'value'
	}

	stages {
        	stage('拉取git仓库代码') {
            		steps {
        checkout scmGit(branches: [[name: '${tag}']], extensions: [], userRemoteConfigs: [[credentialsId: 'ee882b26-32f7-487f-af8b-8ce97ae6d923', url: 'https://gitee.com/feiminjie/helloworld.git']])
            		}
        	}
        	stage('生成docker镜像') {
            		steps {
            		    sh 'docker build -t hello:$tag .'
            		}
        	}
            stage('推送harbor') {
            		steps {
            		    sh '''docker login -u admin -p Harbor12345 103.39.222.98:80
docker tag hello:$tag 103.39.222.98:80/repo/hello:$tag
docker push 103.39.222.98:80/repo/hello:$tag'''
            		}
        	}
            stage('推送yml到master') {
            		steps {
            		    sshPublisher(publishers: [sshPublisherDesc(configName: 'k8s', transfers: [sshTransfer(cleanRemote: false, excludes: '', execCommand: '', execTimeout: 120000, flatten: false, makeEmptyDirs: false, noDefaultExcludes: false, patternSeparator: '[, ]+', remoteDirectory: '', remoteDirectorySDF: false, removePrefix: '', sourceFiles: 'pipeline.yml')], usePromotionTimestamp: false, useWorkspaceInPromotion: false, verbose: false)])
            		}
        	}
        	stage('执行yml文件') {
            		steps {
            		sh '''ssh root@103.39.226.71 kubectl apply -f /usr/local/k8s/pipeline.yml
ssh root@103.39.226.71 kubectl rollout restart deployment helloworld-deployment -n test'''
            		}
        	}
    	}
}
整个执行一下任务。可以去kuboard中查看pod和server是否启动。
jenkins结果:

kuboard结果:

对面的端口就是黄色31840
在浏览器输入 103.39.226.71:31840/api/v1,会输出helloworld
如果只在一台云服务器上部署:主要是运行时将容器的8000端口映射到主机的8000端口,docker run -d -p 8000:8000 hello,云服务器的端口要开放,-d为后台运行
更多推荐
 已为社区贡献3条内容


所有评论(0)