three.js 第六节 -纹理和贴图(普通贴图、hdr贴图)
·
素材

补充一下
参数依次是:
  宽度,
  高度,
  宽度分段数:它决定了平面在宽度方向上被分割成多少个小矩形(或更准确地说,是顶点网格的宽度分辨率)。
             更高的值会创建更平滑的曲线(虽然对于平面来说,这主要体现在边缘的圆形或平滑处理上,如果有的话),但也会增加渲染的顶点和面数。
  高度分段数:与宽度分段数类似,它决定了平面在高度方向上被分割成多少个小矩形。

const planeGeometry = new THREE.PlaneGeometry(1, 1, 64, 64)
// @ts-nocheck
import * as THREE from 'three'
import { OrbitControls } from 'three/examples/jsm/controls/OrbitControls'
import { GUI } from 'three/examples/jsm/libs/lil-gui.module.min.js'
import { RGBELoader } from 'three/examples/jsm/loaders/RGBELoader.js'

const scence = new THREE.Scene()

const camera = new THREE.PerspectiveCamera(45, window.innerWidth / window.innerHeight, 0.1, 1000)
camera.position.set(0, 0, 2)
// camera.lookAt(0, 0, 0)

const renderer = new THREE.WebGLRenderer()
renderer.setSize(window.innerWidth / 2, window.innerHeight / 2)
document.body.appendChild(renderer.domElement)

// -----------------------------------------------------------------
// -----------------------------------------------------------------

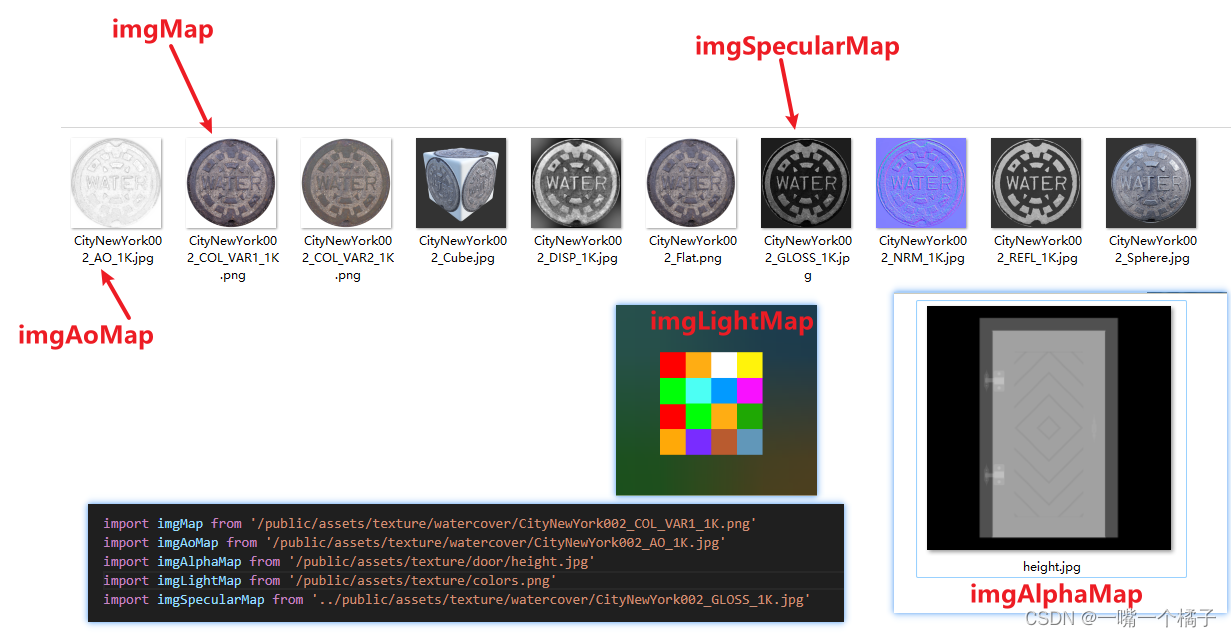
	import imgMap from '/public/assets/texture/watercover/CityNewYork002_COL_VAR1_1K.png'
	import imgAoMap from '/public/assets/texture/watercover/CityNewYork002_AO_1K.jpg'
	import imgAlphaMap from '/public/assets/texture/door/height.jpg'
	import imgLightMap from '/public/assets/texture/colors.png'
	import imgSpecularMap from '../public/assets/texture/watercover/CityNewYork002_GLOSS_1K.jpg'

	`【创建纹理加载器】`
	const textureLoader = new THREE.TextureLoader()

	// 加载纹理
	let texture = textureLoader.load(imgMap)
	// 加载ao贴图
	let aoMap = textureLoader.load(imgAoMap)
	// 透明度贴图
	let alphaMap = textureLoader.load(imgAlphaMap)
	// 光照贴图
	let lightMap = textureLoader.load(imgLightMap)
	// 高光贴图
	let specularMap = textureLoader.load(imgSpecularMap)


	let rgbeLoader = new RGBELoader()
	rgbeLoader.load('/public/assets/texture/Alex_Hart-Nature_Lab_Bones_2k.hdr', (envMap) => {
	  envMap.mapping = THREE.EquirectangularReflectionMapping
	  scence.background = envMap
	  `设置plane的环境贴图(planeMaterial是plane的材质)`
	  planeMaterial.envMap = envMap
	})

	// 创建一个平面
	let planeGeometry = new THREE.PlaneGeometry(1, 1) // 宽,高
	let planeMaterial = new THREE.MeshBasicMaterial({
	  color: 0xffffff,
	  map: texture,
	  transparent: true, // 设置是否透明
	  aoMap: aoMap, // ao贴图(其实就是加上阴影了,ao强度就是控制阴影强度的)
	  aoMapIntensity: 1, // ao强度(不写的话,默认是1)
	  // alphaMap: alphaMap, // 透明度贴图
	  // lightMap: lightMap, // 设置光照贴图(环境贴图之后)
	  specularMap: specularMap, // 高光贴图
	  reflectivity: 1, // 反射强度(值设置的小,贴图上反射的光就不那么强烈了)
	})
	// planeMaterial.map = texture
	let plane = new THREE.Mesh(planeGeometry, planeMaterial)
	scence.add(plane)

	// 创建GUI
	const gui = new GUI()
	gui.add(planeMaterial, 'aoMapIntensity').min(0).max(1).name('ao强度')

// -----------------------------------------------------------------
// -----------------------------------------------------------------


const axesHelper = new THREE.AxesHelper(5)
scence.add(axesHelper)

const controls = new OrbitControls(camera, renderer.domElement)
controls.enableDamping = true
controls.dampingFactor = 0.05

function render() {
  controls.update()
  requestAnimationFrame(render)

  renderer.render(scence, camera)
}
render()
更多推荐
 已为社区贡献5条内容


所有评论(0)