
MyBatis源码分析(四)插件拦截器的原理及使用
一般开源框架都会提供扩展点,让开发者自行扩展,从而完成逻辑的增强。基于插件机制可以实现了很多有用的功能,比如说分页,字段加密,监控等功能,这种通用的功能,就如同AOP一样,横切在数据操作上。而通过Mybatis插件可以实现对框架的扩展,来实现自定义功能,并且对于用户是无感知的。Mybatis插件本质上来说就是一个拦截器,它体现了 JDK动态代理和责任链设计模式的综合运用。
系列文章索引
MyBatis源码分析(一)MyBatis整体架构分析
MyBatis源码分析(二)SqlSessionFactory的构建及配置文件读取过程
MyBatis源码分析(二、续)SqlSource创建流程,SQL如何解析?如何将#{id}变成?的
MyBatis源码分析(三)SqlSession的执行主流程
MyBatis源码分析(四)插件拦截器的原理及使用
MyBatis源码分析(四、续)MyBatis分页插件拦截器设计与实现
MyBatis源码分析(五)一级缓存与二级缓存的原理
MyBatis源码分析(六)MetaObject工具类的使用与源码分析
MyBatis源码分析(七)MyBatis与Spring的整合原理与源码分析
深入理解JDK动态代理原理,使用javassist动手写一个动态代理框架
一、初识MyBatis拦截器插件
1、前置知识:两种拦截器
拦截器其实有两种实现方式,一种是可以从中间截断;另一种是不能从中间截断,只能在中间过程中对数据进行增强或处理。
(1)第一种拦截器
这种拦截器不能从中截断停止后面的拦截器执行,只能在过程中对目标对象进行增强处理。
import java.util.ArrayList;
import java.util.List;

public class InterceptorDemo {

    public static void main(String[] args) {
        InterceptorA interceptorA = new InterceptorA();
        InterceptorB interceptorB = new InterceptorB();
        InterceptorChain interceptorChain = new InterceptorChain();
        interceptorChain.addInterceptor(interceptorA);
        interceptorChain.addInterceptor(interceptorB);
        interceptorChain.pluginAll(new Object()); // 依次执行A、B

    }
}


interface Interceptor {
    Object plugin(Object target);
}

class InterceptorA implements Interceptor {

    @Override
    public Object plugin(Object target) {
        System.out.println("InterceptorA");
        return target;
    }
}

class InterceptorB implements Interceptor {

    @Override
    public Object plugin(Object target) {
        System.out.println("InterceptorB");
        return target;
    }
}

class InterceptorChain {
    List<Interceptor> interceptors = new ArrayList<>();

    public void addInterceptor(Interceptor interceptor) {
        interceptors.add(interceptor);
    }

    public Object pluginAll(Object target) {
        for (Interceptor interceptor : interceptors) {
            target = interceptor.plugin(target);
        }
        return target;
    }
}
(2)第二种拦截器
这种拦截器可以在中间截断,后续的拦截器不会再执行。
import java.util.ArrayList;
import java.util.Iterator;
import java.util.List;

public class InterceptorDemo {

    public static void main(String[] args) {
        InterceptorA interceptorA = new InterceptorA();
        InterceptorB interceptorB = new InterceptorB();
        InterceptorChain interceptorChain = new InterceptorChain();
        interceptorChain.addInterceptor(interceptorA);
        interceptorChain.addInterceptor(interceptorB);
        interceptorChain.plugin(new Object());
    }
}


interface Interceptor {
    Object plugin(Object target, InterceptorChain chain);
}

class InterceptorA implements Interceptor {

    @Override
    public Object plugin(Object target, InterceptorChain chain) {
        System.out.println("InterceptorA");
        //return chain.plugin(target);
        return target; // 后续的拦截器不会被执行
    }
}

class InterceptorB implements Interceptor {

    @Override
    public Object plugin(Object target, InterceptorChain chain) {
        System.out.println("InterceptorB");
        return chain.plugin(target);
    }
}

class InterceptorChain {
    List<Interceptor> interceptors = new ArrayList<>();
    private Iterator<Interceptor> iterator;

    public void addInterceptor(Interceptor interceptor) {
        interceptors.add(interceptor);
    }

    public Object plugin(Object target) {
        if(iterator == null){
            iterator = interceptors.iterator();
        }
        if(iterator.hasNext()) {
            Interceptor next = iterator.next();
            next.plugin(target, this);
        }
        return target;
    }
}
2、什么是Mybatis插件
一般开源框架都会提供扩展点,让开发者自行扩展,从而完成逻辑的增强。
基于插件机制可以实现了很多有用的功能,比如说分页,字段加密,监控等功能,这种通用的功能,就如同AOP一样,横切在数据操作上。
而通过Mybatis插件可以实现对框架的扩展,来实现自定义功能,并且对于用户是无感知的。
Mybatis插件本质上来说就是一个拦截器,它体现了 JDK动态代理和责任链设计模式的综合运用。
3、MyBatis插件支持的扩展接口
Mybatis中针对四大组件提供了扩展机制,这四个组件分别是:
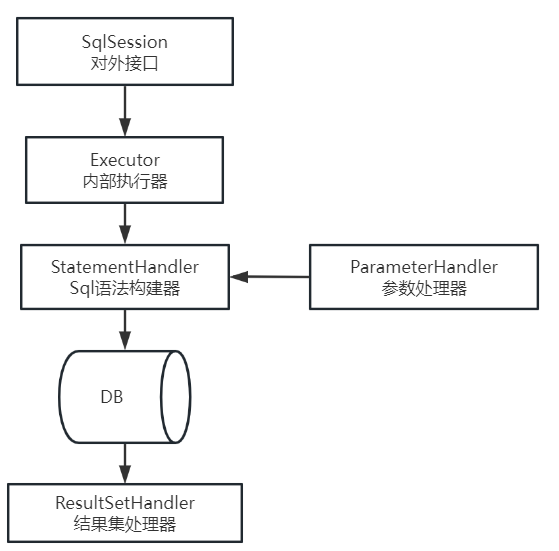
Mybatis中所允许拦截的方法如下:
Executor 【SQL执行器】【update,query,commit,rollback】
StatementHandler 【Sql语法构建器对象】【prepare,parameterize,batch,update,query等】
ParameterHandler 【参数处理器】【getParameterObject,setParameters等】
ResultSetHandler 【结果集处理器】【handleResultSets,handleOuputParameters等】
这些类中方法的细节可以通过查看每个方法的签名来发现,或者直接查看 MyBatis 发行包中的源代码。 如果你想做的不仅仅是监控方法的调用,那么你最好相当了解要重写的方法的行为。 因为在试图修改或重写已有方法的行为时,很可能会破坏 MyBatis 的核心模块。 这些都是更底层的类和方法,所以使用插件的时候要特别当心。
4、能干什么
分页功能:mybatis的分页默认是基于内存分页的(查出所有,再截取),数据量大的情况下效率较低,不过使用mybatis插件可以改变该行为,只需要拦截StatementHandler类的prepare方法,改变要执行的SQL语句为分页语句即可。
性能监控:对于SQL语句执行的性能监控,可以通过拦截Executor类的update, query等方法,用日志记录每个方法执行的时间。
二、拦截器插件初体验
通过 MyBatis 提供的强大机制,使用插件是非常简单的,只需实现 Interceptor 接口,并指定想要拦截的方法签名即可。
1、创建Interceptor的实现类
import org.apache.ibatis.executor.statement.StatementHandler;
import org.apache.ibatis.mapping.BoundSql;
import org.apache.ibatis.plugin.Interceptor;
import org.apache.ibatis.plugin.Invocation;
import org.apache.ibatis.plugin.Plugin;
import java.util.Properties;

/**
 * 使用@Intercepts注解完成插件签名 说明插件的拦截四大对象之一的哪一个对象的哪一个方法
 */
@Intercepts({ @Signature(type = StatementHandler.class,
        method = "prepare",
        args = { Connection.class, Integer.class}) })
public class MyPlugin implements Interceptor {

    // //这里是每次执行操作的时候,都会进行这个拦截器的方法内
    @Override
    public Object intercept(Invocation invocation) throws Throwable {
        //增强逻辑
        StatementHandler statementHandler = (StatementHandler) invocation.getTarget();
        BoundSql boundSql = statementHandler.getBoundSql();
        String sql = boundSql.getSql();
        System.out.println(String.format("mybatis intercept sql:{}", sql));
        return invocation.proceed(); //执行原方法
    }
    /**
     *
     * Description包装目标对象 为目标对象创建代理对象
     * @Param target为要拦截的对象
     * @Return代理对象
     */
    @Override
    public Object plugin(Object target) {
        System.out.println("将要包装的目标对象:" + target);
        return Plugin.wrap(target, this);
    }
    /**获取配置文件的属性**/
    //插件初始化的时候调用,也只调用一次,插件配置的属性从这里设置进来
    @Override
    public void setProperties(Properties properties) {
        System.out.println("插件配置的初始化参数:" + properties);
    }
}
2、配置插件
将写好的插件注册到全局配置文件中。
<!-- mybatis-config.xml -->
<?xml version="1.0" encoding="UTF-8" ?>
<!DOCTYPE configuration PUBLIC "-//mybatis.org//DTD Config 3.0//EN"
		"http://mybatis.org/dtd/mybatis-3-config.dtd">
<configuration>
	<plugins>
		<plugin interceptor="com.demo.interceptor.MyPlugin">
			<property name="dialect" value="mysql" /> <!-- 配置拦截器时自定义的参数 -->
		</plugin>
	</plugins>
</configuration>
三、原理及源码分析
1、拦截器的配置
我们可以在XML中使用plugin标签来配置拦截器:
<!-- mybatis-config.xml -->
<?xml version="1.0" encoding="UTF-8" ?>
<!DOCTYPE configuration PUBLIC "-//mybatis.org//DTD Config 3.0//EN"
		"http://mybatis.org/dtd/mybatis-3-config.dtd">
<configuration>
	<plugins>
		<plugin interceptor="com.demo.interceptor.MyPlugin">
			<property name="dialect" value="mysql" /> <!-- 配置拦截器时自定义的参数 -->
		</plugin>
	</plugins>
</configuration>
也可以通过API的方式,获取Configuration,通过addInterceptor方法添加拦截器。
configuration.addInterceptor(interceptor);
(1)XML配置拦截器原理
在构建SqlSessionFactory时,会对XML配置文件中的configuration标签进行解析:
// org.apache.ibatis.builder.xml.XMLConfigBuilder#parseConfiguration
private void parseConfiguration(XNode root) {
  try {
    // issue #117 read properties first
    propertiesElement(root.evalNode("properties"));
    Properties settings = settingsAsProperties(root.evalNode("settings"));
    loadCustomVfs(settings);
    loadCustomLogImpl(settings);
    typeAliasesElement(root.evalNode("typeAliases"));
    pluginElement(root.evalNode("plugins")); // 处理拦截器
    objectFactoryElement(root.evalNode("objectFactory"));
    objectWrapperFactoryElement(root.evalNode("objectWrapperFactory"));
    reflectorFactoryElement(root.evalNode("reflectorFactory"));
    settingsElement(settings);
    // read it after objectFactory and objectWrapperFactory issue #631
    environmentsElement(root.evalNode("environments"));
    databaseIdProviderElement(root.evalNode("databaseIdProvider"));
    typeHandlerElement(root.evalNode("typeHandlers"));
    mapperElement(root.evalNode("mappers"));
  } catch (Exception e) {
    throw new BuilderException("Error parsing SQL Mapper Configuration. Cause: " + e, e);
  }
}
其中pluginElement方法就是处理plugins标签,对拦截器进行配置:
// org.apache.ibatis.builder.xml.XMLConfigBuilder#pluginElement
private void pluginElement(XNode parent) throws Exception {
  if (parent != null) {
    for (XNode child : parent.getChildren()) {
      // 获取拦截器
      String interceptor = child.getStringAttribute("interceptor");
      // 获取配置的Properties属性
      Properties properties = child.getChildrenAsProperties();
      // 根据配置文件中配置的插件类的全限定名 进行反射初始化
      Interceptor interceptorInstance = (Interceptor) resolveClass(interceptor).getDeclaredConstructor().newInstance();
      // 将属性添加到Intercepetor对象
      interceptorInstance.setProperties(properties);
      // 添加到配置类的InterceptorChain属性,InterceptorChain类维护了一个List<Interceptor>
      configuration.addInterceptor(interceptorInstance);
    }
  }
}
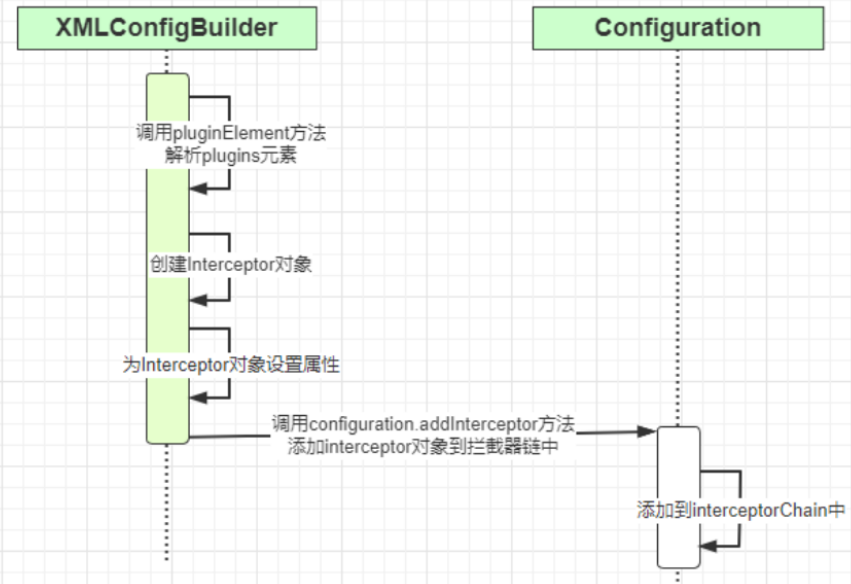
主要做了以下工作:
- 遍历解析plugins标签下每个plugin标签
- 根据解析的类信息创建Interceptor对象
- 调用setProperties方法设置属性
- 将拦截器添加到Configuration类的IntercrptorChain拦截器链中
(2)API方式配置拦截器
API方式配置拦截器就是相当于省略一步XML的配置,需要手动创建Interceptor并且设置Property,然后通过Configuration的addInterceptor方法将拦截器加入到拦截器链中。
2、核心思想
就是使用JDK动态代理的方式,对这四个对象进行包装增强。具体的做法是,创建一个类实现Mybatis的拦截器接口,并且加入到拦截器链中,在创建核心对象的时候,不直接返回,而是遍历拦截器链,把每一个拦截器都作用于核心对象中。这么一来,Mybatis创建的核心对象其实都是代理对象,都是被包装过的。
3、了解JDK动态代理
如果不了解JDK动态代理的,请自行百度学习~
4、源码分析
(1)拦截器链
MyBatis的所有拦截器都会存储在连接器链InterceptorChain中,在InterceptorChain中使用一个List存储着Interceptor:
public class InterceptorChain {

  private final List<Interceptor> interceptors = new ArrayList<>();

  // 将目标类进行代理
  public Object pluginAll(Object target) {
    for (Interceptor interceptor : interceptors) {
      target = interceptor.plugin(target);
    }
    return target;
  }

  public void addInterceptor(Interceptor interceptor) {
    interceptors.add(interceptor);
  }

  public List<Interceptor> getInterceptors() {
    return Collections.unmodifiableList(interceptors);
  }

}
InterceptorChain拦截器链的pluginAll方法是关键方法,将传入的对象进行代理。
(2)被代理的接口
我们看一下pluginAll方法都被哪里调用,都是在Configuration中创建Handler接口时调用的:
public ParameterHandler newParameterHandler(MappedStatement mappedStatement, Object parameterObject, BoundSql boundSql) {
  ParameterHandler parameterHandler = mappedStatement.getLang().createParameterHandler(mappedStatement, parameterObject, boundSql);
  // 代理ParameterHandler
  parameterHandler = (ParameterHandler) interceptorChain.pluginAll(parameterHandler);
  return parameterHandler;
}

public ResultSetHandler newResultSetHandler(Executor executor, MappedStatement mappedStatement, RowBounds rowBounds, ParameterHandler parameterHandler,
    ResultHandler resultHandler, BoundSql boundSql) {
  ResultSetHandler resultSetHandler = new DefaultResultSetHandler(executor, mappedStatement, parameterHandler, resultHandler, boundSql, rowBounds);
  // 代理ResultSetHandler
  resultSetHandler = (ResultSetHandler) interceptorChain.pluginAll(resultSetHandler);
  return resultSetHandler;
}

public StatementHandler newStatementHandler(Executor executor, MappedStatement mappedStatement, Object parameterObject, RowBounds rowBounds, ResultHandler resultHandler, BoundSql boundSql) {
  StatementHandler statementHandler = new RoutingStatementHandler(executor, mappedStatement, parameterObject, rowBounds, resultHandler, boundSql);
  // 代理StatementHandler
  statementHandler = (StatementHandler) interceptorChain.pluginAll(statementHandler);
  return statementHandler;
}

public Executor newExecutor(Transaction transaction) {
  return newExecutor(transaction, defaultExecutorType);
}

public Executor newExecutor(Transaction transaction, ExecutorType executorType) {
  executorType = executorType == null ? defaultExecutorType : executorType;
  executorType = executorType == null ? ExecutorType.SIMPLE : executorType;
  Executor executor;
  if (ExecutorType.BATCH == executorType) {
    executor = new BatchExecutor(this, transaction);
  } else if (ExecutorType.REUSE == executorType) {
    executor = new ReuseExecutor(this, transaction);
  } else {
    executor = new SimpleExecutor(this, transaction);
  }
  if (cacheEnabled) {
    executor = new CachingExecutor(executor);
  }
  // 代理Executor
  executor = (Executor) interceptorChain.pluginAll(executor);
  return executor;
}
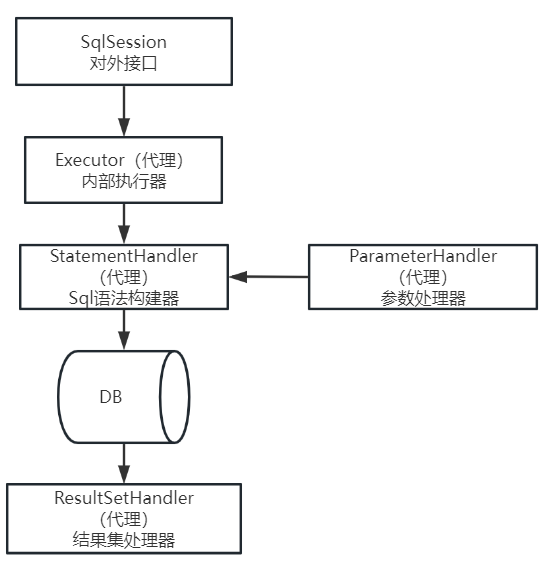
我们发现,MyBatis的四大接口:ParameterHandler、ResultSetHandler、StatementHandler、Executor,在创建的时候,都会调用InterceptorChain的pluginAll方法进行代理。
(3)pluginAll方法核心逻辑
// org.apache.ibatis.plugin.InterceptorChain#pluginAll
public Object pluginAll(Object target) {
  for (Interceptor interceptor : interceptors) {
    target = interceptor.plugin(target);
  }
  return target;
}
pluginAll方法中,将所有的拦截器遍历,调用拦截器的plugin方法:
// org.apache.ibatis.plugin.Interceptor#plugin
default Object plugin(Object target) {
  return Plugin.wrap(target, this);
}
调用了Plugin.wrap方法:
// org.apache.ibatis.plugin.Plugin#wrap
public static Object wrap(Object target, Interceptor interceptor) {
  // 1.解析该拦截器所拦截的所有接口及对应拦截接口的方法
  Map<Class<?>, Set<Method>> signatureMap = getSignatureMap(interceptor);
  Class<?> type = target.getClass();
  // 2.获取目标对象实现的所有被拦截的接口
  Class<?>[] interfaces = getAllInterfaces(type, signatureMap);
  // 3.目标对象有实现被拦截的接口,生成代理对象并返回
  if (interfaces.length > 0) {
    return Proxy.newProxyInstance(
        type.getClassLoader(),
        interfaces,
        new Plugin(target, interceptor, signatureMap));
  }
  // 目标对象没有实现被拦截的接口,直接返回原对象
  return target;
}
我们发现,最终使通过JDK动态代理,对目标类进行了代理,最终的执行器为Plugin。
(3)① getSignatureMap
获取所有的方法签名
private static Map<Class<?>, Set<Method>> getSignatureMap(Interceptor interceptor) {
  // 获取拦截器的@Intercepts 注解
  Intercepts interceptsAnnotation = interceptor.getClass().getAnnotation(Intercepts.class);
  // issue #251
  if (interceptsAnnotation == null) {
    throw new PluginException("No @Intercepts annotation was found in interceptor " + interceptor.getClass().getName());
  }
  // 获取拦截器的@Signature 注解
  Signature[] sigs = interceptsAnnotation.value();
  // key为目标类型,value为目标类型的被代理的方法集合
  Map<Class<?>, Set<Method>> signatureMap = new HashMap<>();
  // 将
  for (Signature sig : sigs) {
    Set<Method> methods = MapUtil.computeIfAbsent(signatureMap, sig.type(), k -> new HashSet<>());
    try {
      // 获取被代理的方法
      Method method = sig.type().getMethod(sig.method(), sig.args());
      methods.add(method);
    } catch (NoSuchMethodException e) {
      throw new PluginException("Could not find method on " + sig.type() + " named " + sig.method() + ". Cause: " + e, e);
    }
  }
  return signatureMap;
}
(3)② getAllInterfaces
获取目标对象实现的所有被拦截的接口。
// org.apache.ibatis.plugin.Plugin#getAllInterfaces
private static Class<?>[] getAllInterfaces(Class<?> type, Map<Class<?>, Set<Method>> signatureMap) {
  Set<Class<?>> interfaces = new HashSet<>();
  while (type != null) {
    // 遍历目标对象所有的接口,如果该接口需要被代理,就添加
    for (Class<?> c : type.getInterfaces()) {
      if (signatureMap.containsKey(c)) {
        interfaces.add(c);
      }
    }
    type = type.getSuperclass();
  }
  return interfaces.toArray(new Class<?>[0]);
}
(4)Plugin类
通过JDK动态代理创建了一个Plugin类,Plugin实现了InvocationHandler,懂JDK动态代理的小伙伴应该都清楚,调用代理类的方法时,会调用InvocationHandler的invoke方法,也就是说,Plugin其实就是一个InvocationHandler。
// 省略部分代码
public class Plugin implements InvocationHandler {

  private final Object target;
  private final Interceptor interceptor;
  private final Map<Class<?>, Set<Method>> signatureMap;

  // 通过构造方法将代理对象target、拦截器Interceptor 、方法签名传入
  private Plugin(Object target, Interceptor interceptor, Map<Class<?>, Set<Method>> signatureMap) {
    this.target = target;
    this.interceptor = interceptor;
    this.signatureMap = signatureMap;
  }

  // 调用被代理的对象的方法时,会执行该逻辑
  @Override
  public Object invoke(Object proxy, Method method, Object[] args) throws Throwable {
    try {
      Set<Method> methods = signatureMap.get(method.getDeclaringClass());
      // 如果该方法需要被拦截,就走拦截器的intercept方法
      if (methods != null && methods.contains(method)) {
        return interceptor.intercept(new Invocation(target, method, args));
      }
      // 如果方法不需要被拦截,直接放行
      return method.invoke(target, args);
    } catch (Exception e) {
      throw ExceptionUtil.unwrapThrowable(e);
    }
  }
}
到现在我们就明白了,实现了Interceptor接口的自定义拦截器,需要重写intercept方法,在需要执行目标方法之前,会走我们自定义的intercept方法逻辑。
(5)Invocation类
Interceptor接口的intercept方法,只有一个参数,就是new 出来的Invocation类:
public class Invocation {

  private final Object target;
  private final Method method;
  private final Object[] args;

  public Invocation(Object target, Method method, Object[] args) {
    this.target = target;
    this.method = method;
    this.args = args;
  }

  public Object getTarget() {
    return target;
  }

  public Method getMethod() {
    return method;
  }

  public Object[] getArgs() {
    return args;
  }

  // 真正执行代理类的目标方法
  public Object proceed() throws InvocationTargetException, IllegalAccessException {
    return method.invoke(target, args);
  }

}
target就是代理的目标类。
method就是目标类的目标方法。
args就是该方法的参数。
我们可以使用这三个关键信息,实现对业务的拦截与定制。
5、总结
代理类生成时序图如下:
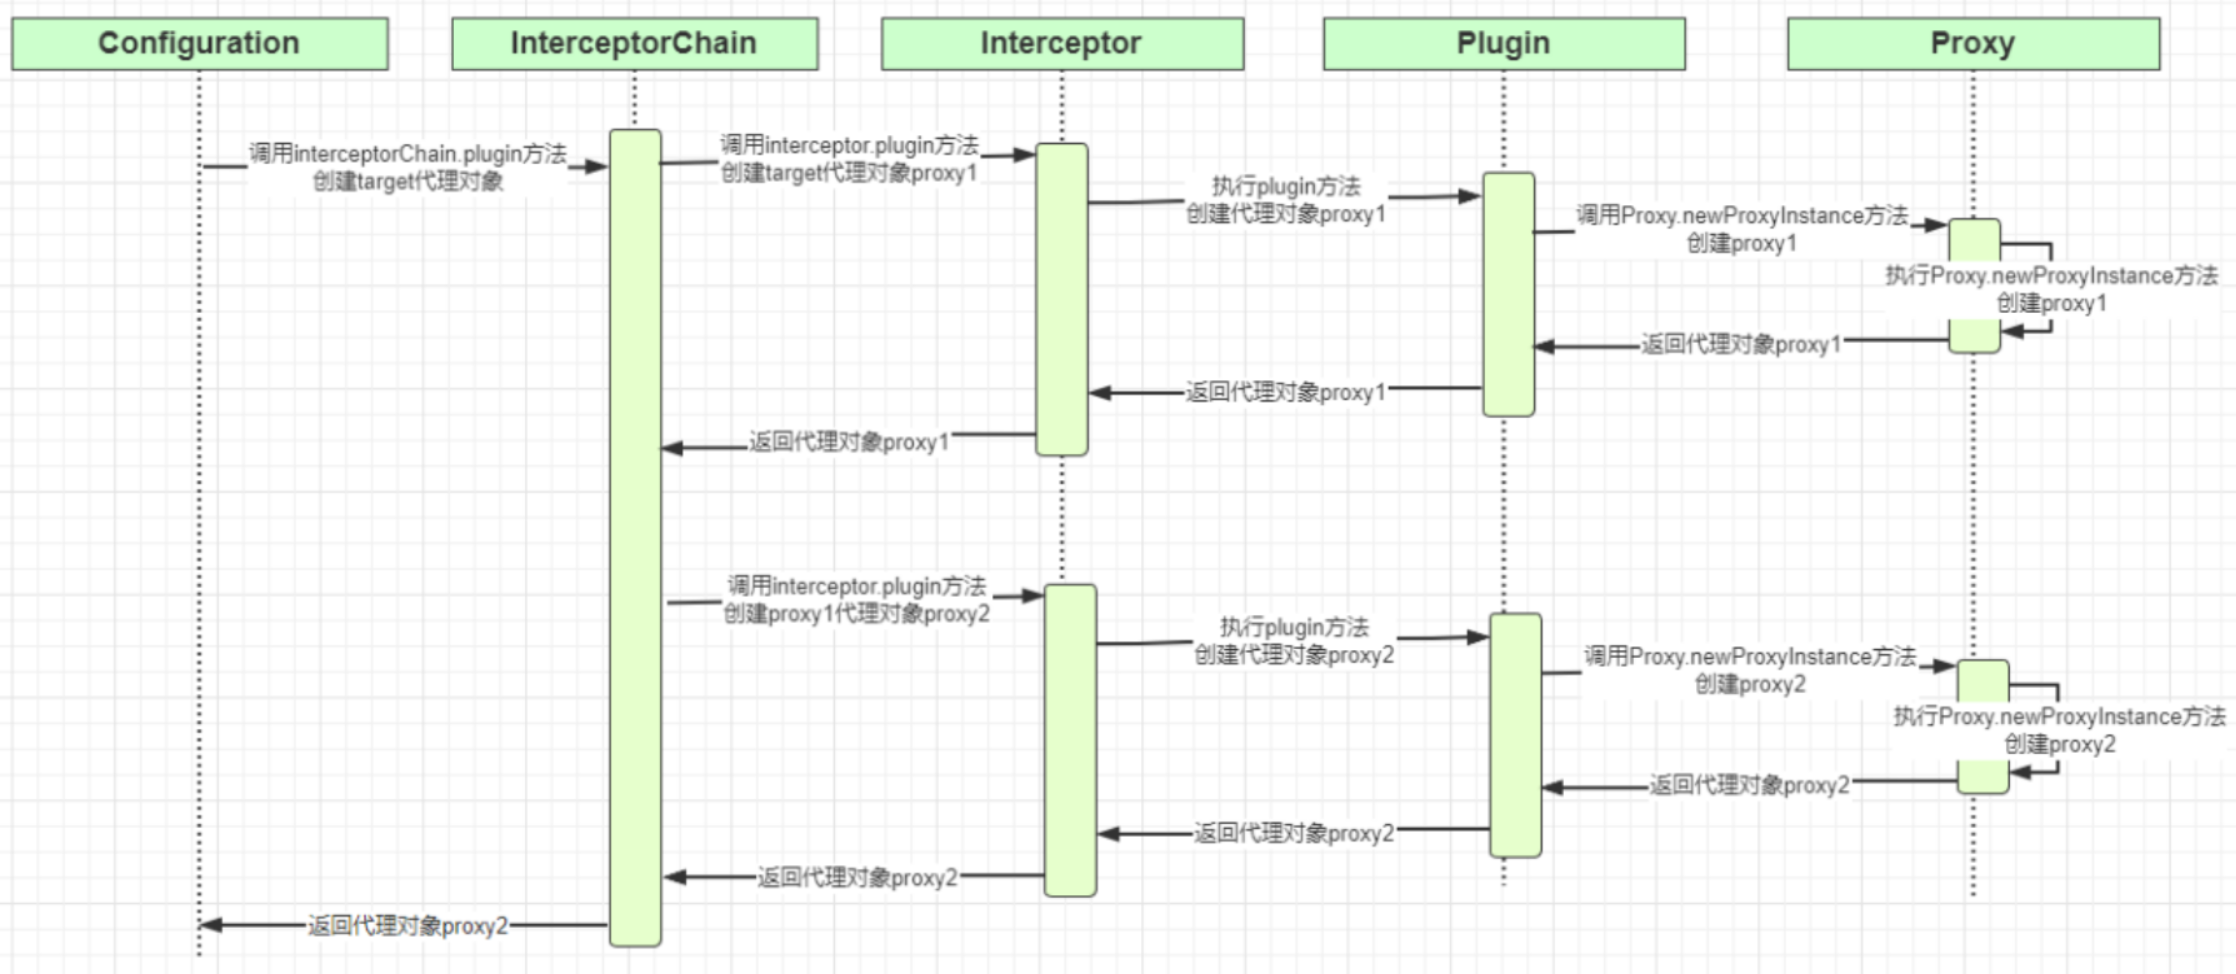
(1)一个对象被代理很多次
问题:同一个组件对象的同一个方法是否可以被多个拦截器进行拦截?
答案是肯定的,所以我们配置在最前面的拦截器最先被代理,但是执行的时候却是最外层的先执行。
具体点:
假如依次定义了三个插件: 插件1 , 插件2 和 插件3 。
那么List中就会按顺序存储: 插件1 , 插件2 和 插件3 。
而解析的时候是遍历list,所以解析的时候也是按照: 插件1 , 插件2 , 插件3 的顺序。
但是执行的时候就要反过来了,执行的时候是按照: 插件3 , 插件2 和 插件1 的顺序进行执行。
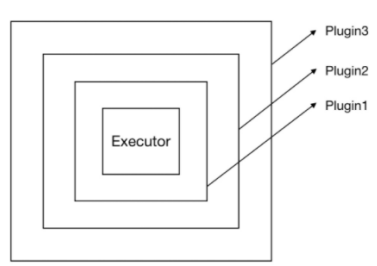
当 Executor 的某个方法被调用的时候,插件逻辑会先行执行。执行顺序由外而内,比如上图的执行顺序为 plugin3 → plugin2 → Plugin1 → Executor 。
写在后面
如果本文对你有帮助,请点赞收藏关注一下吧 ~


旨在为数千万中国开发者提供一个无缝且高效的云端环境,以支持学习、使用和贡献开源项目。
更多推荐


 0
0 0
0- 0


 已为社区贡献13条内容

所有评论(0)