
【lite.ai.toolkit】Onnxruntime保姆级教程
【lite.ai.toolkit】Onnxruntime保姆级教程
最近在Github看到了一个新的部署库lite.ai.toolkit,本博客主要介绍编译测试lite.ai.toolkit的过程。
1. 介绍
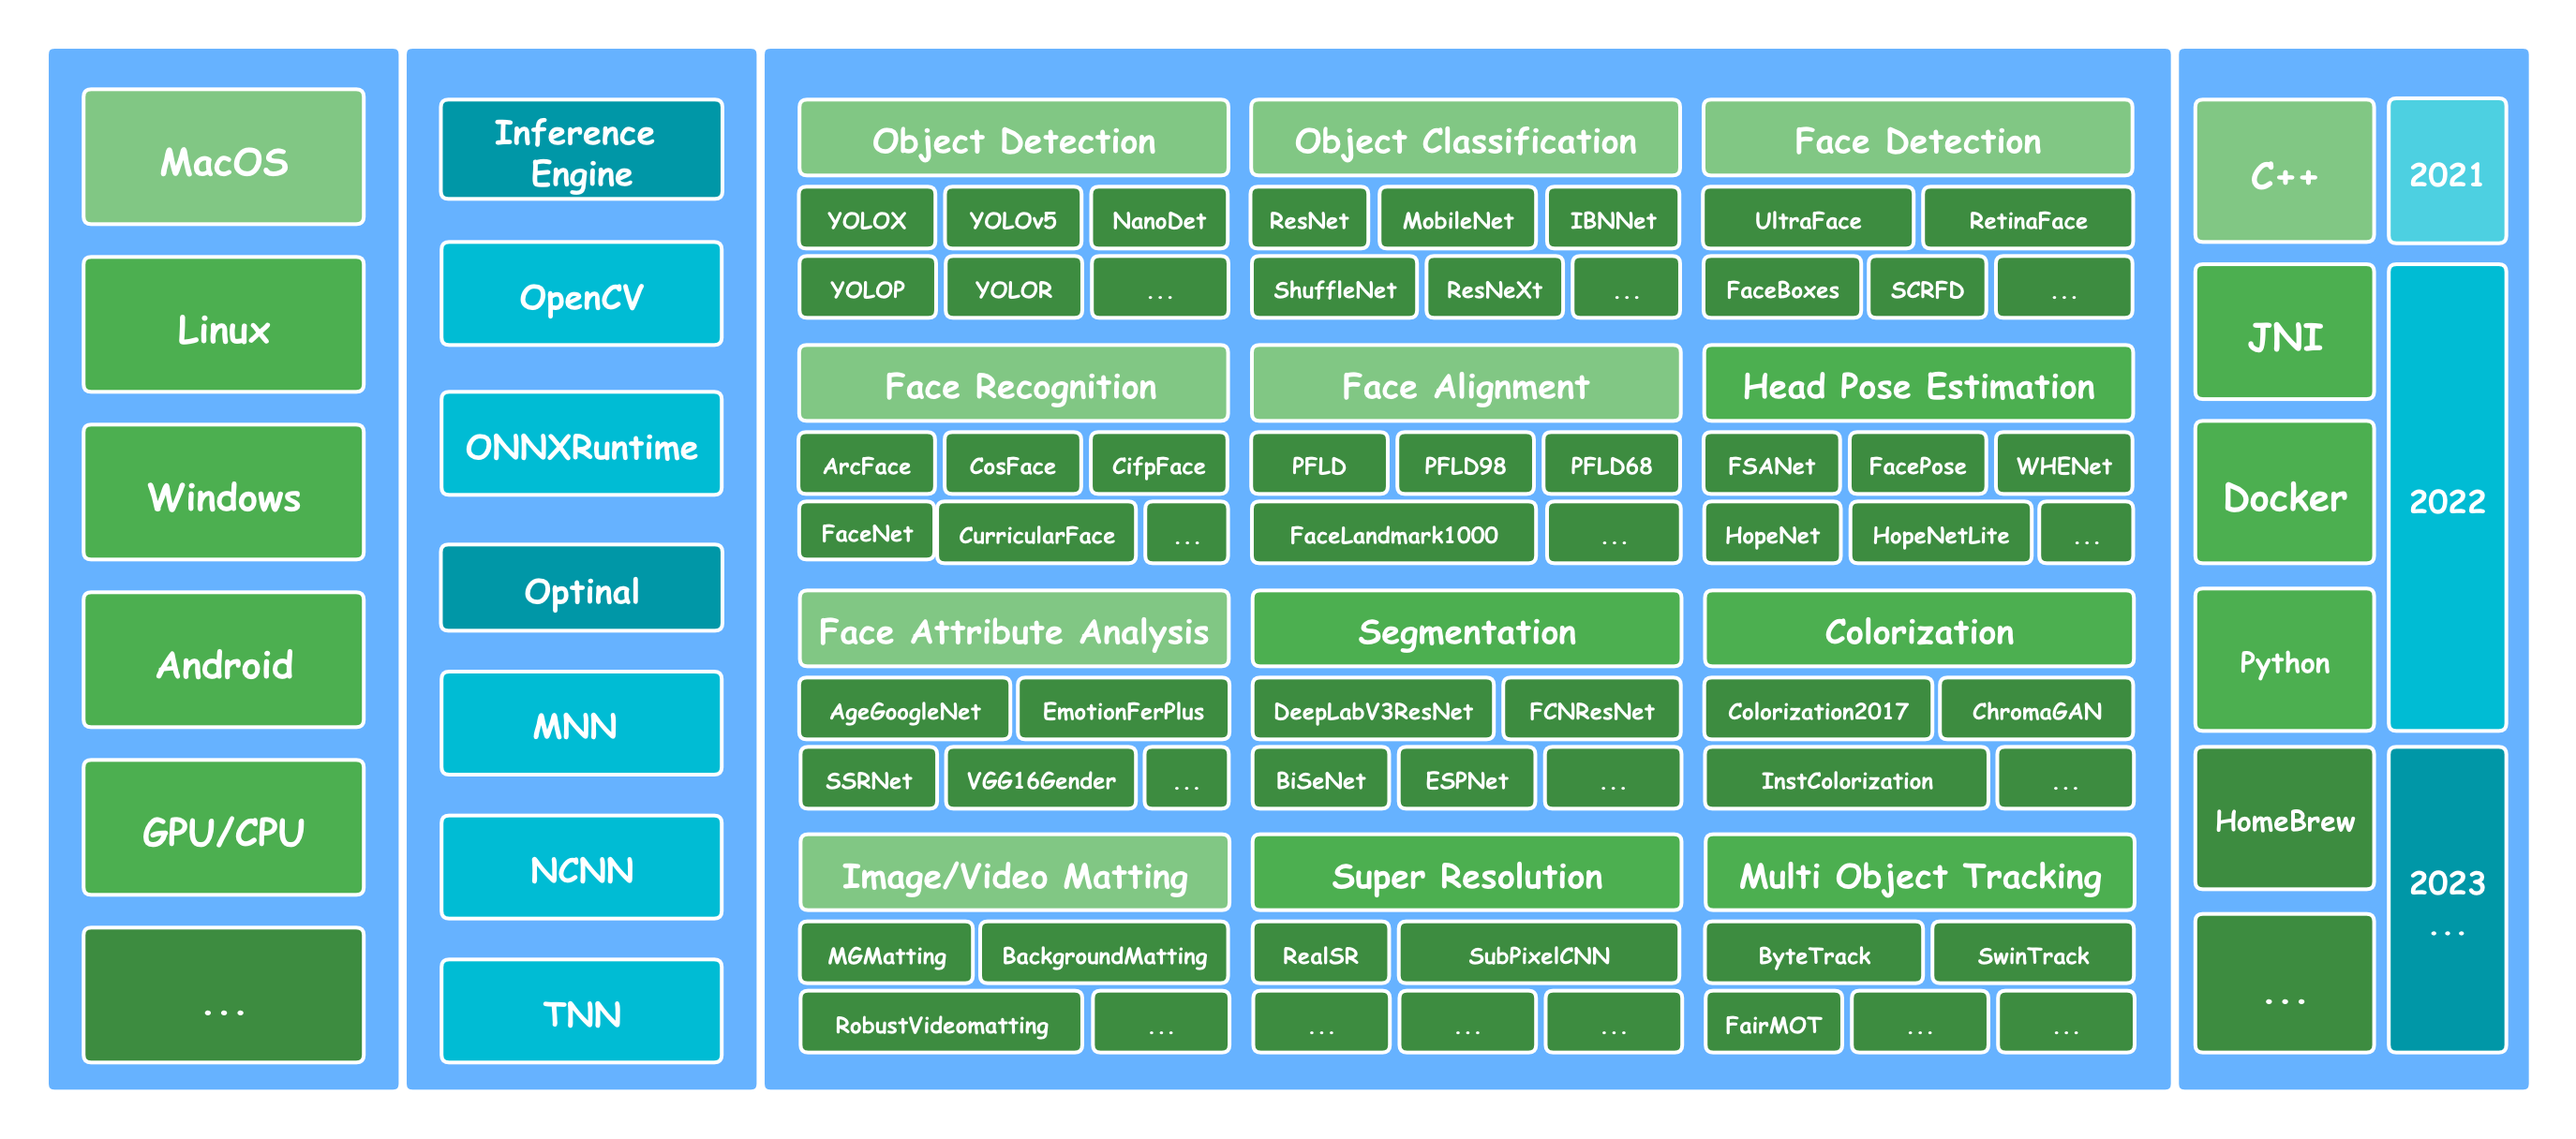
最近在Github看到了一个新的部署库lite.ai.toolkit,主要集成了 Onnxruntime(.onnx), MNN(.mnn), NCNN(.ncnn)和TNN(.tnn)这四个推理库进行C++加速推理,该库已经包括100+流行的开源模型。这是一个根据个人兴趣整理的C++工具箱,, 涵盖目标检测、人脸检测、人脸识别、语义分割、抠图等领域,作者还提供了相关的算法扩展步骤,简单易用。本文使用Onnxruntime(.onnx)作为编译和测试工具。
2. 环境准备
本文使用Linux环境进行对该工程进行编译,首先需要拷贝整个项目工程文件:
git clone depth=1 https://github.com/DefTruth/lite.ai.toolkit.git
在编译前需要安装相关的依赖包:ffmpeg(4.2.2)和opencv(4.5.2),这两个依赖的具体下载编译命令如下:
- FFmepg(4.2.2)下载及编译
找到想要放置FFmepg文件的位置(以ffmepeg为例),在终端运行如下命令:
git clone --depth=1 https://git.ffmpeg.org/ffmpeg.git -b n4.2.2
cd ffmpeg
./configure --enable-shared --disable-x86asm --prefix=/usr/local/ffmpeg --disable-static   # --prefix代表安装路径,可以自行设定
make -j8
sudo make install
- Opencv(4.5.2)下载及编译
找到想要放置Opencv文件的位置,在终端运行如下命令:
wget https://github.com/opencv/opencv/archive/refs/tags/4.5.2.zip
unzip 4.5.2.zip

cd opencv-4.5.2
mkdir build && cd build
cmake .. \
  -D CMAKE_BUILD_TYPE=Release \
  -D CMAKE_INSTALL_PREFIX=your-path-to-custom-dir \  # 记得修改为想要编译到的路径
  -D BUILD_TESTS=OFF \
  -D BUILD_PERF_TESTS=OFF \
  -D BUILD_opencv_python3=OFF \
  -D BUILD_opencv_python2=OFF \
  -D BUILD_SHARED_LIBS=ON \
  -D BUILD_opencv_apps=OFF \
  -D WITH_FFMPEG=ON    # 如果不需要可以关掉WITH_FFMPEG=OFF
make -j8
sudo make install
安装完opencv后可以使用opencv_version命令查看opencv版本号,不支持4.5.5版本。
- Onnxruntime下载
这里不建议去编译Onnxruntime,因为很容易报错,而且问题很多,可能一天都不一定能编译出来,所以还是推荐使用官方编译好的包👀。
找到想要放置Onnxruntime文件的位置,在终端运行如下命令:
wget https://github.com/microsoft/onnxruntime/releases/download/v1.7.0/onnxruntime-linux-x64-1.7.0.tgz
tar zxvf onnxruntime-linux-x64-1.7.0.tgz

# 查看动态链接文件是否存在
ls onnxruntime-linux-x64-1.7.0/lib  # 一般会输出 libonnxruntime.so  libonnxruntime.so.1.7.0这两个文件
3. 编译
- 下载lite.ai.toolkit项目工程
找到想要放置lite.ai.toolkit文件的位置,在终端运行如下命令:
git clone https://github.com/DefTruth/lite.ai.toolkit.git
cd lite.ai.toolkit
cp to_your_opencv/build/lib/* lib/linux        # 将opencv的动态库文件放置到项目对应的文件夹下
cp onnxruntime-linux-x64-1.7.0/lib/* lib/linux # 将onnxruntime的动态库文件放置到项目对应的文件夹下
在经过上述环境准备和安装包下载之后,接下来进行编译,编译命令如下:
sh ./build.sh # 编译之后的文件存放在build文件夹中
接着,测试一下编译好的示例demo,如运行yolov5目标检测demo,可执行如下命令:
cd build/lite.ai.toolkit/bin
./lite_yolov5
如果提示模型不存在,可以通过官方所提供的linux平台onnx权重(code:8gin)或者可以直接访问提供模型的网址进行下载。
4. 测试结果


5. 根据自身需求进行调用测试及其结果
本节使用insightface最新的人脸检测(含关键点检测)方法SCRFD调用lite.ai.toolkit用作测试。
1. 首先使用
scrfd.cpp文件编写如下:
#include "lite/lite.h"
#include <sys/time.h>
static void test_lite()
{
    struct timeval tpstart, tpend;
    float timeuse = 0.f;
    std::string onnx_path = "../checkpoints/scrfd_2.5g_bnkps_shape640x640.onnx";   // 自行修改加载模型的路径
    std::string test_img_path = "../2.jpg";          // 自行修改测试的图片路径
    std::string save_img_path = "../res_scrfd.jpg";  // 自行修改保存的文件名称

    auto *scrfd = new lite::cv::face::detect::SCRFD(onnx_path);

    std::vector<lite::types::BoxfWithLandmarks> detected_boxes;
    cv::Mat img_bgr = cv::imread(test_img_path);

    gettimeofday(&tpstart, NULL);
    scrfd->detect(img_bgr, detected_boxes);
	gettimeofday(&tpend, NULL);
	timeuse = 1000000 * (tpend.tv_sec - tpstart.tv_sec) + tpend.tv_usec - tpstart.tv_usec;
	timeuse /= 1000;
	std::cout << "used time for matching features: " << timeuse << " ms from " << test_img_path << std::endl;

    lite::utils::draw_boxes_with_landmarks_inplace(img_bgr, detected_boxes);
    cv::imwrite(save_img_path, img_bgr);

    std::cout << "Default Version Done! Detected Face Num: " << detected_boxes.size() << std::endl;

    delete scrfd;
}

int main(__unused int argc, __unused char *argv[])
{
    test_lite();
    return 0;
}
CMakeLists.txt文件编写如下:
cmake_minimum_required(VERSION 3.17)
project(scrfd)

set(CMAKE_CXX_STANDARD 11)

set(LITE_AI_DIR ${CMAKE_SOURCE_DIR}/lite.ai.toolkit)
include_directories(${LITE_AI_DIR}/include)
link_directories(${LITE_AI_DIR}/lib)

set(TOOLKIT_LIBS lite.ai.toolkit onnxruntime)
set(OpenCV_LIBS opencv_core opencv_imgcodecs opencv_imgproc opencv_highgui)

add_executable(test_scrfd scrfd.cpp)
target_link_libraries(test_scrfd ${TOOLKIT_LIBS} ${OpenCV_LIBS})
- 添加环境变量:
export LD_LIBRARY_PATH=$PWD/lite.ai.toolkit/lib:$LD_LIBRARY_PATH
#export LIBRARY_PATH=$PWD/lite.ai.toolkit/lib:$LIBRARY_PATH (may need)
- CMake编译测试工程
mkdir build && cd build
cmake -DCMAKE_BUILD_TYPE=Realese .. && make -j8
- 测试:
cd build
./test_scrfd
- 运行结果:

6. Reference

旨在为数千万中国开发者提供一个无缝且高效的云端环境,以支持学习、使用和贡献开源项目。
更多推荐


 0
0 0
0- 0


 已为社区贡献1条内容

所有评论(0)