【个人笔记】真寻bot部署记录+远程postgreSQL访问+源码食用记录
文章目录
安装
0. 系统配置
Centos v8.2
1. 安装
使用真寻bot
https://github.com/zhenxun-org/zhenxun_bot-deploy
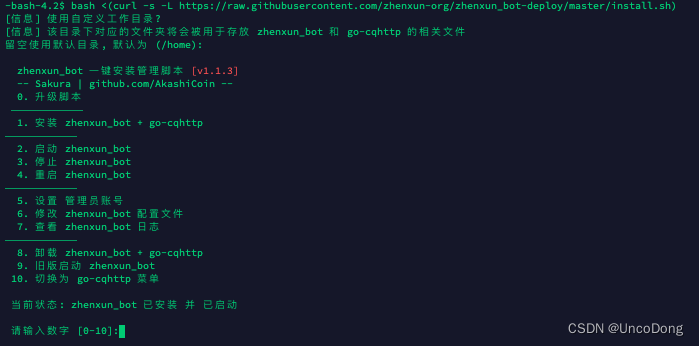
bash <(curl -s -L https://raw.githubusercontent.com/zhenxun-org/zhenxun_bot-deploy/master/install.sh)
选择1,安装go-cqhttp和zhenxun_bot,默认安装到/home路径

注:go-cqhttp和zhenxun_bot是两个单独的程序,go-cqhttp负责启动QQ,zhenxun_bot负责模拟功能
1.1 go-cqhttp启动
https://hibikier.github.io/zhenxun_bot/docs/installation_doc/install_gocq.html
在config.yml中配置QQ号即可登陆
需要注意的是,登陆绝对会遇到问题,因此需要介绍如下配置
- config.yml配置账号密码
- device.json配置设备信息。这里需要修改protocol

一般登陆会遇到两种问题
- 账号密码登陆:对应protocol 0、1、3、4、5、6。会遇到提交验证码失败的问题
- 扫码登录:对应protocol 2。会遇到“服务器网络和当前网络不一致,无法登陆”的问题
上述两个问题都不能通过开放权限/降低登陆配置来强行解决。我尝试的有效解决方案为
- 本地部署go-cqhttp并扫码登陆
- 将本地的session.token上传到服务器目录下

20230530更新
用手表登陆有可能被风控,参考github https://github.com/Mrs4s/go-cqhttp/issues/2174#issuecomment-1567277343
我的是删了device.json和session.token重新生成然后登录的,然后设成Macos,滑块验证完又有短信验证,短信验证过了就不提示风控了
应该可以规避一段时间
1.2 zhenxun_bot启动
直接看文档https://hibikier.github.io/zhenxun_bot/docs/installation_doc/install_zhenxun.html
远程连接数据库
postgreSQL服务重启
Navicat客户端PostgreSQL连接报错:Could not connect to server:Connection refused(0x00002740/10061)
zhenxunbot 教程:安装Postgresql数据库(Ubuntu)
修改两个地方
- postgresql.conf
找到 listen_addresses: ‘*’ 取消前面的 # 注释,使用:wq保存退出 - pg_hba.conf
在底部添加
 # 允许任意用户从任意机器上以密码方式访问数据库
    host    all             all             0.0.0.0/0               md5
然后重启服务
systemctl restart postgresql


-- 如果没有systemctl
su - postgres
pg_ctl start    #启动
pg_ctl stop     #停止
pg_ctl restart  #重启
源码食用
plugins插件
draw_card插件
使用github的host进行加速
由于下载的很多资源都在github上,因此需要加速,参考告别无法访问的github(附解决方案)
以下代码写入/etc/hosts中
140.82.114.25                 alive.github.com
140.82.112.25                 live.github.com
185.199.108.154               github.githubassets.com
140.82.112.22                 central.github.com
185.199.108.133               desktop.githubusercontent.com
185.199.108.153               assets-cdn.github.com
185.199.108.133               camo.githubusercontent.com
185.199.108.133               github.map.fastly.net
199.232.69.194                github.global.ssl.fastly.net
140.82.112.4                  gist.github.com
185.199.108.153               github.io
140.82.114.4                  github.com
192.0.66.2                    github.blog
140.82.112.6                  api.github.com
185.199.108.133               raw.githubusercontent.com
185.199.108.133               user-images.githubusercontent.com
185.199.108.133               favicons.githubusercontent.com
185.199.108.133               avatars5.githubusercontent.com
185.199.108.133               avatars4.githubusercontent.com
185.199.108.133               avatars3.githubusercontent.com
185.199.108.133               avatars2.githubusercontent.com
185.199.108.133               avatars1.githubusercontent.com
185.199.108.133               avatars0.githubusercontent.com
185.199.108.133               avatars.githubusercontent.com
140.82.112.10                 codeload.github.com
52.217.223.17                 github-cloud.s3.amazonaws.com
52.217.199.41                 github-com.s3.amazonaws.com
52.217.93.164                 github-production-release-asset-2e65be.s3.amazonaws.com
52.217.174.129                github-production-user-asset-6210df.s3.amazonaws.com
52.217.129.153                github-production-repository-file-5c1aeb.s3.amazonaws.com
185.199.108.153               githubstatus.com
64.71.144.202                 github.community
23.100.27.125                 github.dev
185.199.108.133               media.githubusercontent.com
定义加载游戏

抽卡插件,其中__init__.py记录了有哪些游戏需要被加载进来

自己扩展游戏
在handles目录下,其中handles/base_handle.py是所有抽卡信息获取的父类,要实现自己的抽卡方案,需要基于base_handle.py基类进行扩展
该文件定义了update_info方法,并在每个子类重载_update_info()方法,因此所有资源下载都是在各个子文件的_update_info()中。此外,还需要手动实现_init_data初始化数据

以碧蓝档案为例

为什么加载完第一次后,没下载全部数据,第二次加载就不下载了
因为这玩意被两个验证机制控制了
1.检查是否存在数据
首先插件加载的时候,会在init这里检查一下是否存在数据,使用的是data_exists()方法,如果检查成功,那就不会触发更新信息的操作了

2.都有哪些做了检查呢
上述的data_exists()方法,在BaseHandle中是这样的,检查的是data_files

往上看定义,data_files是一系列json文件,通过查询路径发现是在data/draw_card路径下

因此如果要加载配置文件的时候重新更新这些抽卡信息,需要删除json文件

后续TODO
【20230526】pycharm远程连接服务器调试代码 https://blog.csdn.net/hehedadaq/article/details/118737855【20230530】已实现,pycharm需要prime版本才能连接,因此我用的vscode。如果无法跳转函数定义,记得看看右下角的python是不是当前工程需要的
【20230528】抽卡问题【20230530】已解决,放到上面的源码解析中了。主要是靠使用github的host进行加速,以及阐述文件- 【20230530】开箱问题
- 【20230530】自定义铁道抽卡
更多推荐
 已为社区贡献6条内容


所有评论(0)