

Pytorch学习与踩坑记录(持续更新版)
Pytorch学习与踩坑记录(持续更新版)
一键AI生成摘要,助你高效阅读
问答
·
Pytorch学习与踩坑记录(持续更新版)
RuntimeError: Tensors must be contiguous
原因是变量所占用存储空间不连续,解决方法调用.contiguous()。如果tensor变量不连续,它会返回一个连续的变量,若此变量是连续的,则会返回其本身。
ValueError: host not found: Name or service not known
在多机分布式训练中,运行时报错,解决方法为:
- 检查master_addr和master_port是否正确。
- 尝试安装高版本Pytorch,官方已修复此BUG。原因如下:我所使用的pytorch版本为1.10.0,后来发现是Kubernetes 在创建 Pod(Pod 是可以在Kubernetes 中创建和管理的、最小的可部署的计算单元) 的同时或之后创建 DNS 条目,因为它基于服务模型。这意味着由于延迟,DNS 主机名可能无法立即解析。一些不同的在线报告称这可能需要长达 30 秒的时间。TCPStore 目前将查找视为致命错误并且不会重试。这意味着作业偶尔会失败,具体取决于 DNS 传播。
Fatal error: ‘THC/THC.h’: No such file or directory
报错
博主的软硬件环境(供参考):
- Linux
- NVIDIA GeForce RTX 3090
- CUDA 11.6
- gcc (Ubuntu 9.4.0-1ubuntu1~20.04.2) 9.4.0
- Pytorch:1.12.0+cu116
博主在安装mmdetection3d的时候,遇到了Fatal error: 'THC/THC.h': No such file or directory的报错。
# 下载mmdetection3d
git clone https://github.com/open-mmlab/mmdetection3d.git
# 切换目录
cd mmdetection3d
# 由于代码需要,切换到指定分支
git checkout v0.17.1
# 编译安装
pip install -v -e .
报错如下:
...
cc1plus: warning: command line option ‘-Wstrict-prototypes’ is valid for C/ObjC but not for C++
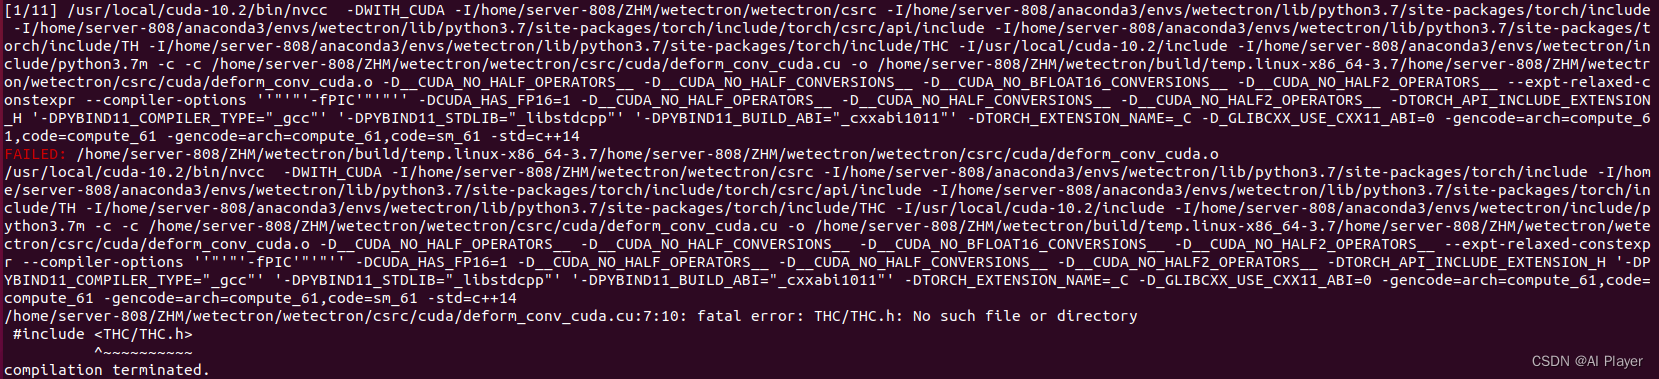
mmdet3d/ops/ball_query/src/ball_query.cpp:4:10: fatal error: THC/THC.h: No such file or directory
#include <THC/THC.h>
^~~~~~~~~~~
compilation terminated.
error: command 'gcc' failed with exit status 1
ERROR: Command errored out with exit status 1:
...
subprocess.CalledProcessError: Command '['ninja', '-v']' returned non-zero exit status 1.
The above exception was the direct cause of the following exception:
...
RuntimeError: Error compiling objects for extension
完整报错如下图所示:
原因
报错的原因是THC方法目前在最新版本的 Pytorch 中已被弃用,并被 ATen API 取代,因此在高版本的Pytorch(版本在1.11.0及以上)编译安装mmdet3d的时候就会遇到无法找到THC/THC.h的报错。
解决方法
解决方法有两种:
- 安装低版本的Pytorch,再安装mmdet3d。
例如,经亲测1.9.1版本的Pytorch可以正常编译成功,命令如下:
conda create -n test python=3.8 -y
conda activate test
pip install torch==1.9.1+cu111 torchvision==0.10.1+cu111 torchaudio==0.9.1 -f https://download.pytorch.org/whl/torch_stable.html
# 安装mmcv、mmdetection和mmsegmentation
# 安装mmdetection3d
- 根据报错的反馈,把所有包含<THE/THC.h>头文件的
#include <THE/THC.h>注释掉,取而代之是新的头文件,代码如下:
//Comment Out
//#include <THE/THC.h>
//extern THCState *state;
//cudaStream_t stream = THCState_getCurrentStream(state);

//Replace with
#include <ATen/cuda/CUDAContext.h>
#include <ATen/cuda/CUDAEvent.h>
cudaStream_t stream = at::cuda::getCurrentCUDAStream();
总结
在安装mmcv、mmdet、mmseg和mmdet3d的时候,首先一定要注意各版本之间的依赖关系,以及软硬件版本,例如Pytorch版本、显卡驱动版本和CUDA版本等等。其次,注意环境的依赖项,如遇到ModuleNotFoundError: No module named ‘XXX’的问题,那就根据报错提示,进行安装相关依赖:pip install XXX,也可参考博主的另一片博客:报错解决:ModuleNotFoundError: No module named ‘XXX’。最后,如果依赖和版本都没有问题,那就依据报错信息,逐一排查其他问题,将BUG解决。
参考文献

旨在为数千万中国开发者提供一个无缝且高效的云端环境,以支持学习、使用和贡献开源项目。
更多推荐


 25
25 0
0- 0


 已为社区贡献5条内容

所有评论(0)