
使用allure如何生成自动化测试报告 ?一文详解allure的使用 。
在自动化测试中,生成测试报告是肯定的 . 那么如何将allure集成在自动化测试中呢 ?allure该如何使用 ?本文就详解allure的使用以及在自动化中的应用
网上介绍allure报告的很多 ,但个人总感觉还是不够整体 ,不够详细 ,所看到的都是局部 。故本人花了些时间 ,将这个allure详细的整理了一遍 。整体且涉及每个细节 。
1.allure介绍

-
它是一个生成HTML测试报告的工具包
-
使用java开发,所以需要java环境
-
功能强大 , 生成的报告美观、直观
-
需要用pytest去搜集测试用例
-
使用浏览器打开,更易进行持续集成
2.allure相关安装和配置
2.1 软件安装列表
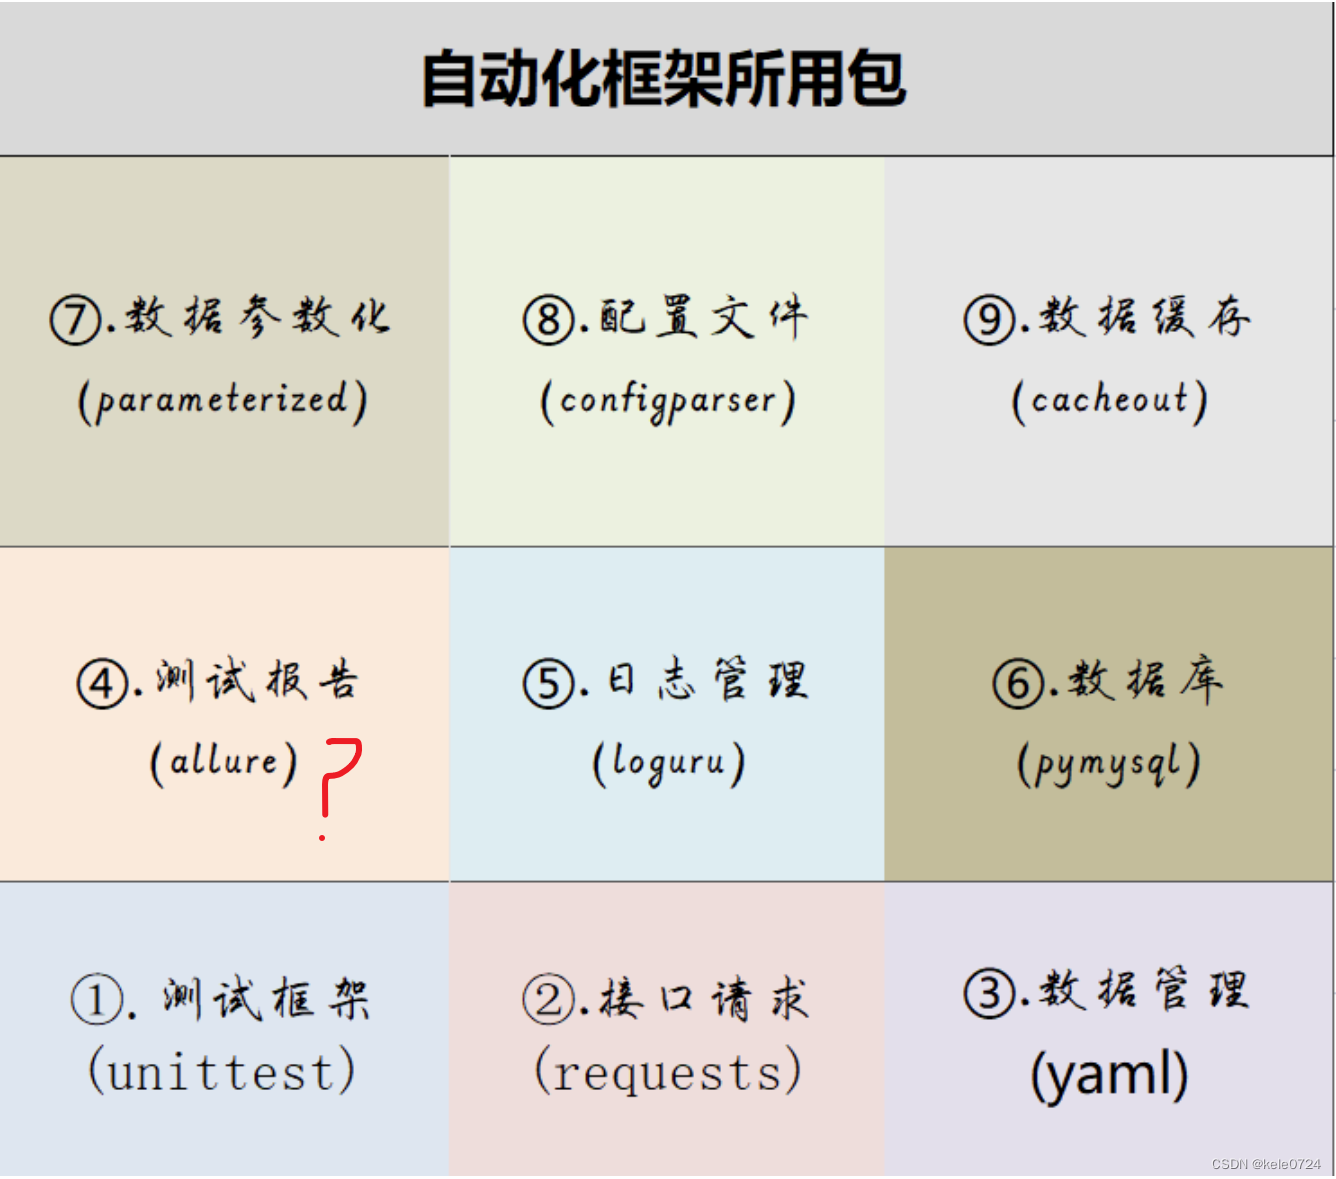
想使用allure,需要安装如下软件 :
| 安装软件 | 用途 | 链接地址 |
|---|---|---|
| java | allure使用java开发,所以必须要有运行环境 | https://www.oracle.com/cn/java/technologies/downloads/ |
| allure | 生成测试报告 | Central Repository: io/qameta/allure/allure-commandline |
| python | 编写自动化所需语言 | Welcome to Python.org |
| pycharm | 开发工具 | Download PyCharm: Python IDE for Professional Developers by JetBrains |
| pytest | python第三方包,使用它来搜集测试用例 | pip install pytest |
如果你先上面下载的麻烦 ,这里直接提供已下载好的安装包 :
2.2 安装四步曲
以上软件安装成功需要四步,分别为 :
-
下载 ,上面下已经地址,没有的自行下载即可。
-
安装 ,
-
allure无需安装,直接解压到一个指定的路径下即可
-
pytest只需要在cmd命令中运行
pip install pytest即可 。 -
其它软件直接双击,一路下一步即可安装成功
-
-
配置环境变量,以上除了pytest不需要配置环境变量,其它的都需要配置 ,具体如何配置见2.3
-
验证 :除了pycharm无需要验证外,其它的都需要输入命令验证,打开cmd窗口输入以下命令进行验证:
# 1. java验证 :
java --version
# 2. python验证 :
python -V
# 3. allure验证
allure --version
# 4. pytest验证
pip show pytest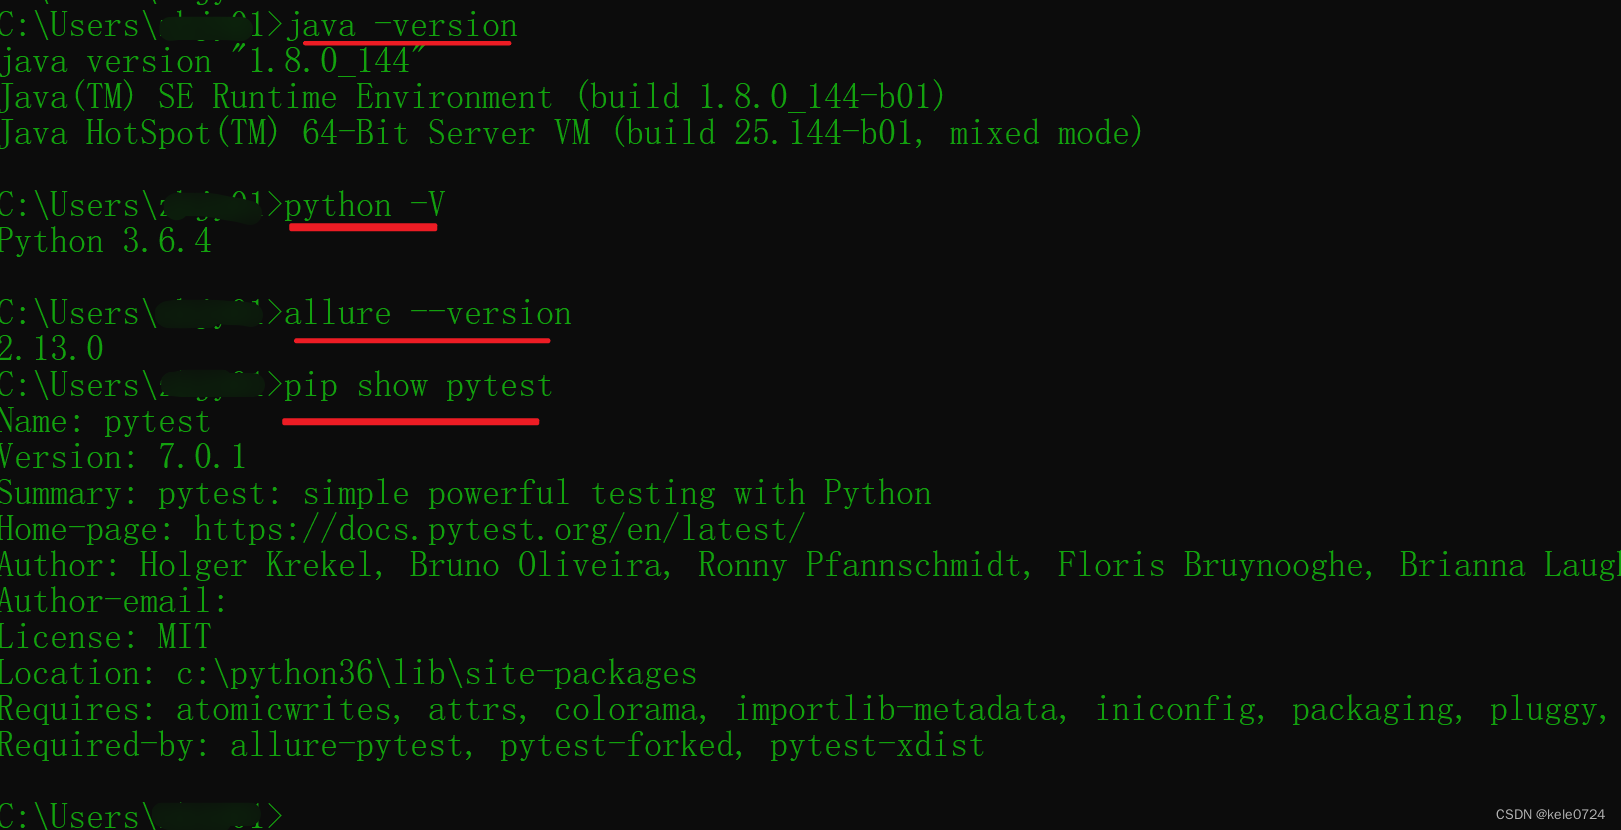
2.3 环境变量配置
(1)java环境配置
此电脑-鼠标右击-属性-高级系统设置-环境变量-添加java环境变量,具体如下: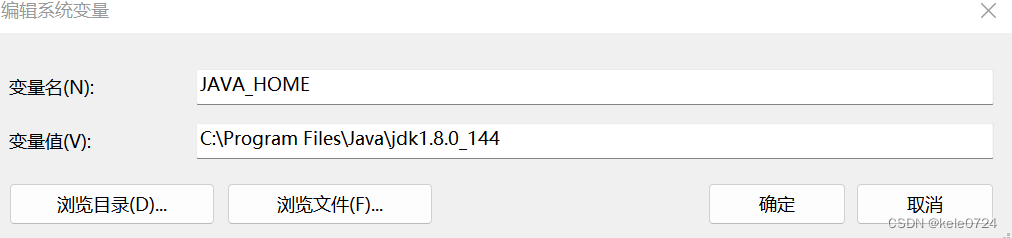
注意 : 变量值里面的路径一定是你自己电脑上安装java的路径
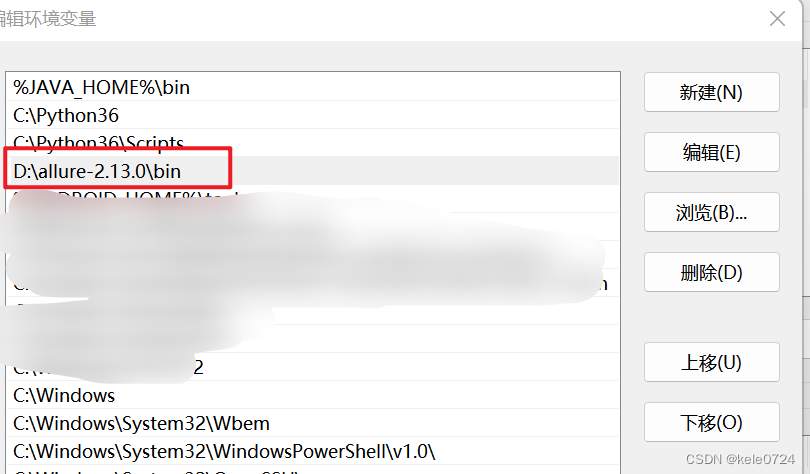
将以上变量保存后,接下来编辑path环境变量 ,添加%JAVA_HOME%\bin ,一般可以将其移到最上面,点击确定。
(2)python环境配置
此电脑-鼠标右击-属性-高级系统设置-环境变量-点击path变量进行编辑(以存在,故是编辑),添加: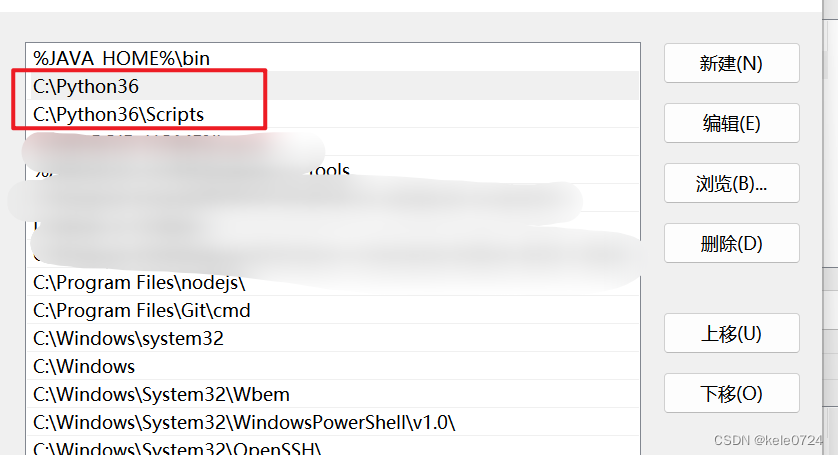
注意 :这里的python路径一定是你电脑上的路径
(3)allure环境配置
此电脑-鼠标右击-属性-高级系统设置-环境变量-添加allure环境变量,具体如下:
3.allure功能
3.1 allure整体流程
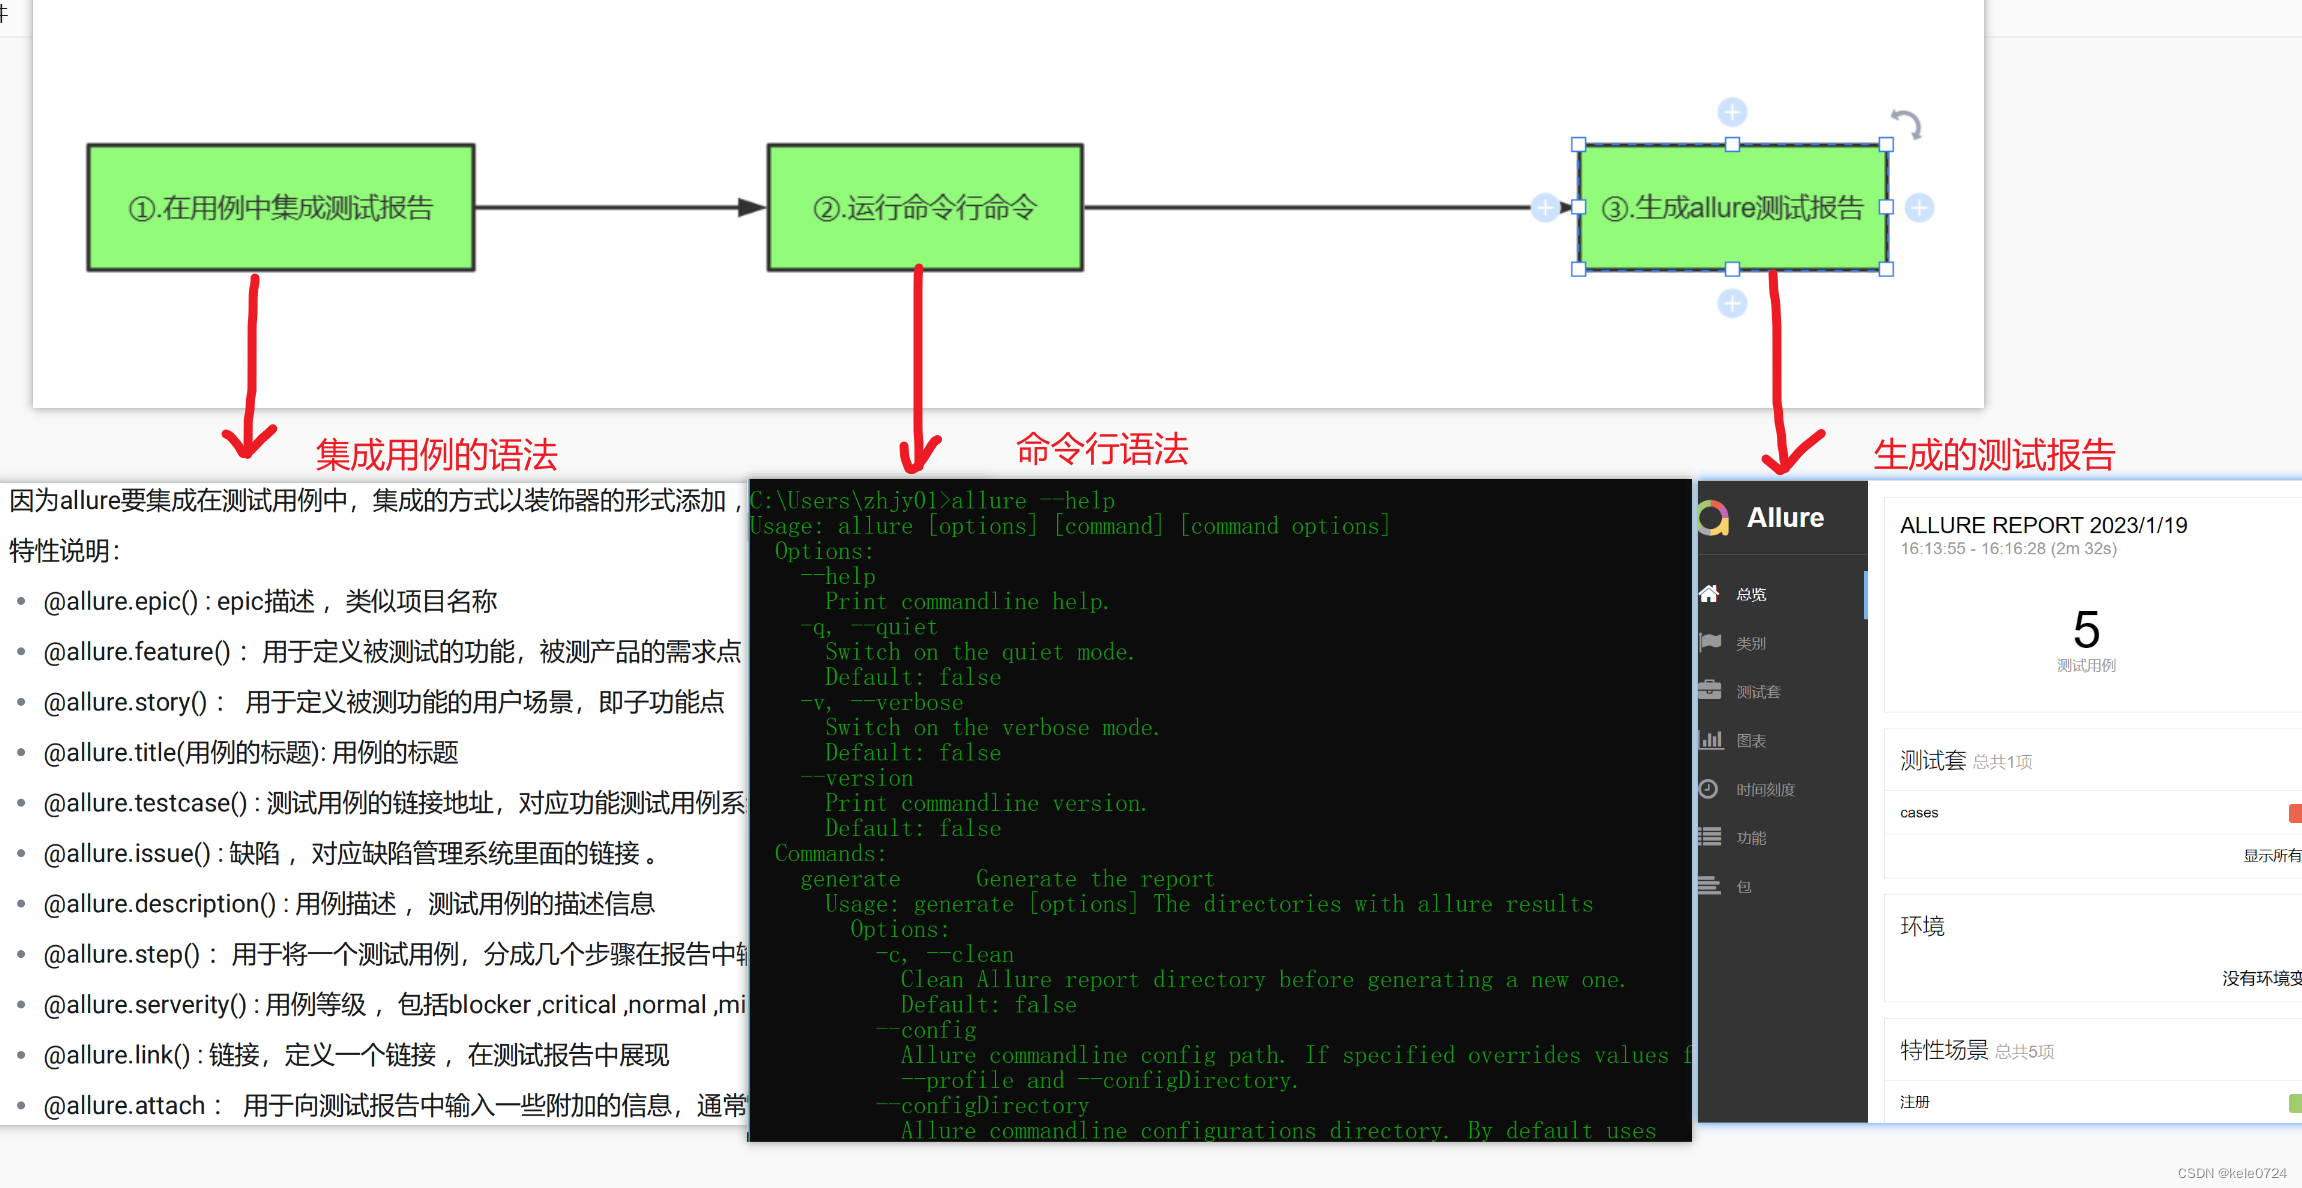
其实 ,在allure中主要分为以上的三部分,分别是用于集成在测试用例的装饰器函数 、 通过命令行命令收集测试用例的命令行工具、最后就是生成测试报告的展示 。
具体使用时,按照如下的流程实现即可 :
-
在编写好的测试用例中添加allure装饰器函数 ,
-
在运行入口处编写运行allure执行命令 ,它就会生成测试报告
-
通过浏览器查看生成的测试报告 。
3.2 allure装饰器函数
(1)基本说明
allure装饰器
# 作用:用于将测试用例的数据展示到测试报告中
# 导入:import allure
# 说明 :
    1.需要将这些装饰器函数添加测试方法或测试类的开头。
    2.同一个类或者一个方法可以添加多个装饰器函数 ,这样此用例就具有了个作用属性 。
(2)装饰器函数
| 函数 | 说明 | 备注 |
|---|---|---|
| @allure.epic() | 敏捷中的概念 | 项目名称 |
| @allure.feature() | 模块名称 | 模块名 |
| @allure.story() | 用户故事 | 子模块 |
| @allure.title(用例的标题) | 用例标题 | 用例标题 |
| @allure.severity() | 用例等级 | 包括:blocker,critical,normal,minor,trivial |
| @allure.step() | 操作步骤 | 测试步骤 |
| @allure.description() | 测试用例描述 | 可以写预期结果 |
| @allure.testcase(url) | 测试用例链接 | 链接到测试用例系统 |
| @allure.issue(url) | 测试bug链接 | 链接到bug系统 |
| @allure.link(url) | 链接 | 一般可以链接到被测系统地址 |
| @allure.attachment() | 附件 | 一般可以添加截图或者日志 |
以上的装饰器其实就是对应测试用例模板中的一些字段 ,具体如下 :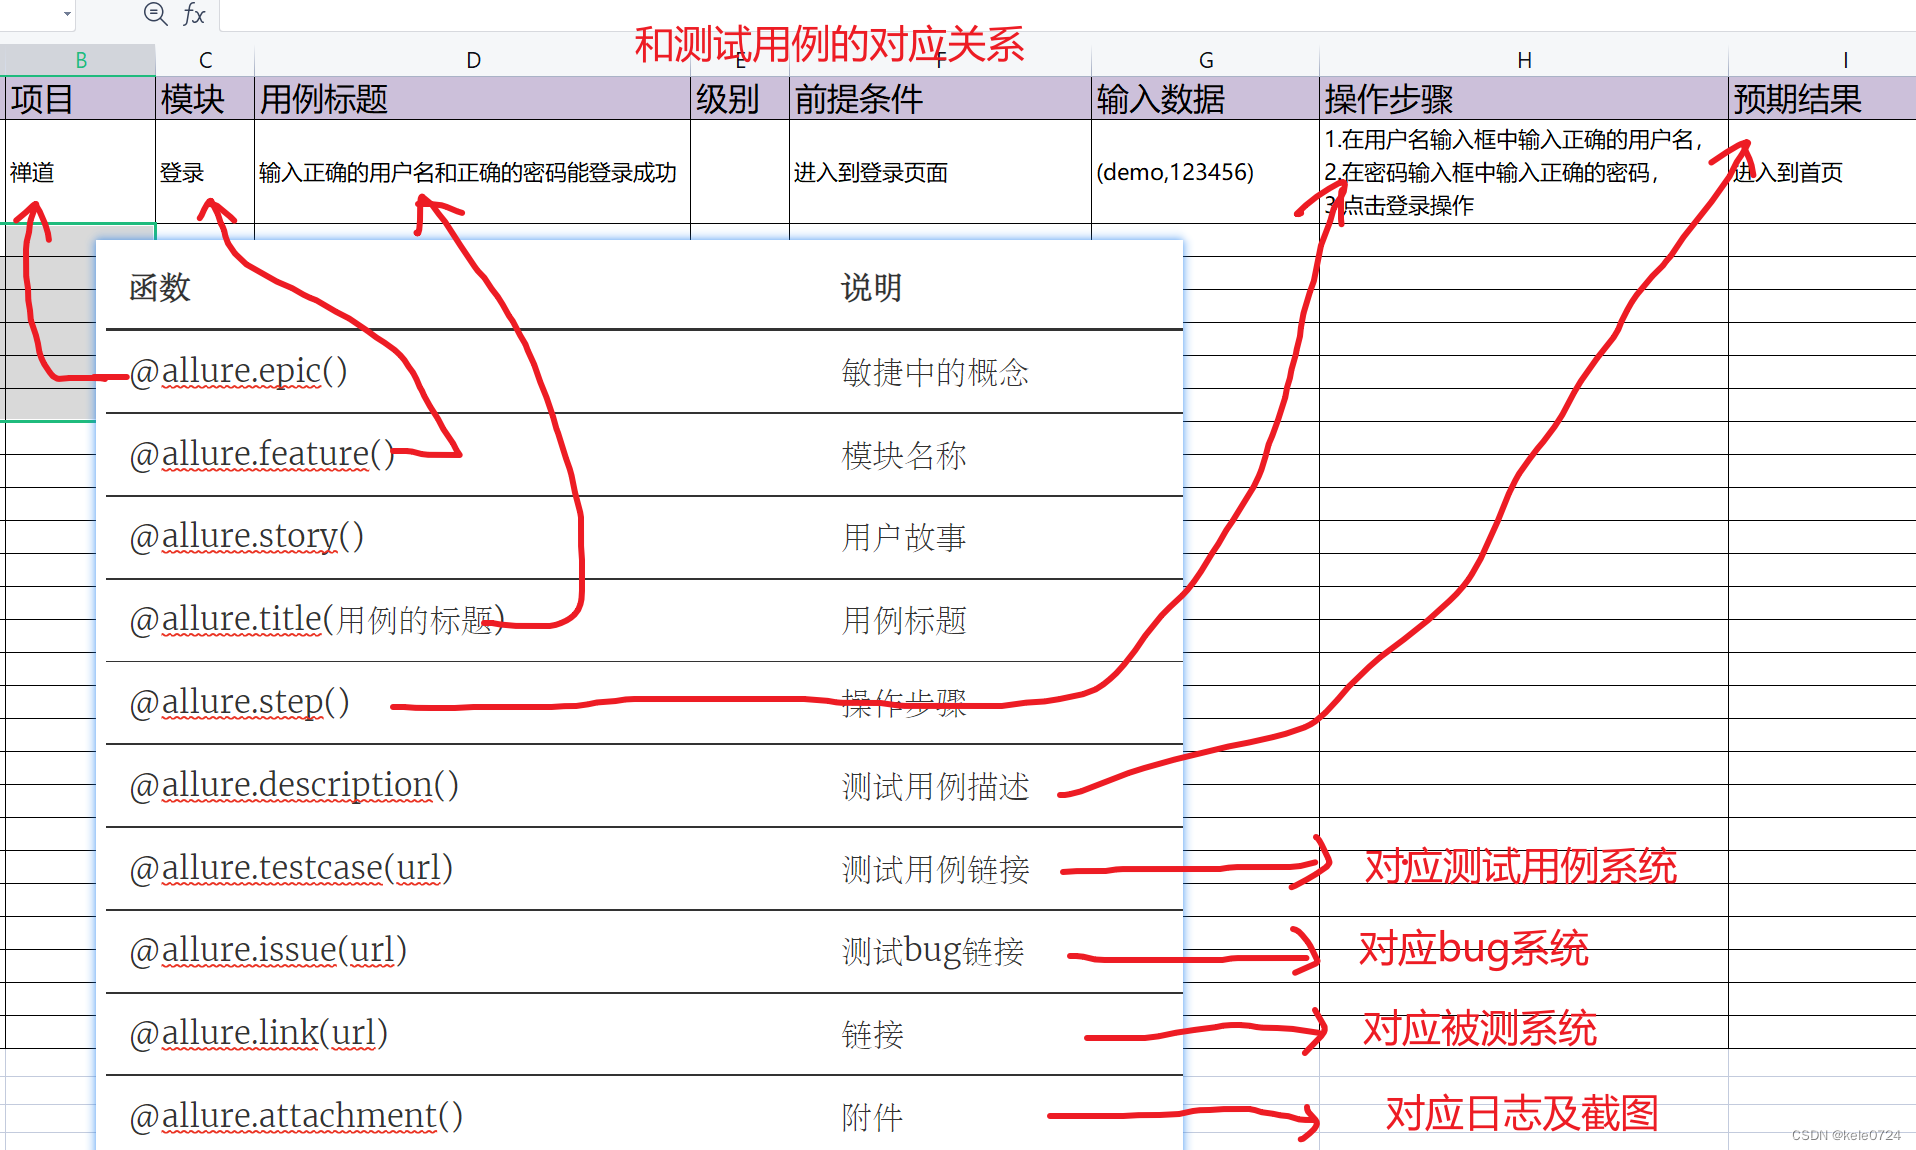
(3)如何在脚本中使用 
(4)使用总结
将我们以上的装饰器整理后就是如下的结构 ,按照此结构可以整理出你的测试用例 。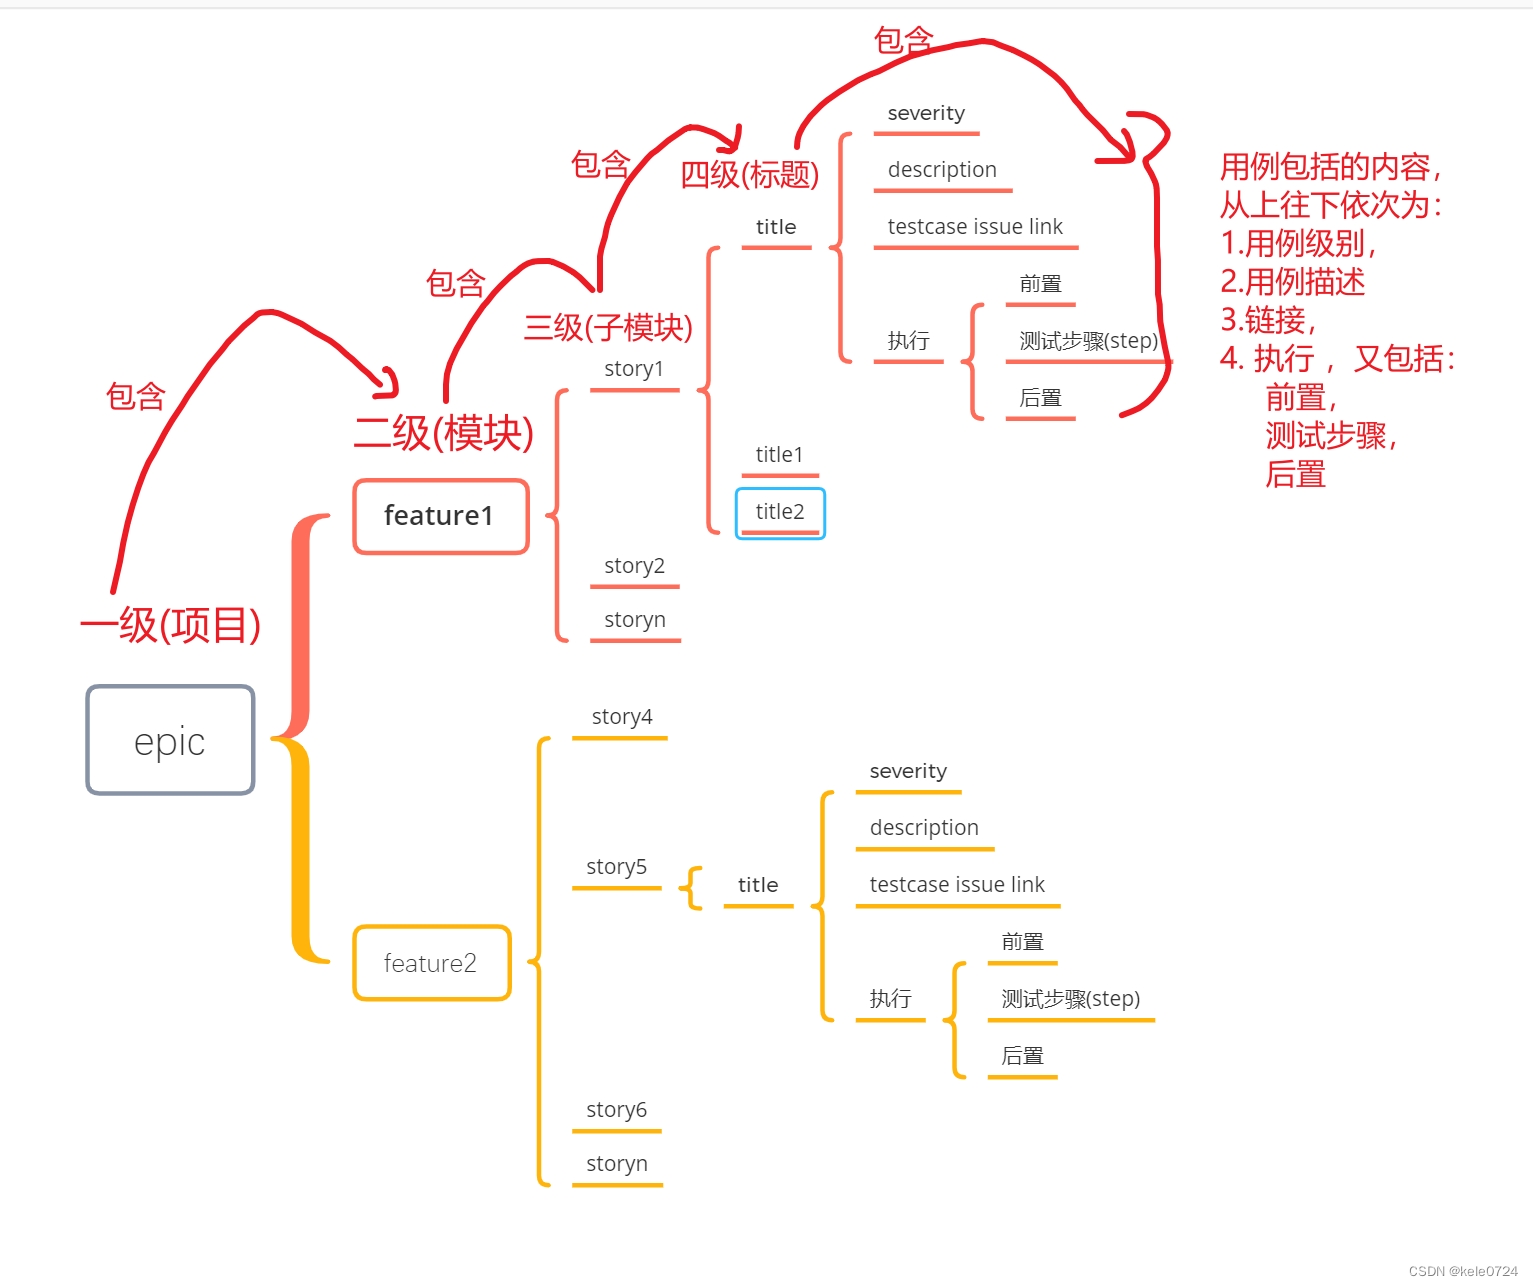
如果你编写的测试用例装饰器函数都已经使用 ,那么它的层级就是如上的结构 ,当然这里还需要说明以下几点 :
-
每一个装饰器都是可选项,可加可不加 。比如你把feature去掉了,那么在报告中就不展示这一层级了 ,其它也是如此。
-
epic、feature、story、title主要用来显示层级 ,而到了title层里,就是显示具体的内容 ,内容包括severity,description,testcase ,issue,link,step等
-
除了step和attachment比较特殊以外,它们都是放在方法内使用 ,其它的都是标注在测试方法的开头或者类的开头 。
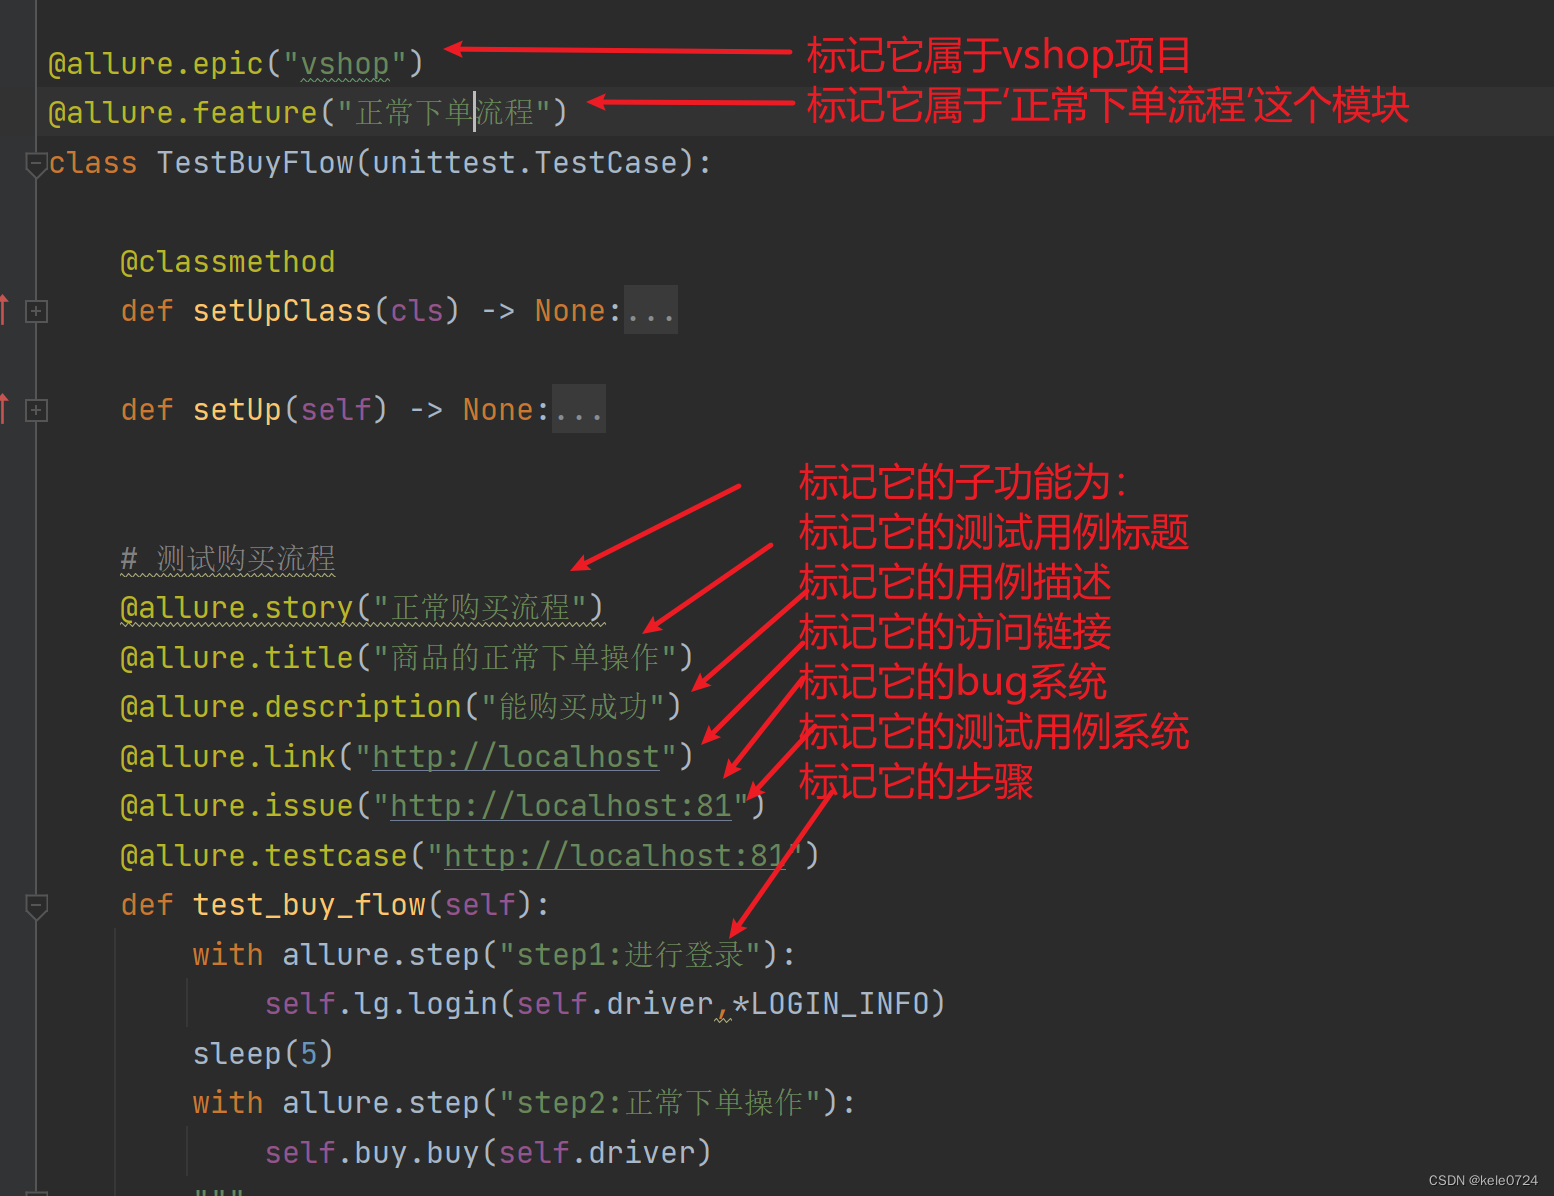
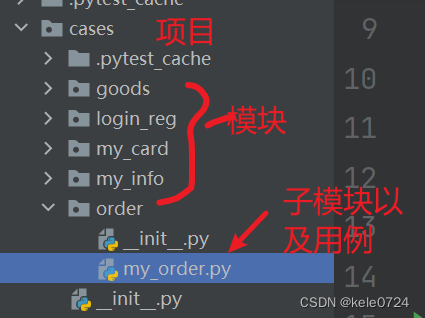
那么,在项目中该怎么组织我们的测试用例呢 ?一般就是按照项目结构一层一层的组织下来 ,比如 :
@allure.epic("vshop")					#标记属于那个项目
@allure.feature("订单")					# 标记属于那个模块
@allure.story("订单列表")					#标记属于那个子模块
@allure.issue("http://localhost")
class TestOrder(unittest.TestCase):

    @classmethod
    def setUpClass(cls) -> None:
        cls.reg = RegLogic()
        cls.mysql = BaseMysql()
        cls.mobile = '13712345678'
        cls.password1,cls.password2 = 123456,123456

    def setUp(self) -> None:
        self.driver = webdriver.Chrome()
        self.driver.maximize_window()
        self.driver.get("http://localhost")

        # 判断账号是否存在
        result = self.mysql.get_one(get_user.format(self.mobile))
        logger.info("查找注册账号结果:{}".format(result))
        if result:
            self.mysql.exec_sql(del_user.format(self.mobile))

    def tearDown(self) -> None:
        self.mysql.exec_sql(del_user.format(self.mobile))
        self.mysql.close()
        self.driver.quit()


    @allure.title("查询订单列表")						#标记测试用例
    @allure.description("显示该列表的所有数据")			# 标记用例的描述
    def test_order_list(self):
        with allure.step("1.进入我的订单列表页"):		#标记测试步骤
            self.order(self.driver)
        # 断言
        self.assertEqual("安全退出",self.reg.get_reg_msg(self.driver))

    @allure.title("查询订单详情")						#标记测试用例
    @allure.description("显示该订单的数据详情")			# 标记用例的描述
    def test_order_list(self):
        with allure.step("1.进入我的订单列表页"):
            self.order(self.driver)
        with allure.step("2.点击最上面一个订单"):
            self.order_detail(self.driver)
        # 断言
        self.assertEqual("安全退出",self.reg.get_reg_msg(self.driver))
3.3命令行参数
(1)命令行参数说明
所谓的命令行参数,就是通过cmd窗口运行的命令 ,如果你对allure的命令行参数不太清楚,可以打开cmd窗口输入:
allure --help
就可以看到如下的显示:
Usage: allure [options] [command] [command options]
  Options:
    --help
      Print commandline help.
    -q, --quiet
      Switch on the quiet mode.
      Default: false
    -v, --verbose
      Switch on the verbose mode.
      Default: false
    --version
      Print commandline version.
      Default: false
Commands:
generate Generate the report
Usage: generate [options] The directories with allure results
        Options:
          -c, --clean
            Clean Allure report directory before generating a new one.
            Default: false
          --config
            Allure commandline config path. If specified overrides values from
            --profile and --configDirectory.
          --configDirectory
            Allure commandline configurations directory. By default uses
            ALLURE_HOME directory.
          --profile
            Allure commandline configuration profile.
          -o, --report-dir, --output
            The directory to generate Allure report into.
            Default: allure-report
serve Serve the report
Usage: serve [options] The directories with allure results
Options:
--config
Allure commandline config path. If specified overrides values from
--profile and --configDirectory.
--configDirectory
Allure commandline configurations directory. By default uses
ALLURE_HOME directory.
-h, --host
This host will be used to start web server for the report.
-p, --port
This port will be used to start web server for the report.
Default: 0
--profile
Allure commandline configuration profile.
open Open generated report
Usage: open [options] The report directory
Options:
-h, --host
This host will be used to start web server for the report.
-p, --port
This port will be used to start web server for the report.
Default: 0
plugin Generate the report
Usage: plugin [options]
Options:
--config
Allure commandline config path. If specified overrides values from
--profile and --configDirectory.
--configDirectory
Allure commandline configurations directory. By default uses
ALLURE_HOME directory.
--profile
Allure commandline configuration profile.以上就是allure显示的命令行参数 ,你可以先看它的格式 ,具体如下:
allure格式: allure [options] [command] [command options]
其中除了allure是必须输入的,剩下括号内的都是可选项,可输可不输人
第一部分就是options,具体包括如下参数 :
Options:
--help
Print commandline help.
-q, --quiet
Switch on the quiet mode.
Default: false
-v, --verbose
Switch on the verbose mode.
Default: false
--version
Print commandline version.
Default: false这个里面都是一些基本信息,相对来说用的少,这里我们不做介绍
第二部分是command,具体包括:
-
generate :Generate the report
-
serve : Serve the report
-
open :Open generated report
-
plugin:Generate the report
以上的命令虽然只有四个,但是每个命令下又都有若干个参数 ,一般加上那个命令,就的加上对应的一些参数 ,这里面我们主要介绍常用的generate命令 。
第三部分是command options,这里主要介绍generate选项 :
Usage: generate [options] The directories with allure results
Options:
-c, --clean
Clean Allure report directory before generating a new one.
Default: false
--config
Allure commandline config path. If specified overrides values from
--profile and --configDirectory.
--configDirectory
Allure commandline configurations directory. By default uses
ALLURE_HOME directory.
--profile
Allure commandline configuration profile.
-o, --report-dir, --output
The directory to generate Allure report into.
Default: allure-report这里主要使用的两个选项就是 :
-
-c : 每次生成报告前清除之前生成的报告文件 ,不加此选项则默认为不清除 。
-
-o : 生成报告的路径 ,也就是你要将测试报告输出到哪里 。
所以 ,我们该如何使用此命令行参数呢 ?可以在cmd窗口运行如下命令:
allure generate JSON路径 -o 生成测试报告路径 -c
这里有一个JSON路径,这个需要通过pytest生成一堆json文件,存放这堆JSON文件的这个路径就是JSON路径。
不过这个命令一般集成在python中去使用的,具体写法参考项目文件。
3.4 生成测试报告
生成的报告就是如下的情况 :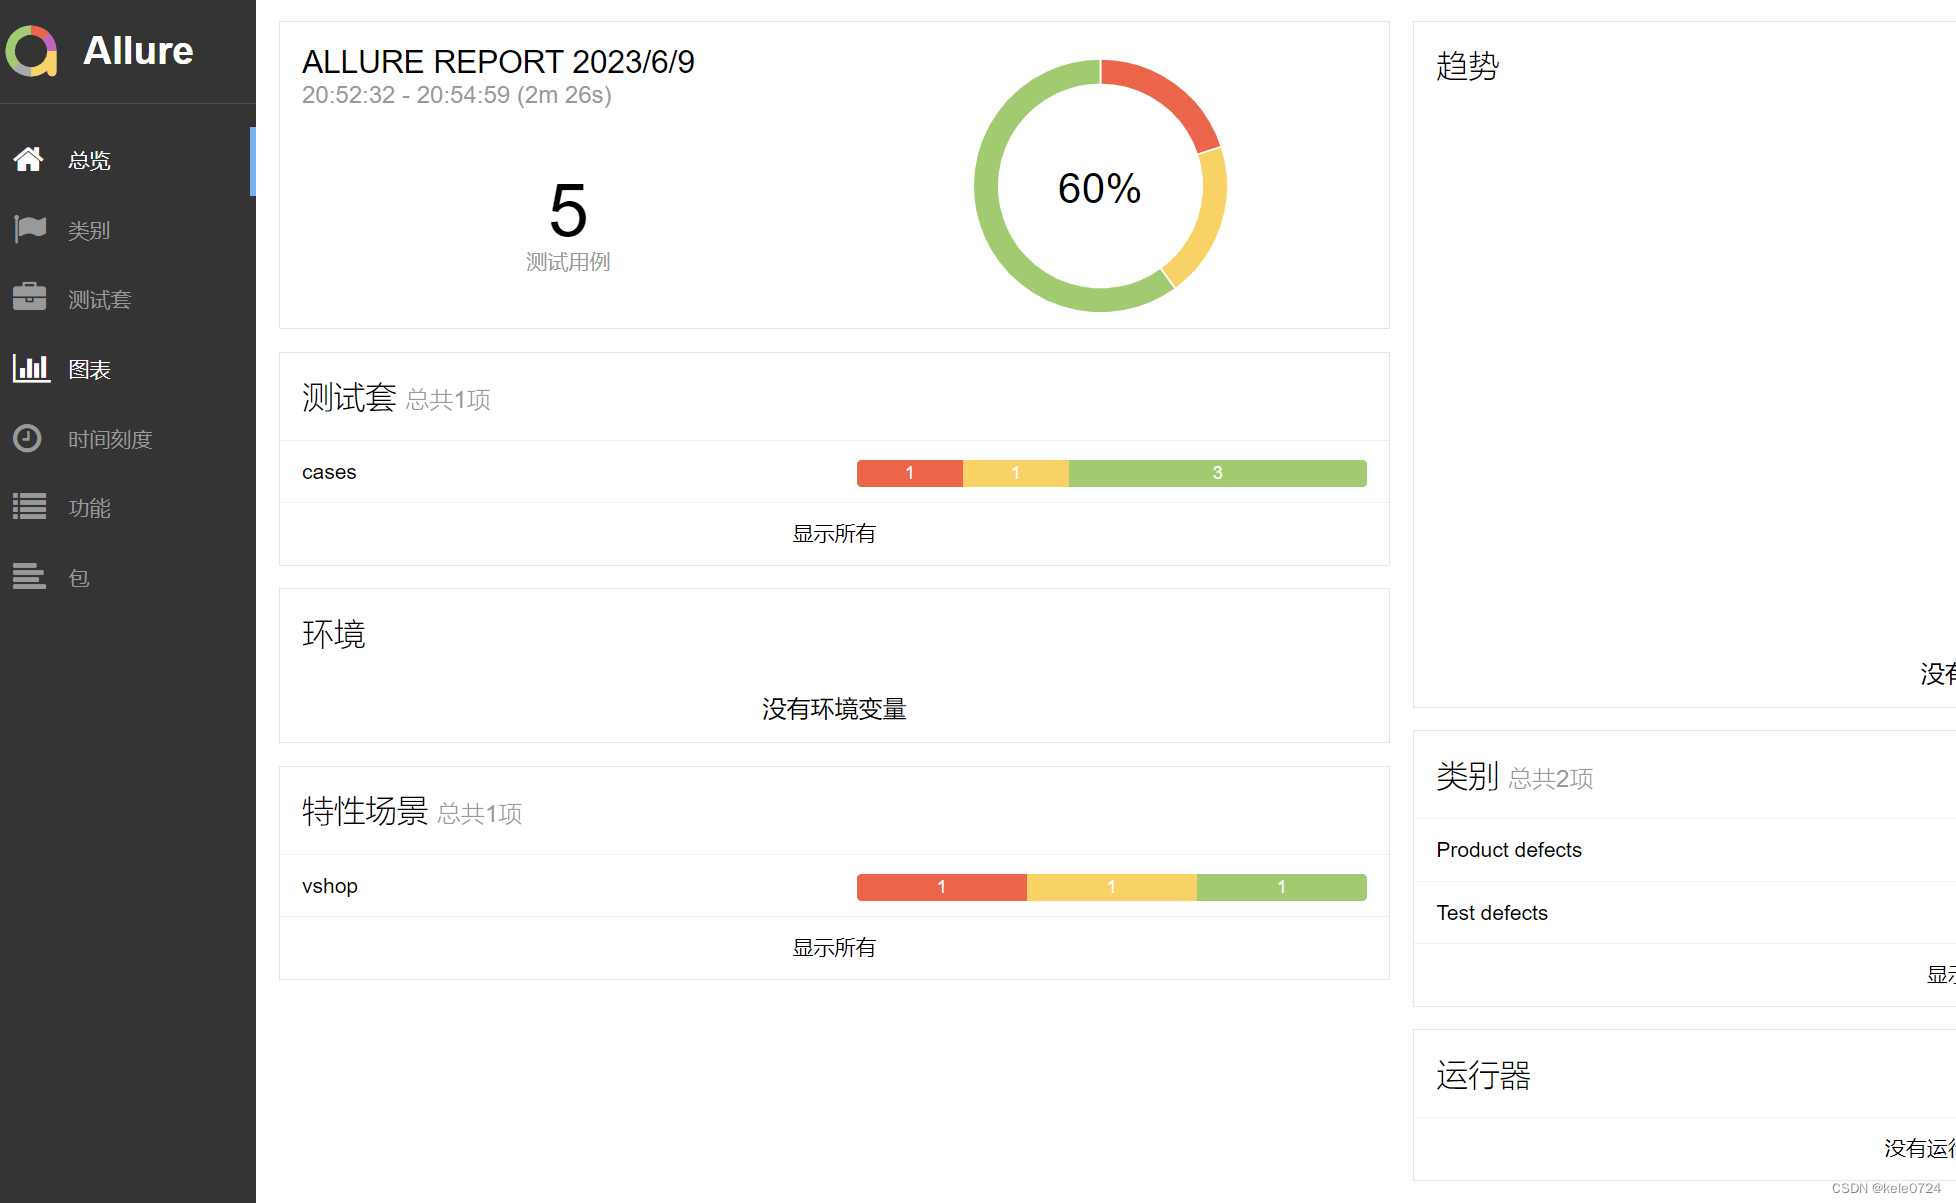
(1)整体说明:
每个tab页都是啥意思呢 ?接下来我们来看下面的说明 :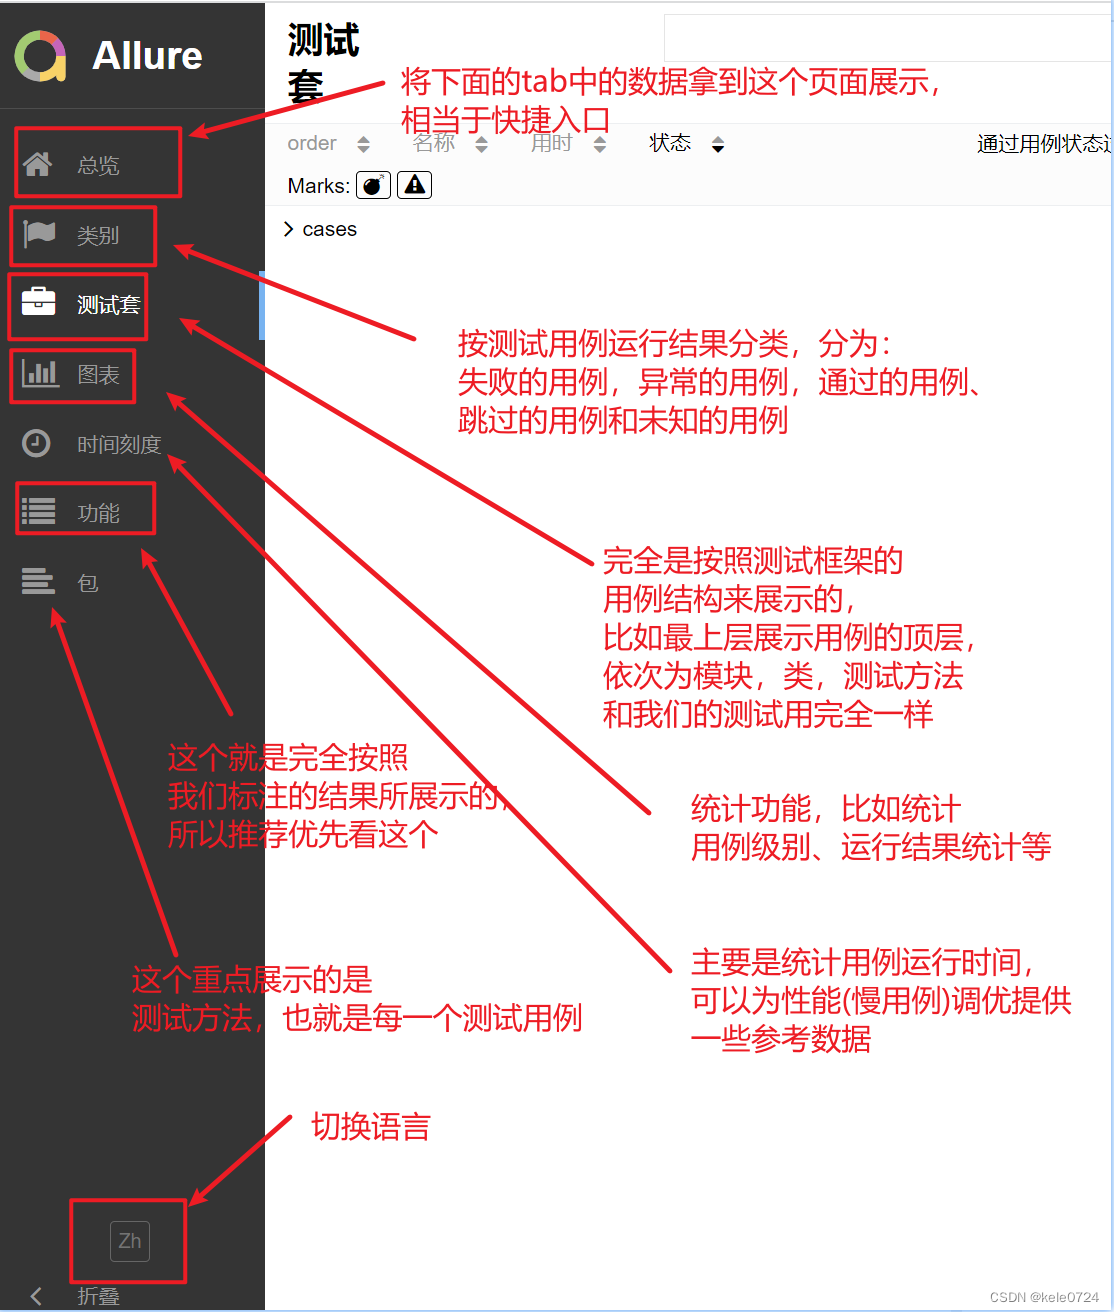
(2)总览: 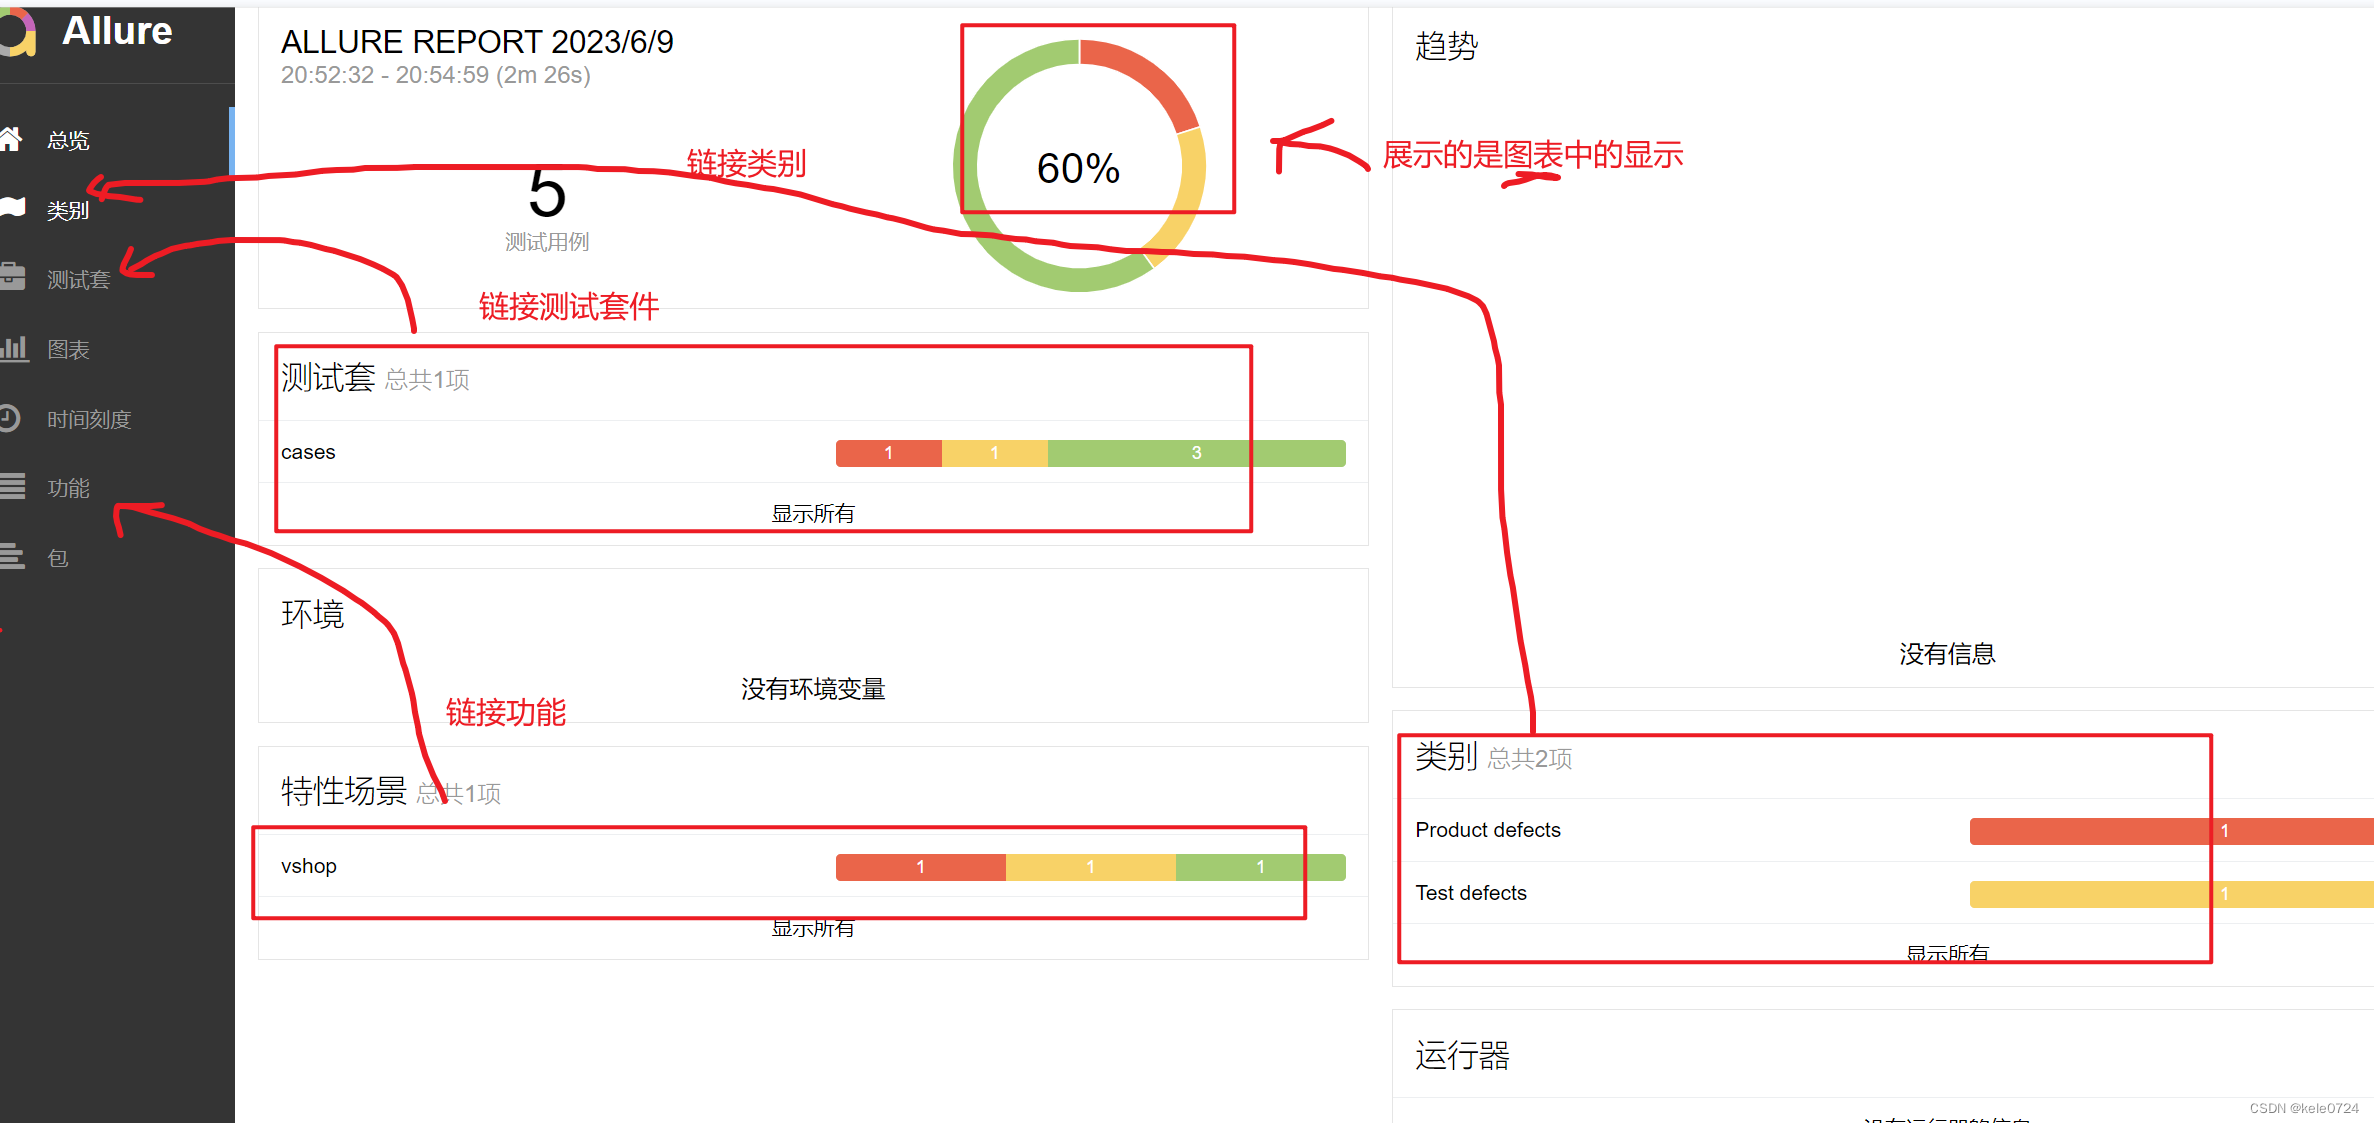
所以,此页面主要是展示和链接其它页面功能 ,相当与其它页面的汇总 。
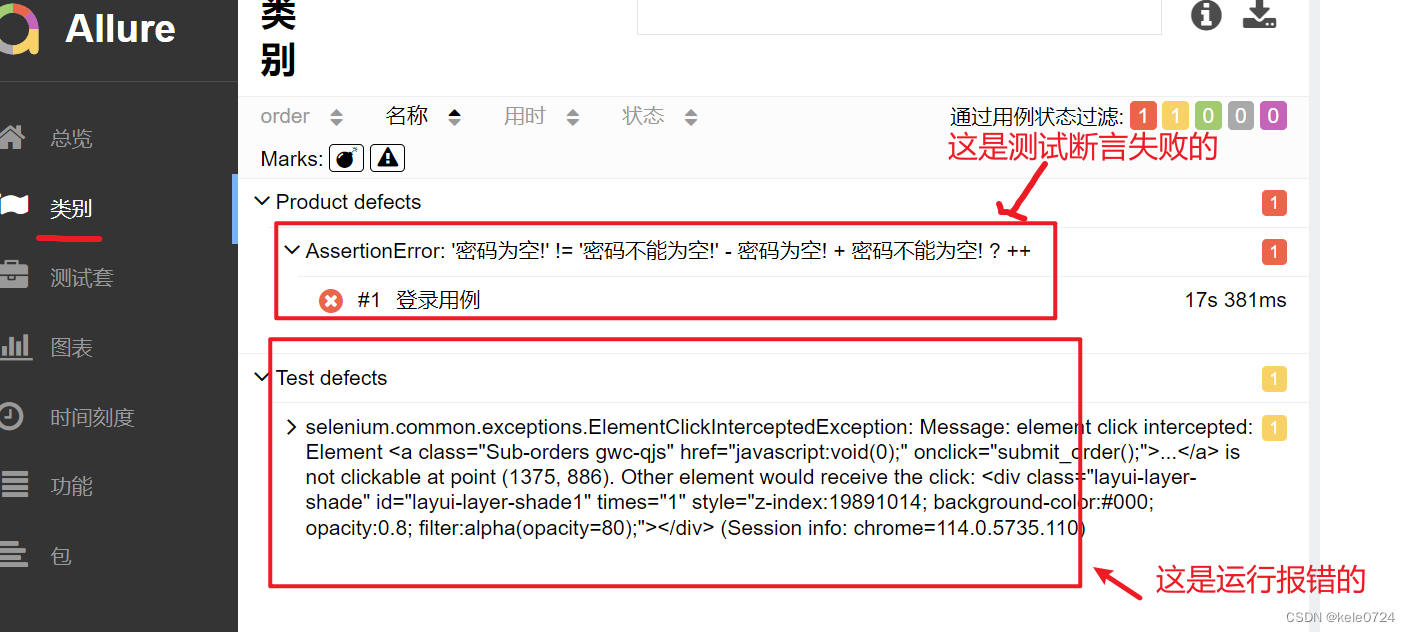
(3)类别
所谓类别,就是按照不同用例的运行结果划分的一个分类 ,具体包括 :
-
报错的用例
-
运行失败的用例
-
运行成功的用例
-
跳过的用例
-
未知的用例 。
(4)测试套
这里的测试套,并不是测试套件 ,它只是按照你项目测试用例的层级一层一层的组织展示的。比如我的代码层级为:
cases:
    test_login.py
    test_buy_flow.py
    test_reg.py

# test_login.py中的代码为:
class TestLogin():
    pass

# test_buy_flow.py中的代码为:
class TestBuyFlow():
    pass

# test_reg.py中的代码为
class TestReg():
    pass
以上的用例组织结构就变为下图的展示方式了 。 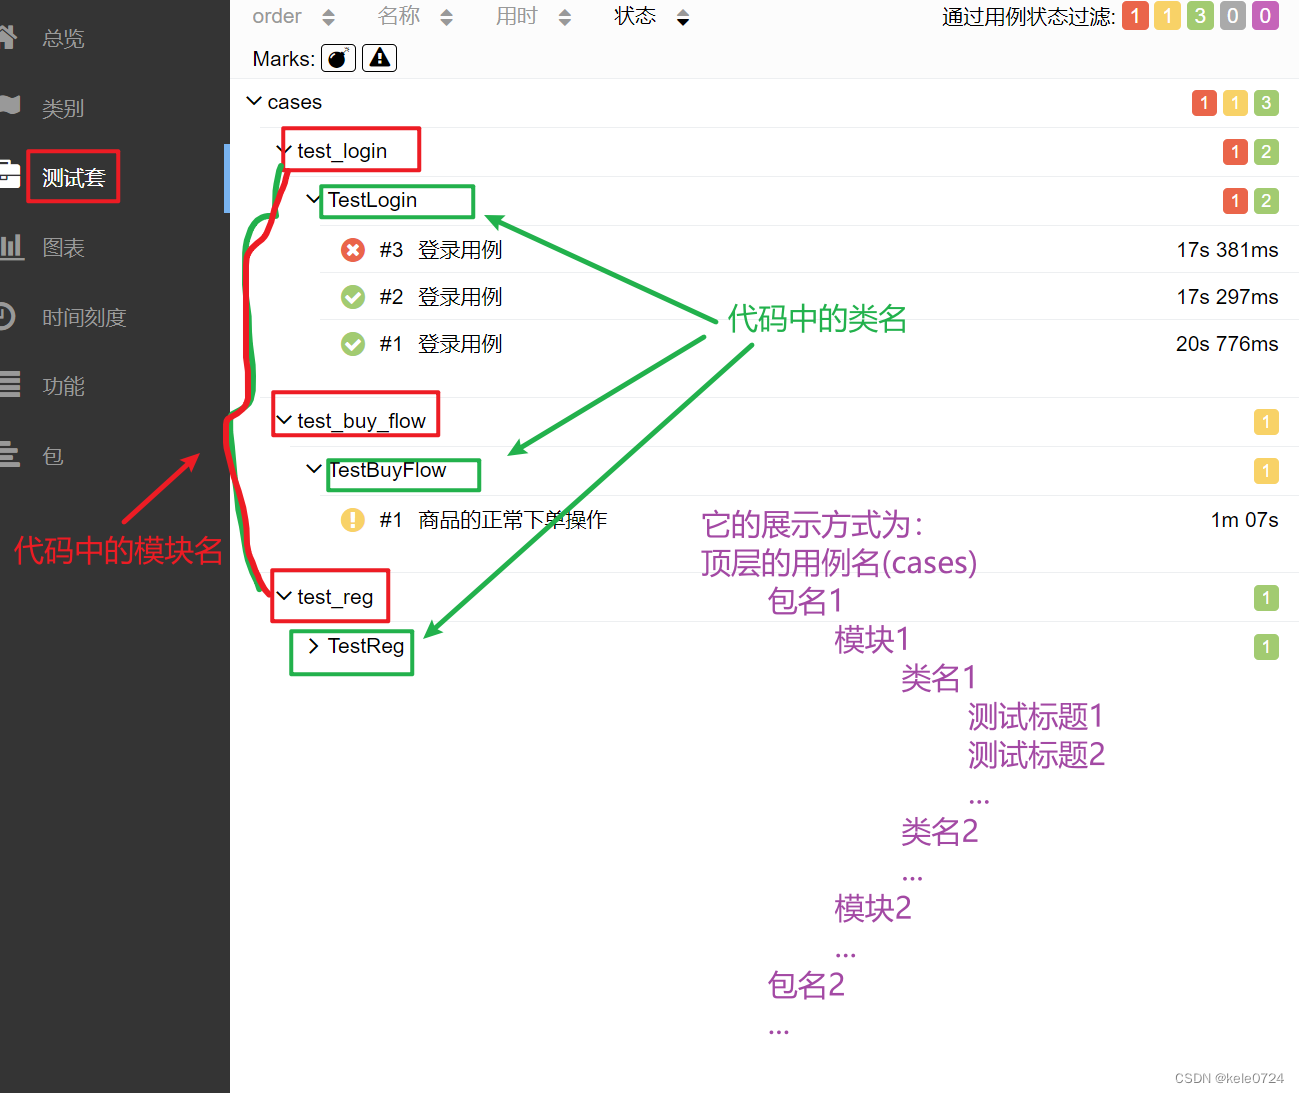
(5)图表
这个就是按照不同的维度进行了数据统计,包括:用例状态、优先级、耗时等。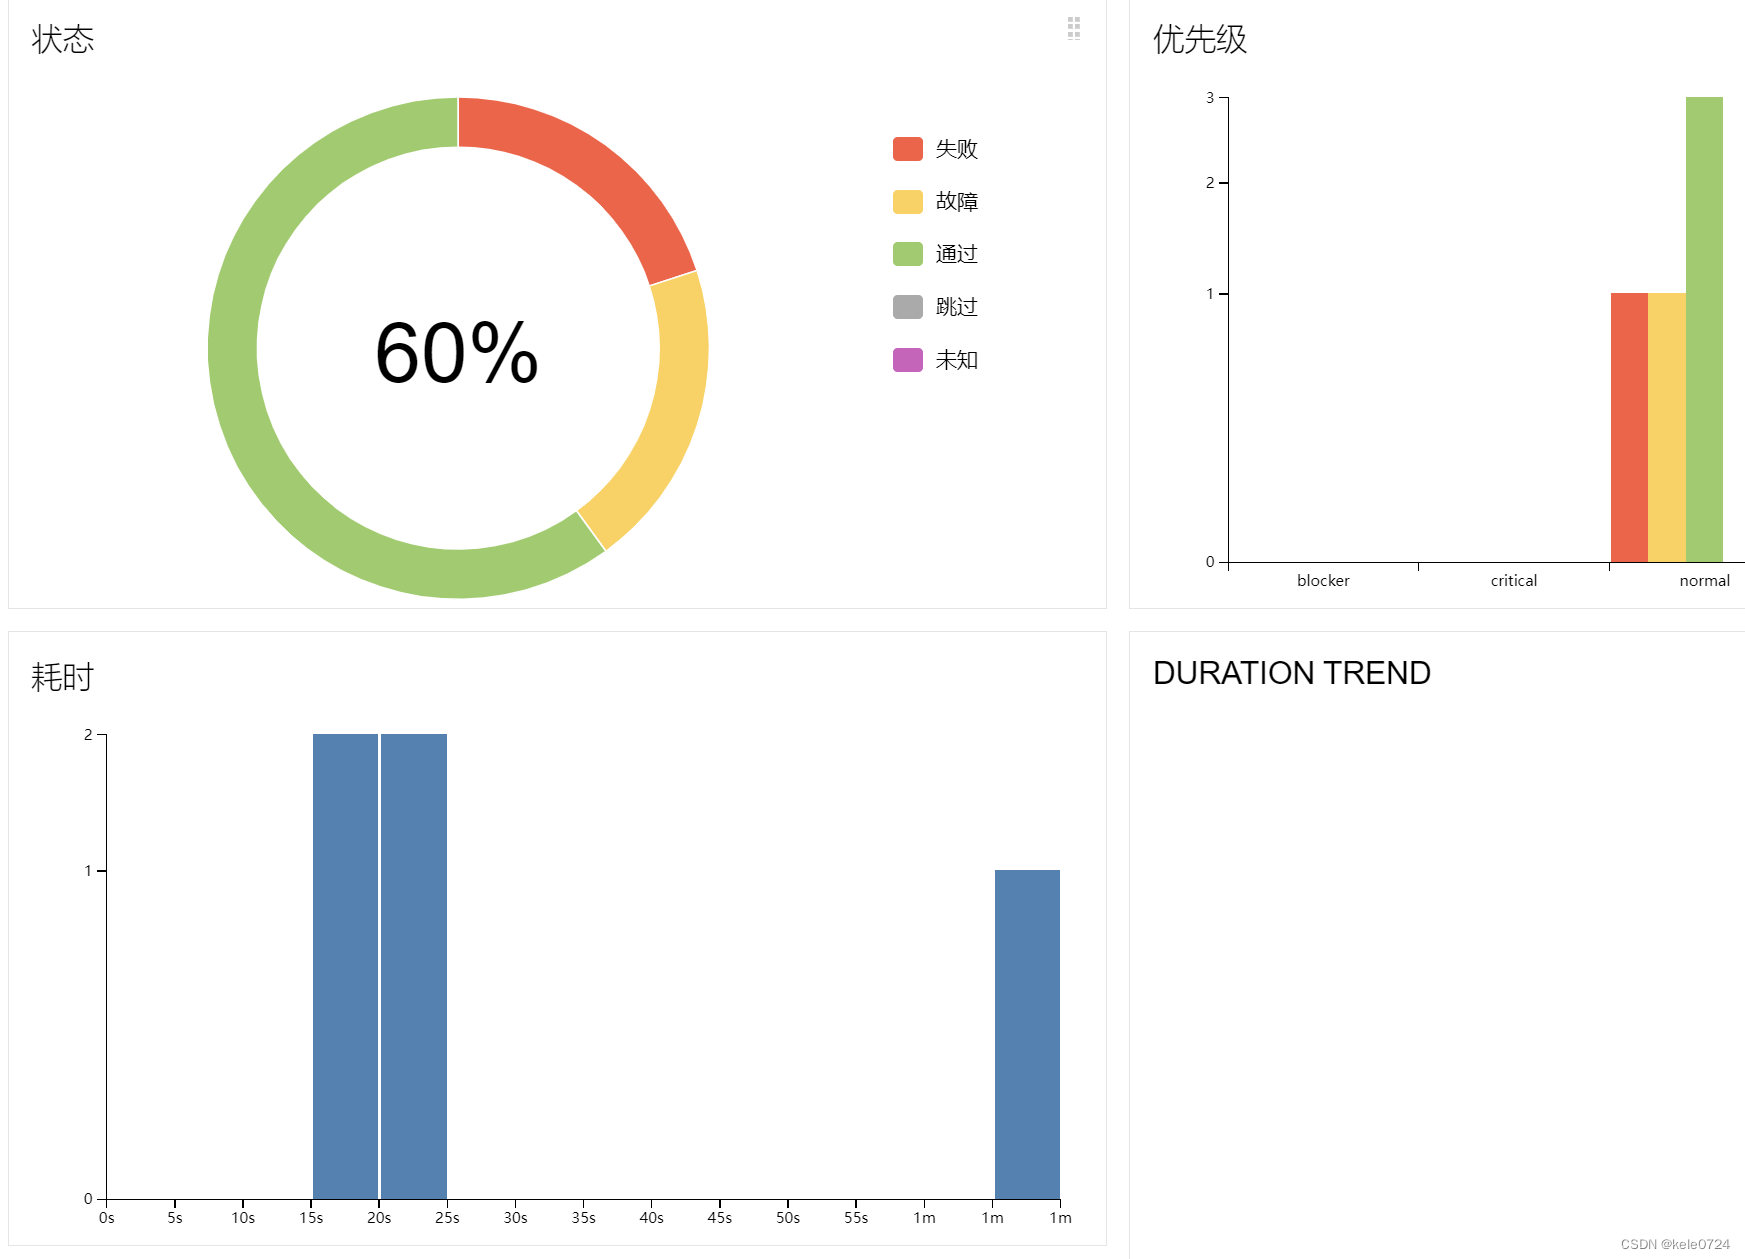
(6)时间刻度
主要统计各个用例的运行时间 ,比如想知道那些用例运行花费的时间长,看这个数据就可以知道 。
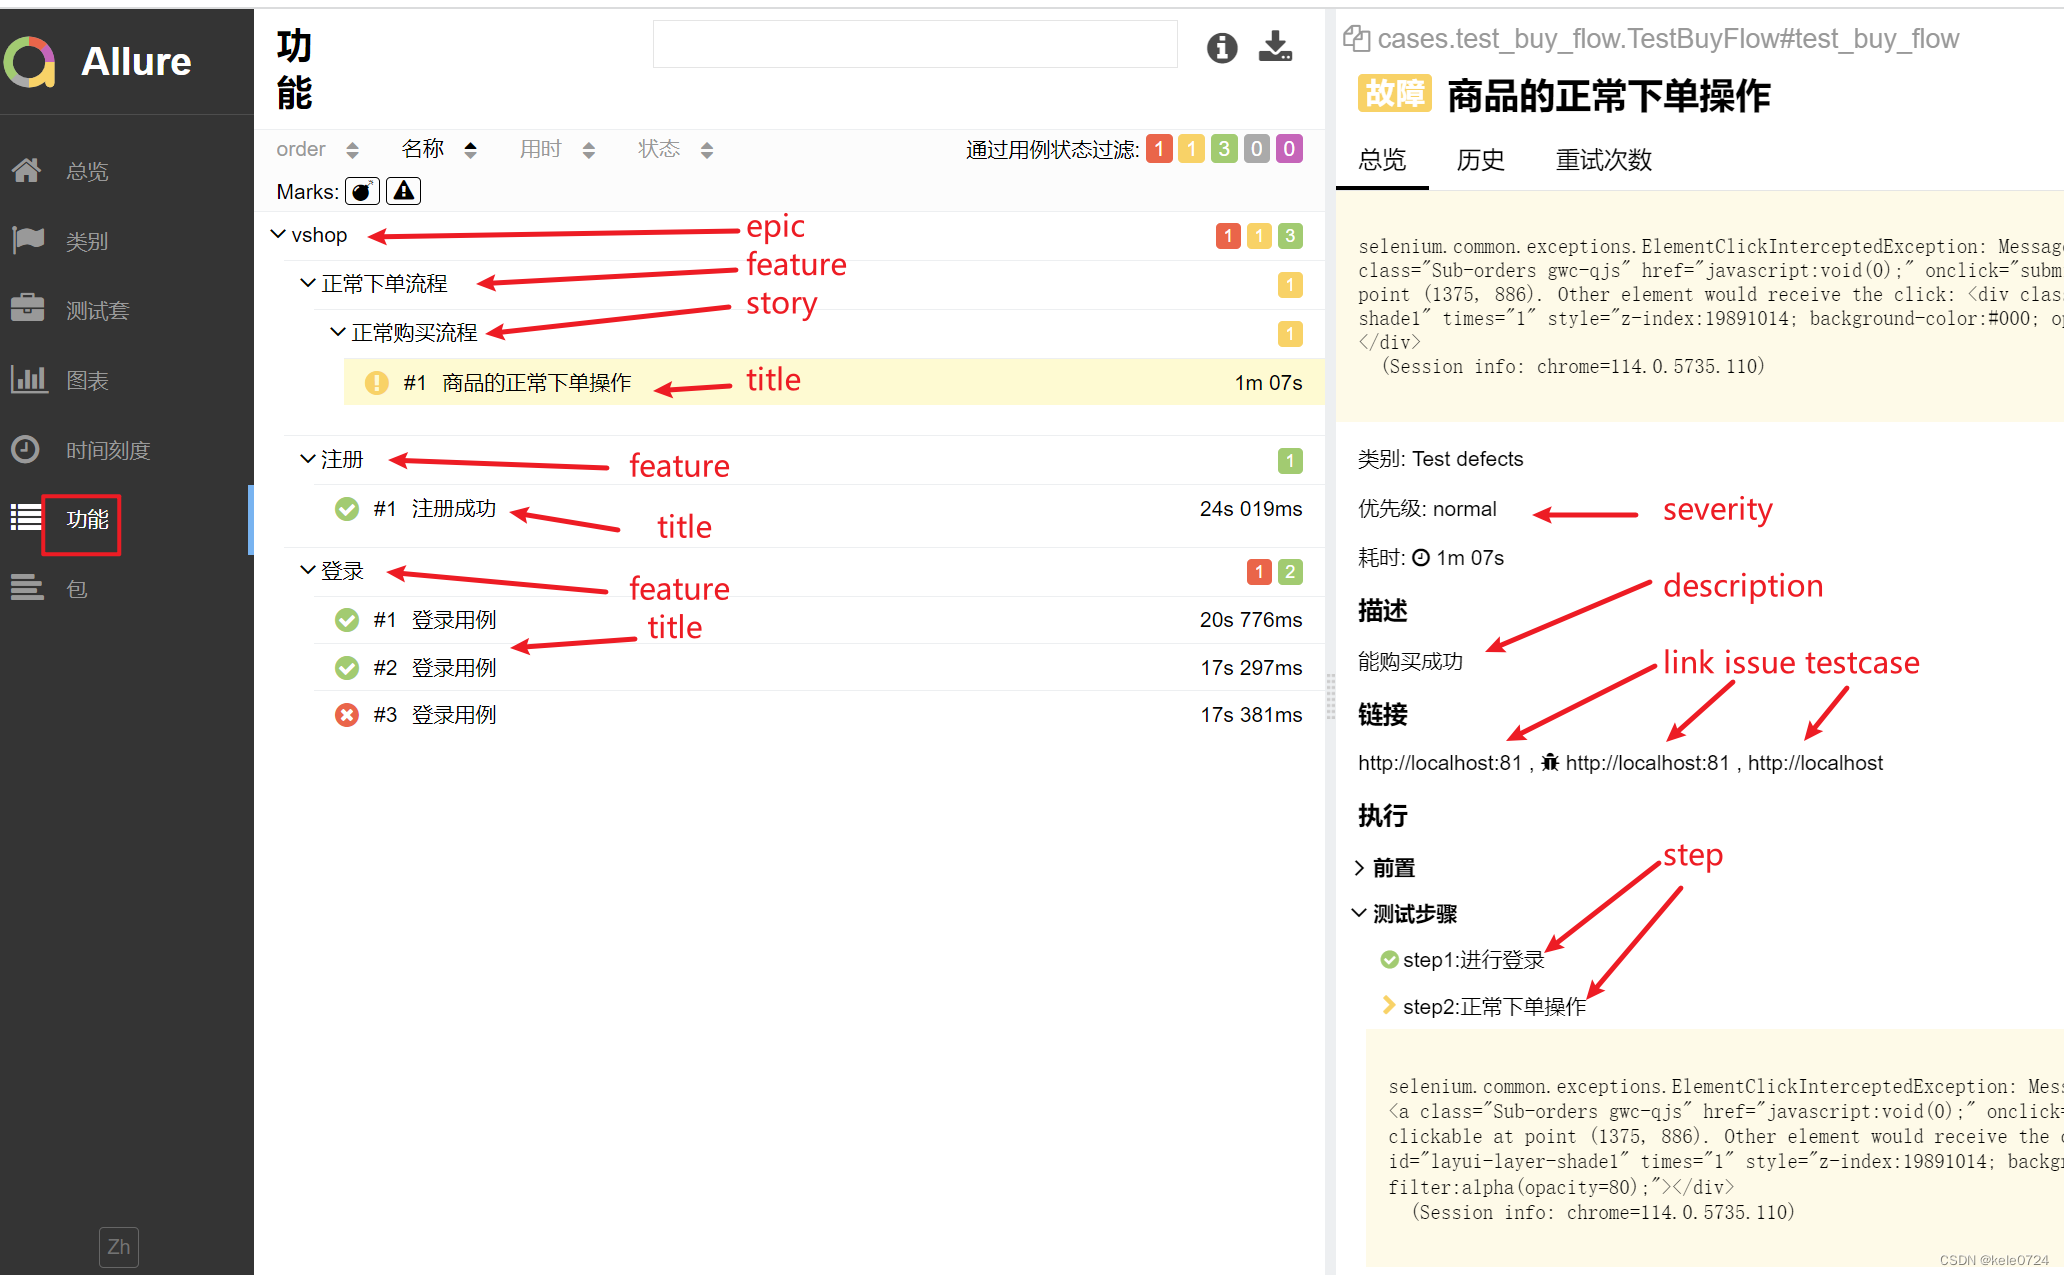
(7)功能
在最开始我们介绍到了allure的装饰器函数 ,分别给每个用例都做了标记 ,那么所标记的结果就是从功能里查看 ,具体如下:
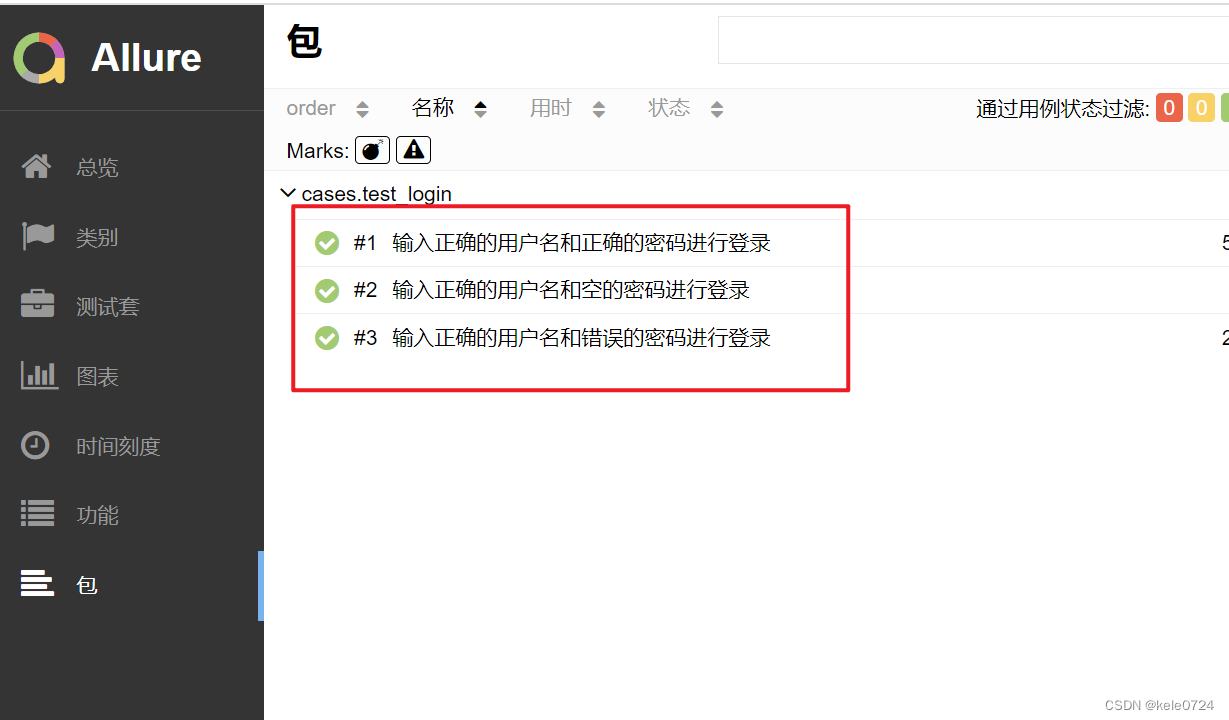
(8)包
此功能忽略中间层级 ,只展示测试方法,即测试用例 ,对于看测试具体结果来说更加直观。
(9)总结
通过上我们可以看到 ,整体来说还是以测试报告的展示为主 ,只不过他的展示维度不同。既然展示维度不同 ,那么查看时更多的结合实际场景来查看,具体可参考如下方式 :
-
(1)要看总体情况 ,先看总览,可以了解到编写了多少测试用例 ,有多少成功的、多少失败的。
-
(2)运行结果若出现用例运行失败的,报错的,可以查看类别 ,这里按照类别分类 ,查看时更加直观 ,帮助你更快的分析和定位问题。
-
(3)想查看哪些用例运行速度慢 ,可以看时间刻度,它可以帮你找出运行慢的用例 ,从而可以进行针对性的性能优化 。
-
(4)快速定位是那个用例运行失败的(要定位到测试方法的) ,可以查看包 ,这个能很直观的看到编写了哪些测试方法,那个成功、那个失败 ,结果一目了然 。
-
(5)若想核对你编写的测试用例情况(和测试用例文件核对) ,可以查看功能,因为它是按照项目层级展示,看起来更加直观 。
-
(6)若想从代码角度来看编写的测试用例情况,可以查看测试套 ,因为它就是按照代码层级所展示的 。
4.项目实践
在之前介绍的测试用例登录脚本中,我们并没有集成测试报告,接下来重写以下两个文件 ,包括 :
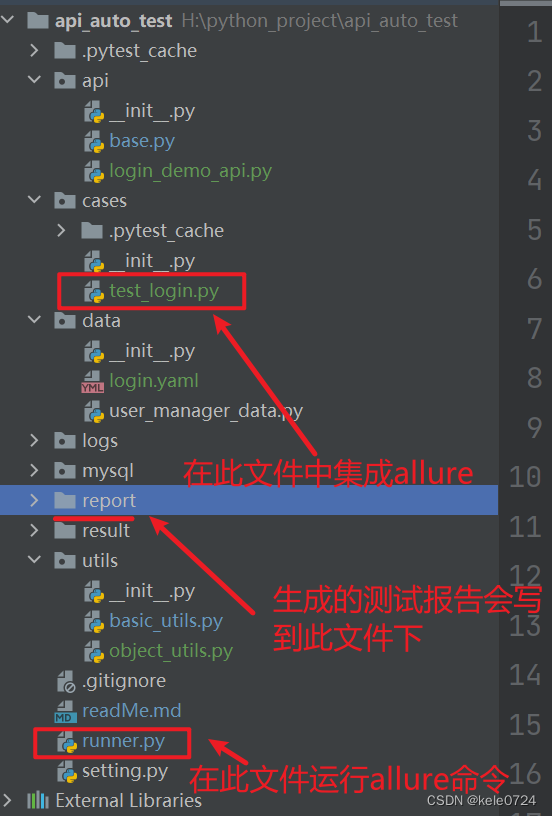
(1)登录测试用例 :test_login.py
import unittest
from api.login_demo_api import login
from utils.basic_utils import read_yaml, get_file_path
import allure
@allure.epic("vshop")
@allure.story("登录")
class TestLogin(unittest.TestCase):
@classmethod
def setUpClass(cls) -> None:
yaml_path = get_file_path('login.yaml') # 获取login.yaml的全路径
result = read_yaml(yaml_path) # 转化为python对象
cls.login_data = result.get('login') # 获取字典中login的值
# case1 : 测试登录成功
@allure.title("输入正确的用户名和正确的密码进行登录")
@allure.description("预期结果:登录成功")
def test_login_success(self):
res = self.login_data[0] # 获取列表中第一个值
login_result = login(res.get('username'),res.get("password"))
self.assertEqual(res.get("code"), login_result.get('errno'))
self.assertEqual(res.get("message"), login_result.get('errmsg'))
# case2 : 测试密码错误
@allure.title("输入正确的用户名和错误的密码进行登录")
@allure.description("预期结果:用户帐号或密码不正确")
def test_password_is_wrong(self):
res = self.login_data[1] # 获取列表中第二个值
login_result = login(res.get('username'),res.get("password"))
self.assertEqual(res.get("code"), login_result.get('errno'))
self.assertEqual(res.get("message"), login_result.get('errmsg',login_result))
# case3 : 测试密码为空
@allure.title("输入正确的用户名和空的密码进行登录")
@allure.description("预期结果:参数不对")
def test_password_is_null(self):
res = self.login_data[2] # 获取列表中第三个值
login_result = login(res.get('username'),res.get("password"))
self.assertEqual(res.get("code"), login_result.get('errno'))
self.assertEqual(res.get("message"), login_result.get('errmsg',login_result))(2) 运行入口脚本:runner.py
import pytest
import os
if __name__ == '__main__':
# 1. 使用pytest生成测试报告时需要传递一个列表
json_dir_path = 'result'
args_list = ['-s', '-v', 'cases', '--alluredir', json_dir_path]
pytest.main(args_list)
# 2. 使用allure命令生成测试报告 :allure generate 数据路径文件 -o html路径文件 -c
html_dir_path = 'report'
cmd = 'allure generate {} -o {} -c'.format(json_dir_path, html_dir_path)
os.system(cmd)(3) 生成测试结果 :report文件夹,打开此文件夹,通过浏览器打开index.html文件 ,就会展示具体生成的测试报告 。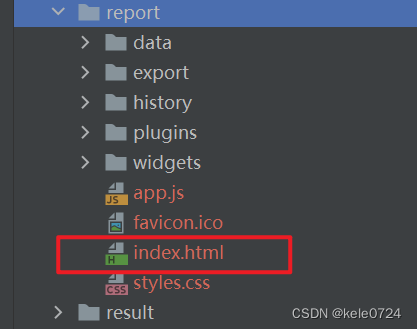


旨在为数千万中国开发者提供一个无缝且高效的云端环境,以支持学习、使用和贡献开源项目。
更多推荐


 13
13 0
0- 0


 已为社区贡献2条内容

所有评论(0)