【Python】Hydra 库使用记录
参考与前言
主要是介绍python hydra库如何使用,如果不知道这是什么,简单介绍:
Hydra 是一个开源 Python 框架,可简化研究和其他复杂应用程序的开发。
关键特性是能够通过**组合动态创建分层配置,并通过配置文件和命令行覆盖它**。 Hydra 这个名字来源于它能够运行多个类似的工作——就像一个有多个头的 Hydra。
简单来讲,就是管理yaml config配置文件的,更方便一点的,虽然也可以yaml.load(),但是这个就是遇到了和没遇到一些工具的区别,比如 tensorboard 和wandb 之类的 wandb真的是香,主要是yaml我也没咋用,近来觉得应该要更为规范些了 所以看了看就先学到了hydra,yaml.load对于小的网络和测试应该绰绰有余了
- 官方文档:https://hydra.cc/docs/intro/
- towards上英文教程:Complete tutorial on how to use Hydra in Machine Learning projects
- 配合使用OmegaConf:https://omegaconf.readthedocs.io/en/latest/index.html
1. 简单介绍
安装
pip install hydra-core
注意其版本和python对应关系:
| Version | Release notes | Python Versions | |
|---|---|---|---|
| ► | 1.1 (Stable) | Release notes | 3.6 - 3.9 |
| 1.0 | Release notes | 3.6 - 3.8 | |
| 0.11 | Release notes | 2.7, 3.5 - 3.8 |
初步测试
假设代码位置和配置文件位置如下:
folder
├── config
│   └── config.yaml
└── main.py
其中main.py如下:
import hydra
from omegaconf import DictConfig, OmegaConf
from pathlib import Path

@hydra.main(config_path="config", config_name="config")

def main(config):
    running_dir = str(hydra.utils.get_original_cwd())
    working_dir = str(Path.cwd())
    print(f"The current running directory is {running_dir}")
    print(f"The current working directory is {working_dir}")

    # To access elements of the config
    print(f"The batch size is {config.batch_size}")
    print(f"The learning rate is {config['lr']}")

if __name__ == "__main__":
    main()
config.yaml为:
### config/config.yaml
batch_size: 10
lr: 1e-4
结果为:
The current running directory is C:\Users\xx\xx\xx\folder\
The current working directory is C:\Users\xx\xx\xx\folder\outputs\2021-12-26\22-47-06
The batch size is 10
The learning rate is 0.0001
首先从这里我们可以看到hydra运行时,会自动建立一个输出文件夹,包含日期和时间信息,然后还会直接将路径调到里面去,以方便保存脚本内的各种东西。这就是初步测试,全部都在这一行:配置的路径在"config",配置的文件名为"config"
@hydra.main(config_path="config", config_name="config")
2. 详细使用
套娃使用法
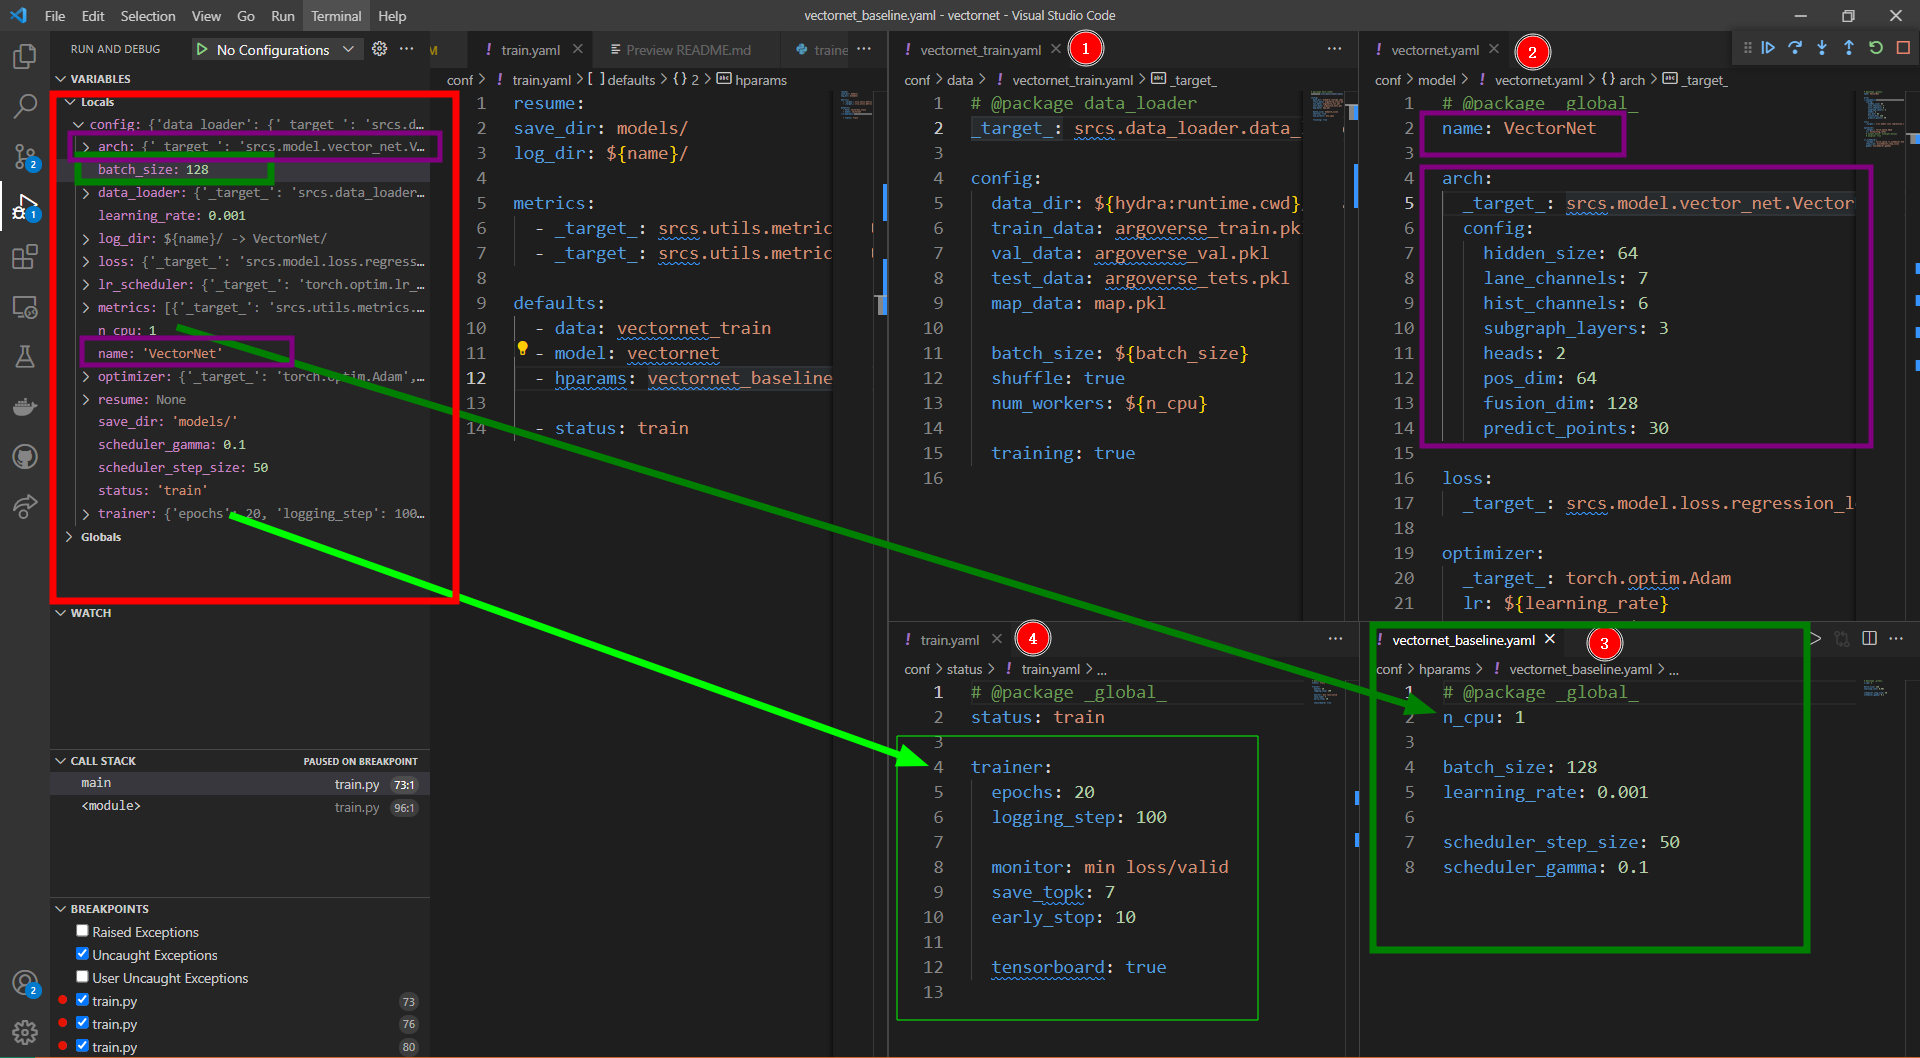
此处主要就是套娃使用,假设我们的conf文件这么复杂:
├───conf
│   │   evaluate.yaml
│   │   preprocess.yaml
│   │   train.yaml
│   │
│   ├───data
│   │       vectornet_train.yaml
│   │       vectornet_val.yaml
│   │
│   ├───hparams
│   │       vectornet_baseline.yaml
│   │
│   ├───model
│   │       vectornet.yaml
│   │
│   └───status
│           debug.yaml
│           train.yaml
其中主conf文件夹下有三个yaml文件,train.yaml如下:
resume:
save_dir: models/
log_dir: ${name}/

defaults:
  - data: vectornet_train
  - model: vectornet
  - hparams: vectornet_baseline

  - status: train
前面三个变量均为直接获取的值,后面defaults里就是套娃的,比如第一个data就是跳入data文件夹下读取vectornet_train文件名的yaml,其余的同理,读进来的变量直接做为config的字典里的成员… 我也不知道咋个描述法,就是config也是自定义的格式为DictConfig,然后defaults下来读到的都直接做为其Dict,这是因为在其yaml下声明了global,示例如下图:

对于每一个Yaml文件开头的一行,定义了这个packages内的配置变量性质,下面摘自官方文档:
PACKAGE      : _global_ | COMPONENT[.COMPONENT]*
COMPONENT    : _group_ | _name_ | \w+

_global_     : the top level package (equivalent to the empty string).
_group_      : the config group in dot notation: foo/bar/zoo.yaml -> foo.bar
_name_       : the config file name: foo/bar/zoo.yaml -> zoo
直接的使用方式为,在yaml开头选择性添加其中一行:
# @package _global_
# @package _group_
# @package _group_._name_
# @package foo.bar
# @package foo._group_._name_
在最新的 Hydra 1.1 默认配置为 _group_
参数搭配运行
也就是说在你运行文件时,如果给出多个config内参数当做输入参数,即此脚本会自动运行多次,比如:
❯ python main.py lr=1e-3,1e-2 wd=1e-4,1e-2 -m
[2021-03-15 04:18:57,882][HYDRA] Launching 4 jobs locally
[2021-03-15 04:18:57,882][HYDRA]        #0 : lr=0.001 wd=0.0001
[2021-03-15 04:18:58,016][HYDRA]        #1 : lr=0.001 wd=0.01
[2021-03-15 04:18:58,149][HYDRA]        #2 : lr=0.01 wd=0.0001
[2021-03-15 04:18:58,275][HYDRA]        #3 : lr=0.01 wd=0.01

❯ python my_app.py -m db=mysql,postgresql schema=warehouse,support,school
[2021-01-20 17:25:03,317][HYDRA] Launching 6 jobs locally
[2021-01-20 17:25:03,318][HYDRA]        #0 : db=mysql schema=warehouse
[2021-01-20 17:25:03,458][HYDRA]        #1 : db=mysql schema=support
[2021-01-20 17:25:03,602][HYDRA]        #2 : db=mysql schema=school
[2021-01-20 17:25:03,755][HYDRA]        #3 : db=postgresql schema=warehouse
[2021-01-20 17:25:03,895][HYDRA]        #4 : db=postgresql schema=support
[2021-01-20 17:25:04,040][HYDRA]        #5 : db=postgresql schema=school
OmegaConf
这个部分主要是to_yaml到无结构的 直接是文本信息 str类型了,通过换行符来分隔
config = OmegaConf.to_yaml(config, resolve=True)

    # initialize training config
    config = OmegaConf.create(config)
    config.local_rank = rank
    config.cwd = working_dir
    # prevent access to non-existing keys
    OmegaConf.set_struct(config, True)
然后再通过create又create回来,顺便往里面添加两个属性再结构化
3. 更多探索
见官方文档 emmm 因为我也是阅读CJ哥的代码 看起来很好用,顺手写一下中文版记录好了
大概已知有:config可以重覆盖,
更多推荐
 已为社区贡献5条内容


所有评论(0)