
SpringBoot 整合 knfe4j ,使用 OpenAPI3 规范
文章目录
前言
SpringDoc 基于 OpenAPI 3 规范,用于 SpringBoot 项目中 API 文档的生成和维护的工具类。
Swagger 一个开源的工具集,其中包括Swagger Editor、Swagger UI和Swagger Codegen等组件。Swagger工具集使用OpenAPI规范,可以生成、展示和测试基于OpenAPI规范的API文档,并提供了生成客户端代码的功能。
Knife4j 完全遵循了 Swagger2 的使用方式,同时还使用了 OpenAPI 3 规范,所以直接使用 Knife4j 就行。
一、OpenAPI 3 常用注解
SpringDoc 里使用的是 Swagger3 的注解,在 io.swagger.v3.oas.annotations 包里
| swagger 2 | swagger 3 |
|---|---|
| @Api | @Tag |
| @ApiIgnore | @Parameter(hidden = true) 或 @Operation(hidden = true) 或 @Hidden |
| @ApiImplicitParam | @Parameter |
| @ApiImplicitParams | @Parameters |
| @ApiModel | @Schema |
| @ApiModelProperty | @Schema |
| @ApiOperation(value = “foo”, notes = “bar”) | @Operation(summary = “foo”, description = “bar”) |
| @ApiParam | @Parameter |
| @ApiResponse(code = 404, message = “foo”) | @ApiResponse(responseCode = “404”, description = “foo”) |
@Tag
用于说明或定义的标签。
部分参数:
name:名称description:描述
@Schema
用于描述实体类属性的描述、示例、验证规则等,比如 POJO 类及属性。
部分参数:
name:名称title:标题description:描述example:示例值required:是否为必须format:属性的格式。如@Schema(format = "email")maxLength、minLength:指定字符串属性的最大长度和最小长度maximum、minimum:指定数值属性的最大值和最小值pattern:指定属性的正则表达式模式type: 数据类型(integer,long,float,double,string,byte,binary,boolean,date,dateTime,password),必须是字符串。如@Schema=(type="integer")implementation:具体的实现类,可以是类本身,也可以是父类或实现的接口
@Content
内容注解。
部分参数:
mediaType:内容的类型。比如:application/jsonschema:内容的模型定义,使用 @Schema 注解指定模型的相关信息。
代码示例
@RequestBody(content = @Content(mediaType = "application/json", schema = @Schema(implementation = User.class)))
@PostMapping("/users")
public void createUser(User user) {
    // ...
}
@Hidden
某个元素(API 操作、实体类属性等)是否在 API 文档中隐藏。
如,getUserById 方法不会显示在 API 文档中
@Hidden
@GetMapping("/users/{id}")
public User getUserById(@PathVariable("id") Long id) {
    // ...
}
代码参考:
使用在实体类字段中,实现对敏感信息或不需要公开的元素进行隐藏。如:用户密码字段
@Schema(description = "用户")
public class User {
    @Schema(description = "用户id")
    private Long id;

    @Schema(description = "用户名")
    private String name;

    @Hidden
    @Schema(description = "用户密码")
    private String password;

    // ...
}
@Operation
描述 API 操作的元数据信息。常用于 controller 上
部分参数:
summary:简短描述description:更详细的描述hidden:是否隐藏tags:标签,用于分组APIoperationId:操作的唯一标识符,建议使用唯一且具有描述性的名称parameters:指定相关的请求参数,使用@Parameter注解来定义参数的详细属性。requestBody:指定请求的内容,使用@RequestBody注解來指定请求的类型。responses:指定操作的返回内容,使用@ApiResponse注解定义返回值的详细属性。
代码参考:
@Operation(
  summary = "操作摘要",
  description = "操作的详细描述",
  operationId = "operationId",
  tags = "tag1",
  parameters = {
    @Parameter(name = "param1", description = "参数1", required = true),
    @Parameter(name = "param2", description = "参数2", required = false)
  },
  requestBody = @RequestBody(
    description = "请求描述",
    required = true,
    content = @Content(
      mediaType = "application/json",
      schema = @Schema(implementation = RequestBodyModel.class)
    )
  ),
  responses = {
    @ApiResponse(responseCode = "200", description = "成功", content = @Content(mediaType = "application/json", schema = @Schema(implementation = ResponseModel.class))),
    @ApiResponse(responseCode = "400", description = "错误", content = @Content(mediaType = "application/json", schema = @Schema(implementation = ErrorResponseModel.class)))
  }
)
@Tag(name = "标签1")
@ApiResponses(value = {
  @ApiResponse(responseCode = "200", description = "成功", content = @Content(mediaType = "application/json", schema = @Schema(implementation = ResponseModel.class))),
  @ApiResponse(responseCode = "400", description = "錯誤", content = @Content(mediaType = "application/json", schema = @Schema(implementation = ErrorResponseModel.class)))
})
public void yourOperation() {
  // 逻辑
}
@Parameter
用于描述 API 操作中的参数
部分参数:
name: 指定的参数名in:参数来源,可选query、header、path或cookie,默认为空,表示忽略ParameterIn.QUERY请求参数ParameterIn.PATH路径参数ParameterIn.HEADERheader参数ParameterIn.COOKIEcookie 参数
description:参数描述required:是否必填,默认为 falseschema:参数的数据类型。如schema = @Schema(type = "string")
代码参考:
    @Operation(summary = "根据用户名查询用户列表")
    @GetMapping("/query/{username}")
    public List<User> queryUserByName(@Parameter(name = "username", in = ParameterIn.PATH, description = "用户名",
            required = true) @PathVariable("username") String userName) {
        return new ArrayList<>();
    }
@Parameters
包含多个 @Parameter 注解,指定多个参数。
代码参考:
包含了 param1 和 param2 两个参数
@Parameters({
  @Parameter(
    name = "param1",
    description = "Parameter 1 description",
    required = true,
    in = ParameterIn.PATH,
    schema = @Schema(type = "string")
  ),
  @Parameter(
    name = "param2",
    description = "Parameter 2 description",
    required = true,
    in = ParameterIn.QUERY,
    schema = @Schema(type = "integer")
  )
})
@RequestBody
API 请求的注解
description:请求信息的描述content:请求的内容required:是否必须
@ApiResponse
API 的响应信息。
部分参数:
responseCode:响应的 HTTP 状态码description:响应信息的描述content:响应的内容
代码参考:
@ApiResponse(responseCode = "200", description = "查询成功", content = @Content(schema = @Schema(implementation = User.class)))
@ApiResponse(responseCode = "404", description = "查询失败")
@GetMapping("/users/{id}")
public ResponseEntity<User> getUserById(@PathVariable("id") Long id) {
    // ...
}
二、项目搭建
1.引入库 pom.xml
导入 SpringBoot、Knife4j 的相关包
    <properties>
        <java.version>1.8</java.version>
        <project.build.sourceEncoding>UTF-8</project.build.sourceEncoding>
        <project.reporting.outputEncoding>UTF-8</project.reporting.outputEncoding>
        <knife4j.version>4.1.0</knife4j.version>
    </properties>

    <parent>
        <groupId>org.springframework.boot</groupId>
        <artifactId>spring-boot-starter-parent</artifactId>
        <version>2.7.12</version>
        <relativePath/>
    </parent>

    <dependencies>
        <!--web 模块-->
        <dependency>
            <groupId>org.springframework.boot</groupId>
            <artifactId>spring-boot-starter-web</artifactId>
        </dependency>
        <!-- 热部署-->
        <dependency>
            <groupId>org.springframework.boot</groupId>
            <artifactId>spring-boot-devtools</artifactId>
            <scope>runtime</scope>
            <optional>true</optional>
        </dependency>
        <!-- lombok -->
        <dependency>
            <groupId>org.projectlombok</groupId>
            <artifactId>lombok</artifactId>
            <optional>true</optional>
        </dependency>
        <!--单元测试-->
        <dependency>
            <groupId>org.springframework.boot</groupId>
            <artifactId>spring-boot-starter-test</artifactId>
            <scope>test</scope>
        </dependency>
        <!-- knife4j-openapi3 -->
        <dependency>
            <groupId>com.github.xiaoymin</groupId>
            <artifactId>knife4j-openapi3-spring-boot-starter</artifactId>
            <version>${knife4j.version}</version>
        </dependency>
    </dependencies>
查看 knife4j 的目录结构,发现已集成 springdoc 和 swagger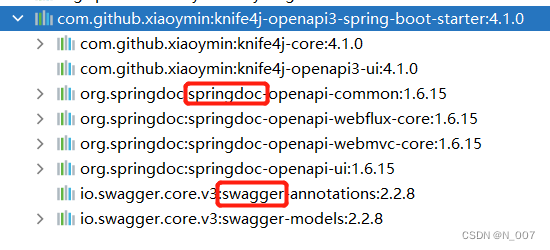
2.实体类、控制器
实体类
@Tag(name = "用户", description = "用户实体类")
@Data
public class User {

    @Schema(name = "用户id", type = "long")
    private Long id;
    @Schema(name = "用户名", type = "long")
    private String name;
    @Schema(name = "密码", type = "password")
    private String password;
}
控制器
在 controller 下新建 admin、front 两个包,用于后面的分组显示。
目录结构如下: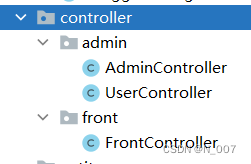
其中,UserController 结构如下:
package com.zeroing.controller.admin;

import com.zeroing.entity.User;
import com.zeroing.service.UserService;
import io.swagger.v3.oas.annotations.Operation;
import io.swagger.v3.oas.annotations.Parameter;
import io.swagger.v3.oas.annotations.enums.ParameterIn;
import io.swagger.v3.oas.annotations.media.Content;
import io.swagger.v3.oas.annotations.media.Schema;
import io.swagger.v3.oas.annotations.responses.ApiResponse;
import io.swagger.v3.oas.annotations.tags.Tag;
import org.springframework.beans.factory.annotation.Autowired;
import org.springframework.web.bind.annotation.*;

@RestController
@RequestMapping("/user")
@Tag(name = "用户管理", description = "用户数据增删改查")
public class UserController {

    @Autowired
    private UserService userService;

    @GetMapping("/{id}")
    @Operation(
            summary = "根据ID,查询用户",
            parameters = {
                    @Parameter(name = "id", required = true, in = ParameterIn.PATH)
            },
            responses = {
                    @ApiResponse(responseCode = "200",description = "成功",content = @Content(mediaType = "application/json", schema = @Schema(implementation = User.class))),
                    @ApiResponse(responseCode = "400", description = "错误", content = @Content(mediaType = "application/json"))
            }
    )
    public User getUserById(@PathVariable Long id) {
        return userService.getUserById(id);
    }
}
3.knife4j 配置
可参考 knife4j 和 springdoc-openapi 文档进行个性化的参数配置。
knife4j 增强配置
springdoc-openapi 属性配置
yml 配置
# springdoc-openapi项目配置
springdoc:
 group-configs:
   - group: 后端管理接口
     packages-to-scan: com.zeroing.controller.admin
   - group: 前端API接口
     packages-to-scan: com.zeroing.controller.front

# knife4j的增强配置,不需要增强可以不配
knife4j:
 enable: true
 setting:
   language: zh-CN
配置类
import io.swagger.v3.oas.models.OpenAPI;
import io.swagger.v3.oas.models.info.Contact;
import io.swagger.v3.oas.models.info.Info;
import io.swagger.v3.oas.models.info.License;
import org.springframework.context.annotation.Bean;
import org.springframework.context.annotation.Configuration;

@Configuration
public class SwaggerConfig {

   // 设置 openapi 基础参数
   @Bean
   public OpenAPI customOpenAPI() {
       return new OpenAPI()
               .info(new Info()
                       .title("SpringBoot API 管理")
                       .contact(new Contact().name("N_007").email("xxxx@163.com").url("https://blog.csdn.net/N_007"))
                       .version("1.0")
                       .description( "SpringBoot 集成 Knife4j 示例")
                       .license(new License().name("Apache 2.0")));
   }
}
4.启动项目
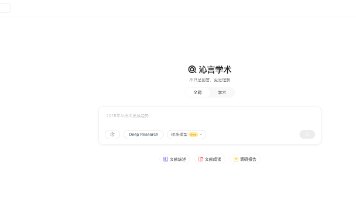
启动成功,访问 http://localhost:8080/doc.html
可以查看分组 API,在线测试API 等功能
三、总结
使用步骤:
- 导入对应的包
- 编写配置类(config、yml)
- 在不同的类上,根据需求,使用不同的注解说明方法的要素
其他的就是多看 knife4j 和 springdoc-openapi 的文档。
参考文档
[1]:Spring Boot 中使用 SpringFox 整合 Swagger 3(OpenAPI 3)生成 API 文档
[2]: ChatGPT 3.5

旨在为数千万中国开发者提供一个无缝且高效的云端环境,以支持学习、使用和贡献开源项目。
更多推荐

 32
32 0
0- 0


 已为社区贡献1条内容

所有评论(0)