打造VS Code(支持Markdown/UML/脑图/代码模板/Draw.io画图)
Visual Studio Code是一个文本编辑器,除了写代码和编辑普通文本外,借助插件还可以实现一些常用的图形化功能。下面介绍下,在 VS Code 中支持以下几种常用的功能:
- Markdown
- 思维导图
- UML
- 代码模板
- mermaid
- Draw.io 画图
Markdown
Markdown 是一种轻量级的文本标记语言,使用简单符号即可编辑出带有丰富格式的内容,让编辑者专注于内容本身,而不用花费太多额外精力去调整文本格式。CSDN、简书、Github等网站都支持 Markdown 格式。语法参考
要在 VS Code 中支持 Markdown 格式,推荐安装以下插件:
文件后缀名保存为.md,会自动预览,也可以用快捷键 ctrl+shift + v 显示预览。
以下内容是在网上找的一篇讲 Markdown 格式的示例文档,文档本身用也的 Markdown 格式,在 VS Code 中的显示效果如下:


为了更好的支持 Markdown 格式,另外推荐两个选装插件:
- Markdownlint Markdown 语法格式检测和语法错误提示及修复建议
- Markdown Preview Enhanced 显示功能增强
本文也是用 VS Code 书写
2023/6/29补充
Markdown 是 HTML 的子集,不支持的内容还可以直接使用 HTML 写,下面是一个复杂表格的例子。
<table>
  <tr>
    <td>列名1</td>
    <td>列名2</td>
    <td>列名3</td>
  </tr>
  <tr>
    <td>行首1</td>
    <td colspan="2">合并列2-3</td>
  </tr>
  <tr>
    <td rowspan="2">行首2-3</td>
    <td>列名2</td>
    <td>列名3</td>
  </tr>
  <tr>
    <td>列名2</td>
    <td>列名3</td>
  </tr>
</table>
生成的效果如下:
| 列名1 | 列名2 | 列名3 |
| 行首1 | 合并列2-3 | |
| 行首2-3 | 列名2 | 列名3 |
| 列名2 | 列名3 | |
脑图
思维导图又叫脑图,是一种图形化思维的工具。百度脑图相信很多人都用过,推荐以下插件,在 VS Code 中画思维导图,体验跟百度脑图一样,这个插件叫:
文件后缀名以保存为.km,会自动显示,也可以用快捷键ctrl/cmd + m显示。跟 Markdown 不一样,思维导图的编辑,是在图形化的界面中,不需要写文本。下面是我用这个插件整理的算法与数据结构的知识点,也分享出来:

可以切换各种不同的显示样式:
也可以选择不同的配色:
缺点是不会自动保存,按快捷键 ctrl/cmd+s保存。
可以导出成图片:
UML
UML 即 统一建模语言,是一种面向对象分析和设计的建模工具,广泛使用的有时序图和类图。利用插件,也可以在 VS Code 中画 UML 图。PlanUML是一个开源的 UML 图绘制库,可以使用文本描述,绘制出对应的 UML 图,非常适合程序员使用。在 VS Code 中支持 PlantUML,需要安装插件:
同时,还必须安装:
- Java 环境(下载地址)。
- Graphviz-Dot。
配置环境变量如下:


将文件名以 *.pu, *.puml后缀结尾,即可使用PlantUML 语法画图,使用快捷键 Alt+D 编译预览。
下面是一个简单的时序图示例:
@startuml test
== build ==
Main -> Builder: createEntity()
Builder -> EntityFactory: create()
EntityFactory -> Entity: constructor()
== run ==
Main -> Main: update()
Main -> Entity: update()
Entity -> Entity: render()
Entity -> Entity: emitEvent(EVENT_RENDER)
Entity --> Main: onRender()

@enduml

下面是一个类图的示例:
@startuml test

Class ClassA {
    -- 属性 --
    +String publicAttr
    #int protectedAttr
    -long privateAttr
    .. 其他格式 ..
    +A: String
    #B: Number
    -C: Boolean
    == 方法 ==
    +getAttr()
    #setAttr()
    -readAttr()
}

note top: 在顶部注释说明

Class ClassB {

}

note right: 在右边注释说明

ClassA <-- ClassB:关联
ClassA <.. ClassB : 依赖
ClassA o-- ClassB:聚集
ClassA <|-- ClassB:泛化
ClassA <|.. ClassB:实现
@enduml

MD 中插入 UML
除了在单独的 uml 文件中,也可以将 UML 的绘制代码嵌入到 Markdown 中,格式如下:

代码模板
在开发的过程中,很多代码片段都是重复的,如果能自动补全,会方便快捷很多,vscode 的用户片段(code snippet)就是做这个的。下面是使用步骤:
-
设置-》用户代码片段

-
选择要设置模板编程语言,比如 typescript

-
会打开一个对应编程预言的 json 文件,如 typescript.json,其默认内容如下,是一个简单的示例:
{
	// Place your snippets for typescript here. Each snippet is defined under a snippet name and has a prefix, body and
	// description. The prefix is what is used to trigger the snippet and the body will be expanded and inserted. Possible variables are:
	// $1, $2 for tab stops, $0 for the final cursor position, and ${1:label}, ${2:another} for placeholders. Placeholders with the
	// same ids are connected.
	// Example:
	// "Print to console": {
	// 	"prefix": "log",
	// 	"body": [
	// 		"console.log('$1');",
	// 		"$2"
	// 	],
	// 	"description": "Log output to console"
	// }

}
默认内容是一个简单的示例,参照例子,添加自己的模板,如
{
	// Place your snippets for typescript here. Each snippet is defined under a snippet name and has a prefix, body and
	// description. The prefix is what is used to trigger the snippet and the body will be expanded and inserted. Possible variables are:
	// $1, $2 for tab stops, $0 for the final cursor position, and ${1:label}, ${2:another} for placeholders. Placeholders with the
	// same ids are connected.
	// Example:
	// "Print to console": {
	// 	"prefix": "log",
	// 	"body": [
	// 		"console.log('$1');",
	// 		"$2"
	// 	],
	// 	"description": "Log output to console"
	// }
	"ts file template": {
		"prefix": "ts",
		"body": [
			"",
			"",
			"/**",
			" * ${2: description}",
			" *",
			" * @export",
			" * @class ${1:ClassName}",
			" * @author xuld",
			" * @date $CURRENT_YEAR-$CURRENT_MONTH-$CURRENT_DATE",
			" */",
			"",
			"export class ${1:ClassName} extends $3",
			"{",
			"    $0",
			"}",
		],
		"description": "my typescript file template"
	},
	"constructor": {
		"prefix": "con",
		"body": [
			"constructor()",
			"{",
			"    $0",
			"}",
		],
		"description": "my typescript constructor template"
	},
	"ts region template": {
		"prefix": "re",
		"body": [
			"//#region ${1:setter getter}",
			"$0",
			"//#endregion ${1:setter getter}",
		],
		"description": "my typescript region template"
	},
	"getter setter": {
		"prefix": "gs",
		"body": [
			"public get ${1:attrName}(): ${2:Type}",
			"{",
			"    return this._${1:attrName};",
			"}",
			"public set ${1:attrName}(value: ${2:Type})",
			"{",
			"    this._${1:attrName} = value;$0",
			"}",
		],
		"description": "my typescript getter setter template"
	},
	"singleton instance": {
		"prefix": "ins",
		"body": [
			"private static _instance: ${1:ClassName} = null;",
			"public static get instance(): ${1:ClassName}",
			"{",
			"    if (this._instance == null)",
			"    {",
			"        this._instance = new ${1:ClassName}();",
			"    }",
			"    return this._instance;",
			"}",
		],
		"description": "my typescript singleton instance template"
	},
}
配置说明:
- json 的 key,简单的功能描述
- json 的 value,是配置具体的值
- prefix ,输入之后弹窗自动补全的文本
- body,补全的内容,其中
- $0 表示 按tab建最后停留的位置
- $1 表示默认鼠标停留的位置
- $n 表示按tab键之后依次停留的位置
- ${n-内容},表示tab键移动时选中的文本,可以有多个,会同时选中
- 支持变量,如:
- $CURRENT_YEAR 年
- $CURRENT MONTH 月
- $CURRENT_DATE 日
- description 功能的详细描述
- 使用示例,比如如上配置,输入 ts 时,会出现提示:

按enter键,自动补全,按tab键可以在配置$n的位置自动切换,如下:

mermaid 语法
PlantUML 不支持甘特图,饼状图等,脑图也不是很好用,mermaid 可以作为补充,支持:
- 甘特图:使用 gantt 关键字,具体用法后文有示例
- 饼状图:使用 pie 关键字,具体用法后文示例
- 流程图:使用 graph 关键字,也可以用来画脑图
- 序列图:使用 sequenceDiagram 关键字
- 类图:使用 classDiagram 关键字
- 状态图:使用 stateDiagram 关键字
- 用户旅程图:使用 journey 关键字
甘特图
饼状图
脑图(流程图)
语法
graph 方向描述
    图表中的其他语句...
方向
方向描述
| 方向 | 意义 | 翻译 |
|---|---|---|
| TB | from Top to Bottom | 从上到下 |
| BT | from Bottom to Top | 从下到上 |
| RL | from Right to Left | 从右到左 |
| TB | from Left to Right | 从左到右 |
节点
节点定义
| 表述 | 说明 |
|---|---|
| id[文字] | 矩形节点 |
| id(文字) | 圆角矩形节点 |
| id((文字)) | 圆形节点 |
| id>文字] | 右向旗帜状节点 |
| id{文字} | 菱形节点 |
连线
节点间的连线
| 表述 | 说明 |
|---|---|
| > | 添加尾部箭头 |
| - | 不添加尾部箭头 |
| – | 单线 |
| –text– | 单线上加文字 |
| == | 粗线 |
| ==text== | 粗线加文字 |
| -.- | 虚线 |
| -.text.- | 虚线加文字 |
节点的文字中包含标点符号,需要时用双引号包起来
子图表
subgraph 子图表名称
    子图表中的描述语句...
end
脑图示例
Draw.io 画图
通过 Draw.io 插件,可以在vs code 中画图,通过交互式绘制——拖拉拽,而非代码。
界面和效果如下: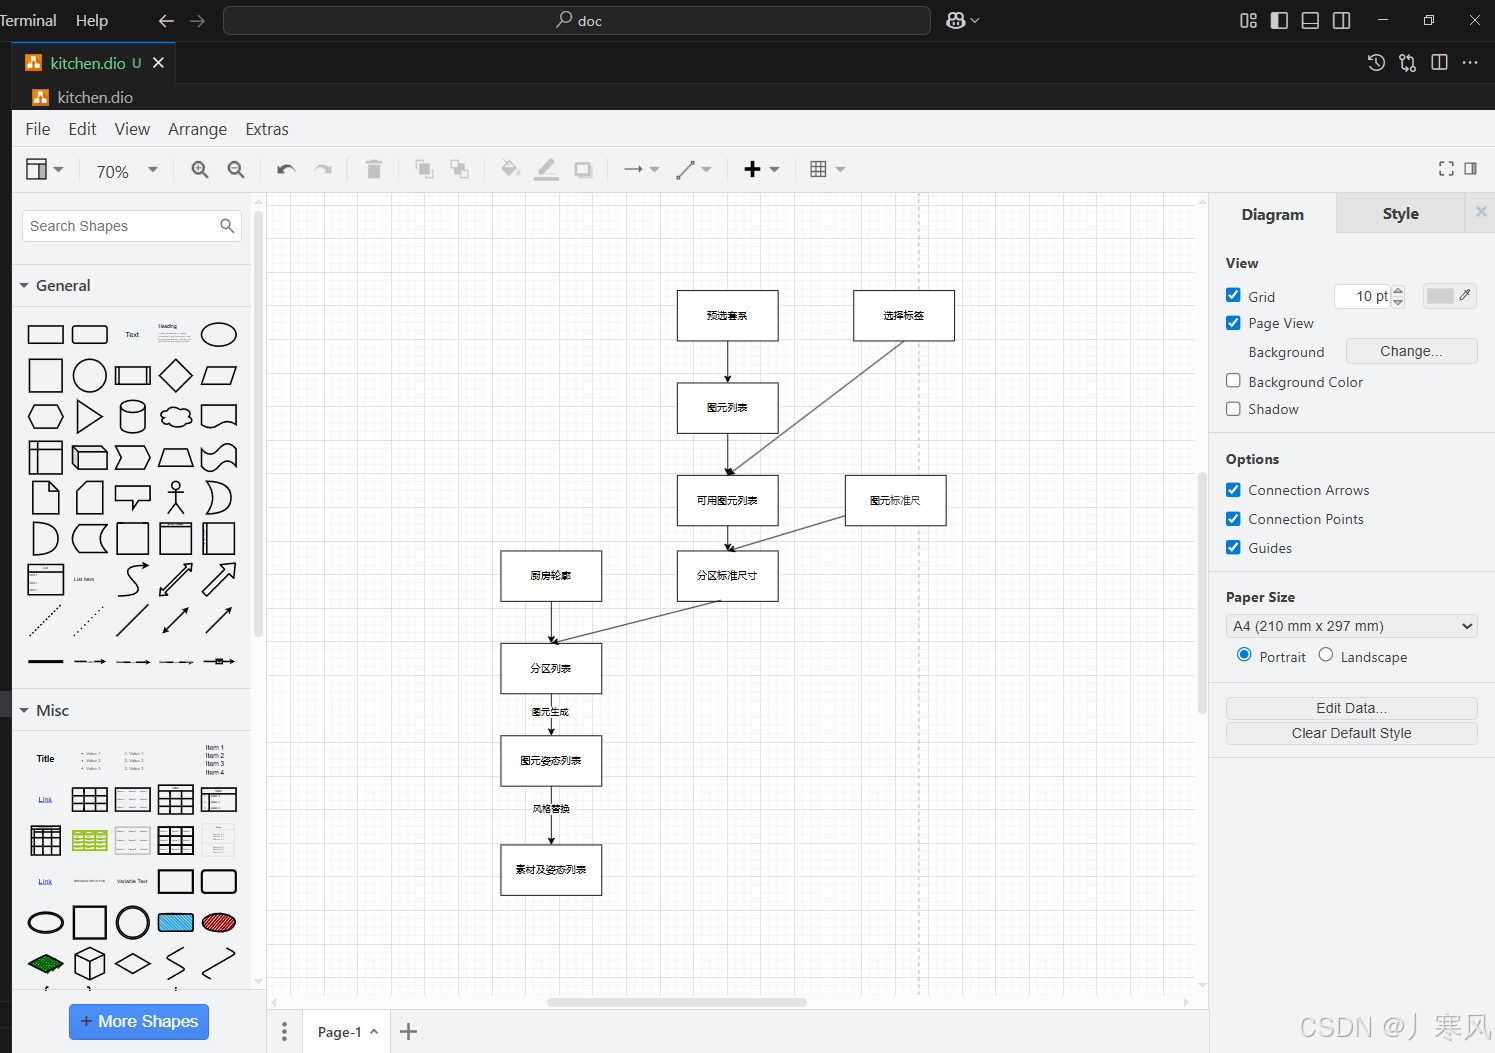
小结
VS Code 本身只是一个文本编辑工具,通过丰富的插件拓展了很多实用的功能,支持了 Markdwon、思维导图和UML图,基本上能满足日常所需的全部功能。

AtomGit 是由开放原子开源基金会联合 CSDN 等生态伙伴共同推出的新一代开源与人工智能协作平台。平台坚持“开放、中立、公益”的理念,把代码托管、模型共享、数据集托管、智能体开发体验和算力服务整合在一起,为开发者提供从开发、训练到部署的一站式体验。
更多推荐


 27
27 0
0- 0


 已为社区贡献4条内容

所有评论(0)