
yolov8pose pt转onnx,并实现图片和视频推理
最近在弄一个和人体关键点识别相关的项目,前面写了一个Yolopose的onnx推理脚本,这次
轮到yolov8pose,记录一下
YOLOv8 Pose 相关简介
yolov8项目链接:v8官网
pose权重链接:v8pose权重

看自己设备配置和推理速度下载需要的模型
pt转onnx
这里我以YOLOV8s-pose为例
可以新建脚本,用下面的代码实现转换,没有ultralytics库的用pip安装
from ultralytics import YOLO
model = YOLO("yolov8s-pose.pt")
success = model.export(format="onnx", simplify=True)  # export the model to onnx format
assert success
print("转换成功")
转换过程基本上没有什么问题,
可以将onnx模型拖到在netron中查看模型结构


模型的输入为(1,3,640,640),模型的输出为(1,56,8400),56可以表示为4+1+3*17,4表示人体检测框的中心坐标(x,y)和(w,h),1表示人体检测的得分,因为只对人体进行目标点检测,所以省略了目标检测中的类别。共检测人体的17个关键点,每个关键点用三个数据表示分别为x,y,conf,模型推理结果中,每个关键点都有数据,但是有的点conf非常低,还可能为负数,其实这些点根本不存在,那估计是模型在瞎猜,后处理要过滤掉这些点
大概推理步骤
1.读取模型,传入图片或视频
使用onnxruntime.InferenceSession()读取模型
2.图片预处理
主要是图片不失真resize,两边灰条填充成(640,640),然后调整通道和维度,符合模型的输入
3.模型推理
使用session.run()进行推理
4.置信度过滤
先用置信度阈值卡一波
5.NMS处理
用NMS算法处理一波,得到每个目标唯一的检测数据
6.将检测框、关键点坐标还原到原图上
通过resize后的图片与原图进行比较,计算缩放比和填充大小,将检测数据缩放到原图中
7.遍历检测数据,开始画框、画点、画骨架
最后就是在图上显示检测结果
脚本说明
脚本需要设置onnx路径,设置了两种模式:1是图片检测,记得设置图片路径,2是视频检测,并显示推理的FPS,视频检测只需要注意一下自己的摄像头编号

完整代码如下:
import onnxruntime
import numpy as np
import cv2
import time
# 调色板
palette = np.array([[255, 128, 0], [255, 153, 51], [255, 178, 102],
                    [230, 230, 0], [255, 153, 255], [153, 204, 255],
                    [255, 102, 255], [255, 51, 255], [102, 178, 255],
                    [51, 153, 255], [255, 153, 153], [255, 102, 102],
                    [255, 51, 51], [153, 255, 153], [102, 255, 102],
                    [51, 255, 51], [0, 255, 0], [0, 0, 255], [255, 0, 0],
                    [255, 255, 255]])
# 17个关键点连接顺序
skeleton = [[16, 14], [14, 12], [17, 15], [15, 13], [12, 13], [6, 12],
            [7, 13], [6, 7], [6, 8], [7, 9], [8, 10], [9, 11], [2, 3],
            [1, 2], [1, 3], [2, 4], [3, 5], [4, 6], [5, 7]]
# 骨架颜色
pose_limb_color = palette[[9, 9, 9, 9, 7, 7, 7, 0, 0, 0, 0, 0, 16, 16, 16, 16, 16, 16, 16]]
# 关键点颜色
pose_kpt_color = palette[[16, 16, 16, 16, 16, 0, 0, 0, 0, 0, 0, 9, 9, 9, 9, 9, 9]]

def letterbox(im, new_shape=(640, 640), color=(114, 114, 114), scaleup=True):
    '''  调整图像大小和两边灰条填充  '''
    shape = im.shape[:2]
    if isinstance(new_shape, int):
        new_shape = (new_shape, new_shape)
    # 缩放比例 (new / old)
    r = min(new_shape[0] / shape[0], new_shape[1] / shape[1])
    # 只进行下采样 因为上采样会让图片模糊
    if not scaleup:
        r = min(r, 1.0)
    # 计算pad长宽
    new_unpad = int(round(shape[1] * r)), int(round(shape[0] * r))  # 保证缩放后图像比例不变
    dw, dh = new_shape[1] - new_unpad[0], new_shape[0] - new_unpad[1]  # wh padding
    # 在较小边的两侧进行pad, 而不是在一侧pad
    dw /= 2
    dh /= 2
    # 将原图resize到new_unpad(长边相同,比例相同的新图)
    if shape[::-1] != new_unpad:  # resize
        im = cv2.resize(im, new_unpad, interpolation=cv2.INTER_LINEAR)
    # 计算上下两侧的padding
    top, bottom = int(round(dh - 0.1)), int(round(dh + 0.1))
    # 计算左右两侧的padding
    left, right = int(round(dw - 0.1)), int(round(dw + 0.1))
    # 添加灰条
    im = cv2.copyMakeBorder(im, top, bottom, left, right, cv2.BORDER_CONSTANT, value=color)
    return im

def pre_process(img):
    # 归一化 调整通道为(1,3,640,640)
    img = img / 255.
    img = np.transpose(img, (2, 0, 1))
    data = np.expand_dims(img, axis=0)
    return data

def xywh2xyxy(x):
    ''' 中心坐标、w、h ------>>> 左上点,右下点 '''
    y = np.copy(x)
    y[:, 0] = x[:, 0] - x[:, 2] / 2  # top left x
    y[:, 1] = x[:, 1] - x[:, 3] / 2  # top left y
    y[:, 2] = x[:, 0] + x[:, 2] / 2  # bottom right x
    y[:, 3] = x[:, 1] + x[:, 3] / 2  # bottom right y
    return y

# nms算法
def nms(dets, iou_thresh):
    # dets: N * M, N是bbox的个数,M的前4位是对应的 左上点,右下点
    x1 = dets[:, 0]
    y1 = dets[:, 1]
    x2 = dets[:, 2]
    y2 = dets[:, 3]
    scores = dets[:, 4]
    areas = (x2 - x1 + 1) * (y2 - y1 + 1)  # 求每个bbox的面积
    order = scores.argsort()[::-1]  # 对分数进行倒排序
    keep = []  # 用来保存最后留下来的bboxx下标
    while order.size > 0:
        i = order[0]  # 无条件保留每次迭代中置信度最高的bbox
        keep.append(i)
        # 计算置信度最高的bbox和其他剩下bbox之间的交叉区域
        xx1 = np.maximum(x1[i], x1[order[1:]])
        yy1 = np.maximum(y1[i], y1[order[1:]])
        xx2 = np.minimum(x2[i], x2[order[1:]])
        yy2 = np.minimum(y2[i], y2[order[1:]])
        # 计算置信度高的bbox和其他剩下bbox之间交叉区域的面积
        w = np.maximum(0.0, xx2 - xx1 + 1)
        h = np.maximum(0.0, yy2 - yy1 + 1)
        inter = w * h
        # 求交叉区域的面积占两者(置信度高的bbox和其他bbox)面积和的必烈
        ovr = inter / (areas[i] + areas[order[1:]] - inter)
        # 保留ovr小于thresh的bbox,进入下一次迭代。
        inds = np.where(ovr <= iou_thresh)[0]
        # 因为ovr中的索引不包括order[0]所以要向后移动一位
        order = order[inds + 1]
    output = []
    for i in keep:
        output.append(dets[i].tolist())
    return np.array(output)

def xyxy2xywh(a):
    ''' 左上点 右下点 ------>>> 左上点 宽 高 '''
    b = np.copy(a)
    # y[:, 0] = (x[:, 0] + x[:, 2]) / 2  # x center
    # y[:, 1] = (x[:, 1] + x[:, 3]) / 2  # y center
    b[:, 2] = a[:, 2] - a[:, 0]  # w
    b[:, 3] = a[:, 3] - a[:, 1]  # h
    return b

def scale_boxes(img1_shape, boxes, img0_shape):
    '''   将预测的坐标信息转换回原图尺度
    :param img1_shape: 缩放后的图像尺度
    :param boxes:  预测的box信息
    :param img0_shape: 原始图像尺度
    '''
    # 将检测框(x y w h)从img1_shape(预测图) 缩放到 img0_shape(原图)
    gain = min(img1_shape[0] / img0_shape[0], img1_shape[1] / img0_shape[1])  # gain  = old / new
    pad = (img1_shape[1] - img0_shape[1] * gain) / 2, (img1_shape[0] - img0_shape[0] * gain) / 2  # wh padding
    boxes[:, 0] -= pad[0]
    boxes[:, 1] -= pad[1]
    boxes[:, :4] /= gain  # 检测框坐标点还原到原图上
    num_kpts = boxes.shape[1] // 3   # 56 // 3 = 18
    for kid in range(2,num_kpts+1):
        boxes[:, kid * 3-1] = (boxes[:, kid * 3-1] - pad[0]) / gain
        boxes[:, kid * 3 ]  = (boxes[:, kid * 3 ] -  pad[1]) / gain
    # boxes[:, 5:] /= gain  # 关键点坐标还原到原图上
    clip_boxes(boxes, img0_shape)
    return boxes
def clip_boxes(boxes, shape):
    # 进行一个边界截断,以免溢出
    # 并且将检测框的坐标(左上角x,左上角y,宽度,高度)--->>>(左上角x,左上角y,右下角x,右下角y)
    top_left_x = boxes[:, 0].clip(0, shape[1])
    top_left_y = boxes[:, 1].clip(0, shape[0])
    bottom_right_x = (boxes[:, 0] + boxes[:, 2]).clip(0, shape[1])
    bottom_right_y = (boxes[:, 1] + boxes[:, 3]).clip(0, shape[0])
    boxes[:, 0] = top_left_x      #左上
    boxes[:, 1] = top_left_y
    boxes[:, 2] = bottom_right_x  #右下
    boxes[:, 3] = bottom_right_y

def plot_skeleton_kpts(im, kpts, steps=3):
    num_kpts = len(kpts) // steps  # 51 / 3 =17
    # 画点
    for kid in range(num_kpts):
        r, g, b = pose_kpt_color[kid]
        x_coord, y_coord = kpts[steps * kid], kpts[steps * kid + 1]
        conf = kpts[steps * kid + 2]
        if conf > 0.5:   # 关键点的置信度必须大于 0.5
            cv2.circle(im, (int(x_coord), int(y_coord)), 10, (int(r), int(g), int(b)), -1)
    # 画骨架
    for sk_id, sk in enumerate(skeleton):
        r, g, b = pose_limb_color[sk_id]
        pos1 = (int(kpts[(sk[0]-1)*steps]), int(kpts[(sk[0]-1)*steps+1]))
        pos2 = (int(kpts[(sk[1]-1)*steps]), int(kpts[(sk[1]-1)*steps+1]))
        conf1 = kpts[(sk[0]-1)*steps+2]
        conf2 = kpts[(sk[1]-1)*steps+2]
        if conf1 >0.5 and conf2 >0.5:  # 对于肢体,相连的两个关键点置信度 必须同时大于 0.5
            cv2.line(im, pos1, pos2, (int(r), int(g), int(b)), thickness=2)

class Keypoint():
    def __init__(self,modelpath):
        # self.session = onnxruntime.InferenceSession(modelpath, providers=['CUDAExecutionProvider','CPUExecutionProvider'])
        self.session = onnxruntime.InferenceSession(modelpath, providers=['CPUExecutionProvider'])
        self.input_name = self.session.get_inputs()[0].name
        self.label_name = self.session.get_outputs()[0].name
    def inference(self,image):
        img = letterbox(image)
        data = pre_process(img)
        # 预测输出float32[1, 56, 8400]
        pred = self.session.run([self.label_name], {self.input_name: data.astype(np.float32)})[0]
        # [56, 8400]
        pred = pred[0]
        # [8400,56]
        pred = np.transpose(pred, (1, 0))
        # 置信度阈值过滤
        conf = 0.7
        pred = pred[pred[:, 4] > conf]
        if len(pred) == 0:
        	print("没有检测到任何关键点")
        	return image
        else:
	        # 中心宽高转左上点,右下点
	        bboxs = xywh2xyxy(pred)
	        # NMS处理
	        bboxs = nms(bboxs, iou_thresh=0.6)
	        # 坐标从左上点,右下点 到 左上点,宽,高.
	        bboxs = np.array(bboxs)
	        bboxs = xyxy2xywh(bboxs)
	        # 坐标点还原到原图
	        bboxs = scale_boxes(img.shape, bboxs, image.shape)
	        # 画框 画点 画骨架
	        for box in bboxs:
	            # 依次为 检测框(左上点,右下点)、置信度、17个关键点
	            det_bbox, det_scores, kpts = box[0:4], box[4], box[5:]
	            # 画框
	            cv2.rectangle(image, (int(det_bbox[0]), int(det_bbox[1])), (int(det_bbox[2]), int(det_bbox[3])),
	                                (0, 0, 255), 2)
	            # 人体检测置信度
	            if int(det_bbox[1]) < 30 :
	                cv2.putText(image, "conf:{:.2f}".format(det_scores), (int(det_bbox[0]) + 5, int(det_bbox[1]) +25),
	                        cv2.FONT_HERSHEY_DUPLEX, 0.8, (0, 0, 255), 1)
	            else:
	                cv2.putText(image, "conf:{:.2f}".format(det_scores), (int(det_bbox[0]) + 5, int(det_bbox[1]) - 5),
	                            cv2.FONT_HERSHEY_DUPLEX, 0.8, (0, 0, 255), 1)
	            # 画点 连线
	            plot_skeleton_kpts(image, kpts)
	        return image

if __name__ == '__main__':
    modelpath = r'yolov8n-pose.onnx'
    # 实例化模型
    keydet = Keypoint(modelpath)
    # 两种模式 1为图片预测,并显示结果图片;2为摄像头检测,并实时显示FPS
    mode = 2
    if mode == 1:
        # 输入图片路径
        image = cv2.imread('imgs/5.jpg')
        start = time.time()
        image = keydet.inference(image)
        end = time.time()
        det_time = (end - start) * 1000
        print("推理时间为:{:.2f} ms".format(det_time))
        print("图片完成检测")
        cv2.namedWindow("keypoint", cv2.WINDOW_NORMAL)
        cv2.imshow("keypoint", image)
        cv2.imwrite('imgs/res.jpg',image)
        cv2.waitKey(0)
        cv2.destroyAllWindows()
    elif mode == 2:
        # 摄像头人体关键点检测
        cap = cv2.VideoCapture(0)
        # 返回当前时间
        start_time = time.time()
        counter = 0
        while True:
            # 从摄像头中读取一帧图像
            ret, frame = cap.read()
            image  = keydet.inference(frame)
            counter += 1  # 计算帧数
            # 实时显示帧数
            if (time.time() - start_time) != 0:
                cv2.putText(image, "FPS:{0}".format(float('%.1f' % (counter / (time.time() - start_time)))), (5, 30),
                            cv2.FONT_HERSHEY_SIMPLEX, 0.75, (0, 0, 255), 1)
                # 显示图像
                cv2.imshow('keypoint', image)
            if cv2.waitKey(1) & 0xFF == ord('q'):
                break
        # 释放资源
        cap.release()
        cv2.destroyAllWindows()
    else:
        print("\033[1;91m 输入错误,请检查mode的赋值 \033[0m")
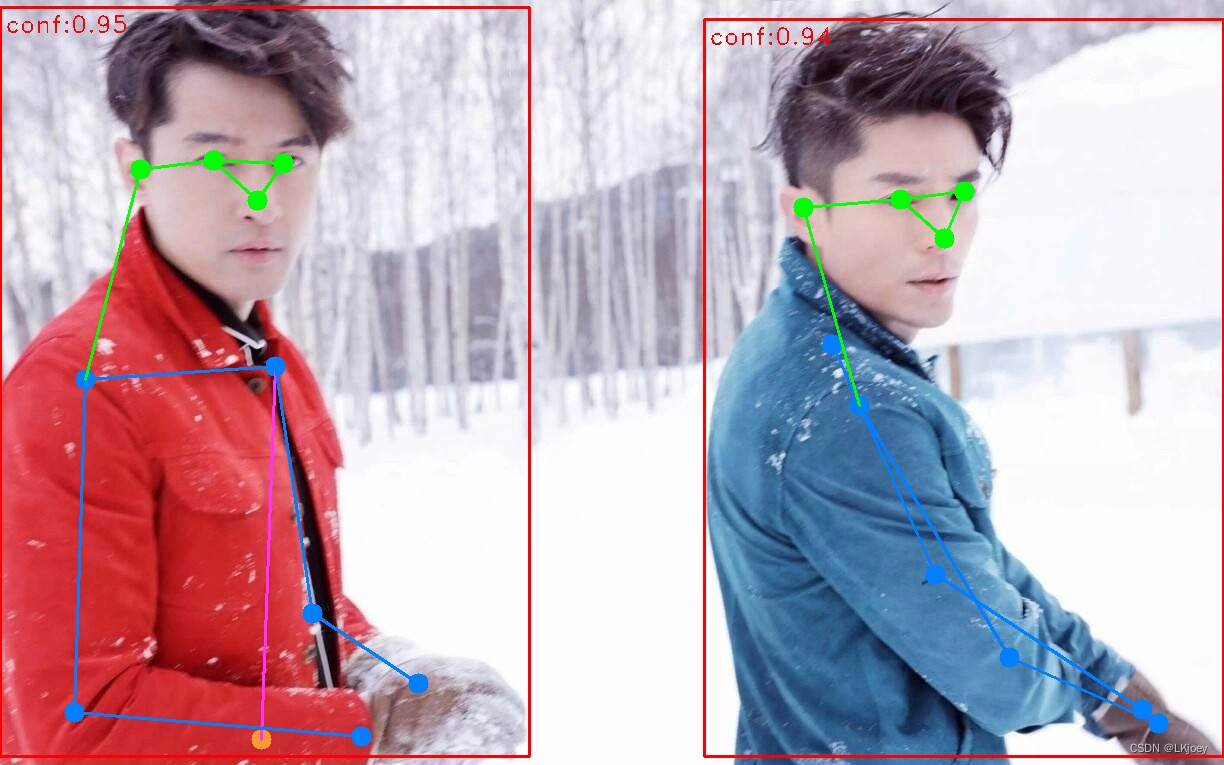
图片检测效果

视频就不展示了,相较于yolov5pose,v8pose明显快多了,FPS有15帧左右,v8n-pose有20帧左右
显示效果可以再优化一下,有兴趣的小伙伴可以整一整


旨在为数千万中国开发者提供一个无缝且高效的云端环境,以支持学习、使用和贡献开源项目。
更多推荐
 20
20 0
0- 0


 已为社区贡献1条内容

所有评论(0)