初识 Cloudify
初识 Cloudify
介绍
Cloudify 是开源的云编排框架,管理应用的整个生命周期,主要功能包括:
- 应用编排:blueprint,部署和管理
- 应用维护:工作流,事件和日志管理
- 可插拔:使用插件垒起来的
- 标准:基于TOSCA的DSL(领域描述语言)
安装
前提:Centos 7,python 2.7.5,pip 7.1.0
- 从 rpm 安装 download from
http://getcloudify.org/downloads/get_cloudify.html - 使用安装脚本安装(需要联网)
download script from http://gigaspaces-repository-eu.s3.amazonaws.com/org/cloudify3/get-cloudify.py
$ python get-cloudify.py - 从源码安装
部署应用的方式
- 仅使用 CLI
- 使用 Cloudify Manager
术语
- blueprint:cloudify 用blueprint 来定义应用,blueprint 是应用的逻辑展示,包括配置脚本、和其他资源的关联等应用需要的一切;
- workflow:cloudify 用 workflow 来提供和管理应用,workflow 用来定义对应用执行动作的流程,默认为 install;
- plugin:cloudify 用 plugin 实现应用的部署,比如 “home-grown script-plugin” 是执行一堆脚本来部署 web server,对应不同的blueprint,需要安装相应的plugin,安装方式”cfy local install-plugins -p BLUEPRINT_PATH”;
- model:保存应用的整个结构
- deployment:blueprint 的实例,model 的一部分
- node:blueprint 中定义的每个逻辑实体,包含多个node实例(比如multiple virtual machines),对应 blueprint 中的 “node_templates”
- Cloudify Manager:包括开源栈的环境,用户可以
- 利用其不同的插件(例如Docker,脚本,Chef和Puppet插件)来管理应用程序的主机
- 维护 blueprints 目录
- 创建blueprint的多个部署,并安装
- 应用的恢复、扩展和其他定制workflow
- 并发多个workflow
- 使用其Web UI查看指标、搜索日志、查看应用程序的拓扑结构和执行的不同任务
- 通过认证和授权插件为应用管理提供安全环境
- 保留指标和事件的历史
- 管理运行应用程序的主机上的代理
demo 1: 部署本地 python web server
- download from https://github.com/cloudify-examples/simple-python-webserver-blueprint/archive/master.zip
- 解压,cd 到目录
$ unzip simple-python-webserver-blueprint-master.zip
$ cd simple-python-webserver-blueprint-master
$ ls
blueprint.yaml  cloudify-logo.png  index.html  install.py  README.md  uninstall.py
$ cfy local init --blueprint-path blueprint.yaml --inputs '{"webserver_port": "8000", "host_ip":"localhost"}'
$ cfy local execute -w install
$ curl http://localhost:8000
<html>
    <header>
        <title>Cloudify Hello World</title>
    </header>
<body>
    <h1>Hello, World!</h1>
    <img src="cloudify-logo.png">
</body>
</html>
$ cfy local outputs
{
  "http_endpoint": "http://localhost:8000"
}
$ cfy local instances
[
  {
    "host_id": "host_43650",
    ...
  },
  {
    "host_id": "host_43650",
    ...
  }
]
$ cfy local execute -w uninstall
blueprint 文件结构
使用 YAML
You can see that our blueprint has a tosca_definitions_version, and *imports, inputs, node_templates **and **outputs **sections. 不止,参见http://docs.getcloudify.org/3.3.1/blueprints/overview/*
The tosca_definitions_version is the version of the blueprint’s DSL (Domain Specific Language).
imports is where you import additional yaml files to use in your blueprint.
inputs are somewhat like the blueprint’s configuration. You can set different inputs and use them across the blueprint.
node_templates contains your application’s resources and how they’re deployed. 指定应用跑在那台host上
outputs are pieces of information you can use after a blueprint was deployed.
Cloudify Manager 安装
$ mkdir -p ~/cloudify-manager
$ cd ~/cloudify-manager
$ curl -L https://github.com/cloudify-cosmo/cloudify-manager-blueprints/archive/3.3.1.tar.gz -o cloudify-manager-blueprints.tar.gz
$ tar -xzvf cloudify-manager-blueprints.tar.gz
$ cd cloudify-manager-blueprints-3.3.1
$ ls -l
$ cfy bootstrap --install-plugins -p /path/to/manager/blueprint/file -i /path/to/inputs/yaml/file
外观展示
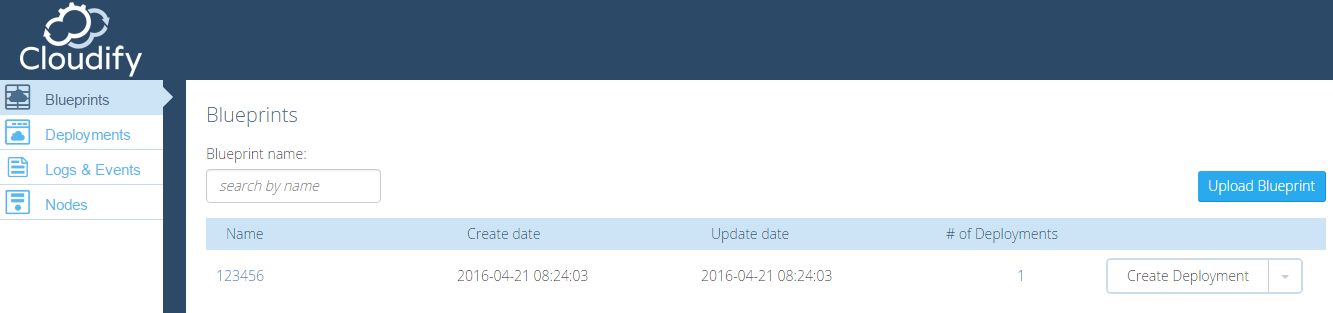
Cloudify Manager 架构
包括三部分:
* Manager:集中控制中心
* Agents:各个节点的代理,负责执行具体的工作
* Web UI:对外展示
Manager有众多的开源软件组成,架构如下
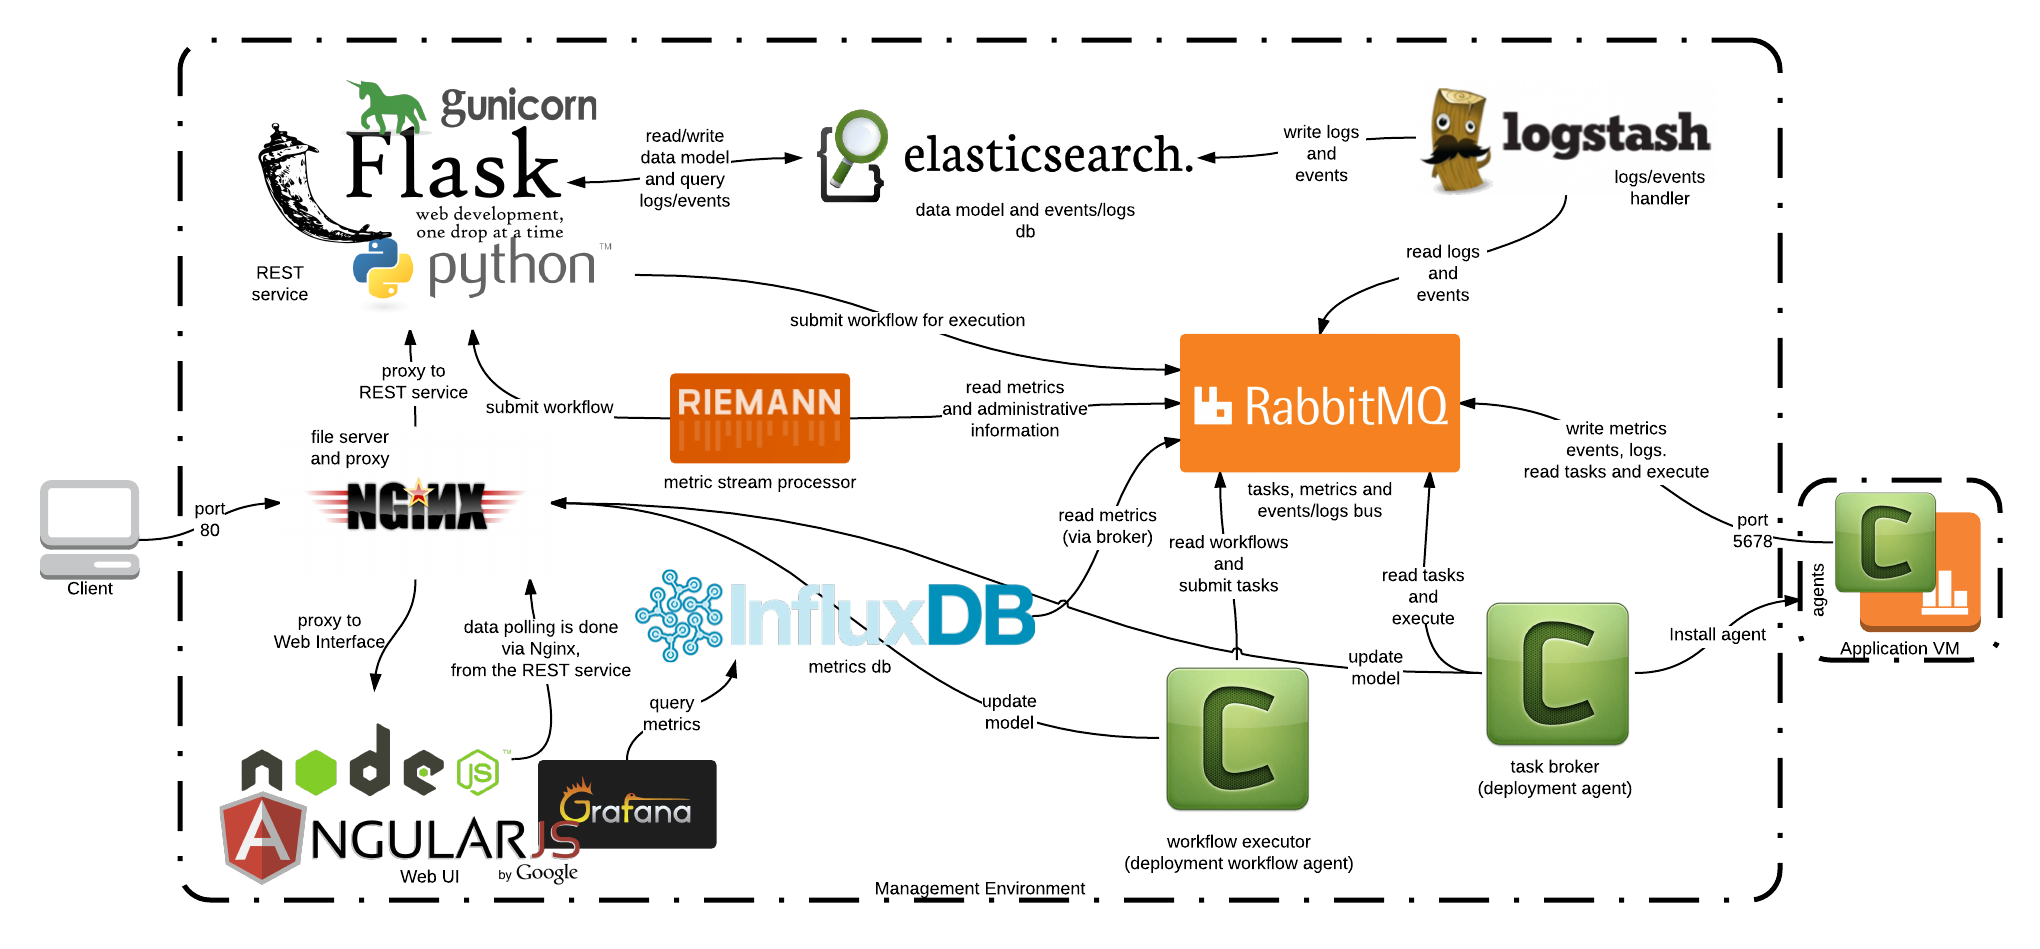
- Nginx:REST 服务和UI 的代理;文件服务器(保存一些资源)
- Gunicorn and Flask:Gunicorn为WSGI HTTP服务,Flask为web框架
- Elasticsearch:保存应用的models,存储日志和事件
- Logstash:日志收集,并push到Elasticsearch保存
- RabbitMQ:消息中间件,应用之间通信使用
- Riemann:基于策略的事件流处理器
- Celery:分布式的任务队列
- InfluxDB and Grafana:InfluxDB 存储监控到metrics,Grafana是InfluxDB的图形dashboard

AtomGit 是由开放原子开源基金会联合 CSDN 等生态伙伴共同推出的新一代开源与人工智能协作平台。平台坚持“开放、中立、公益”的理念,把代码托管、模型共享、数据集托管、智能体开发体验和算力服务整合在一起,为开发者提供从开发、训练到部署的一站式体验。
更多推荐


 0
0 0
0- 0


 已为社区贡献1条内容

所有评论(0)