
CVUI学习::(一)基于OpenCv的ui库
CVUI::基于OpenCv的ui库这里介绍一个简单却强大的ui库,CVUI,该ui库在Opencv的绘图基础上,不需要openGL,不需要imgui,只需要一个.h头文件+Opencv+CMake即可向该项目原作者致敬,github:https://github.com/Dovyski/cvui该库可实现的效果:一、helloworld测试cvui库的hellowor...
一键AI生成摘要,助你高效阅读
问答
·
CVUI::基于OpenCv的ui库
这里介绍一个简单却强大的ui库,CVUI,该ui库在Opencv的绘图基础上,不需要openGL,不需要imgui,只需要一个.h头文件+Opencv+CMake即可
向该项目原作者致敬,github:https://github.com/Dovyski/cvui
该库可实现的效果:
一、helloworld测试
cvui库的helloworld基本流程:
- 初始化 cvui::init()
- 创建背景mat cv::mat
- 设置mat颜色基调 cv::Scalar()
- 创建文本cvui::text()
- 显示 imshow()
核心函数:
(1)cvui初始化:
void init(const cv::String& theWindowName, int theDelayWaitKey = -1, bool theCreateNamedWindow = true);- 第一个参数:窗口名字
- 第二个参数:相当于cvwaitkey() ,括号的值,自动调用waitkey()
- 第三个参数:是否由init来创建窗口,即是否自动调用namewindow(),如果填false,则需自己手动namewindow()
(2)文本初始化
void text(cv::Mat& theWhere, int theX, int theY, const cv::String& theText, double theFontScale = 0.4, unsigned int theColor = 0xCECECE);
- 第一个参数:要画上文本的图像
- 第二个参数:文本的位置x
- 第三个参数:文本的位置y
- 第四个参数:传入的文本
- 第五个参数:字体缩放因子
- 第六个参数:文本颜色
测试代码:
#include <iostream>

using namespace std;
#define CVUI_IMPLEMENTATION
#include "cvui.h"
#include<opencv2/core/core.hpp>
#include<opencv2/highgui/highgui.hpp>
#include<chrono>
using namespace cv;

#define WINDOW_NAME "CVUI Hello World!"
int main()
{
    cv::Mat frame = cv::Mat(200, 500, CV_8UC3);
    cvui::init(WINDOW_NAME);

    while (true) {
        // Fill the frame with a nice color
        frame = cv::Scalar(49, 52, 49);

        // Render UI components to the frame
        cvui::text(frame, 110, 80, "Hello, world!");
        cvui::text(frame, 110, 120, "cvui is awesome!");

        // Update cvui stuff and show everything on the screen
        cvui::imshow(WINDOW_NAME, frame);

        if (cv::waitKey(20) == 'q') {
            break;
        }
    }

    return 0;
}
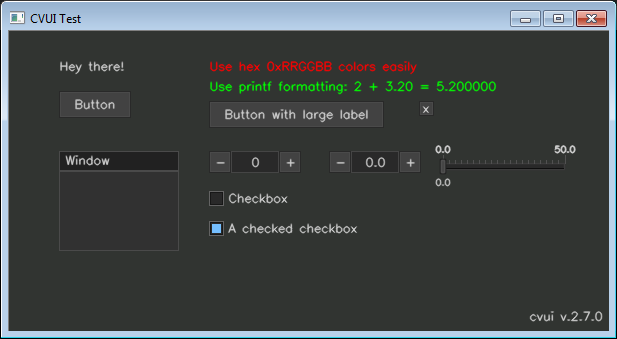
二、实现效果


旨在为数千万中国开发者提供一个无缝且高效的云端环境,以支持学习、使用和贡献开源项目。
更多推荐


 3
3 0
0- 0


 已为社区贡献3条内容

所有评论(0)