
java 实现微信小程序接口
使用weixin-java-miniapp实现微信小程序登录接口,我们使用开源的包maven 依赖<dependency><groupId>com.github.binarywang</groupId><artifactId>weixin-java-miniapp</artifactId><version>3.9.0</
使用weixin-java-miniapp实现微信小程序登录接口,我们使用开源的包
maven 依赖
<dependency>
    <groupId>com.github.binarywang</groupId>
    <artifactId>weixin-java-miniapp</artifactId>
    <version>3.9.0</version>
</dependency>
第一步:小程序通过wx.login()获取code。
第二步:小程序通过wx.request()发送code到开发者服务器。
第三步:开发者服务器接收小程序发送的code,并携带appid、appsecret(这两个需要到微信小程序后台查看)、code发送到微信服务器。
第四步:微信服务器接收开发者服务器发送的appid、appsecret、code进行校验。校验通过后向开发者服务器发送session_key、openid。
第五步:开发者服务器自己生成一个skey(自定义登录状态)与openid、session_key进行关联,并存到数据库中(mysql、redis等)。
第六步:开发者服务器返回生成skey(自定义登录状态)到小程序。
第七步:小程序存储skey(自定义登录状态)到本地。
1、将我们一些基础配置信息先放到application.yml 文件中

wx:
  miniapp:
    configs:
        - appid: appid #微信小程序的appid
          secret: secret #微信小程序的Secret
          token: token #微信小程序消息服务器配置的token
          aesKey: aesKey #微信小程序消息服务器配置的EncodingAESKey
          msgDataFormat: JSON
2、用java对象和配置映射
@Data
@ConfigurationProperties(prefix = "wx.miniapp")
public class WxMaProperties {

    private List<Config> configs;

    @Data
    public static class Config {
        /**
         * 设置微信小程序的appid
         */
        private String appid;

        /**
         * 设置微信小程序的Secret
         */
        private String secret;

        /**
         * 设置微信小程序消息服务器配置的token
         */
        private String token;

        /**
         * 设置微信小程序消息服务器配置的EncodingAESKey
         */
        private String aesKey;

        /**
         * 消息格式,XML或者JSON
         */
        private String msgDataFormat;
    }

}
@Slf4j
@Configuration
@EnableConfigurationProperties(WxMaProperties.class)
public class WxMaConfiguration {
    public final WxMaProperties properties;

    public static final Map<String, WxMaMessageRouter> routers = Maps.newHashMap();
    public static Map<String, WxMaService> maServices;

    @Autowired
    public WxMaConfiguration(WxMaProperties properties) {
        this.properties = properties;
    }

    public static WxMaService getMaService(String appid) {
        WxMaService wxService = maServices.get(appid);
        if (wxService == null) {
            throw new IllegalArgumentException(String.format("未找到对应appid=[%s]的配置,请核实!", appid));
        }

        return wxService;
    }

    public static WxMaMessageRouter getRouter(String appid) {
        return routers.get(appid);
    }

    @PostConstruct
    public void init() {
        List<WxMaProperties.Config> configs = this.properties.getConfigs();
        if (configs == null) {
            throw new WxRuntimeException("大哥,拜托先看下项目首页的说明(readme文件),添加下相关配置,注意别配错了!");
        }

        maServices = configs.stream()
            .map(a -> {
                WxMaDefaultConfigImpl config = new WxMaRedisConfigImpl(new JedisPool());
                config.setAppid(a.getAppid());
                config.setSecret(a.getSecret());
                config.setToken(a.getToken());
                config.setAesKey(a.getAesKey());
                config.setMsgDataFormat(a.getMsgDataFormat());

                WxMaService service = new WxMaServiceImpl();
                service.setWxMaConfig(config);
                routers.put(a.getAppid(), this.newRouter(service));
                return service;
            }).collect(Collectors.toMap(s -> s.getWxMaConfig().getAppid(), a -> a));
    }
}
从配置代码中可以看到初始化的时候 new WxMaDefaultConfigImpl、 WxMaServiceImpl 这两个类,那么作用是什么呢?请看登录接口!
3、登录接口
/**
     * 登陆接口
     */
    @GetMapping("/login")
    public String login(@PathVariable String appid, String code) {
        if (StringUtils.isBlank(code)) {
            return "empty jscode";
        }

        final WxMaService wxService = WxMaConfiguration.getMaService(appid);

        try {
            WxMaJscode2SessionResult session = wxService.getUserService().getSessionInfo(code);
            this.logger.info(session.getSessionKey());
            this.logger.info(session.getOpenid());
            //TODO 可以增加自己的逻辑,关联业务相关数据
            return JsonUtils.toJson(session);
        } catch (WxErrorException e) {
            this.logger.error(e.getMessage(), e);
            return e.toString();
        }
    }
WxMaJscode2SessionResult session = wxService.getUserService().getSessionInfo(code);
这个是开源包封装好的,我们来看下源码


可以看出来这里的appid 和secret 和从WxMaconfig中获取的,这就是我们之前WxMaService设置的config
WxMaService service = new WxMaServiceImpl();
service.setWxMaConfig(config);
这种方式可以支持多个小程序,还有另外一种配置,支持单个小程序。
1、还是一样yml文件配置

2、还是一样映射到java对象
@Configuration
@ConfigurationProperties(prefix = "wx.mini")
public  class WxProperties {

    private String appId;

    private String appSecret;

    private String mchId;

    private String mchSecret;

    private String notifyUrl;

    private String keyPath;

    public String getNotifyUrl() {
        return notifyUrl;
    }

    public void setNotifyUrl(String notifyUrl) {
        this.notifyUrl = notifyUrl;
    }

    public String getMchSecret() {
        return mchSecret;
    }

    public void setMchSecret(String mchSecret) {
        this.mchSecret = mchSecret;
    }

    public String getAppId() {
        return this.appId;
    }

    public void setAppId(String appId) {
        this.appId = appId;
    }

    public String getAppSecret() {
        return appSecret;
    }

    public void setAppSecret(String appSecret) {
        this.appSecret = appSecret;
    }

    public String getMchId() {
        return mchId;
    }

    public void setMchId(String mchId) {
        this.mchId = mchId;
    }

    public String getKeyPath() {
        return keyPath;
    }

    public void setKeyPath(String keyPath) {
        this.keyPath = keyPath;
    }
}
@Configuration
public class WxConfig {
    @Autowired
    private WxProperties wxProperties;

    @Bean
    public WxMaConfig wxMaConfig() {
        WxMaDefaultConfigImpl config = new WxMaDefaultConfigImpl();
        config.setAppid(wxProperties.getAppId());
        config.setSecret(wxProperties.getAppSecret());
        return config;
    }

    @Bean
    public WxMaService wxMaService(WxMaConfig maConfig) {
        WxMaService service = new WxMaServiceImpl();
        service.setWxMaConfig(maConfig);
        return service;
    }
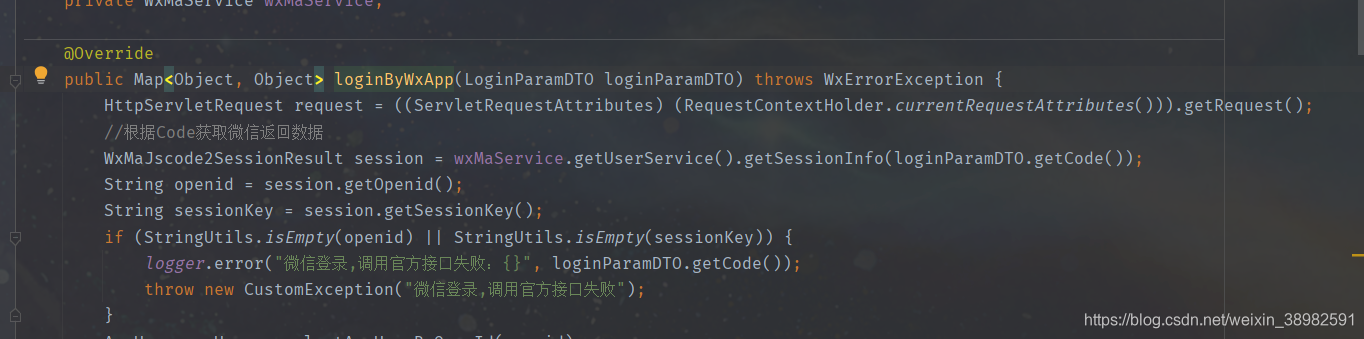
3、登录接口


旨在为数千万中国开发者提供一个无缝且高效的云端环境,以支持学习、使用和贡献开源项目。
更多推荐


 3
3 0
0- 0


 已为社区贡献3条内容

所有评论(0)