JasperReport是一个强大、灵活的报表生成工具,能够展示丰富的页面内容,并将之转换成PDF,HTML,或者XML格式。最重要的是它是开源的,这给我们带来很大方便,但是文档却要钱,让人不爽。不过人总要生存,再说,做这么一个好东西,用户总不能一点代价也不付(虽然对于中国普通程序原来说太贵了点)。它还有一个相关的开源工程—IReport,这是一个图形化的辅助工具,因为JasperReport仅提供了可使用的类库而未提供更好的开发工具,IReport的出现解决了这一难题。它们配合使用将会更大程度的提高效率。
该库完全由Java写成,可以用于在各种Java应用程序,包括J2EE,Web应用程序中生成动态内容。它的主要目的是辅助生成面向页面的(page oriented),准备付诸打印的文档。
JasperReport借由定义于XML文档中的report design进行数据组织。这些数据可能来自不同的数据源,包括关系型数据库,collections,java对象数组。通过实现简单的接口,用户可以将report library插入到订制好的数据源中,在以后我们将提到有关内容。
其实这是一份JasperReport Ultimate Guide的简单翻译以及我的理解和例子。在最后,我将描述一个我正在做的工程,将其中用到的相关信息贡献出来。我这么做是因为当我在学这个类库的时候苦于很少有相关的中文文档,诱惑语焉不详,希望其他人不再受苦。这个文档将分几次贴出来,与原文档的章节相对应。这份文档的Word形式将在全部完成之后放在我的公开邮箱中与各位共享。我的EMail是jxuedi@gmail.com有什么意见或想法请与我联系。
闲言少叙,进入正题。
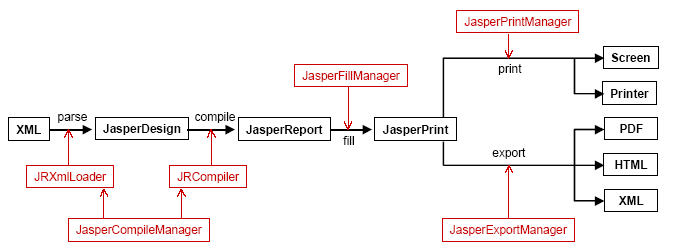
上图为一个生成报表并打印(导出)的全过程。我将会把涉及到的重要的类进行一一说明。
这是一个未经加工的报表实例,供JasperReport Library使用。这个类可以在JasperReport类库内置的XML解析器对XML report design进行解析处理之后得到。如果你的程序不想对直接XML文件进行操作,在例子noxmldesign中有不使用XML设计文件而动态生成这个类的方法。我们稍稍看看这个例子:
import 略
public class NoXmlDesignApp
{
private static JasperDesign getJasperDesign() throws JRException
{
//JasperDesign定义JasperDesign的头信息
              JasperDesign jasperDesign = new JasperDesign();
              jasperDesign.setName("NoXmlDesignReport");
              .剩余略
             
              //Fonts定义使用到的字体
              JRDesignStyle normalStyle = new JRDesignStyle();
              normalStyle.setName("Arial_Normal");
                           
              //Parameters 定义Parameters的内容—这个内容以后会提到
              JRDesignParameter parameter = new JRDesignParameter();
              parameter.setName("ReportTitle");
              parameter.setValueClass(java.lang.String.class);
              jasperDesign.addParameter(parameter);
 
              parameter = new JRDesignParameter();
              parameter.setName("OrderByClause");
              parameter.setValueClass(java.lang.String.class);
              jasperDesign.addParameter(parameter);
 
              //Query 定义查询
              JRDesignQuery query = new JRDesignQuery();
              query.setText("SELECT * FROM Address $P!{OrderByClause}");
              jasperDesign.setQuery(query);
 
              //Fields
              JRDesignField field = new JRDesignField();
              field.setName("Id");
              field.setValueClass(java.lang.Integer.class);
              jasperDesign.addField(field);
 
              //Variables 定义变量
              JRDesignVariable variable = new JRDesignVariable();
              variable.setName("CityNumber");
              variable.setValueClass(java.lang.Integer.class);
              variable.setResetType(JRVariable.RESET_TYPE_GROUP);
 
              //Groups 定义组
              group.setMinHeightToStartNewPage(60);
              expression = new JRDesignExpression();
              //余下定义一个文档的其他内容,这里省略
             
              return jasperDesign;
       }
从getJasperDesign()方法我们可以看出,这个应用程序并没有从XML文件里面将report design提取出来在生成JasperDesign类,而是直接利用JasperDesign提供的函数生成了一个报表设计。这样做的原因是基于灵活性的考虑,你可以在程序中随时动态生成报表,而不需要去从硬盘或网络中读取XML设计文件。但通常我不这么做,因为比较麻烦,而且要对JasperReport的每个元素都非常熟悉才行。
这个类的实例包含了一个经过编译的report design对象。生成它的时机是对报表编译之后,但尚未对其填入数据的时候。编译过程中,JasperReport需要生成一个临时的类文件,用以保存report expression,如变量表达式,文本,图像表达式,组表达式等等。这个临时的Java Source File是被动态编译的,编译器使用的是JDK中用来执行应用程序的编译器类(compiler class)。如果 tools.jar不在classpath中,编译过程将采用javac.exe来进行后台编译。编译后所得的字节码保存在JasperReport类中,用来在执行期装填数据(filling the report with data)和给表达式赋值(evaluate various report expression)。
这是一个上面提到的与编译有关的类。利用它提供的一些方法,你将有能力编译从本地硬盘或一个Input Stream获得的XML report;还可以通过传给JasperCompileManager一个JasperDesign类,来对内存中的report design进行编译—功能很强大。
当一个报表已经装填好数据之后,这个文档就以JasperPrint类的实例出现。这个类可以直接用JasperReport内置的viewer进行查看,也可以序列化到硬盘以备后用,或者发送到网上去。这个类的实例是报表装填过程后的产物,它可以被JasperReport类库中的导出方法导出成各种流行的格式—PDF,HTML,XML等等。
这个类与报表的数据源有关。只要能够恰当的实现他的一些接口,用户就可以在报表中使用各种数据源,在报表装填的时候由报表引擎负责对数据进行解释和获取。当报表装填的时候,报表引擎都会在后台生成或提供一个该接口的实例。
这是一个JRDataSource的缺省实现,因为很多报表数据都来源于关系数据库,所以JasperReport缺省包含了这个外覆(wrap)了java.sql.ResultSet对象的实现。
这个类可以用来包裹(wrap)用以对报表进行装填的、已经载入的结果集,也可以被报表引擎用来包裹通过JDBC执行完查询后所得的数据----非常有用。
顾名思义,这个类用于包裹java.swing.table.TableModel类中的数据,它也是实现了JRDataSource接口,用于在Java Swing程序中使用已经被载入到table中的数据来生成报表。
这是JRDataSouce接口的最简单实现,这个类用在不需要显示数据源数据而从参数中获取数据的报表和仅需要知道数据源中的实际行数(number of virtual rows)的报表中。
JasperReport自带的例子:fonts,images,shapes和unicode中使用这个类对报表进行装填,来模拟没有任何record的数据源,这时所有的field都为null。例如:
JasperRunManager.runReportToPdfFile(fileName, null, new JREmptyDataSource());
这个类用来实现报表的数据装填。这个类提供了很多方法来接受各种类型的report design--可以是一个对象,一个文件,或一个输入流。它的输出结果也是多样的:file,Object,output Stream。
report的装填引擎需要接收一个可以从中获取数据和value的数据源作为报表参数。参数值(Parameters value)通常使用Java.util.Map来提供,里面包含的KEY是报表的参数名。
数据源可以通过两种方式提供,这取决于你的解决方案:
通常情况下,用户应该提供一个JRDataSource对象,例如我前面提到的那些。
但是大多数的报表都是采用关系数据库中的值来装填数据,所以JasperReport拥有一个内置的缺省行为—让用户在报表设计的时候提供一个SQL查询。在运行期,这个查询将被执行以用来从数据库中获取要装填的数据。在这种情况下,JasperReport仅需要一个java.sql.Connection对象来取代通常的数据对象。JasperReport需要这个连接对象来连接数据库管理系统并执行查询操作。
在查询结束之后,JasperReport将自动生成一个JRResultSetDataSource,并将它返回给报表装填过程。
这个类同样用于报表装填期间,用户可以自己定义一些代码,并由报表引擎在装填过程中执行。这些用户代码可以处理报表数据操作,或在一些定义好的时刻执行,例如page,列,或组的分割处。
这是一个非常方便的JRAbstractScriptlet的子类。通常情况下你应该选择继承这个类。
这个类用户提供打印方法,用户可以将整个文档或部分文档传递给它,也可以选择是否显示打印Dialog,这在他的API文档中可以找到,这里不再赘述。
顾名思义,这个类负责文档的导出。这个类的具体信息详见API文档。非常明显和清除,没什么好解释的,Just use it即可。
有时,我们仅仅需要构造一个流行的文档格式,例如PDF,或HTML,而不需要将装填过程后生成的JasperPrint对象保存到硬盘或其他中间媒体上。这时,可以使用这个类来直接将装填过程生成的文档导出到所需的格式。
这是一个基于Swing的应用程序,你可以将它视为一个独立组件,用来进行打印预览。用户可以继承这个类,来构造满足自身要求的预览程序。
这个类更像是使用JRViewer的教学组件,它演示了一个Swing应用程序如何装在并显示报表。
这个类用于报表的设计期间,用来预览报表模版。它仅作为一个开发工具存在于类库中。
装载器用于报表生成的各个主要阶段—编译,装填等等。用户和引擎都可以利用这个类来装载所需的序列化对象如file,URLs,intput stream等等。这个类最令人感兴趣的函数当属loadOnjectFromLocation(String location)。当用户使用这个类从指定地点装载对象的时候,该函数将首先将location解释为一个合法的URL,如果解析失败,函数将认为所提供的location是硬盘上的一个文件名,并将试图读取它。如果在指定地点没找到文件,它将通过classpath定位一个相应于该location的资源,所有努力失败之后,将抛出异常。
这一节我们将看到对你的XML报表设计进行分析,编译,装填数据,预览结果和导出到其他格式的过程。
JasperReport使用SAX2.0 API对XML文件进行解析。然而,这并不是必须的,用于可以在执行其自行决定使用哪一种XML解析器。
JasperReport使用org.xml.sax.helpers.XMLReaderFactory类的createXMLReader()来获得解析器实例。在这种情况下,就像在SAX2.0文档中说的那样,在运行期,把Java系统属性org.xml.sax.driver(这是属性的key)的值(value)设定为SAX driver类的全限定名是必要的。用户可以通过两种方法做到这一点,我稍后将解释全部两种方法。如果你想使用不同的SAX2.0XML解析器,你需要指定相应的解析器类的名字。
设置系统属性的第一种方法是在你启动Java虚拟机的时候,在命令行使用-D开关:java –Dorg.xml.sax.driver=org.apache.serces.parsers.SAXParser mySAXApp sample.xml
在JasperReport提供的所有例子中,都采用ANT构建工具来执行不同的任务。我们通过使用内置的<java> task中的<sysproperty>元素来提供这一系统属性:
<sysproperty key=”org.xml.sax.driver” value=”org.apache.xerces.parsers.SAXParser”/>
第二种设置系统属性的方法是使用java.lang.System.setProperty(String key, String value)
System.setProperty(“org.xml.sax.driver”,” org.apache.xerces.parsers.SAXParser”);
Jsp/compile.jsp和web-inf/class/servlets/CompileServlet.java文件提供了这方面的例子。
注:对于第二种方法,我要说些题外话。有关于JVM的系统属性(我们可以通过System.out.println(System.getProperty(“PropertyKey”)来查看),可以在运行期像上面说所得那样用System.setProperty(“propertyKey”,”propertyValue”);来进行设置。但是一旦JVM已经启动之后,其内建的系统属性,如user.dir,就不能再被更改。奇怪的是我们仍可以用System.setProperty()方法对其进行设置,而在用System.out.println(System.getProperty())方法进行查看的时候发现,其值已经更改为我们设置的值,但事实上我们设置的值不会起任何作用。所以对于内置的属性,我们只能通过-D开关在JVM执行之前进行设置。对于org.xml.sax.driver,由于它不是系统内建属性,所以仍然可以在JVM启动之后加以设置。更详细的信息可以参考王森的〈Java深度历险〉。
为了深成一个报表,用户需要首先生成报表的设计(report’s design),生成方法或采用直接编辑XML文件,或通过程序生成一个net.sf.jasper.engine.design.JasperDesign对象。本文中,我将主要采用编辑XML文件的方法,因为这种方法在目前是使用JasperReport类库的最好的方法,并且我们有机会更好的了解类库的行为。
先前提到过,XML报表设计是JasperReport用来生成报表的初级材料(raw meterial)。这是因为XML中的内容需要被编译并载入到JasperDesign对象中,这些对象将在报表引擎向其中填入数据之前经过编译过程。
注意:大多数时候,报表的编译被划归为开发时期的工作。你需要编译你的应用程序报表设计,就像你编译你的Java源文件一样。在部署的时候,你必须将编译好的报表,连同应用程序一起安装到要部署的平台上去。这是因为在大多数情况下报表设计都是静态的,很少用应用程序需要提供给用户在执行期编译的,需要动态生成的报表。
报表编译过程的主要目的是生成并装载含有所有报表表达式(report expression)的类的字节码。这个动态生成的类将会被用来在装填数据,并给所有报表表达式求值(evaluate)的时候使用。具体例子是,如果你用IReport生成一个报表名字叫SimpleSheetTest,它的XML设计文件名叫SimpleSheetTest.jrxml,同时和它在同一目录下IReport会自动生成一个文件名为SimpleSheetTest.java,里面主要是一些报表元素,如Field,Parameters,Variables的定义,以及一些求值表达式。当然,像上面提到的,这个文件在你直接使用JasperReport API的时候是看不到的,因为它是在执行期生成的一个Class。要想看到它的办法是:在IDE(JBuilder,Eclipse)中单步执行程序,在报表打印的阶段,你将能跟踪到这个类,它的名字就是“你的报表名.java”,按上面的例子就是SimpleSheetTest.java,这和IReport是一致的。当然也可以像下面说的那样,到生成这个类的临时目录里找到它。
在这个类生成过程之前,JasperReport引擎需要验证报表设计的一致性(consistency),哪怕存在一处验证检查失败都不会继续运行下面的工作。在下面的章节,我将会展示报表设计验证成功之后的状况。
对于这个包含了所有报表表达式(report expressions)的类的字节码,我们至少需要关心三个方面的内容:
l        临时工作目录(temporary working directory)
l        Java 编译器的使用
l        Classpath
 
为了能够编译Java源文件,这个文件必须被创建并且被保存到磁盘上。Java编译过程的输出是一个.class文件,这个包含所有报表表达式的类在这个工作目录里被创建并编译,这也是为什么JasperReport需要访问这个临时目录的原因。当报表的编译过程结束之后,这些临时的类文件将被自动删除,而生成的字节码将保存在net.sf.jasper.engine.JasperReport对象中。如果需要的话,这个类可以将自己序列化(serialized itself)并保存到磁盘上。这就是IReport的做法。
缺省情况下,这个临时工作目录就是启动JVM时的当前目录,这却取决于JVM的系统属性user.dir。通过更改系统属性jasper.report.compile.temp,用户可以很容易更改这个工作目录。在Web环境下,特别是当你不想让含有启动Web Server的批处理文件的目录和报表编译过程的临时工作目录混在一起的时候,修改这个属性就可以了。
上面提到的第二个方面涉及用来编译报表表达式类的Java编译器。首先,报表引擎将试图使用sun.tools.javac.Main类来编译Java源文件。这个类包含在tools.jar中,当且仅当这个jar文件在JDK安装目录下的bin/目录中,或在classpath中时,sun.tools.javac.Main才能正常使用。
如果JasperReport不能成功装载sun.tools.javac.Main文件,程序将动态执行java编译过程,就像我们通常用命令行那样,使用JDK安装目录下的bin/目录下的javac.exe。这就是为什么将JDK安装目录/lib/下的tools.jar文件copy到JasperReport工程的lib/目录下是一个可选的操作(optional operation)。如果tools.jar不在classpath中,JasperReport将显示错误信息并继续上面提到的操作。
当编译Java源文件的时候,最重要的事情莫过于classpath。如果Java编译器不能在指定的classpath中找到它试图编译的所有相关类的源文件,则整个过程将失败并停止,错误信息将在控制台显示出来。同样的事情也将发生在JasperReport试图编译报表表达式类的时候。所以,在runtime为编译过程提供正确的classpath是非常重要的。例如,我们我们需要确认在classpath中,我们提供了在报表表达式中可能用到的类(custom class)。
在这个方面也有一个缺省的行为。如果没有为编译report class特殊指定classpath,引擎将会使用系统属性java.class.path的值来确定当前的JVM classpath。如果你指定了系统属性jasper.reports.compile.class.path的值,你可以用你定义的classpath来覆盖缺省行为。
大多数情况下,编译一个report只需要简单的调用JasperReport类库中的JasperCompileManager.compileReport(myXmlFileName);即可。调用之后将生成编译好的report design并存储在.jasper文件中,这个文件将会保存在和提供XML report design文件相同的目录中。
JasperReport类库并没有提供高级的GUI工具来辅助进行设计工作。但是目前已经有至少4个project试图提供这样的工具。然而,JasperReport本身提供了一个很有用的可视化组件来帮助报表设计者在编译的时候预览报表设计(其实不如直接用IReport方便)。
net.sf.jasper.view.JasperDesigner是一个基于Swing的Java应用程序,它可以载入并显示XML形式或编译后的报表设计。尽管它不是一个复杂的GUI应用程序,缺乏像拖拽可视化报表元素这样的高级功能,但是它仍然是一个有用的工具(instrument)。所有JasperReport工程提供的例子都利用了这个报表查看器(report viewer)。
如果你已经安装了ANT(别告诉我你不知道什么是ANT),想要查看一个简单的报表设计(JasperReport工程所带例子),你只需要到相应的文件夹下输入如下命令:
〉ant viewDesignXML    或者    〉ant viewDesign
如果你没安装ANT,要达到上面的效果就不是很容易,因为JasperReport本身需要一些其他辅助的jar包(在JasperReport安装目录/lib下),在运行的时候,你需要把这些jar包都包含到你的classpath里面,并且正确设计系统属性,如上面提到的org.xml.sax.driver。我可以展示一下在windows下的例子:
>java -classpath ./;../../../lib/commons-digester.jar;
../../../lib/commons-beanutils.jar;../../../lib/commons-collections.jar;
../../../lib/xerces.jar;../../../lib/jasperreports.jar
-Dorg.xml.sax.driver=org.apache.xerces.parsers.SAXParser
dori.jasper.view.JasperDesignViewer -XML -FFirstJasper.xml
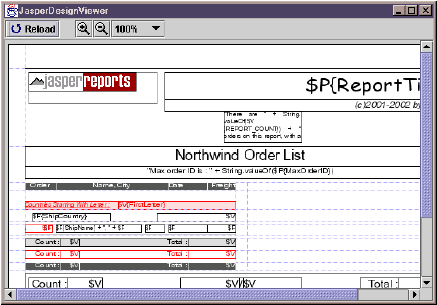
很麻烦吧?还是赶快弄个ANT吧。下面是预览之后的结果(其实用IReport更好)
3.4报表装填(Filling Report)
报表装填(report filling)过程是JasperReport library最重要的功能。它体现了这个软件最主要的目的(main objective),因为这一过程可以自由的操作数据集(data set),以便可以产生高质量的文档。有3种材料需要装填过程中作为输入提供给JasperReport:
l        report design(report templet)
l        参数(parameters)
l        数据源(data source)
这一过程的输出通常是一个单一的最终要被查看,打印或导出到其他格式的文档。
要进行这一过程,我们需要采用net.sf.jasper.engine.JasperFillManager类。这个类提供了一些方法来让我们装填报表设计(report design),report design的来源可以是本地磁盘,输入流,或者直接就是一个已存在于内存中的net.sf.jasper.engine.JasperReport类。输出的产生是于输入类型相对应的,也就是说,如果JasperFillManager接到一个report design的文件名,装填结束后生成的report将会是一个放在磁盘上的文件;如果JasperFillManager收到的是一个输入流,则生成的report将会被写道一个输出流中。
有些时候,这些JasperFillManager提供的方法不能满足某些特定的应用的要求,例如可能有人希望他的report design被作为从classpath中得到的资源,并且输出的报表作为一个文件存放在一个指定的磁盘目录下。遇到这种情况时,开发人员需要考虑在将报表设计传递给报表装填过程之前,用net.sf.jasper.engine.util.JRLoader类来装载report design对象。这样,他们就能获得像报表名这样的report design属性,于是开发者就能生成最终文档的名字(construct the name of the resulting document),并将它存放到所需的位置上。
在现实中,有许多报表装填的情境(scenarios),而装填管理器仅试图覆盖其中最常被使用到的部分。然而对于想要自己定制装填过程的人来说,只要采用上面所说的方法,任何开发者都可以达到满意的结果。
报表参数通常作为java.util.Map的value提供给装填管理器,参数名为其键值(key)。
作为装填过程所需的第三种资源—数据源,有如下两种情况:
通常,引擎需要处理net.sf.jasper.engine.JRDataSource接口的一个实例,通过这个实例,引擎可以在装填过程中获取所需数据。JasperFillManager提供的方法支持所有的JRDataSource对象(这是一个Interface,上面一章提到过它的常用实现)。
然而,这个管理器还提供一些接受java.sql.Connection对象作为参数的方法集,来取代所需的数据源对象。这是因为在很多情况下,报表生成所需的数据都来源于某个关系型数据库中的表(table)。
在报表中,用户可以提供SQL查询语句来从数据库中取回报表数据(report data)。在执行期,engine唯一需要做的是获得JDBC connection对象,并使用它来连接想要连接的数据库,执行SQL查询并取回报表数据。在后台,引擎将使用一个特殊的JRDataSource对象,但是它对于调用它的程序来说是透明的。
JasperReport工程提供了相关的例子,它们采用HSQL数据库服务器(在工程文件中,有一个相应的文件夹),要运行这些例子你需要首先启动该服务器,方法是:在/demo/hsqldb目录下输入如下命令:>ant 或者 >ant runServer
没装ANT就麻烦点:>java -classpath ./;../../lib/hsqldb.jar org.hsqldb.Server
一下代码片断显示了query例子是如何装填数据的:
//Preparing parameters
Map parameters = new HashMap();
parameters.put("ReportTitle", "Address Report");
parameters.put("FilterClause", "'Boston', 'Chicago', 'Oslo'");
parameters.put("OrderClause", "City");
//Invoking the filling process
JasperFillManager.fillReportToFile(fileName, parameters, getConnection());
报表填充阶段的输出通常是一个JasperPrint对象,如果把它保存在磁盘上,通常以一个.jrprint文件的形式存在。JasperReport拥有一个内置的查看器,用来查看用内置的XML导出器(XML exporter)获得的XML格式的报表文件。这个查看器就是以前提到过的net.sf.jasper.niew.JRViewer—一个基于Swing的应用程序组件,用户可以通过继承这个类来定制自己所需的查看器。JasperReport工程中自带的例子webapp中,你可以阅读JRViewerPlus类的代码来获取进一步内容。
注意: JasperViewer 更像是一个教人们如何使用 JRViewer 组件的演示程序,这里要注意一点,当你调用 JasperViewer viewReport() 方法来显示报表时,如果你关闭了预览 Frame ,整个应用程序将会随之结束,因为这个函数最后调用了 System.exit(0) ;你可以通过继承这个类,并重新在你的 Viewer 里注册 java.awt.event.WindowListener 来避免这一情况的发生。
JasperReport类库的主要目标,就是生成可打印的文档。而且多数应用程序生成的报表都是需要落实(或打印)到纸张上。我们可以用net.sf.jasper.engine.JasperPrintManager来打印JasperReport生成的文档。当然,报表也同样可以在被导出到其他格式如PDF,HTML之后再被打印。通过JasperPrintManager提供的方法,我们可以打印整个文档,打印单个文档或打印某一范围内的文档,可以显示打印对话框也可以不显示。下面的例子演示了不显示对话框,打印整个文档的方法:JasperPrintManager.printReport(myReport,false);
这个例子显示了如何打印5-11页的文档,同时显示打印对话框:net.sf.jasper.engine.JasperPrintManager.printPages(myReport,4,10,true);
在一些应用程序环境下,将JasperReport生成的文档从其特有的格式导出到其他更为流行的格式如PDF,HTML是非常有用的。这样一来,其他人就可以在没有安装JasperReport的情况下查看这些报表,特别是当这些文档要通过网络发送出去的时候。
JasperReport提供了JasperExportManager类来支持此项功能。这项功能将会在以后不断加入对新的格式的支持。目前,JasperReport主要支持导出PDF,HTML和XML类型的文档,下面是导出的代码片断:JasperExportManager.exortReportToHtmlFile(myReport);
注意:想要将自己的报表导出到其他格式的用户,需要实现 JRExporter 的接口,或继承相应的 JRAbstractExporter 类。
当使用JasperReport的时候,你经常会与序列化的对象,如以编译的报表设计,或已生成的报表打交道。有时,你需要手动载入从不同的source如input stream或你用类库核心功能(lib’s core functionality)产生的序列化类。JasperReport提供了两个特殊的工具类来提供上述操作的能力,这些类通常供报表引擎自己使用:
net.sf.jasper.engine.util.JRLoader
net.sf.jasper.engine.util.JRSaver
       第一个类提供了一些方法让我们能够从不同类型的数据源如文件,URL,input stream和classpath里面获取序列化对象。最令人感兴趣的方法是loadObjectFormLocation(String)。它已经在上一章中介绍过了,这里不再赘述。
与上面的对象载入工具相反的部分是JRSaver类,它可以帮助程序员将自己的类序列化之后存放到本地磁盘或通过Output Stream发送到网络上去。
有时,开发人员可能想要载入已经生成好的report,或最终的已经被导出到XML格式的JasperReport文档,这与上面所说的直接load序列化对象有所不同。这时,我们需要载入的是将载入的XML内容进行编译,并生成JasperPrint对象,而并非仅仅是载入序列化对象。这时,我们可以通过net.sf.jasper.engine.xml.JRPrintXmlLoader类的一些静态方法,通过编译从XML文件中读取的内容构建出一个位于内存中的文档对象。
报表设计体现了一个模版,JasperReport引擎利用这个模版将同台生成的内容传递给打印机,屏幕或Web。存储在数据库中的数据在报表装填的过程过被组织起来,根据已有的报表设计来获得可以进行打印的,面向页面的(page oriented)文档。
总而言之,一个报表设计包含了所有的结构相关信息和将数据提供给报表所涉及的各个方面。这些信息涉及将在文档中显示出来的各种text或图像元素的位置和内容,自定义计算(custom calculation),数据组织,报表生成时的数据操作,等等。
报表设计通常都定义在一个拥有特殊格式的XML文档中,并且在被填充数据之前要经历JasperReport的编译过程,有关于这个XML文档的详细信息我们将在以后说明。然而JasperReport也允许用户通过JasperReport提供的API构造in-memory报表对象,例程noxmldesign就是很好的例子,但是我们通常不这么用。
当使用XML文件进行报表设计的时候,JasperReport将使用内置的DTD文件来验证其受到的XML内容的有效性。如果XML验证通过,则说明所提供的报表设计符合JasperReport所需要的XML结构和语法规则,其引擎能够生成经过编译的report design。
有效的XML文档总是在验证时指向JasperReport的内部DTD文件。如果没有提供DTD文档的引用,报表的编译过程将会突然结束。这对所有人来说都是一个负担,因为DTD引用通常是相同的,并且这些引用可能会简单的被从以前的报表设计中copy过来。在一开始,你需要将这个引用从给定的例子中copy过来。
正如以前说的一样,报表引擎仅能识别指向其内部DTD文件的的引用。你不能随便从类库的源文件中将那些DTD文件copy到别的地方,再在你的报表设计文件中文件中指向你copy的那些DTD文件。如果你想那样做的话,你将需要调整类库中某些类,包括net.sf.jasper.engine.xml.JRXmlDigester类的某些代码。如果你遇到像引擎无法找到其内部的DTD文件而导致的无法载入资源的问题,请确定你已经在使用外部DTD文件之前排除了所有可能发生的情况。遇到这样的问题是不太可能的,因为资源载入机制会随着时间不断改进。JasperReport只有两种合法的XML报表设计的DTD引用,他们是:
<!DOCTYPE jasperReport PUBLIC “-//JasperReports//DTD Report Design//EN” “ http://JasperReports.sourceforge.net/dtds/jasperreport.dtd”>或者
<!DOCTYPE jasperReport PUBLIC “-//JasperReports//DTD Report Design//EN” “http://www.jasperreports.com/dtds/jasperreport.dtd”>
XML报表的root元素是<jasperReport>,下面是一个普通带JasperReport的样子:
<?xml version=”1.0”>
<!DOCTYPE jasperReport PUBLIC “-//JasperReports//DTD Report Design//EN” “ http://JasperReports.sourceforge.net/dtds/jasperreport.dtd”>
<jasperReports name=”name_of_the_report”…>
</jasperReports>
当要生成不同语言的XML报表设计的时候,在XMl文件的首部的编码属性需要特别关注一下。缺省情况下,如果这个属性的值没被订制,则XML解析器将会使用“UTF-8”作为XML文件的编码格式。这一点是非常重要的,因为报表设计通常包含了静态的本地化text。对于大多数西欧语言来说,ISO-8859-1编码,也就是我们常说的LATIN1将会很好的处理如法语中重音符号的显示问题。
<?xml version=”1.0” encoding=”ISO-8859-1”>
在编辑XML文件的时候,要找到某种特殊语言的编码类型,你可以查看XML document.FIXME
我们上面已经看到,<jasperReport>斯XML报表设计的根元素。这一节我将介绍报表设计对象的Property的细节以及这些属性所对应的XML attributes(为避免混淆,我将不提供Property和Attribute的中文而直接使用英文)。

1

每一个报表都必须有一个名字。这个名字是相当重要的,因为类库需要它来生成文件,尤其是当编译,装填,导出报表的默认行为被使用的时候,这个名的作用更为重要。这个名字是以<jasperReport>元素的name attribute的形式提供的,并且是强制必须填写。
Column Count(列数)
JasperReport允许生成每页的列数超过一列的报表,正如下面的图片,展示了拥有两列的报表:

1

默认情况下,报表引擎生成每页一列的报表。
Print Order(打印顺序)
对于拥有超过一列的报表,为其提供列将被以什么顺序填充是很重要的。你可以使用<jasperReport>的printOrder attribute来进行设置。有如下两种情况:
n        Vertical Filling:这个选项将导致列是自顶向下被填充(printOrder=”Vertical”)
n        Horzontal:列将自左向右被填充(printOrder=”Horizontal”)
缺省设置将是printOrder=Vertical
Page Size(页面大小)
有两个attribute是用来提供要生成的文档大小的:pageWith,pageHeight。像所有其他显示元素位置和尺寸的attribute一样,这两个attribute是以像素为单位的。JasperReport采用Java默认的每英寸72点的设置。这意味着pageWith=”595”将大约是8.26英寸,这大概是A4纸的尺寸。
默认的纸张大小是A4纸:pageWith=”595” pageHeight=”842”
Page Orientation(默认设置为Portrait)
orientation属性用来设置文档打印格式是“Portrait”还是“Landscape”。JasperReport允许用户在从“Portrait”切换到“Landscape”的时候调整液面的宽度和高度。我们先看一个例子:我们假定要生成一个A4纸的报表,采用“Protrait”格式。
pageWidth=”595” pageHeight=”842” orientation=”Portrait”
如果我们决定用A4纸的“Landscape”布局,首先要调整相应的页面宽度和高度:
pageWidth=”842” pageHeight=”595” orientation=”Landscape”
这是因为JasperReport需要确切知道它所要绘制的报表页的宽度和高度,而不只看我们提供的orientation属性,至少在报表装填的时候是这样。orientation属性仅在报表打印时有用,来通知打印机或某些exporters页面的orientation设置。
Page Margins(页边距)
一旦页面大小确定下来,用户就可以在生成报表的时候设定报表的边距。有四个属性来完成这项工作:topMargin,LeftMargin,bottomMargin和rightMargin。缺省的设置是上下边距20像素,左右边距20像素。
Column Size and Spacing(列宽和列间距)
一个报表可能含有多列,我们可以通过上面提到的columnCount属性得到报表列数。JasperReport需要知道列的宽度和列间距的大小。有两个属性用于这项工作:columnWidth和columnSpacing。当我们对报表设计进行编译的时候,编译器会对这项设置进行有效性检查(validation check)--看列的宽度和列间距是否符合给定的页面宽度和页边距。因为缺省的列数为一,所以缺省的列间距为0像素,并且缺省的列宽等于页面宽度减去左右边距所得的值。在上面A4的例子中,列宽即为555像素。
有时我们提供给我们的报表的数据源可能会没有任何record。whenNoDataType属性可以让你选择当所提供的数据源中没有数据的时候入和察看生成的报表。如下有三种不同的可能性,你可以任选其一:
l               Empty Document:生成的报表不含有页面(no page in it)。当你试图装载这样的文档(whenNoDataType=”NoPages”)的时候,Viewer 可能会抛出一个错误。
l               Blank page:表示生成的报表将仅含有一个空白页。(whenNoDataType=”BlankPage”)
l               All sections displayed:除了detail部分的其他部分将在生成的文档中显示出来。(whenNoDataType=”AllSectionNoDetail”)。
缺省的设置是whenNoDataType=”NoPages”。
              Title and Summary Sections Placement(标题和摘要的放置)
如果你想让title部分和summary部分在单独的一页里显示,你所需要做的事情就是让下面的一个或两个属性的值为“true”:isTitleNewPage,isSummaryNewPage。这两个属性缺省情况下为false。
注意 : 即使你选择了在最后一页的剩余部分显示 summary ,如果列数超过一列,并且第二列已经在最后一页出现的时候(没试过,等有机会试验一下),新的一页将会被自动生成。
scirptletClass属性用于设置用于当前报表的scriptlet类的名字。在以后我会对Scriptlet进行详细讨论。如果你没为这个属性提供任何值,报表引擎将会使用net.sf.jasper.engine.JRDefaultScriptlet的实例。
当我们谈到报表装填过程的时候,有三样东西需要作为输入提供给报表引擎:报表设计(report design),参数值(parameter values)和报表的数据源(data source)。
在先前的章节,我们已经看到了有关报表设计的某些方面,现在我们要更加详细的关注其他两方面的内容:参数(parameter)和报表数据源。他们描绘了报表引擎在装填报表过程中所用到的仅有的数据来源。像你用其他报表工具所希望的一样,这些数据将会根据报表设计中的定义的模版(template)被组织起来,并被用来生成准备打印的、面向页面的文档。
表达式是JasperReport的一个非常有用的特性。他们可以用来声明执行各种执行各种计算(calculations)的报表变量(report variables),进行报表的数据组织,定制报表文本字段(text field)的内容或者进一步定制报表对象的appearance。
所有报表表达式基本上都是Java表达式,他们可以以特殊的语法引用报表参数(parameter),报表字段(field)和报表变量(variable)。在XML报表设计中,有一些用于定义表达式的元素:<variableExpression>,<initalValueExpression>,<groupExpression>,<printWhenExpression>,<imageExpression>,<textFieldExpression>等等
因为所有的JasperReport表达式都是真正(real)的Java表达式,只要你用完整的类名(包括包名)来引用这些表达式,你就可以在任何class中使用他们。当你编译报表和装填数据的时候,你应该确定你在报表表达式中使用的类已经写入了classpath。
报表参数引用是通过$P{}序列引入的,例如:
<textFieldExpression>
      $P{ReportTitle}
</textFieldExpression>
这个例子假定我们在报表设计中有一个名为ReportTitle的报表参数,这个参数是一个java.lang.String类。当报表进行装填的时候,文本字段将会显示这个参数的值。
为了在一个表达式中使用报表字段,字段名必须放在$F{}的括号中。例如,如果我们想要在一个文本字段中显示两个数据源字段的连接值(concatenated values),我们可以定义如下表达式:
<textFieldExpression>
      $F{FirstName} + “ “ + $F{LastName}
</textFieldExpression>
表达式可以更加复杂:
<textFieldExpression>
      $F{FirstName} + “ “ + $F{LastName} + “ was hired on “ +
   (new SimpleDateFormat(“MM/DD/YYYY”)).format($F{HireDate)) + “.”
</textFieldExpression>
正如你所看到的一样,参数、字段和变量引用都是通过用JasperReport的特殊语法从一个真正地Java对象中引入的。(实际上是一个JREvaluator对象,该对象是在运行其生成的动态对象,并不能在本地磁盘上见到它的身影,不过如果你使用iReport的话,你就可以在生成报表文件的同一目录下看到它的本来面目)
Parameters是传递给报表装填操作的对象引用。这些参数主要作用于把那些不能从报表数据源中获得的数据传给报表引擎。例如,我们可能要把执行报表装填过程的用户名字专递给报表引擎,如果我们想让它显示在报表上或者在我们想在报表的title上动态的改变它,我们就可以以参数的形式传给报表引擎。
我们可以用如下的方式定义参数:
<parameter name=”ReportTitle” class=”java.lang.String”>
<parameter name=”MaxOrderId” class=”java.lang.Integer”>
<parameter name=”SummaryImage” class=”java.awt.Image”>
这里所提供的报表参数值可以被用到各种报表表达式中,在报表SQL查询中,甚至可以用到报表的scriptlet类里。下面是构成参数定义的全部组件(XML元素):
name属性是一个强制属性。JasperReport的命名习惯和Java语言的命名习惯是类似的,这意味着参数名应该是一个单词,其中不含特殊字符(如分号)。
报表参数的第二个强制属性是提供参数值的类型名。这个类型属性可以使任意的值,只要这个类型的名字在报表编译期和装填期能在classpath中找到即可。
在GUI引用程序中,建立一个报表参数集,让用户在执行装填过程之前输入某些应用程序需要用户输入的报表参数是很有用的。可选参数isForPropting参数用来声明是否显示提示信息让用户输入某些参数。下面的例子中,我声明了一个文本参数,当需要用户输入参数值的时候,这个文本参数用来在一个已定制的对话框中描述需要用户输入什么样的参数。
<parameter name="Comments" class="java.lang.String" isForPrompting="true">
<parameterDesciption>
<![CDATA[
Please type here the report comments if any
]]>
</parameterDesciption>
</parameter>
注意:相信大家都知道 <![CDATA[ 内容 ]]> 表示“内容”将不被 XML 解析器解析,也就是说,你可以在“内容”里加入 XML 的特殊字符,如 > < 等等。
通常参数值都是使用java.util.Map对象传给装填过程的,其中参数名作为Key。这样,你就不用每次都为每个参数提供一个value了—可以批量放到Map对象里一起传给装填管理器。如果你没有为参数提供一个value,引擎就认为它是null。但是如果你为它提供了一个默认值,则引擎将在你没提供这个参数值的情况下使用这个默认值。如果你在装填时没提供数据,下面的java.util.Date将在装填是被引擎使用来表示当天日期:
<parameter name="MyDate" class="java.util.Date">
<defaultValueExpression>
new java.util.Date()
</defaultValueExpression>
</parameter>
在参数的默认表达式中,我们可以使用这个与定义的报表参数。
每一个报表设计中都含有一些与定义的报表参数,这些内置的参数的描述如下:
REPORT_PARAMETERS_MAP
这是一个内置的参数,这个参数总是指向一个java.util.Map对象,该对象保存了用户调用报表装填过程时传递给报表引擎的用户定的参数。
REPORT_CONNECTION
这个报表参数指向一个java.sql.Connection对象,这个对象被提供给报表引擎用来通过JDBC来执行SQL报表查询。将master报表使用的JDBC Connection对象传递给subreport是非常有用的,有关这方面信息请查看subreport例子
REPORT_DATASOURCE
在报表装填的时候,我们可以或者直接由应用程序中提供,或由报表引擎从所提供的JDBC Connection在后台create而获得一个数据源。这个内置的参数允许我们在报表表达式中或scriptlet中访问报表数据源,而不论我们为什么要这么做。
REPORT_SCRIPTLET
即使报表不使用scriptlet,这个内置的参数仍将指向一个net.sf.jasper.engine.JRAbstracStriptlet实例,该实例实际是一个net.sf.jasper.engine.JRDefaultScriptlet对象。
但是当使用scriptlet时,报表装填过程所生成的这个指向scriptlet类实例的引用允许我们调用其中的某些特殊函数,使用或控制scriptlet对象在装填过程中已经准备好的数据。在scriptlet例子中你可以看到更详细的使用过程。
5.3    Data Source(数据源)
在进行报表装填的时候,JasperReport引擎迭代的从用户提供的数据源中提取record,并根据报表设计所提供的模版生成报表的各个部分(section)。通常情况下,引擎需要接收一个net.sf.jasper.engine.JRDataSource对象作为报表数据源。但是像我们即将看到的那样,当报表数据存储于关系型数据库的时候,JasperReport有了让用户提供一个JDBC链接对象来替代通常的数据源对象的特性。JRDataSource接口非常简单,如果我们想要实现它只需要实现下面两个方法:
public Boolean next() throw JRException;
public Object getFieldValue(JRField jrField) throw JRException
在报表装填的时候,next()方法将被报表引擎调用,迭代的从数据源中获取数据。第二个方法用来为每个在当前数据源记录(data source record)中的报表字段(report field)提供value。
       应当知道, 从数据源取得数据的唯一方法是使用report field。一个数据源对象更像是一个二维表,表中含有数据。这个二维表的行是一条一条的record,而每一列都映射为一个report field。所以我们可以在report表达式中使用数据源。JasperReport提供了一些缺省的JRDataSource实现,我们来具体看一下:
Class net.sf.jasper.engine.JRResultSetDataSource
这是一个非常有用的缺省实现,因为他外覆(wrap)了java.sql.ResultSet对象。由于多数报表的生成都采用关系数据库中存储的数据,所以这个类是被使用得最为广泛的数据源对象。然而在以下的两种情况下您可以不必在装填过程中自己生成这个对象:
如果你选择在你的报表中用SQL查询来获得在关系数据库的某个table中的数据,报表引擎将会通过执行给定的SQL查询并且将返回的java.sql.ResultSet外覆为一个net.sf.jasper.engine.JRResultSetDataSource实例来执行这项操作。引擎唯一需要的是一个java.sql.Connection对象来执行查询操作。这时你可以提供connection对象来作为通用数据源对象(usual data source object)。例子有:jasper,scriptlet,subreport和query。
当然你可以在应用程序中即JasperReport之外执行SQL查询。这样的话,你可以手动的外覆java.sql.ResultSet,再调用报表装填过程之前实例化这个数据源对象。当使用这种类型的数据源的时候,你需要为在result set中的每一列生命一个report field。report field的名字和类型必须和列的名字和类型匹配。
Class net.sf.jasper.engine.JREcptyDataSource
这个类主要用于当生成报表的数据不是来自数据源,而是来自参数或重要的仅是数据源中virtual records的数量的时候。例子fonts,images,shapes和unicode都使用了这个类来装填报表,来模拟数据源中没有一条记录,所有字段都为null的情况。
Class net.sf.jasper.engine.data.JRTableModelDataSource
这个JRDataSource接口的缺省实现外覆了javax.swing.table.TableModel对象,它可以用在Java Swing应用程序中从已经显示到屏幕上的table中得数据来生成报表。--我喜欢。
通常有两种方法来使用这种数据源:
通常,为了要从中取得数据,你需要为javax.swing.table.TableModel对象的每一列生命一个report field。但是有些情况下会出现问题,比如report field的命名需要遵照Java命名规范来声明变量,而table的列名则不需要。幸运的是,你仍然可以通过列的索引而不是它的名字来将report field与列进行映射。例如,一个列名为“Produce Description”不可能被映射到名为“Produce Description”的report field上,因为report field名中含有空格,这将引起一个编译错误。但是如果你知道这个列示table model对象的第三列(index=2),那么你就可以命名相应的字段“COLUMN_2”并无误地使用这一列的数据。例子有:datasource
Class net.sf.jasper.engine.data.JRBeanArrayDataSource
这个类外覆了一个JavaBeans数组,并且通过反射来获取report field的值。在这种数据源中,一个JavaBean对象描述了一条记录。如果我们有一个名为“ProductDescription”的report field,在获取这个字段的值的时候,程序将会试图通过反射机制调用一个当前JavaBeans对象中]名为getProductDescription()的方法。对于boolean字段,当调用 get前缀的属性不能返回其属性值的时候,程序将会试图使用 is前缀的方法来获得属性值。
Class net.sf.jasper.engine.data.JRBeanCollectionDataSource
这个类和上一个类非常类似,它也是使用反射机制和JavaBean命名规范,但是它外覆了一个java.util.Collection对象而不是一个JavaBean对象数组。在datasource例子中你可以看到进一步的用法。
为了要为报表装填数据,我们需要为报表引擎提供所需的数据,或者至少告诉它怎样去获取数据。JasperReport通常需要接受一个net.sf.jasper.engine.JRDataSource对象作为报表的数据源,同时作为更为强大的功能,JasperReport能直接用JDBC从关系数据库总获取数据。类库允许用户在他们的报表设计中提供SQL查询以便可以自运行期从数据库中提取数据。要做到这一点,你只需要在装填的时候为装填管理器的fillReport()方法提供一个java.sql.Connection而不是JRDataSource对象即可。
在报表中,可以使用<queryStrng>元素来引入查询。如果这个元素存在,则出现在报表参数声明之后,报表field之前。
如下是一个SQL查询的例子:
<queryString><![CDATA[SELECT * FROM Orders]]></queryString>
为了更好的定制从数据库中取回的数据集(data set),一个重要的方面是在报表查询字符串中 报表参数的使用(use of report parameters)。在查询中,这些参数可能会像动态过滤器(dynamic filter)一样工作,它们用特殊的语法被引入进来为报表提供数据,很像report expression。
如下有两种在查询中的使用参数的方法:
1.      像通常的java.sql.PreparedStatement的参数那样使用,用如下语法:
<queryString>
<!CDATA[
SELECT * FROM Orders WHERE OrderID <= $P{MaxOrderID} ORDER BY ShipCountry
]]>
</queryString>
2.      有时,我们需要使用参数来动态更改SQL查询的某些部分,或将整个SQL查询作为参数提供给装填过程。在这种情况下,语法稍微有些不同,向下面的例子,注意 “!”
      <queryString>
<!CDATA[
SELECT * FROM $P!{MyTable} ORDER BY $P!{OrderByClause}
]]>
</queryString>
在这个例子中,这个引入了参数值得特殊的语法确定了我们为这些参数所提供的值将会替代查询中的参数引用($P!{}的内容)。这些参数将被传给使用java.sql.PrepqredStatement对象的数据库服务器。
事实上,报表引擎首先处理$P!{}参数引用,通过使用他们的值来获取最重的SQL查询,并且仅当这件事完成之后,引擎才会将剩下的普通的$P{}参数引用传递给usual IN parameters。--实际上就是嵌套查询啦。
第二种用于SQL查询的参数引用允许你在运行期传递整个SQL查询语句:
<queryString>$P!{MySQLQuery}</queryString>
注意:你不能在参数值中再加入参数引用,也就是说,参数引用不能嵌套使用。
更详细的信息可以参看工程所带的例程:jasper,subreport,scriptlet,webapp以及最有学习价值的query
报表字段是从数据源到报表设计的数据映射的唯一途径。你可以应用报表字段在report表达式中使用数据源中的数据,或获得所需的输出。一旦定义了报表字段,你需要在报表填充的时候确认你所提供的数据源中提供了所有你声明的fields。
例如,如果你使用JRResultSetDataSource作为数据源,你需要确定在SQL查询结束之后所获得的ResultSet中的column包含你生命的全部fields。相应的列名和字段名必须完全相同,并且其数据类型也必须完全一致。
这是一个字段声明的语法,字段的声明需要对应于数据库表中的某一字段。我们来考虑一个Employee的例子,有如下表结构(structure):
报表字段需要像下面这样定义:
<field name="EmployeeID" class="java.lang.Integer"/>
<field name="LastName" class="java.lang.String"/>
<field name="FirstName" class="java.lang.String"/>
<field name="HireDate" class="java.util.Date"/>
如果你定义的字段不能和ResultSet中的某一列相对应,则在运行期将会抛出异常(如果你用IReport,在编译时也会抛出异常)。然而执行SQL查询之后返回的结果集中包含的列不需要与报表字段一一对应(即列可以多于字段,只是在显示的时候不显示出来罢了)。
<Field>元素的name属性是强制属性(即不能省略),你可以在表达式中通过它来引用该字段。字段名必须是一个单词,且不含有特殊字符,如点和分号。
这个属性描述了字段值的类型,缺省的类型是java.lang.String,还有其他可选类型如:
java.lang.Object
java.lang.Boolean
java.lang.Byte
java.util.Date
java.sql.Timestamp
java.lang.Double
java.lang.Float
java.lang.Integer
java.io.InputStream
java.lang.Long
java.lang.Short
java.math.BigDecimal
如果某些数据源含有一些自定义的类型,则该类型所对应的字段应该声明为java.lang.Object。但是与参数定义不同的是,你只能选择上述列表中的类型名。
当实现一个自定义数据源的时候跟,这一伴随着某个字段的附加的文本块是很有用的。你可以在字段描述中保存一个key或其他任何信息以便于在运行期从自定义数据源中取回字段值。通过使用可选的<fieldDescription>元素,你就可以轻松的越过字段名的约束(field naming conventions),在从数据源取数据的时候,使用字段描述而不是字段名来获取相应数据。
<field name="PersonName" class="java.lang.String" isForPrompting="true">
<fieldDesciption>PERSON NAME</fieldDesciption>
</field>
报表变量是建立在报表表达式之上的一些特殊对象。他们是用表达式定义的,用来执行某些运算,来简化报表中频繁出现或使用某些项目(如页号,页码,某些列的累加和等等)。下面是它的定义语法:
可以看到,在这个语法中,一个变量可以引用其他变量,当且仅当被引用的变量已经在报表中被定义过。所以,在报表设计中,变量定义的顺序非常重要。
与字段名和参数名一样,<variable>元素的name属性是强制属性,报表引擎允许在报表表达式中通过这个这个名字来引用变量。变量名的命名规则与参数和字段的规则相同。
每一个变量都有其类型,缺省为java.lang.String,然而只要你所选择的类型可以在classpath中找到,你就可以在报表编译期和填充期声明任何类型的报表变量。
报表变量的值可以在每一次迭代(iteration)中被改变,但也可以在装填过程中的某一特定的时间(specified moments)通过它的初始的value表达式恢复其初始值。这一行为是由resetType属性控制的,这一属性规定了报表装填过程中当报表变量在何时需要重新进行初始化(或恢复到初始值)。该元素有五种选项值:
n        No Reset:变量将不会使用其initial value expression对自身进行初始化,而将仅报表从变量表达式中所求得的值(resetType=”None”)。
n        Report Level Reset:变量将在报表填充过程的起始阶段使用其初始化表达式初始化一次(resetType=”Report”)。
n        Page Level Reset:变量将在每一页的起始时被重新初始化(resetType=”Page”)。
n        Colunm Level Reset:变量将在每个新列的开始被初始化(resetType=”Column”)
n        Group Level Reset:变量将在每次resetGroup属性提供的break的地方被重新初始化(resetType=”Group”)。
缺省的属性为resetType=”Report”
如果存在的话,resetGroup属性包含了报表的组的名字并且仅与resetType=”Gropu”的resetType属性相关联。
像以上所提到的,变量能执行内置的计算类型(build-in types of calculation)。下面是<variable>元素的calculation属性的所有可能的值:
Calculation Nothing
这是变量执行的缺省计算。这意味着变量值在数据源的每次迭代时被重新计算(这里的计算只是简单的通过变量表达式给变量赋值)。
Calculation Count
在每次数据源的迭代的时候( 注:这里和之前我所说的数据源的迭代都是指:例如,在报表装填的时候,引擎执行 SQL 查询返回的 ResultSet 中含有若干记录,每次迭代都是指从 ResultSet 中获得一条记录,并将这条记录的值赋给已经声明的字段),一个计数(count)变量将会把用主表达式(main expression)计算所得的非空(not null)值累加起来。计数变量(Count variables)必须是一个数字类型的变量,但是它的主表达式可以是一个非数字型表达式(non-numeric expression),因为报表引擎不关心表达式类型,而仅仅将这些非空的返回值得数目累加起来—就好像一个累加器一样。
只有变量的初始值表达式必须是数字型的,并且需要和变量的类型相同,因为这个值将会在初始化的时候被直接赋给变量。
Calculation Sum
如果你选择了这种类型的计算,报表引擎将会把变量主表达式的返回值累加到一起,但需要注意的是变量必须是数字类型的。我们不能计算一个java.lang.String或java.util.Date类型的报表变量。
Calculation Average
对于数据源中的每一条记录,报表引擎可以计算通过对变量表达式求值所得的一些列结果的平均值(series of values obtained by evaluating the variable’s expression)。这种类型的计算的也只能是数字类型的变量。
为了完成计算平均值的操作,报表引擎将在后台了创建一个helper报表变量来计算values的累加和(sum),并用它来计算这些value的均值。这个helper sum variables的命名规则是在对应的变量名后面加上“_SUM”前缀。例如,如果你声明了一个数字类型的变量,名为MyAverageVariable,报表引擎将会建立一个MyVerageVariable_SUM的变量来帮助计算均值。如果你需要的话,你可以在其他的报表表达式中使用这个helper变量,就像你使用其他你声明的变量一样。
为了计算均值,报表引擎同时也需要一个计数变量(count variable)。但是对于“Report”,“Page”和“Column”的reset type,引擎将使用我们在下一节即将看到的内置的计数变量。对于resetType=“Group”的情况,引擎将在后台建立一个helper计数变量,这个变量的名字是在原来的均值变量名后面加上一个“_COUNT”后缀。
Calculation Lowest and Highest
对于每一个数据源记录来说,如果你想在一系列从赋值表达式中获得得最大或最小的value,你就需要选择这种类型的计算。
Calculation StandardDeviation(标准偏差) and Variance(方差)
在一些特殊的报表中,你可能会需要执行一些高级的数字运算,而JasperReport已经内置了对的一些经过变量表达式赋值所得到的value的标准偏差和方差进行计算的算法。和前面计算均值的方法一样,报表引擎首先建立一些helper变量来获得相应于当前一系列值的计数和累加和,这些变量命名方式和上面一样,这里不再赘述。
Calculation System
这种类型的计算被用在当你不希望报表引擎干预你的变量运算的时候,这意味着你将自己计算变量的值。对于这种类型的计算,报表引擎唯一可以做的就是从数据源的一个迭代到另一个迭代的过程中将你已经计算好的value保存起来(conserve)。
例子:下面是一个是变量声明的简单例子,这个变量将为所有名为“Quantity”的数字型报表字段求和。
<variable name="QuantitySum" class="java.lang.Double" calculation="Sum">
<variableExpression>$F{Quantity}</variableExpression>
</variable>
如果我们想求得每一页的这个字段的总合,则应该如下定义:
<variable name="QuantitySum" class="java.lang.Double" resetType="Page"
calculation="Sum">
<variableExpression>$F{Quantity}</variableExpression>
<initialValueExpression>new Double(0)</initialValueExpression>
</variable>
在上面的例子中,我们的页累加变量将会在每一新页的开始时被置为0。
JasperReport提供了一些内置的系统变量可以直接用于表达式中:
Variable PAGE_NUMBER
这个变量保存当前的页号,在报表装填结束的时候,这个变量就保存着最终文档的总页数。所以要在JasperReport的文本字段中显示页号和总页数你都可以用它。
Variable COLUMN_NUMBER
这个变量将记录当前的列号。
Variable REPORT_COUNT
当数据源迭代结束之后,这个变量里将包含被处理的数据record的总数。
Variable PAGE_COUNT
这个变量纪录当前页中处理的record的数目。
Variable COLUMN_COUNT
这个变量纪录生成当前列时所处理的record的数目。
Variable GroupName_COUNT
当我们声明一个group时,引擎将会自动建立一个用户计算构成当前group的记录数的计数变量,即在组和组的rupture之间所处理的纪录的数目。(注意,这里的GroupName是泛指组名,即任意一个组的名字)


至此,JasperReport的大致功能选项就都介绍完了,余下的部分如报表的各个组成部分,Scriptlet,报表元素(文本,图形元素--线,矩形,图片等),要么在JasperReport所给例子中才能有更好的理解,要么你只要用一下IReport就一目了然了(比如报表的各个组成部分在IReport中都是可视化的,文本,图形元素也都是可拖拽到报表上的,非常容易弄懂),至于高级部分SubReport的用法,这片文档也说得比较少,如果你需要的话就看看IReport的文档吧。不过我还是在下面列出了所有的英文原文,共有兴趣的朋友或我自己在遇到某些细节的时候备用。 J
When building a report design we need to define the content and the layout of its sections. The entire
structure of the report design is based on the following sections: <title> , <pageHeader> ,
<columnHeader> , <groupHeader> , <detail> , <groupFooter> , <columnFoter> ,
<pageFooter> , <summary> .
Sections are portions of the report template that have a specified height and width and can contain
report elements like lines, rectangles, images or text fields. Those sections are filled repeatedly at report
generating time and make up the final document that is being produced. When declaring the content
and layout of a report section, in an XML report design, we use the generic element <band> .
XML Syntax
<!ELEMENT band (printWhenExpression?, (line | rectangle | image | staticText
| textField | subreport | elementGroup)*)>
<!ATTLIST band
height NMTOKEN "0"
<!ELEMENT printWhenExpression (#PCDATA)>
Report sections are sometimes referred as report bands and represent a feature that almost all report
tools have and use in the same way.
Band Height
The attribute height available in a report band declaration specifies the height in pixels for that
particular band and is very important in the overall report design.
The elements contained by a certain report band should always fit the band's dimensions, to avoid
potential bad results when generating the reports. The engine issues a warning if it finds elements
outside the band borders, when compiling report designs.
Skipping Bands
All the report sections allow you to define a report expression that will be evaluated at runtime in order
to decide if that particular section should be generated or skipped, when producing the document.
This expression is introduced by the <printWhenExpression> that is available in any <band>
element of the XML report design and should always return a java.lang.Boolean object or null .
The JasperReports Ultimate Guide
Page 39
A minimal report design can contain no report section at all, because each one of them is optional. But
such a minimal report design won't produce very interesting documents.
XML Syntax
<!ELEMENT title (band?)>
<!ELEMENT pageHeader (band?)>
<!ELEMENT columnHeader (band?)>
<!ELEMENT detail (band?)>
<!ELEMENT columnFooter (band?)>
<!ELEMENT pageFooter (band?)>
<!ELEMENT summary (band?)>
So let's take a closer look at each report section and see how it behaves.
Title
This is the first section of the report. It is generated only once during the report filling process and
makes it for the beginning of the resulting document.
Being the first section of the report means that it will precede even the page header section. Those who
want to have the page header printed somehow before the title section will have to copy the elements
present on the page header also at the beginning of the title section. They could suppress the actual
page header on the first page using the <printWhenExpression>, based on the PAGE_NUMBER
report variable.
As we have already seen in the 4.3 Report Properties paragraph, the title section could be followed by
a page break, if the attribute isTitleNewPage is set to "true" .
Page Header
This section appears at the top of each page in the generated document.
Column Header
This section appears at the top of each column in the generated document.
Detail
For each record in the data source, the engine will try to generate this section.
Column Footer
This section appears at the bottom of each column in the generated document. It never stretches
downward to acquire the content of its containing text fields and will always remain of declared fixed
height.
The JasperReports Ultimate Guide
Page 40
Page Footer
This section appears at the bottom of each page in the generated document. Just like the column footer
section above, the page footer never stretches downwards to acquire the content of its containing text
fields and will always remain of declared fixed height.
Summary
This section is generated only once per report and appears at the end of the generated document, but is
not necessarily the last section being generated.
That's because in some cases, the column footer or/and page footer of the last page can follow it.
As mentioned in the 4.3 Report Properties paragraph, the summary section can start a new page of its
own, by setting the isSummaryNewPage attribute to "true" . Even if this attribute remains false , the
summary section always starts a new page if it does not fit on the remaining space of the last page or if
the report has more than one column and on the last page it has already started a second column.
If the main report sections that we have seen here are not sufficient for what you need, maybe you
should consider introducing supplementary sections like group headers and group footers.
We are now going to see how to group data on the report.
Groups represent a flexible way to organize data on a report. A report group is represented by sequence
of consecutive records in the data source that have something in common, like the value of a certain
report field for example.
A report group has 3 components:
_ group expression;
_ group header section;
_ group footer section.
The value of the associated group expression is what makes group records stick tighter. This value is
the thing that they have in common. When the value of the group expression changes during the
iteration through the data source at report filling time, a group rupture occurs and the corresponding
group sections <groupFooter> and <groupHeader> are inserted in the resulting document.
We can have as many groups as we want on a report. The order of groups declared in a report design is
important because groups contain each other. One group contains the following group and so on. And
when a larger group encounters a rupture, all subsequent groups are reinitialized.
Data grouping works as expected only when the records in the data source are already
ordered accordingly to the group expressions used in the report.
For example, if you want to group some products by country and city of the manufacturer,
the engine expects to find the records in the data source already ordered by country and city.
If not, you should expect to find records belonging to a specific country or city in different
parts of the resulting document, because JasperReports does not sort the data source for you,
before using it.
The JasperReports Ultimate Guide
Page 41
XML Syntax
<!ELEMENT group (groupExpression?, groupHeader?, groupFooter?)>
<!ATTLIST group
name NMTOKEN #REQUIRED
isStartNewColumn (true | false) "false"
isStartNewPage (true | false) "false"
isResetPageNumber (true | false) "false"
isReprintHeaderOnEachPage (true | false) "false"
minHeightToStartNewPage NMTOKEN "0"
<!ELEMENT groupExpression (#PCDATA)>
<!ELEMENT groupHeader (band?)>
<!ELEMENT groupFooter (band?)>
The name unequivocally identifies the group and can be used in other XML attributes, when you want
to refer a particular report group. The name of a group is mandatory and obeys the same naming
convention that we mentioned for the report parameters, fields and report variables.
Starting New Page/Column When Group Breaks
Sometimes is useful to introduce a page or column break when a new group starts, probably because
that particular group is more important and should start on a page or column of its own.
To instruct the engine to start a new page or column for a certain group, instead of going to print it on
the remaining space at the bottom of the page or column, you have to set to "true" either the
isStartNewPage or isStartNewColumn attribute.
Those two attributes are the only settings in the entire library that let you voluntary
introduce page breaks. In all other situation, the reporting engine introduces page breaks
automatically, if it needs to.
However, in some report designs, you probably want to introduce page breaks on purpose,
because some particular report section of yours is larger than one page. You can achieve that
by introducing special dummy groups as you can see in the Tips & Tricks section of the
freely available documentation, published on the JasperReports site .
However, if you don't want to consistently introduce page or column breaks for a particular group, but
you rather do that only if the remaining space at the bottom of the page or column is too small, you
should consider using the minHeightToStartNewPage attribute.
This attribute specifies the minimum amount of remaining vertical space required so that the group
does not start a new page of its own. It is measured in pixels.
Resetting Page Number
If required, report groups have the power to reset the built-in report variable which contains the current
page number (variable PAGE_NUMBER ). This could be achieved by setting the isResetPageNumber
attribute to "true" .
The JasperReports Ultimate Guide
Page 42
This section is the one that marks the start of a new group in the resulting document, and it is inserted
in the document every time the value of the group expression changes during the iteration through the
data source.
Every time a report group changes, the engine adds the corresponding group footer section before
starting the new group or when the report ends.
Check the provided samples like jasper , datasource or query , to see how report groups can be used.
The JasperReports Ultimate Guide
Page 43
All the data displayed on a report comes from the report parameters and from the report fields. This
data can be processed using the report variables and their expressions.
There are specific moments in time when variable processing occurs. Some variables are initialized
according to their reset type when the report starts, or when a page or column break
is encountered, or
when a group changes. Furthermore, variables are evaluated every time new data is fetched from the
data source (for every row).
But only simple variable expressions cannot always implement complex functionality. This is where
scriptlets intervene. Scriptlets are sequences of Java code that are executed every time a report event
occurs. Through scriptlets, users have the possibility to affect the values stored by the report variables.
Since scriptlets work mainly with report variables, is important to h
have full control over the exact
moment the scriptlet is executed.
JasperReports allows the execution of custom Java code BEFORE or AFTER it initializes the report
variables according to their reset type: Report , Page , Column or Group .
In order to make use of this functionality, users only have to create a scriptlet class by extending one of
the following two classes:
dori.jasper.engine.JRAbstractScriptlet
dori.jasper.engine.JRDefaultScriptlet
The complete name of this custom scriptlet class (including the package) has to be specified in the
scriptletClass attribute of the <jasperReport> element and has to be available in the classpath,
at report filling time, so that the engine could instantiate it on the fly. If no value is specified for the
scriptletClass attribute, the engine will instantiate the JRDefaultScriptlet class.
When creating a JasperReports scriptlet class, there are several methods that developers should
implement or override, like: beforeReportInit() , afterReportInit() , beforePageInit() ,
afterPageInit() , beforeGroupInit() , afterGroupInit() , etc. Those methods will be called
by the report engine at the appropriate time, when filling the report.
For more complex reports, if you need to use very complicate report expressions, for grouping or
displaying data, maybe you should consider transferring this complexity to a separate class to which
you then make calls from simplified report expressions. The scriptlet class is perfect for transferring
this complexity to. This is because the reporting engine supplies you with a reference to the scriptlet
object it creates on the fly using the REPORT_SCRIPTLET built-in parameter.
Check the scriptlet sample to see this type of functionality used.
The JasperReports Ultimate Guide
Page 44
The generated reports would be empty if you would not put some report elements in the report design.
The report elements are displayable objects like static texts, text fields, images, lines or rectangles, that
you put in your report design sections so that they appear in the final document.
As you can see, the report elements come in two flavors:
_ Text elements : static texts and text fields that display dynamic content;
_ Graphic elements : lines, rectangles and images.
We shall see those two element categories and their particularities in the following sections. For now
we are going to present in detail the element properties that both categories share.
When you add a report element to one of your report sections, you have to specify the relative position
of this element in that particular section and its size, along with other general report element properties
like color, transparency, stretch behavior, etc.
The properties that are common to all types of report elements are grouped in the <reportElement>
tag that can appear in the declaration of all report elements.
XML Syntax
<!ELEMENT reportElement (printWhenExpression?)>
<!ATTLIST reportElement
positionType (Float | FixRelativeToTop | FixRelativeToBottom)
"FixRelativeToTop"
isPrintRepeatedValues (true | false) "true"
mode (Opaque | Transparent) #IMPLIED
x NMTOKEN #REQUIRED
y NMTOKEN #REQUIRED
width NMTOKEN #REQUIRED
height NMTOKEN #REQUIRED
isRemoveLineWhenBlank (true | false) "false"
isPrintInFirstWholeBand (true | false) "false"
isPrintWhenDetailOverflows (true | false) "false"
printWhenGroupChanges CDATA #IMPLIED
forecolor CDATA #IMPLIED
backcolor CDATA #IMPLIED
<!ELEMENT printWhenExpression (#PCDATA)>
The x and y attributes of any report element are mandatory and represent x and y coordinates,
measured in pixels, that mark the absolute position of the top-left corner of the specified element within
its parent report section.
Some report elements such as the text fields have special properties that allow them to stretch
downwards in order to acquire all the information they have to display. Their height is calculated at
runtime and may affect the other neighboring elements present in the same report section, especially
those placed immediately below them.
The positionType attribute specifies the behavior that the report element should have if the layout of
the report section in which it is been place is affected by stretch.
The JasperReports Ultimate Guide
Page 45
There are 3 possible values for the positionType attribute:
_ Floating position : The element will float in its parent section if it is pushed downwards by other
elements fount above it. It will try to conserve the distance between it and the neighboring
elements placed immediately above ( positionType="Float" ).
_ Fixed position relative to the top of the parent band : The current report element will simply ignore
what happens to the other section elements and tries to conserve the y offset measured from the top
of its parent report section ( positionType="FixRelativeToTop" ).
_ Fixed position relative to the bottom of the parent band : If the height of the parent report section is
affected by elements that stretch, the current element will try to conserve the original distance
between its bottom margin and the bottom of the band
( positionType="FixRelativeToBottom" ).
A report element called e2 will float when another report element called e1 stretches, only
if these three conditions are met:
_ e2 has postitionType="Float"
_ e1.y + e1.height < e2.y
_ e1.width + e2.width >= max(e1.x + e1.width, e2.x + e2.width) –
min(e1.x, e2.x)
The second and the third conditions together say that the element e2 must be placed below
the e1 .
By default, all elements have a fixed position relative to the top of the band.
To see how element stretching and element floating work together, check the stretch sample provided.
The width and height attributes are mandatory and represent the size of the report element measured
in pixels. Additional element settings that have to do with the element stretching mechanism will
determine the reporting engine to sometimes ignore the specified element height. But this attribute
remains mandatory since even when the height is calculated dynamically, the element will not be
smaller than the original specified height.
There are two attributes that represent colors: forecolor and backcolor . The fore color is the one
used to draw the text of the text elements and the border of the graphic elements. The back color is the
one used to fill the background of the specified report element, if it is not transparent.
You could specify colors using the decimal or hexadecimal representation of the integer number
corresponding to the desired color. The preferred way to specify colors in XML is using the
hexadecimal representation, because it allows controlling the level for each base color of the RGB
system.
For example, you can display some text in red if you set the forecolor attribute of the corresponding
text field like this:
forecolor="#FF0000"
The equivalent using the decimal representation would be:
forecolor="16711680"
but the inconvenience is evident.
The JasperReports Ultimate Guide
Page 46
The default fore color is black and the default back color is white.
Element Transparency
Report elements can be either transparent or opaque, depending on the value you specify for the
attribute mode .
The default value for this attribute depends on the type of the report element. Graphic elements like
rectangles and lines are opaque by default, but the images are transparent. Both static texts and text
fields are transparent by default, and so are the subreport elements.
Skipping Element Display
The engine can decide at runtime if it really should display a report element, if you use the
<printWhenExpression> that is available for all types of report elements.
If present, this report expression should return a java.lang.Boolean object or null and is evaluated
every time the section containing the current element is being generated, to see if this particular
element should appear or not in the report.
If the expression returns null , it is equivalent to returning java.lang.Boolean.FALSE and if the
expression is missing, the report element will get printed every time, that is if other setting do not
intervene, as we shall see below.
Reprinting Elements on Section Overflows
When generating a report section, the engine might be forced to start a new page or column, because
the remaining space at the bottom of the current page or column was not sufficient for all the section
elements to fit in, probably because some elements have stretched.
In such cases, you might want to reprint some of your already displayed elements, on the new page or
column, to recreate the context in which the page/column break occurred.
To achieve this, you have to set isPrintWhenDetailOverflows="true" for all those report
elements you want to reappear on the next page or column.
Suppressing Repeating Values Display
First, let's see what exactly a "repeating value" is.
It very much depends on the type of the report element we are talking about.
For text field elements, this is very intuitive. In the following list containing person names taken from
an usual phone book, you can see that for some consecutive lines, the value of the "Family Name"
column repeats itself (those are only dummy phone numbers _ ).
Family Name First Name Phone
Johnson Adam 256.12.35
Johnson Christine 589.54.52
Johnson Peter 546.85.95
Johnson Richard 125.49.56
Smith John 469.85.45
Smith Laura 459.86.54
Smith Denise 884.51.25
You might want to suppress the repeating "Family Name" values and print something like this:
The JasperReports Ultimate Guide
Page 47
Family Name First Name Phone
Johnson Adam 256.12.35
Christine 589.54.52
Peter 546.85.95
Richard 125.49.56
Smith John 469.85.45
Laura 459.86.54
Denise 884.51.25
You can do that, if for the text field that displays the family name, you set:
isPrintRepeatedValues="false"
The static text elements behave in the same way. As you would expect, their value always repeats and
in fact it never changes, until the end of the report. This is why we call them static texts. So, if you set
isPrintRepeatedValues="false" for one of your <staticText> elements, you should expect to
see it displayed only once, the first time, at the beginning of the report, and never again.
Now, what about graphic elements?
An image is considered to be repeating itself if its bytes are exactly the same from one occurrence to
the next. This could only happen if you choose to cache your images using the isUsingCache
attribute available in the <image> element and if the corresponding <imageExpression> returns the
same value from one iteration to the next (the same file name, the same URL, etc).
Lines and rectangles are always repeating themselves, because they are static elements, just like the
static texts we have seen above. So, when deciding to not display repeating values for a line or a
rectangle, you should expect to see it displayed only once, at the beginning of the report and then
ignored until the end of the report.
The isPrintRepeatedValues attribute works only if the corresponding
<printWhenExpression> is missing. If this is not missing, it will always dictate if the
element should be printed or not, regardless of the repeating values.
If you decide to not display the repeating values for some of your report elements, you have the
possibility to soften or refine this behavior, by indicating the exceptional occasions to which you might
want to have a particular value redisplayed, during the report generation process.
When the repeating value spans on multiple pages or columns, you have the possibility to redisplay this
repeating value at least once for every page or column.
By setting isPrintInFirstWholeBand="true" , you make sure that the report element will
reappear in the first band of a new page or column that is not an overflow from a previous page or
column.
Also, if the repeating value you have suppressed spans on multiple groups, you have the possibility to
make it reappearing at the beginning of a certain report group, is you specify the name of that particular
group in the printWhenGroupChanges attribute.
Removing Blank Space
When report elements are not displayed for some reason: <printWhenExpression> evaluated to
Boolean.FALSE , or repeated value being suppressed, a blank space remains where that report element
would have stood.
This blank space also appears if a text field displays only blank characters or an empty text.
There is a way to eliminate this unwanted blank space, on the vertical axis, only if some conditions are
met.
The JasperReports Ultimate Guide
Page 48
For example, if you have three successive text fields, one on top of the other like this:
TextField1
TextField2
TextField3
If the second one has an empty string as its value, or contains a repeated value that you chose to
suppress, the output would look like this:
TextField1
TextField3
In order to eliminate the gap between the first text field and the third, you have to set
isRemoveLineWhenBlank="true" for your second text field. You would obtain something like this:
TextField1
TextField3
But there are certain conditions that have to be met in order for this functionality to work. The blank
space will not be removed, if your second text field shares some vertical space with other report
elements that are printed even this second text fields of your does not print.
For example, you might have some vertical lines on the sides of your report section like this:
| TextField1 |
| |
| TextField3 |
or you might have a rectangle that draws a box around your text fields:
------------------
| TextField1 |
| |
| TextField3 |
------------------
or even other text elements that are placed on the same horizontal with your second text field:
Label1 TextField1
Label2
Label3 TextField3
In all those situations, the blank space between the first and the third text field cannot be remove,
because it is being used by other report elements that are printed as you can see.
The blank vertical space between elements can be removed using the isRemoveWhenBlank
attribute, only if it is not used by other elements, as explained above.
There are two kinds of text elements in JasperReports: static texts and text fields.
As their names suggest it, the first are text elements with a fixed, static content, who does not change
during the report filling process and are used especially for introducing labels on the final document.
Text fields however, have an associated expression, which is evaluated at runtime to produce the text
content that will be displayed.
Both types of text elements share some properties and those are introduced using a <textElement>
element. We are now going to see them in detail.
The JasperReports Ultimate Guide
Page 49
XML Syntax
<!ELEMENT textElement (font?)>
<!ATTLIST textElement
textAlignment (Left | Center | Right | Justified) "Left"
lineSpacing (Single | 1_1_2 | Double) "Single"
Text Alignment
You can specify how the content of a text element should be aligned using the textAlignment
attribute and choosing one of the 4 possible values: "Left" , "Center" , "Right" or "Justified".
Text Line Spacing
The amount of space between consecutive lines of text can be set using the lineSpacing attribute:
_ Single : The paragraph text advances normally using an offset equal to the text line height
( lineSpacing="Single" ).
_ 1.5 Lines : The offset between two consecutive text lines is of 1 ½ lines
( lineSpacing="1_1_2" ).
_ Double : The space between text lines is double the height of a single text line
( lineSpacing="Double" ).
The font settings for the text elements are also part of the <textElement> tag, but we are going to see
them in detail, in the following separate section of this book.
8.1.1 Fonts and Unicode Support
Each text element present on your report can have its own font settings. Those settings can be specified
using the <font> tag available in the <textElement> tag.
Since most of the time, in a report design, there are only a few types of fonts used, that are shared by
different text elements, there's no point forcing XML report design creators to specify the same font
settings for each text element, over and over again. But rather they could reference a report level font
declaration and adjust only some of the font settings, on the spot, if a particular text element requires it.
Report Fonts
A report font is in fact a collection of font settings declared at report level that can be reused
throughout the entire report design, when setting the font properties of text elements.
The JasperReports Ultimate Guide
Page 50
XML Syntax
<!ELEMENT reportFont EMPTY>
<!ATTLIST reportFont
name NMTOKEN #REQUIRED
isDefault (true | false) "false"
fontName CDATA "sansserif"
size NMTOKEN "10"
isBold (true | false) "false"
isItalic (true | false) "false"
isUnderline (true | false) "false"
isStrikeThrough (true | false) "false"
pdfFontName CDATA "Helvetica"
pdfEncoding CDATA "CP1252"
isPdfEmbedded (true | false) "false"
Report Font Name
The name attribute of a <reportFont> element is mandatory and must be unique, because it will be
used when referencing the corresponding report font throughout the report.
Default Report Font
You can use isDefault="true" for one of your report font declarations, to mark the report font that
you want to be used by the reporting engine as the default base font, when dealing with text elements
that do not reference a particular report font. This default font will also be used by the text elements
that do not have any font settings at all.
All the other report font properties are the same as those for a normal <font> element that we are
going to see below.
XML Syntax
<!ELEMENT font EMPTY>
<!ATTLIST font
reportFont NMTOKEN #IMPLIED
fontName CDATA #IMPLIED
size NMTOKEN #IMPLIED
isBold (true | false) #IMPLIED
isItalic (true | false) #IMPLIED
isUnderline (true | false) #IMPLIED
isStrikeThrough (true | false) #IMPLIED
pdfFontName CDATA #IMPLIED
pdfEncoding CDATA #IMPLIED
isPdfEmbedded (true | false) #IMPLIED
Referencing a Report Font
When introducing the font settings for a text element of your report, you have the possibility to use a
report font declaration as a base, for those font settings you want to obtain.
All the attributes of the <font> element, if present, are used only to override the attributes with the
same name that are present in the report font declaration referenced using the reportFont attribute.
The JasperReports Ultimate Guide
Page 51
For example, if we have a report font like the following:
<reportFont
name="Arial_Normal"
isDefault="true"
fontName="Arial"
size="8"
pdfFontName="Helvetica"
pdfEncoding="Cp1252"
isPdfEmbedded="false"/>
and we want to create a text field that has basically the same font settings like those in this report font,
but only a greater size, the only thing we should do is to reference this report font using the
reportFont attribute and specify the desired font size like this:
<textElement>
<font reportFont="Arial_Normal" size="14"/>
</textElement>
When the reportFont attribute is missing, the default report font is used as base font.
Font Name
In Java, there are two types of fonts: physical fonts and logical fonts. Physical fonts are the actual font
libraries consisting of, for example, TrueType or PostScript Type 1 fonts. The physical fonts may be
Arial, Time, Helvetica, Courier, or any number of other fonts, including international fonts.
Logical fonts are the five font types that have been recognized by the Java platform since version 1.0:
Serif, Sans-serif, Monospaced, Dialog, and DialogInput. These logical fonts are not actual font libraries
that are installed anywhere on your system. They are merely font-type names recognized by the Java
runtime, which must be mapped to some physical font that is installed on your system.
In the fontName attribute of the <font> element or the <reportFont> element, you have to specify
the name of a physical font or the name of a logical font. You only have to make sure the font you
specify really exists and is available on your system.
For more details about fonts in Java, check the Java Tutorial or the JDK documentation.
Font Size
The font size is measured in points and can be specified using the size attribute.
Font Styles and Decorations
There are 4 boolean attributes available in the <font> and <reportFont> elements that control the
font style and/or decoration. Those are isBold , isItalic , isUnderline and isStrikeThrough
and their significance should be evident to anybody.
PDF Font Name
When exporting reports to PDF format, the JasperReports library uses the iText library.
As their name states it (Portable Document Format) the PDF files can be viewed on various platforms
and you can be sure they will always look the same. This is partially because in this format there is a
special way of dealing with fonts.
The JasperReports Ultimate Guide
Page 52
If you want to design your reports so that they eventually be exported to PDF, you have to make sure
you choose the appropriate PDF font settings that correspond to the Java font settings of your text
elements.
The iText library knows how to deal with built-in fonts and TTF files. It recognizes the following builtin
font names:
Courier
Courier-Bold
Courier-BoldOblique
Courier-Oblique
Helvetica
Helvetica-Bold
Helvetica-BoldOblique
Helvetica-Oblique
Symbol
Times-Roman
Times-Bold
Times-BoldItalic
Times-Italic
ZapfDingbats
The iText library requires us to specify either a built-in font name from the above list, either the name
of a TTF file that it can locate on disk, every time we work with fonts. The font name introduced by the
fontName attribute previously explained is of no use when exporting to PDF. This is why we have
special font attributes, so that we are able to specify the font settings that the iText library expects from
us.
The pdfFontName attribute can contain the name of a PDF built-in font from the above list or the
name of a TTF file that can be located on disk at runtime, when exporting to PDF.
It is for the report design creator to choose the right value for the pdfFontName attribute
that would perfectly corresponds to the Java physical or logical font specified using the
fontName attribute. If those two fonts, one used by the Java viewers and printers and the
other used in the PDF format, do not represent in fact the same font, or do not at least look
alike, you might get unexpected results when exporting to PDF format.
Additional PDF fonts can be installed on your system if you choose one of the Acrobat Reader's font
packs. For example, by installing the Asian font pack from Adobe on your system, you would be able
to use for the pdfFontName attribute font names like:
Language PDF Font Name
Simplified Chinese STSong-Light
Traditional Chinese MHei-Medium
MSung-Light
Japanese HeiseiKakuGo-W5
HeiseiMin-W3
Korean HYGoThic-Medium
HYSMyeongJo-Medium
For more details about how to work with fonts when generating PDF documents, check the iText
library documentation.
PDF Encoding
When creating reports in different languages and wanting to export them to PDF, you have to make
sure that you choose the appropriate character encoding type.
For example, an encoding type widely used in Europe is Cp1252 , also known as LATIN1 . Other
possible encoding types are:
The JasperReports Ultimate Guide
Page 53
Character Set Encoding
Latin 2: Eastern Europe Cp1250
Cyrillic Cp1251
Greek Cp1253
Turkish Cp1254
Windows Baltic Cp1257
Simplified Chinese UniGB-UCS2-H
UniGB-UCS2-V
Traditional Chinese UniCNS-UCS2-H
UniCNS-UCS2-V
Japanese UniJIS-UCS2-H
UniJIS-UCS2-V
UniJIS-UCS2-HW-H
UniJIS-UCS2-HW-V
Korean UniKS-UCS2-H
UniKS-UCS2-V
You can find more details about how to work with fonts and character encoding when generating PDF
documents, here, in the iText library documentation .
PDF Embedded Fonts
If you want to use a TTF file when exporting your reports to PDF format and you want to make sure
everybody will be able to view it without problem, you have to make sure that at least one of the
following conditions are met:
_ they all have that TTF font installed on their systems;
_ you embed the font in the PDF document itself.
Its not easy to comply with the first condition and this is why the preferred way to do it is to embed the
TTF in the generated PDF documents that you are distributing.
You can do that by setting the isPdfEmbedded attribute to "true" .
Further details about how to embed fonts in the PDF documents you can find in the iText
documentation. A very useful example you can find in the unicode sample provided with the project.
8.1.2 Static Texts
Static texts are text elements with fixed content, which does not change during the report filling
process. They are used mostly to introduce static text label in the generated documents.
XML Syntax
<!ELEMENT staticText (reportElement, textElement?, text?)>
<!ELEMENT text (#PCDATA)>
As you can see from the above presented syntax, besides element general properties and text specific
properties that we have already explained, a static text definition has in addition only the <text> tag,
which introduces the fixed text content of the static text element.
8.1.3 Text Fields
Unlike static text elements, which do not change their text content, text fields have an associated
expression that is evaluated with every iteration in the data source, in order to obtain the text content
that has to be displayed.
The JasperReports Ultimate Guide
Page 54
XML Syntax
<!ELEMENT textField (reportElement, textElement?, textFieldExpression?,
anchorNameExpression?, hyperlinkReferenceExpression?,
hyperlinkAnchorExpression?, hyperlinkPageExpression?)>
<!ATTLIST textField
isStretchWithOverflow (true | false) "false"
evaluationTime (Now | Report | Page | Column | Group) "Now"
evaluationGroup CDATA #IMPLIED
pattern CDATA #IMPLIED
isBlankWhenNull (true | false) "false"
hyperlinkType (None | Reference | LocalAnchor | LocalPage |
RemoteAnchor | RemotePage) "None"
<!ELEMENT textFieldExpression (#PCDATA)>
<!ATTLIST textFieldExpression
class (java.lang.Boolean | java.lang.Byte | java.util.Date |
java.sql.Timestamp | java.lang.Double | java.lang.Float | java.lang.Integer
| java.lang.Long | java.lang.Short | java.math.BigDecimal |
java.lang.String) "java.lang.String"
Variable Height Text Fields
Given the fact that text fields have a dynamic content, most of the time you wont be able to exactly
anticipate the amount of space you have to provide for your text fields so that they can display all their
content.
If the space you reserve for your text fields is not sufficient, the text content will be truncated so that it
fits in the available area.
This scenario is not always acceptable and you can let the reporting engine to calculate itself at runtime
the amount of space required to display the entire content of the text field and automatically adjust the
size of the report element.
You can achieve this by setting the isStretchWithOverflow to "true" for the particular text field
elements you are interested in. By doing this, you make sure that if the specified height for the text
field is not sufficient, it will automatically be increased (never decreased) in order to be able to display
the entire text content.
When text fields are affected by this stretch mechanism, the entire report section to which they belong
to will be also stretched.
Evaluating Text Fields
Normally, all the report expressions are evaluated immediately, using the current values of all the
parameters, fields and variables at that particular moment. It is like making a photo of all data, for
every iteration in the data source, during the report filling process.
This means that at any particular time, you won't have access to values that are going to be calculated
later, in the report filling process. It perfectly makes sense, since all the variables are calculated step by
step and reach their final value only when the iteration arrives at the end of the data source range they
cover.
For example, a report variable that calculates the sum of a field for each page will not contain the
expected sum until the end of the page is reached. That's because the sum is calculated step by step,
The JasperReports Ultimate Guide
Page 55
when iterating through the data source records, and at any particular time, the sum will be only partial,
since not all the records of the specified range have been processed.
If this is the case, how to display the page sum of a this field, on the page header, since this value will
be known only when the end of the page is reached. At the beginning of the page, when generating the
page header, our sum variable would contain zero, or its initial value.
Fortunately, JasperReports has a very interesting feature that lets you decide the exact moment you
want the text field expression to be evaluated, avoiding the default behavior which makes this
expression be evaluated immediately, when generating the current report section.
It is the evaluationTime attribute we are talking about. It can have one of the following values:
_ Immediate evaluation : The text field expression is evaluated when filling the current band
( evaluationTime="Now" ).
_ End of report evaluation : The text field expression is evaluated when reaching the end of the
report ( evaluationTime="Report" ).
_ End of page evaluation : The text field expression is evaluated when reaching the end of the current
page ( evaluationTime="Page" ).
_ End of column evaluation : The text field expression is evaluated when reaching the end of the
current column ( evaluationTime="Column" ).
_ End of group evaluation : The text field expression is evaluated when the group specified by the
evaluationGroup attribute changes ( evaluationTime="Group" ).
The default value for this attribute is "Now", as already mentioned. In the example presented above,
you could easily specify evaluationTime="Page" for the text field placed in the page header
section, so that it displays the value of the sum variable only when reaching the end of the current page.
The only restriction you should be aware of, when deciding to avoid the immediate
evaluation of the text field expression, is that in such cases, the text field will never stretch
in order to acquire all its content.
This is because the text element height is calculated when the report section is generated and
even the engine will come back later with the text content of the text field, the element
height will not be adapted, because it will ruin the already created layout.
Suppressing Null Values Display
If the text field expression returns null , your text field will display the "null" text in the generated
document. A simple way to avoid this is to set the isBlankWhenNull attribute to "true" . By doing
this, the text field will cease to display "null" and will display an empty string. This way nothing will
appear on your document if the text field value is null .
Formatting Output
Of course, when dealing with numeric or date/time values, you could use the Java API to format the
output of the text field expressions yourself. But there is a more convenient way to do it: by using the
pattern attribute available in the <textField> element.
The value you should supply to this attribute is the same that you would supply if it were for you to
format the value using either the java.text.DecimalFormat class or
java.text.SimpleDateFormat class, depending on the type of value to format.
In fact, what the engine does is to instantiate the java.text.DecimalFormat class if the text field
expression returns subclasses of the java.lang.Number class or to instantiate the
java.text.SimpleDataFormat if the text field expression return java.util.Date or
java.sql.Timestamp objects.
For more detail about the syntax of this pattern attribute, check the Java API documentation for those
two classes: java.text.DecimalFormat and java.text.SimpleDateFormat .
The JasperReports Ultimate Guide
Page 56
Text Field Expression
We have already talked about the text field expression. There is nothing more to say about it except
that it is introduced by the <textFieldExpression> element and can return values from only a
limited range of classes listed below:
java.lang.Boolean
java.lang.Byte
java.util.Date
java.sql.Timestamp
java.lang.Double
java.lang.Float
java.lang.Integer
java.lang.Long
java.lang.Short
java.math.BigDecimal
java.lang.String
If the text field expression class is not specified using the class attribute, it is assumed to be
java.lang.String , by default.
The second major category of report elements, besides text elements that we have seen, are the graphic
elements. In this category we have lines, rectangles and images.
They all have some properties in common and those are grouped under the attributes of the
<graphicElement> tag.
XML Syntax
<!ELEMENT graphicElement EMPTY>
<!ATTLIST graphicElement
stretchType (NoStretch | RelativeToTallestObject |
RelativeToBandHeight) "NoStretch"
pen (None | Thin | 1Point | 2Point | 4Point | Dotted) #IMPLIED
fill (Solid) "Solid"
Stretch Behavior
The stretchType attribute of a graphic element can be used to customize the stretch behavior of the
element when on the same report section there are text fields that stretch themselves because their text
content is too large to fit in the original text field height.
When stretchable text fields are present on a report section, the height of the report section itself will be
affected be stretch.
A graphic element can respond to the modification of the report section layout in three ways:
_ Won't stretch : The graphic element preserves its original specified height
( strechType="NoStretch" ).
_ Stretching relative to the parent band height : The graphic element will adapt its height to match
the new height of the report section it placed on, which has been affected by stretch
( stretchType="RelativeToBandHeight" ).
_ Stretching relative to the tallest element in group : You have the possibility to group the elements
of a report section in multiple imbricate groups, if you like. The only reason you might have for
grouping your report elements is to be able to customize their stretch behavior. Details about how
to group elements are supplied in the section 8.4 Element Groups that will follow. Graphic
The JasperReports Ultimate Guide
Page 57
elements can be made to automatically adapt their height to fit the amount of stretch suffered by
the tallest element in the group that they are part of
( stretchType="RelativeToTallestObject" ).
Border Thickness
Unlike text elements, the graphic elements always have a border. You can control the type and
thickness of it using the pen attribute. Remember that the color of the border comes from the
forecolor attribute presented when describing the <reportElement> tag, in a previous chapter.
Here are all the possible types for a graphic element border:
_ No border : The graphic element will not display any border around it ( pen="None" ).
_ Thin border : The border around the graphic element will be half a point thick ( pen="Thin" ).
_ 1 point thick border : Normal border ( pen="1Point" ).
_ 2 points thick border : Thick border ( pen="2Point" ).
_ 4 point thick border : ( pen="4Point" ).
_ Dotted border : The border will be 1 point thick and made of dots ( pen="Dotted" ).
The default border around graphic elements depends on their type. Lines and rectangles have a normal
1 point thick border by default. Images however, do not display any border, by default.
Background Fill Style
The fill attribute specifies the style of the background for the graphic elements, but the only style
supported for the moment is the solid fill style, which is also the default ( fill="Solid" ).
8.2.1 Lines
When displaying a line element, JasperReports draws one of the two diagonals of the rectangle
represented by the x , y , width and height attributes specified for this particular line element.
XML Syntax
<!ELEMENT line (reportElement, graphicElement?)>
<!ATTLIST line
direction (TopDown | BottomUp) "TopDown"
Line Direction
Which one of the two diagonals of the rectangle should be drawn can be decided using the direction
attribute:
_ The diagonal that starts in the top-left corner of the rectangle and goes to the bottom left corner is
drawn in case you set direction="TopDown" .
_ The line will start in the bottom-left corner and will go to the upper-right if you choose
direction="BottomUp" .
You can draw vertical lines by specifying width="0" and horizontal lines setting height="0" . For
such lines the direction is not important.
The default direction for a line is "TopDown" .
The JasperReports Ultimate Guide
Page 58
8.2.2 Rectangles
The rectangles are the most basic graphic elements. This is why there are no supplementary settings to
make for the declaration of a rectangle element, besides those already seen when talking about the
<reportElement> and <graphicElement> tags.
XML Syntax
<!ELEMENT rectangle (reportElement, graphicElement?)>
For more detailed examples of lines and rectangles, check the shapes sample.
8.2.3 Images
The most complex graphic elements that you can have on a report are the images.
Just like for the text field elements, their content is dynamically evaluated at runtime, using a report
expression.
XML Syntax
<!ELEMENT image (reportElement, graphicElement?, imageExpression?,
anchorNameExpression?, hyperlinkReferenceExpression?,
hyperlinkAnchorExpression?, hyperlinkPageExpression?)>
<!ATTLIST image
scaleImage (Clip | FillFrame | RetainShape) "RetainShape"
isUsingCache (true | false) "true"
evaluationTime (Now | Report | Page | Column | Group) "Now"
evaluationGroup CDATA #IMPLIED
hyperlinkType (None | Reference | LocalAnchor | LocalPage |
RemoteAnchor | RemotePage) "None"
<!ELEMENT imageExpression (#PCDATA)>
<!ATTLIST imageExpression
class (java.lang.String | java.io.File | java.net.URL |
java.io.InputStream | java.awt.Image) "java.lang.String"
Scaling Images
Given the fact that images are loaded at runtime, there is no way knowing their exact size, when
creating the report design. It might be that the dimensions of the image element specified at design time
do not correspond to the actual image loaded at runtime.
This is why you have to decide how you expect the image to behave in order to adapt to the original
image element dimensions you specified in the report design. There is the scaleImage attribute that
allows you to do that, by choosing one of its 3 possible values:
_ Clipping the image : If the actual image is larger than the image element size, it will be cut off so
that it keeps its original resolution, and only the region that fits the specified size will be displayed
( scaleImage="Clip" ).
The JasperReports Ultimate Guide
Page 59
_ Forcing the image size : If the dimensions of the actual image do not fit those specified for the
image element that displays it, the image can be forced to obey them and stretch itself so that it fits
in the designated output area. It will be deformed if necessary ( scaleImage="FillFrame" ).
_ Keeping image proportions : If the actual image does not fit into the image element, it can be
adapted to those dimensions without needing to deform it and keep its original proportions
( scaleImage="RetainShape" ).
Retain Shape
Clip
Fill Frame
- figure 7 -
Caching Images
All image elements have dynamic content. There are no special elements to introduce static images on
the reports, like we have special static text elements.
However, most of the time, the images on a report are in fact static and do not necessarily come from
the data source or from parameters. In the majority of cases, they are loaded from files on disk and
represent logos and other static resources.
If we have to display the same image multiple times on a report, if it is about a logo appearing on the
page header for example, there is no point on loading the image file every time we have to display it.
We can instruct the reporting engine to cache this particular image. This way we are making sure that
the image will be loaded from disk or from its particular location only once and then it will only be
reused every time it has to be displayed.
By setting the isUsingCache attribute to "true" , the reporting engine will try to recognize
previously loaded images using their specified source. For example, it will recognize an image if the
image source is a file name that it has already loaded, or if it is the same URL.
This caching functionality is available only for image elements that have expressions returning
java.lang.String objects as the image source, representing file names, URLs or classpath
resources. That's because the engine uses the image source string as the key to recognize that it is the
same image that it has already cached.
Evaluating Images
As we have already seen when talking about text fields, you have the possibility to postpone the
evaluation of the image expression, which by default is performed immediately.
This would allow you to display in some region of a document, images that are going to be built or
chose only later in the report filling process, due to complex algorithms or whatever.
The same attributes, evaluationTime and evaluationGroup, that we have talked about in the text
fields section are available also in the <image> element. The evaluationTime attribute can have the
following values:
_ Immediate evaluation : The image expression is evaluated when filling the current band
( evaluationTime="Now" ).
_ End of report evaluation : The image expression is evaluated when reaching the end of the report
( evaluationTime="Report" ).
_ End of page evaluation : The image expression is evaluated when reaching the end of the current
page ( evaluationTime="Page" ).
The JasperReports Ultimate Guide
Page 60
_ End of column evaluation : The image expression is evaluated when reaching the end of the current
column ( evaluationTime="Column" ).
_ End of group evaluation : The image expression is evaluated when the group specified by the
evaluationGroup attribute changes ( evaluationTime="Group" ).
The default value for this attribute is "Now" .
Image Expression
The value returned by the image expression is used as the source for the image that is going to be
displayed. The image expression is introduced by the <imageExpression> element and can return
values from only a limited range of classes listed below:
java.lang.String
java.io.File
java.net.URL
java.io.InputStream
java.awt.Image
When the image expression returns a java.lang.String value, the engine will try to see
whether the value represents an URL from which to load the image. If it is not a valid URL
representation, it will try to locate a file on disk and load the image from it, assuming that
the value represents a file name. If no file is found, it will finally assume that the string
value represents the location of a classpath resource and will try to load the image from
there. Only if all those fail, an exception will be thrown.
If the image expression class is not specified using the class attribute, it is assumed to be
java.lang.String , by default.
The images sample provided with the project contains several examples of image elements.
8.2.4 Charts and Graphics
The JasperReports library does not produce charts and graphics itself. This is not one of its goals.
However, it can easily integrate charts and graphics produces by other, more specialized Java libraries.
The great majority of available Java libraries that produce charts and graphics can output to image files
or to in-memory Java image objects. This is why it shouldn't be hard for anybody to put a chart or a
graphic generated by one of those libraries into a JasperReports document using a normal image
element that we have presented in the previous section of this book.
You can see this working in the sample called chart , which comes with the project.
JasperReports allows you to create drill-down reports, to introduce tables of contents in your
documents or to redirect viewers to other external documents using special report elements called
hyperlinks.
Hyperlinks are special elements that contain a reference to a local destination within the current
document or to an external resource to which the viewer of the document will be redirected if he or she
clicks on that particular hyperlink element.
Hyperlinks are not the only actors in this viewer-redirecting scenario. There has to be a way for you to
specify what are the destinations in a document. These local destinations are called anchors.
The JasperReports Ultimate Guide
Page 61
There are no special report elements that introduce hyperlinks or anchors in a report design, but rather
some special setting that make an usual report element to be a hyperlink or/and an anchor.
In JasperReports, only text field elements and image elements can be hyperlinks or anchors. This is
because for both types of elements, there are special settings that allow you to specify the hyperlink
reference to which the hyperlink will point or the name of the local anchor. Note that a particular text
field or image can be both anchor and hyperlink at the same time.
XML Syntax
<!ELEMENT anchorNameExpression (#PCDATA)>
<!ELEMENT hyperlinkReferenceExpression (#PCDATA)>
<!ELEMENT hyperlinkAnchorExpression (#PCDATA)>
<!ELEMENT hyperlinkPageExpression (#PCDATA)>
Hyperlink Type
When presenting the XML syntax for text field elements and image elements, you probably saw that
there was an attribute called hyperlinkType, which we didn't explain at that moment. We are going
to do that right now and here are the possible values for this attribute along with their significance:
_ No hyperlink : By default, neither the text fields nor the images represent hyperlinks, even if the
special hyperlink expressions are present ( hyperlinkType="None" ).
_ External reference : The current hyperlink points to an external resource specified by the
corresponding <hyperlinkReferenceExpression> element, usually an URL
( hyperlinkType="Reference" ).
_ Local anchor : The current hyperlink points to a local anchor specified by the corresponding
<hyperlinkAnchorExpression> element ( hyperlinkType="LocalAnchor" ).
_ Local page : The current hyperlink points to a 1 based page index within the current document
specified by the corresponding <hyperlinkPageExpression> element
( hyperlinkType="LocalPage" ).
_ Remote anchor : The current hyperlink points to an anchor specified by the
<hyperlinkAnchorExpression> element, within an external document indicated by the
corresponding <hyperlinkReferenceExpression> element
( hyperlinkType="RemoteAnchor" ).
_ Remote page : The current hyperlink points to a 1 based page index specified by the
<hyperlinkPageExpression> element, within an external document indicated by the
corresponding <hyperlinkReferenceExpression> element
( hyperlinkType="RemotePage" ).
Anchor Expression
If present in a text field or image element declaration, the <anchorNameExpression> tag will
transform that particular text field or image into a local anchor of the resulting document, to which
hyperlinks can point. The anchor will bare the name returned after evaluating the anchor name
expression, which should always return java.lang.String values.
Hyperlink Expressions
Depending on the current hyperlink type, one or two of the following expressions will be evaluated and
used to build the reference to which the hyperlink element will point:
The JasperReports Ultimate Guide
Page 62
<hyperlinkReferenceExpression>
<hyperlinkAnchorExpression>
<hyperlinkPageExpression >
What is important to know is that the first two should always return java.lang.String and the third
should return java.lang.Integer values.
There is a special sample called hyperlink , provided with the projects, which shows how this type of
report elements can be used.
Report elements placed in any report section can be arranged in multiple imbricate groups. The only
reason you might have for grouping your elements is to be able to customize the stretch behavior of the
graphic elements, as explained in the section 8.2 Graphic Elements .
The stretchType attribute, available for graphic elements, has among its possible values one called
" RelativeToTallestObject ". When choosing this option, the engine will try to identify the object
from the same group with the current graphic element, which suffered the biggest amount of stretch. It
will then adapt the height of the current graphic element to the height of this tallest element of the
group.
But for this to work, you have to group your elements. This is done using the <elementGroup> and
</elementGroup> tags to mark the elements that are part of the same group.
XML Syntax
<!ELEMENT elementGroup (line | rectangle | image | staticText | textField |
subreport | elementGroup)*>
Element groups can contain other nested element groups and there is no limit on the number of the
nested element groups.
Check the stretch sample, to see how element grouping works.
The JasperReports Ultimate Guide
Page 63
Subreports are an import feature for a report-generating tool. They allow the creation of more complex
reports and simplify the design work. The subreports are very useful when creating master-detail type
of reports or when the structure of a single report is not sufficient to describe the complexity of the
desired output document.
A subreport is in fact a normal report that is been incorporated as apart of another report. You can
imbricate your subreports and make a subreport that contains itself other
subreports, the nesting level
not being limited.
On the other hand, a subreport is also a special kind of a report element that helps you introduce a
subreport into the parent report.
There's nothing more to say about subreports, seen as normal reports, because they are compiled and
filled just like normal reports are and we already have seen all that in previous chapters. In fact, any
report design can be used as a subreport when incorporated into another report design, without the need
to change anything inside it.
What we are going to see now, are the details concerning the <subreport> element that you use when
introducing subreports into master reports.
XML Syntax
<!ELEMENT subreport (reportElement, parametersMapExpression?,
subreportParameter*, (connectionExpression | dataSourceExpression)?,
subreportExpression?)>
<!ATTLIST subreport
isUsingCache (true | false) "true"
<!ELEMENT parametersMapExpression (#PCDATA)>
<!ELEMENT subreportParameter (subreportParameterExpression?)>
<!ATTLIST subreportParameter
name NMTOKEN #REQUIRED
<!ELEMENT subreportParameterExpression (#PCDATA)>
<!ELEMENT connectionExpression (#PCDATA)>
<!ELEMENT dataSourceExpression (#PCDATA)>
<!ELEMENT subreportExpression (#PCDATA)>
<!ATTLIST subreportExpression
class (java.lang.String | java.io.File | java.net.URL |
java.io.InputStream | dori.jasper.engine.JasperReport) "java.lang.String"
Subreport Expression
Just like normal report designs, subreport designs are in fact dori.jasper.engine.JasperReport
objects. Those are obtained after compiling a dori.jasper.engine.design.JasperDesign object
as seen in the 3.2 Compiling Report Designs section of this book.
The JasperReports Ultimate Guide
Page 64
We have seen that the text field elements have an expression that will be evaluated to obtain the text
content to display. The image elements have an expression representing the source of the image to
display. In the same way, subreport elements have an expression that is evaluated at runtime, in order
to obtain the source of the dori.jasper.engine.JasperReport object to load.
The so-called subreport expression is introduced by the <subreportExpression> element and can
return values from the following classes:
java.lang.String
java.io.File
java.net.URL
java.io.InputStream
dori.jasper.engine.JasperReport
When the subreport expression returns a java.lang.String value, the engine will try to
see whether the value represents an URL from which to load the subreport design object. If
it is not a valid URL representation, it will try to locate a file on disk and load the subreport
design from it, assuming that the value represents a file name. If no file is found, it will
finally assume that the string value represents the location of a classpath resource and will
try to load the subreport design from there. Only if all those fail, an exception will be
thrown.
If the image expression class is not specified using the class attribute, it is assumed to be
java.lang.String , by default.
Caching Subreports
A subreport element can load different subreport designs with every evaluation, giving you great
flexibility in shaping you documents.
However, most of the time, the subreport elements on a report are in fact static and their source do not
necessarily change with every new evaluation of the subreport expression. In the majority of cases, the
subreport designs are loaded from fixed locations: files on disk or static URLs.
If the same subreport design is filled multiple times on a report, there is no point on loading the
subreport design object from the source file every time we have to fill it with data.
We can instruct the reporting engine to cache this particular subreport design object. This way we are
making sure that the subreport design will be loaded from disk or from its particular location only once
and then it will only be reused every time it has to be filled.
By setting the isUsingCache attribute to "true" , the reporting engine will try to recognize
previously loaded subreport design objects, using their specified source. For example, it will recognize
a subreport object if its source is a file name that it has already loaded, or if it is the same URL.
This caching functionality is available only for subreport elements that have expressions returning
java.lang.String objects as the subreport design source, representing file names, URLs or
classpath resources. That's because the engine uses the subreport source string as the key to recognize
that it is the same subreport design that it has already cached.
The JasperReports Ultimate Guide
Page 65
Since subreports are normal reports themselves, they are compiled or filled in the same way. This
means that they also require a data source from which to get the data when they are filled and that can
also receive parameters, for the additional information they have to use when being filled.
There are two ways to supply the parameter values to a subreport and they can be used simultaneously,
if desired.
You can supply a map containing the parameter values, like we do when filling a normal report with
data, using one of the fillReportXXX() methods exposed by the
dori.jasper.engine.JasperFillManager class (see the 3.4 Filling Reports chapter to refresh
your memory).
This can be achieved if you use the <parametersMapExpression> element, which introduces the
expression that will be evaluated in order to obtain the specified parameter map. This expression should
always return a java.util.Map object in which the keys are the parameter names.
In addition to or instead of supplying the parameter values in a map, you can supply the parameter
values individually, one by one, using a <subreportParameter> element for each parameter you are
interested in. In such case, you have to specify the name of the corresponding parameter using the
mandatory name attribute and you have to provide an expression that will be evaluated at runtime to
obtain the value for that particular parameter, value that will be supplied to the subreport filling
routines.
Note that you can use both ways to provide subreport parameter values, simultaneously. When this
happens, the parameter values specified individually, using the <subreportParameter> element, will
override the parameters values present in the parameter map, that correspond to the same subreport
parameter. If the map does not contain corresponding parameter values already, the individually
specified parameter values will be added to the map.
Attention! When you supply the subreport parameter values, you have to be aware that the
reporting engine will affect the java.util.Map object it receives, adding the built-in
report parameter values that correspond to the subreport. This map is also affected by the
individually specified subreport parameter values, as already explained above.
In order to avoid altering the original java.util.Map object that you send, you can wrap it
in a different map, before supplying it to the subreport filling process like this:
new HashMap(myOriginalMap)
This way, your original map object remains unaffected and modifications are made to the
wrapping map object.
This is useful especially when you want to supply to your subreport the same set of
parameters that the master report has received and you use the built-in
REPORT_PARAMETERS_MAP report parameter of the master report. However, you don't want
to affect the value of this built-in parameter and you will wrap it like this:
<parametersMapExpression>
new HashMap($P{REPORT_PARAMETERS_MAP})
</parametersMapExpression>
The JasperReports Ultimate Guide
Page 66
Subreports need a data source in order to generate their content, just like normal report do.
In the 3.4 Filling Reports chapter of this book we have seen that when filling a report you have to
supply either a data source object or a connection object, depending on that particular report type. That
is if it has an internal SQL query and you want to have it executed to obtain the report data or you
supply the report data yourself.
Subreports behave in the same way and expect to receive the same kind of input when they are being
filled.
You can supply to your subreport either a data source using the <dataSourceExpression> element
or a JDBC connection for the engine to execute the subreport's internal SQL query using the
<connectionExpression> element. These two XML elements cannot be both present at the same
time in a subreport element declaration. This is because you cannot supply both a data source and a
connection for your subreport. You have to decide on one of them and stick to it.
The report engine expects that the data source expression returns a
dori.jasper.engine.JRDataSource object and that the connection expression returns a
java.sql.Connnection object, whichever is present.
You can see how subreports work, if you check the subreport sample.
The JasperReports Ultimate Guide
Page 67
Previous chapters have presented the core functionality that most people will get to use when working
with the JasperReports library.
However, some complex requirements of your specific applications might force you to dig deeper into
the JasperReports functionality in order to adapt it to suit you needs.
In the following sections we are going to take a closer look at those aspects that are likely to interest
you if you'll want to make full benefit from the use of the JasperReports library.
In the 3.2 Compiling Report Designs chapter we have explained how report designs pass from their
initial XML form into the compiled form, before being used to generate full-featured documents.
The engine first parses the XML report design and creates the in-memory representation of it by
instantiating and preparing a dori.jasper.engine.design.JasperDesign object. This object is
then subject to various validation checks and suffers the compilation process that produces a
corresponding dori.jasper.engine.JasperReport object.
But in certain cases, in your application, you might want to manually load the XML report design into a
dori.jasper.engine.design.JasperDesign object, without immediately compiling it. Such
scenarios might be common for applications that programmatically create report designs and use the
XML form to store them temporary or permanently.
Loading dori.jasper.engine.design.JasperDesign objects from XML report design can be
easily by calling one of the public static load() methods exposed by the
dori.jasper.engine.xml.JRXmlLoader class. This way you can load report design object from
XML content store in filed or that is been read from input streams.
The process opposed to the XML report design loading process is the generation of the XML form for a
given report design object.
As seen above, sometimes report designs are created programmatically, using the JasperReports API.
The report design objects obtained this way can be serialized, for disk storage or transfer over the
network, but they also can be stored in XML format.
You can obtain the XML representation of a given report design object by using one of the public static
writeReport() methods exposed by the dori.jasper.engine.xml.JRXmlWriter utility class.
JasperReports library comes with several default implementations of the
dori.jasper.engine.JRDataSource interface. This interface is used to supply the report data
when invoking the report filling process, as explained in the previous chapters of this book.
These default implementations let you generate reports using data from relational databases retrieved
through JDBC, from Java Swing tables or from collections and arrays of JavaBeans objects.
But maybe your application data that your are trying to display in your reports has a special structure or
is organized in a very particular way preventing you from using any of the default implementations of
the data source interface that come with the library.
In such situations, you will have to create custom implementations for the
dori.jasper.engine.JRDataSource interface, in order to wrap your special report data, so that
the reporting engine can understand and use it when generating the reports for you.
The JasperReports Ultimate Guide
Page 68
Creating a custom implementation for the dori.jasper.engine.JRDataSource interface is not
very difficult since you have to implement only two methods.
The first one, the next() method, is called by the reporting engine every time it wants the current
pointer to advance to the next virtual record in the data source.
The other, the getFieldValue() method, is called by the reporting engine with every iteration in the
data source to retrieve the value for each report field.
The JasperReports library comes with built-in viewers that allow you to display the reports stored in the
library's proprietary format or to preview your report designs when you create them.
These viewers are represented by the following two classes:
_ dori.jasper.view.JasperViewer : You use this class to view generated reports, either as
in-memory objects or serialized objects on disk or even stored in XML format.
_ dori.jasper.view.JasperDesignViewer : This class can be used to preview report
designs, either in XML form or compiled form.
But these default viewers might not suit everybody's needs and therefore you might consider
customizing them so they adapt to certain application requirements.
In order to do that, you should be aware that these viewers use in fact other, more basic visual
components that come with the JasperReports library.
The report viewer mentioned above use the visual component represented by the
dori.jasper.view.JRViewer class and its companions. It is in fact a special
javax.swing.JPanel component that is capable of displaying generated reports and that can be
easily incorporated in other Java Swing based applications or applets.
If the functionality of this basic visual component is not sufficient for what you need, you can adapt it
by subclassing it. If for example you would want to have an extra button on the toolbar of this viewer,
you might consider extending the component and add that button yourself in the new visual component
you obtain by subclassing.
This can be seen in the webapp sample, where the "Printer Applet" displays a customized version of the
report viewer with an extra button in the toolbar.
Another very important issue is that the default report viewer that comes with the library does not know
how to deal with document hyperlinks that point to external resources. It only deals with local
references and can redirect the viewer to corresponding local anchor.
However, JasperReports offers you the possibility to handle yourself the clicks made on document
hyperlinks that point to external documents and not local anchors.
The only thing you have to do in order to achieve this, is to implement the
dori.jasper.view.JRHyperlinkListener interface and to add to register with the viewer
component an instance of this listener class, using the addHyperlinkListener() method exposed
by the dori.jasper.view.JRViewer class.
By doing this, you make sure the viewer will also call your implementation of the gotoHyperlink()
method in which you handle yourself the external references.
The JasperReports library continually evolves and improves. Among the features that are likely to be
introduced with time is the ability to export to new documents formats, besides PDF, HTML and XML.
In order to extend diversify in this direction, without affecting the existing functionality, JasperReports
provides those interested in this subject an interface for them to implement, in case they want to create
exporter classes that transform the generated documents into new output formats.
This way, if you need to export your reports into a special output format that is not yet available in the
core library, you might decide to implement yourself the dori.jasper.engine.JRExporter
interface.
The JasperReports Ultimate Guide
Page 69
Before deciding to implement this interface, it is important for you to understand how the
implementation is expected to function.
All the input data the exporter might need should be supplied to it using the so-called exporter
parameters, before the exporting process is started.
This is because the exporting process will be always invoked by calling the exportReport() method
of the dori.jasper.engine.JRExporter interface, and this method does not receive any
parameters itself, when called. The exporter parameters have to be already set using the
setParameter() method on the exporter instance you are working with, before launching the export
task.
You might choose to bulk set all your exporter parameters using the setParameters() method which
receives a java.util.Map object containing the parameter values. The keys in this map should be
instances of the dori.jasper.engine.JRExporterParameter class, as you would supply when
individually calling the setParameter() method for each of your exporter parameters.
Note that no matter what the type of output your exporter produces, you will be using parameters to
indicate to the exporter where to place or send this output.
Such parameter might be called OUT parameters.
For example, if you want your exporter to send the output it produces to an output stream, you will
supply the java.io.OutputStream object reference to the exporter using a parameter, probably
identified by the dori.jasper.engine.JRExporterParameter.OUTPUT_STREAM constant.
It is recommended to use the public constants of the
dori.jasper.engine.JRExporterParameter class to identify the parameters you set in your
exporters and only if you don't find one available for a particular setting you have to make in your
exporter, to extend this class to add new constants. This can be seen for the
dori.jasper.engine.export.JRXmlExporter , where special parameter identifier where created
by subclassing the dori.jasper.engine.JRExporterParameter class in the
dori.jasper.engine.export.JRXmlExporterParameter class.
You don't have to start from scratch when implementing the exporter interface, because there is a
convenience abstract class called dori.jasper.engine.JRAbstractExporter that at least deals
with parameter management for you.
Logo

旨在为数千万中国开发者提供一个无缝且高效的云端环境,以支持学习、使用和贡献开源项目。

更多推荐